![]() В данной статье я расскажу как добавить разрешающее правило в Брандмауэр Windows Server 2012 R2 (в Windows Server 2008 R2 действия аналогичны). Правило будем добавлять на примере работы сервера 1С:Предприятие 8.х (необходимо открыть порт 1541 для менеджера кластера, порты 1560-1591 для рабочих процессов и порт 1540 для агента сервера).
В данной статье я расскажу как добавить разрешающее правило в Брандмауэр Windows Server 2012 R2 (в Windows Server 2008 R2 действия аналогичны). Правило будем добавлять на примере работы сервера 1С:Предприятие 8.х (необходимо открыть порт 1541 для менеджера кластера, порты 1560-1591 для рабочих процессов и порт 1540 для агента сервера).
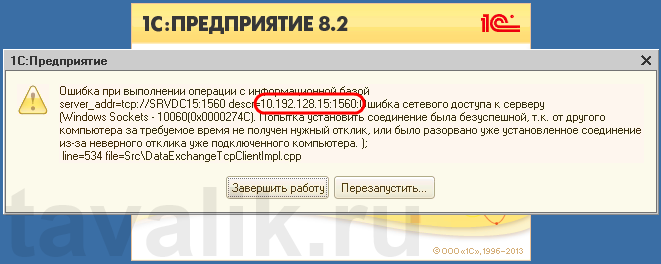
Некоторые программы и службы при работе через сетевые протоколы используют определенные порты для обмена данными. По умолчанию включенный брандмауэр Windows блокирует подобную сетевую активность. В частности, если попытаться подключиться с клиентской машины к серверу 1С:Предприятие 8.х можно натолкнуться на ошибку:
«Ошибка при выполнении операции с информационной базой (…). Ошибка сетевого доступа к серверу (…). Попытка установить соединение была безуспешной, т. к. от другого компьютера за требуемое время не получен нужный отклик, или было разорвано уже установленное соединение из-за неверного отклика уже подключенного компьютера (…) »
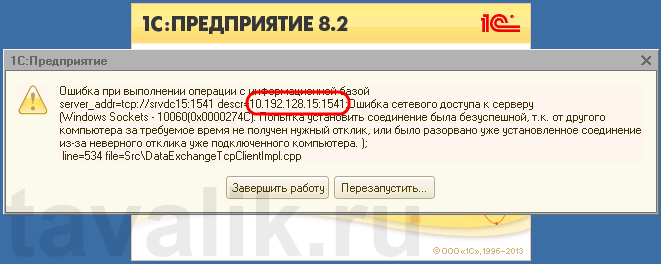
Данная ошибка означает, что по указанному адресу не найден сервер «1С:Предприятия», ну или на сервере закрыт порт (в данном случае порт 1541).
Для открытия порта, заходим на компьютер, где установлен сервер «1С:Предприятия» (в моем примере это компьютер с адресом 10.192.128.15 и установленной на нем операционной системой Windows Server 2012 R2).
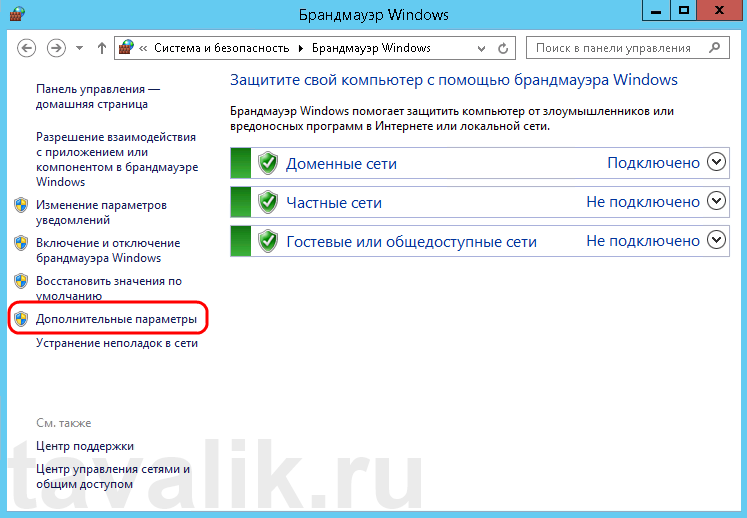
Запускаем брандмауэр Windows. Сделать это можно кликнув правой кнопкой мыши по «Пуск» (Start), затем «Панель управления» (Control Panel) — «Система и безопасность» (System and Security) — «Брандмауэр Windows» (Windows Firewall). Или же выполнив команду firewall.cpl (для этого необходимо нажать комбинацию клавиш Win + R, в окне «Отрыть» (Open) ввести имя команды и нажать «ОК» ) .

Далее нажимаем на «Дополнительные параметры» (Advanced Settings) в меню слева.
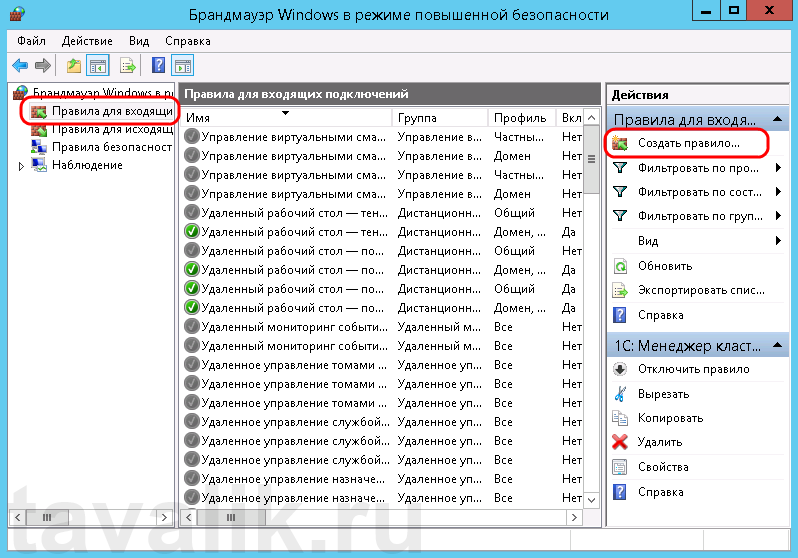
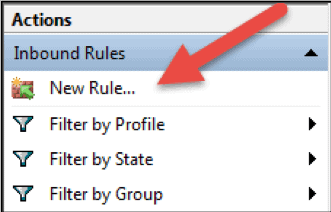
В открывшемся окне, в дереве слева откроем вкладку «Правила для входящих подключений» (Inbound Rules), а затем в меню «Действия» (Actions) выберем пункт «Создать правило…» (New Rule…).
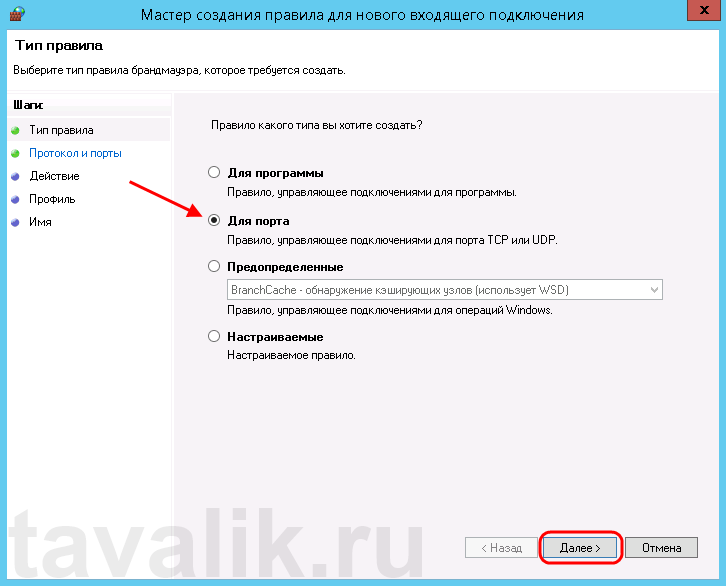
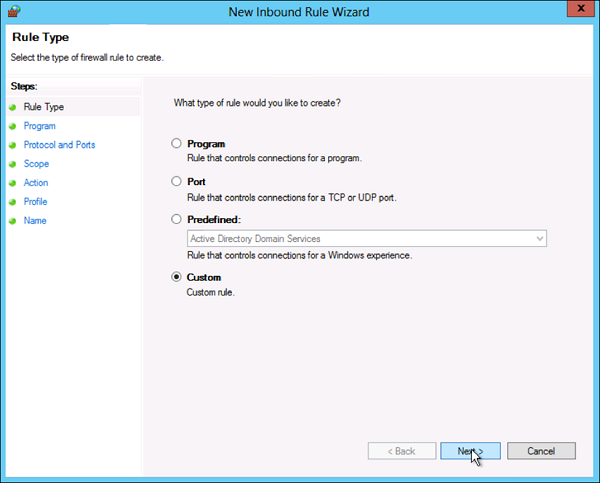
Запустится «Мастер создания правила для нового входящего подключения» (New Inbound Rule Wizard). На первой странице выберем тип правила (Rule Type) «Для порта» (Port) и нажмем «Далее» (Next).
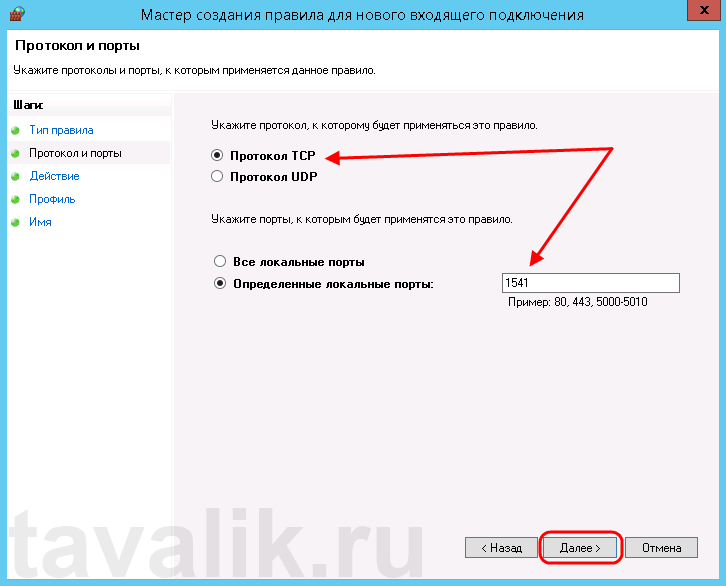
Затем необходимо указать протокол (в нашем примере это TCP) и, непосредственно, номер порта (Specific local ports), который открываем. После чего жмем «Далее» (Next).
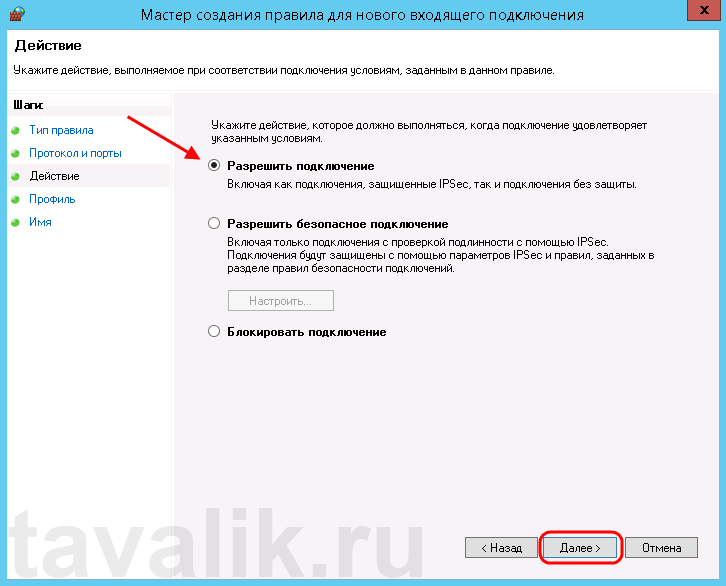
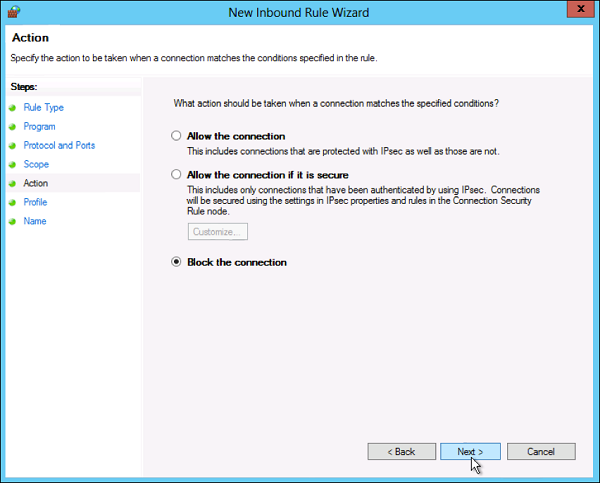
Теперь укажем действие связанное с добавляемым правилом. Выберем «Разрешить подключение» (Allow the connection) и нажмем «Далее» (Next).
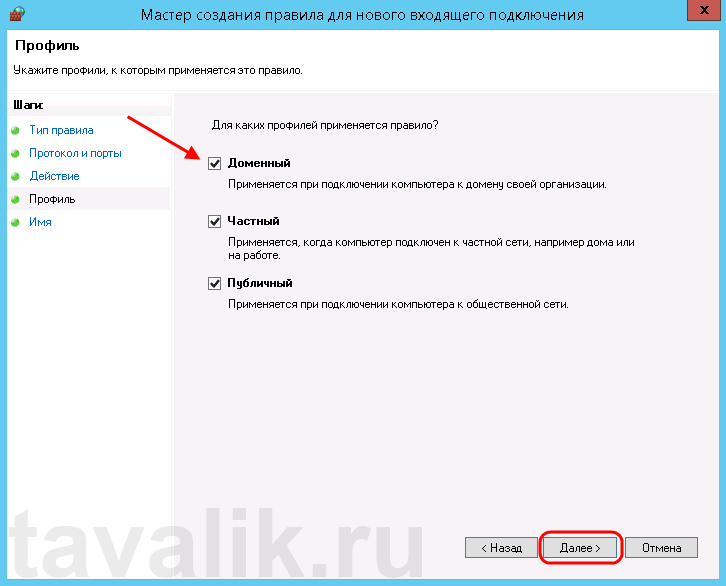
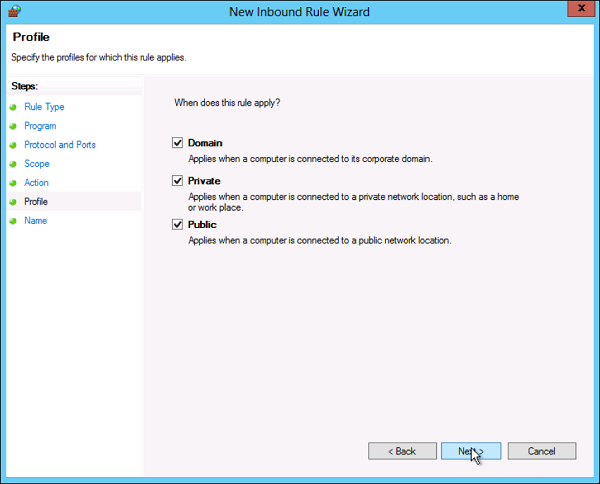
На следующей странице нужно указать, для каких профилей брандмауэра будет действовать правило. Отмечаем нужные профили галочками и жмем «Далее» (Next).
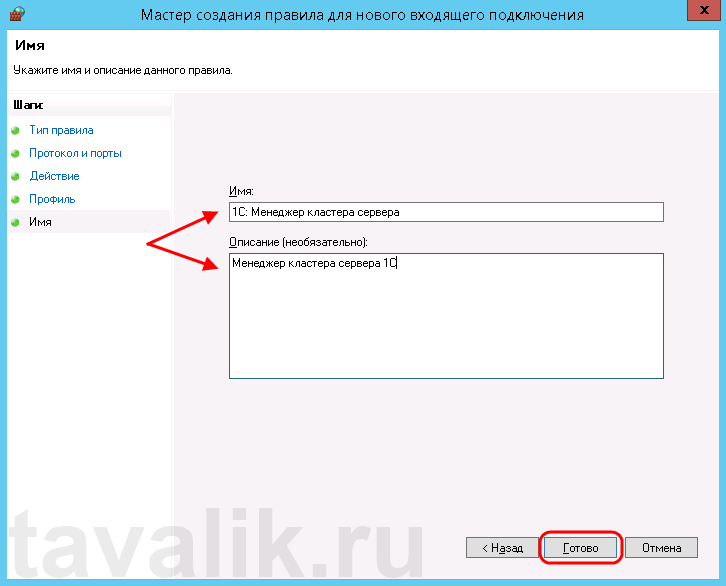
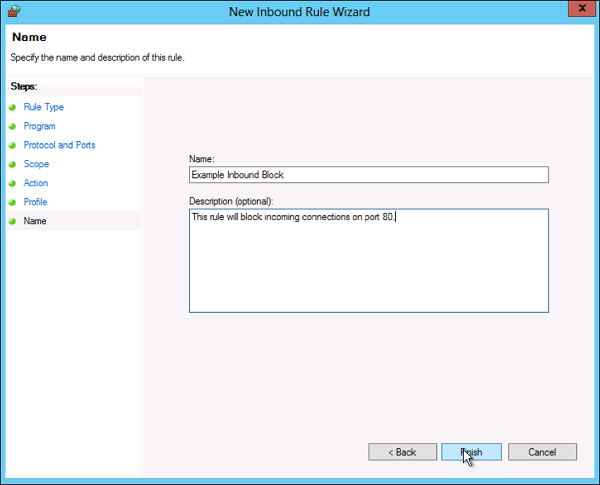
Ну и наконец, вводим имя и описание для нового правила и нажимаем «Готово» (Finish) для завершения работы мастера.
Пробуем снова подключиться к серверу «1С:Предприятия» и видим что ошибка сохранилось, но в сообщении уже другой, 1560-ый порт.
Вышеописанным способом добавим еще одно разрешающее правило, с названием «1С: Рабочие процессы» для всего диапазона портов с 1560 по 1591 (для рабочих процессов 1С), указав их через дефис на шаге «Протокол и порты» (Protocol and Ports).

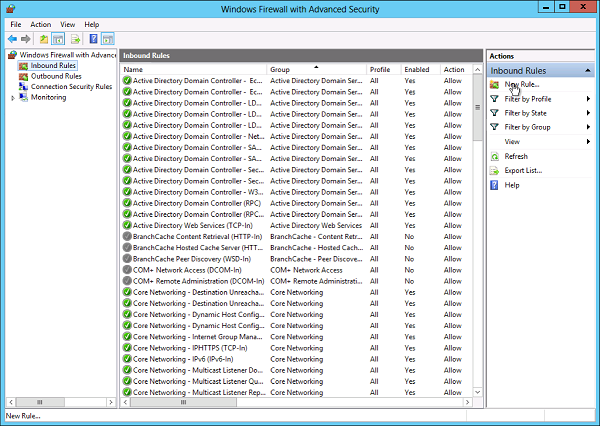
Теперь, в оснастке «Брандмауэр Windows в режиме повышенной безопасности» (Windows Firewall with Advanced Security) в таблице «Правила для входящих подключений» (Inbound Rules) мы должны увидеть 2 только что созданных правила.
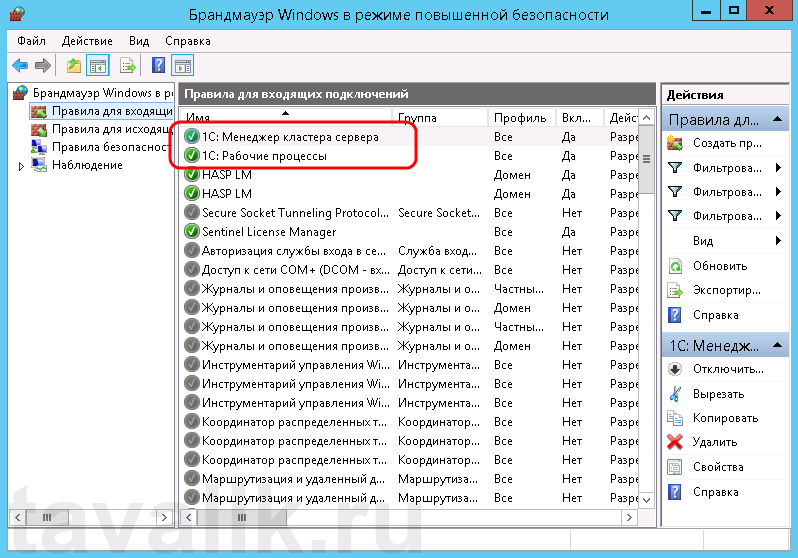
Ну а клиент «1С:Предприятия» должен без ошибок подключиться к серверу. Если же потребуется подключаться к этом серверу через консоль администрирования серверов «1С:Предприятия», то необходимо также открыть порт 1540.
Аналогичным образом добавляются правила для для исходящих подключений (Outbound Rules), запрещающие правила, правила для определенных программ и протоколов. Также любое правило можно изменить, открыв его свойства из данной оснастки.
Introduction
Firewalls have become an essential part of every network that has access to the Internet. Without firewalls, anyone would be able to access your network and servers and infect them with malicious software. Properly configured, a firewall can substantially decrease undesirable network communications in a local network.
The article will explain how to create a firewall rule using firewall MMC and Windows PowerShell. We are using Windows Server 2012, but the procedure applies to other versions of Windows, with slight variations.
What is a Firewall?
A firewall is a piece of hardware or software that controls the flow of data packets, and it is critical on modern computer systems. It protects private networks and devices from malicious actions coming from public networks in the same way a physical firewall prevents fire from spreading from one area to another. A firewall acts as a defense mechanism which controls network traffic according to the implemented firewall rules.
Computers behind a firewall cannot receive data until the data passes all filters. This enhances security by a large margin and reduces the risk of unauthorized access to private networks. A proper firewall configuration provides your system with a crucial layer of security and lowers the risk of successful hacking attacks. Firewalls can perform many tasks:
- Protect the data on your computer by creating a barrier that blocks any undesired incoming or outgoing traffic.
- Notify you if there are any connection requests from other computers.
- Log activity for later inspection and warn you if any application tries to connect to another computer.
How Windows Server Firewalls Work
As the name suggests, a firewall acts like a barrier between your local devices and the external network. When you send a connection request to your computer or server over the internet, a hacker can interrupt that connection and try to gain access to your private network. With a firewall in place, only the network traffic that matches firewall rules can get through.
The sets of firewall rules you define in the firewall settings review every packet for flagged information. To make the most out of your firewall, you should precisely define both inbound and outbound rules in order to avoid any unwanted connections.
For example, you can set an inbound rule defining that the data communicated through a specific port, such as TCP port 80, can pass the firewall. That means if the firewall sees a packet coming towards any other port, it will drop it and the data will not reach its intended destination.
Windows Firewall Server 2012 with Advanced Security
Windows Firewall with Advanced Security is the management console which stores all Windows Firewall configurations. Windows Firewall is a host-based firewall solution embedded with virtually all current Windows operating systems.
Windows Firewall with Advanced Security provides safer inbound and outbound network communications by enforcing rules that control traffic flow for its local machine. There are three available firewall profiles:
- Domain. It is used when a computer connects to the corporate network. It is a network where the device can detect its domain controller.
- Private. We use this profile for computers that connect to a private network, such as home or office. In private networks, the users are always behind a device and not directly exposed to the Internet.
- Public. This profile is used when a computer connects to a public network, such as libraries, airports and other public hotspots. The firewall configurations should be the most restrictive for this profile since these networks are the least secure.
The benefits of using Windows Server Firewall with Advanced Security are numerous:
- It is ready out-of-the-box. It comes preinstalled with personal Microsoft Windows operating systems as well as Server editions. It is also active by default, protecting your operating system from the very first startup.
- It does not need a special license or additional hardware. Once you obtain your copy of a Windows operating system, there are no additional costs.
- It is highly flexible. It offers many advanced functionalities and different levels of controls for the firewall services.
What is the Difference between Windows Firewall and Windows Firewall with Advanced Security?
The difference between the two is the level of functionality available to the end-user, that is, the interface itself. Both of them are the same firewall service. The Windows Firewall is easier to use and more consumer-friendly. It is located in the Control Panel and allows you to perform basic firewall configurations.
The Windows Firewall with Advanced Security offers granular control over the inbound and outbound rules, as well as the default firewall profiles. You can modify all advanced firewall configurations using the Microsoft Management Console (MMC) or Windows PowerShell.
How to Launch Windows Firewall with Advanced Security Console?
You can access the Windows Firewall with Advanced Security console in a few different ways. Whichever method you choose, it will open Windows Firewall MMC where you can make further firewall configurations for all profiles.
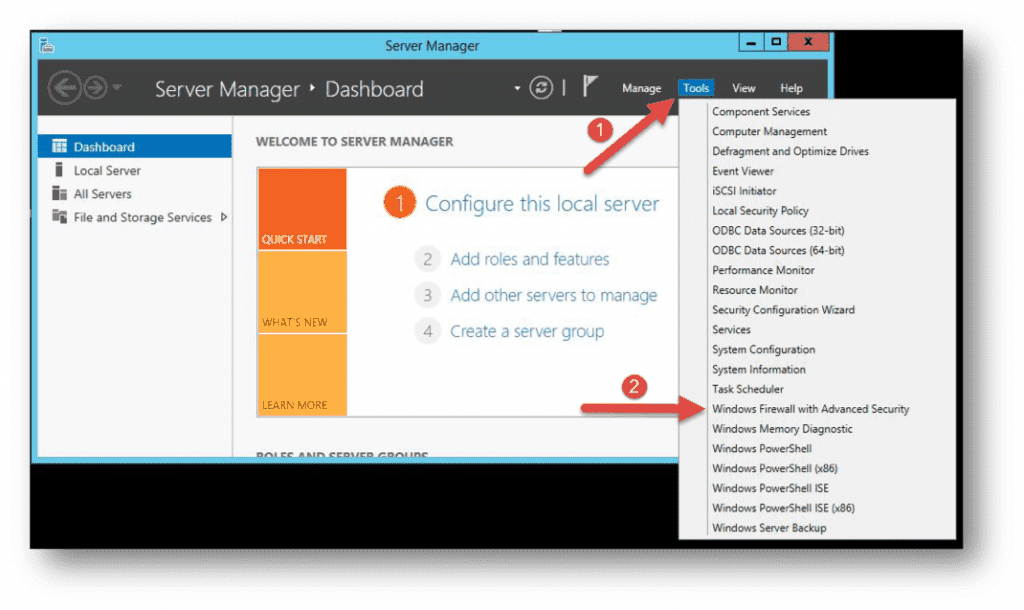
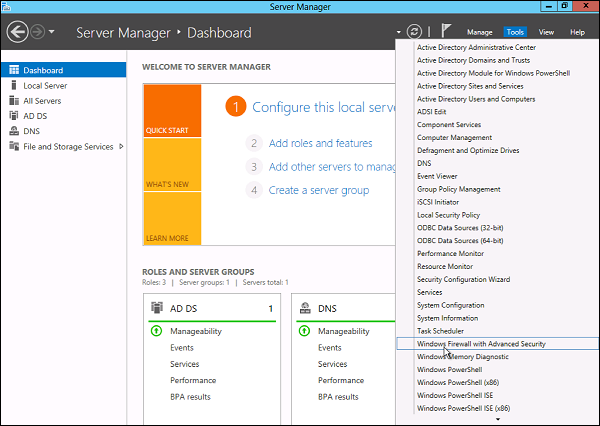
- Use the Server Manager to access the firewall MMC. Once the window opens, go to Tools on the top right side, and locate the Windows Firewall with Advanced Security option toward the bottom of the list.
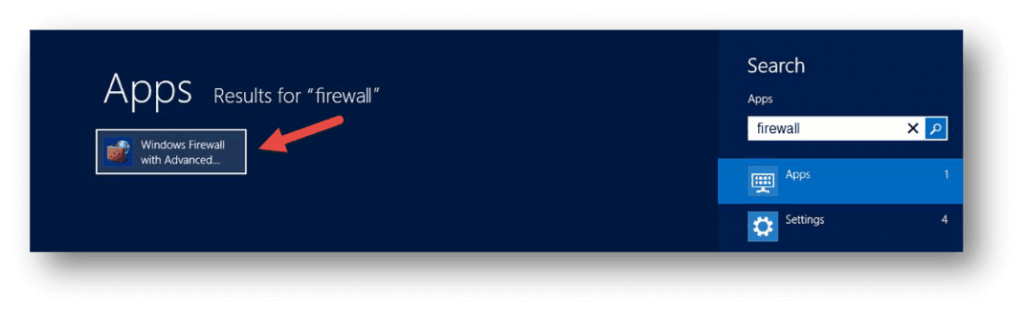
- Open the Start menu (use the Windows key on your keyboard) and type “firewall”. You should see the Windows Firewall with Advanced Security icon appear as one of the search results.
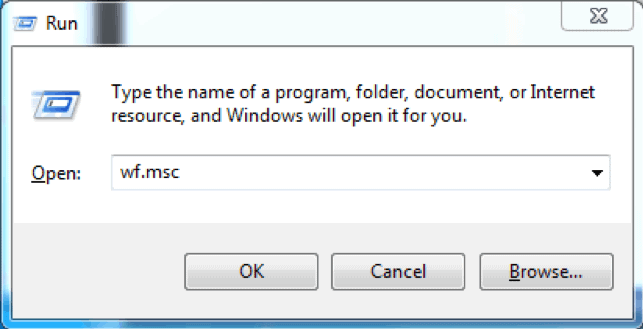
- Use the Run box to launch Windows Firewall with Advanced Security. Press Win + R keys, type in msc and hit Enter to load the console. You can also use Command Prompt or Windows PowerShell to run this command.
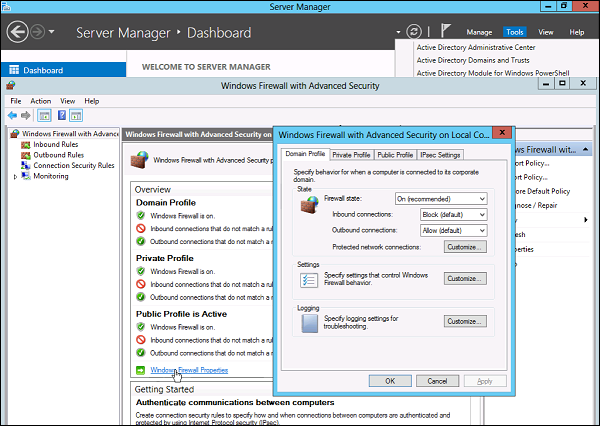
Now that you have the Windows Firewall with Advanced Security console open, in the middle you can see the summary of the three firewall profiles. Their default configuration is to permit the outgoing traffic and to limit incoming traffic.
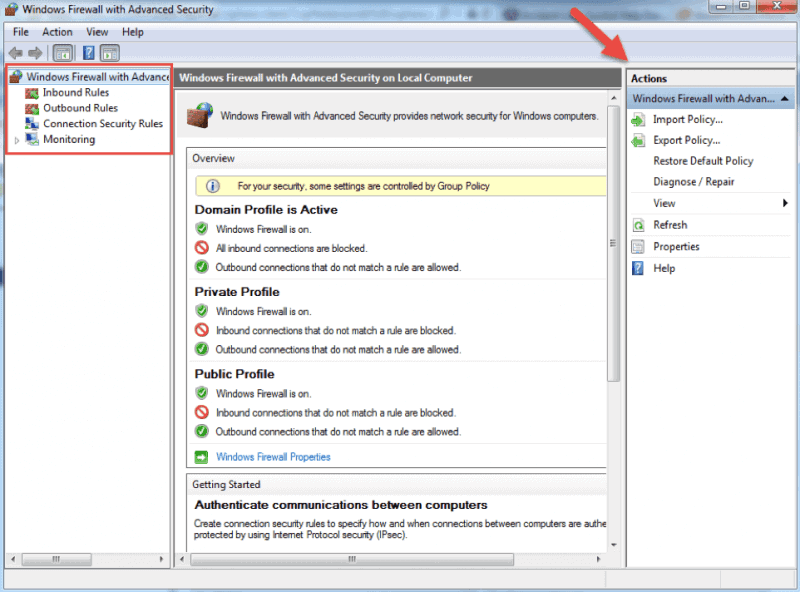
When you select an option from the menu on the left side of the window, you will see its details in the middle section. On the right side, the menu will show the available actions for the option you previously selected.
The Windows Firewall with Advanced Security console allows you to configure inbound and outbound rules, as well as the Internet Protocol security (IPSec) connections. The Monitoring tab allows you to view the active firewall rules and connection security rules for that server.
Firewall Rules
Windows firewall rules allow you to state whether to permit or block specific incoming or outgoing network connections. You can choose between multiple parameters and settings for each individual inbound or outbound rule. This includes selecting a program, a TCP or UDP port, protocol, service, or profile that a rule will apply to.
The procedure is the same when creating inbound rules and outbound rules with Windows Firewall with Advanced Security. I will list the steps for creating an inbound rule and you can follow them in the same order when you want to create an outbound rule.
How to Create Inbound Rules
Launch the Windows Firewall with Advanced Security MMC using the method you prefer. You may want to pin the shortcut to the start menu if you use the console on a regular basis.
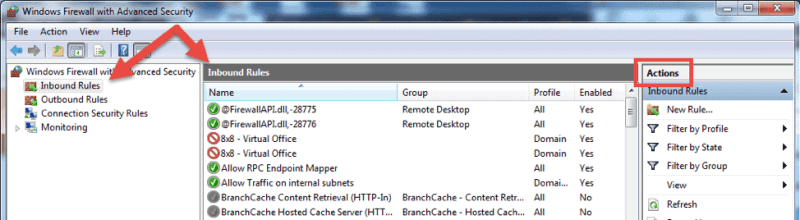
- On the home screen, select the Inbound Rules The console will show all inbound rules in the middle section and available actions in the right pane. You can filter the list by using the available choices.
- Click on New Rule… to start the New Inbound Rule Wizard.The wizard will let you choose the type of rule you want to create. You can choose one out of four types.
- This rule allows or blocks connections for a user-defined program. It allows you to select a path to an executable (*.exe) file. It does not require to insert any program-specific settings.
- A rule based on port settings allows you to permit or block a connection depending on the TCP or UDP port number it uses. You can state multiple ports to apply to this firewall rule.
- This rule contains a list of the most common Windows programs and services. You can select one to allow or block connections for it.
- Custom. This is the most flexible rule in the Wizard. It allows you to create a tailor-made rule with configurations that previous options do not provide. I will proceed with listing the steps for this rule since it covers the most settings.
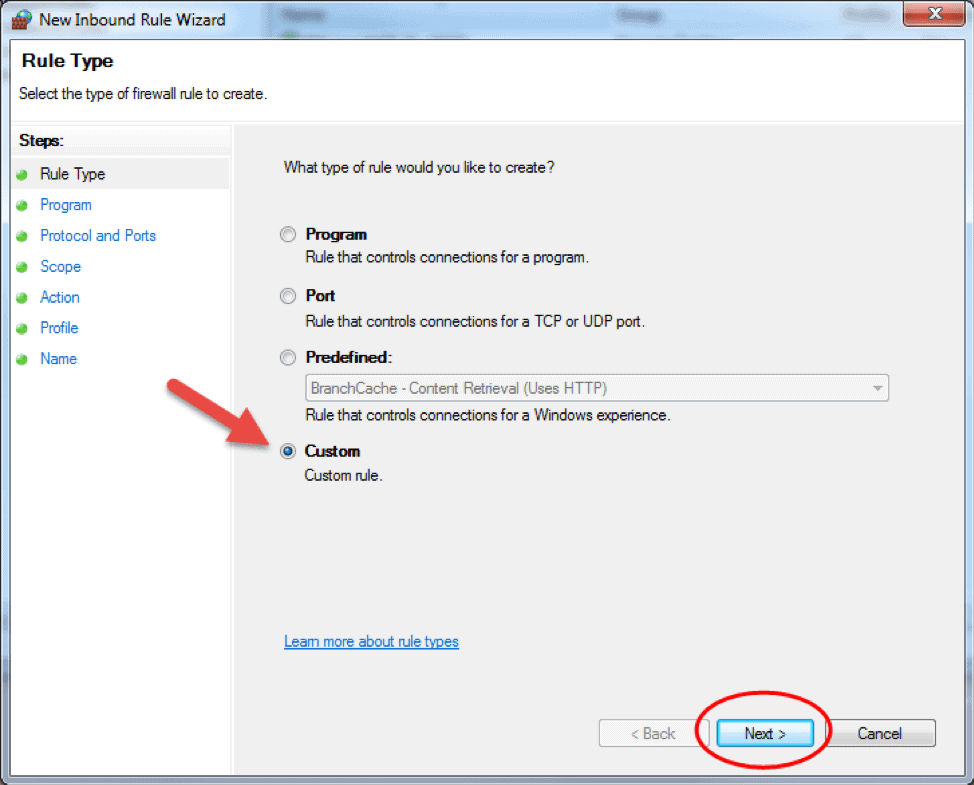
- Click on Custom and click Next to proceed.
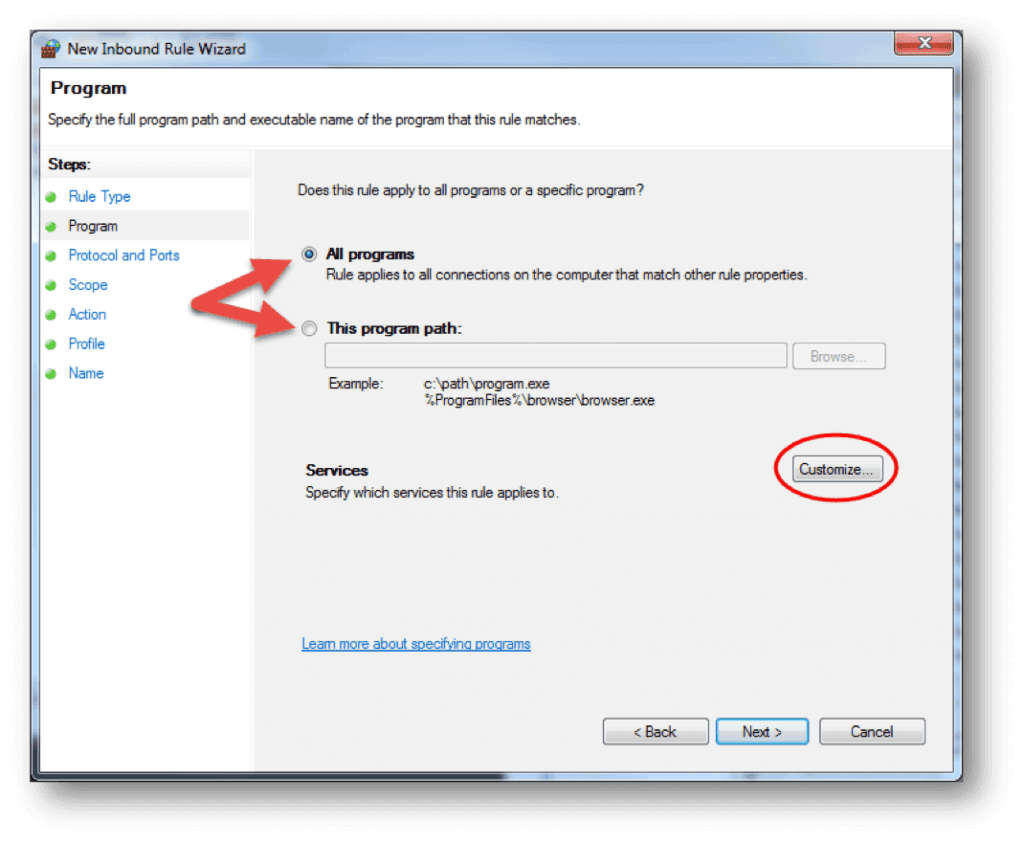
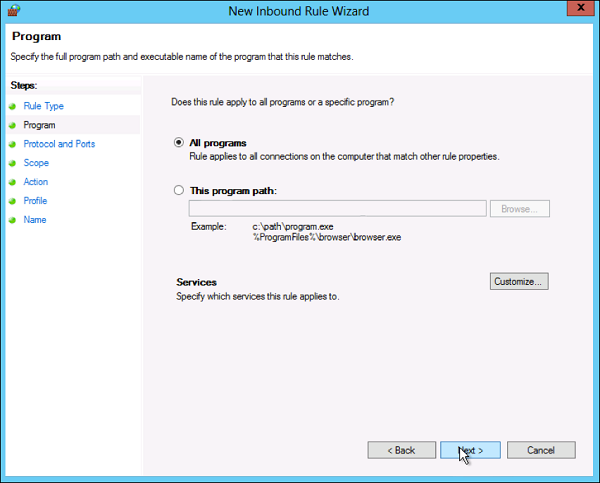
- Choose if the rule will apply to connections for All programs or a specific program on the local machine and click Next. You can click Customize… to select additional settings for the processes of the program you selected.
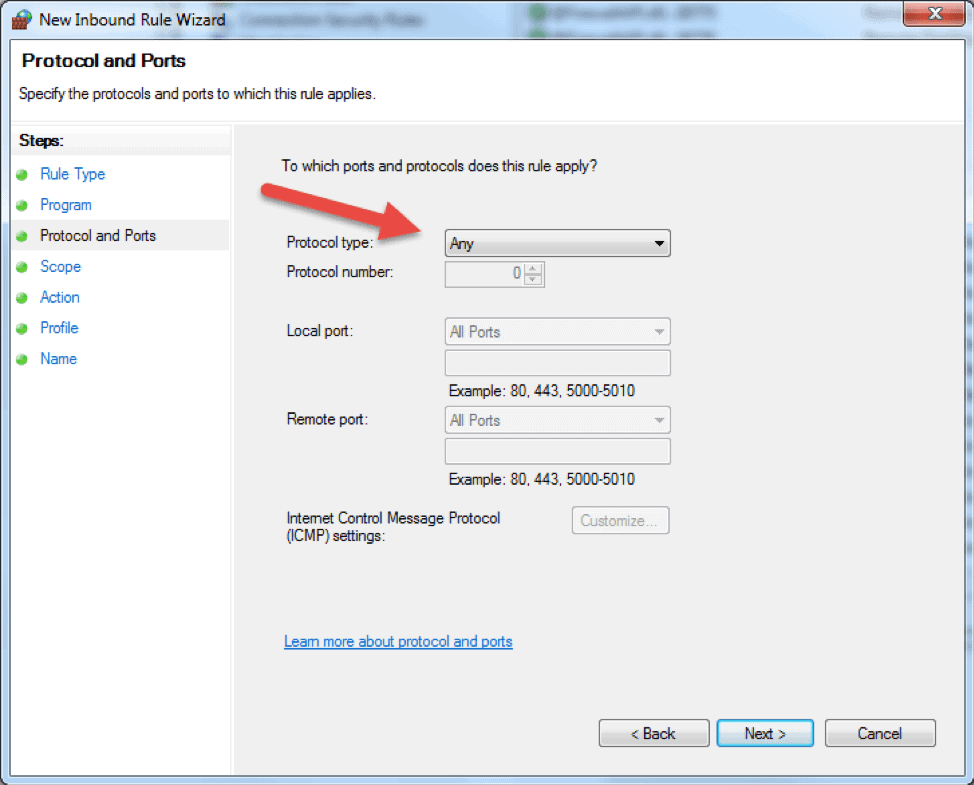
- The following step will allow you to specify the protocol and port for the traffic that this firewall rule will filter. Click Next after you select a protocol type and configure the settings.
- Protocol type. Click on the bar and select the protocol from the dropdown list. You can always select Custom to manually configure the port number. If you select TCP or UDP, you will need to specify local and remote port.
- Protocol number. This field populates automatically after you select a protocol type, and you cannot change it. In order to insert your own port, select Custom in the ‘Protocol type’ dropdown menu.
- Local port. This represents the port on the local machine where you are creating this rule. This section becomes editable if you select TCP or UDP in the ‘Protocol type’ dropdown. Select one of the options from the dropdown box. Note that RPC Endpoint Mapper and RPC Dynamic Ports are available only for TCP inbound rules, and IPHTTPS is available for TCP only. Edge Traversal is available for UDP inbound rules.
- Remote port. This is the port on a remote machine that is trying to establish a connection with the local machine. This section becomes editable if you select TCP or UDP in the ‘Protocol type’ dropdown. Select one of the options from the dropdown box. Note that RPC Endpoint Mapper and RPC Dynamic Ports are available only for TCP inbound rules, and IPHTTPS is available for TCP only. Edge Traversal is available for UDP inbound rules.
- Internet Control Message Protocol (ICMP) settings. You can customize the ICMP settings if you select ICMPv4 or ICMPv6 in the ‘Protocol type’ dropdown list.
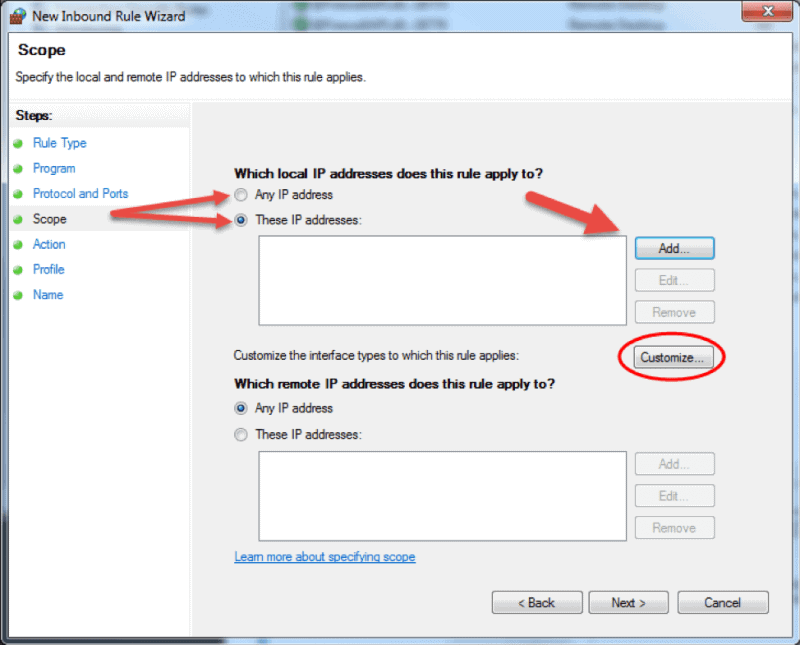
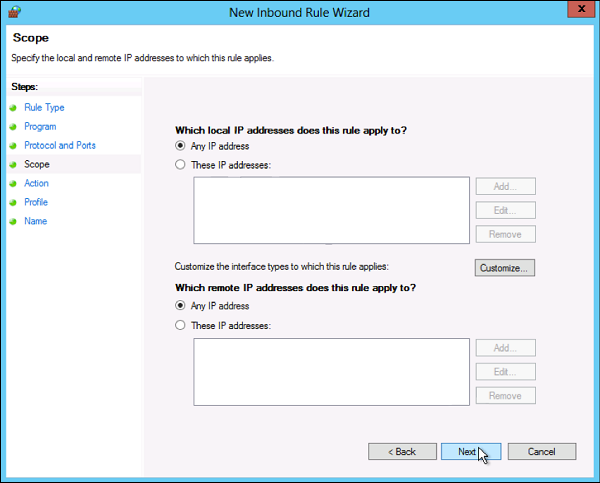
- The Scope step of the wizard allows you to input local and remote IP addresses whose network traffic applies to the current rule.
- Local. If you select ‘Any IP address’ in the local IP addresses section, then the rule applies to the traffic going through the network device that uses a local IP address. This is always the case with the machine where you are creating the rule. Select ‘These IP addresses’ to state that the rule applies to the packets with an address specified in the list. Click Add to insert the IP address to match. You can later edit or remove any of the IP addresses in the list. You can also apply this rule to a specific interface. Click Customize… and select to apply the rule to connections on all interfaces or chose one of the available interfaces listed in the box.
- Remote. If you select ‘Any IP address’ in the remote IP addresses section, then the rule applies to the traffic coming from any IP address included in the list. Select ‘These IP addresses’ to insert the remote IP addresses to which the rule applies. Click Add to specify the IP address to match. You can later edit or remove any of the IP addresses in the list.
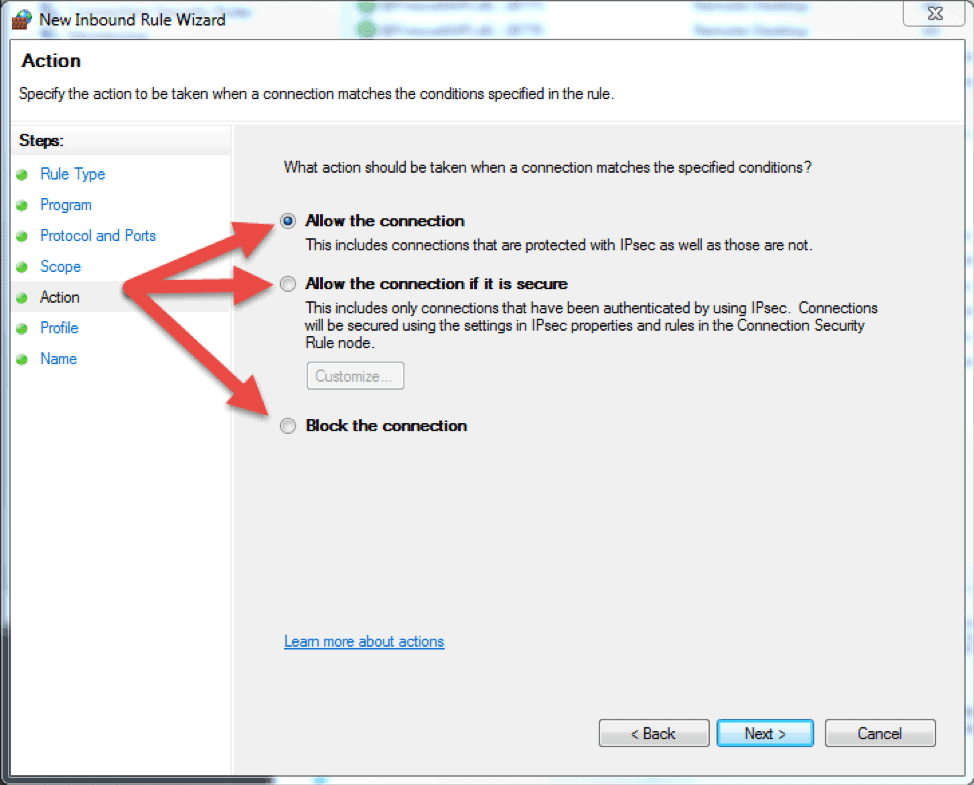
- The next step lets you chose the action the firewall takes when a connection matches the inbound rule configuration. You can select one of the three available options and then click Next to continue.
- Allow the connection. If the connection matches the inbound or the outbound rule configuration, the packets can go through the firewall.
- Allow the connection if it is secure. Select this option to allow only IPSec connections. If you chose this option, two more steps will appear in the wizard: Users and Computers. The additional steps let you chose users and computers you want to block or grant them access. Click on ‘Customize…’ to configure the authentication and integrity requirements.
- Block the connection. This option blocks all network traffic that matches the firewall rule configuration. If a similar rule with ‘allow’ action is in place, then the block action has the priority unless otherwise is stated in the other rule.
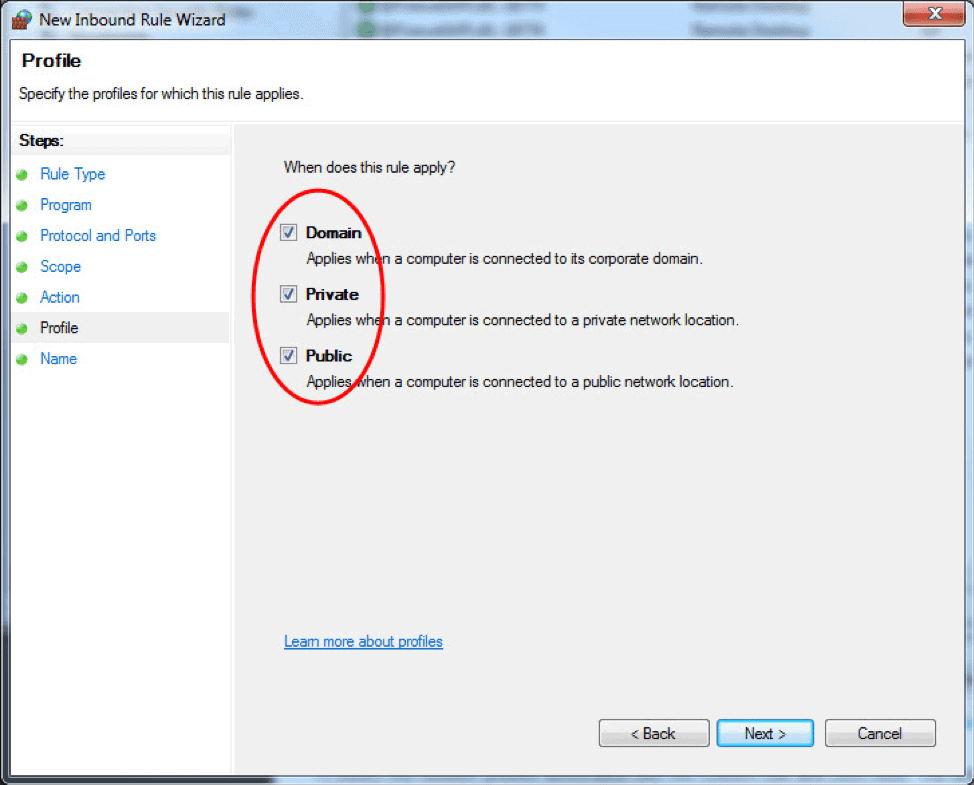
- The Profile step lets you choose the firewall profile the rule will apply to. You can leave everything selected or uncheck a profile that you do not want to include. Click Next to proceed to the final step.
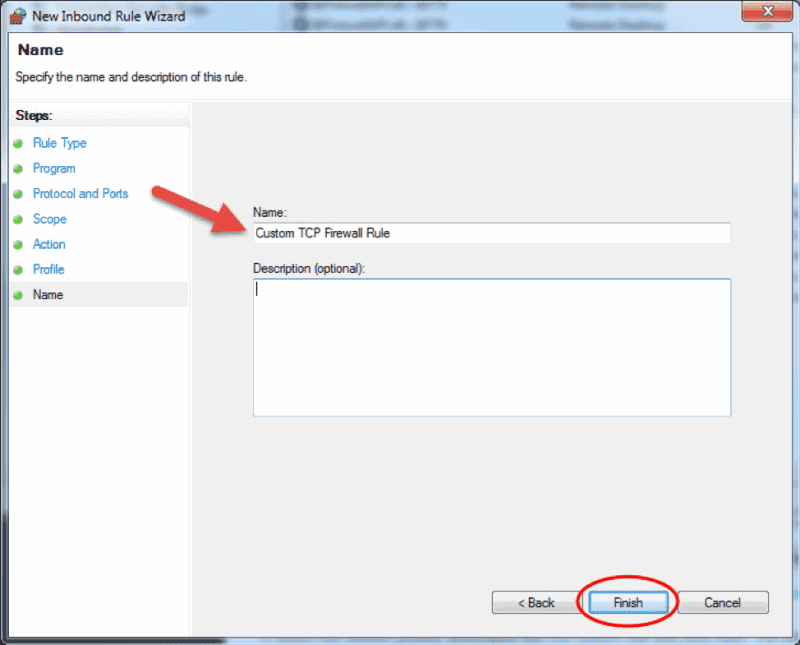
- In the final step, enter the desired name and optional description for this firewall rule, and click Finish.
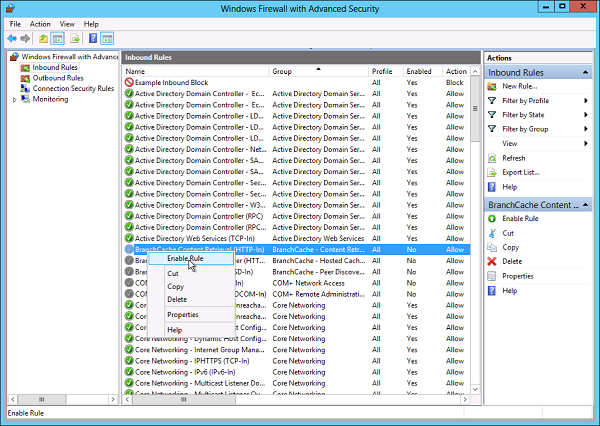
When you close the wizard, the rule will take effect immediately. You can find the rule in the firewall console when you click on the Inbound rules option. Enabled rules have green checkmark icon while disabled are with grey icons.
How to Edit a Firewall Rule
To edit any existing rule and make additional configuration, open the Windows Firewall with Advanced Security console and select Inbound Rules or Outbound Rules option. Locate and click a rule to see the actions specific to it in the right pane. Select Properties and another window will load where you can edit the rule settings.
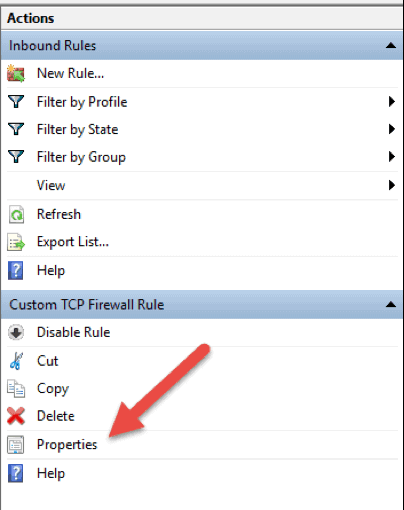
You can also disable, cut, copy, or delete the rule you selected. Make sure you highlight the correct rule to avoid changing firewall configurations for wrong rules.
Tip: you can double click a rule to directly open the Properties window.
How to Create a Firewall Rule with Windows PowerShell
1. Launch the PowerShell command line. You can do so by searching for “powershell” in the start menu, or press Win + R keys on your keyboard and type in “powershell” in the Run box.
2. Insert the following command and hit enter:
New-NetFirewallRule -DisplayName "TCP custom inbound rule" -Enabled:True -Profile Private -Direction Inbound -Action Allow -Protocol TCP -LocalPort 1234New-NetFirewallRule. This command creates a rule. It is followed by a string of parameters and their values.-DisplayName. Specifies the display name of the rule.-Enabled. Enables the rule if set to true. If you omit this parameter, it defaults to true.-Profile. Assigns the rule to the specified profile: Domain, Private, orPublic.-Direction. States if the rule applies to inbound or outbound connections. If you leave it out, it defaults to Inbound.-Action.Specify if the firewall rule will block or allow the connection. If you do not state the action, it defaults to Allow.-Protocol. Specify the protocol for the rule. In this case, we used TCP. Omitting the protocol defaults the setting to Any.-LocalPort. Insert the port where the traffic can go through on the local server. Omitting the port number defaults the setting to Any.
This is only one example of how to add a firewall rule using the Windows PowerShell command line. You can find more examples in the Microsoft PowerShell Documentation.
Conclusion
This article explains the basic functions and different types of firewall and details the steps for managing the Windows Server Firewall within the Windows Firewall with Advanced Security interface. The Windows Firewall Management Console is a powerful tool that allows for creating detailed configurations. If you carefully followed the instructions in the article, you are now able to manage the firewall on your Windows Server.
Открытие порта в брандмауэре Windows
- В этой статье я расскажу о такой вещи, как открытие портов в Windows Server 2012 R2. Эта инструкция актуальна только для штатного брандмауэра Windows. Чаще всего его возможностей достаточно для повседневной работы сервера.
- Данные действия актуально делать только в том случае, если заказана услуга «Виртуальный сервер». Следует настроить на нём необходимые Вам порты. Для услуги ВДЦ лучше использовать функцию Firewall, доступную в vCloud Director, а также NAT.
- Для настройки брандмауэра в Linux воспользуйтесь ISP Manager Lite.
- Эти действия имеют смысл, если Вы планируете после этого включить брандмауэр и использовать его в качестве системы защиты сервера.
- Если Вы ошибётесь в настройках и потеряете доступ к серверу по RDP, то обратитесь к нему через виртуальную консоль.
Процесс открытия портов
Чтобы это сделать, выполните следующую последовательность шагов:
1. Откройте меню пуск и нажмите на квадрат Панель управления;
2. Выберите опцию просмотра «Крупные значки», чтобы проще было добраться до нужного меню;
3. Откройте «Брандмауэр Windows, а затем «Дополнительные параметры»;

4. Должно открыться окно «Брандмауэр Windows в режиме повышенной безопасности. В этом окне выберите в списке слева «Правила для входящих подключений».

5. Затем, в списке справа щёлкните на пункт «Создать правило», чтобы открыть «Мастер создания правила для нового входящего подключения».
6. На первом шаге этот мастер спросит Вас, правило какого типа Вы хотите создать. Выберите «Для порта» и нажмите кнопку «Далее».

7. На шаге «Протокол и порты» мастер спросит номер порта, который Вы хотите открыть, или диапазон этих портов. Необходимо ввести номер порта в поле «Определённые локальные порты». В случае, если Вам необходимо открыть более одного порта, то укажите их диапазон, используя знак дефиса, например, «27015-27019». Если нужен не диапазон портов, а несколько разных, то вместо дефиса поставьте запятую, например: «80,443». После этого нажмите кнопку «Далее».

8. На следующем шаге Вас спросят о действии, которое должно выполнятся для данного порта. Поскольку Вы открываете порт, то убедитесь, что выбран пункт «Разрешить подключение», после чего нажмите «Далее».

9. Далее, у Вас будет возможность выбрать профиль. Если Вы не вполне понимаете, что это такое, то оставьте все 3 пункта отмеченными флажками.

10. Затем введите имя создаваемого правило, такое, чтобы оно давало понять, для чего создано. Нажмите кнопку «Готово», после чего Вы увидите только что созданное правило должно в самом верху списка.

11. Чтобы отредактировать какое-либо правило, выделите его в списке, а затем нажмите справа пункт «Свойства».

Примечание
- Если у Вас установлена другая программа, выполняющая функции брандмауэра, то настраивайте открытие портов в ней, согласно прилагающейся к ней инструкции. Некоторые антивирусы также могут выполнять функции брандмауэра.
- Если брандмауэр установлен отдельно, то настройки открытия портов нужно делать в нём.
- Проверить результат можно на этом сайте, а также, обратившись со своего компьютера по порту, который открыли (если это TCP порт, то можно через Telnet). Лучше всего для этого воспользоваться программой Nmap.
![]() В данной статье я расскажу как добавить разрешающее правило в Брандмауэр Windows Server 2012 R2 (в Windows Server 2008 R2 действия аналогичны). Правило будем добавлять на примере работы сервера 1С:Предприятие 8.х (необходимо открыть порт 1541 для менеджера кластера, порты 1560-1591 для рабочих процессов и порт 1540 для агента сервера).
В данной статье я расскажу как добавить разрешающее правило в Брандмауэр Windows Server 2012 R2 (в Windows Server 2008 R2 действия аналогичны). Правило будем добавлять на примере работы сервера 1С:Предприятие 8.х (необходимо открыть порт 1541 для менеджера кластера, порты 1560-1591 для рабочих процессов и порт 1540 для агента сервера).
Некоторые программы и службы при работе через сетевые протоколы используют определенные порты для обмена данными. По умолчанию включенный брандмауэр Windows блокирует подобную сетевую активность. В частности, если попытаться подключиться с клиентской машины к серверу 1С:Предприятие 8.х можно натолкнуться на ошибку:
«Ошибка при выполнении операции с информационной базой (…). Ошибка сетевого доступа к серверу (…). Попытка установить соединение была безуспешной, т. к. от другого компьютера за требуемое время не получен нужный отклик, или было разорвано уже установленное соединение из-за неверного отклика уже подключенного компьютера (…) »
Данная ошибка означает, что по указанному адресу не найден сервер «1С:Предприятия», ну или на сервере закрыт порт (в данном случае порт 1541).
Для открытия порта, заходим на компьютер, где установлен сервер «1С:Предприятия» (в моем примере это компьютер с адресом 10.192.128.15 и установленной на нем операционной системой Windows Server 2012 R2).
Запускаем брандмауэр Windows. Сделать это можно кликнув правой кнопкой мыши по «Пуск» (Start), затем «Панель управления» (Control Panel) — «Система и безопасность» (System and Security) — «Брандмауэр Windows» (Windows Firewall). Или же выполнив команду firewall.cpl (для этого необходимо нажать комбинацию клавиш Win + R, в окне «Отрыть» (Open) ввести имя команды и нажать «ОК» ) .
Далее нажимаем на «Дополнительные параметры» (Advanced Settings) в меню слева.
В открывшемся окне, в дереве слева откроем вкладку «Правила для входящих подключений» (Inbound Rules), а затем в меню «Действия» (Actions) выберем пункт «Создать правило…» (New Rule…).
Запустится «Мастер создания правила для нового входящего подключения» (New Inbound Rule Wizard). На первой странице выберем тип правила (Rule Type) «Для порта» (Port) и нажмем «Далее» (Next).
Затем необходимо указать протокол (в нашем примере это TCP) и, непосредственно, номер порта (Specific local ports), который открываем. После чего жмем «Далее» (Next).
Теперь укажем действие связанное с добавляемым правилом. Выберем «Разрешить подключение» (Allow the connection) и нажмем «Далее» (Next).
На следующей странице нужно указать, для каких профилей брандмауэра будет действовать правило. Отмечаем нужные профили галочками и жмем «Далее» (Next).
Ну и наконец, вводим имя и описание для нового правила и нажимаем «Готово» (Finish) для завершения работы мастера.
Пробуем снова подключиться к серверу «1С:Предприятия» и видим что ошибка сохранилось, но в сообщении уже другой, 1560-ый порт.
Вышеописанным способом добавим еще одно разрешающее правило, с названием «1С: Рабочие процессы» для всего диапазона портов с 1560 по 1591 (для рабочих процессов 1С), указав их через дефис на шаге «Протокол и порты» (Protocol and Ports).
Теперь, в оснастке «Брандмауэр Windows в режиме повышенной безопасности» (Windows Firewall with Advanced Security) в таблице «Правила для входящих подключений» (Inbound Rules) мы должны увидеть 2 только что созданных правила.
Ну а клиент «1С:Предприятия» должен без ошибок подключиться к серверу. Если же потребуется подключаться к этом серверу через консоль администрирования серверов «1С:Предприятия», то необходимо также открыть порт 1540.
Аналогичным образом добавляются правила для для исходящих подключений (Outbound Rules), запрещающие правила, правила для определенных программ и протоколов. Также любое правило можно изменить, открыв его свойства из данной оснастки.
Introduction
Firewalls have become an essential part of every network that has access to the Internet. Without firewalls, anyone would be able to access your network and servers and infect them with malicious software. Properly configured, a firewall can substantially decrease undesirable network communications in a local network.
The article will explain how to create a firewall rule using firewall MMC and Windows PowerShell. We are using Windows Server 2012, but the procedure applies to other versions of Windows, with slight variations.
What is a Firewall?
A firewall is a piece of hardware or software that controls the flow of data packets, and it is critical on modern computer systems. It protects private networks and devices from malicious actions coming from public networks in the same way a physical firewall prevents fire from spreading from one area to another. A firewall acts as a defense mechanism which controls network traffic according to the implemented firewall rules.
Computers behind a firewall cannot receive data until the data passes all filters. This enhances security by a large margin and reduces the risk of unauthorized access to private networks. A proper firewall configuration provides your system with a crucial layer of security and lowers the risk of successful hacking attacks. Firewalls can perform many tasks:
- Protect the data on your computer by creating a barrier that blocks any undesired incoming or outgoing traffic.
- Notify you if there are any connection requests from other computers.
- Log activity for later inspection and warn you if any application tries to connect to another computer.
How Windows Server Firewalls Work
As the name suggests, a firewall acts like a barrier between your local devices and the external network. When you send a connection request to your computer or server over the internet, a hacker can interrupt that connection and try to gain access to your private network. With a firewall in place, only the network traffic that matches firewall rules can get through.
The sets of firewall rules you define in the firewall settings review every packet for flagged information. To make the most out of your firewall, you should precisely define both inbound and outbound rules in order to avoid any unwanted connections.
For example, you can set an inbound rule defining that the data communicated through a specific port, such as TCP port 80, can pass the firewall. That means if the firewall sees a packet coming towards any other port, it will drop it and the data will not reach its intended destination.
Windows Firewall Server 2012 with Advanced Security
Windows Firewall with Advanced Security is the management console which stores all Windows Firewall configurations. Windows Firewall is a host-based firewall solution embedded with virtually all current Windows operating systems.
Windows Firewall with Advanced Security provides safer inbound and outbound network communications by enforcing rules that control traffic flow for its local machine. There are three available firewall profiles:
- Domain. It is used when a computer connects to the corporate network. It is a network where the device can detect its domain controller.
- Private. We use this profile for computers that connect to a private network, such as home or office. In private networks, the users are always behind a device and not directly exposed to the Internet.
- Public. This profile is used when a computer connects to a public network, such as libraries, airports and other public hotspots. The firewall configurations should be the most restrictive for this profile since these networks are the least secure.
The benefits of using Windows Server Firewall with Advanced Security are numerous:
- It is ready out-of-the-box. It comes preinstalled with personal Microsoft Windows operating systems as well as Server editions. It is also active by default, protecting your operating system from the very first startup.
- It does not need a special license or additional hardware. Once you obtain your copy of a Windows operating system, there are no additional costs.
- It is highly flexible. It offers many advanced functionalities and different levels of controls for the firewall services.
What is the Difference between Windows Firewall and Windows Firewall with Advanced Security?
The difference between the two is the level of functionality available to the end-user, that is, the interface itself. Both of them are the same firewall service. The Windows Firewall is easier to use and more consumer-friendly. It is located in the Control Panel and allows you to perform basic firewall configurations.
The Windows Firewall with Advanced Security offers granular control over the inbound and outbound rules, as well as the default firewall profiles. You can modify all advanced firewall configurations using the Microsoft Management Console (MMC) or Windows PowerShell.
How to Launch Windows Firewall with Advanced Security Console?
You can access the Windows Firewall with Advanced Security console in a few different ways. Whichever method you choose, it will open Windows Firewall MMC where you can make further firewall configurations for all profiles.
- Use the Server Manager to access the firewall MMC. Once the window opens, go to Tools on the top right side, and locate the Windows Firewall with Advanced Security option toward the bottom of the list.
- Open the Start menu (use the Windows key on your keyboard) and type “firewall”. You should see the Windows Firewall with Advanced Security icon appear as one of the search results.
- Use the Run box to launch Windows Firewall with Advanced Security. Press Win + R keys, type in msc and hit Enter to load the console. You can also use Command Prompt or Windows PowerShell to run this command.
Now that you have the Windows Firewall with Advanced Security console open, in the middle you can see the summary of the three firewall profiles. Their default configuration is to permit the outgoing traffic and to limit incoming traffic.
When you select an option from the menu on the left side of the window, you will see its details in the middle section. On the right side, the menu will show the available actions for the option you previously selected.
The Windows Firewall with Advanced Security console allows you to configure inbound and outbound rules, as well as the Internet Protocol security (IPSec) connections. The Monitoring tab allows you to view the active firewall rules and connection security rules for that server.
Firewall Rules
Windows firewall rules allow you to state whether to permit or block specific incoming or outgoing network connections. You can choose between multiple parameters and settings for each individual inbound or outbound rule. This includes selecting a program, a TCP or UDP port, protocol, service, or profile that a rule will apply to.
The procedure is the same when creating inbound rules and outbound rules with Windows Firewall with Advanced Security. I will list the steps for creating an inbound rule and you can follow them in the same order when you want to create an outbound rule.
How to Create Inbound Rules
Launch the Windows Firewall with Advanced Security MMC using the method you prefer. You may want to pin the shortcut to the start menu if you use the console on a regular basis.
- On the home screen, select the Inbound Rules The console will show all inbound rules in the middle section and available actions in the right pane. You can filter the list by using the available choices.
- Click on New Rule… to start the New Inbound Rule Wizard.The wizard will let you choose the type of rule you want to create. You can choose one out of four types.
- This rule allows or blocks connections for a user-defined program. It allows you to select a path to an executable (*.exe) file. It does not require to insert any program-specific settings.
- A rule based on port settings allows you to permit or block a connection depending on the TCP or UDP port number it uses. You can state multiple ports to apply to this firewall rule.
- This rule contains a list of the most common Windows programs and services. You can select one to allow or block connections for it.
- Custom. This is the most flexible rule in the Wizard. It allows you to create a tailor-made rule with configurations that previous options do not provide. I will proceed with listing the steps for this rule since it covers the most settings.
- Click on Custom and click Next to proceed.
- Choose if the rule will apply to connections for All programs or a specific program on the local machine and click Next. You can click Customize… to select additional settings for the processes of the program you selected.
- The following step will allow you to specify the protocol and port for the traffic that this firewall rule will filter. Click Next after you select a protocol type and configure the settings.
- Protocol type. Click on the bar and select the protocol from the dropdown list. You can always select Custom to manually configure the port number. If you select TCP or UDP, you will need to specify local and remote port.
- Protocol number. This field populates automatically after you select a protocol type, and you cannot change it. In order to insert your own port, select Custom in the ‘Protocol type’ dropdown menu.
- Local port. This represents the port on the local machine where you are creating this rule. This section becomes editable if you select TCP or UDP in the ‘Protocol type’ dropdown. Select one of the options from the dropdown box. Note that RPC Endpoint Mapper and RPC Dynamic Ports are available only for TCP inbound rules, and IPHTTPS is available for TCP only. Edge Traversal is available for UDP inbound rules.
- Remote port. This is the port on a remote machine that is trying to establish a connection with the local machine. This section becomes editable if you select TCP or UDP in the ‘Protocol type’ dropdown. Select one of the options from the dropdown box. Note that RPC Endpoint Mapper and RPC Dynamic Ports are available only for TCP inbound rules, and IPHTTPS is available for TCP only. Edge Traversal is available for UDP inbound rules.
- Internet Control Message Protocol (ICMP) settings. You can customize the ICMP settings if you select ICMPv4 or ICMPv6 in the ‘Protocol type’ dropdown list.
- The Scope step of the wizard allows you to input local and remote IP addresses whose network traffic applies to the current rule.
- Local. If you select ‘Any IP address’ in the local IP addresses section, then the rule applies to the traffic going through the network device that uses a local IP address. This is always the case with the machine where you are creating the rule. Select ‘These IP addresses’ to state that the rule applies to the packets with an address specified in the list. Click Add to insert the IP address to match. You can later edit or remove any of the IP addresses in the list. You can also apply this rule to a specific interface. Click Customize… and select to apply the rule to connections on all interfaces or chose one of the available interfaces listed in the box.
- Remote. If you select ‘Any IP address’ in the remote IP addresses section, then the rule applies to the traffic coming from any IP address included in the list. Select ‘These IP addresses’ to insert the remote IP addresses to which the rule applies. Click Add to specify the IP address to match. You can later edit or remove any of the IP addresses in the list.
- The next step lets you chose the action the firewall takes when a connection matches the inbound rule configuration. You can select one of the three available options and then click Next to continue.
- Allow the connection. If the connection matches the inbound or the outbound rule configuration, the packets can go through the firewall.
- Allow the connection if it is secure. Select this option to allow only IPSec connections. If you chose this option, two more steps will appear in the wizard: Users and Computers. The additional steps let you chose users and computers you want to block or grant them access. Click on ‘Customize…’ to configure the authentication and integrity requirements.
- Block the connection. This option blocks all network traffic that matches the firewall rule configuration. If a similar rule with ‘allow’ action is in place, then the block action has the priority unless otherwise is stated in the other rule.
- The Profile step lets you choose the firewall profile the rule will apply to. You can leave everything selected or uncheck a profile that you do not want to include. Click Next to proceed to the final step.
- In the final step, enter the desired name and optional description for this firewall rule, and click Finish.
When you close the wizard, the rule will take effect immediately. You can find the rule in the firewall console when you click on the Inbound rules option. Enabled rules have green checkmark icon while disabled are with grey icons.
How to Edit a Firewall Rule
To edit any existing rule and make additional configuration, open the Windows Firewall with Advanced Security console and select Inbound Rules or Outbound Rules option. Locate and click a rule to see the actions specific to it in the right pane. Select Properties and another window will load where you can edit the rule settings.
You can also disable, cut, copy, or delete the rule you selected. Make sure you highlight the correct rule to avoid changing firewall configurations for wrong rules.
Tip: you can double click a rule to directly open the Properties window.
How to Create a Firewall Rule with Windows PowerShell
1. Launch the PowerShell command line. You can do so by searching for “powershell” in the start menu, or press Win + R keys on your keyboard and type in “powershell” in the Run box.
2. Insert the following command and hit enter:
New-NetFirewallRule -DisplayName "TCP custom inbound rule" -Enabled:True -Profile Private -Direction Inbound -Action Allow -Protocol TCP -LocalPort 1234New-NetFirewallRule. This command creates a rule. It is followed by a string of parameters and their values.-DisplayName. Specifies the display name of the rule.-Enabled. Enables the rule if set to true. If you omit this parameter, it defaults to true.-Profile. Assigns the rule to the specified profile: Domain, Private, orPublic.-Direction. States if the rule applies to inbound or outbound connections. If you leave it out, it defaults to Inbound.-Action.Specify if the firewall rule will block or allow the connection. If you do not state the action, it defaults to Allow.-Protocol. Specify the protocol for the rule. In this case, we used TCP. Omitting the protocol defaults the setting to Any.-LocalPort. Insert the port where the traffic can go through on the local server. Omitting the port number defaults the setting to Any.
This is only one example of how to add a firewall rule using the Windows PowerShell command line. You can find more examples in the Microsoft PowerShell Documentation.
Conclusion
This article explains the basic functions and different types of firewall and details the steps for managing the Windows Server Firewall within the Windows Firewall with Advanced Security interface. The Windows Firewall Management Console is a powerful tool that allows for creating detailed configurations. If you carefully followed the instructions in the article, you are now able to manage the firewall on your Windows Server.
В процессе работы различных служб и программного обеспечения по сетевым протоколам, данные рабочие элементы используют конкретные порты, через которые происходит обмен данными.
В конфигурации бранмауэра Windows Server 2008/2012 R2 по умолчанию предусмотрена блокировка сетевой активности. Чтобы дать возможность вашим клиентским программам работать через соответствующие порты с серверными компонентами, необходимо добавить в Windows Firewall правила, которые позволят производить обмен данными в сети с использованием определенных портов.
Зачастую пользователи сталкиваются с ситуациями, в которых клиентскому ПО не удается найти сервер «1С:Предприятие», запущенный в серверной среде, управляемой Win Server 2012. При этом могут вылетать ошибки следующего характера:
-
ошибка доступа к серверу по сети;
-
ошибка при выполнении операций с информационной базой;
-
безуспешная попытка установить соединение, не был получен нужный отклик от другого компьютера;
-
было разорвано уже установленное соединение из-за неверного отклика уже подключенного компьютера.
Данные ошибки указывают на то что клиентскому ПО не удалось по указанному адресу найти сервер для 1С. Нередко случается так, что на сервере требуемый для подключения порт просто закрыт. В случае с 1С-сервером это порт под номером 1541.
Чтобы открыть данный порт, необходимо зайти на сервер через RDP-подключение и запустить управление Windows Firewall. Эту операцию можно произвести двумя способами. Первый вариант – перейти в «Панель управления», далее в подраздел «Система и безопасность», гд е нужно запустить, собственно, брандмауэр.
Также для этого можно воспользоваться командной строкой, выполнив в ней команду firewall.cpl – для этого нажимаем горячие клавиши Win+R, после чего переходим в раздел «Открыть», вводим имя команды и жмем подтверждение действия.
После того, как мы получили доступ к брандмауэру Windows, в его активном окне нам нужно выбрать раздел дополнительных параметров, который расположен в левом меню. Дальше в левой части открывшегося нового окна необходимо перейти к разделу правил для входящих подключений и через меню «Действия» выбрать «Создать новое правило».
Перед нами откроется мастер создания правил для новых входящих подключений. На титульной странице необходимо выбрать тип выбираемого правила, помеченный названием «Для портов» и можно перейти дальше. Теперь укажем протокол передачи сетевых данных (в нашем случае указываем TCP), а также номер открываемого порта.
На следующей вкладке нам нужно будет указать непосредственно действие, которое будет связано с создаваемым нами правилом. Нас интересует действие «Разрешить подключения». Выбираем его и жмем «Далее». Теперь отмечаем требуемые профили Windows Firewall, на которые должно распространяться создаваемое нами действие. Последняя страница мастера предлагает нам ввести имя для нового правила, а также добавить для него описание по желанию. Жмем готово и завершаем работу с мастером.
После создания правила нужно снова попробовать подключиться к 1С-серверу. При подключении мы увидим ту же самую ошибку, но теперь в сообщении говорится уже о другом порте под номером 1560.
По аналогии с описанной выше схемой добавления портов добавляем еще одно правило, в котором указываем диапазон портов 1560-1591. Эти порты требуются для обеспечения различных рабочих процессов программы 1C. Порты, входящие в этот диапазон, указываем через дефис в разделе «Protocol and Ports».
После проделанных манипуляций переходим в оснастку «Windows Firewall with Advanced Security». Здесь, в разделе правил для входящего подключения мы сможем увидеть созданные нами правила. При этом теперь клиент 1С должен свободно подключаться к серверному окружению. Если требуется подключение к вашему серверу через консоль серверного администрирования 1C, вам потребуется создать отдельное правило, открывающее порт 1540.
При необходимости добавления правил к исходящим подключениям можно воспользоваться той же схемой создания правил для отдельных протоколов и программ.
Настройка Windows Firewall для Win Server 2012 на 1С-сервере + MS SQL
Теперь несколько слов о том, как произвести настройку брандмауэра под Windows Server 2012 в указанной конфигурации. Такая связка – не редкость для современных офисов, но иногда требуется дополнительное время, чтобы разобраться в принципе работы Windows Firewall относительно серверного окружения 1С.
При условии, что сервер осуществляет прием подключения на стандартный TCP-порт 1433, нужно просто разрешить этот порт, воспользовавшись созданием правил для брандмауэра, принцип которого мы рассмотрели выше. Чтобы проверить, действительно ли работа идет через этот порт, можно запустить оснастку «Диспетчер конфигурации SQL Server» в Server 2012 и перейти на вкладку сетевой конфигурации. Здесь нужно выбрать вкладку протоколов для MSSQLSERVER и в левом окне найти TCP/IP-протокол. Выбираем его и кликаем «Свойства», после чего ищем вкладку «IP-адреса» и раскрываем ветку «IPAII».
Если же SQL-порт динамический, потребуется разрешение подключения к следующему приложению %ProgramFiles%Microsoft SQL ServerMSSQL10_50.MSSQLSERVERMSSQLBinnsqlservr.exe.
Как уже было сказано выше, 1С-сервер работает с портом 1541 и портами в диапазоне 1560-1591. Однако нередко случается так, что по непонятным причинам данный список откртых портов все равно не дает выполнять подключение к серверу. Чтобы все работало на 100% нужно всего лишь расширить этот диапазон, указав в нем порты от 1540 до 1591.
Брандмауэр Windows в режиме повышенной безопасности – это брандмауэр, который работает на Windows Server 2012 и включен по умолчанию. Настройки брандмауэра в Windows Server 2012 управляются из консоли управления Microsoft брандмауэра Windows . Чтобы настроить параметры брандмауэра, выполните следующие действия:
Шаг 1. Нажмите «Диспетчер серверов» на панели задач → Откройте меню «Инструменты» и выберите «Брандмауэр Windows в режиме повышенной безопасности».
Шаг 2. Чтобы просмотреть текущие параметры конфигурации, выберите « Свойства брандмауэра Windows» в консоли MMC. Это позволяет получить доступ к изменению настроек для каждого из трех профилей брандмауэра, а именно: настройки домена, частного и общего доступа, а также настроек IPsec.
Шаг 3 – Применение пользовательских правил, который будет включать следующие два шага –
-
Выберите « Входящие правила» или « Исходящие правила» в разделе « Брандмауэр Windows в режиме повышенной безопасности» в левой части консоли управления. (Как вы знаете, исходящий трафик – это трафик, генерируемый сервером в Интернет, а входящий трафик – наоборот). Правила, которые в настоящее время включены, обозначены зеленым значком флажка, в то время как отключенные правила отображают серый значок флажка.
-
Правое нажатие на правило позволит вам включить / отключить.
Выберите « Входящие правила» или « Исходящие правила» в разделе « Брандмауэр Windows в режиме повышенной безопасности» в левой части консоли управления. (Как вы знаете, исходящий трафик – это трафик, генерируемый сервером в Интернет, а входящий трафик – наоборот). Правила, которые в настоящее время включены, обозначены зеленым значком флажка, в то время как отключенные правила отображают серый значок флажка.
Правое нажатие на правило позволит вам включить / отключить.
Как создать новое правило брандмауэра?
Чтобы создать новое правило брандмауэра, вы должны придерживаться следующих шагов –
Шаг 1 – С правой стороны либо Правил входящих, либо Правил исходящих – нажмите «Новое правило».
Шаг 2 – Пользовательский из радиальной кнопки Тип правила → нажмите Далее .
Шаг 3. Выберите ассоциацию программы для правила настраиваемого брандмауэра в качестве Все программы или путь к программе → нажмите Далее.
Шаг 4 – Поле типа протокола выберите тип протокола → нажмите Далее .

Шаг 5 – Выберите сопоставление IP-адресов для локальных и удаленных адресов → нажмите Далее .
Шаг 6 – Выберите действие, которое нужно выполнить для соответствующего трафика → нажмите Далее.
Шаг 7 – Выберите профили, связанные с пользовательским правилом → нажмите Далее .
Шаг 8. Введите имя для правила брандмауэра и необязательное описание → Готово .
Шаг 9 – Правило брандмауэра можно найти на соответствующей вкладке «Правило», входящее или исходящее в зависимости от созданного типа. Чтобы отключить или удалить правило, найдите правило в MMC, щелкните его правой кнопкой мыши и выберите « Отключить правило» или « Удалить» .
This article is all about allowing Standard Windows Server to communicate with the existing servers in the environment that are domain joined such as LDAP Servers for Authentication, SCOM for monitoring and SCCM for deploying updates and patches including Software
deployment.
In many such cases we are left to investigate issues that are either Network Firewall related, Antivirus Software that have inbuilt Firewall policies or Windows Firewall that block communications if they are not configured with allow rules or configured with
exceptions.
There are cases when Administrator have to remotely manage Servers to gather information or to deploy a script and if Windows Firewall is not setup correctly someone has to either login via Console or if it is physical server it will be a physical visit to
the Datacentre to allow remote management for managing the servers.
Below set of Firewall rules can be deployed via Group Policy (TechNet Article Link )or via a script and hope this useful to setup Windows Servers with default set of policies and rules.
These rule sets are standard set of rules that allows default ports to communicate within the environment to manage and control the Server estate.
As always these are set of rules that is deployed on Test Environment as we have implemented secure Network lockdown to mimic my Production environment, so please implement this in your test/development environment prior to creating the policies in the Production
environment.
Purpose of these wiki is to allow administrator to create a template that allows standard communication between the Servers in an secure lockdown environment and to be confident that Server policy is configured at the appropriate lockdown settings.
| Inbound Rules | |||
| Name | Protocol | Local Port | Remote Port |
| ALL ICMP V4 | ICMPv4 | Any | Any |
| Core Networking — Destination Unreachable (ICMPv6-In) | ICMPv6 | Any | Any |
| Core Networking — Destination Unreachable Fragmentation Needed (ICMPv4-In) | ICMPv4 | Any | Any |
| Core Networking — Dynamic Host Configuration Protocol (DHCP-In) | UDP | 68 | 67 |
| Core Networking — Dynamic Host Configuration Protocol for IPv6(DHCPV6-In) | UDP | 546 | 547 |
| Core Networking — Internet Group Management Protocol (IGMP-In) | IGMP | Any | Any |
| Core Networking — IPv6 (IPv6-In) | IPv6 | Any | Any |
| Core Networking — Multicast Listener Done (ICMPv6-In) | ICMPv6 | Any | Any |
| Core Networking — Multicast Listener Query (ICMPv6-In) | ICMPv6 | Any | Any |
| Core Networking — Multicast Listener Report (ICMPv6-In) | ICMPv6 | Any | Any |
| Core Networking — Multicast Listener Report v2 (ICMPv6-In) | ICMPv6 | Any | Any |
| Core Networking — Neighbor Discovery Advertisement (ICMPv6-In) | ICMPv6 | Any | Any |
| Core Networking — Neighbor Discovery Solicitation (ICMPv6-In) | ICMPv6 | Any | Any |
| Core Networking — Packet Too Big (ICMPv6-In) | ICMPv6 | Any | Any |
| Core Networking — Parameter Problem (ICMPv6-In) | ICMPv6 | Any | Any |
| Core Networking — Router Advertisement (ICMPv6-In) | ICMPv6 | Any | Any |
| Core Networking — Router Solicitation (ICMPv6-In) | ICMPv6 | Any | Any |
| Core Networking — Time Exceeded (ICMPv6-In) | ICMPv6 | Any | Any |
| File Server Remote Management (DCOM-In) | TCP | 135 | Any |
| File Server Remote Management (SMB-In) | TCP | 445 | Any |
| File Server Remote Management (WMI-In) | TCP | RPC Dynamic Ports | Any |
| AD Global Catalog | TCP | 3268 | Any |
| AD Global Catalog Secure | TCP | 3269 | Any |
| AD Kerberos TCP | TCP | 88 | Any |
| AD Kerberos UDP | UDP | 88 | Any |
| AD DNS TCP | TCP | 53 | Any |
| AD DNS UDP | UDP | 53 | Any |
| AD LDAP | TCP | 389 | Any |
| AD LDAP Secure | TCP | 636 | Any |
| Time Service | UDP | 123 | Any |
| Remote Desktop — Shadow (TCP-In) | TCP | Any | Any |
| Remote Desktop — User Mode (TCP-In) | TCP | 3389 | Any |
| Remote Desktop — User Mode (UDP-In) | UDP | 3389 | Any |
| Remote Service Management (NP-In) | TCP | 445 | Any |
| Remote Service Management (RPC) | TCP | RPC Dynamic Ports | Any |
| Remote Service Management (RPC-EPMAP) | TCP | RPC Endpoint Mapper | Any |
| SMC Service | UDP | Any | Any |
| SMC Service | TCP | Any | Any |
| SNAC Service | TCP | Any | Any |
| SNAC Service | UDP | Any | Any |
| SCCM Client — Http | Http | 80 | Any |
| SCCM Client — Https | Https | 443 | Any |
| SCCM Client UDP | UDP | 135 | Any |
| SCCM Client UDP | UDP | 137 | Any |
| SCCM Client UDP | UDP | 138 | Any |
| SCCM Client | TCP | 139 | Any |
| SCCM Client Notification | TCP | 10123 | Any |
| SCCM Remote Control | TCP | 2701 | Any |
| SCOM Agent | TCP | 5723 | Any |
| SQL Server Access | TCP | 1433 | Any |
| Windows Firewall Remote Management (RPC) | TCP | RPC Dynamic Ports | Any |
| Windows Firewall Remote Management (RPC-EPMAP) | TCP | RPC Endpoint Mapper | Any |
| Windows Remote Management (HTTP-In) | TCP | 5985 | Any |
| WSUS | TCP | 8530 | Any |
| WSUS | TCP | 8531 | Any |
| Windows KMS License | TCP | 1688 | Any |
| Outbound Rules | |||
| SCCM Client | TCP | 10123 | Any |
| SCCM Client WSUS | TCP | 8530 | Any |
| SCCM Client WSUS | TCP | 8531 | Any |
| SCCM Multicast | TCP | 63000-64000 | Any |
| SCCM PXE DP | UDP | 67-69 | Any |
| SCCM PXE ProxyDHCP | UDP | 4011 | Any |
| SCCM Client — Http | Http | 80 | Any |
| SCCM Client — Https | Https | 443 | Any |
| SCOM Agent | TCP | 5723 | Any |
| AD Global Catalog | TCP | 3268 | Any |
| AD Global Catalog | TCP | 3269 | Any |
Another useful source for viewing information about IPsec policy changes for Windows Firewall with Advanced Security is the operational log found in Event Viewer:
Applications and Services Logs/Microsoft/Windows/Windows Firewall with
Advanced Security/ConnectionSecurity
You can also enable the ConnectionSecurityVerbose operational log if you need more detailed information about IPsec policy events.
Lesson summary
![]() IPsec involves a number of different concepts, mechanisms, and technologies that you should understand before you attempt to implement it in your production environment.
IPsec involves a number of different concepts, mechanisms, and technologies that you should understand before you attempt to implement it in your production environment.
![]() IPsec can provide authentication, data integrity, data encryption, or any combination of the three to protect network traffic.
IPsec can provide authentication, data integrity, data encryption, or any combination of the three to protect network traffic.
![]() You can configure IPsec settings on a computer by using the Windows Firewall with Advanced Security snap-in, Group Policy, or Windows PowerShell.
You can configure IPsec settings on a computer by using the Windows Firewall with Advanced Security snap-in, Group Policy, or Windows PowerShell.
![]() Connection security rules can be of the isolation, authentication exemption, server-to-server, tunnel, or custom type.
Connection security rules can be of the isolation, authentication exemption, server-to-server, tunnel, or custom type.
![]() You can create and manage connection security rules using the Windows Firewall with Advanced Security snap-in, Group Policy, or Windows PowerShell.
You can create and manage connection security rules using the Windows Firewall with Advanced Security snap-in, Group Policy, or Windows PowerShell.
![]() Authenticated bypass allows matching network traffic that has been authenticated as coming from an authorized and trusted user or computer.
Authenticated bypass allows matching network traffic that has been authenticated as coming from an authorized and trusted user or computer.
![]() You can monitor main mode and quick mode security associations by using the Windows Firewall with Advanced Security snap-in or Windows PowerShell.
You can monitor main mode and quick mode security associations by using the Windows Firewall with Advanced Security snap-in or Windows PowerShell.
Lesson review
Answer the following questions to test your knowledge of the information in this lesson. You can find the answers to these questions and explanations of why each answer choice is correct or incorrect in the “Answers” section at the end of this chapter.
1. Diffie–Hellman Group 14 is an example of what?
A. An IPsec authentication method
B. An IPsec data-integrity algorithm
C. An IPsec data-encryption algorithm
D. An IPsec key-exchange algorithm
2. You want to use IPsec to protect communications between a server and computers on a specific subnet of your network. Which type of connection security rule can you create to do this? (Choose all that apply.)
A. Isolation rule
B. Authentication exemption rule
C. Server-to-server rule
D. Custom rule
3. When creating connection security rules, which authentication option would you typically use in an environment that includes computers unable to use the IPsec authentication methods available with Windows Firewall with Advanced Security?
A. Request Authentication For Inbound And Outbound Connections
B. Require Authentication For Inbound Connections And Request Authentication For Outbound Connections
C. Require Authentication For Inbound And Outbound Connections
D. Do Not Authenticate
Practice exercises
The goal of this section is to provide you with hands-on practice with the following:
![]() Configuring firewall rules
Configuring firewall rules
![]() Implementing IPsec
Implementing IPsec
To perform the following exercises, you need at least two domain-joined installations of Windows Server 2012 R2 using the Server With A GUI installation option. For example, one of the servers could be a domain controller in the corp.fabrikam.com domain and the other server could be a member server in the same domain. The servers can be either physical servers or virtual machines. You should be logged on to each server using a user account that is a member of the Domain Admins group. For the purposes of these exercises, the names of the servers are assumed to be HOST4 and HOST7 and their IP addresses are, respectively, 172.16.11.230 and 172.16.11.240. If your servers have different names or IP addresses, you should modify the steps in these exercises accordingly.
Exercise 1: Configuring firewall rules
In this exercise, you create and configure firewall rules and examine what happens when firewall rules conflict with one another.
1. Log on to HOST4 and use Server Manager to install the Web Server (IIS) role on the computer.
2. Use the Local Server page of Server Manager to turn off the IE Enhanced Security Configuration for Administrators.
3. Launch Internet Explorer and verify that you can open the default IIS8 home page of the Default Web Site on the local computer by typing http://localhost into the address bar.
4. Log on to HOST7 and use the Local Server page of Server Manager to turn off the IE Enhanced Security Configuration for Administrators.
5. Launch Internet Explorer and verify that you can open the default IIS8 home page of the Default Web Site on HOST4 by typing http:// followed by the host’s IP address (for example http://172.16.11.230) into the address bar.
6. Open the Windows Firewall with Advanced Security snap-in from the Tools menu of Server Manager, right-click the root node, and select Properties.
7. Configure the settings on the Domain Profile tab so that the default firewall rule for outbound connections is to block traffic. Then click Apply.
8. Delete the browsing history in Internet Explorer, making sure to deselect the Preserve Favorites Website Data option, and then press F5 to attempt to open the site http://172.16.11.230 again.
Question: Why can’t the site be displayed?
Answer: The default rule is applied last when firewall rules are processed. Because the default outbound rule is Block, access to the site is blocked.
9. Change the settings on the Domain Profile tab so that the default firewall rule for outbound connections is to allow traffic. Then click OK.
10. Press F5 in Internet Explorer to verify that you can open the Default Web Site on HOST4.
11. Right-click the Outbound Rules node in the Windows Firewall with Advanced Security snap-in and select New Rule to launch the New Outbound Rule Wizard.
12. On the Rule Type page, select Port.
13. On the Protocols And Ports page, select TCP, select Specific Remote Ports, and type 80 in the text box.
14. On the Action page, leave Block The Connection selected.
15. Accept the default settings on the Profile page.
16. Type Block TCP port 80 on the Name page and click Finish to create the new firewall rule.
17. Delete the browsing history in Internet Explorer, making sure to deselect the Preserve Favorites Website Data option, and then press F5 to attempt to open the Default Web Site on HOST4 again.
Question: Why can’t the site be displayed?
Answer: An explicit outbound port rule blocks the HTTP request from accessing the site on TCP port 80.
18. Select the Inbound Rules node, right-click the rule named Block TCP port 80, and select Disable Rule.
19. Press F5 in Internet Explorer to verify that you can open the Default Web Site on HOST4.
Question: Why is the site now displayed?
Answer: The outbound port rule to block TCP port 80 has been disabled, and the default outbound rule is to allow outgoing traffic.
20. Right-click the Outbound Rules node in the Windows Firewall with Advanced Security snap-in and select New Rule to launch the New Outbound Rule Wizard again.
21. On the Rule Type page, select Program.
22. On the Program page, select TCP, select This Program Path, and browse to select the following executable:
C:\ProgramFiles (x86)\Internet Explorer\iexplore.exe
23. On the Action page, leave Block The Connection selected.
24. Accept the default settings on the Profile page.
25. Type Block Internet Explorer on the Name page and click Finish to create the new firewall rule.
26. Delete the browsing history in Internet Explorer, making sure to deselect the Preserve Favorites Website Data option, and then press F5 to attempt to open the Default Web Site on HOST4.
Question: Why can’t the site be displayed?
Answer: An explicit outbound program rule blocks the HTTP request from accessing the site on TCP port 80.
27. Select the Inbound Rules node, right-click the rule named Block Internet Explorer, and select Disable Rule.
28. Right-click the rule named Block TCP port 80 and select Enable Rule.
29. Delete the browsing history in Internet Explorer, making sure to deselect the Preserve Favorites Website Data option, and then press F5 to attempt to open the Default Web Site on HOST4 again. You should not be able to access the site because of the outbound rule that blocks access to TCP port 80.
30. At this point, you should continue directly to practice exercise 2.
Exercise 2: Implementing IPsec
In this exercise, you create connection security rules to implement IPsec communications between HOST4 and HOST7.
1. Switch to HOST4 and open the Windows Firewall with Advanced Security snap-in.
2. Right-click the Connection Security Rules node beneath the root node and select New Rule to open the New Connection Security Rule Wizard.
3. On the Rule Type page, select Server-To-Server.
4. On the Endpoints page, in the Which Computers Are In Endpoint 1? section, select These IP Addresses. Then click Add, type the IIP address for HOST4, and click OK.
5. On the same page, in the Which Computers Are In Endpoint 2? section, select These IP Addresses. Then click Add, type the IP address for HOST7, and click OK.
6. On the Requirements page, leave Request Authentication For Inbound And Outbound Connections selected.
7. On the Authentication Method page, select Advanced and click Customized to open the Customize Advanced Authentication Methods dialog box.
8. In the First Authentication Methods section, click Add, select Preshared Key (Not Recommended), type mytestkey, and click OK twice. Click Next.
9. Accept the default settings on the Profile page and click Next.
10. Type HOST4 to HOST7 on the Name page and click Finish to create the new connection security rule.
11. Select the Connection Security Rules node under the Monitoring node, and verify that the new connection security rule is active (listed).
12. Open a Windows PowerShell prompt and ping HOST7 to attempt to establish IPsec communications between HOST4 and HOST7.
13. Switch to the Windows Firewall with Advanced Security snap-in and select the Main Mode node under the Connection Security Rules node.
Question: Why hasn’t a main mode SA been established yet between HOST4 and HOST7?
Answer: Connection security rules must be configured on both computers before IPsec communications can be established between them.
14. Switch to HOST7 and open the Windows Firewall with Advanced Security snap-in.
15. Right-click the Connection Security Rules node beneath the root node and select New Rule to open the New Connection Security Rule Wizard.
16. On the Rule Type page, select Server-To-Server.
17. On the Endpoints page, in the Which Computers Are In Endpoint 1? section, select These IP Addresses. Then click Add, type the IP address for HOST7, and click OK.
18. On the same page, in the Which Computers Are In Endpoint 2? section, select These IP Addresses. Then click Add, type the IP address for HOST4, and click OK.
19. On the Requirements page, leave Request Authentication For Inbound And Outbound Connections selected.
20. On the Authentication Method page, select Advanced and click Customized to open the Customize Advanced Authentication Methods dialog box.
21. In the First Authentication Methods section, click Add, select Preshared Key (Not Recommended), type mytestkey, and click OK twice. Click Next.
22. Accept the default settings on the Profile page and then click Next.
23. Type HOST7 to HOST4 on the Name page and click Finish to create the new connection security rule.
24. Select the Connection Security Rules node under the Monitoring node and verify that the new connection security rule is active (listed).
25. Open a Windows PowerShell prompt and ping HOST4 to attempt to establish IPsec communications between HOST7 and HOST4.
26. Switch to the Windows Firewall with Advanced Security snap-in and select the Main Mode node under the Connection Security Rules node. You should see a main mode SA with HOST7’s IP address as the local address and HOST4’s IP address as the remote address.
27. Right-click the main mode SA and select Properties. Click OK after viewing the properties of the SA.
28. Select the Quick Mode node under the Connection Security Rules node. You should see a quick mode SA with 172.16.11.240 as the local address and 172.16.11.230 as the remote address.
29. Right-click the quick mode SA and select Properties. Click OK after viewing the properties of the SA.
30. Launch Internet Explorer and attempt to open the Default Web Site on HOST4. You should see a message saying that the page can’t be displayed. This is because the outbound firewall rule you created earlier to block TCP port 80 is still in effect on HOST7.
31. Select the Outbound Rules node in the Windows Firewall with Advanced Security snap-in.
32. Right-click the rule named Block TCP Port 80 and select Properties to open the properties for the firewall rule.
33. On the General tab, select Allow The Connection If It Is Secure and then click OK.
34. Press F5 in Internet Explorer to verify that you can open the Default Web Site on HOST4.
Suggested practice exercises
The following additional practice exercises are designed to give you more opportunities to practice what you’ve learned and to help you successfully master the lessons presented in this chapter.
![]() Exercise 1 Redo practice exercise 1 using Windows PowerShell commands instead of using the Windows Firewall with Advanced Security snap-in.
Exercise 1 Redo practice exercise 1 using Windows PowerShell commands instead of using the Windows Firewall with Advanced Security snap-in.
![]() Exercise 2 Redo practice exercise 2 using Windows PowerShell commands instead of using the Windows Firewall with Advanced Security snap-in.
Exercise 2 Redo practice exercise 2 using Windows PowerShell commands instead of using the Windows Firewall with Advanced Security snap-in.
Answers
This section contains the answers to the lesson review questions in this chapter.
Lesson 1
1. Correct answers: B and D
A. Incorrect: Windows Firewall with Advanced Security has three firewall profiles, which correspond to the three network location types on the Windows platform. The domain profile is automatically applied to any network connection that Windows identifies as having a network location type of domain. The private profile is automatically applied to any network connection that Windows identifies as having a network location type of private. The public profile is automatically applied to any network connection that Windows identifies as having a network location type of public.
B. Correct: All three profiles can be active at the same time on a computer if Windows detects that there are network connections of each type present.
C. Incorrect: The Inbound Connections setting lets you configure how Windows Firewall with Advanced Security handles incoming traffic. The default option is Block, which blocks all connections that do not have firewall rules that explicitly allow the connection. The other two options are Block All Connections, which blocks all connections regardless of any firewall rules that explicitly allow the connection, and Allow, which allows the connection unless there is a firewall rule that explicitly blocks the connection.
D. Correct: To display the currently active settings for the domain profile on the local computer, you can use the Get-NetFirewallProfile cmdlet with the –PolicyStore ActiveStore parameter. The active store is policy store that contains the currently active policy, which is the sum of all policy stores that apply to the computer. The persistent store is the policy store that contains the persistent policy for the local computer. This policy is not from GPOs and has been created manually or programmatically (during application installation) on the computer.
2. Correct answer: C
A. Incorrect: Rules that explicitly allow some form of traffic have lower, not higher, priority than rules that explicitly block the same form of traffic. Because rule A is a block rule and rule B is an allow rule, rule A has higher priority than rule B.
B. Incorrect: Rules that explicitly allow some form of traffic have lower, not higher, priority than rules that explicitly block the same form of traffic. Because rule A is a block rule and rule B is an allow rule, rule A has higher priority than rule B.
C. Correct: Rules that explicitly block some form of traffic are applied before rules that explicitly allow the same form of traffic. Because rule A is a block rule and rule B is an allow rule, rule A has higher priority and is applied first. The result is that outbound traffic from the svchost.exe process running on the computer is blocked.
D. Incorrect: When firewall rules are processed by Windows Firewall with Advanced Security, as soon as a packet matches a rule the rule is applied and rules processing stops at that point. Because outbound traffic from the svchost.exe process running on the computer matches rule A, rules processing stops at that point and the outbound default rule is not applied to the traffic.
3. Correct answers: A and D
A. Correct: A program rule specifies how traffic associated with a specific program (executable) running on the local computer should be handled.
B. Incorrect: A port rule specifies how traffic associated with a specific TCP or UDP port or port range on the local computer should be handled.
C. Incorrect: A predefined rule specifies how traffic associated with a specific Windows feature or service running on the local computer should be handled.
D. Correct: A custom rule specifies how traffic should be handled based on any of the traffic-filtering criteria supported by Windows Firewall with Advanced Security. These criteria include being able to specify a program (executable) running on the local computer.
Lesson 2
1. Correct answer: D
A. Incorrect: IPsec authentication methods include computer or user (Kerberos V5), computer or user (NTLMv2), computer or user certificate, computer health certificate, and preshared key.
B. Incorrect: IPsec data-integrity algorithms include MD5, SHA-1, SHA-256, SHA-384, AES-GMAC 128, AES-GMAC 192, AES-GMAC 256, AES-GCM 128, AES-GCM 192, and AES-GCM 256.
C. Incorrect: IPsec data-encryption algorithms include DES, 3DES, AES-CBC 128, AES-CBC 192, AES-CBC 256, AES-GCM 128, AES-GCM 192, and AES-GCM 256.
D. Correct: IPsec key-exchange algorithms include, Diffie–Hellman Group 1, Diffie–Hellman Group 2, Diffie–Hellman Group 14, Diffie–Hellman Group 24, Elliptic Curve Diffie–Hellman P-256, and Elliptic Curve Diffie–Hellman P-384.
2. Correct answers: C and D
A. Incorrect: You can use isolation rules to isolate computers from other computers. For example, you can use isolation rules to protect computers that are joined to your domain from computers that are outside your domain.
B. Incorrect: You can use authentication exemption rules to specify computers that should be exempted from being required to authenticate, regardless of any other connection security rules that have been configured. For example, you can use authentication exemption rules to allow access to domain controllers and other infrastructure servers with which the computer needs to communicate before authentication can be performed.
C. Correct: You can use server-to-server rules to protect communications between two computers, two groups of computers, two subnets, or some combination of these, such as between a computer and a subnet. For example, you can use server-to-server rules to protect communications between a database server and a front-end web server.
D. Correct: You can configure custom rules using criteria from other rule types except tunnel rules. This means you can create a custom rule that has the same effect as a server-to-server rule.
3. Correct answer: A
A. Correct: The Request Authentication For Inbound And Outbound Connections option is typically used in low-security environments or those in which computers are unable to use the IPsec authentication methods available with Windows Firewall with Advanced Security. You can also use it for computers in the boundary zone in a server and in a domain isolation scenario.
B. Incorrect: The Require Authentication For Inbound Connections And Request Authentication For Outbound Connections option is typically used in environments where computers are able use the IPsec authentication methods available with Windows Firewall with Advanced Security. You can also use it for computers in the main isolation zone in a server and in a domain isolation scenario.
C. Incorrect: The Require Authentication For Inbound And Outbound Connections option is typically used in environments where network traffic must be controlled and secured. You can also use it for computers in the main isolation zone in a server and in a domain isolation scenario.
D. Incorrect: The Do Not Authenticate option is typically used to create an authentication exemption for connections to computers that do not require IPsec protection.
Правильная настройка брандмауэра Windows Server 2012 является одним из ключевых аспектов обеспечения безопасности сервера. Однако иногда вам может понадобиться открыть порт в брандмауэре для разрешения входящего или исходящего трафика для конкретного приложения или сервиса.
Открытие порта в брандмауэре Windows Server 2012 может показаться сложной задачей, особенно для новичков. Однако с помощью этой пошаговой инструкции вы сможете легко справиться с этой задачей и настроить нужные порты для ваших потребностей.
Шаг 1: Запустите утилиту «Windows Firewall with Advanced Security». Вы можете найти ее в меню «Административные инструменты» в разделе «Система и безопасность».
Шаг 2: В окне утилиты выберите «Входящие правила» или «Исходящие правила», в зависимости от того, какое правило вы хотите создать.
Шаг 3: Нажмите правой кнопкой мыши на папке с правилами и выберите «Новое правило».
Шаг 4: В появившемся окне выберите тип правила, которое вы хотите создать. Например, вы можете выбрать «Позволить подключения через определенные порты».
Шаг 5: Укажите номер порта, который вы хотите открыть, и выберите, какой тип соединения вы хотите разрешить. Например, вы можете выбрать «TCP» или «UDP».
Шаг 6: Выберите действие, которое будет применяться к трафику, проходящему через этот порт. Например, вы можете выбрать «Разрешить подключения».
Шаг 7: Укажите, к каким профилям сети будет применяться это правило. Обычно рекомендуется выбрать все профили для максимальной безопасности.
Шаг 8: Дайте правилу имя и описание, чтобы вы могли легко идентифицировать его в будущем.
Шаг 9: Нажмите «Завершить», чтобы создать правило и открыть указанный порт в брандмауэре Windows Server 2012.
После завершения этих шагов вы успешно откроете порт в брандмауэре Windows Server 2012. Помните, что правильная настройка брандмауэра важна для обеспечения безопасности вашего сервера, поэтому будьте внимательны и внимательно следуйте инструкциям.
Как открыть порт в брандмауэре Windows Server 2012
Шаг 1: Откройте «Панель управления». Для этого щелкните правой кнопкой мыши по кнопке «Пуск» в левом нижнем углу, а затем выберите «Панель управления» в контекстном меню.
Шаг 2: Найдите и откройте раздел «Система и безопасность». В нем выберите «Брандмауэр Windows».
Шаг 3: В окне «Брандмауэр Windows» выберите «Разрешить приложение или функцию через брандмауэр».
Шаг 4: Чтобы открыть порт, щелкните на кнопке «Изменить настройки». Если у вас нет административных прав, вам может потребоваться ввести имя пользователя и пароль администратора.
Шаг 5: В списке приложений найдите приложение или службу, для которых вы хотите открыть порт. Выделите его и нажмите кнопку «Подробности».
Шаг 6: В открывшемся окне найдите и отметьте соответствующий порт. Если порт не существует в списке, нажмите кнопку «Добавить порт», чтобы добавить его вручную.
Шаг 7: После того как вы выбрали порт или добавили его, убедитесь, что для этого порта включена флажок в столбце «Частные» и «Публичные». Если есть необходимость, также отметьте флажок в столбце «Домашние сети».
Шаг 8: Нажмите «OK», чтобы сохранить изменения. Порт будет открыт в брандмауэре Windows Server 2012.
Примечание: Важно быть осторожным при открытии портов в брандмауэре, так как это может создать уязвимости в безопасности вашего сервера. Убедитесь, что вы только открываете порты, необходимые для работы конкретных приложений или служб, и следите за обновлениями безопасности для защиты сервера от возможных угроз.
Пошаговая инструкция
Открытие порта в брандмауэре Windows Server 2012 может быть необходимо при настройке сетевых служб или приложений. Чтобы выполнить данное действие, следуйте следующим шагам:
|
Шаг 1: |
Откройте меню «Пуск» и введите в поисковой строке «Брандмауэр сети Windows» |
|
Шаг 2: |
Выберите в результате поиска «Брандмауэр сети Windows с расширенными функциями защиты» |
|
Шаг 3: |
В открывшемся окне щелкните на ссылке «Создать правило входящего соединения» |
|
Шаг 4: |
В появившемся мастере создания правила выберите опцию «Пользовательское» |
|
Шаг 5: |
Нажмите кнопку «Далее» и заполните следующие поля:
После заполнения полей нажмите кнопку «Далее». |
|
Шаг 6: |
Выберите, когда правило должно применяться, и нажмите кнопку «Далее». |
|
Шаг 7: |
Укажите название и описание правила (необязательно) и нажмите кнопку «Готово». |
Вы успешно создали правило для открытия порта в брандмауэре Windows Server 2012. Теперь ваше приложение или служба сможет использовать указанный порт для обмена данными.