This post demonstrates how to install Windows Server 2012R2 evaluation version onto Oracle VirtualBox.
- First go to Windows Server 2012R2 evaluation downloading website “https://www.microsoft.com/en-in/evalcenter/evaluate-windows-server-2012-r2“
Choose ISO file type
Download ISO image of Windows Server 2012R2 evaluation

2. Start Oracle Virtual Manager, Select NEW.
Name: Windows Server 2012R2
Type: Microsoft Windows
Version: Windows 2012(64-bit)

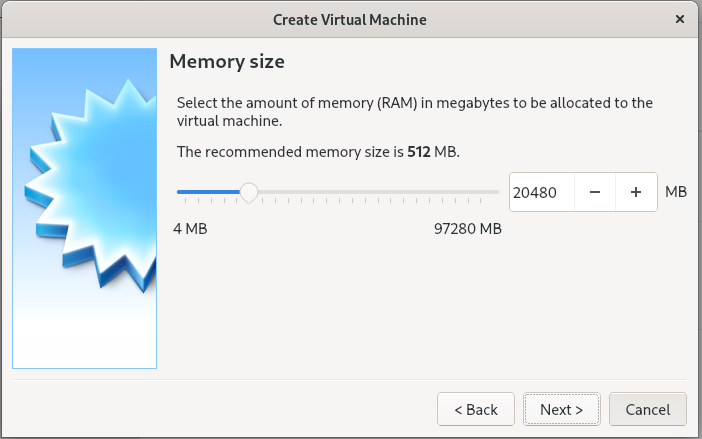
3. Give 5120M memory size depending on availability.

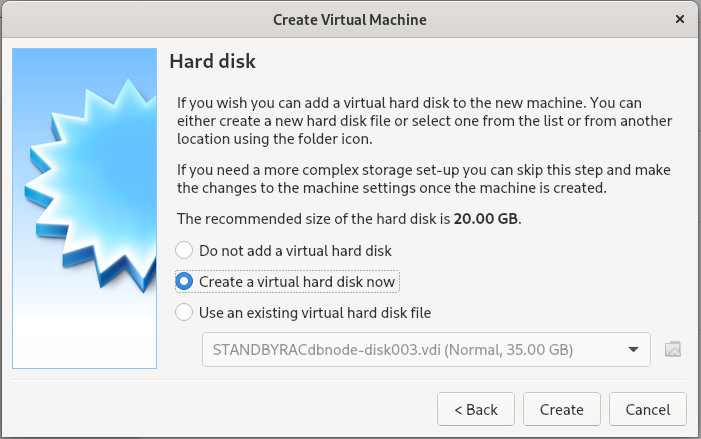
4. Create an virtual hard disk.

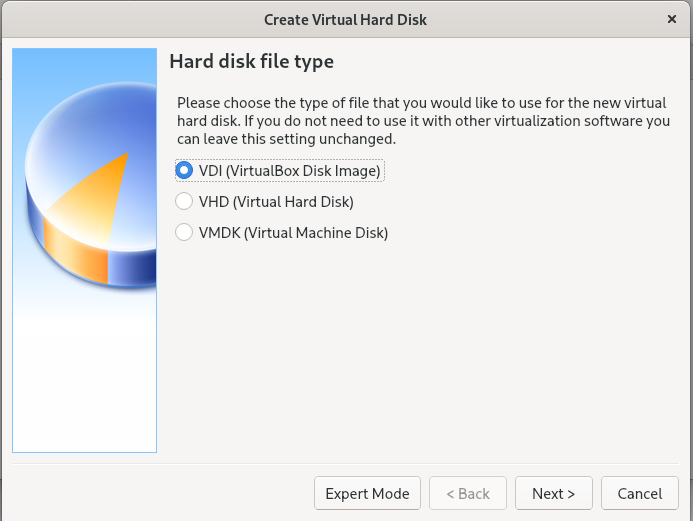
5. Choose “VDI( VirtualBox Disk Image)“.

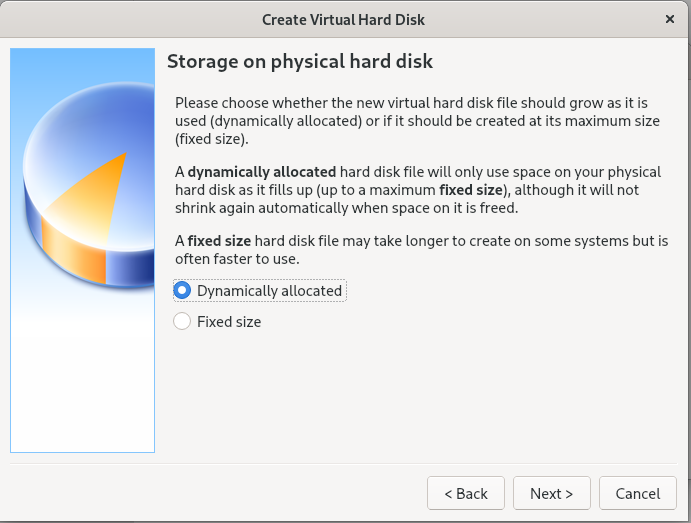
6. Choose “Dynamically allocated“.

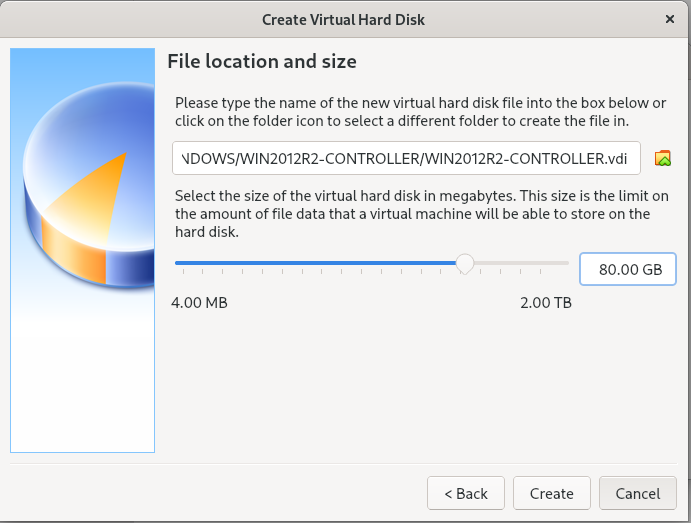
7. Give size 30GB.

8. Also you can choose where the VDI image file located.

9. Click “create” to create “Windows Server 2012R2” virtual machine.

10. Now attach the ISO image to the virtual CD/DVD drive by :
a)Ensure the Windows Server 2012R2 VM is selected and click Settings.
b)Select Storage. Click on Empty under IDE Controller.
c)In the Attributes section, click on “+”sign for adding optimal disk.
d)Select “Choose a disk file”.
e)Browse to the location where you saved the Windows DVD ISO file and select it.
f)Click Open.
g)It should look similar to the following graphic.


11) Now we can install Windows 2012R2 .
a)Select the Windows Server 2012R2 VM in VirtualBox and click Start.
When the Install screen appears, click Next.

b)Click Install Now.

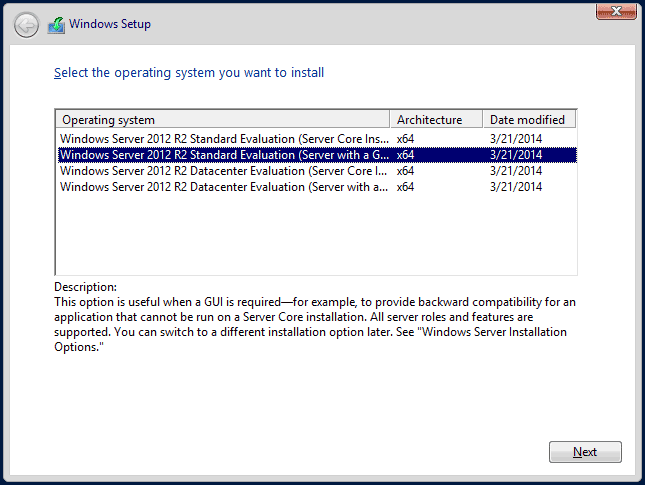
c)Select 2012 evalution Datacenter (Server with a GUI) and click Next. The Server Core installation includes a command prompt but not a graphical user interface (GUI).
d)Review the license terms, select the checkbox to accept the license terms, and click Next.

e) Select Custom: Install Windows only (advanced).

f) The 30 GB drive you created with the VM will be selected as Drive 0 Unallocated Space. Click Next.

g)The installation will begin .

h)When prompted, enter a password for the Administrator account in the Password and Retype password text boxes. Click Finish.

To log on Windows Server 2012R2, press the host key plus the Delete key to simulate the CTRL + ALT + DELETE key combination. The host key is the right-CTRL key by default.

Here we can see, “Windows Server 2012 ISO For Virtualbox”
Installing Windows Server 2012 as Virtual Server
I chose to have fun with the beta version of Windows Server 2012 and required such notes so that you might download and then install it all on your personal computer. These measures will significantly explain how you can put a virtual example of Windows Server 2012 onto a Windows 7 system.
Notice: Windows Server 8 has been renamed to Windows Server 2012 and edited to reflect the shift.
When these measures can allow you to set up and play with Windows Server 2012, they also allow you to play with virtualization; that’s a subject of growing significance for almost virtually any certificates.
Windows Server 2012 is another host operating system, and it is now in the beta phase. Microsoft has a background of server operating systems together using desktop computer systems to use the two qualities. Windows Server 2003 was paired using Windows XP, Windows Server 2008 was paired using Windows Vista, and Windows Server 2008 R2 was paired using Windows 7.
You may expect to visit Windows 8 go live later this season, likely in October. Windows Server 2012 will most likely be published within three weeks of Windows 8.
Virtual Box
Windows Server 2012 is a 64-bit functioning system. Sad to say, the Windows Virtual PC program that’s available as a free upgrade on Windows 7 won’t operate 64-bit functioning systems. An alternate is VirtualBox.
It is possible to find a complimentary copy of all VirtualBox here: https://www.virtualbox.org/wiki/Downloads.
After downloading it, then navigate to where you stored it, and then double-click it to begin the setup. You may take the defaults by clicking through every display.
Download ISO or VHD
You can download the Windows Server 2012 beta: http://technet.microsoft.com/en-us/evalcenter/hh670538.aspx. You will have the option of downloading the 64-bit ISO that’s a DVD picture or even a digital hard disk (VHD) picture. The 64-bit VHD picture will operate as a digital system onto a Windows Server 2008 R2 system utilizing Hyper-V, but it will not run on Windows Virtual PC.
But should you download the ISO DVD image, you may use it to set up the operating system on Virtual Box running inside Windows 7. It is a 3.3 GB file; it might take a while, depending on your relationship’s speed.
Install VirtualBox
Start VirtualBox by clicking Start, All Programs, Oracle VM VirtualBox, also picking Oracle VM VirtualBox. During the setup, you will be prompted many times to put in the device program. This computer program is necessary for various digital apparatus so ought to be set up. All these are signed along with the Publisher is recognized as Oracle Corporation. When the setup finishes, click Finish. VirtualBox will then begin.
Create a VM
It is possible to use these steps to make a virtual machine (VM) utilized for Windows Server 2012.
- Click on the New button in the menu bar. Review the data about the Welcome page and then click on Next.
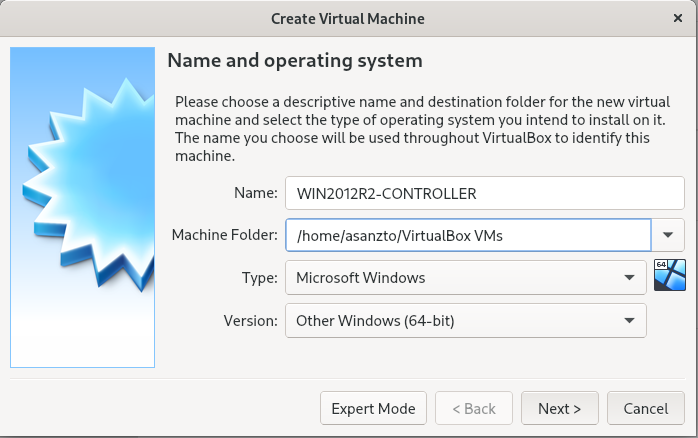
- Offer your VM a title like Windows Server 2012.
- About the OS Form, make sure Microsoft Windows is picking as the working system. Select Windows 8 (64-bit) since the Version. Click on Next.
- The default memory size is 1536. Change this to 2048 and click on Next.
- Accept the defaults on the Digital Hard Disk site. This makes a brand new 20 GB hard disk which may be employed to boot up (or begin ) that the VM. Click on Next.
- Accept the default option VDI (VirtualBox Disk Picture ) to your new virtual disk and then click on Next.
- Accept the default option of dynamically allocated to the virtual disk drive. Click on Next.
- On the Digital Disk File Location and Size webpage, alter the dimensions to 40 GB. When wanted, you can change the location by clicking on the folder and navigating to another site. Click on Next.
- On the Summary page, then click on Generate.
Following the VM is generated, Virtual Box will seem like the following picture. I’ve got both Windows 8 Consumer Preview and Windows Server 2012 (formerly called Windows Server  installed from the figure.
It is worthwhile saying the clear. Now, this VM is vacant. Though it’s called Windows Server 2012, it does not have Windows Server 2012 installed, however. This is comparable to you making a document in Word and also naming it “My Strategy for Success.” Just specifying the file does not include the contents.
Attach the ISO to the VM
If you were already installing this onto a computer, you would set the DVD into the drive and then boot it into the DVD. You simulate it by minding the ISO image to the digital CD/DVD drive. The following steps show this procedure.
- Make sure the Windows Server 2012 VM (Windows Server 2012 ISO For Virtualbox) is chosen and click on Settings.
- Select Storage. Click Empty under IDE Controller.
- From the Attributes section, click the CD icon on the best of CD/DVD Drive.
- Select Pick a digital CD/DVD.
- Navigate to where you stored your Windows DVD ISO file and then select it. Click on Open.
- The IDE Controller doesn’t more be recorded as Lively but instead has this ISO file title. It should appear like the following picture.
Installing Windows Server 2012
Now, you should have the following:
- VirtualBox installed
- A vacant VM made for Windows Server 2012
- An ISO image file for Windows Server 2012 Connected to the VM
It is possible to use these steps to set up Windows Server 2012.
- Pick the Windows Server 2012 VM (Windows Server 2012 ISO For Virtualbox) from VirtualBox and click on Start.
- Review the information on Vehicle Capture Keyboard along with the server key and click on OK. You will probably find one or more messages that are additional. Review them and click on OK.
- As soon as the Install screen appears, click Next. Click on Install Now.
- Select Server 2012 Beta Datacenter (Server using a GUI) and click on next. The Server Core setup involves a command prompt but not a graphic user interface (GUI).
- Review the permit terms, choose the checkbox to accept the license conditions, and click on Next.
- Select Custom: Install Windows just (sophisticated ).
- The 40 GB push you generated with all the VM will be chosen as Drive 0 Unallocated Space. Click on Next.
- The installation begins, and you will not have to do anything else for a short time. Today might be a fantastic time to have a rest.
- When prompted, enter a password to the Administrator account in the Password and Retype password boxes. As a test system, you might choose to use something you can readily recall, like P@ssw0rd. Click Finish.
To log in, press on the server key and the Delete key to mimic the CTRL + ALT + DELETE key combination. The server key is your right-CTRL key.
Navigation and Shutting Down
The Windows Key (usually found between CTRL and ALT in the left of the spacebar is a significant key for navigation, and also, you’ll be able to use it to toggle between both viewpoints.
Furthermore, there are lots of different Windows key combinations. One that you will want to consider to close off your system is Windows + I. This may create a screen like the following picture, and you can pick the power button to reboot or power down your system.
-
Home
-
News
- Windows Server 2012 R2 ISO Download for VMware, VirtualBox, etc.
By Vera | Follow |
Last Updated
If you need to install Windows Server 2012 R2, where do you download its ISO file? How to install Windows Server 2012 with the ISO file on VMware, VirtualBox, or your computer? Read this post and MiniTool Solution gives you a simple guide, just follow the wizard below.
Windows Server 2012 R2 was released as codename “Windows Server 8.1”. That is, Server 2012 is the Windows 8.1 derived server operating system that can receive official support from Microsoft. It was the successor of Windows Server 2008. Windows Server 2012 R2 now is still available and the support of this system will end on October 10, 2023.
If you need to install Server 2012 R2, you can download its ISO file and burn it to a USB drive for the installation on your PC or directly use the ISO file to install it on VirtualBox or VMware. Go to know what you should do.
Windows Server 2012 R2 ISO Download Free
Attention: Currently, you cannot free download Windows Server 2012 R2 ISO file from Microsoft’s website since this company has deleted the download page from its official page. Although you search for “Microsoft Windows Server 2012 ISO” in Google Chrome, you can see the title called Try Windows Server 2012 R2 on Microsoft Evaluation Center from Microsoft. But when you click the given link, it brings you to another webpage.
How do you get Windows Server 2012 R2? You can download an ISO from some third-party websites. Just search for “Windows Server 2012 R2 ISO download iso 64 bit”, “Windows Server 2012 R2 ISO standard download”, “Windows Server 2012 R2 ISO download free”, and more in Google Chrome. You can find many pages to download the ISO file.
After free downloading the ISO file, you can install Server 2012 R2.
How to Install Windows Server 2012 R2
To install this operating system on your computer, you should make sure the machine meets the minimum system requirements:
- CPU: 1.4 GHz 64-bit processor
- RAM: 512 MB
- Disk Space: 32 GB
- Gigabit (10/100/1000baseT) Ethernet adapter
If you install Server 2012 on VMware or VirtualBox, ignore these requirements.
Tips:
Before installing Windows Server 2012 R2 on your computer, remember to back up your PC with MiniTool ShadowMaker, a professional server backup software.
MiniTool ShadowMaker TrialClick to Download100%Clean & Safe
Next, download Rufus and burn the Windows Server 2012 R2 ISO file you have downloaded to a USB flash drive to get a bootable drive. Then, boot the PC from that drive for a clean install. After choosing a language and keyboard format, click Install now to continue. Then, follow the on-screen to start the installation.
During the process, you can choose an edition of this server operating system. Based on the ISO file you download, you may not see the following interface.
If you need to install Server 2012 on VMware or VirtualBox, click New Virtual Machine or New to start the setup. There are two related posts for you:
- Step-by-Step Guide: How to Setup a Virtual Machine
- VMware Vs VirtualBox, Which Is Better For You
Final Words
It is easy to download Windows Server 2012 R2 ISO and install it on your computer or virtual machine. Just get its ISO file and follow the given instructions to finish the installation.
About The Author

Position: Columnist
Vera is an editor of the MiniTool Team since 2016 who has more than 7 years’ writing experiences in the field of technical articles. Her articles mainly focus on disk & partition management, PC data recovery, video conversion, as well as PC backup & restore, helping users to solve some errors and issues when using their computers. In her spare times, she likes shopping, playing games and reading some articles.
We are going to install Windows 2012R2 Standard Edition in VirtualBox as part of creating a Oracle Windows Cluster.
We want to have 3 server: 1 Controller + 2 Database servers:
| Server Name | Public IP: | Private IP: |
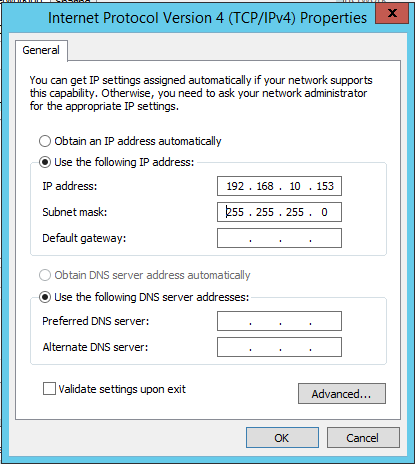
| win-rac1 | 192.168.56.151 | 192.168.10.151 |
| win-rac2 | 192.168.56.152 | 192.168.10.152 |
| win-rac-control | 192.168.56.153 | 192.168.10.153 |
Here the steps to create WIN-RAC-CONTROL (the controller) on VirtualBox. They are exactly the same for all 3 servers and you only need to change hostnames and IP’s.
You can clone the first VM and recreate the other 2, but you might have problems down the line at Network level saying same MAC is in different servers, so I decided to create all 3 individually.
**Disclaimer: You will need licence and Windows activated, if not, you are running the risk of VM’s crashing every 5-10min.
STEPS:
1:- New:
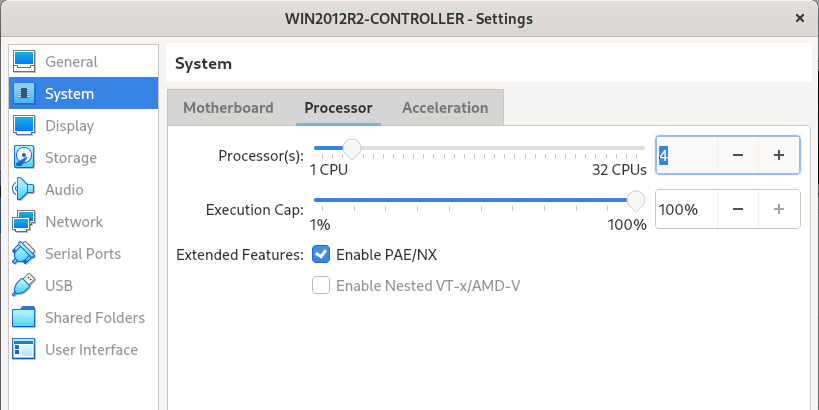
2:- Memory Size (20G for this test)
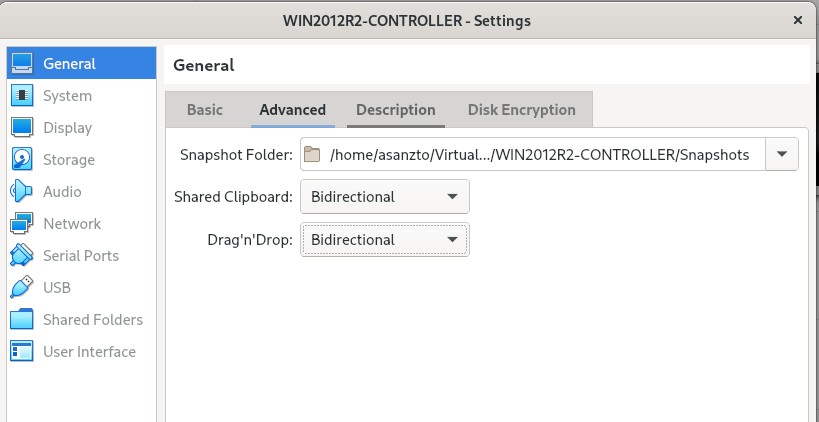
4:- Settings -> General:
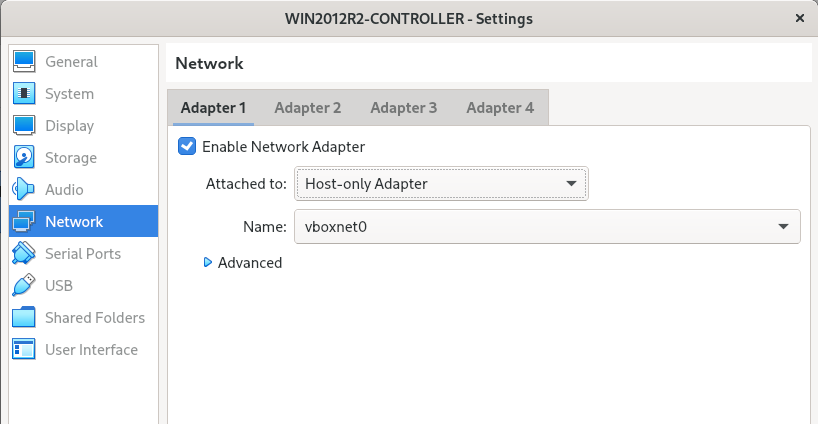
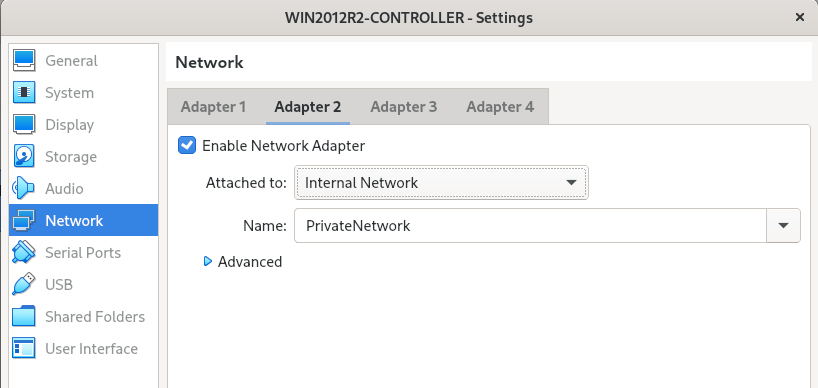
5:- Settings -> Network:
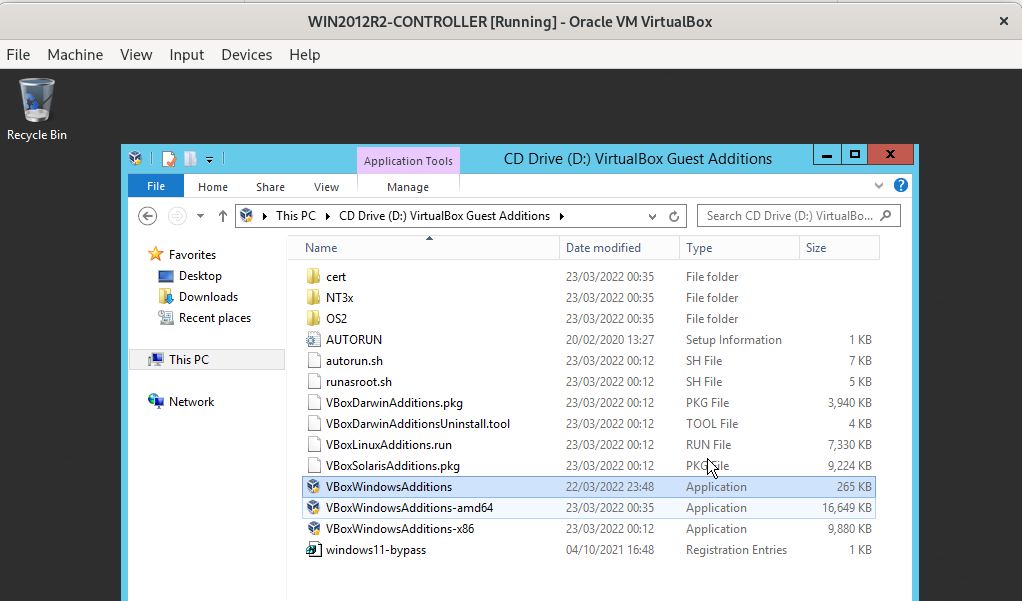
6:- Once Installed, Install Guest Additions:
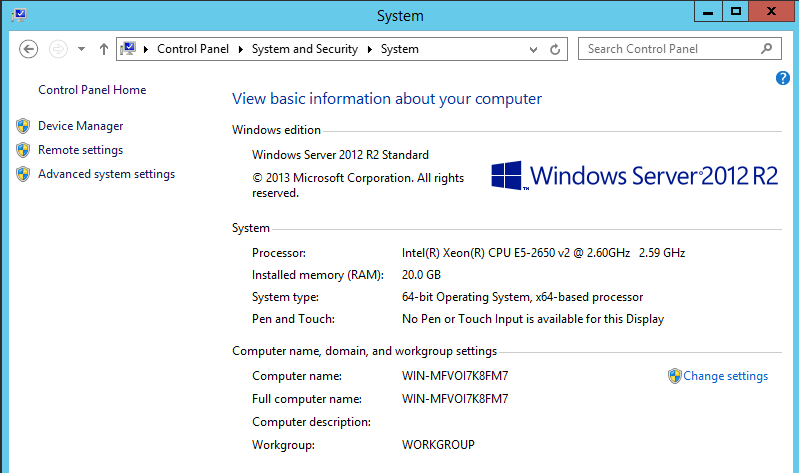
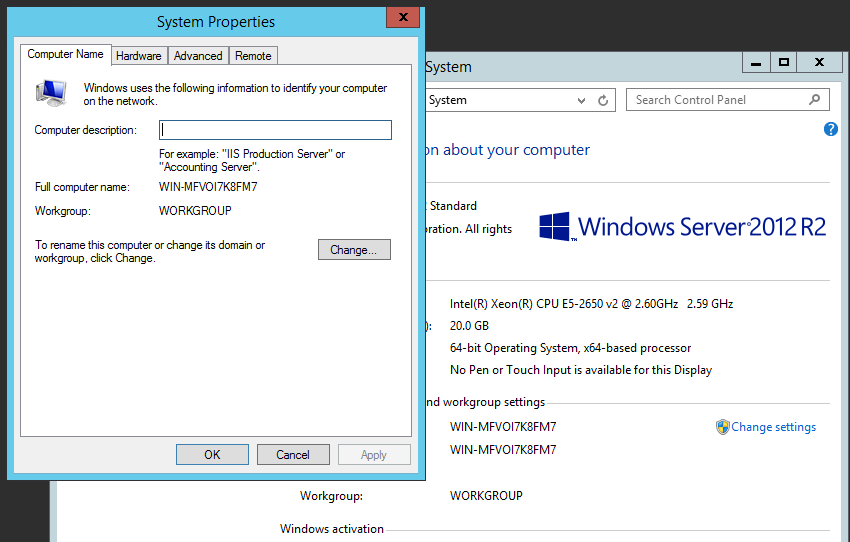
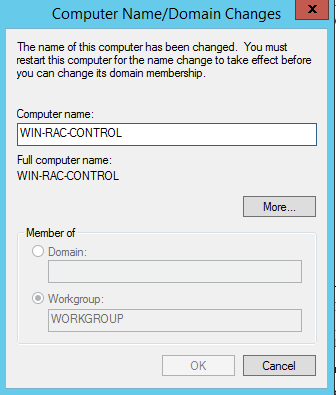
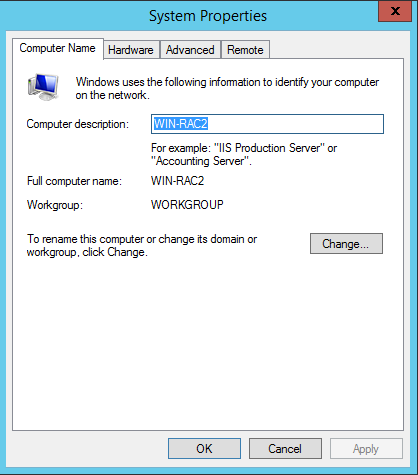
7:- Change Host Name: (Control Panel -> System and Security -> System -> Change Settings)
8:- Set PUBLIC IP ( Control Panel->Network and Internet->Network Connections -> First Interface)

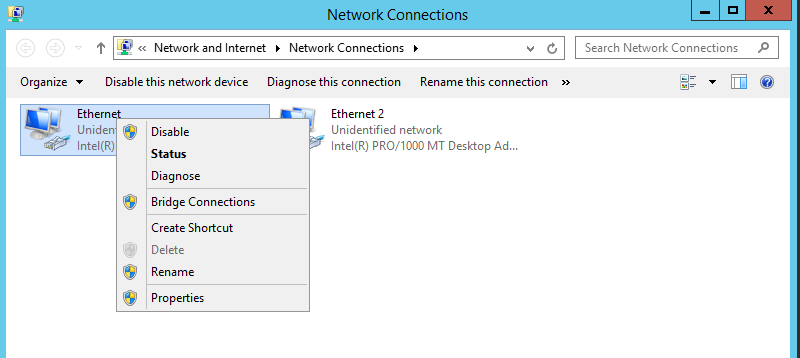
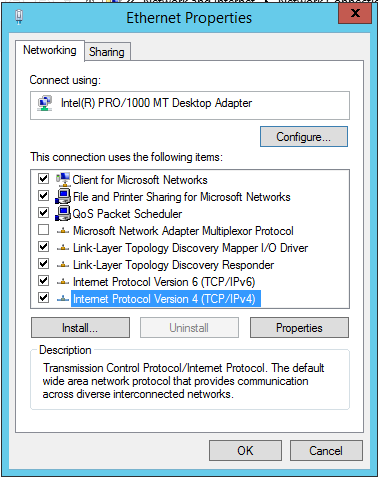
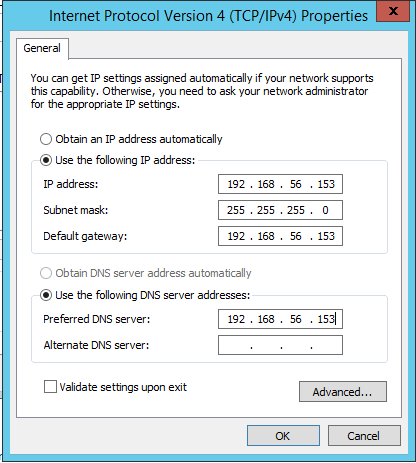
9:- Set PUBLIC IP ( Control Panel->Network and Internet->Network Connections -> Second Interface)
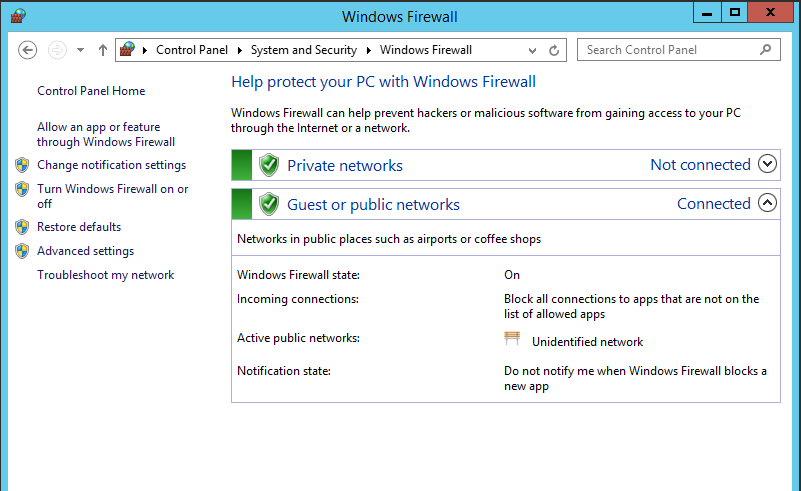
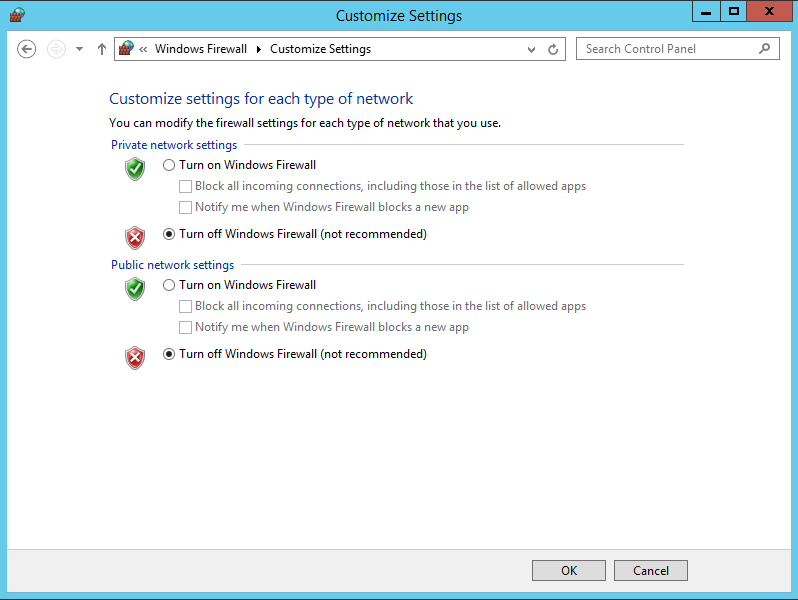
10:- Turn OFF Firewall:
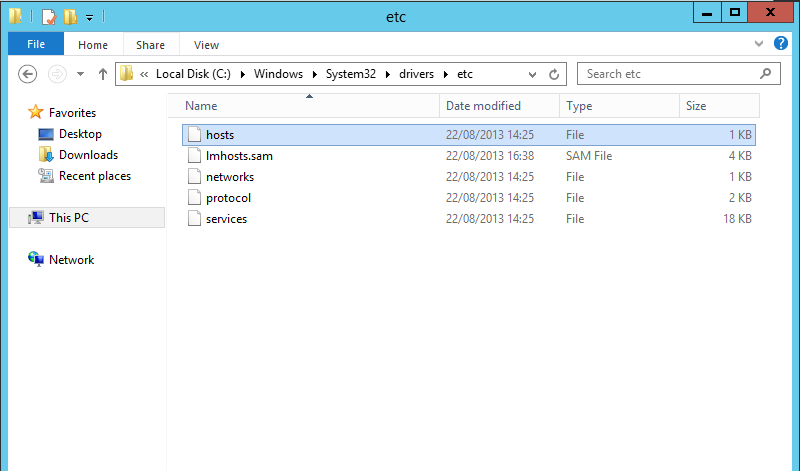
11:- Update host file with the following:
# Public
192.168.56.151   win-rac1.localdomain          			win-rac1
192.168.56.152   win-rac2.localdomain          			win-rac2
192.168.56.153   win-rac-control.localdomain   	    	win-rac-control
192.168.56.153   TESTLAB.localdomain   	    			TESTLAB  <<-- we will need it later
192.168.53.161   ACCESSPOINT                            <<---- We will need this later to create an ACTIVE/PASSICE
# Private
192.168.10.151   win-rac1-priv.localdomain     			win-rac1-priv
192.168.10.152   win-rac2-priv.localdomain     			win-rac2-priv
192.168.10.153   win-rac-control-priv.localdomain       win-rac-control-priv
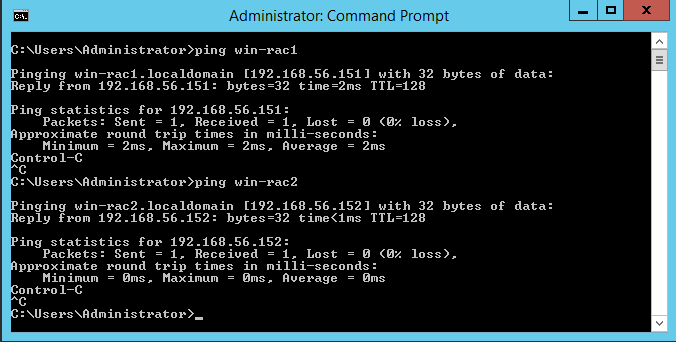
12:- PING all hosts, public and private interfaces (once created):
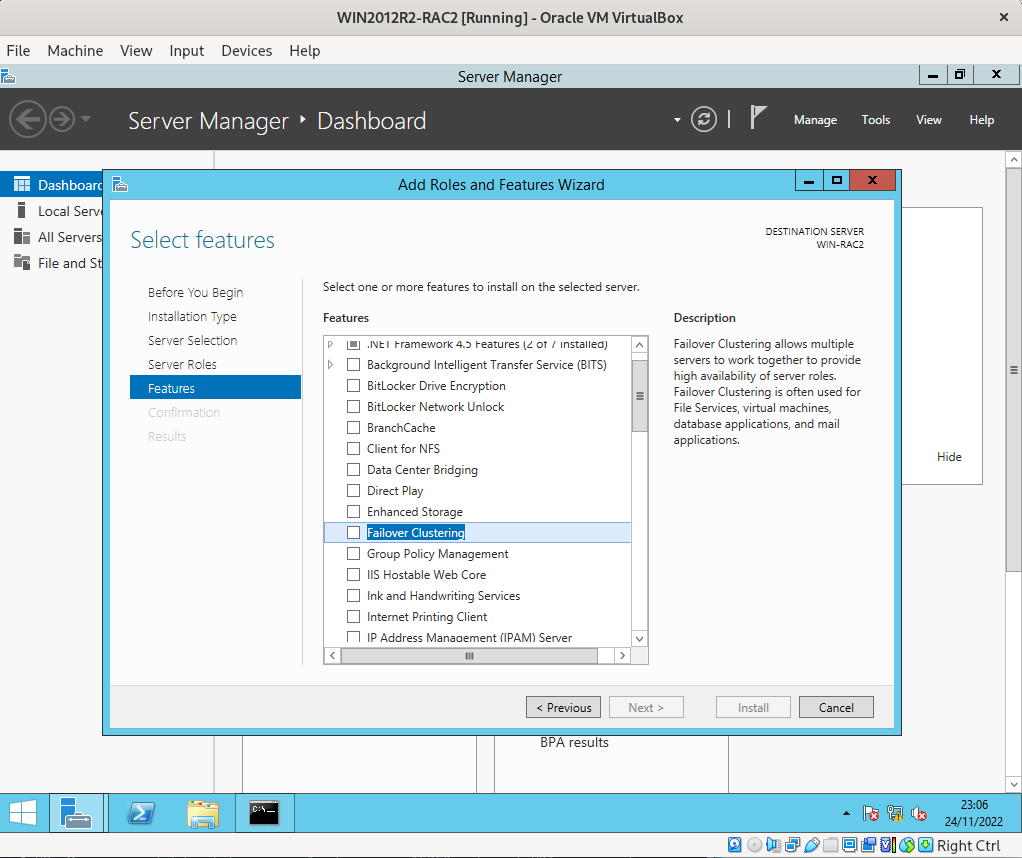
13:- Install Failover Clustering (Server Manager -> Manage -> Add Roles and Features)
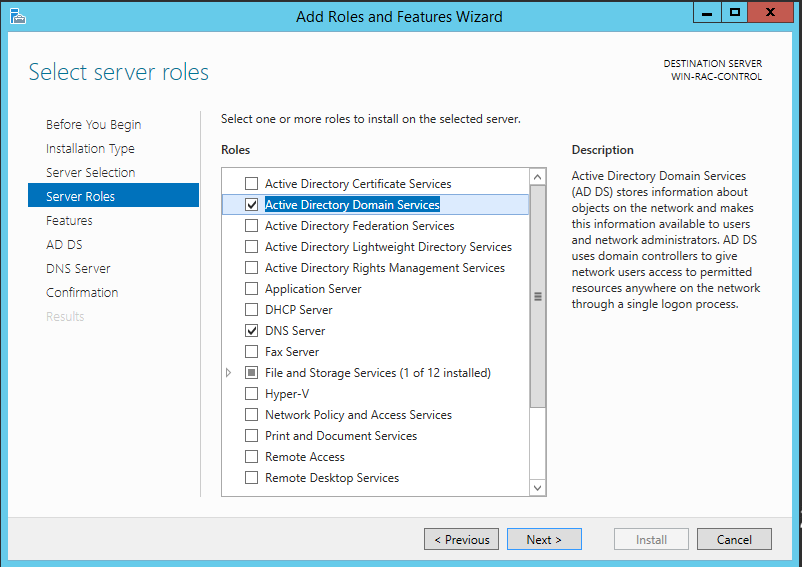
14:- ONLY on CONTROLLER Server: Install Active Directory (Server Manager -> Manage -> Add Roles and Features):
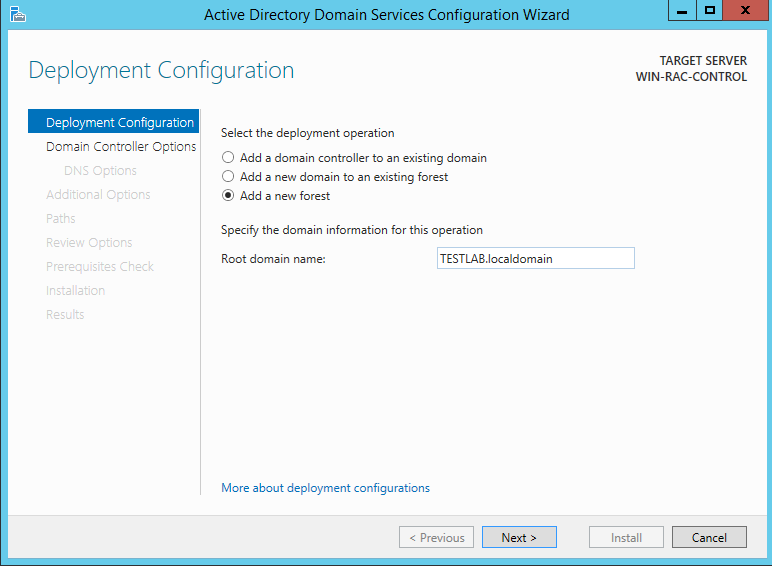
15:- Configure Active Directory:
Deployment Configuration -> Add a new forest -> enter domain name -> Next
Enter password for Directory Services Restore Mode(DSRM) in password field
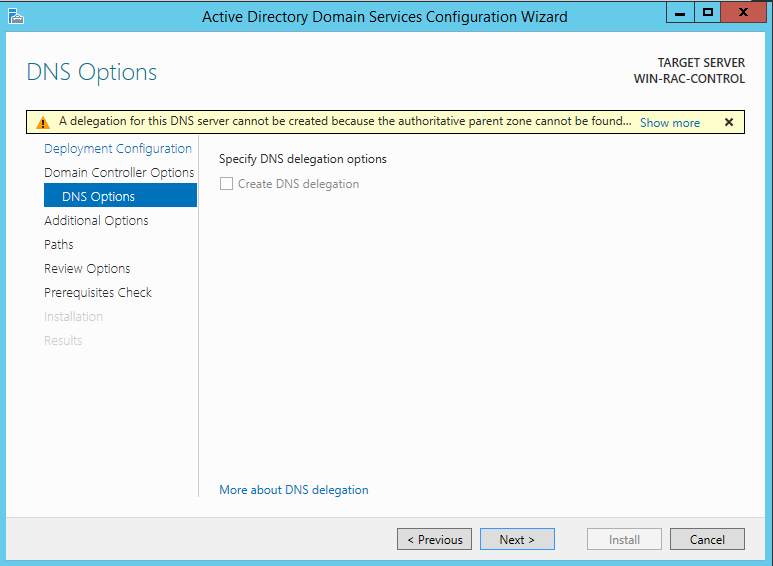
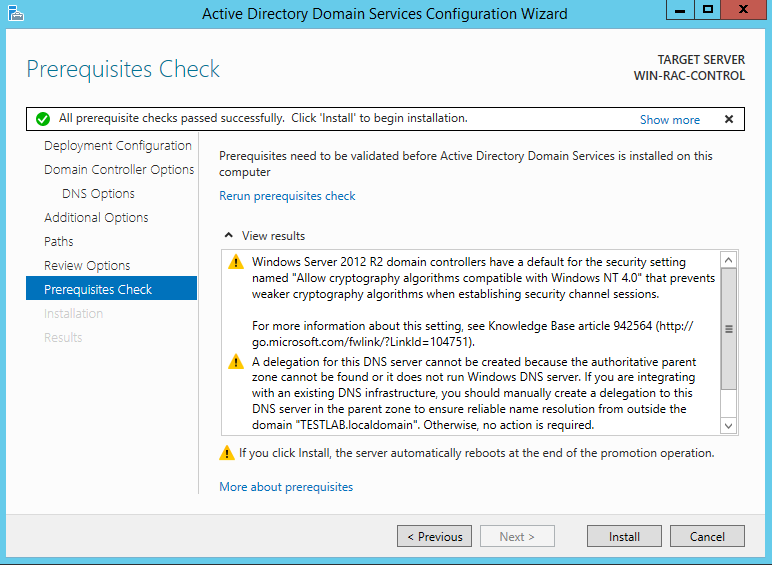
On DNS Options -> Next (ignroe warning)
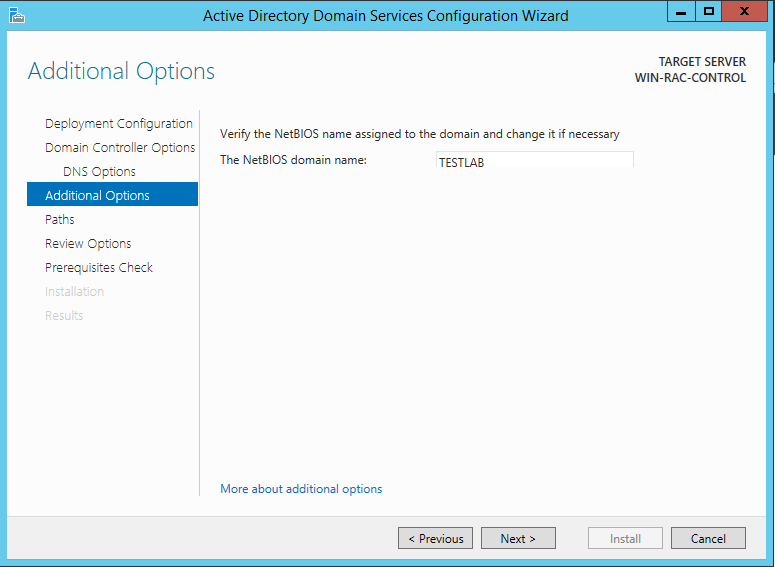
Additional Options
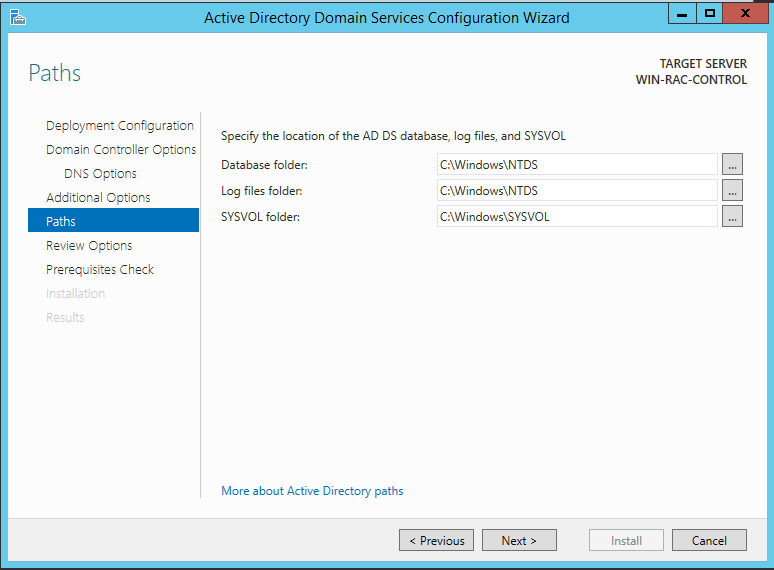
Paths -> Next
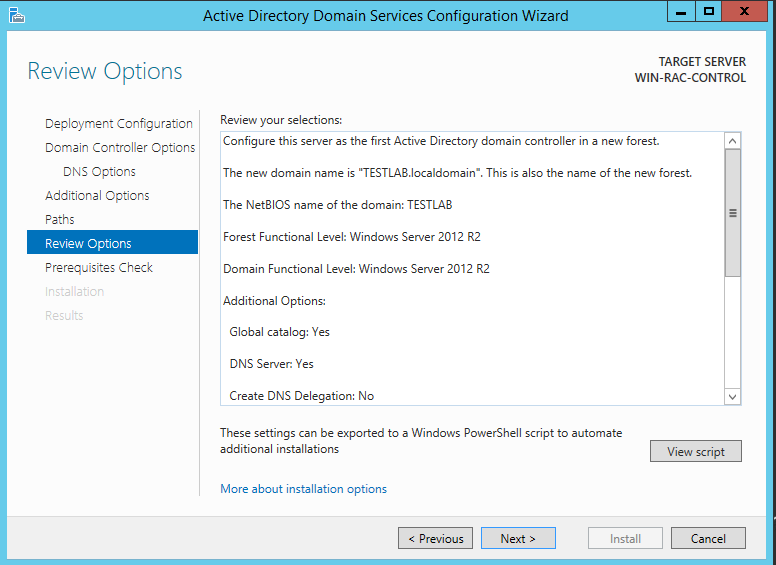
Review Options -> Next
Prerequisites Checks -> Install
Once Install finishes, it will automatically reboot the server
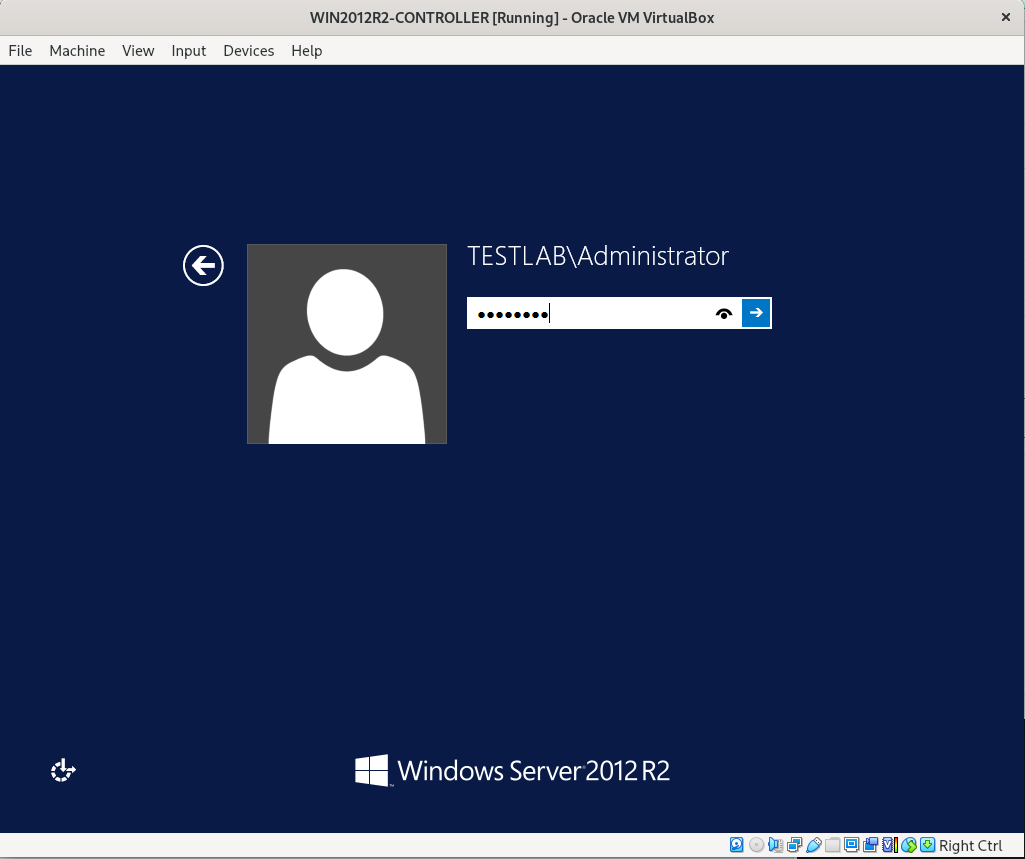
Log in to the server using domain admin credentials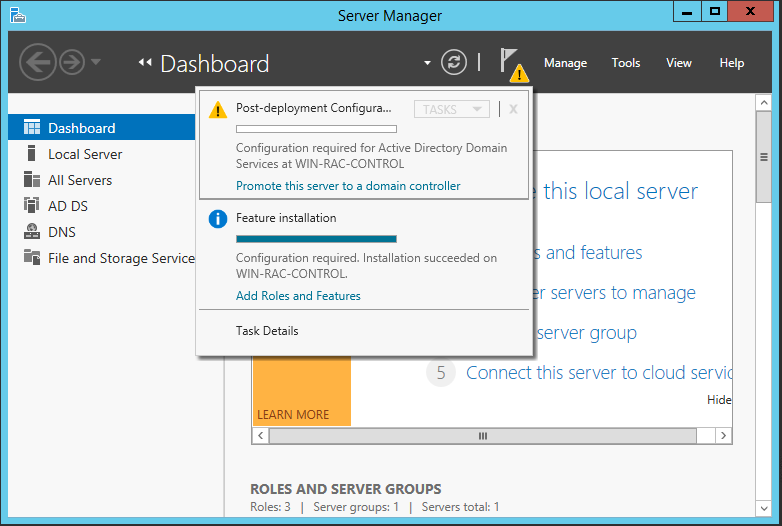
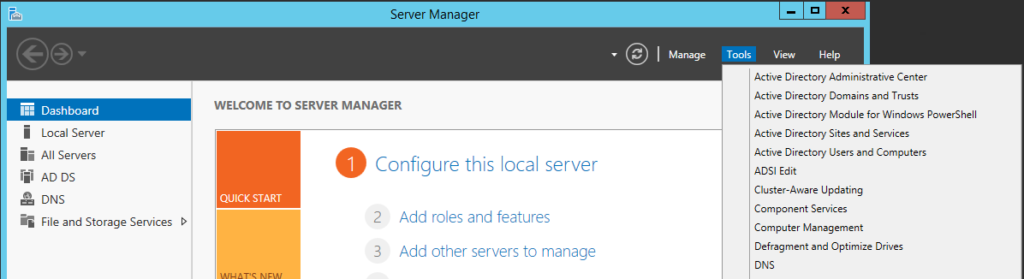
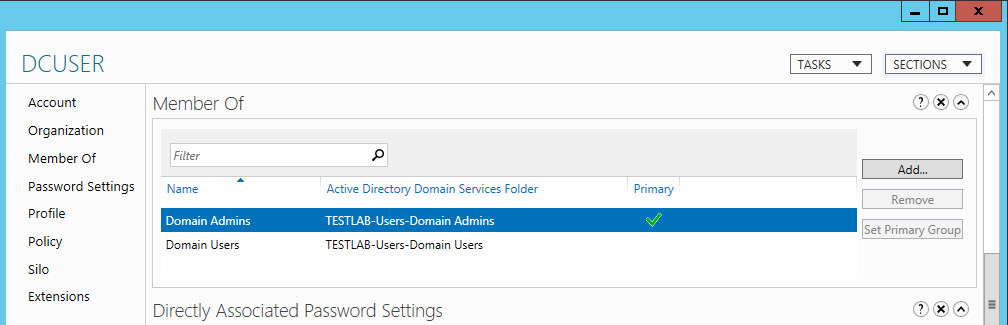
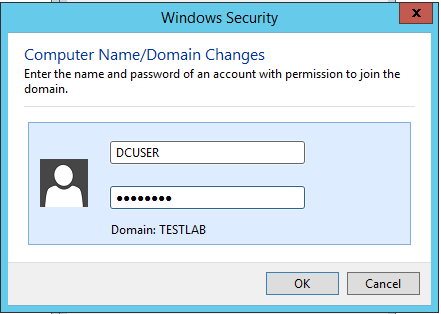
16:- Create a Domain Account (Server Manager -> Tools -> AD Administrative Center)
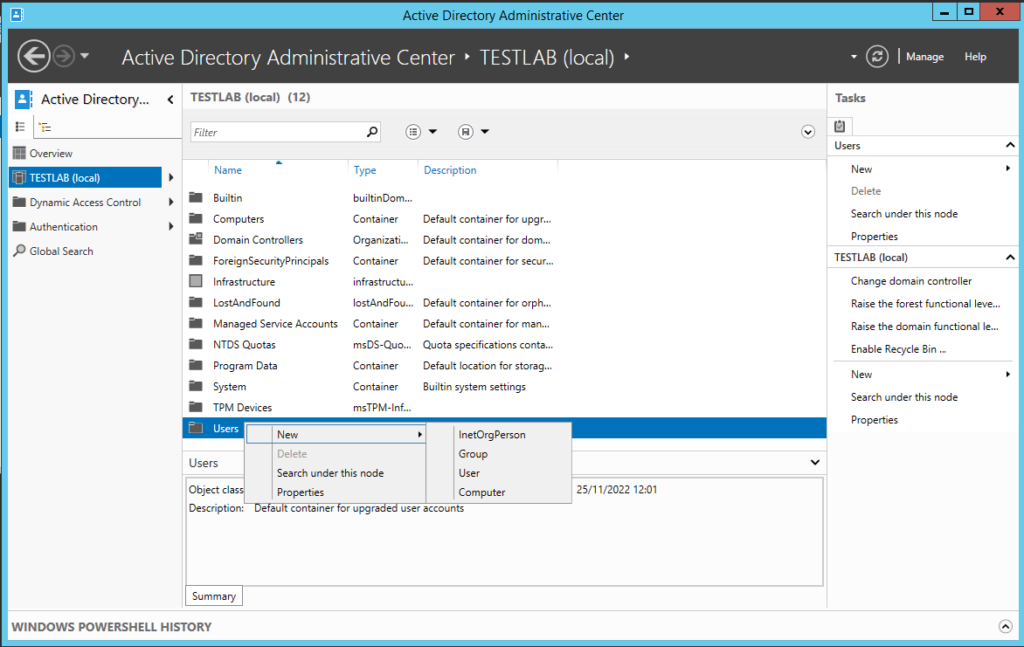
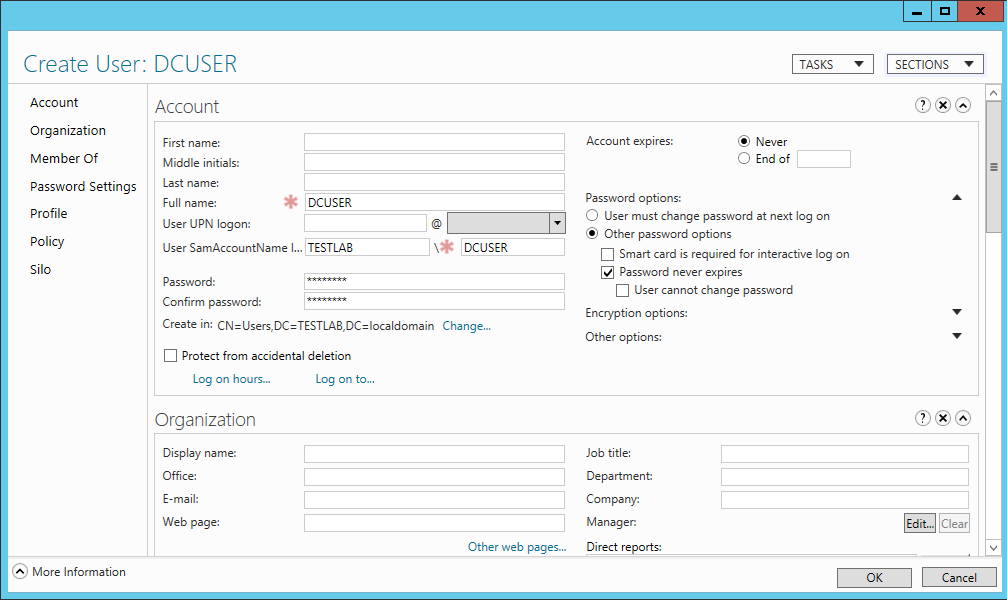
17:- Add DCUSER to the “Domain Admins”:
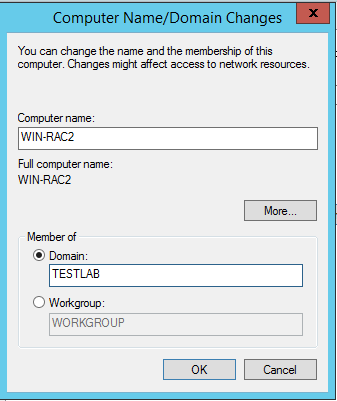
18:- Connect other servers to domain TESTLAB (in case WIN-RAC1 and WIN-RAC2)
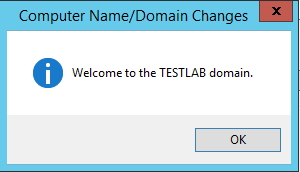
That’s it! Example of installing Windows 2012R2 and connect to a domain done!
Post Views:
973
In This Topic Trainee Will Learn How to Install Windows Server 2012
This tutorial will disclose how to introduce Windows Server 2012 R2 in a virtual machine.
First, you need to have Windows Server 2012 R2 ISO file and VirtualBox installed.
Make a new virtual machine on VirtualBox by clicking on New. Select the type and form of the virtual machine. For this situation, Windows 2012 (64-bits).

Create a new virtual machine
Set the amount of memory (RAM). I selected the 4096 MB (4 GB).

Set the amount of memory
Create the virtual hard disk and set its size. I selected 40 GB.

Create a virtual hard disk

Set the virtual hard disk size
When starting the virtual machine, you will be asked to select the ISO file. Select the Windows Server 2012 R2 ISO file.

Select the virtual optical disk file
The installation wizard will have been started. Select your language, time and keyboard input. Then, start the installation.

Windows setup

Install Windows Server 2012 R2
Select the type of installation. In this case, Custom: Install Windows only (advanced). Hence, choose the partition to install windows and wait to finish the installation.

Type of installation

Partition for Windows Server

Installing Windows Server 2012 R2
When finishing the installation, the virtual machine will be restarted. Then, type the administrator password and Windows Server 2012 R2 will be ready.

Administrator password

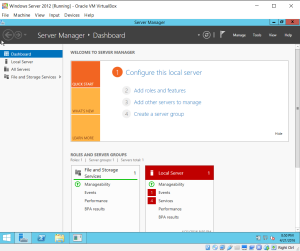
Windows Server 2012 R2
Thanks for reading! We hope you found this tutorial helpful and we would love to hear your feedback in the Comments section below. And show us what you’ve learned by sharing your photos and creative projects with us.
Microsoft Windows Server 2019