Learn to turn on this protocol on all Windows editions
- TSL 1.2 is the immediate past internet security protocol, with the latest one being version 1.3.
- The security layer provides security and efficiency for client-server communications and data transfer.
- You can enable and check for the presence of the protocol on your computer and server in different ways.
Transport Layer Security (TLS 1.2), also known as Transport Layer Security, is an encryption protocol designed to keep users’ data safe when the data is transferred over a network. The TLS 1.2 protocol is similar to the SSL (Secure Sockets Layer).
Transport Layer Security (TLS 1.2) is mainly used by client-server applications to share data and information across a network without security breaches or information leaks.
It functions to provide confidentiality, authenticity, and integrity by employing certificates between the computer applications sharing information.
How can I check if TLS 1.2 is enabled?
Transport Layer Security was introduced in 1999 as an Internet Engineering Task Force and has since evolved, with TLS 1.2 introduced in 2008.
Transport Layer Security has two levels of operation: the TLS handshake protocol and the TLS record, and the TLS operates in the application layer.
TLS 1.2 is more than just an upgrade; it is an essential step to ensuring safe data sharing. Older versions of the Transport Layer Security have become susceptible to attacks and security breaches easily avoidable with TLS 1.2.
Ensure that the TLS version is updated to TLS 1.2. and TLS 1.2. is enabled on your system to protect your data.
TSL 1.2 and 1.3 are enabled by default on Windows 11. You can also read this piece to learn more about how the protocol works.
How we test, review and rate?
We have worked for the past 6 months on building a new review system on how we produce content. Using it, we have subsequently redone most of our articles to provide actual hands-on expertise on the guides we made.
For more details you can read how we test, review, and rate at WindowsReport.
The quickest way to check whether TLS 1.2 is enabled on your computer is to search for the presence of the registry key. HKEY_LOCAL_MACHINE\SYSTEM\CurrentControlSet\Control\SecurityProviders\SCHANNEL\Protocols\TLS 1.2\Client\EnabledAnd its corresponding value, 1.
What is the command to check the TLS version in Windows?
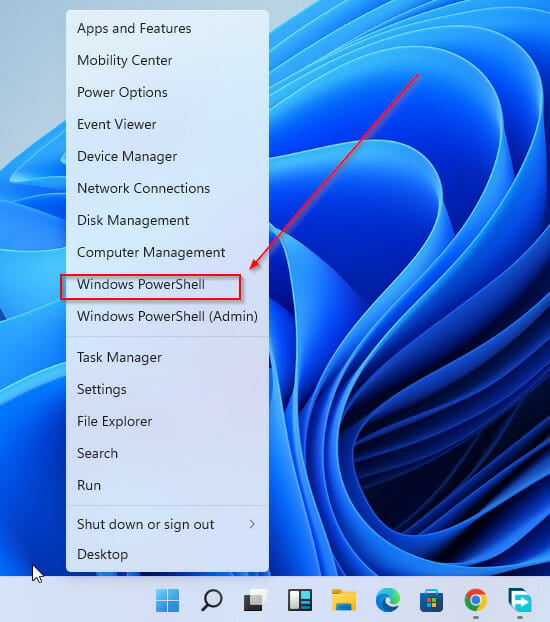
- Press Windows + X.
- Select Windows Powershell.

- Enter the following command:
Get-TlsCipherSuite.
- Press Enter. Y

You can check the version of TLS 1.2 in Windows using the command: openssl s_client -connect www.google.com:443 -tls1_2. You’ll be able to tell whether the version is supported if you get the certificate chain and handshake. Otherwise, you will get the handshake error message.
How do you check which TSL protocol is being used?
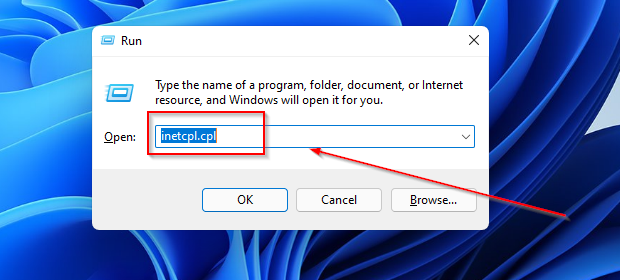
- Press Windows + R.

- Press Enter.
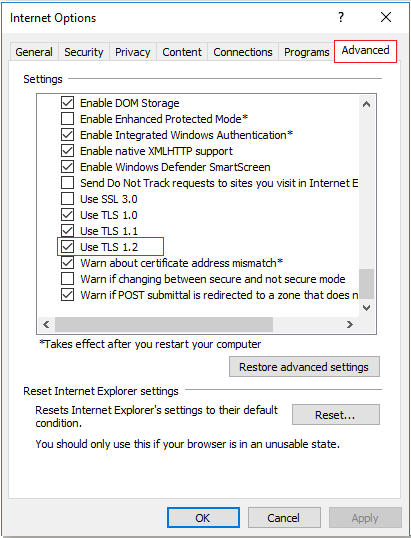
- In the Internet Properties window, click on the Advanced tab.

- Scroll to the bottom of the page and check which TLS protocol is reviewed.

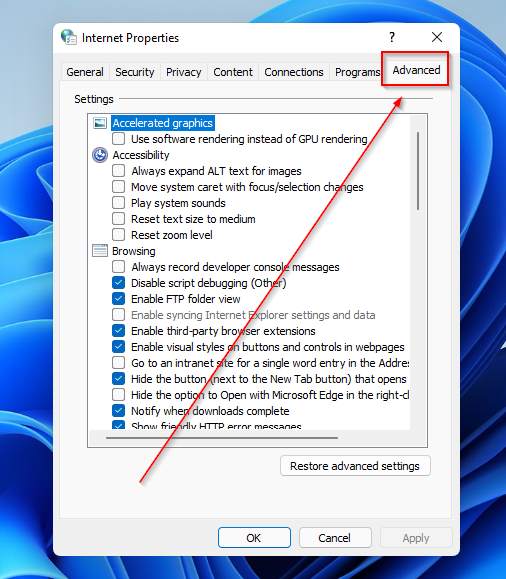
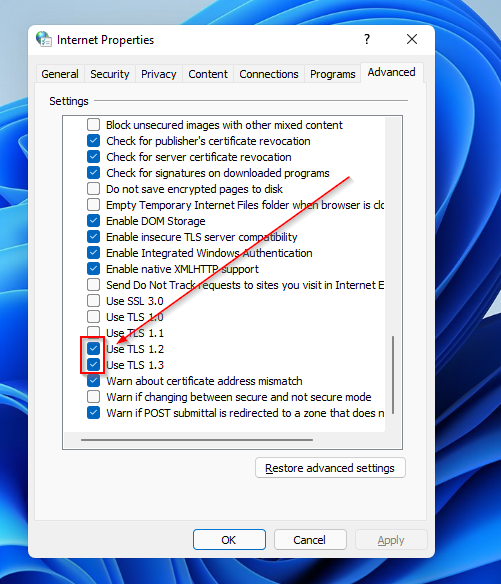
There are different TLS protocols, with the latest being 1.3. You can view the currently used ones by noting which ones have checked boxes.
How do I enable TLS 1.2 on Windows?
- Enable TLS 1.2 on Windows 11
- Enable TLS 1.2 on Windows 10
- Enable TLS 1.2 on Windows 7
- Enable TLS 1.2 on Windows Server 2019
- Enable TLS 1.2 on Windows Server 2016
- Enable TLS 1.2 on Windows Server 2012 R2
1. Enable TLS 1.2 on Windows 11
- Click on Windows + R.
- Press Enter.
- In the Internet Properties window, click on the Advanced tab.
- Scroll down and check for the TSL protocol in use
- Select Apply.
- Close the browser window and relaunch your Google Chrome browser.

2. Enable TLS 1.2 on Windows 10
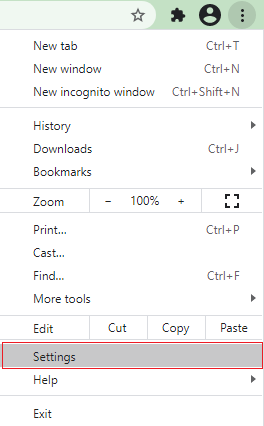
1. Open Google Chrome.
2. Press the Alt + F keys.
3. Click on Settings.
4. Go to Advanced.
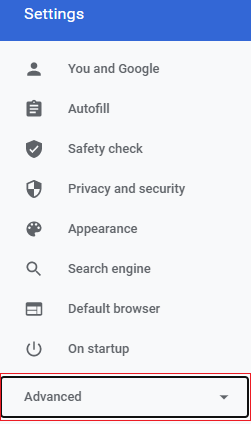
5. Scroll down and select System.
6. Click on Open your computer’s proxy settings.
7. Press on Internet options and select Advanced.
8. Scroll down and click on security and tick the use TLS 1.2box.
9. Click OK.
10. Close the browser window and relaunch the browser.
On Windows 10, TLS 1.2 can be easily enabled via Internet Options, directly from the Google Chrome browser. The settings will take effect as soon as you restart your PC.
3. Enable TLS 1.2 on Windows 7
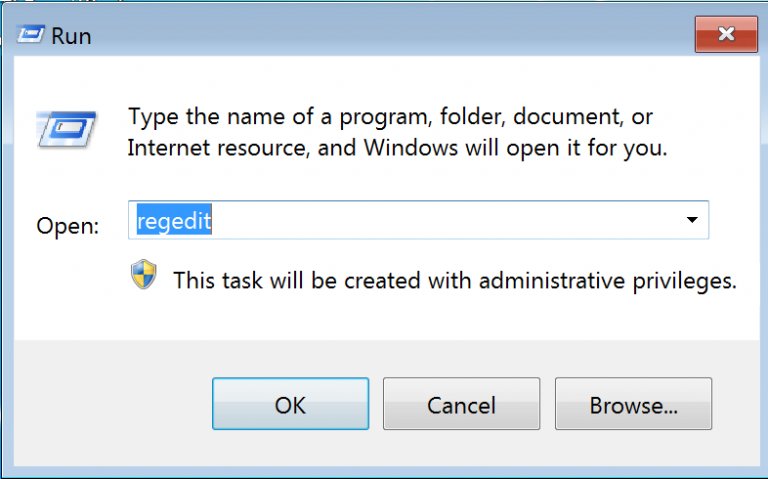
- Go to the status bar, and click on the Windows button. Click on Run.
- Type Regedit on the run page.

- Click OK to access the Registry editor.
- Clicking the OK button will give you access to Windows options
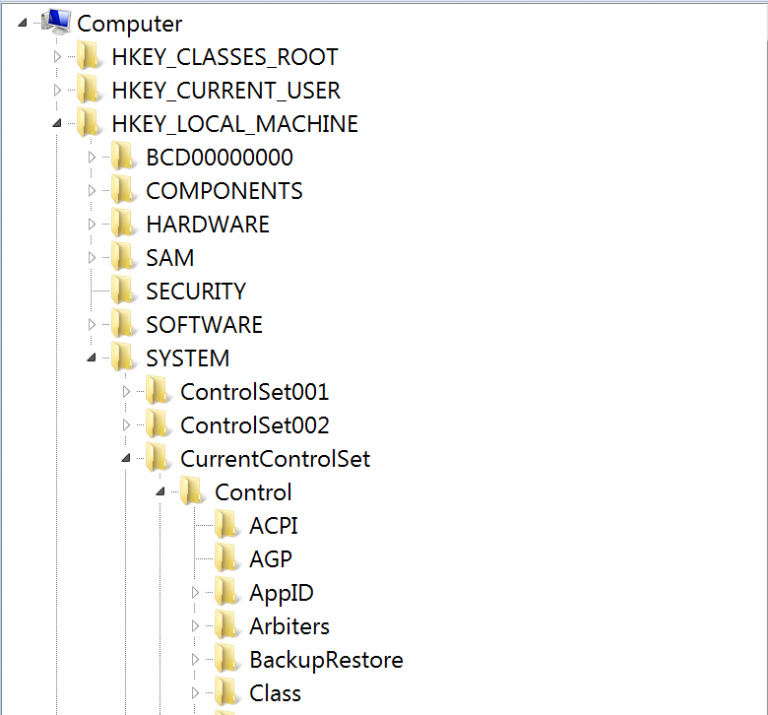
- For Windows 7, enter this registry key:
HKEY_LOCAL_MACHINE\SYSTEM\CurrentControlSet\Control\SecurityProviders\SCHANNEL\Protocols.
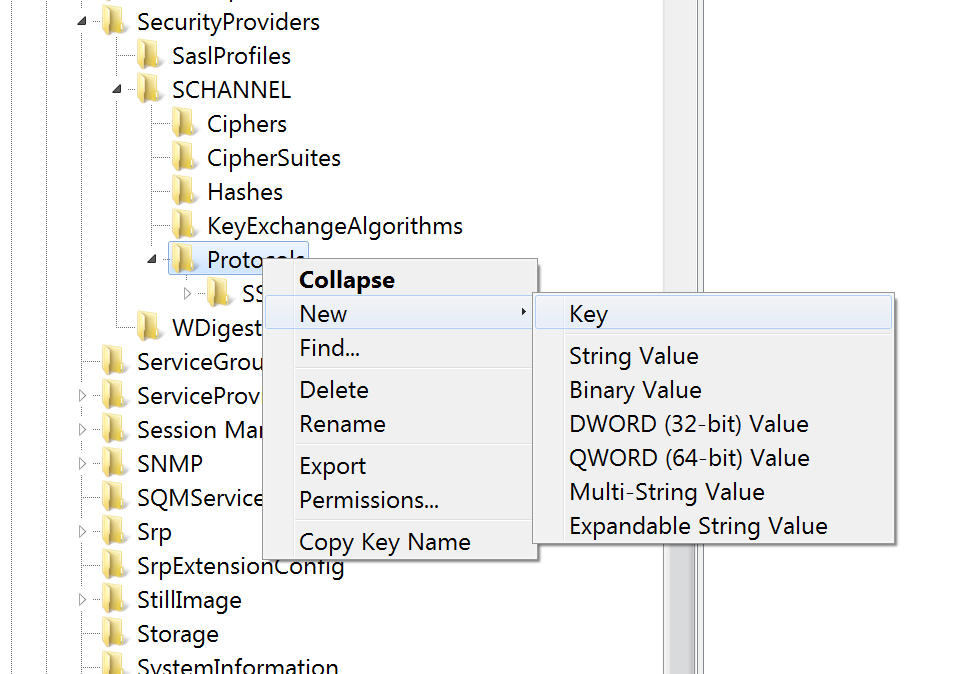
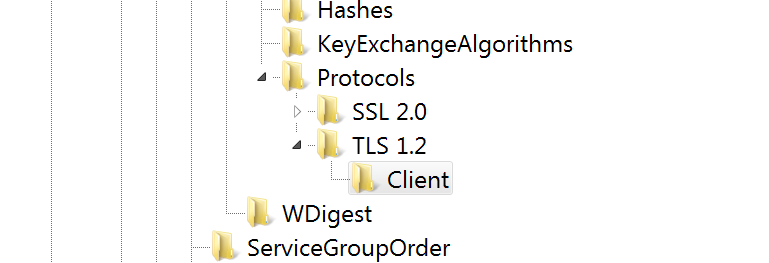
- Click the Protocols folder, click on New and select Key from the drop-down menu.

- Once you complete step 5, a new folder named New Key #1 will be created.
- Rename the folder as TLS 1.2.
- Right-click the TLS 1.2 tab, and click on New.
- Select Key from the drop-down menu.
- Once step 7 is complete, a new folder will be created named New Key #1.
- Rename the folder as Client.

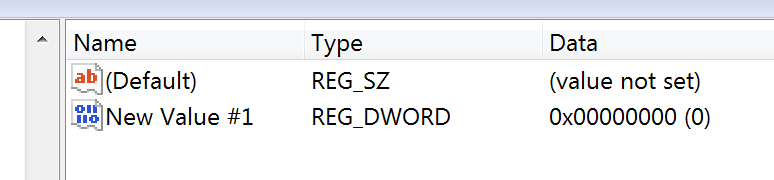
- Right-click the Client Key, click on New, and select DWORD (32-bit) Value from the drop-down list.
- Click on DWORD (32-bit) Value and a new file named “New Value #1”. Change the name to Disabledbydefault.

- Once all the steps have been completed, reboot your system to activate the changes.
4. Enable TLS 1.2 on Windows Server 2019
- Press the Windows+ R buttons to access Regedit.
- Press Enter.
- Navigate to
Computer\HKEY_LOCAL_MACHINE\SYSTEM\CurrentControlSet\Control\SecurityProviders\SCHANNEL\ - Right-click the right pane, and click on New.
- Select Key.
- Name the new key TLS 1.2 and click on it.
- Click on New.
- Create a new key called Client.
- Right-click the client key and click on New.
- Select DWORD (32-bit) Value.
- Name the new file DWORD DisabledByDefault.
- Double-click it to open its properties
- Make sure the base is hexadecimal and the value is zero.
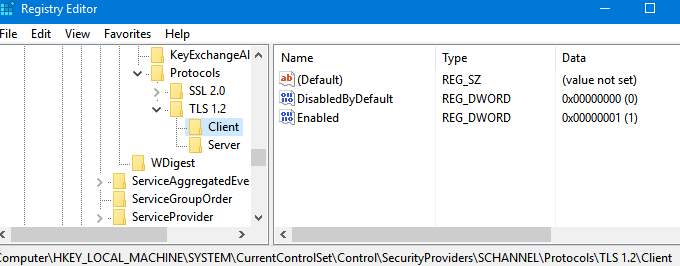
- Create another new DWORD file and name it Enabled.
- Double-click it to ensure that the base is hexadecimal and the value is one.
- Repeat the same steps for the server key using the exact words: DWORDS and Values.
- Close the registry.
- Restart the system.
5. Enable TLS 1.2 on Windows Server 2016
- First, open the Windows Start menu.
- Type Regedit in the search bar to open it.
- Make sure you backup your current registry before making any changes.
- In the registry, go to
Computer\HKEY_LOCAL_MACHINE\SYSTEM\CurrentControlSet\Control\SecurityProviders\SCHANNEL\Protocols
- Right-click the empty right pane and click on New.
- Select Key.
- Name the new key TLS 1.2
- Right-click the empty right pane again and create two new keys named Client and Server.
- Select the Client key, click New, and select the DWORD (32-bit) value.
- Click the DWORD and rename it to DisabledByDefault.
- Right-click it, modify the base to hexadecimal and set the value to zero.
- Create another DWORD and name it enabled.
- Modify the base to hexadecimal and set the value to one.
- Repeat the same steps for the Server Key and create DWORDS with the same values.
- Close the registry and reboot your server.
6. Enable TLS 1.2 on Windows Server 2012 R2
- Launch the regedit.exe program.
- Enter the path:
HKEY_LOCAL_MACHINE\SOFTWARE\Microsoft\.NETFramework\v2.0.50727. - Create a new entry named SystemDefaultTlsVersions.
- Set the DWORD value to one.
- Create another entry named SchUseStrongCrypto and set the DWORD value to one.
- Go to the path:
HKEY_LOCAL_MACHINE\SOFTWARE\Microsoft\.NETFramework\v4.0.30319. - Create an entry and name it SystemDefaultTlsVersions.
- Set the DWORD value to one.
- Make the same changes to the 64 bits OS location:
HKEY_LOCAL_MACHINE\SOFTWARE\Wow6432Node\Microsoft\.NETFramework\v2.0.50727. - Please create a new entry, and name it SystemDefaultTlsVersions.
- Set the DWORD value to one.
- Create another entry and name it SchUseStrongCrypto with the DWORD value set to one.
- Go to
HKEY_LOCAL_MACHINE\SOFTWARE\Wow6432Node\Microsoft\.NETFramework\v4.0.30319. - Perform the same modifications as the earlier locations.
For more information about how to enable TLS on Windows Server, check out our dedicated article.
- How to Type Accents on Windows 11
- How to Disable the Insert Your Security Key Into the USB Port popup
- DTS Sound Unbound for Windows 11: Download & Install
- Fix: EXCEPTION_ILLEGAL_INSTRUCTION Error on Windows 11
- Delayed Write Failed Error on Windows 11: How to Fix it
How can I upgrade from TLS 1.0 to TLS 1.2
- Search for Server from the top menu bar.
- From the list of options, select the server of your choice.
- Go to Server Management and select settings and packages.
- Click on the advanced tab and scroll down to the Nginx box.
- The TLS Versions will display a list of selected versions. Click on edit to make changes.
- Select your desired protocol depending on the requirements and click save changes.
Older TSL versions are less secure than the latest ones. So you can also read more about disabling the TSL 1.0 protocol. If your device runs the latest Windows version, version 1.3 will be present.
Sometimes, Windows 11 users can experience TSL errors. Our guide provides a comprehensive solution.
As earlier emphasized, TSL 1.3 is automatically enabled on modern Preview builds of Windows. As far as internet security deployment protocols go, TSL 1.3 is the standard. Its secure protocols are made in such a way as to facilitate endpoint-to-endpoint data transfer. That is, it provides an additional security layer for client-server communications.
The new protocol addresses most of the failings of previous versions, making cryptographic algorithms obsolete. As a result, the handshake protocol (client authentication) is greatly encrypted and enhanced.
In addition, TSL 1.3 sees a marked improvement in privacy. The implication is that the network’s visibility of your user details and information is severely limited.
Having made it this far in this article, you’re sure to have found multiple solutions to enabling the TSL 1.2 protocol on your computer. If you’ve found this article interesting and valuable, please share your experience in the comments below.
![]()
Please refer to the following steps to enable TLS 1.2 on Windows Server 2012.
1. At first, go to start and open the registry editor. Go to Start and Run. In the Run, type regedit and click on the OK button.

2. Back up the registry file. Click on File and then on Export. Select your location to save the registry file. It is always recommended to have the backup File of your registry file so that in case of an issue, you can import the File to make it as it was earlier.

3. Now, browse to the following registry key.
HKEY_LOCAL_MACHINE\SYSTEM\CurrentControlSet\Control\SecurityProviders\SCHANNEL\Protocols
4. Right-click on the Protocols folder, select New, then Key using the dropdown. It will create a new folder and rename this folder to TLS 1.2.

5. Right-click on key TLS 1.2 and add two new keys Inside it and rename the two new keys as below.
- Client
- Server
6. Right-click on the Client key, select New, select DWORD (32-bit) Value from the dropdown, and rename the DWORD to DisabledByDefault.

7. Right-click on DisabledByDefault and select Modify from the dropdown, and make sure the Value data field is set to 0 and the Base is Hexadecimal. Then, click on the OK button.

8. Let’s create another DWORD for the Client key as you did in Step 7 and rename the second DWORD to Enabled.

9. Right-click on Enabled, select Modify option from the dropdown and ensure the Value data field is set to 1 and the Base is Hexadecimal. Then, click on the OK button.

10. For the Server key, repeat steps 7 to 9 (create two DWORDs, DisabledByDefault and Enabled, and their values Inside the Server key).
11. Reboot the server, and TLS 1.2 is now enabled on your server.
That’s all.
Was this answer helpful?
Growing trends in cyber attacks made system administrators implement more secured communication protocols to protect their assets and network from attacks. TLS plays a vital role in the implementation stack. TLS is a critical security protocol that is used to encrypt communications between clients and servers. TLS 1.2 and TLS 1.3 are the two latest versions of the Transport Layer Security (TLS) protocol and offer many advantages over their previous versions. TLS 1.2 is the most widely used version of the TLS protocol, but TLS 1.3 is gaining popularity. As a system administrator, you should enable TLS 1.2 and TLS 1.3 on your Windows Server to enhance the security of your infrastructure.
Before learning how to enable TLS 1.2 and TLS 1.3 on your Windows Server, let’s understand TLS 1.2 and TLS 1.3 and what these TLS protocols offer more than their predecessors.
Table of Contents
A Short Note About TLS 1.2 and TLS 1.3:
TLS is a cryptographic protocol that is used to secure communications over computer networks. TLS 1.2 and TLS 1.3 are the two latest versions of the Transport Layer Security (TLS) protocol. TLS 1.2 was finalized in 2008, and TLS 1.3 was finalized in 2018.
TLS 1.2 improves upon TLS 1.1 by adding support for Elliptic Curve Cryptography (ECC) and introducing new cryptographic suites that offer better security than the suites used in TLS 1.1. TLS 1.3 improves upon TLS 1.2 by simplifying the handshake process and making it more resistant to man-in-the-middle attacks. In addition, TLS 1.3 introduces new cryptographic suites that offer better security than the suites used in TLS 1.2.
TLS 1.2 and TLS 1.3 are both backward compatible with TLS 1.1 and earlier versions of the protocol. This means that a client that supports TLS 1.2 can communicate with a server that supports TLS 1.1 and vice versa. However, TLS 1.2 and TLS 1.3 are not compatible with each other. A client that supports TLS 1.2 cannot communicate with a server that supports TLS 1.3, and vice versa.
TLS 1.2 is the most widely used version of the TLS protocol, but TLS 1.3 is gaining in popularity. Many major web browsers, including Google Chrome, Mozilla Firefox, and Microsoft Edge, now support TLS 1.3. In addition, major Internet service providers, such as Cloudflare and Akamai, have started to support TLS 1.3 on their servers. Please visit this page if you want to deeply review the comparison of TLS implementations across different supported servers and clients.
Please visit these posts to learn more about TLS 1.2 and TLS 1.3:
- What Is SSL/TLS? How SSL, TLS 1.2, And TLS 1.3 Differ From Each Other?
- Decoding TLS v1.2 protocol Handshake with Wireshark
- Decoding TLS 1.3 Protocol Handshake With Wireshark
- How to Enable TLS 1.3 in Standard Web Browsers?
- How to Enable TLS 1.3 on Popular Web Servers?
- How to Disable TLS 1.0 and TLS 1.1 on Your Apache Server?
- How to Disable TLS 1.0 and TLS 1.1 on Your Nginx Server?
TLS 1.3 is the most secure version of the TLS protocol and is the recommended version to use for all new deployments. However, TLS 1.2 is still widely used and will continue to be supported for the foreseeable future.
Why Should You Enable TLS 1.2 and TLS 1.3 on Windows Server?
As a windows administrator, it is not just your duty to take care the system’s health. But, it is also your responsibility to create a secure environment to protect your Windows from internal and external threats. TLS 1.2 and TLS 1.3 are the new and most secure transport layer security protocols. As a system administrator, you should enable TLS 1.2 and TLS 1.3 on your Windows Server for the following reasons:
- Both TLS 1.2 and TLS 1.3 introduces new cryptographic suites that offer better security than the suites used in older TLS and SSL protocols.
- Both TLS 1.2 and TLS 1.3 are more resistant to man-in-the-middle attacks and simplify the handshake process, which makes it more difficult for attackers to eavesdrop on communications.
- TLS 1.3 simplifies the handshake process and removes unnecessary cryptographic overhead, which results in a faster connection time.
How to Enable TLS 1.2 and TLS 1.3 on Windows Server?
We have covered 3 different ways to enable TLS 1.2 and TLS 1.3 on your Windows Server in this post. You can choose any one of the three ways to enable TLS 1.2 and TLS 1.3 on your Windows Server depending on your technical and automation skills.
- Enable TLS 1.2 and TLS 1.3 manually using Registry
- Enable TLS 1.2 and TLS 1.3 using Powershell Commands
- Enable TLS 1.2 and TLS 1.3 using CMD
Note: Microsoft clearly said that it supports TLS 1.3 only after Windows 11 & Windows Server 2022 operating systems. No support will be provided for TLS 1.3 below Windows 10 and Windows Server 2019. You can refer to the below table that shows the Microsoft Schannel Provider support of TLS protocol versions.
TLS Protocols Supported by Windows Operating Systems:
| Windows OS | TLS 1.0 Client | TLS 1.0 Server | TLS 1.1 Client | TLS 1.1 Server | TLS 1.2 Client | TLS 1.2 Server | TLS 1.3 Client | TLS 1.3 Server |
|---|---|---|---|---|---|---|---|---|
| Windows Vista/Windows Server 2008 | Enabled | Enabled | Not supported | Not supported | Not supported | Not supported | Not supported | Not supported |
| Windows Server 2008 with Service Pack 2 (SP2) | Enabled | Enabled | Disabled | Disabled | Disabled | Disabled | Not supported | Not supported |
| Windows 7/Windows Server 2008 R2 | Enabled | Enabled | Disabled | Disabled | Disabled | Disabled | Not supported | Not supported |
| Windows 8/Windows Server 2012 | Enabled | Enabled | Enabled | Enabled | Enabled | Enabled | Not supported | Not supported |
| Windows 8.1/Windows Server 2012 R2 | Enabled | Enabled | Enabled | Enabled | Enabled | Enabled | Not supported | Not supported |
| Windows 10, version 1507 | Enabled | Enabled | Enabled | Enabled | Enabled | Enabled | Not supported | Not supported |
| Windows 10, version 1511 | Enabled | Enabled | Enabled | Enabled | Enabled | Enabled | Not supported | Not supported |
| Windows 10, version 1607/Windows Server 2016 Standard | Enabled | Enabled | Enabled | Enabled | Enabled | Enabled | Not supported | Not supported |
| Windows 10, version 1703 | Enabled | Enabled | Enabled | Enabled | Enabled | Enabled | Not supported | Not supported |
| Windows 10, version 1709 | Enabled | Enabled | Enabled | Enabled | Enabled | Enabled | Not supported | Not supported |
| Windows 10, version 1803 | Enabled | Enabled | Enabled | Enabled | Enabled | Enabled | Not supported | Not supported |
| Windows 10, version 1809//Windows Server 2019 | Enabled | Enabled | Enabled | Enabled | Enabled | Enabled | Not supported | Not supported |
| Windows 10, version 1903 | Enabled | Enabled | Enabled | Enabled | Enabled | Enabled | Not supported | Not supported |
| Windows 10, version 1909 | Enabled | Enabled | Enabled | Enabled | Enabled | Enabled | Not supported | Not supported |
| Windows 10, version 2004 | Enabled | Enabled | Enabled | Enabled | Enabled | Enabled | Not supported | Not supported |
| Windows 10, version 20H2 | Enabled | Enabled | Enabled | Enabled | Enabled | Enabled | Not Supported | Not Supported |
| Windows 10, version 21H1 | Enabled | Enabled | Enabled | Enabled | Enabled | Enabled | Not Supported | Not Supported |
| Windows 10, version 21H2 | Enabled | Enabled | Enabled | Enabled | Enabled | Enabled | Not Supported | Not Supported |
| Windows Server 2022 | Enabled | Enabled | Enabled | Enabled | Enabled | Enabled | Enabled | Enabled |
| Windows 11 | Enabled | Enabled | Enabled | Enabled | Enabled | Enabled | Enabled | Enabled |
Method 1 : Enable TLS 1.2 and TLS 1.3 manually using Registry
Let’s begin learning how to enable TLS 1.2 and TLS 1.3 manually using Windows Registry.
Time needed: 10 minutes
Method 1 : Enable TLS 1.2 and TLS 1.3 manually using Registry
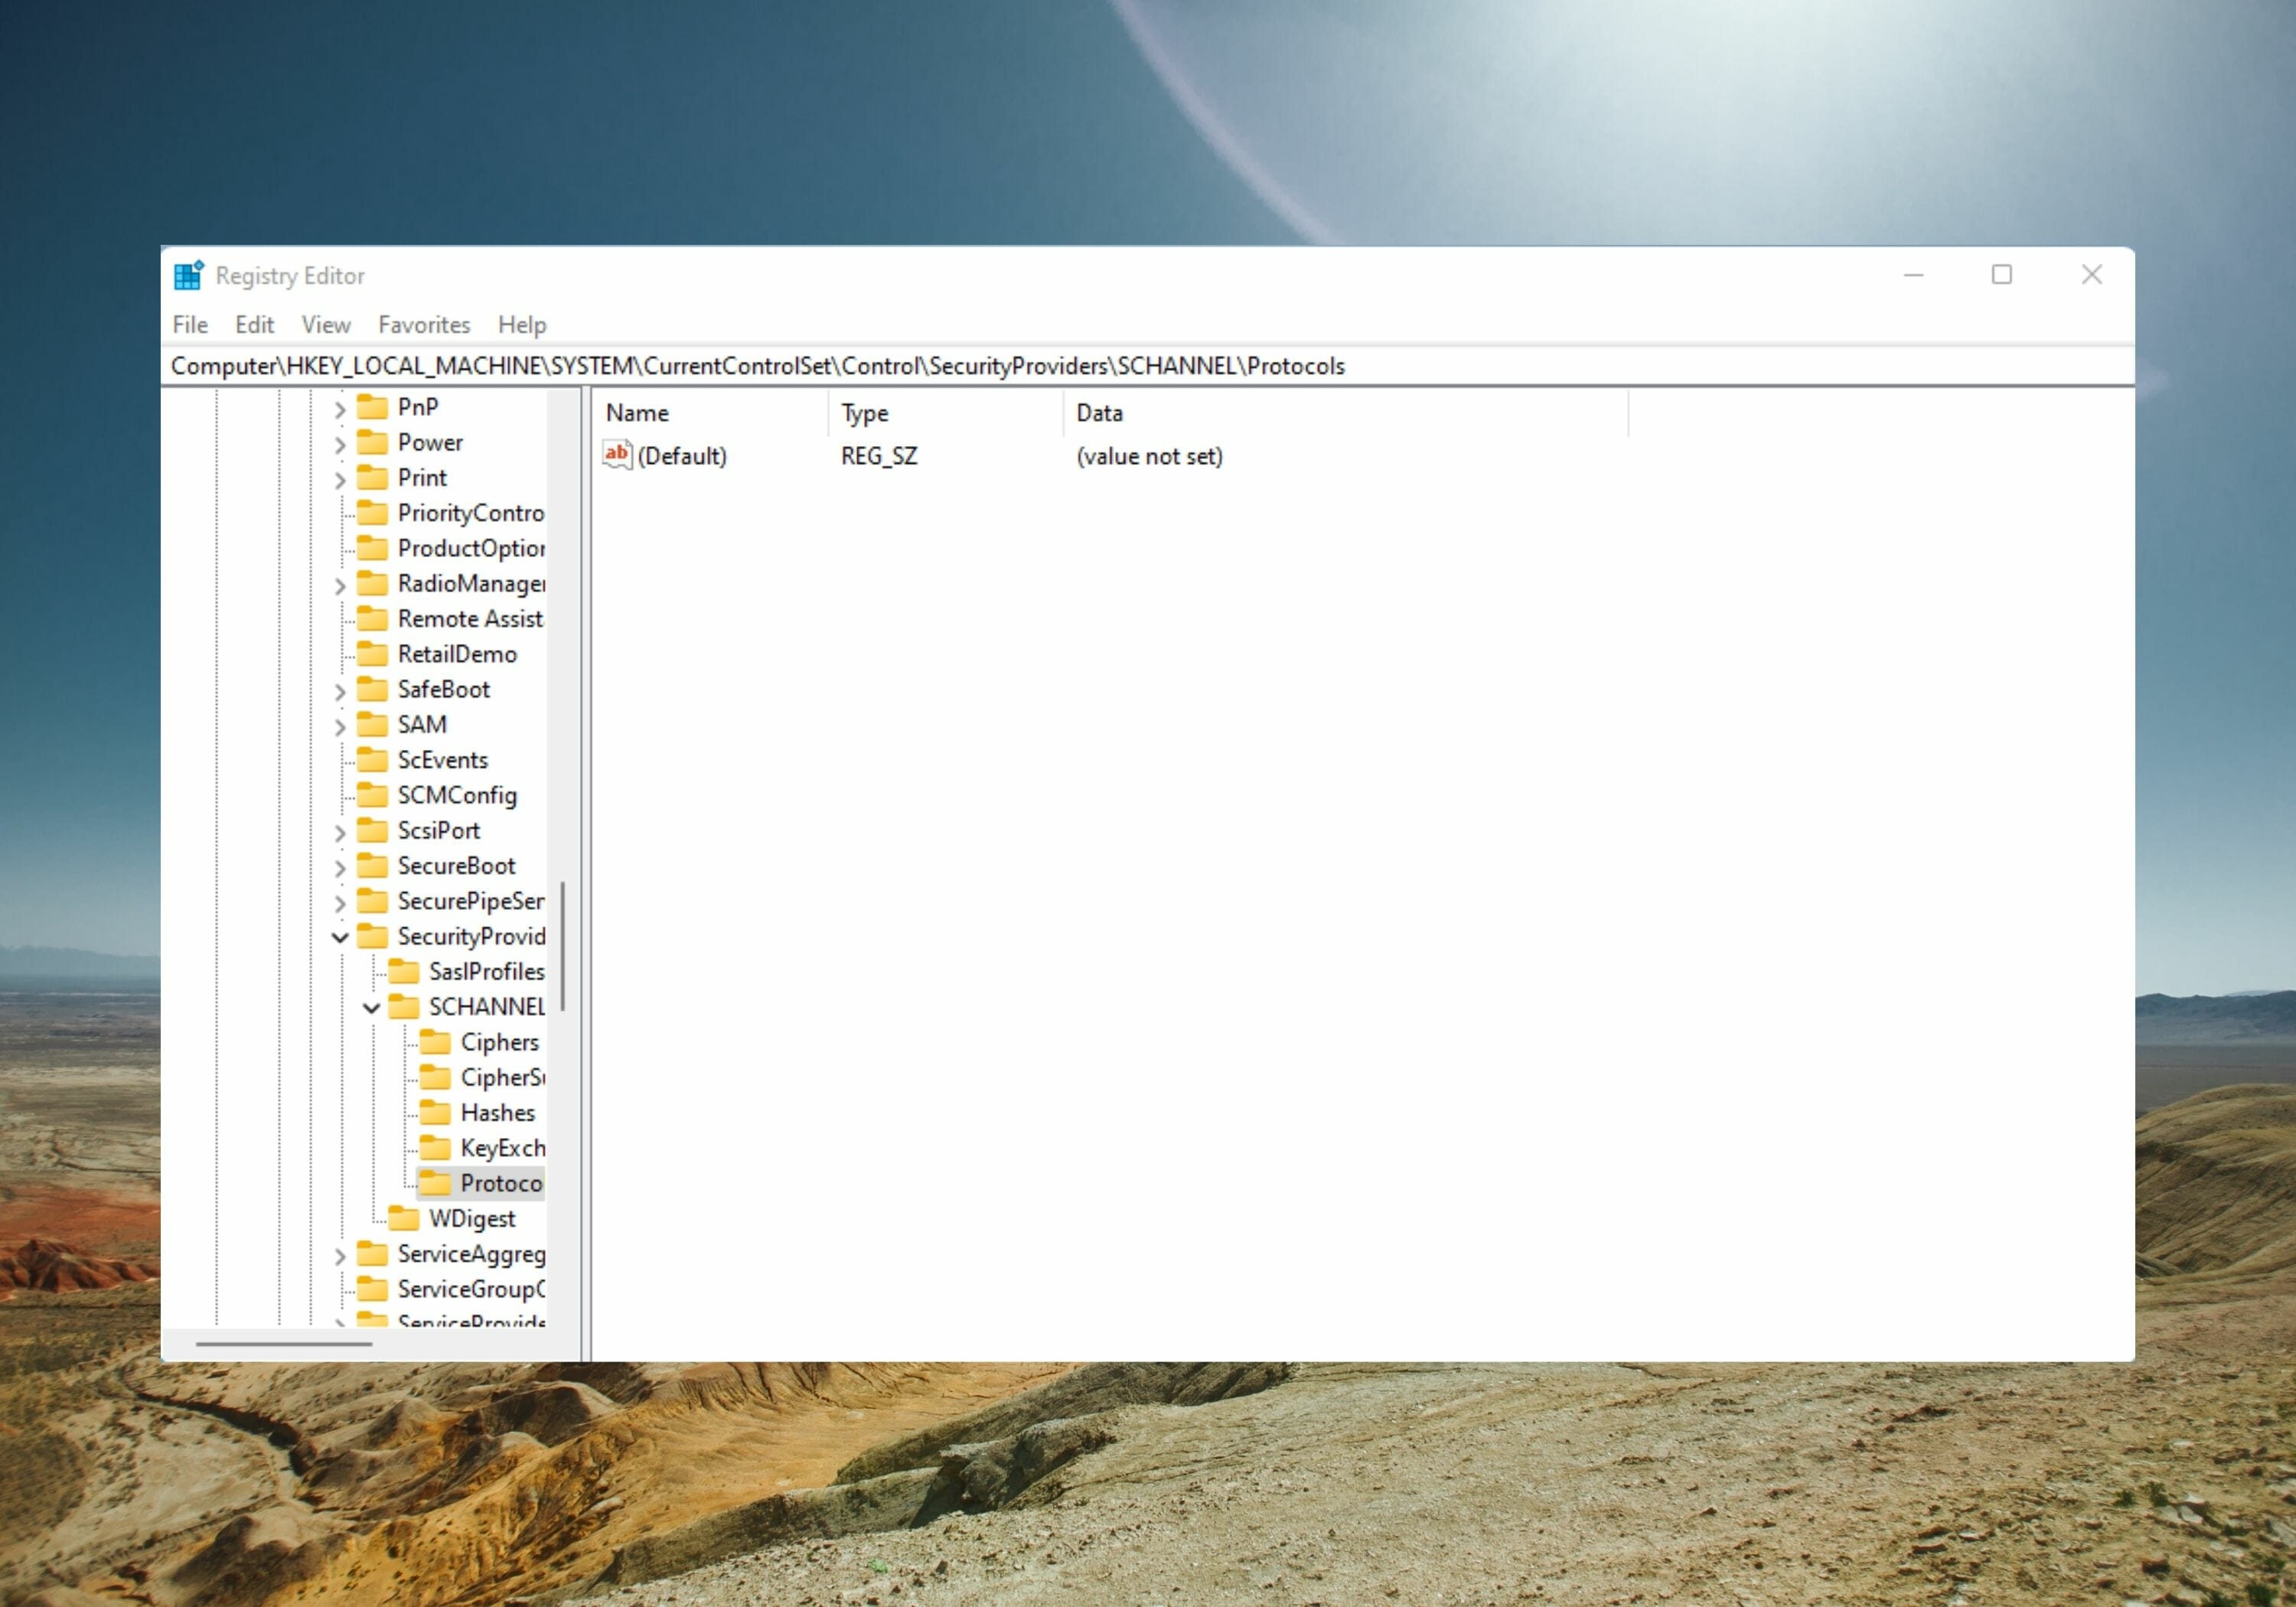
- Open regedit utility
Open ‘Run‘, type ‘regedit‘ and click ‘OK‘.

- Create New Key
In Registry Editor, navigate to the path : HKEY_LOCAL_MACHINE\SYSTEM\CurrentControlSet\Control\SecurityProviders\SCHANNEL\Protocols
Create a new key by Right click on ‘Protocols‘ –> New –> Key
- Rename the Registry Key ‘TLS 1.2’
Rename the registry key as ‘TLS 1.2‘.

- Create One More Registry Key ‘Client’ underneath ‘TLS 1.2’
As smiler to the above step, create another key as ‘Client‘ underneath ‘TLS 1.2‘ as shone in this picture.

- Create New Item ‘DWORD (32-bit) Value’ Underneath ‘Client’, select ‘New’
Create new item by right click on ‘Client‘, select ‘New’ –> DWORD (32-bit) Value.

- Rename the Item ‘DWORD (32-bit) Value’ to ‘DisabledByDefault’
Name the item as ‘DisabledBy Default’ with Hexadecimal value as ‘0’.

- Create another item, ‘Enabled’ Underneath TLS 1.2
Similarly create another item, ‘Enabled‘ with Hexadecimal value as ‘1‘.

- List of Item Created underneath ‘Client’
After registry item creations underneath ‘Client’, it looks as below.

- Create ‘Server’ and corresponding Keys as in the case of ‘Client’
Similar to above steps, create a key ‘Server’ under ‘Protocols’ and create ‘DWORD (32-bit)’ and ‘Enabled’ as shown below.
– HKEY_LOCAL_MACHINE\SYSTEM\CurrentControlSet\Control\SecurityProviders\SCHANNEL\Protocols\TLS 1.2\Server\Enabled with Hexadecimal value as ‘1’
– HKEY_LOCAL_MACHINE\SYSTEM\CurrentControlSet\Control\SecurityProviders\SCHANNEL\Protocols\TLS 1.2\Server\DisabledByDefault with Hexadecimal value as ‘0’
- Enable TLS 1.3 on the Windows Server
Similar to above steps, create a ‘DWORD (32-bit)’ and ‘Enabled’ items in the below path to enable TLS 1.3
Note: TLS 1.3 is supported in Windows 11 & Windows server 2022 onwards.
– HKEY_LOCAL_MACHINE\SYSTEM\CurrentControlSet\Services\HTTP\Parameters\EnableHTTP3 with Hexadecimal value as ‘1’


Method 2 : Enable TLS 1.2 and TLS 1.3 on Windows Server using Powershell Commends
Follow this simple procedure to enable TLS 1.2 and TLS 1.2 using Powershell comments.
- Open Powershell as Administrator

2. Run below commands to create Registry entry
TLS 1.2
- New-Item 'HKLM:\SYSTEM\CurrentControlSet\Control\SecurityProviders\SCHANNEL\Protocols\TLS 1.2\Client' -Force

- New-ItemProperty -Path 'HKLM:\SYSTEM\CurrentControlSet\Control\SecurityProviders\SCHANNEL\Protocols\TLS 1.2\Client' –PropertyType 'DWORD' -Name 'DisabledByDefault' -Value '0'

- New-ItemProperty -Path 'HKLM:\SYSTEM\CurrentControlSet\Control\SecurityProviders\SCHANNEL\Protocols\TLS 1.2\Client' -PropertyType 'DWORD' -Name 'Enabled' -Value '1'


- New-Item 'HKLM:\SYSTEM\CurrentControlSet\Control\SecurityProviders\SCHANNEL\Protocols\TLS 1.2\Server' -Force

- New-ItemProperty -Path 'HKLM:\SYSTEM\CurrentControlSet\Control\SecurityProviders\SCHANNEL\Protocols\TLS 1.2\Server' –PropertyType 'DWORD' -Name 'DisabledByDefault' -Value '0'

- New-ItemProperty -Path 'HKLM:\SYSTEM\CurrentControlSet\Control\SecurityProviders\SCHANNEL\Protocols\TLS 1.2\Server' –PropertyType 'DWORD' -Name 'Enabled' -Value '1'


TLS 1.3 (Supports in Windows 11 & Windows Server 2022)
- New-ItemProperty -Path 'HKLM:\SYSTEM\CurrentControlSet\services\HTTP\Parameters' -PropertyType 'DWORD' -Name 'EnableHttp3' -Value '1'
Before running the commands you can see no items were exist underneath Protocol.

After running the commands you can see there are two keys created ‘TLS 1.2’ & ‘TLS 1.3’, Underneath each protocols there are ‘Client’ &’Server’ Keys inside them ther are two items ‘DisableByDefault’ & ‘Enabled’.


Method 3: Enable TLS 1.2 and TLS 1.3 on Windows Server using native CMD
Follow this simple procedure to enable TLS 1.2 and TLS 1.2 using CMD comments.
- Open ‘Command Prompt’ as Administrator

2. Run below commands to create Registry entry.
TLS 1.2
- reg add "HKEY_LOCAL_MACHINE\SYSTEM\CurrentControlSet\Control\SecurityProviders\SCHANNEL\Protocols\TLS 1.2\Client" /v DisabledByDefault /t REG_DWORD /d 0 /f

- reg add "HKEY_LOCAL_MACHINE\SYSTEM\CurrentControlSet\Control\SecurityProviders\SCHANNEL\Protocols\TLS 1.2\Client" /v Enabled /t REG_DWORD /d 1 /f


- reg add "HKEY_LOCAL_MACHINE\SYSTEM\CurrentControlSet\Control\SecurityProviders\SCHANNEL\Protocols\TLS 1.2\Server" /v DisabledByDefault /t REG_DWORD /d 0 /f

- reg add "HKEY_LOCAL_MACHINE\SYSTEM\CurrentControlSet\Control\SecurityProviders\SCHANNEL\Protocols\TLS 1.2\Server" /v Enabled /t REG_DWORD /d 1 /f


TLS 1.3 (Supports in Windows 11 & Windows Server 2022)
- reg add "HKEY_LOCAL_MACHINE\SYSTEM\CurrentControlSet\services\HTTP\Parameters" /v EnableHttp3 /t REG_DWORD /d 1 /f
We hope this post would help you know how to enable TLS 1.2 and TLS 1.3 on your Windows Server to enhance the security of your infrastructure. Please share this post if you find this interested. Visit our social media page on Facebook, LinkedIn, Twitter, Telegram, Tumblr, Medium & Instagram, and subscribe to receive updates like this.
Frequently Asked Questions:
1. What is TLS?
Transport Layer Security (TLS) is a cryptographic protocol designed to provide secure communication over computer networks. It is the successor to Secure Sockets Layer (SSL) and is widely used to encrypt data transmissions between a client and a server, ensuring privacy and data integrity.
2. What are TLS 1.2 and TLS 1.3?
TLS 1.2 and TLS 1.3 are the most recent versions of the TLS protocol, with TLS 1.3 being the latest. They include several improvements over previous versions, such as enhanced security, better performance, and support for more modern cryptographic algorithms. Enabling these versions on your Windows Server ensures that your server uses the most secure and up-to-date encryption methods.
3. Why should I enable TLS 1.2 and TLS 1.3 on my Windows Server?
Enabling TLS 1.2 and TLS 1.3 on your Windows Server ensures that your server can establish secure connections with clients using the latest encryption standards. This helps protect sensitive data from eavesdropping and tampering while providing better performance and compatibility with modern web browsers and applications.
4. How do I enable TLS 1.2 and TLS 1.3 on my Windows Server?
To enable TLS 1.2 and TLS 1.3 on your Windows Server, follow these steps:
1. Open the Registry Editor by pressing Win + R, typing regedit, and pressing Enter.
2. Navigate to the following registry key:
HKEY_LOCAL_MACHINE\SYSTEM\CurrentControlSet\Control\SecurityProviders\SCHANNEL\Protocols
3. Create new keys for TLS 1.2 and TLS 1.3 if they do not exist.
4. Under each TLS version key, create subkeys named Client and Server.
5. Create a new DWORD (32-bit) value named Enabled under both Client and Server subkeys, and set its value to 1.
6. Create a new DWORD (32-bit) value named DisabledByDefault under both Client and Server subkeys, and set its value to 0.
7. Close the Registry Editor and restart your server to apply the changes.
5. How do I disable older, less secure TLS versions on my Windows Server?
To disable older, less secure TLS versions on your Windows Server, follow the same steps as enabling TLS 1.2 and TLS 1.3, but set the Enabled DWORD value to 0 and the DisabledByDefault DWORD value to 1 for the older TLS versions (e.g., TLS 1.0 and TLS 1.1).
6. Can I enable TLS 1.2 and TLS 1.3 on other operating systems besides Windows Server?
Yes, you can enable TLS 1.2 and TLS 1.3 on other operating systems, such as Linux and macOS. The process may vary depending on the platform and the software used, but the overall goal remains the same: to configure the server to use the most recent and secure versions of the TLS protocol.
7. How do I check which TLS versions are currently enabled on my Windows Server?
You can use a third-party tool like Nmap (https://nmap.org/) or SSL Labs’ SSL Server Test (https://www.ssllabs.com/ssltest/) to scan your server and determine which TLS versions are currently enabled.
8. Can I enable TLS 1.2 and TLS 1.3 for specific applications or services on my Windows Server?
Yes, you can enable TLS 1.2 and TLS 1.3 for specific applications or services on your Windows Server. The process may vary depending on the application or service, but it typically involves configuring the application’s settings or modifying its configuration files. Refer to the documentation for the specific application or service for more information on how to enable the desired TLS versions.
9. What are the system requirements for enabling TLS 1.2 and TLS 1.3 on Windows Server?
To enable TLS 1.2 on Windows Server, you need at least Windows Server 2008 R2 or later. For TLS 1.3, you need at least Windows Server 2016 or later, along with an update to the latest version of the Schannel.dll file. Additionally, ensure that the server and the clients connecting to it support the necessary cryptographic algorithms and protocols required for TLS 1.2 and TLS 1.3.
10. Do I need to update my server’s SSL/TLS certificates after enabling TLS 1.2 and TLS 1.3?
Enabling TLS 1.2 and TLS 1.3 on your Windows Server does not require updating your existing SSL/TLS certificates. However, it is essential to ensure that your certificates are valid, up to date, and issued by a trusted Certificate Authority (CA). If your certificates are about to expire or if you have concerns about their security, consider obtaining new certificates to maintain a secure and trustworthy connection.
11. How do I test if my Windows Server is using TLS 1.2 or TLS 1.3 after enabling them?
To test if your Windows Server is using TLS 1.2 or TLS 1.3, you can use online testing tools like SSL Labs’ SSL Server Test (https://www.ssllabs.com/ssltest/) or perform a manual test using OpenSSL. To test with OpenSSL, run the following commands in the terminal (replace “example.com” with your server’s domain name or IP address):
For TLS 1.2:
openssl s_client -connect example.com:443 -tls1_2
For TLS 1.3:
openssl s_client -connect example.com:443 -tls1_3
If the connection is successful and the protocol version in the output matches the desired TLS version, your server is correctly configured to use TLS 1.2 or TLS 1.3.
12. Will enabling TLS 1.2 and TLS 1.3 affect the performance of my Windows Server?
Enabling TLS 1.2 and TLS 1.3 on your Windows Server may result in a slight increase in the resources required for encryption and decryption. However, the performance impact is generally minimal, and the security benefits provided by these newer TLS versions outweigh any potential performance drawbacks. Moreover, TLS 1.3 introduces several performance optimizations, such as reduced handshake latency, which can improve the overall performance of secure connections.

Arun KL
Hi All, I am Arun KL, an IT Security Professional. Founder of “thesecmaster.com”. Enthusiast, Security Blogger, Technical Writer, Editor, Author at TheSecMaster. To know more about me. Follow me on LinkedIn
Hello Dev, in this article, we will discuss how to enable TLS 1.2 on Windows Server 2012 R2 to ensure secure communication for your applications and services. Before we dive into the steps, let’s understand what TLS is and why it is essential.
What is TLS and why is it important?
The Transport Layer Security (TLS) protocol is a cryptographic protocol that secures communication over the internet. It ensures that data transmitted between two devices is encrypted and cannot be accessed by unauthorized parties. TLS ensures secure communication for various applications such as email, web browsers, and instant messengers.
Windows Server 2012 R2 supports TLS 1.0, TLS 1.1, and TLS 1.2. However, due to security reasons, it is recommended to use TLS 1.2 as it has several security improvements over its predecessors. Enabling TLS 1.2 on your server will prevent security breaches and protect your sensitive data.
Steps to enable TLS 1.2 on Windows Server 2012 R2
Step 1: Open Registry Editor
The first step to enabling TLS 1.2 is to open Registry Editor. You can do this by clicking on the Start menu and typing ‘regedit’ in the search bar. Once the Registry Editor opens, navigate to the following path:
|
Hive |
Key |
|---|---|
|
HKEY_LOCAL_MACHINE |
SYSTEM\CurrentControlSet\Control\SecurityProviders\SCHANNEL\Protocols |
Here, you will see several subkeys such as SSL 2.0, SSL 3.0, TLS 1.0, and TLS 1.1. We need to create a new subkey for TLS 1.2.
Step 2: Create a new subkey for TLS 1.2
To create a new subkey, right-click on the ‘Protocols’ key and select ‘New’ -> ‘Key’. Name the key ‘TLS 1.2’. Once the subkey is created, right-click on it and select ‘New’ -> ‘Key’ to create two more subkeys named ‘Client’ and ‘Server’.
Your registry editor should now look like this:
|
Hive |
Key |
Value |
|---|---|---|
|
HKEY_LOCAL_MACHINE |
SYSTEM\CurrentControlSet\Control\SecurityProviders\SCHANNEL\Protocols\TLS 1.2\Client |
|
|
HKEY_LOCAL_MACHINE |
SYSTEM\CurrentControlSet\Control\SecurityProviders\SCHANNEL\Protocols\TLS 1.2\Server |
Step 3: Create new DWORD values
Under the ‘Client’ and ‘Server’ subkeys, create the following DWORD values:
|
Registry Key |
Value Name |
Data Type |
Value Data |
|---|---|---|---|
|
TLS 1.2\Client |
DisabledByDefault |
REG_DWORD |
0 |
|
TLS 1.2\Client |
Enabled |
REG_DWORD |
1 |
|
TLS 1.2\Server |
DisabledByDefault |
REG_DWORD |
0 |
|
TLS 1.2\Server |
Enabled |
REG_DWORD |
1 |
These values will enable TLS 1.2 and disable its predecessors for both client and server communication.
Step 4: Restart the server
After creating the subkeys and DWORD values, you need to restart the server for the changes to take effect. Once the server is restarted, TLS 1.2 will be enabled and ready for use.
FAQ about enabling TLS 1.2 on Windows Server 2012 R2
Q: What is the difference between TLS 1.2 and its predecessors?
A: TLS 1.2 has several security improvements over its predecessors. It has enhanced cipher suites that provide better encryption, it supports Perfect Forward Secrecy (PFS), and it has better protection against attacks such as POODLE and BEAST.
Q: Is it safe to disable TLS 1.0 and TLS 1.1?
A: Yes, it is safe to disable TLS 1.0 and TLS 1.1 as they are no longer considered secure. However, before disabling them, make sure that all your applications and services support TLS 1.2.
Q: How can I check if TLS 1.2 is enabled on my server?
A: You can use an online SSL/TLS scanner such as SSL Labs to check if TLS 1.2 is enabled on your server. Alternatively, you can use the following PowerShell command to check if TLS 1.2 is enabled:
Get-TlsCipherSuite | Where-Object {$_.Name -like "*TLS*1.2*"}
Q: Can I enable TLS 1.2 on Windows Server 2008 R2?
A: Yes, you can enable TLS 1.2 on Windows Server 2008 R2 by following similar steps as mentioned in this article. However, it is recommended to upgrade to a newer version of Windows Server for better security and support.
Conclusion
Enabling TLS 1.2 on Windows Server 2012 R2 is crucial for securing the communication between your applications and services. By following the steps mentioned in this article, you can easily enable TLS 1.2 on your server and protect your sensitive data from security breaches. Remember to always keep your server up to date with the latest security patches and protocols for optimal security.
В этой статье мы рассмотрим, как включить протокол Transport Layer Securit (TLS 1.2) в различных версиях Windows, в том числе для приложений .Net и WinHTTP. Протоколы TLS 1.0 и TLS 1.1 являются устаревшими, и если вы мигрировали все ваши сервисы на TLS 1.2 или TLS 1.3, вы можете отключить поддержку старых версий протоколов на клиентах и серверах Windows (Отключение TLS 1.0 и TLS 1.1 с помощью групповых политик). Но перед этим, вам нужно убедиться, что на всех ваших клиентах поддерживается протокол TLS 1.2.
В современных версиях Windows (Windows 11/10/8.1 и Windows Server 2022/2019/2016/2012R2) протокол TLS 1.2 включен по-умолчанию. А вот в предыдущих версиях Windows (Windows 7, Windows Server 2008R2/2012), чтобы включить TLS 1.2, придется выполнить ряд предварительных настроек.
Windows XP и Vista не поддерживают TLS 1.2.
Например, чтобы включить TLS 1.2 в Windows 7 нужно:
- Убедится, что у вас установлен Windows 7 SP1;
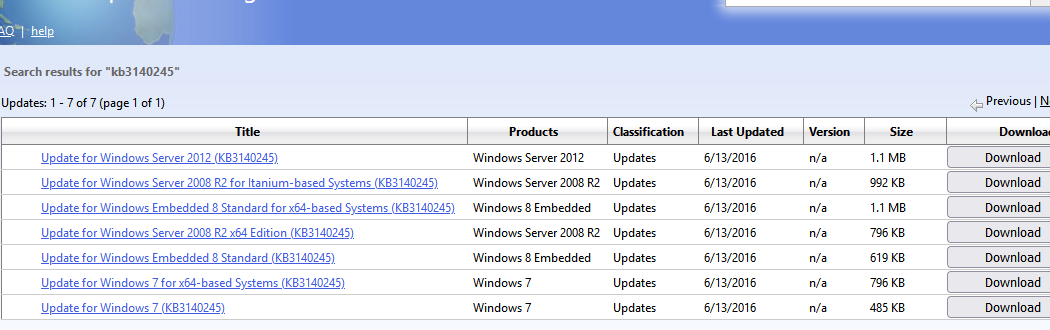
- Скачать и вручную установить MSU обновление KB3140245 из Microsoft Update Catalog (https://www.catalog.update.microsoft.com/search.aspx?q=kb3140245);

- Далее нужно скачать и установить патч MicrosoftEasyFix51044.msi (патч добавляет в реестр параметры, которые обеспечивают поддержку TLS 1.2 в Windows 7/2008R2/2012);
- Перезагрузите компьютер.
Эти параметры реестра описаны в статье Update to enable TLS 1.1 and TLS 1.2 as default secure protocols in WinHTTP in Windows (https://support.microsoft.com/en-us/topic/update-to-enable-tls-1-1-and-tls-1-2-as-default-secure-protocols-in-winhttp-in-windows-c4bd73d2-31d7-761e-0178-11268bb10392).
На компьютере появятся следующие REG_DWORD параметры реестра в ветке
HKLM\SYSTEM\CurrentControlSet\Control\SecurityProviders\SCHANNEL\Protocols\TLS 1.2\Client\
и
HKLM\...Protocols\TLS 1.2\Servers
:
- DisabledByDefault = 0
- Enabled = 1
Чтобы протокол TLS 1.2 использовался по-умолчанию для приложений на WinHttp API, нужно добавить REG_DWORD параметр
DefaultSecureProtocols = 0x00000A00
в ветку HKEY_LOCAL_MACHINE\SOFTWARE\Microsoft\Windows\CurrentVersion\Internet Settings\WinHttp (на 64 битной версии Windows в ветке HKEY_LOCAL_MACHINE\SOFTWARE\Wow6432Node\Microsoft\Windows\CurrentVersion\Internet Settings\WinHttp).
Возможные значения параметра DefaultSecureProtocols, который определяет разрешенные протоколы для WinHTTP подключений:
- 0x00000A0 – значение по умолчанию, которое разрешает только SSL 3.0 и TLS 1.0 для WinHTTP;
- 0x0000AA0 — разрешить использовать TLS 1.1 и TLS 1.2 в дополнении к SSL 3.0 и TLS 1.0;
- 0x00000A00 – разрешить только TLS 1.1 и TLS 1.2;
- 0x00000800 – разрешить только TLS 1.2.
Начиная с Windows 10 и Windows Server 2016, все версии Windows поддерживают TLS 1.2 для коммуникаций через WinHTTP.
Вы можете использовать следующий PowerShell скрипт чтобы создать эти параметры реестра:
$reg32bWinHttp = "HKLM:\SOFTWARE\Microsoft\Windows\CurrentVersion\Internet Settings\WinHttp"
$reg64bWinHttp = "HKLM:\SOFTWARE\Wow6432Node\Microsoft\Windows\CurrentVersion\Internet Settings\WinHttp"
$regWinHttpDefault = "DefaultSecureProtocols"
$regWinHttpValue = "0x00000800"
$regTLS12Client = "HKLM:\SYSTEM\CurrentControlSet\Control\SecurityProviders\SCHANNEL\Protocols\TLS 1.2\Client"
$regTLS12Server = "HKLM:\SYSTEM\CurrentControlSet\Control\SecurityProviders\SCHANNEL\Protocols\TLS 1.2\Server"
$regTLSDefault = "DisabledByDefault"
$regTLSValue = "0x00000000"
 $regTLSEnabled = "Enabled"
$regTLSEnableValue = "0x00000001"
# Для Windows x86
$test = test-path -path $reg32bWinHttp
if(-not($test)){
New-Item -Path $reg32bWinHttp
}
New-ItemProperty -Path $reg32bWinHttp -Name $regWinHttpDefault -Value $regWinHttpValue -PropertyType DWORD
# Для Windows x64
$test = test-path -path $reg64bWinHttp
if(-not($test)){
New-Item -Path $reg64bWinHttp
}
New-ItemProperty -Path $reg64bWinHttp -Name $regWinHttpDefault -Value $regWinHttpValue -PropertyType DWORD
New-Item -Path "HKLM:\SYSTEM\CurrentControlSet\Control\SecurityProviders\SCHANNEL\Protocols\TLS 1.2”
New-Item -Path $regTLS12Client
New-Item -Path $regTLS12Server
New-ItemProperty -Path $regTLS12Client -Name $regTLSDefault -Value $regTLSValue -PropertyType DWORD
New-ItemProperty -Path $regTLS12Client -Name $regTLSEnabled -Value $regTLSEnableValue -PropertyType DWORD
New-ItemProperty -Path $regTLS12Server -Name $regTLSDefault -Value $regTLSValue -PropertyType DWORD
New-ItemProperty -Path $regTLS12Server -Name $regTLSEnabled -Value $regTLSEnableValue -PropertyType DWORD
Перезагрузите компьютер:
Restart-Computer
Осталось включить поддержку TLS 1.2 для приложений .NET Framework. Для этого нужно в реестре включить принудительное использование системных протоколов шифрования для приложений .NET 3.5 и 4.x. Если вы используете старые версии NET Framework 4.5.1 или 4.5.2 на Windows Server 2012 R2/2012 или Windows 8.1, сначала установите последние обновления для .Net Framework 4.5.1 (они добавят поддержку TLS 1.2 в .Net).
Ниже указаны параметры реестра, которые нужно настроить для различных версий .Net:
для .Net 3.5 и 2.0
[HKEY_LOCAL_MACHINE\SOFTWARE\Microsoft\.NETFramework\v2.0.50727]
"SystemDefaultTlsVersions"=dword:00000001
[HKEY_LOCAL_MACHINE\SOFTWARE\Wow6432Node\Microsoft\.NETFramework\v2.0.50727]
"SystemDefaultTlsVersions"=dword:00000001
[HKEY_LOCAL_MACHINE\SOFTWARE\Microsoft\.NETFramework\v2.0.50727]
"SchUseStrongCrypto"=dword:00000001
[HKEY_LOCAL_MACHINE\SOFTWARE\Wow6432Node\Microsoft\.NETFramework\v2.0.50727]
"SchUseStrongCrypto"=dword:00000001
для .Net 4.х
[HKEY_LOCAL_MACHINE\SOFTWARE\Microsoft\.NETFramework\v4.0.30319]
"SystemDefaultTlsVersions"=dword:00000001
[HKEY_LOCAL_MACHINE\SOFTWARE\Wow6432Node\Microsoft\.NETFramework\v4.0.30319]
"SystemDefaultTlsVersions"=dword:00000001
для .Net 4.6
[HKEY_LOCAL_MACHINE\SOFTWARE\Microsoft\.NETFramework\v4.0.30319]
"SchUseStrongCrypto"=dword:00000001
[HKEY_LOCAL_MACHINE\SOFTWARE\Wow6432Node\Microsoft\.NETFramework\v4.0.30319]
"SchUseStrongCrypto"=dword:00000001
Например, без этих параметров вы не сможете подключиться к репозиториям PSGallery из консоли PowerShell на Windows Server 2012 R2 с ошибками:
- Install-Module: Unable to download from URI
- Unable to resolve package source
Проблема тут в в том, что по-умолчанию PowerShell пытается использовать протокол TLS 1.0 для подключения к PSGallery. С апреля 2020 года PowerShell Gallery разрешает подключение к NuGet провайдеру только с помощью TLS 1.2.
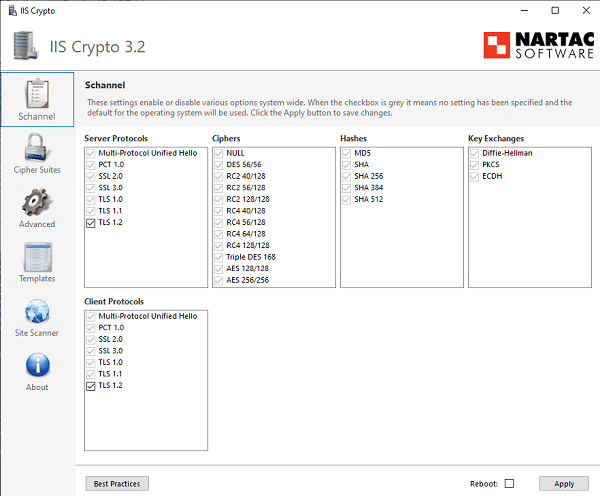
Также существует бесплатная утилита IISCrypto, которая позволяет включить/выключить различные протоколы TLS/SSL и настройки Schannel через графический интерфейс (https://www.nartac.com/Products/IISCrypto/). Здесь вы можете выбрать какие версии протоколов TLS хотите настроить. Если все галки напротив протоколов Schannel серые, значит в Windows используются стандартные настройки. В моем примере я включил протокол TLS 1.2 для клиента и сервера с помощью PowerShell скрипта, рассмотренного ранее. Утилита IISCrypto теперь показывает, что протокол TLS 1.2 включен вручную.
IISCrypto не позволяет изменить настройки TLS для .NET и WinHTTP.