Установка корневого центра сертификации Microsoft CA на MS Windows Server 2008 R2
Назначение корпоративного центра сертификации
Шифрование, сертификаты, цифровые подписи плотно вошли в повседневную
деятельность организаций. Ведущие игроки на рынке программного активно
продвигают идеологию «безопасного интернета», требуя поддержки цифровых
сертификатов.
Однако текущее положение в этой области не позволяет решать вопросы
безопасного интернета без существенных финансовых затрат на
приобретение SSL- сертификатов. При этом
бесплатные сертификаты сервиса
Let’s Encrypt покрывают лишь узкий спектр корпоративных потребностей в
сертификатах. Например, не покрываются сертификаты для шифрования
документов, почты, цифровых подписей, аутентификация клиентов. Для
использования публичных сертификатов, выданных коммерческими CA вам
необходимо иметь публичный домен. Получить сертификат для веб-сервера
на имя domain.local от Let’s Encrypt технически невозможно. Именно
поэтому актуальность частных корпоративных центров сертификации
остаётся на очень высоком уровне.
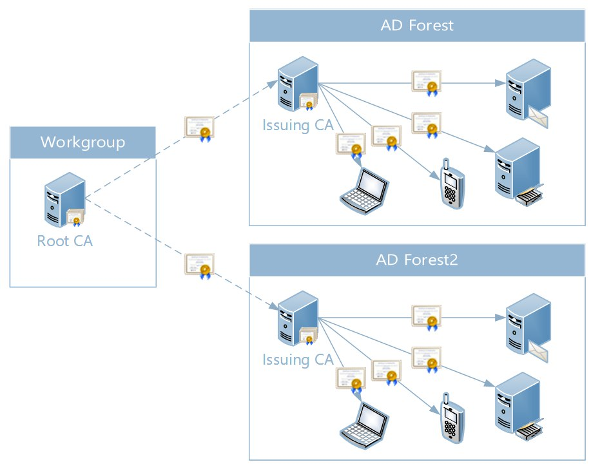
Двухуровневая схема развертывания иерархии центра сертификации (ЦС) для
небольших и средних предприятий является наиболее оптимальной,
поскольку она позволяет обеспечить должный уровень безопасности и
приемлемый уровень гибкости разделения ЦС на определённые функции.
Здесь корневой ЦС
выпускает сертификаты для подчинённых ЦС, а уже
подчинённый ЦС
выдаёт сертификаты конечным потребителям. Это позволяет
изолировать корневой ЦС от сети, что автоматически сводит к нулю шанс
компрометации такого ЦС. Основное время корневой ЦС жизни может и
должен проводить в выключенном состоянии. Включать его нужно только для
обновления собственного сертификата, подчинённого ЦС или для публикации
нового списка отозванных сертификатов (CLR). Другим достоинством
двухуровневой иерархии является улучшенная гибкость в разбиении
подчинённых ЦС на классы, например, для разных групп потребителей или
отдельно для рабочих станций, отдельно для пользователей.
Также можно выделить один ЦС для выдачи сертификатов с повышенными требованиями к
сертификатам (например, сертификаты для аутентификации и цифровой
подписи) и ЦС общего назначения.
Типовая схема двухуровневой схемы центра сертификации (ЦС):
Установка корневого центра сертификации Microsoft CA на MS Windows Server 2008 R2
Для того чтобы установить корневой центр сертификации, необходимо:
- Создать файл политик центра сертификации.
-
Установить автономный корневой Центр сертификации (со службой
сертификации и службой регистрации в центре сертификации через
Интернет) MS Windows Server 2008 R2. Настроить службу на
автоматический выпуск сертификатов. - Настроить службу на автоматический выпуск сертификатов.
- Включить аудит работы службы, сделать настройки безопасности.
-
Добавить ссылки на точку распространения отозванных сертификатов и
корневого сертификата центра сертификации, которые будут добавляться в
каждый выпущенный сертификат.
Создание файла политик CAPolicy.inf корневого ЦС
Считаем, что для самоподписанного сертификата корневого Центра
сертификации нет необходимости указания точки распределения списка
отозванных сертификатов (расширение CDP). Для этого в файле политик
значение CRL Distribution Point (точка распределения списка отозванных
сертификатов) сделать пустым.
Содержимое файла CAPolicy.inf будет следующим:
[Version] Signature=”$Windows NT$”
[CRLDistributionPoint]
URL=» «
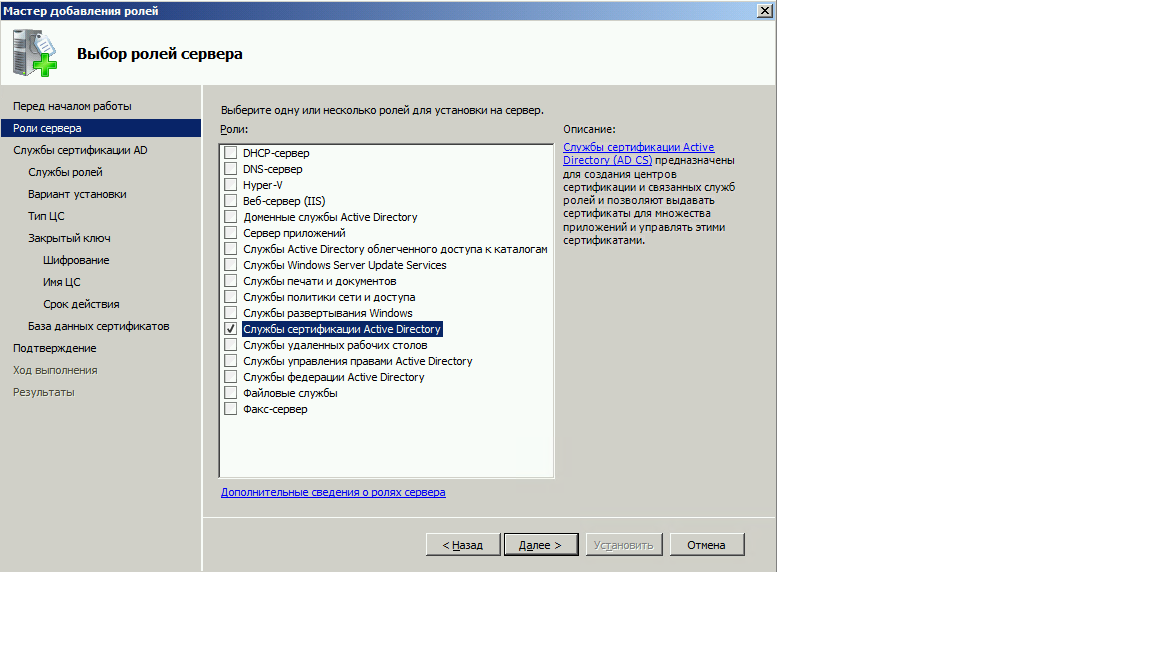
Установка службы сертификации из состава MS Windows
Установка службы сертификации производится с использованием Мастера
компонентов Windows в следующей последовательности:
- Открыть окно Панели управления, выполнив команды Пуск, Панель управления.
-
В окне Панели управления открыть пункт Администрирование и выбрать
Диспетчер сервера. -
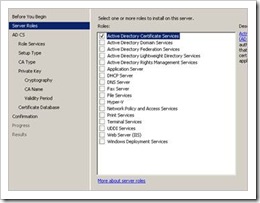
Выбрать пункт Роли. В правой части окна нажать Добавить роли и выделить пункт
Службы сертификации Active Directory.
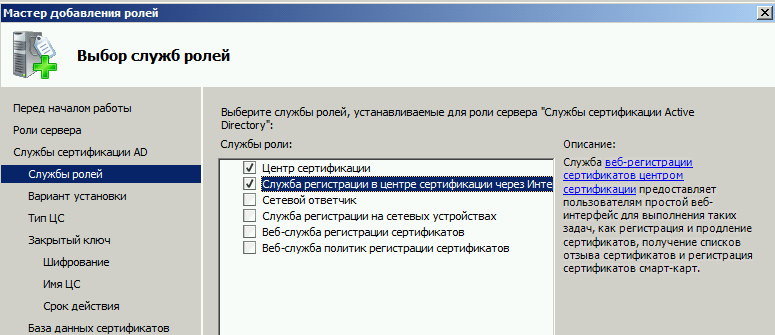
В следующем окне мастера выбрать пункты Центр Сертификации —и Служба регистрации
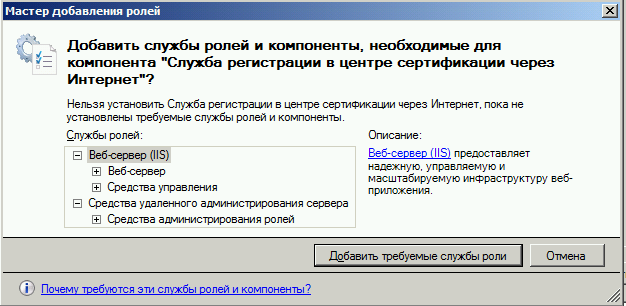
в центре сертификации через Интернет. - В появившемся окне нажать кнопкуДобавить требуемые службы роли:
- Далее следует выбрать Автономный ЦС, затем – Корневой ЦС.
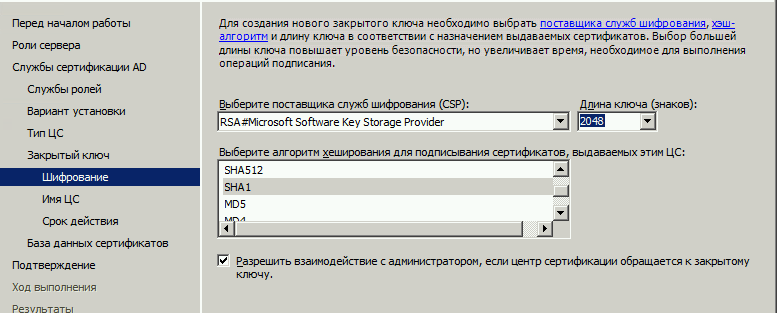
- При создании нового ключа ЦС выбрать опцию Создать новый закрытый ключ.
-
Далее следует выбрать криптопровайдер RSA#Microsoft Software Key
Storage Provider и установить опцию Разрешить взаимодействие с администратором,
если центр сертификации обращается к закрытому ключу. -
Далее следует ввести сведения о ЦС. Имя ЦС (в примере это MS-Root-CA)
может быть введено как кириллицей, так и латиницей. При этом если имя
вводится кириллицей, то его длина не должна превышать 50 символов. Если
Имя вводится латиницей, то его длина не должна превышать 250 символов.
Имя ЦС может быть любым. -
Ввести сведения о Вашей организации по следующему
примеру: -
Далее нужно задать срок действия сертификата ЦС 15 лет и затем следовать указаниям Мастера
установки службы, выбирая предлагаемые значения по умолчанию.
OU= название отдела
O=название организации
L=город местонахождения
C=RU
На сообщение о расширенной кодировке имен выбираем Да.
Настройка корневого Центра сертификации
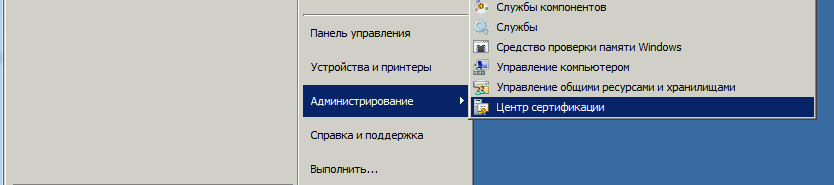
Запускаем центр сертификации: Пуск\Все программы\Администрирование\Центр сертификации.
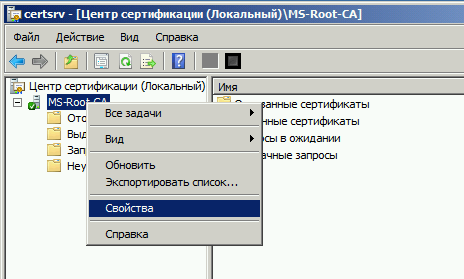
Просмотреть настройки Центра сертификации — вызвать контекстное меню и выбрать Свойства.
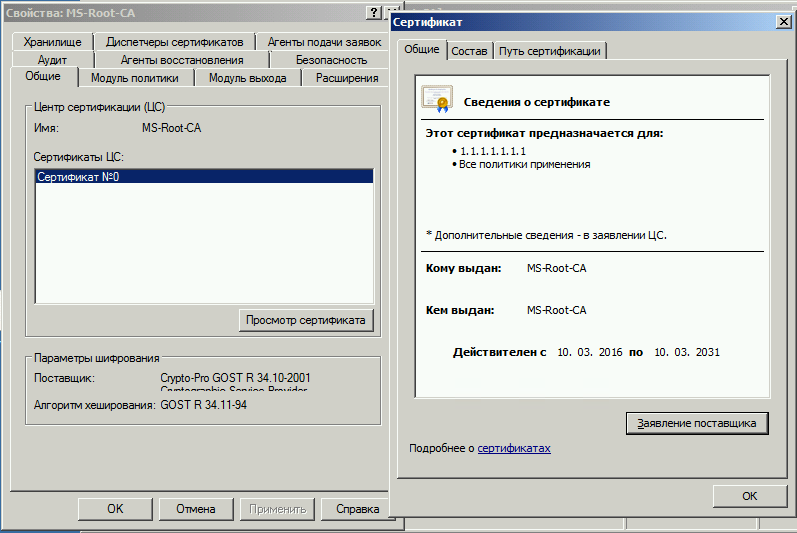
В окне можно просмотреть выпущенный самоподписанный сертификат корневого Центра сертификации
и проверить, какая информация легла в сертификат из файла политик CAPolicy.inf и при установке Центра
сертификации.
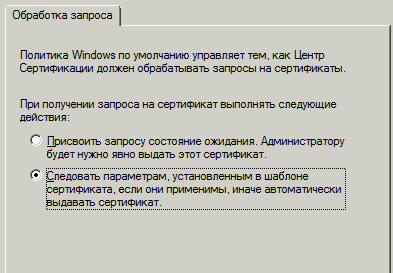
Настроить Модуль политики на выдачу сертификатов в
автоматическом режиме. Установить переключатель в строку Следовать параметрам…

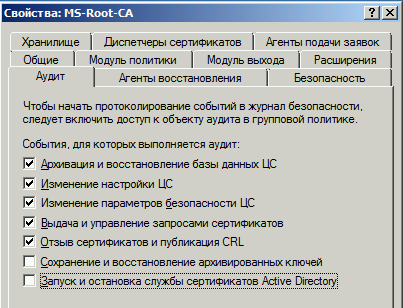
Перейти в закладку Аудит. Включить протоколирование
событий безопасности. Активировать события безопасности, кроме Сохранение и
восстановление архивированных ключей и Запуск и остановка службы сертификатов Active Directory
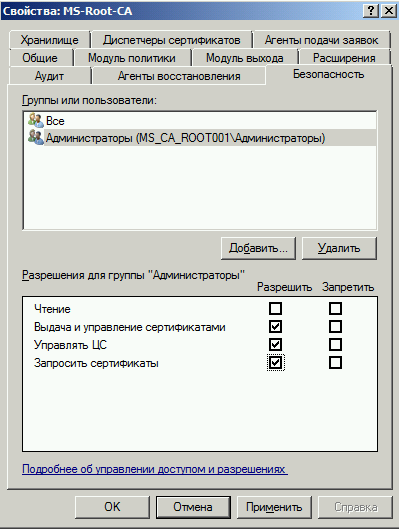
Перейди в закладку Безопасность. Разрешите Администратору
запрашивать сертификаты:
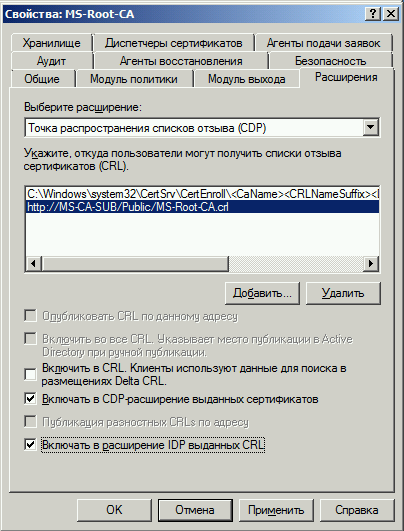
Настройка публикации списка отозванных сертификатов
Перейти в закладку Расширения. В меню Выберите расширение
выбрать Точка распространения списка отзыва (CDP).
Удалить точки распространения, кроме C:\Windows.Добавить путь,
например, https://servername /Public/Certname.crl, где
servername – сервер, на котором будет настроено публичное
хранилище, а Certname – название сертификата.
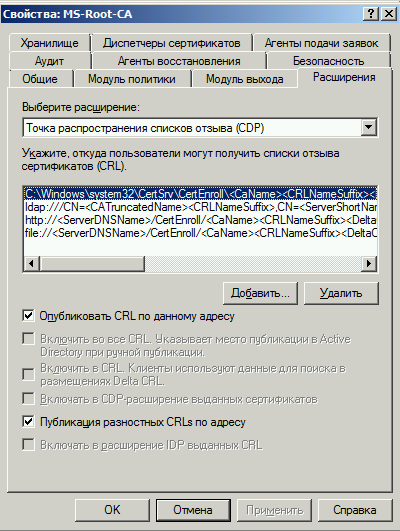
Включить настройки Включать в CDP-расширение выданных сертификатов и
Включать в расширения IDP выданных CRL. Перезапустить центр сертификации.
В дополнение к CDP, необходимо сконфигурировать дополнение, включающее
информацию о локализации сертификата ЦС AIA. Для этого в поле Выберите расширение
перейти к Authority Information Access (AIA). Удалить доступы к
сведениям о центрах сертификации, кроме C:\Windows…. Добавить путь,
например, https://servername/Public/Certname.ce, где servername –
сервер, на котором будет настроено публичное хранилище, а Certname – название сертификата.
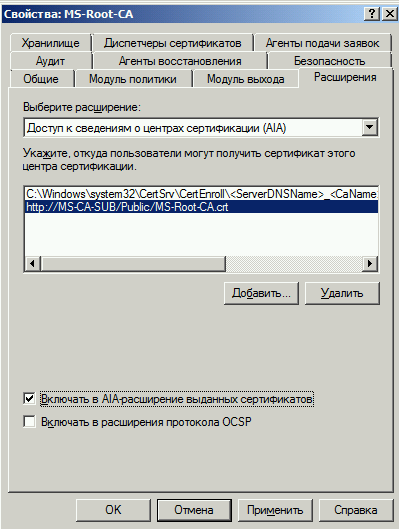
Включить настройки Включать в AIA-расширение выданных сертификатов.
Перезапустить Центр сертификации.
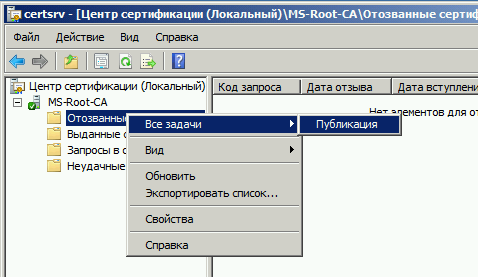
Поскольку значения дополнений CDP и AIA изменены, то для учета
изменений необходимо выпустить и опубликовать CRL. Для публикации CRL
необходимо в дереве консоли Центра сертификации нажать правой кнопкой
мыши на узел Отозванные сертификаты. В появившемся меню
выбрать Все задачи — Публикация
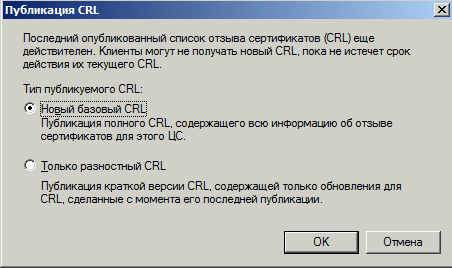
Оставить по умолчанию тип публикуемого CRL – Новый базовый CRL.
Нажать кнопку ОК.
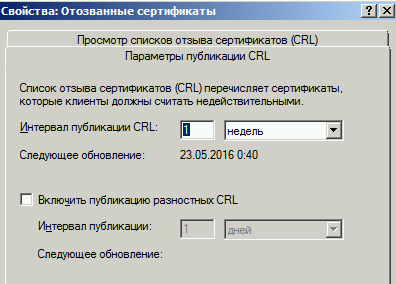
Для просмотра и изменения параметров публикации CRL в окне контекстного
меню выберем Свойства.
Посмотреть выпущенные списки отозванных сертификатов можно в закладке
Просмотр списков отзыва сертификатов (CRL).
Списки отозванных сертификатов размещены в папке
C:\Windows\System32\Certsrv\CertEnroll,
куда по умолчанию публикуются списки.
")
![]()
We can import any additional certificate in Windows 7/2008 R2. In this article, we will demonstrate how to import our own self-signed Root CA certificate, which will be used later for the SSTP VPN connection.
It is very important to place every certificate in the proper store. Otherwise, it can be invisible for your application or service.
Let’s begin!
A word of caution. Check your local laws and regulations relating to security, cryptography, etc. In some countries, using the OpenSSL package, certificates or cryptography can be against the law. In such case, you must stop reading this article and you should not follow any instruction mentioned here. It is solely within your responsibility.
Check this page if you need any additional instructions related to the other platforms.
Installing the certificate
I will assume that you already have the Root CA certificate and the administrative access to your computer.
- We should download the file named ca.crt somewhere on the local disk (for example in C:\Temp)

- Open the MMC GUI (Start > Run > type MMC > click on the button [ Run ]). The MMC window will open. In case that UAC control is on (and it is always ON, right?), we need confirm that we want to run this application

- Choose File > Add/Remove Snap-in…

- Choose the snap-in named Certificates from the list and click on the button [ Add > ].

- The new dialog will pop up. You should choose the account (or the location) that will be managed. Choose Computer account. This is the only way to access this account, as the Certificates console from the menu is related to your local user account.

- This new console will be used for the Local computer. Left this choice, click on the button [ Finish ] and then on [ OK ].

- The new certificates management console will open.
- Navigate to Trusted Root Certification Authorities and then Certificates. Remember, we need to import the Root CA certificate for our self-signed authority.
- Right click on Certificates and chose All tasks > Import from the context menu.

- The import Wizard will run. On the second screen, click on the button named [ Browse ] and navigate to the location of this certificate (e.g. C:\Temp\ca.crt) and click [ Next > ].
- On the next screen, choose Place all certificates in the following store (if this option is not selected). This store should be Trusted Root Certification Authorities. Continue with the Wizard and on the last screen re-check all options. If you’re happy with them, just click on the button named [ Finish ] and let Wizard import this certificate.

- After a few seconds the pop up message will appear. Our certificate is successfully loaded.

- Click on the button [ OK ] to close this dialog. We just imported certificate.
- We can either repeat this process for another certificate or simply close this MMC console. You don’t need to save it.


Congratulations!
Our certificate is ready to be used. We can now progress to the next step – adding our new SSTP VPN connection.
Stay tuned.
Yes, you can have your own Certification Authority (CA), and issue certificates for clients. The bad news is that certificates issued by your internal CA are trusted only by you internal clients, or by clients that have your root certificate imported. For internal applications, sites etc this is gold, because you don’t have to by a commercial certificate, but if you have a public HTTPS site you will need a commercial certificate. Certification authorities can have multiple ramifications or levels, like Root CA, then a Subordinate CA, and the last one is the Issuing CA.Bellow I created a diagram for a better visualization.

Root CA will issue certificates only for Subordinate CA, and the Subordinate CA will issue certificates only for Issuing CA. The Issuing CA is the one that will issue certificates for internal clients. You can, off course create more than three ramifications, but even those commercials Certification Authorities are not going with more than three. Now there are multiple types of Certification Authorities for Windows Domains. The first and the bigger one is Enterprise Root CA, then is Enterprise Subordinate CA. These two types are used only if you have a Windows Domain implemented in your network. The last two are Enterprise Standalone CA, and Subordinate Standalone CA. These are used if you don’t have a Windows Domain implemented. Now the difference between Enterprise and Standalone is that with Enterprise you have certificate templates, and the root certificate will automatically be deployed to all clients. I will end this introduction now, and start working.
For this guide I have a Domain Controller (DC) running Windows Server 2008 R2, and another Windows Server 2008 R2 (named Server-Cert) joined to the domain, which will be our Enterprise Root CA. Yes I’m going with the Enterprise version, because is a Windows Domain, and for small business is more than sufficient a single Enterprise Root CA.
Go to Server-Cert and open Server Manager; right-click Roles and choose Add Roles.

Click Next to skip the Welcome screen. On the Roles screen select the Active Directory Certificate Services and click Next.

Skip the introduction of AD CS. On the Role Services screen we have the option to install more than just the certificate service. For this demonstration I’m going to install the Certification Authority Web Enrollment too. This will give us a web page to request certificates, and it’s great, believe me. As soon as you click the Certification Authority Web Enrollment you will be asked to install some required prerequisites. And off course a web site to function needs a web server. Just click Add Required Roles Services and continue the wizard.


Because this is about installing Enterprise Root CA, just leave the defaults here and click Next.

Again leave the defaults here to install a Root CA.

We need to create a new private key, so click Next to continue.

For Enterprise Root CA I usually choose a length key of 4096 and leave the rest to default.

Give your Root CA a name. I always change the name, because I really hate the default one.

Select a validity period. For Enterprise Root CA I usually type 30 years.

If you have a reason to change the default log and database location, do it using the Browse buttons. Now comes the IIS installation part, just go with the defaults and finish the wizard.

The installation is done. Go to Administrative Tools > Certification Authority to open the Management Console for the Certificate Services. From this console you can revoke certificates and create templates.

To see the root certificate just right-click the server name, choose Properties and hit the button View Certificate

Open a browser and type http://localhost/certsrv, and the Certificates Services Web Enrolment page should open. Using this web page clients can request certificates, if they have the proper permissions.

Want content like this delivered right to your
email inbox?
Keywords : Windows 2008 PKI Certificate Authority certutil certreq template root CA Enterprise CA convert pfx to pem generate custom certificate request subject alternate name san attribute
Today’s blog post targets the deployment of a Windows 2008 server based Certificate Authority (AD CS) and will discuss some common scenario’s where certificates are used / required. Finally, I will show some scripts that can be used to manage your CA, backup your CA, distribute CRL’s, create custom certificate requests, convert keys etc…
Design
Before starting the installation of the Certificate Authority components on a 2008 server, it is important to think about the design of your CA infrastructure.
In any case, even if you are just a small company, I would highly recommend deploying at least a 2 tier model, which consists of an offline standalone root CA, and one or more issuing/policy CA’s.
Let’s asume that we are going to set up a classic 2 tier CA topology. If your hierarchy looks different, then most of the settings will still apply, but you need to think about the pathlength in your Issuing or Intermediate CA setup CAPolify.inf file (see later).
Standalone root specifications
The standalone root CA will work fine on a Windows 2008 server standard edition. 32bit – 64bit… it doesn’t matter. The machine should be offline anyway. This machine will only be used to create the primary (root CA) certificate, and to sign the certificate for the issuing CA. Furthermore, the root CA should not be member of a domain, and should be hardened. You can use the SCW and/or GPO Accelerator tools to secure the host.
Issuing CA specifications
If budget permits, I would highly recommend using Windows 2008 server Enterprise edition for the issuing CA. This will allow you to create custom templates, which will provide you with much more flexibility in the end. Of course, if you don’t have budget, 2008 standard edition will work as well. Even 2003 or 2000 CA’s will work. This blog post will assume that you are using Windows 2008 server Enterprise edition. If you are using standard editions, skip everything about custom templates (see later). Keep in mind : CA running on Windows server standard edition only supports v1 templates.
This server should be part of your AD, as a member server. (Enterprise CA)
CRL & AIA
In every CA scenario, one of the features that is part of your CA is called CRL (Certificate Revocation List). Access to this list (of revoked certificates) may be fundamental to the security of your environment. So it will be important to think about the CRL prior to installing the CA services. The CRL distribution point can be placed on a webserver, file server, or accessed via ldap.
If you are going to use certificates on the internet, it is recommended to limit the CRL access to a webserver only. After all, you don’t want to open up your firewall to allow ldap queries to your DC’s or allow file share access from the internet.
The same reasoning also applies to the way the AIA can be accessed. You can use the same distribution point techniques as with CRL, but again, I would recommend using web based distribution only.
You can change the crl & aia path afterwards, but the changes will only be visible when you renew existing certificates, or create new certificates.
In short : CRL and AIA (Authority Information Access. This basically refers to the certificate of your root CA) distribution points must be part of your design. It is recommended to enable a http distribution point and disable all others. If you want to allow access to your CRL over the internet, you may have to set up split DNS, and set up a dedicated webserver in your DMZ. You can then copy the crl files to that webserver using a script.
By default, the aia (crt) file is saved under \\serverpki01\c$\Windows\System32\certsrv\CertEnroll. If you don’t modify the default CDP (CRL Distribution Point) settings, then the crl files will be stored in this folder as well.
Both the crl files and the crt files need to be copied to your CRL/AIA Distribution Point webserver, if that is what you want to do. Furthermore, the URL in the CDP must work – so you may need to check the filenames of the crl/crt files and see if they match the filename mentioned in the CDP. If not, you will have to rename the files while copying them from the CA server to the webserver(s).
OCSP
Using classic CRL may introduce a couple of problems. You need to build some custom scripts and separated websites in order to properly make the crl available internally and on the internet. On top of that, as the number of certificates grows, the number of revoked certificates may increase as well. As a result, the crl file will just grow larger and larger, which means that it will take longer and longer for clients to download the crl files.
Furthermore, certain network activities may generate a lot of traffic to the crl at the same time. If a user sends a signed email to a very large group of users at the same time, the crl webserver may not be able to handle this amount of traffic.
You can set up additional CA’s in order to overcome this problem, use delta CRL’s, partitioned CRL’s etc.. but you are not really solving the problem. A possible solution for classic CRL issues is the implementation of an OCSP (Online Certificate Status Protocol) (RFC 2560), which is introduced in Windows 2008. (click here for more info)
Does OCSP mean that you do not have to care about using the classic crl distribution points ? Yes and no. If you only use OCSP compatible clients/applications, then you don’t really need to use these distribution points. But because a lot of legacy stuff is still out there, it may be wise to at least implement a crl distribution point as well as the OCSP solution.
Before you begin : conventions & checklist
Before starting the installation, these are a couple of things that you should prepare / document when planning AD CS deployment.
Hostnames : After installing AD CS on a server, you cannot change the hostname of the server anymore. Make sure your server has been configured with its final hostname / fqdn.
Key length : The typical key length for the average root CA should be 4096 bits or higher. The typical key length for an issuing CA should be 2048 bits or higher. Just keep in mind that, depending on the use of your CA infrastructure, you may encounter some limitations. Some Nortel Contivity VPN routers & Cisco VPN 3000 concentrator devices (and other legacy equipment), Java versions older than 1.5, etc… don’t like certificates in the chain that have a key length that is larger than 2048 bits. Is this a reason to ‘weaken’ your root CA key length ? According to me : no. I would consider either building a separate single root CA, just for creating certificates for these devices, or just replace this equipment with newer equipment. Sometimes, you will also have the option to set the trust point to the certificate of the issuing CA instead of the root CA, which should also solve the issue.
For servers, end users, etc, I would recommend using a key length of at least 1024 bits.
Common Name & Distinguished Name : When setting up a CA, you will be asked to provide a Common Name and Distinguished Name. The CN basically refers to the logical name you want to assign to your CA. For your root CA, this could be «My Root CA 01», for an issuing CA, this could be «My Issuing CA 01».
I would recommend using a sequence number in your common names (as as a consequence, in your Distinguished Names also). This will help you creating unique filenames for CRL’s / AIA
The Distinguished Name consists of the Common Name, followed by
OU (optional)
O (Organization)
C (Country)
It is recommended to provide at least the O (organization) and C (Country) attributes to the DN.
Key store / CryptoAPI
WIndows 2008 introduces a new key store called CNG. This key store offers better protection, so it is recommended to use this new key store for both your root and issuing CA’s. For the root CA, you should enable «Strong private key protection» as well.
Store the CA keys
You can keep the root CA key on the root CA, but it may be better to store it on a smartcard or something and remove it from the root CA. This will make the root CA even more secure.
CA Hashing algorithm
You will need to select a hashing algorithm, which will be used to sign the certificates that are issued by the CA. For maximum compatibility, SHA1 can be used. If you don’t really care about max. compability, feel free to use a more secure hashing algorithm.
Lifetime / Validity / Expiration
Another set of parameters that needs to be prepared are lifetime / key validity settings.There are 2 main types : certificate lifetime settings, and crl lifetime settings.
The certificate validity specifies how long a specific certificate will work before it is expired. You can (and should renew this certificate) at 80% of its lifetime. If you forget about this, users will receive certificate warnings and certain applications may stop working.
Basically, not only the lifetime settings are important, the key renewal process is equally important as well.
For a root CA, you can set the lifetime to a couple of years. (e.g. 15 years). Every certificate that is signed by the root CA, can have a maximum lifetime of the root CA’s lifetime. Since the root CA is only used to sign the issuing CA certificate, this only applies to the lifetime of the issuing CA certificate.
Once this issuing certificate is signed, the same rule will apply to all certificates issued by the issuing CA. So if you have set your issuing CA to expire after 12 years, then this will have an impact on the certificates that are created/signed on the issuing CA.
Webserver certificates, user certificates, etc… usually have a lifetime of 1 year. But you can specify the lifetime yourself. But in most cases, 1 year would work fine.
The CRL validity determines how often a CRL will be renewed & should be published on the CRL distribution point. A second CRL lifetime setting is the delta crl lifetime. This indicates how often the delta crl is created and published. Since the delta only contains changes, this can happen faster than the full (base) crl. For an internal issuing CA, you can set the full crl lifetime to e.g. 1 week, and the delta crl to one day. Luckily, you can specify a grace period as well (e.g. 2 days), so clients would have 2 additional days to connect to the crl distribution point. As with many security related settings, you need to find your own balance between security and functionality. The faster you set crl/delta crl expiration, the more accurate they will be, but this comes at a resource/bandwidth/functionality price. It’s up to the applications/developers to determine the behaviour when the latest crl could not be downloaded / used for validation. The application will decide whether this will become a blocking or non-blocking issue.
The crl for a root CA should not change very often. After all, it is only used to sign another CA certificate. The only reason for a root CA crl to get updated is when the issuing CA certificate needs to be revoked (which, if all goes well, should never happen). Basically, the crl validity for a root CA can be set to 1 year. In that case, you need to boot the CA at least once per year (BEFORE the crl validity date has expired) and create / publish a new crl). After creating the crl, you can shut down the root CA again.
Timesync
Since timing is important (renewal, revocation, expiration), it is recommended to timesync your CA with a trusted NTP timesource.
DNS
If you want to make your CRL / AIA distribution point accessible internally and externally, you may need to set up split DNS. Pick a solid FQDN for the URL, that can be configured on your internal DNS (pointing to your internal webserver) and on the external DNS server (pointing to an publicly reachable webserver). I do not recommend using the same webserver for both purposes. You can easily copy the crl files to a remote webserver, so it is better to keep the internal and external servers separated.
IP config
Although it is not a CA requirement, it is advised to use static IP addresses for all CA servers.
Database & log location
By default, the certificate database and log files are stored somewhere under the %system32% folder. It is recommended to change this to another folder. Make sure to apply some NTFS permission changes. Basically, only administrators/System should be allowed to access these folders, so you can remove SERVER\Users from the list of NTFS permissions on your new folder.
X.509 Certificate Version support
Windows 2003 and 2008 support X.509 v3 certificates.
SP, CP and CPS
The Security Policy (SP), Certification Policy (CP) and Certificate Practice Statement (CPS) are 3 documents that, imho, are really necessary in order to professionally run a CA, manage certificates, etc. These documents may be (technically) easy to write, but will require a lot of effort to get them approved. Nevertheless, these documents describe the foundations about how you are going to handle security and your CA environment.
The CP is a document that describes how your organization will validate the ID of a certificate’s subject and for what purposes a certificate can be used. In most cases, the CP consists of a couple of classes, each indicating a validation process and key usage description. The DoD has build a set of classes that can help you writing your own CP.
See http://iase.disa.mil/policy-guidance/index.html#pki and http://iase.disa.mil/pki/dod-cp-v90-final-9-feb-05-signed.pdf
For small to medium sized organizations, it is not uncommon to have only 2 to 3 classes :
(example)
| Class | ID Validation | Usage |
| YourOrg Class 1 | email address only | |
| YourOrg Class 2 | – user or device must log on – request will be issued when CA admin has received formal, written & signed request including motivation/reasoning for the request Request must contain : – Subject Distinguished Name – … |
web server SSL IPSec Computer Domain Controller |
| YourOrg Class 3 | – user most log on – user must provide one piece of ID (written request including ID) |
digital signature encryption client authentication |
In addition to this table, you need to make some decisions about how you want to certificates to be enrolled. Do you want them to be enrolled automatically or manually ? Do you want everybody to be able to request the certificate, or just a limited group of users ? (e.g. admins) Do you want a group of people to be able to issue requests, or just a very limited group of (central) admins ?
It is advised to design the delegation model prior to installing the CA, because you will need this kind of information when setting up the templates on your issuing CA.
The CSP document describes how the CA will be managed to uphold security and CP. This document contains (a.o.) :
– how will the CA enforce measures to validate certificate’s subject ?
– Organizations liability description in case of «problems»
– Revocation requirements (in case a certificate needs to be revoked before it has expired)
– …
=> Look at ISO 28811 (Iso standard for CP and CSP) + RFC 3647
You can find a lot of CPS documents available on the internet, which should help you building your own.
Root CA Installation
There are 2 ways to install a CA : you can either use a configuration file, or you can install using default settings and then change the parameters that can be set in the configuration file afterwards.
Using configuration file CAPolicy.inf
If you want to install the CA using a configuration file, then you will have to create a text file called CAPolicy.inf and store it in the Windows (%windir%) folder. The filename and path are very important. The file must exist before you start the installation, otherwise it will not be processed.
Sample CAPolicy.inf file :
; ; CAPolicy.inf example file for the Root CA ; [Version] Signature= "$Windows NT$"
[Certsrv_Server] ; ; [1] Defines the key length of the CA certificate ; RenewalKeyLength=4096 ; ; [2] Defines the duration that the CA certificate is valid when it is renewed ; RenewalValidityPeriod=Years RenewalValidityPeriodUnits=15
;
; [3] Defines the CRL period and CRL delta period
;
CRLPeriod = Years
CRLPeriodUnits = 1
CRLDeltaPeriod = Years
CRLDeltaPeriodUnits = 1
;
; [4] Defines whether to load the default templates or not.
LoadDefaultTemplates=0
[CRLDistributionPoint] ; ; [5] No CRL distribution point is defined for the CA certificate ; This is because a root certificate must not have a CRL distribution point ; because there is no parent CA that would be able to maintain the CRL. ; An empty section means that there is no CRL distribution point defined
;empty=true is only required for Windows 2003 servers. 2008 assumes Empty=true by default Empty=true [AuthorityInformationAccess] ; ; [6] There is no path to a parent CA certificate because a self signed root ; has no parent CA. ; An empty section means that there is no AIA distribution point defined;
;empty=true is only required for Windows 2003 servers. 2008 assumes Empty=true by default Empty=true ;NOT APPLIED @IMPERIAL ;[BasicConstraintsExtension] ; ; [7] The PathLength defines how many subordinate CA's are allowed as ; subordinates of this CA. A CA in a 2-tier CA hierarchy will have up ; to 1 subordinate CA levels
; ;PathLength = 1 ;Critical = True
As you can see in the example file, by default, the Windows 2008 root CA will not include AIA and CDP (CRL Distribution Point) information in the root CA certificate. If you want to specify this information, you must change the [CRLDistributionPoint] and [AuthorityInformationAccess] sections :
[CRLDistributionPoint] ; Empty=false
URL = http://%1/cert/My Root CA.crl
Critical = true
The following variables can be used :
| Variable | Name |
| %1 | ServerDNSName (fqdn) |
| %2 | ServerShortName (Netbios) |
| %3 | CA Name |
| %4 | CertificateName |
| %5 | Domain DN |
| %6 | ConfigDN |
| %7 | CATruncatedName |
| %8 | CRLNameSuffix |
| %9 | DeltaCRLAllowed |
| %10 | CDPObjectClass |
| %11 | CAObjectClass |
If you have designed your CDP / AIA webservers, you can also provide the URL to that webserver. The name of the files that are generated by the CA (.crl for CRL and .crt for AIA) have to match the file that will be placed on the webserver. If the files don’t match, you can still use a script to rename the files afterwards.
You can now start installing & configuring the AD CS role on the server.
Without configuration file
No config file means that you can start installing & configuring the AD CS role, and you’ll have the modify the settings afterwards.
Installing AD CS
In Windows 2008 server, AD CS acts as a role, so you will have to install AD CS using «Add roles»
Accept the warning about the fact that you will not be able to change the hostname after you have installed CA.
Select the Certificate Authority Role. If you are installing a dedicated root CA, you don’t need the Certificate Authority Web Enrollment
![clip_image002[6]](https://www.corelan.be/wp-content/uploads/2008/09/clip-image0026-thumb.jpg)
Select «standalone» (note that you cannot select «Enterprise» since the root CA is and should be a standalone server, not a domain member)
![clip_image002[8]](https://www.corelan.be/wp-content/uploads/2008/09/clip-image0028-thumb.jpg)
Select «Root CA»
![clip_image002[12]](https://www.corelan.be/wp-content/uploads/2008/09/clip-image0021211-thumb.jpg)
Select «Create a new private key»
![clip_image002[10]](https://www.corelan.be/wp-content/uploads/2008/09/clip-image00210-thumb.jpg)
Select the CSP (Cryptographic Service Provider) and hashing algorithm, and set the key length. On the root CA, also select «Use strong private key protection)
Note : the CSP’s with a # in the name refer to the new CryptoAPI
![clip_image002[14]](https://www.corelan.be/wp-content/uploads/2008/09/clip-image00214-thumb.jpg)
Set the Common Name for this CA : e.g. My Root CA
Set the Distinguished name suffix : e.g. OU=IT,O=MyOrg,C=BE
The «Preview of distinguished name:» field should now indicate CN=My Root CA,OU=IT,O=MyOrg,C=BE
Set the validity period (15 years in my example)
Choose the database & log locations
Finalize the install
![clip_image002[16]](https://www.corelan.be/wp-content/uploads/2008/09/clip-image00216-thumb.jpg)
![clip_image002[18]](https://www.corelan.be/wp-content/uploads/2008/09/clip-image00218-thumb.jpg)
Manually modifying settings
Whether you have used a CAPolicy.inf file or not, it is advised to review all important settings before continuing.
You can get all current settings by running the following command line command :
The settings that will require your attention are :
CRLPeriod, CRLPeriodUnits, CRLOverlapUnits, CRLOverlapPeriod, ValidityPeriod, ValidityPeriodUnits
You can define/change these settings using the certutil commands :
certutil -setreg CA\CRLPeriod "Years"
certutil -setreg CA\CRLPeriodUnits 1

certutil -setreg CA\CRLOverlapPeriod "Months"
certutil -setreg CA\CRLOverlapUnits 1

certutil -setreg CA\ValidityPeriod "Years"
certutil -setreg CA\ValidityPeriodUnits 12
Pay close attention to the syntax. If you mistype a regkey, you will not get a warning or error. Certutil will simply create a new registry key without further notice. You can find all registry keys under HKLM\System\CurrentControlSet\Services\CertSvc\Configuration\My Root CA
These 3 settings define
– the CRL expiration (1 year for a root CA should be OK)
– the CRL grace period (1 month)
– the max. Validity Period for certificates that will be signed on this CA. Since we are only going to sign the Issuing CA certificate on this CA, you can set this to 10 or 12 years.
Completing the configuration of the root CA
Open mmc and add the «Certificate Authority» snap-in, running on the local machine, to the list. Open the snap-in. Select the root CA, right-click and choose properties. You will get a couple of tabsheets :
General : Using the «View Certificate» button, you can see the Details of the root CA certificate. Open the «details» tabsheet and look for the «Key Usage» and «Basic Constraints» fields, you should get this :
![clip_image002[20]](https://www.corelan.be/wp-content/uploads/2008/09/clip-image00220-thumb.jpg)

Policy Module : This tabsheet allows you to define whether certificate requests should be processed automatically or manually. On the root CA, set this to «Set the certificate request status to pending….» This will ensure that you will have to manually issue the Issuing CA certificate request later on.
Exit module : This allows you to define whether you want to publish certificates to the filesystem or not. The default setting is Yes. Leave this setting to Yes
Extensions : This is the place where you will need to define the CDP and AIA parameters. On the root CA, only allow publication to local file system and http. (So basically remove ldap:// and file:// and modify http:// and c:\windows\… to whatever suits your environment.
You need the local filesystem entry so the crl file is put on the local filesystem when a new crl is created. You can then copy this crl file (or files, if you allow delta crl’s to be created as well) to the webserver, that is specified in the http:// cdp extension.
– Local filesystem : e.g. d:\certs\cdp\.crl
Enable «Publish CRLs to this location»
Enable «Public Delta CRLs to this location»
– HTTP : e.g. http://crl.mydomain.com/.crl
Enable «Include in CRLs. Clients use this to find Delta CRL locations»
Enable «Include in the CDP extension of issued certificates»
Enable «Include in the IDP extension of issued CRLs»
For AIA, you can use similar settings (enable filesystem and http, remove ldap:// and file://).
– Local filesystem : e.g. d:\certs\aia\
.crt
– HTTP : e.g. http://aia.mydomain.com/.crt
Enable «Include in the AIA extension of issued certificates»
If you are using OCSP, enable «Include in the online certificate status protocol (OCSP) extension
Storage : this indicates where the CA will store its data. For a standalone root CA, this will be a location on a disk. For an Enterprise root CA, this will be AD
Certificate Managers : This setting allows you to delegate access to some specific templates. This is not the only place where you can set security on templates, so you can choose ‘Do not restrict certificate managers’ for now, and use the security tabsheets to further delegate control.
Enrollment Agents : Only supported on Enterprise CA
Audting : I would recommend auditing all events
Recovery Agents : Only supported on Enterprise CA
Security : Allows you to define who can Read, Issue/Manage Certificates, Manage the CA and Request Certificates. You will be able to further refine security on specific templates on your Enterprise CA. For the root CA, I would strongly recommend to limit the number of people who will have access to this CA.
When everything has been configured, restart the certificate services :
net stop certsvc
net start certsvc
Note:
Do NOT issue any certificates until all of the settings have been configured & verified to be working !!
You can verify the settings by creating a crl : Open the Certificate Authority MMC, open Revoked Certificates, right-click and choose «All Tasks – Publish»
Verify that the file was created under d:\certs\cdp
Open the file (which should still be empty) and look at the «Issuing Distribution Point Name». Verify that it contains the value that you had expected.
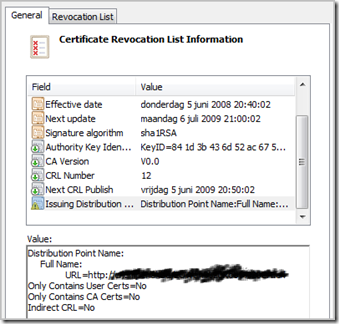
Look at the Effective Date and Next Update dates. If you have set the CRL Period to 1 year, then the values in this field should reflect that setting.
If everything is fine, you are now ready to set up the Issuing CA.
Issuing CA Installation
Template versions
Windows 2008 supports 3 Certificate Template versions : Version 1, 2 and 3.
Version 1 was introduced with Windows 2000 CA, Version 2 was introduced with Windows 2003 CA and version 3 works with Windows 2008. Windows 2008 supports version 1, 2 and 3 certificates, however version 3 templates (don’t get confused with x.509v3 certificates) are only supported when you have extended the AD schema with 2008 schema extensions (schema version 44). The schema update is not mandatory, but you won’t be able to use v3 templates. In other words, if you create/change/… templates, you will have to select 2003 compatible (v2) templates, otherwise things won’t work as expected.
Optionally updating the schema
Whether you are running Windows 2000 AD (SP4), 2003 AD or 2008 AD, you can update to the 2008 schema version using this procedure :
- Backup AD
- Insert the 2008 server DVD into the DVD drive of the DC that holds the schema master FSMO role (run netdom query fsmo to find your schema master)
- Log on with Schema Administrators and Enterprise Administrators permissions in the forest root domain, and Domain Admin access for the domain that hosts the schema operations master.
- Stop AD replication (see Performing an AD schema update in a safe way)
- open a command prompt and navigate to the DVD drive (Z: in my example)
- Run the following commands :
C:\>z:
Z:\> cd \sources\adprep
Z:\sources\adprep>adprep /forestprep

ADPREP WARNING:

Before running adprep, all Windows 2000 Active Directory Domain Controllers in
the forest should be upgraded to Windows 2000 Service Pack 4 (SP4) or later.

[User Action]
If ALL your existing Windows 2000 Active Directory Domain Controllers meet this
requirement, type C and then press ENTER to continue. Otherwise, type any other
key and press ENTER to quit.

C
When the schema change has complete, enable replication again.
Verify that replication occurs and works fine. When AD has been replication to all DC’s, verify that the schema has been extended on all DC’s. The new version should be v44.
- Next, find the infrastructure master FSMO role holder in the domain. Log on to this DC as Domain Admin
- Backup AD
- Stop replication
- Insert the Windows 2008 server DVD in the drive and open a command prompt
- Navigate to the DVD drive (Z: in my example) and run the following commands :
C:\>z: Z:\> cd \sources\adprep Z:\sources\adprep>adprep /domainprep /gpprep
(Perform these steps for every domain in the forest)
Enable replication again if everything went well & verify that replication works fine.
Note : These schema changes are not required in order to set up a Windows 2008 Enterprise CA in your forest. The updates will only enable the use of v3 templates. So if you can live with v2 templates (which should be ok for most scenario’s), you do not need to prepare the forest or the domains. And if you ever want to start using v3 templates, you can still update the schema afterwards.
Installing the Issuing CA
The initial setup process of the Issuing CA looks very similar to the procedure used to set up the root CA. Again, you can start with building a CAPolicy.inf file, or you can just go ahead and set up the CA, and then refine the various settings afterwards.
An example CAPolicy.inf file could look like this :
; CApolicy.inf file for the Issuing CA
;
[Version]
Signature= "$Windows NT$"

[Certsrv_Server]
;
; [1] Defines the key length of the CA certificate
;
RenewalKeyLength=2048
;
; [2] Defines the duration that the CA certificate is valid when it is renewed
;
RenewalValidityPeriod=Years
RenewalValidityPeriodUnits=10
;
; [3] Defines the CRL expiration
;
CRLPeriod=Weeks
CRLPeriodUnits=1
;
; [4] Defines the Delta CRL
;
CRLDeltaPeriod=Days
CRLDeltaPeriodUnits=1

;[BasicConstraintsExtension]
;
; [5] The PathLength defines how many subordinate CA's are allowed as
;     subordinates of this CA. A CA in a 2-tier CA hierarchy will have up
;     to 1 subordinate CA levels
;
;PathLength = 0
;Critical = True
;
; [6] You can optionally define not to load the default templates.
;     I usually don't enable this feature, but disable the ones that I'm not
;     going to use manually, after installation
;LoadDefaultTemplates=0
Add the computer object that is going to host the CA into the Pre-Windows 2000 compatible access group, and into the «Cert Publishers» Domain local groups in each domain.
Log in as member of the Enterprise Admins and local administrators on the server that is going to host the Issuing CA
You need to «Add Roles» and add the Active Directory Certificate Services role. Read and accept the note about not being able to change the hostname or domain membership afterwards. On the next page, select «Certification Authority» and «Certification Authority Web Enrollment». You will be prompted to access the additional roles that need to be installed because you have selected the «Certification Authority Web Enrollment»
![clip_image002[1]](https://www.corelan.be/wp-content/uploads/2008/09/clip-image0021-thumb.jpg)
On the next screen, select «Enterprise». If you are not an Enterprise Admin, you will not be able to select «Enterprise»
![clip_image002[4]](https://www.corelan.be/wp-content/uploads/2008/09/clip-image0024-thumb.jpg)
Select «Subordinate»
![clip_image002[6]](https://www.corelan.be/wp-content/uploads/2008/09/clip-image0026-thumb1.jpg)
Select to create a new private key
![clip_image002[8]](https://www.corelan.be/wp-content/uploads/2008/09/clip-image0028-thumb1.jpg)
CSP : RSA#Microsoft Software Key Storage Provider
Key Length : set to 2048
Hash algorithm : select sha1 (for compatibility) or shaxxx for increased security
![clip_image002[10]](https://www.corelan.be/wp-content/uploads/2008/09/clip-image00210-thumb1.jpg)
Set the Common Name & Distinguished Name
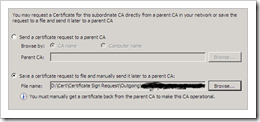
Certificate request to parent : select to save the request to a file. Save the certificate request somewhere on your harddrive, so you can copy it to the root CA and get it signed.
Define the database and log location (e.g. D:\Cert\DB and D:\Cert\Log – again, make sure the NTFS permissions on these folders are set to the absolute minimum)
![clip_image002[12]](https://www.corelan.be/wp-content/uploads/2008/09/clip-image00212-thumb.jpg)
Review the settings and Install to start the installation.
After installing the Issuing CA, we need to get the certificate signed by the root CA
Signing the Issuing certificate on the root CA
Copy the request file that was generated during the installation process to the root CA.
Open the Certificate Authority mmc on the root CA. Right click on the root CA and choose «All Tasks – Submit New Request»
Select the request file. Open the «Pending Requests» view, refresh and verify that you can see the Pending Request
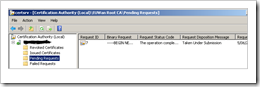
Because you have selected to put all requests in pending state until administrator issues the request, the request will just stay in the «Pending Requests» view until you manually Issue the request. Simply right-click on the pending request and choose «Issue»
![clip_image002[14]](https://www.corelan.be/wp-content/uploads/2008/09/clip-image00214-thumb1.jpg)
Open the Issued Certificates view and verify that the request was issued.
Now we need to export this certificate so we can install it on the Issuing CA. Open the certificate, go to the Details tabsheet and click «Copy to file». Click «next» on the Welcome screen.
Select P7B format, make sure to select «Include all certificates in the certification path if possible»
![clip_image002[16]](https://www.corelan.be/wp-content/uploads/2008/09/clip-image00216-thumb1.jpg)
Save the certificate to disk so you can copy it back to the issuing CA.
![clip_image002[18]](https://www.corelan.be/wp-content/uploads/2008/09/clip-image00218-thumb1.jpg)
Copy the certificate back to the Issuing CA.
Before installing this signed request, it is important to verify that the CDP website is active and works as designed. As long as the CDP doesn’t work, don’t install the certificate yet. Make sure the crl from the root CA is copied to the webserver and matches the URL that is specified in the CDP extension of the certificate that has been signed on the root CA.
There is no technical reason not to install the signed Issuing CA certificate yet, however if you don’t verify that the CDP works, you may be installing an already revoked certificate, and if you start deploying certificates right away without verifying the CDP, these certificates may contain a wrong CDP URL.
If you are sure the CDP works, you can import the certificate into the Issuing CA :
Open Certificate Authority MMC, right click the Issuing CA name and choose «All Tasks – Install CA Certificate»
Select the signed certificate (the file that was copied back from the root CA). That’s it. You can now start the Issuing Certificate Authority by pressing the «start» button.
Setting Issuing CA properties
Right click on the Issuing CA name in the Certificate Authority mmc, choose «properties»
Go to the Policy Module tabsheet and set the Request handling to «Follow the settings in the certificate template»
In the Exit module tabsheet, disable «Allow certificates to be published to the file system»
Turn on auditing for all CA events + enable KSP auditing
auditpol /set /subcategory:"other system events" /success:enable /failure:enable
Set CDP & AIA extensions, set security, and verify that the storage indicates that Configuration data is stored within AD.
I recommend verifying whether all CRL settings are set correct before creating any certificates. You can use the same certutil commands that were used when setting up/configuring the root CA, but with different parameter values of course
Suppose you want to set the CRL to 1 week, with 2 days of Grace period, and set the CRL Delta to 1 day and finally, you want to set the maximum validity period for any certificate to 2 years, then use the following commands :
certutil -setreg CA\CRLPeriod "Weeks"
certutil -setreg CA\CRLPeriodUnits 1

certutil -setreg CA\CRLOverlapPeriod "Days"
certutil -setreg CA\CRLOverlapUnits 2

certutil -setreg CA\CRLDeltaPeriod "Days"
certutil -setreg CA\CRLDeltaPeriodUnits 1

certutil -setreg ca\ValidityPeriod "Years"
certutil -setreg ca\ValidityPeriodUnits 2
Stop and start the certificate services in order to make these changes effective.
From this point forward, the Issuing CA will start producing CRL files. You will have to write a script to copy the crl files and crt (aia) file to the webserver(s) in order to make sure the CDP content is up to date.
Before creating certificates, you should use the pkiview.mmc tool in order to verify that everything works. When you open the Issuing CA node in the PKI View, you should see 4 times «OK», indicating that the CA certificate is fine, the AIA and CDP locations are fine and accessiable, and the DeltaCRL Location works fine too.
Creating custom templates and managing templates on the Issuing CA
At lot of work has been done already, but we are still not ready to issue any certificate yet. First, we need to determine which templates we are going to allow, and who will be allowed to use those templates.
If you open the «Certificate Templates» view in the Certificate Authority MMC on the Issuing CA, you will see the list of default templates (assuming that you did not set the LoadDefaultTemplates=0 in the CAPolicy.inf file)
If you don’t see the default templates, you can get them back by running
certutil -InstallDefaultTemplates
If one or more of the default Templates are installed, but just not enabled (visible in the view), then you can enable that Template by running
certutil -SetCATemplates +Administrator
(Administrator Template in this example)
Pay attention : don’t forget the ‘+’ in the command, otherwise you will disable all Templates, except the Administrator template
The default Templates are v1 templates. As a result, when running a Windows server 2008 (or 2003) standard edition, you only hace access to v1 templates. The Directory Email Replication template is a v2 template.
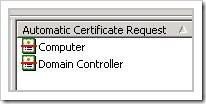
These default templates cannot be fully modified (e.g. you cannot change the key length or renewal period), therefore I do not recommend using them (except perhaps for the following default templates 
- Computer
- Domain COntroller
- EFS Recovery Agent
- Code Signing
- Directory Email Replication
I strongly recommend creating new templates and then deploying these templates to the CA. This will allow you to basically manipulate & tweak all of the available template features. You can create a new template by right-clicking the Certificate Templates view, and choose «Manage».
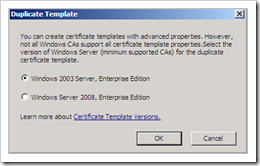
You will now get the list with all available templates. Select one of the templates, right-click and choose «Duplicate Template». The first thing that you will be asked to do is to select the Template version. Even if you have not updated the Schema to 2008, you will still get the option to create a Windows Server 2008, Enterprise Edition template. You can modify and save the template, but if you have not updated the schema, this template will NOT work.
You can now change all of the templates parameters. Don’t forget to set a unique Template Display Name and Template Name. In the Template Name, I recommend not to use any strange characters or spaces. This makes it easier to enable/deploy this new template in the CA.
If you have finished building your new template, let’s say you have created «WebServerInternal1Y», you can activate it by running the following command :
certutil –setCATemplates +WebServerInternal1Y
(again, don’t forget about the plus sign in the command. Otherwise, you would disable all of the existing enabled templates, and only enable the WebServerInternal1Y template)
Restart the Certificate Service to make the new template available.
Delegate access to the templates
The template is the place where you can set the security for this template. You can basically state who can use this template to request certificates, you can determine who can manage this template etc. Before changing the security (or any other parameter), disable the template, make the changes, and then enable it again.
Just make sure that, if the template targets users, you must set «Authenticated Users» to ‘read only’, otherwise they won’t even see the template. You can then grant the «Read and Enroll» permission to a group of users in order to allow certain users to generate a certificate request.
If you have created a template that targets computers, you will have to allow a computer group to have ‘read & enroll’ access also.
If security has been set, you can enable the template again using the certutil command (see above)
In general, these are the rules :
- To enroll a certificate, a user must have Read and Enroll permissions
- To enable autoenrollment, the user/computer object must have Read, Enroll and Autoenroll permissions. Of course, the template must allow for automatic enrollment
- For certificate renewal, the user/computer object must have read and enroll permissions
- The manage templates, the user must have write permissions
- Always make sure «Authenticated Users» have read permissions, otherwise you won’t be able to see the certificate template in the Web Enrollment page. This does not mean that every user will see all templates, it only allows the CA to build the list of templates. Then, based on the enrollment permissions, the template will be available in the list or not.
- In order for a CA to be able to issue certificates, it must have read permissions on the templates.
Enable the use of Subject Alternate Name attributes in certificates
If you want to allow the use of SAN in your certificates, you will have to enable this.
Default setting :
![]()
You can enable this by running the following command :
certutil –setreg policy\EditFlags +EDITF_ATTRIBUTESUBJECTALTNAME2
Restart the Certificate Service to apply the changes
Configuring the Web Enrollment website
Depending on your needs, you may want to enable AUthentication on the Web Enrollment website. But in any case, I would recommend you to enable SSL on the website. Otherwise, you may not be able to properly request certificates. There’s a little problem with this. If you want to allow people to access your Web Enrollment page over HTTPS, you don’t want them to get a certificate warning, right ? But if you want to fix this, you need to request a certificate from this Issuing CA and install it on the webserver…
This is how you do this
- Open IIS Manager and select the server name
- Open «Server Certificates» and create a self-signed certificate.
- Select the Default Web Site (which is hosting the CertSrv virtual directory/application) and enable the self signed certificate. Make sure HTTPS works and that you can access the webpage over HTTPS.
- Enable authentication for the Default Web Site and disable Anonymous Access.
- Go back to the Home page of the IIS manager and select «Server Certificates» again
- Select «Create Certificate Request»
- Fill out the fields (Common Name = FQDN of the Web Enrollment Website URL)
- Save the request to a file
- Open your webbrowser and navigate to the https://server/CertSrv website. Ignore the certificate warning and log on
- Click «Request a certificate»
- Choose «Submit a certificate request by using a base-64…»
- Open the request text file, copy the contents and paste it into the Saved Request field on the web page. Select the Certificate Template that relates to Web Servers and click Submit
- Depending on the settings in the template, the request will be issued either automatically (or will require an administrator to issue the request). Just make sure the request gets issued if this doesn’t happen automatically.
- If manual issuing was required, go back to the home page of the Web Enrollment web page. This time, choose «View the status…»
- You will see the Saved Request. Click on the request.
- You will now get access to the certificate. If admin access was not required to issue the certificate, you would be redirected to this page right after submitting the certificate request
- Save the Base64 encoded file to disk.
- Go back to IIS Manager. Select «Complete Certificate Request»
- Feed the downloaded file, set the friendly name to something you can recognize easily as being the SSL certificate for the CertSrv website
- You can now use this certificate for the CertSrv website. If your clients trust this Issuing CA, they will not get a certificate warning anymore when accessing the Web Enrollment page.
Renewal process
A quick cli command to list all certificates that will expire in a given number of days
(Example : list all certificates that will expire in less than one year. Start date is today (14th of july 2008), end date is today+ 1 year (14th of july 2009)
certutil –view -out "RequestID,RequesterName,NotAfter"
-restrict "NotAfter <= 14/07/2009 00:00,NotAfter >= 14/07/2008 00:00"
If you want to know which certificate was enrolled using autoenrollment (and may be renewed automatically based upon your template settings, and which ones will required manual intervention :
certutil -view -out "RequestID,Request DistinguishedName"
certutil -view -v -out rawrequest | findstr Process
The first command will list the Requests, the second command will indicate the Process used to enroll the certificate. If you put those 2 outputs next to each other, you can easily build a list of certificates that will require manual renewal. Of course, you can limit the scope of this command using the -restrict parameter as well.
Processes including «CertEnrollCtrl.exe», «svchost.exe» indicate automatic enrollment.
Processed including «inetmgr.exe», «certreq», «cscript» indicate manual enrollments.
Renewing the root CA certificate
If you need to renew the root CA certificate, you must take the following steps
- Boot the root CA
- Open Certificate Authority Management Console
- Select the Root CA in the right hand pane, right click and choose «All Tasks» – «Renew CA certificate»
No further actions are required.
Renewing the issuing CA certificate
If you need to renew the issuing CA certificate, this is what you will need to do :
- Open Certificate Authority Management Console
- Select the Issuing CA in the right hand pane, right click and choose «All Tasks» – «Renew CA certificate»
- Save the request to a file
- Boot the root CA and copy the request to the root CA
- Open Certificate Authority Management Console on the root CA
- Select the Root CA in the right hand pane, right click and choose «All Tasks» – «Submit new request»
- Submit the request to the root CA, issue the request on the root CA
- Export the new signed issuing CA certificate from «Issued Certificates» on the root CA, copy the file to the Issuing CA
- Install the new certificate on the Issuing CA
Backing up the CA
As part of your daily operations, you must back up the CA. YOu can only backup the private key by right clicking the CA and selecting «Backup». The nice thing is that you only need to do this once in the lifetime of the certificate. As long as you keep the key in a safe place, you should be fine.
If you want to backup the CA database, then you can use a certutil command in a scheduled task script. The only requirement for the script to work is that the target directory is empty.
Assuming that you would back up your CA into the D:\backup folder, then you could use the following script :
@echo off
cls
echo Moving old backup folders
rmdir d:\backup\database.5 /S /Q
ren d:\backup\database.4 database.5
ren d:\backup\database.3 database.3
ren d:\backup\database.2 database.4
ren d:\backup\database.1 database.2
ren d:\backup\database database.1
echo Backing up CA
certutil -backupdb d:\backup >backupcertdb.log
(Just make sure the d:\backup folder exists the first time you launch the script). If you run this script just once per day and copy the d:\backup folder to tape every day, then you have a nice little rotation mechanism.
If you ever need to restore the CA, you can simply build a new server with exact the same hostname. During the setup of the CA , you can select to restore the CA from a backup and feed it your backup key and backup database.
Building your chain of trust : deploying certificates
Deploying the root CA certificate
There are a couple of ways to deploy the root CA certificate into the Trusted Root Certificate Authorities store on your computers. If the computers are part of the domain, you can use a Group Policy to deploy the root CA certificate. If you cannot use a GPO, you will have to
– manually install the certificate into the local machine store (mmc – certificates (Local Machine ) …)
– install the certificate using command line (see below)
In both cases, you need to have local administrator access in order to perform the task. The nice thing about the command line option is the fact that you can use e.g. VBScript/WMI in order to remotely execute the command line script in order to deploy the certificate..
certutil -addstore -f Root RootCACertificate.crt
Fact is – deploying the root CA certificate is the easiest when you can use a GPO. If you want to deploy the root CA certificate into the Trusted Root CA of all machines in your domain, you can edit the Default Domain Policy. First, make sure you have a copy of the root CA certificate on disk. Next, edit the GPO.
Go to “Computer Configuration” – “Windows Settings” – “Security Settings” – “Public Key Policies” – “Trusted Root Certification Authorities” and import the certificate of your root CA. This should take care of the deployment of the root CA when the GPO gets applied to all computer objects in the domain.
Alternatively, you can just add the root certificate into AD :
certutil -dspublish -f RootCACertificate.crt RootCA
Deploying the root CA certificate to Windows Mobile devices
It basically comes down to this
1. Open the root CA certificate, open the Details tabsheet and go to «Thumbprint». You will need this string later on
2. Save the certificate to disk («Copy certificate» and select Base64 encoded CER file)
3. Open the cer file in wordpad and copy the base64 encoded string between —-BEGIN CERTIFICATE—– and —-END CERTIFICATE—– (so exclude these 2 lines)
4. Create a xml file
<wap-provisioningdoc>
 <characteristic type="CertificateStore">
  <characteristic type="ROOT" >
   <characteristic type="PASTE THE THUMBPRINT STRING HERE, NO SPACES">
    <parm name="EncodedCertificate" value="PASTE THE BASE64 ENCODED CERTIFICATE STRING HERE"/>
   characteristic>
  characteristic>
 characteristic>
wap-provisioningdoc>
Paste the thumbprint string and the Base64 encoded string between the quotes and save the file as _setup.xml
5. Convert the file into a cab file using makecab _setup.xml rootcert.cab
Deploying root CA Certificate into a Java Keystore
Copy the root certificate .cer file to the machine and run the following command
C:\Program Files\Java\jre1.6.0_07\lib\security>"c:\Program Files\Java\jre1.6.0_07\bin\keytool.exe"
-import -trustcacerts -keystore cacerts -file "rootCA.cer"
You will be asked to enter the keystore password. If you have not changed the default password, you’ll have to enter «changeit» (without quotes).
Accept the import by entering «yes»
Autoenrolling Domain Controller certificate
First, verify that the Domain Controller certificate allows autoenrollment.
Edit the Default Domain Controller Certificate.
Go to “Computer Configuration” – “Windows Settings” – “Security Settings” – “Public Key Policies” – “Automated Certificate Request Settings”
![clip_image002[22]](https://www.corelan.be/wp-content/uploads/2008/09/clip-image00222-thumb.jpg)
Right-click and choose “Automatic Certificate Request”
![clip_image004[2]](https://www.corelan.be/wp-content/uploads/2008/09/clip-image0042-thumb.jpg)
Click next
Select the Domain Controller Certificate, Click Next, Click Finish
Creating custom certificate requests
Creating certificate requests with Subject Alternate Names
Example : webserver certificate
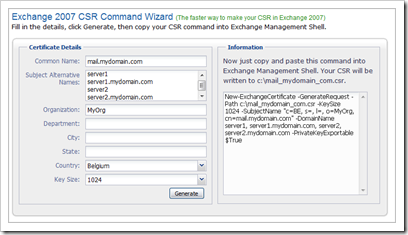
You can create a webserver certificate request that includes a Subject Alternate Name using Exchange 2007 powershell :
New-ExchangeCertificate -GenerateRequest:$true -Path c:\newCert.req -DomainName
www.mydomain.com,crl.mydomain.com,aia.mydomain.com -PrivateKeyExportable:$true   -FriendlyName "MyDomain SSL Certificate with SAN for www crl and aia"   -IncludeAcceptedDomains:$false -Force:$true
Copy the request file to the CA and submit the request file. Issue the certificate and export the issued certificate to file again. You can now import the certificate manually (using Certificates (Local Computer) mmc) or using the following Exchange powershell cmdlet :
Import-ExchangeCertificate c:\SSLCertificate.cer
If you don’t have Exchange powershell, you can also create a certificate request using the certreq utility (see next topic)
Note : since you have specified «PrivateKeyExportable:$true», you can generate/import the certificate on an Exchange 2007 server, then export it (export private key as well) and then import the entire key onto another webserver. So if you set the parameters right, you will have maximum flexibility.
Creating custom certificate requests using certreq
If you need to create a custom certificate request, you can basically build a custom request using the certreq command line utility and a template .inf file. Just make sure to create the request on the machine where the certificate needs to be installed.
In my example, I will explain how to create a certificate request for a domain controller certificate using certreq.
First of all, you should find out what the required attributes/settings are that must be part of the request in order to create a request file that contains all of the mandatory fields. Furthermore, you should get the exact TemplateName for the template that will be used on the CA while submitting the request.
In my example, the Domain Controller request must have the fqdn of the DC as the subject field, and the template is called DomainControllerAuthentication
Create a template file for each domain controller, fill out the Subject field, KeyLength and CertificateTemplate name and put the template file on the domain controller.
The template file looks like this :
;----------------- DC1_remotedomain_com.inf ----------------- [Version] Signature="$Windows NT$ [NewRequest] Subject = "CN=DC1.remotedomain.com" KeySpec = 1
KeyUsage=0xA0 KeyLength = 1024 Exportable = TRUE MachineKeySet = TRUE SMIME = False PrivateKeyArchive = FALSE UserProtected = FALSE UseExistingKeySet = FALSE ProviderName = "Microsoft RSA SChannel Cryptographic Provider" ProviderType = 12 RequestType = PKCS10
[EnhancedKeyUsageExtension]
OID=1.3.6.1.5.5.7.3.1 ;used for server authentication
[RequestAttributes] CertificateTemplate = DomainControllerAuthentication
If the CA requires EnhancedKeyUsageExtensions (e.g. server verification), you should add a section called «EnhancedKeyUsageExtension» and specify the OID to use :
[EnhancedKeyUsageExtension] OID=1.3.6.1.5.5.7.3.1 ;used for server authentication
This may not be required all the time. Check the Enhanced Key Usage Extensions of your Certificate Template on the CA before building the inf template file and generating the request file. Also, this may not be required when submitting the request onto an Enterprise CA.
Once you have created the templates, you can create a request using the following command :
certreq -new DC1_remotedomain_com.inf DC1_request.req
(do the same on DC2, with the template file for DC2)
You can now submit the requests and issue the certificates. Export the certificates and and save the exported .cer file. Copy signed file back to the host where the request was created and run the following command :
certreq -accept DC1SignedCertificate.cer
If you now check the certificates store, you should see the certificate. Verify that, when you open the certificate, it contains a private key (which indicates that the certreq -accept command has bound the request and the signed certificate together)
If you want to use the certificate on another machine, you can now export this certificate (including the private key – of course, if that was allowed in the request)
This type of certificates will facilitate the use of LDAP/S. You can read more on this topic at http://support.microsoft.com/kb/321051/en-us
You can verify the full chain for each DC by using the following certutil command :
If you want to create a template file for creating a SSL certificate for server with fqdn webserver1.remotedomain.com, and you would like to include SAN for www.remotedomain.com, server1.remotedomain.com and web.remotedomain.com and you want to use your Custom CA Template called WebServerInternal1Y, then the template file needs to look like this :
;----------------- webserver.inf -----------------
[Version]
Signature="$Windows NT$

[NewRequest]
Subject = "CN=webserver1.remotedomain.com"
KeySpec = 1
KeyUsage=0xA0
KeyLength = 1024
Exportable = TRUE
MachineKeySet = TRUE
SMIME = False
PrivateKeyArchive = FALSE
UserProtected = FALSE
UseExistingKeySet = FALSE
ProviderName = "Microsoft RSA SChannel Cryptographic Provider"
ProviderType = 12
RequestType = PKCS10

[RequestAttributes]
CertificateTemplate = WebServerInternal1Y
SAN="dns=www.remotedomain.com&dns=server1.remotedomain.com&dns=web.remotedomain.com
Note : You can submit a certificate request for a webserver SSL certificate, including a SAN Attribute, using an advanced request on the Web Enrollment page as well : http://support.microsoft.com/kb/931351
All you need to do is edit the «attributes» field and fill out the san attributes :
san:dns=www.remotedomain.com&dns=server1.remotedomain.com&dns=web.remotedomain.com
Submit the request, and you’ll have the same results.
To see all possible entries in the template.inf file, visit Technet at http://technet2.microsoft.com/windowsserver/en/library/008acdeb-0650-4063-a9a2-1258b3229d4f1033.mspx?mfr=true
Notes :
1. After installing the certificate that was generated using a custom inf template, don’t forget to clean up the temporary (request) files and inf templates. Better safe than sorry.
2. The Windows 2008 CA Web Enrollment GUI does no longer allow users to save certificates in the local machine store (as in 2003). The reason for this is the fact that, under Vista, Internet Explorer does no longer run with administrative permissions, so you cannot save anything in the local machine store. As a result of this design change, the feature was removed from the website. So if you want certificates to be stored in the local machine store, you will have to create a custom request (using inf templates, as explained in this chapter).
Creating certificates for OpsMgr
Obtaining Certificates for Ops Mgr via Command Line or Script
http://technet.microsoft.com/en-us/library/bb735408(TechNet.10).aspx
Creating certificates for Exchange
Sometimes, creating certificates for Exchange 2007, that need to be with a third party CA (= your 2008 CA may be a third party CA to your Exchange environment), may not work from the first time. It is important that the Subject Common Name is specified correctly : http://msexchangeteam.com/archive/2007/02/19/435472.aspx
If you want to make sure your certificate request in Exchange 2007 is ok, you can use the command generator at https://www.digicert.com/easy-csr/exchange2007.htm
CA Management Processes
As with every system configuration, you need to think about the management and maintenance processes that need to be put in place. Two of the most common processes related to a CA are approving/rejecting pending requests, and renew expired certificates. The Windows 2008 CA mmc includes a view for pending requests, and you can sort on expiration date in the ‘issued certificates’ view to see which certificates are about to expire. But both actions require manual intervention, so I wrote a little tool that will allow you to script these 2 actions and send you an email if requests need to be approved, or certificates are about to expire. Check out this post for more info about this tool.
One quick additional comment about the root CA. You probably have your root CA offline. You’ll need to bring you root CA online at least one time per year, in order to avoid issues with your issuing CA.
All you need to do is boot the root CA (it does not have to be connected to the network), export the CRL on the root CA, and copy it to your CRL website (the one used for the issuing CA’s). After that action, you can shut down the root CA again. This will ensure clients will be able to validate the certificate for the issuing CA.
Converting certificates
from pfx to pem
Some appliances only support the use of PEM format certificates. You cannot create PEM format certificates on a Windows 2008 CA, but you can convert a pfx file into a pem file quite easily.
You can use OpenSSL to convert from PFX to PEM. OpenSSL runs on Linux, but a Win32 version can be found at http://gnuwin32.sourceforge.net/packages/openssl.htm or from http://www.slproweb.com/products/Win32OpenSSL.html
To convert a PFX file to a PEM file, follow these steps on a Windows machine:
1. Install OpenSSL
2. Copy the pfx file to the machine that has openssl installed
3. Open a command prompt and change into the GnuWin32\bin directory (in case you are using the gnuwin32 version):
cd %ProgramFiles%\GnuWin32\bin
4. Type the following command to convert the PFX file to an unencrypted PEM file :
openssl pkcs12 -in yourpfxcertificate.pfx -out yourpemcertificate.pem -nodes
from pem to pfx
You can use the same openssl tools to convert pem into pfx :
openssl.exe pkcs12 -in yourpemcertificate.pem -out yourpfxcertificate.pfx -nodes
from cer to pem
openssl x509 -in base64cert.cer -out yourcert.pem
Other conversions
http://shib.kuleuven.be/docs/ssl_commands.shtml
Interesting links :
- Windows 2008 CA clustering
- Active Directory Certificate Services
- Certutil
- Brian’s Security Blog
- Windows PKI Blog
- Requesting an offline DC certificate (Windows 2000 and 2003)
- Autoenrollment
- Create certificate requests on 2003 Web Enrollment website from 2008 server / Vista clients – Hotfix available
- http://www.microsoft.com/downloads/details.aspx?displaylang=en&FamilyID=28b910f8-6374-48dd-a897-11fff62ab795
© 2008 – 2021, Peter Van Eeckhoutte (corelanc0d3r). All rights reserved.
Install a Root Certification Authority
http://technet.microsoft.com/en-us/library/cc731183(d=printer).aspx
Applies To: Windows Server 2008 R2
For most organizations, a root certification authority (CA) certificate is the first Active Directory Certificate Services (AD CS) role service that they install. In a basic public key infrastructure (PKI), a root CA may be the only CA that an organization deploys.
Whether you install just one CA or multiple CAs, the root CA certificate establishes the foundation and basic rules that govern certificate issuance and use for your entire PKI. Where the root certificate defines standards for what is acceptable and unacceptable in the PKI hierarchy, AD CS applies those standards to any other CAs and AD CS role services.
A root CA can be a stand-alone or enterprise CA. If there is more than one CA in the organization, many organizations minimize the exposure of their root CA by keeping it offline except when it is needed to process a request for a subordinate CA certificate.
Membership in local Administrators, or equivalent, is the minimum required to complete this procedure. If this will be an enterprise CA, membership in Domain Admins, or equivalent, is the minimum required to complete this procedure. For more information, see Implement Role-Based Administration.
To install a root CA
- Open Server Manager,click Add Roles, click Next,and click Active Directory Certificate Services. Click Next two times.


- On the Select Role Services page, click Certification Authority. Click Next.

- On the Specify Setup Type page, click Standalone or Enterprise. Click Next.
If you are connected the network and connected the CA Host with an administrator account (member of Enterprise and Domain Admins groupe)

If you are connected to the CA hosting computer with adminstrator ceredentials (an admin account) you will get this (AD will not use AD DS to issue certificate to users)

| Note |
| You must have a network connection to a domain controller in order to install an enterprise CA. |
- On the Specify CA Type page, click Root CA. Click Next.

For more information, see Types of Certification Authorities.
- On the Set Up Private Key page, click Create a new private key. Click Next.

- On the Configure Cryptography page, select a cryptographic service provider, key length, and hash algorithm. Click Next.

For more information, see Cryptographic Options for CAs.
- On the Configure CA Name page, create a unique name to identify the CA. Click Next.

For more information, see Certification Authority Naming.
- On the Set Validity Period page, specify the number of years or months that the root CA certificate will be valid. Click Next.

- On the Configure Certificate Database page, accept the default locations unless you want to specify a custom location for the certificate database and certificate database log. Click Next.

For more information, see Certificates Database.
- On the Confirm Installation Options page, review all of the configuration settings that you have selected. If you want to accept all of these options, click Install and wait until the setup process has finished.


Now lunch MMC snap-in for the Certfication Authority (CA Root) we just install
You can type certsrv.msc to show the CA console
