В этой статье будет описан порядок создания резервной копии (backup) сервера работающего под ОС Windows Server 2008 R2 штатными средствами и восстановление (restore) из полученного образа.
Все админы делятся на две категории: на тех, кто еще не делает бэкапы и тех, кто УЖЕ делает бэкапы
Backup
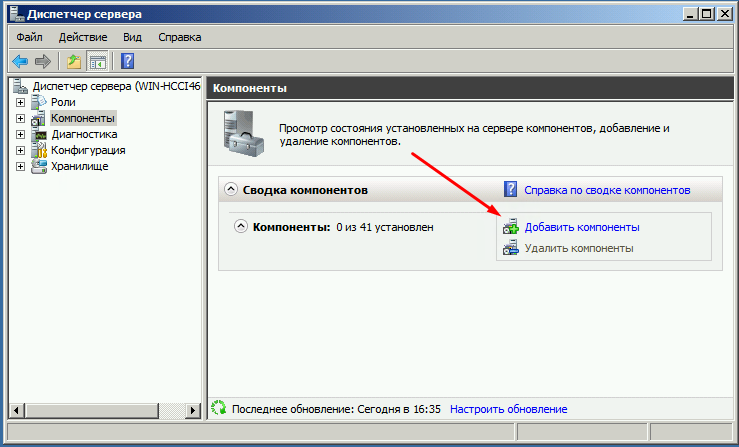
Для того что бы можно было создать образ нашего сервера сначала нужно установить компонент системы Система архивации данных Windows Server, для этого запускаем Диспетчер сервера, выбираем Компоненты, жмём Добавить компоненты
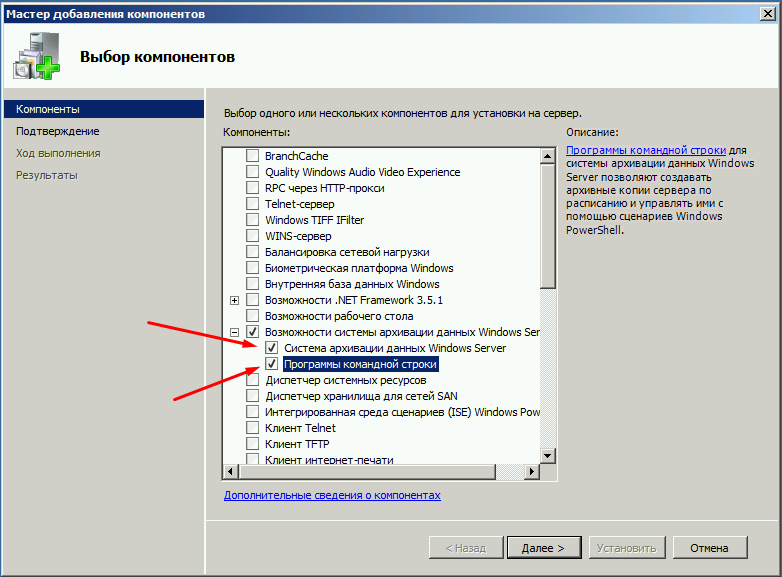
в появившемся окне ставим галочки напротив Система архивации данных Windows Server и Программы командной строки. Жмём далее, установить и дожидаемся окончания процесса установки.
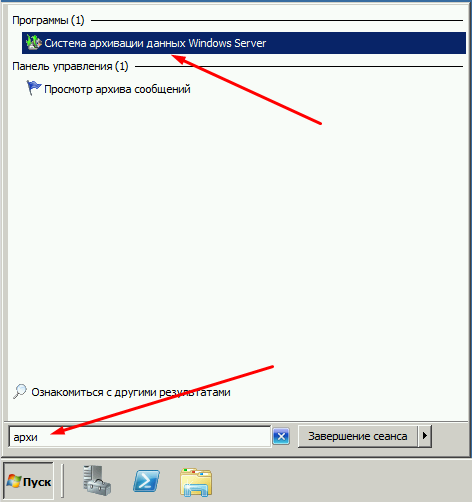
Теперь мы можем приступать к резервному копированию, для этого переходим в меню пуск и набираем в строке поиска «архив», затем выбираем Система архивации данных Windows Server.
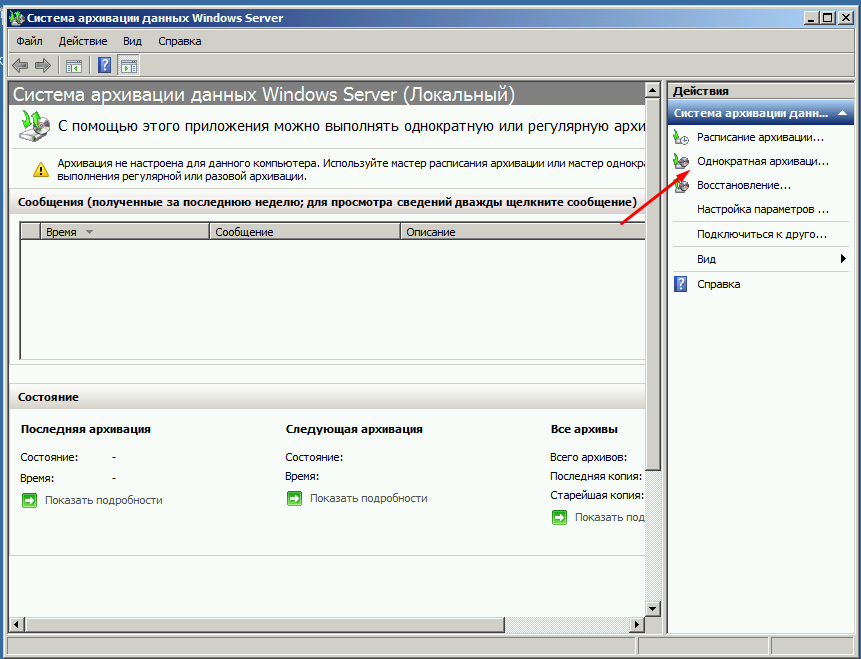
В этом окне собраны основные элементы управления системой архивации, в данном обзоре мы воспользуемся Однократной архивацией. В дальнейшем если у Вас есть например отдельный жёсткий диск для хранения образов, Вы можете создать расписание архивации.
Выбираем Настраиваемый, жмём далее
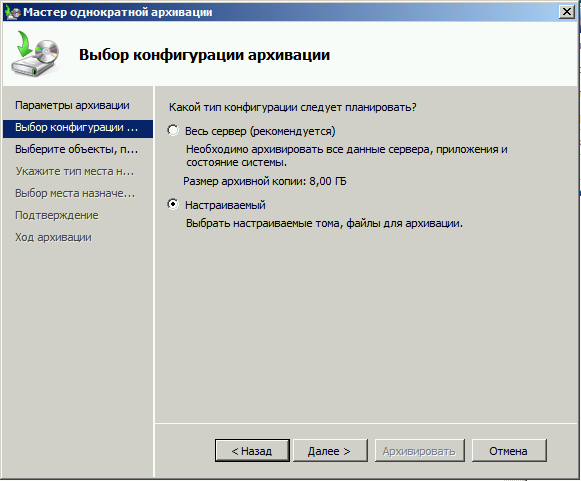
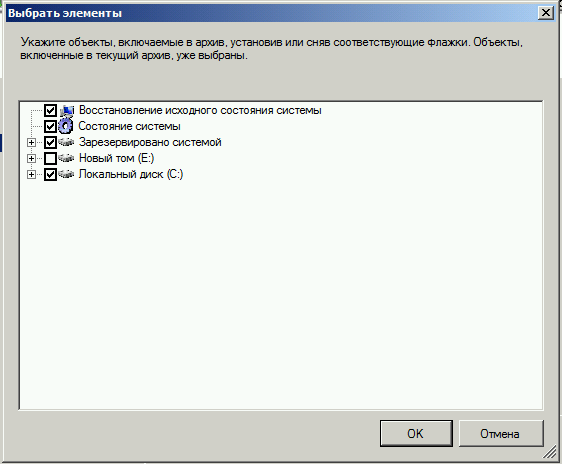
Жмём добавление элементов и ставим галочку Восстановление исходного состояния системы, возможно у Вас будут другие диски, которые не выберутся автоматически, но Вы хотите их включить в архив, можете смело ставить галку. Есть только одно но, нельзя ставить галку на том диске куда вы хотите сохранить архив.
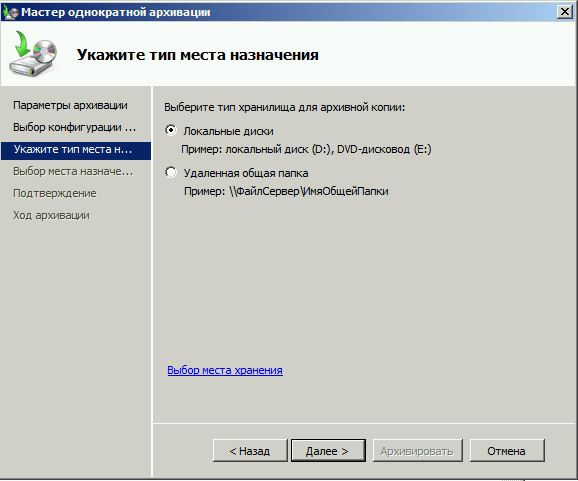
На следующем этапе необходимо выбрать куда мы будем сохранять данные, я буду сохранять на внешний USB диск, который у меня находится под буквой E: поэтому выбираю Локальные диски. Хотя система архивации позволяет сохранять образы системы так же по сети, в общую папку например.
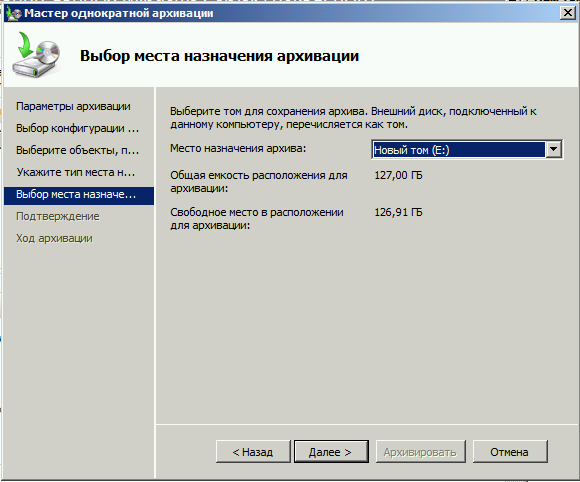
На следующем шаге система предлагает выбрать диск куда мы будем сохранять архив, в моём случае это E:
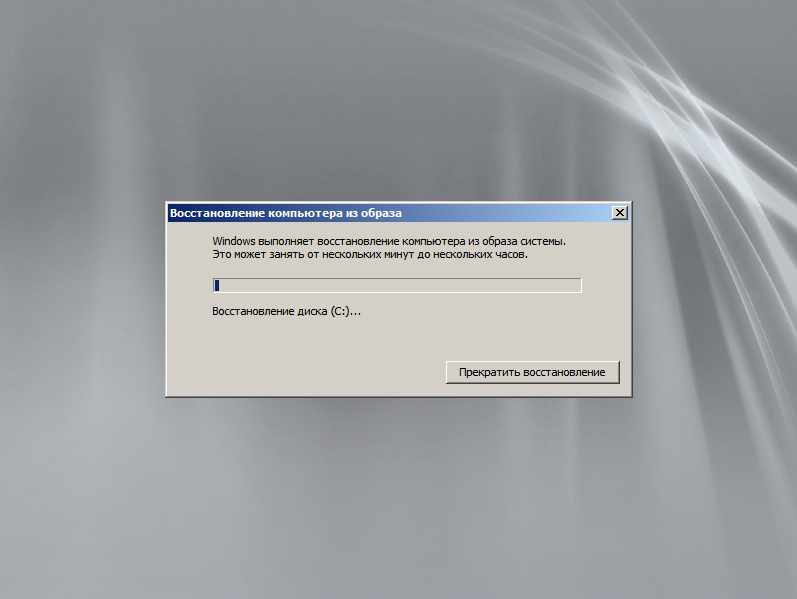
Жмём далее, затем Архивировать и ждём пока процесс архивации закончится.
По завершению процесса архивации можем зайти на жёсткий диск и посмотреть, должна появится папка WindowsImageBackup.
В окне Системы архивации в случае успешного завершения создания образа системы должна стоять отметка Успех. Дважды щёлкнув по строке мы можем увидеть подробности.
Restore
Для того что бы восстановится из этого образа есть два способа, первый из окна Системы архивации, подходит в том случае если наша система загружается. Для того что бы восстановится жмём кнопку Восстановление
Выбираем Этот сервер
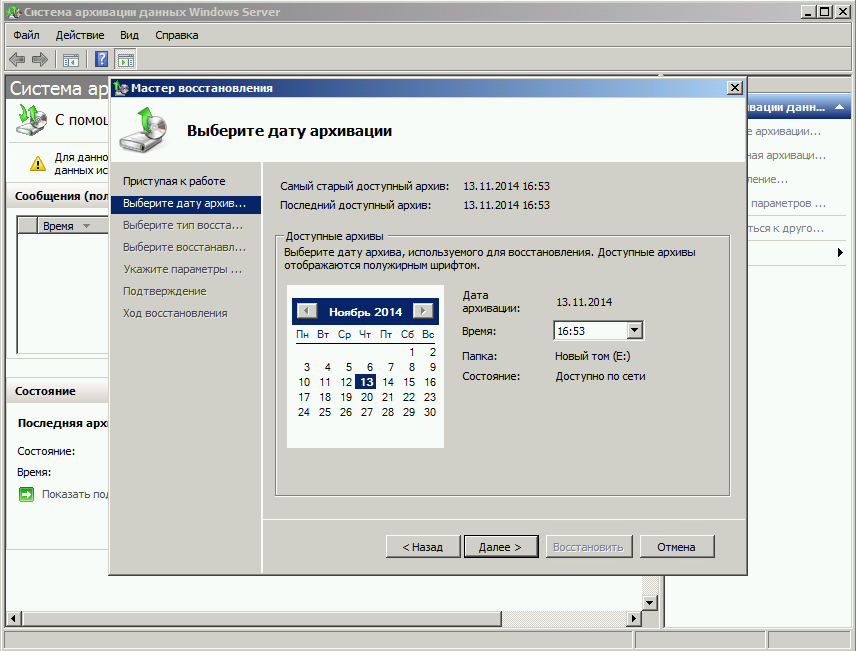
И выбираем дату, архива.
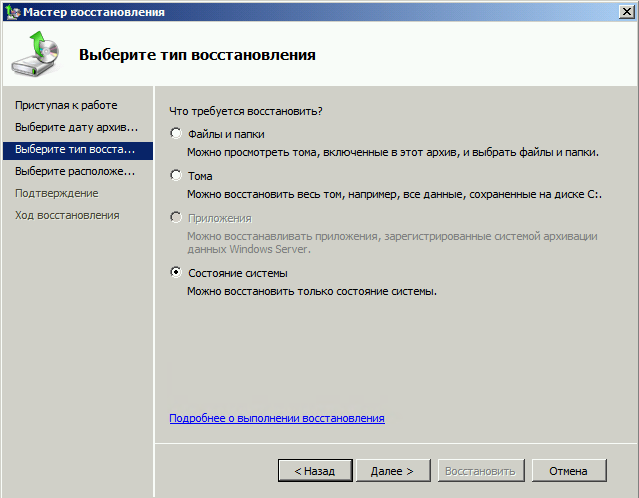
На следующем шаге мы можем выбрать нужные нам файлы и папки, или же выбрать восстановление состояния системы если хотим восстановить весь сервер.
И затем выбираем исходное размещение. И жмём кнопку восстановить.
Bare metal recovery
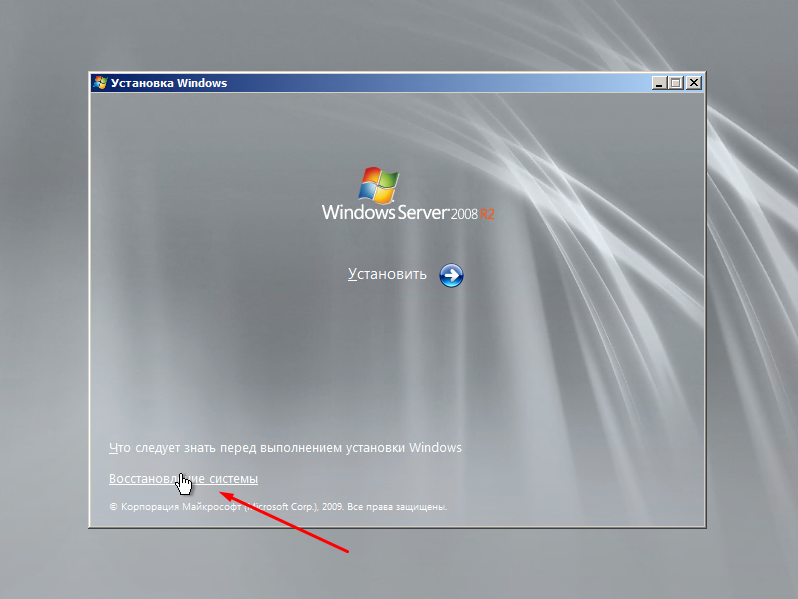
Так же, если наш сервер по какой-либо причине не загружается, или мы заменили его на новый мы можем воспользоваться установочным диском Windows Server для того чтобы восстановить состояние системы, для этого загружаемся с установочного диска и на втором экране установки выбираем восстановить
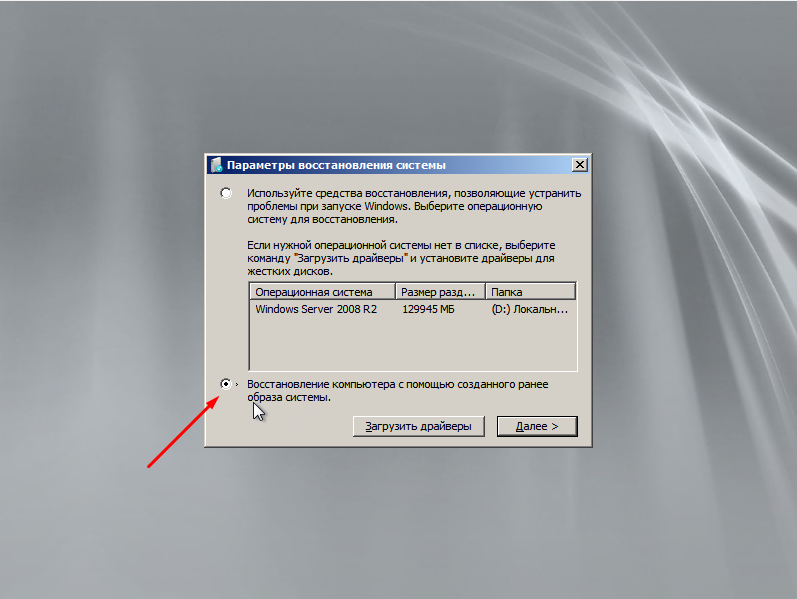
На следующем шаге выбираем Восстановление компьютера с помощью созданного ранее образа системы.
Далее нам предлагают либо использовать последний удачный, либо выбрать образ, попробуем выбрать.
Система сама сканирует диски на наличие образа, есть возможность через кнопку дополнительно установить драйвер или выбрать сетевое расположение образа. Выбираем образ и жмём далее.
Выбираем нужный нам архив доступный в образе и так же, далее.
Если случилась такая неприятность и мы заменили диск, то стоит поставить галочку Форматировать и разбить на разделы диски. Если же установлен диск который разбит как надо то эту галочку можно не ставить. Затем жмём готово и ждём пока система восстановится.
Пожалуй на этом всё.
Как и прежде любые вопросы или пожелания можно оставлять в комментариях ниже, буду стараться по возможности ответить.
Windows Server Backup 2008 R2 — это встроенный инструмент резервного копирования, который позволяет пользователям создавать и восстанавливать резервные копии данных на сервере с помощью простого и понятного интерфейса. Настраивать и использовать этот инструмент намного проще, чем устанавливать и обновлять сторонние программы резервного копирования.
В этой статье мы рассмотрим пошаговое руководство по настройке Windows Server Backup 2008 R2 на сервере с операционной системой Windows Server 2008 R2. Мы разберемся, как создать расписание резервного копирования, выбрать данные для резервного копирования, а также настроить место для хранения резервных копий.
Примечание: Перед началом настройки Windows Server Backup 2008 R2 убедитесь, что у вас есть права администратора на сервере и необходимые разрешения.
Шаг 1: Откройте Windows Server Backup 2008 R2, нажав на кнопку «Пуск» и выбрав «Административные инструменты» в меню. Затем выберите «Windows Server Backup» для открытия приложения.
Шаг 2: В окне приложения Windows Server Backup 2008 R2 выберите «Действия» в правой панели, а затем «Расписание резервного копирования».
Шаг 3: В появившемся окне выберите «Создать новое задание резервного копирования» и нажмите «Далее».
Содержание
- Зачем нужна настройка Windows Server Backup 2008 R2?
- Шаг 1: Установка и запуск Windows Server Backup 2008 R2
- Шаг 2: Создание и настройка резервного плана
- Шаг 3: Выбор и настройка целевого хранилища
- Шаг 4: Планирование и автоматическое выполнение резервного копирования
Зачем нужна настройка Windows Server Backup 2008 R2?
Windows Server Backup 2008 R2 предоставляет обширные возможности для создания, планирования и восстановления резервных копий. Он позволяет сохранять данные на различных устройствах, таких как локальные диски, сетевые ресурсы или съемные носители, и может быть настроен для автоматического выполнения резервного копирования в заданное время.
Настройка Windows Server Backup 2008 R2 также позволяет восстановить данные с резервных копий в случае потери или повреждения сервера. Это может помочь восстановить информацию, программы и настройки без необходимости переустановки операционной системы и приложений.
Наконец, настройка резервного копирования Windows Server Backup 2008 R2 является обязательным требованием для соответствия некоторым стандартам безопасности, таким как HIPAA (Health Insurance Portability and Accountability Act) или PCI DSS (Payment Card Industry Data Security Standard). Эти стандарты требуют ведения резервного копирования и восстановления данных для обеспечения безопасности и конфиденциальности информации.
Шаг 1: Установка и запуск Windows Server Backup 2008 R2
Перед началом настройки резервного копирования с помощью Windows Server Backup 2008 R2 необходимо установить и запустить программу. В этом разделе описывается процесс установки и запуска Windows Server Backup 2008 R2.
Для начала, убедитесь, что у вас установлена операционная система Windows Server 2008 R2. Если операционная система установлена, перейдите к следующему шагу, в противном случае, установите Windows Server 2008 R2 перед продолжением установки программы.
Выполните следующие шаги для установки Windows Server Backup 2008 R2:
| 1. | Откройте меню «Пуск» и выберите пункт «Панель управления». |
| 2. | В Панели управления выберите пункт «Программы» и затем «Включение или отключение компонентов Windows». |
| 3. | Откроется окно «Включение или отключение компонентов Windows». В списке компонентов найдите «Windows Server Backup» и установите флажок рядом с ним. |
| 4. | Нажмите кнопку «ОК» для сохранения изменений и начала установки компонента. |
| 5. | Дождитесь завершения установки компонента. |
После завершения установки Windows Server Backup 2008 R2, вы можете запустить программу, следуя этим шагам:
| 1. | Откройте меню «Пуск» и выберите пункт «Панель управления». |
| 2. | В Панели управления выберите пункт «Система и безопасность» и затем «Резервное копирование и восстановление». |
| 3. | Откроется окно «Резервное копирование и восстановление». Нажмите на ссылку «Настроить резервное копирование» в разделе «Настройка резервного копирования». |
| 4. | Выполните настройку резервного копирования согласно вашим потребностям и настройкам. |
Поздравляю! Вы успешно установили и запустили Windows Server Backup 2008 R2.
Шаг 2: Создание и настройка резервного плана
Чтобы создать резервный план, выполните следующие действия:
- Откройте Windows Server Backup, перейдя в меню «Панель управления» -> «Администрирование» -> «Windows Server Backup».
- В окне Windows Server Backup, щелкните на ссылке «Запланировать резервное копирование».
- В появившемся окне «Задача планирования резервного копирования» выберите опцию «Для выборочного резервирования, щелкните здесь».
- Выберите пункт «Позволить мне выбрать диски для резервирования или подтвердить выбор рекомендованных дисков» и нажмите «Далее».
- Выберите диски и/или папки, которые вы хотите резервировать, и нажмите «Далее».
- В следующем окне выберите место для хранения резервной копии (может быть на локальном диске или сетевом ресурсе) и нажмите «Далее».
- Настройте расписание резервных копий, выбрав частоту и время, в которое они будут выполняться, и нажмите «Далее».
- В окне «Описание плана резервного копирования» введите описание для плана и нажмите «Далее».
- Проверьте настройки и нажмите «Готово», чтобы создать резервный план.
- После создания резервного плана, проверьте его статус и настройки в окне Windows Server Backup.
Теперь у вас есть созданный и настроенный резервный план, который будет автоматически выполняться согласно заданному расписанию. Вы также можете запустить резервное копирование вручную в любое время, если это необходимо.
Шаг 3: Выбор и настройка целевого хранилища
После выбора необходимых компонентов для резервного копирования в Windows Server Backup 2008 R2, необходимо выбрать и настроить целевое хранилище, где будут храниться данные резервных копий.
Windows Server Backup 2008 R2 предоставляет несколько опций для выбора целевого хранилища. Вам предлагается выбрать одну из следующих опций:
— Жесткий диск: Вы можете выбрать локальный жесткий диск на вашем сервере, который будет использоваться в качестве целевого хранилища для резервных копий. Также вы можете указать путь к папке на этом жестком диске, где будут храниться данные резервного копирования.
— Общедоступная сетевая папка: Вы можете выбрать сетевую папку, которая находится на другом сервере или устройстве хранения данных. Для доступа к этой папке вам может потребоваться указать имя пользователя и пароль для аутентификации.
— Офисная сеть: Если ваш сервер находится в офисной сети, вы можете использовать сетевое устройство хранения данных, например, сетевое хранилище (NAS), доступное в этой сети.
— Удаленные облачные службы хранения данных: Если вы хотите использовать удаленные облачные службы для хранения резервных копий, вам может потребоваться установить и настроить дополнительное программное обеспечение или подписку на службу хранения данных в облаке.
После выбора целевого хранилища, следует настроить параметры резервного копирования, такие как регулярность выполнения резервных копий и хранение истории версий файлов. Эти параметры могут быть настроены на следующем шаге.
Шаг 4: Планирование и автоматическое выполнение резервного копирования
Планирование и автоматическое выполнение резервного копирования в Windows Server Backup 2008 R2 позволяют создавать регулярное расписание резервного копирования для автоматической защиты данных.
Чтобы настроить планирование и автоматическое выполнение резервного копирования, выполните следующие действия:
- Откройте Windows Server Backup 2008 R2.
- Выберите раздел «Действия» в левой панели.
- В выпадающем списке выберите «Расписание резервного копирования».
- Нажмите кнопку «Добавить расписание».
- В появившемся окне введите имя для расписания.
- Выберите дату и время начала резервного копирования.
- Установите частоту выполнения резервного копирования (ежедневно, еженедельно или ежемесячно).
- Выберите тип резервного копирования (полное, инкрементное или дифференциальное).
- Выберите ресурсы для резервного копирования (диски, системный состав или конкретные папки и файлы).
- Нажмите кнопку «Сохранить» и закройте окно.
Теперь резервное копирование будет выполняться автоматически в соответствии с заданным расписанием. Вы можете настроить несколько расписаний для разных ресурсов или разных типов резервного копирования.
Планирование и автоматическое выполнение резервного копирования позволяют значительно упростить процесс защиты данных и обеспечить их надежность и доступность в случае сбоя или потери.
Solutions provider takeaway: This chapter excerpt provides information on Windows server backup in Windows Server 2008 R2. You will learn how to configure backup settings, back up specific files and perform system state and bare-metal backups.
Manage Backup and Recovery
Now that you have seen some of the tools for backups and recovery, it is time to put them to use. When you perform backups traditionally, you want to have the backups on a schedule so you are sure they are happening at regular intervals. This will make finding the right media for recovery easy. Even though Backup and Recovery are performed separately, they are joined together in form and function. The type of backup you perform will always dictate the recovery options available to you. In reality, the backup strategy is determined by your recovery requirements and what your service-level agreement is with your users and business. Is it OK if a user has to wait 24 hours to recover a file? What if the user is the CEO? Is it OK to turn off a server during work hours? What if the server is mission critical to your organization? These are all key questions, among many others, that you need to address when defining your policies and procedures and determining the best way to handle the needs of your organization.
Whether you choose to perform backup and recovery tasks with the GUI, command-line tool, or the PowerShell cmdlets, you are essentially performing the same task. In this section, you will learn how to use the backup and recovery tools to perform your daily tasks. Not that to perform either backup or recovery, you do need to be a member of the Backup Operators or Administrators groups.
Back Up Your Server
After you have determined your backup strategy, it is time to back up the server. When you back up your server, you want to make sure you schedule your backup times to not impact your network or your users. Try to schedule the backups after-hours, when the system is being used the least. You also want to make sure your backups complete in a timely manner; this is where knowing the difference between full and incremental backups can offer value to you and your organization.
Configure Backup Settings
Before you perform your backup, you may need to define your backup settings. You have only a few selections to make to configure your backup. Specifically, you need to determine whether you want to perform a full/normal backup, an incremental backup, or a custom combination of both of these methods. To configure your server, perform the following steps:
- Start Windows Server Backup by selecting Start ⇒ Administrative Tools ⇒ Windows Server Backup.
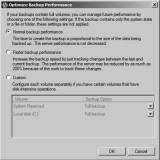
- In the right Actions task pane, click Configure Performance Settings; you will see a screen similar to Figure 8.7.
-
Figure 8.7: Backup performance settings

The three options listed determine how the backup will be performed. It is important for you to know the choices you make here will not be applied if you are backing up only system state.
- Normal Backup Performance is the default method for Windows Server Backup, and this method will perform a normal backup.
- Faster Backup Performance will perform an incremental backup for your system.
- Custom will allow you to choose a combination of the previous two options for your drives. For example, you could perform a full backup on your data volume but only an incremental backup on your system drive.
- Select the setting for your system, and click OK.
Back Up Your Server
After you have installed the backup tools, it is now just a matter of setting up the tasks to begin protecting your system. When you are ready to perform the backup and you know what files and folders you want to protect, you are ready to set up the backup test and schedule.
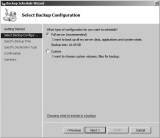
The first time you load the tool, you will see a message telling you no backup has been configured and you need to either set up a backup schedule or set up a backup once to begin protecting your system. Whether you choose to create a backup schedule or perform a backup once, the choices in the wizard are the same, with the exception of configuring the schedule:
- Start Windows Server Backup by selecting Start ⇒ Administrative Tools ⇒ Windows Server Backup.
- To launch the backup wizard, in the Actions pane on the right, select Backup Schedule to create a regular backup task, or select Backup Once if you just want to perform an immediate backup. For this set of tasks, you will see the Backup Schedule choice.
- Review the Getting Started screen, and click Next to see a screen similar to Figure 8.8.
-
Figure 8.8: Configuring the backup
- Select Full Server (Recommended), and click Next.
- Set your schedule; the default is once a day at 9 p.m. You can also configure multiple times a day to perform the backup. After you set your schedule, click Next.
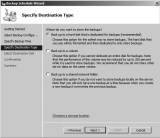
- On the Specify Destination Type screen, as shown in Figure 8.9, you’ll see two new choices in Windows Server 2008 R2; these allow you to store your backup to another volume and to a network share. These methods provide flexibility for your backup process that did not exist in prior versions of Windows servers. However, make sure you make note of the performance costs to your additional volume or network. You will have to decide what the right balance is for you and your organization. After you make your selection, click Next.
-
Note: The first time you run the backup wizard, you may be asked to format the destination drive. When you select the default choice of Backup To Hard Disk That Is Dedicated For Backups, it will reformat the selected disk before the backup process begins. Make sure you have saved any necessary data off the drive. The format of the drive has to be NTFS; also, make sure you have at least 1½ times the free drive space compared to what you are backing up.
Figure 8.9 : Backup destinations
- On the Select Destination Disk page, select where you want to store your backups. For a scheduled backup, this can be another hard drive or a network share. It cannot be an optical drive or removable media. However, you can use optical drives or removable media for backup-once backups, and these media choices provide a great choice for bare-metal backups. After you make your selection, click Next.
- If you are presented with a warning to format the disk and you are positive you want to use the selected disk, click Yes. Otherwise, click No, and select another drive to store your backup.
- Review the Confirmation screen, and click Finish to create the scheduled task for backup and format the volume (if this is your first time using Windows Server Backup). If you chose Backup Once, you will click Backup to immediately perform the backup.
- Review your Summary screen, and click Close.
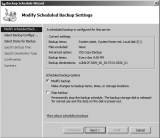
Note: After you have run the backup wizard the first time, the next time you run it you will see a screen similar to Figure 8.10. This allows you to modify the existing backup or stop the backup process. You can still configure the backup once if you need to create new backups for different files or needs, like bare-metal recovery.
Figure 8.10: Modifying the existing backup schedule
Back Up Specific Files
In Windows Server Backup in Windows Server 2008, you had to back up the entire volume. In Windows Server 2008 R2, you now can include or exclude folders or individual files. You can also exclude files based on the file types with filters. For this purpose, you will see how to modify an existing backup schedule.
- Start Windows Server Backup by selecting Start ⇒ Administrative Tools ⇒ Windows Server Backup.
- To launch the backup wizard, in the Actions pane on the right, select Backup Schedule.
- On the Modify Backup Schedules screen, verify that Modify Backup is selected, and click Next.
- Select Custom, and click Next.
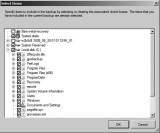
- On the Select Items For Backup screen, you will see what you are currently backing up. If want to add or remove from the backup, click Add Items, and you will see a screen similar to Figure 8.11.
-
Figure 8.11: Backup item selection
- Select the items you want to add to or remove from the backup by selecting or deselecting the check boxes next to the items. If you want to select specific folders, click the + sign next to your listed hard drives to expand the directory tree and then make your folder selections. When you are done selecting items to back up, click OK.
- If you want to exclude certain files from your backup, such as temporary files (*.tmp) or music files (.wmv, .mp3, and so on), click the Advanced Settings button.
- Click Add Exclusion to select the drive or folders you want to apply your exclusions.
- Select the drive you want to use. Typically you will want your full volumes to have the exclusion applied. However, you can select individual folders or files to exclude directly. When you’re done selecting your locations, click OK.
- To exclude certain files, click in the File Type column, and type in your exclusion. You can also specify whether you want apply the filter to the subfolders. For example, if you wanted to exclude .tmp files from your backup, type *.tmp. Your screen would look similar to Figure 8.12.
-
Figure 8.12: Backup exclusions
If you want to add more exclusions, click Add Exclusion, and repeat the process. Likewise, if you want to remove the exclusion, you can select it and click Remove Exclusion.
- When you are finished creating exclusions, click OK to proceed through the rest of the wizard.
- Set or modify your schedule, and click Next.
- Select your destination type, and click Next.
- Select the destination disk, and click Next.
- If you are presented with a warning to format the disk and you are positive you want to use the selected disk, click Yes. Otherwise, click No, and select another drive to store your backup.
- Review the Confirmation screen, and click Finish to create the scheduled task for backup and format the volume (if this is your first time using Windows Server Backup). If you chose Backup Once, you will click Backup to immediately perform the backup.
- Review your Summary screen, and click Close.

Perform a System State Backup
When you back up the system state, you are backing up a majority of the system configuration information. In Windows Server 2008 R2, you can perform the system state backup inside the Windows Server Backup Tool, and you do not have to solely use wbadmin.exe. Also, if you have installed additional roles on the Windows Server 2008 R2 server, your system state will contain more data. By default, on a server with no additional roles, the system state backup always contains the following components:
- Registry
- COM+ class registration database
- Boot files, including system files
- System files under Windows File Protection
If the system is a domain controller in addition to the default system state data, system state will contain the following:
- Active Directory service
- SYSVOL directory
|
|||
If you have installed clustering on the server, the system state data will contain the clustering services information.
If you have installed a certificate services server, the system state data will contain the certificate services database.
If you have installed IIS, the system state data will contain the IIS metadirectory.
- Start Windows Server Backup by selecting Start ⇒ Administrative Tools ⇒ Windows Server Backup.
- To launch the backup wizard, in the Actions pane on the right, select Backup Schedule to create a regular backup task, or select Backup Once if you just want to perform an immediate backup. For this set of tasks, you will see the Backup Schedule choice.
- Review the Getting Started screen, and click Next.
- Select Custom, and click Next.
- On the Select Items For Backup screen, click Add Items.
- Click System State, click OK, and then click Next.
- If presented with a scheduling window, set or modify your schedule, and click Next.
- Select your destination type, and click Next.
- Select the destination disk, and click Next.
- If you are presented with a warning to format the disk and you are positive you want to use the selected disk, click Yes. Otherwise, click No, and select another drive to store your backup.
- Review the Confirmation screen, and click Finish to create the scheduled task for backup and format the volume (if this is your first time using Windows Server Backup). If you chose Backup Once, you will click Backup to immediately perform the backup.
- Review your Summary screen, and click Close.
Perform a Bare-Metal Backup
Another backup option that will provide you with a great option in case of a catastrophic failure is a bare-metal backup. The bare-metal backup will back up your system state, your system volume, and the system reserved data. This backup set is also unique in that you will need the Windows Server 2008 R2 installation media available during recovery.
This is a good time to use a USB drive or another portable media to store this backup. The main reason is because to perform the restore, you need to boot the system into the Windows Recovery Environment using a Windows Server 2008 R2 installation DVD.
- Start Windows Server Backup by selecting Start ⇒ Administrative Tools ⇒ Windows Server Backup.
- To launch the backup wizard, in the Actions pane on the right, select Backup Schedule to create a regular backup task, or select Backup Once if you just want to perform an immediate backup. For this set of tasks, you will see the Backup Schedule choice.
- Review the Getting Started screen, and click Next.
- Select Custom, and click Next.
- On the Select Items For Backup step, click Add Items.
- Click Bare Metal Recovery, and click OK; then click Next.
- If presented with a scheduling window, set or modify your schedule, and click Next.
- Select your destination type, and click Next.
- Select the destination disk, and click Next.
- If you are presented with a warning to format the disk and you are positive you want to use the selected disk, click Yes. Otherwise, click No, and select another drive to store your backup.
- Review the Confirmation screen, and click Finish to create the scheduled task for backup and format the volume (if this is your first time using Windows Server Backup). If you chose Backup Once, you will click Backup to immediately perform the backup.
- Review your Summary screen, and click Close.
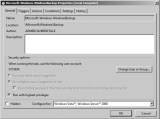
Look at the Scheduled Tasks
Whenever you create a backup schedule, you may be wondering where the task is stored. The task is stored in the Task Scheduler tool, and you can view your backup tasks there. You can also run the task directly from the Task Scheduler. The tasks in the Task Scheduler have several properties you can modify, as shown in Table 8.2.
Table 8.2: Task Property Tabs
|
Property Tab |
Definition |
| General | Contains the description, author, and what account will be used to run the command. |
| Triggers | Determines when the task will be performed. In the case of a backup, the trigger is date and time. |
| Actions | Determines what programs or commands will be run. |
| Conditions | Specifies additional options, combined with the triggers, that determine whether the task should run. |
| Settings | Controls additional behaviors of the task. An important setting here is Allow Task To Be Run On Demand. If you want to be able to run your tasks directly from the Task Scheduler, you have to select this setting to turn it on. |
| History | Shows the past history of the task when it was run. |
Property Tab Definition
- Click Start ⇒ Administrative Tools ⇒ Task Scheduler.
- Expand the tree to view the backup tasks. Click the + to expand Task Scheduler Library ⇒ Microsoft ⇒ Windows, and then click Backup.
- Double-click the task to view the properties of the backup task, and you will see a screen similar to Figure 8.13.
Figure 8.13: Backup task
You can also view the status of your backups and get more details on the main console page of the Windows Server Backup window, as shown in Figure 8.14.
Figure 8.14: Windows Server Backup
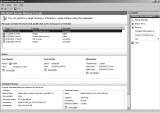
From the main console window, you can view the details, status, and next schedule for your backups and recovery processes. The Windows Server Backup Tool will show all the events with your backups and restores in this main console window.
![]()
![]() Backing Up and Recovering Your Server
Backing Up and Recovering Your Server
![]() Windows server backup in Windows Server 2008 R2
Windows server backup in Windows Server 2008 R2
![]() Bare-metal, system state recovery in Windows Server 2008 R2
Bare-metal, system state recovery in Windows Server 2008 R2
Printed with permission from Wiley Publishing Inc. Copyright 2010. Microsoft Windows Server 2008 R2 Administration Instant Reference by Matthew Hester and Chris Henley. For more information about this title and other similar books, please visit Wiley Publishing Inc.
Dig Deeper on MSP business strategy
-
How to configure shadow copies on file servers
By: Damon Garn
-
How to avoid common GPO backup and restore problems
By: Mike Kanakos
-
How to use file server reporting in FSRM
By: Damon Garn
-
How to implement file classification in file servers
By: Damon Garn


В этой статье будет описан порядок создания резервной копии (backup) сервера работающего под ОС Windows Server 2008 R2 штатными средствами и восстановление (restore) из полученного образа.
Все админы делятся на две категории: на тех, кто не делает бэкапы и тех, кто УЖЕ делает бэкапы.
Backup
Для того что бы можно было создать образ нашего сервера сначала нужно установить компонент системы Система архивации данных Windows Server, для этого запускаем Диспетчер сервера, выбираем Компоненты, жмём Добавить компоненты

в появившемся окне ставим галочки напротив Система архивации данных Windows Server и Программы командной строки. Жмём далее, установить и дожидаемся окончания процесса установки.

Теперь мы можем приступать к резервному копированию, для этого переходим в меню пуск и набираем в строке поиска “архив”, затем выбираем Система архивации данных Windows Server.

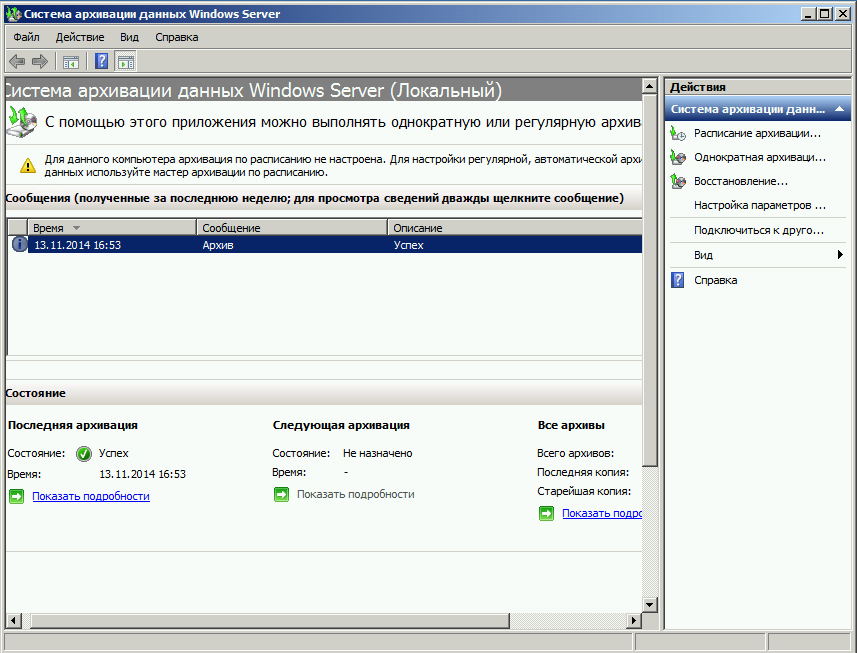
В этом окне собраны основные элементы управления системой архивации, в данном обзоре мы воспользуемся Однократной архивацией. В дальнейшем если у Вас есть например отдельный жёсткий диск для хранения образов, Вы можете создать расписание архивации.

Выбираем Настраиваемый, жмём далее

Жмём добавление элементов и ставим галочку Восстановление исходного состояния системы, возможно у Вас будут другие диски, которые не выберутся автоматически, но Вы хотите их включить в архив, можете смело ставить галку. Есть только одно но, нельзя ставить галку на том диске куда вы хотите сохранить архив.

На следующем этапе необходимо выбрать куда мы будем сохранять данные, я буду сохранять на внешний USB диск, который у меня находится под буквой E: поэтому выбираю Локальные диски. Хотя система архивации позволяет сохранять образы системы так же по сети, в общую папку например.

На следующем шаге система предлагает выбрать диск куда мы будем сохранять архив, в моём случае это E:
Жмём далее, затем Архивировать и ждём пока процесс архивации закончится.

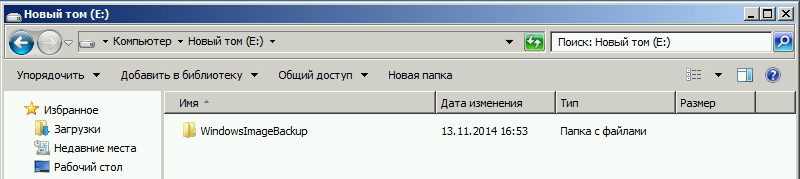
По завершению процесса архивации можем зайти на жёсткий диск и посмотреть, должна появится папка WindowsImageBackup.

В окне Системы архивации в случае успешного завершения создания образа системы должна стоять отметка Успех. Дважды щёлкнув по строке мы можем увидеть подробности.

Restore
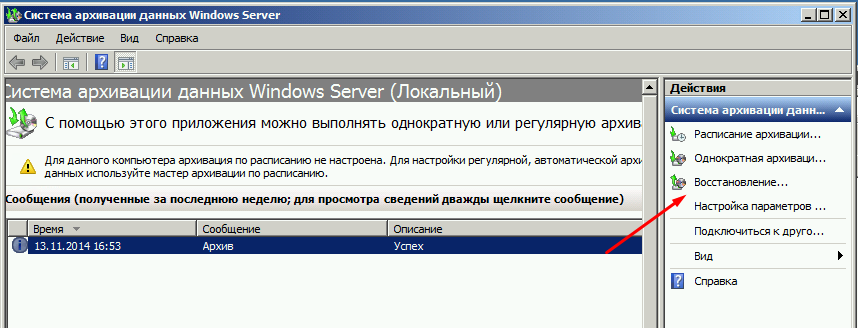
Для того что бы восстановится из этого образа есть два способа, первый из окна Системы архивации, подходит в том случае если наша система загружается. Для того что бы восстановится жмём кнопку Восстановление

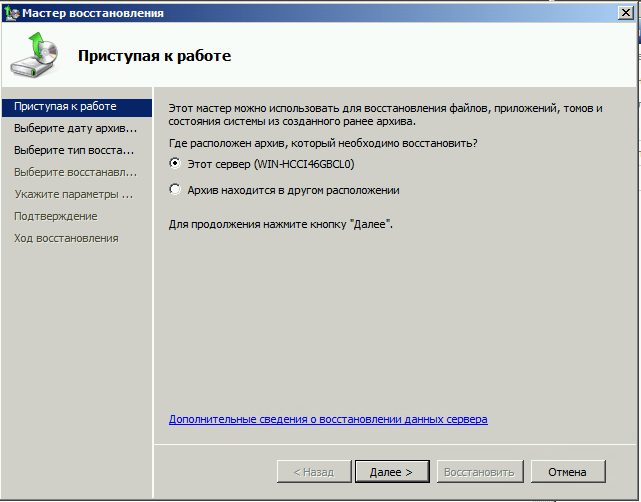
Выбираем Этот сервер

И выбираем дату, архива.

На следующем шаге мы можем выбрать нужные нам файлы и папки, или же выбрать восстановление состояния системы если хотим восстановить весь сервер.

И затем выбираем исходное размещение. И жмём кнопку восстановить.
Bare metal recovery
Так же, если наш сервер по какой-либо причине не загружается, или мы заменили его на новый мы можем воспользоваться установочным диском Windows Server для того чтобы восстановить состояние системы, для этого загружаемся с установочного диска и на втором экране установки выбираем восстановить

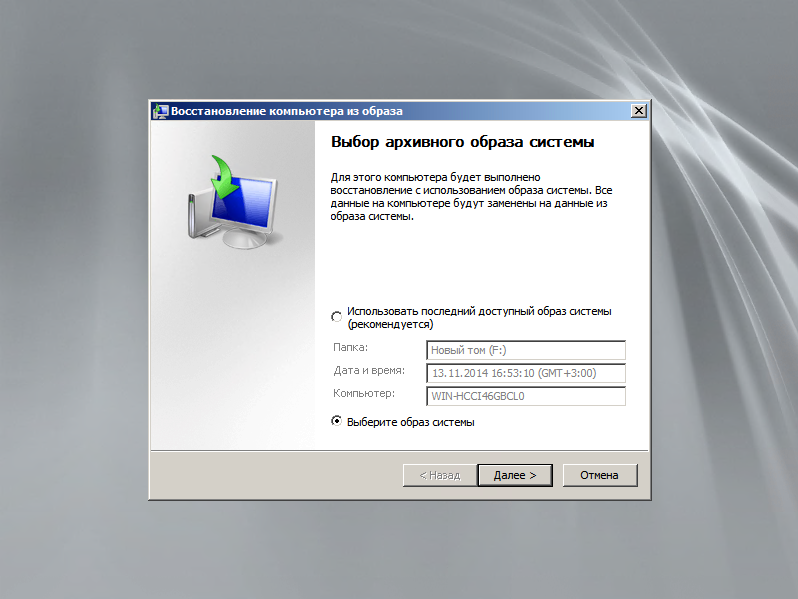
На следующем шаге выбираем Восстановление компьютера с помощью созданного ранее образа системы.

Далее нам предлагают либо использовать последний удачный, либо выбрать образ, попробуем выбрать.

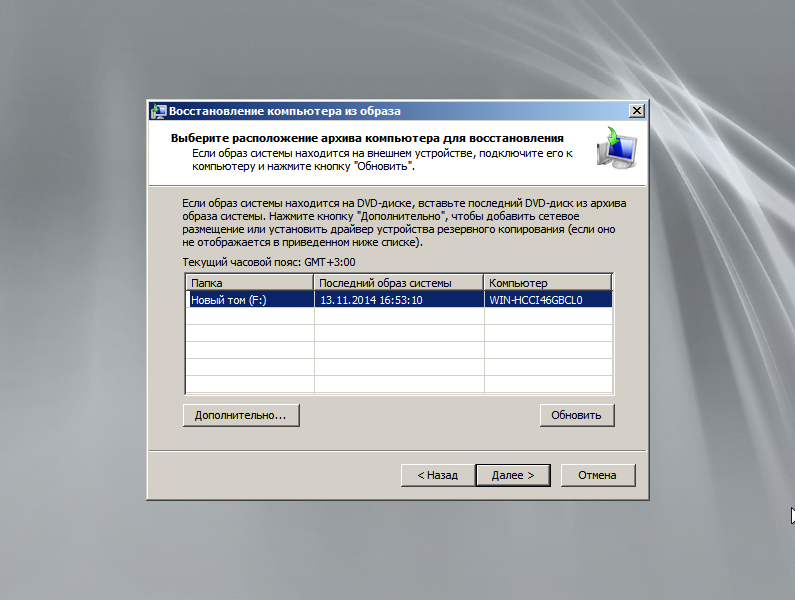
Система сама сканирует диски на наличие образа, есть возможность через кнопку дополнительно установить драйвер или выбрать сетевое расположение образа. Выбираем образ и жмём далее.

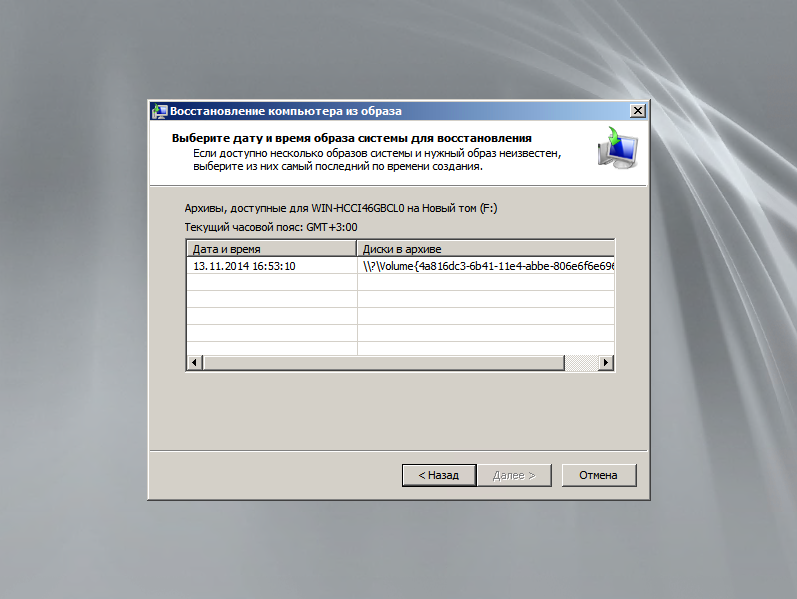
Выбираем нужный нам архив доступный в образе и так же, далее.

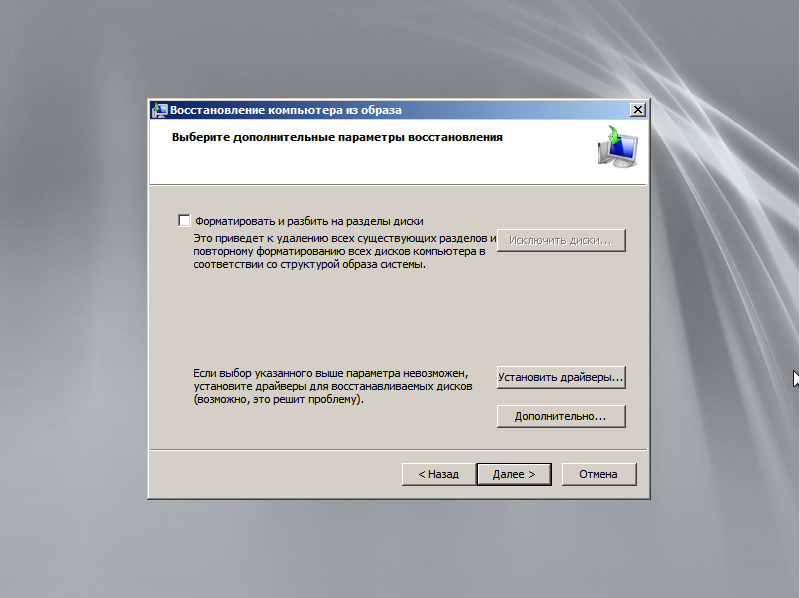
Если случилась такая неприятность и мы заменили диск, то стоит поставить галочку Форматировать и разбить на разделы диски. Если же установлен диск который разбит как надо то эту галочку можно не ставить. Затем жмём готово и ждём пока система восстановится.


Пожалуй на этом всё.
Как и прежде любые вопросы или пожелания можно оставлять в комментариях ниже, буду стараться по возможности ответить.
Спасибо https://trustore.ru/article/base/rezervnoe-kopirovanie-i-vosstanovlenie-server-2008-r2.html
Windows Server Backup is a component built into Windows Server 2008 R2, including snap-in Microsoft Management Console (MMC), a command line tool and Windows PowerShell cmdlets.
- Delete log information in Windows Server Backup
- Install Windows Server 2003 and create a backup server

Windows Server Backup is a component built into Windows Server 2008 R2, including snap-in Microsoft Management Console (MMC), a command line tool and Windows PowerShell cmdlets. Windows Server Backup is like its predecessor — Ntbackup (on Windows Server 2000/2003) — provides a complete solution for daily data backup and restore when needed.
Compared to Windows Server 2008 RTM, Windows Server 2008 R2 has new extended features that you can backup, store backups and how to recover from backup.
Note : One thing to remember is that you cannot use Windows Server Backup to restore a backup created by Ntbackup. However, there is a read-only version of Ntbackup (free) that can help you recover the data created by Ntbackup, which can be installed on Windows Server 2008 R2 and Windows 7. Download details at here.
Backup with Windows Server Backup
You can use Windows Server Backup to backup the entire server (all volumes), a list of selected volumes, a system partition or a specific directory / file.
Note : In Windows Server 2008 RTM you will be limited to backup items, only a few options are volume and the entire server.
You can use Windows Server Backup to create and manage backups for a local or remote computer, which can schedule to run backup automatically.
Install Windows Server Backup
When adding the Windows Server Backup Features and subordinate features, you need to install the following tools:
- Windows Server Backup Microsoft Management Console (MMC) snap-in
- Wbadmin command-line tool
- Windows PowerShell cmdlets for Windows Server Backup
To install Windows Server Backup, you can use one of the following three methods:
- Use Server Manager
- Use Servermanagercmd.exe
- Use PowerShell
To install Windows Server Backup, log on to the computer using an Administrator account or an account with administrative rights.
1. Install Windows Server Backup using Server Manager
— Open Server Manager
— Click Features
— Click Add Features

— In the Add Features Wizard page, scroll down and select Windows Server Backup features . If you also want to use PowerShell command templates, select the Command Line Tools option . You do not need this addition if you only want to use the GUI or the WBADMIN command line tool. Click Next .

— On the Confirm Installation Selections page, click Install .

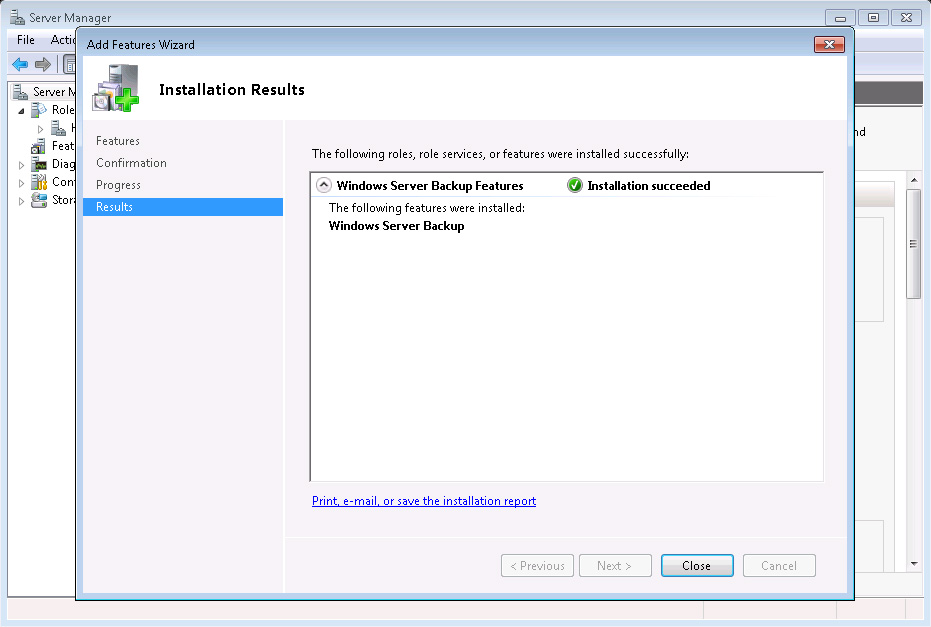
— No need to restart the server after setup is complete
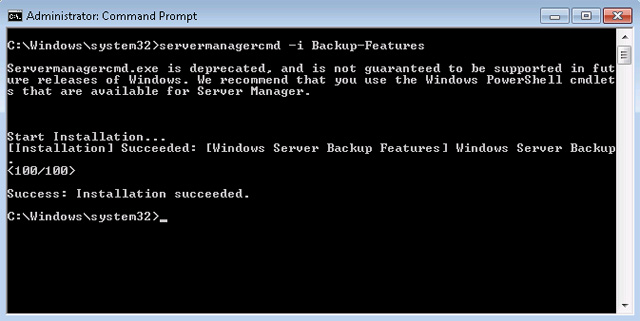
2. Install Windows Server Backup using Servermanagercmd.exe
Using the Servermanagercmd.exe command is an easy way, but this command may be deprecated in later versions of Windows, so don’t use it too much .
— Open a command window with advanced administrator privileges (right-click CMD and select Run as Administrator ).
— Enter: servermanagercmd -i Backup-Features
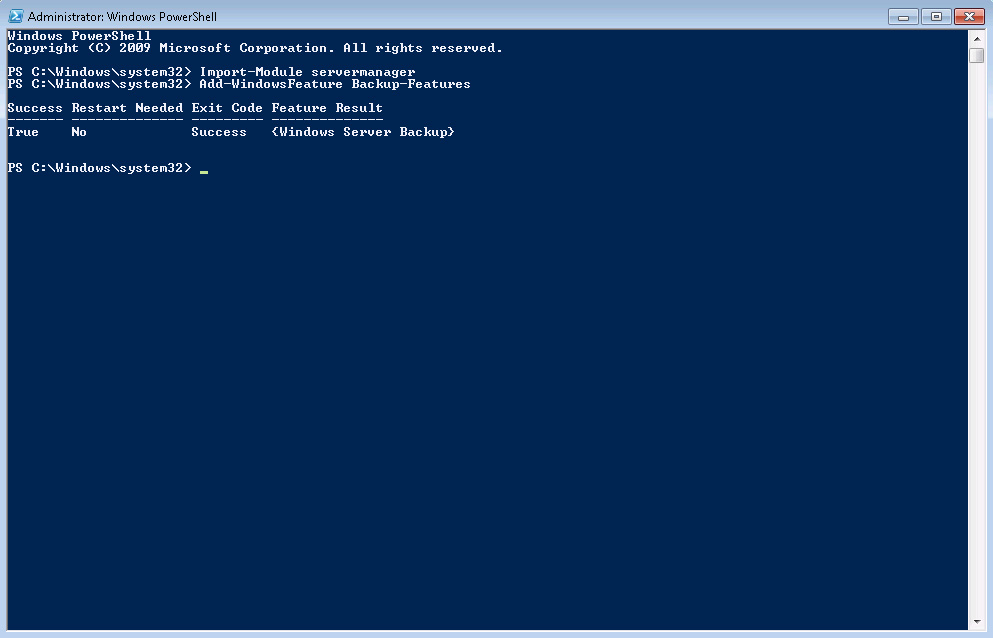
3. Install Windows Server Backup using PowerShell
In Windows Server 2008 R2, PowerShell is installed by default. However, to install roles with this tool, you need to import the Server Manager module.
— Open a PowerShell window with advanced permissions (right click on PowerShell and select Run as Administrator )
— Enter: Import-Module servermanager
— After importing, enter: Add-WindowsFeature Backup-Features .
Read more
- How to install and configure backups in Windows Server 2012
- 4 ways to manage the process of Backup Windows Server 2008 on multiple servers
- Back up virtual machines with Windows Server 2008 R2 and Hyper-V
- Instructions for installing Windows Server 2016 on Windows 10
- Instructions for installing Windows Server 2012 step by step
- Install and configure Windows Server Backup for Hyper-V