0. Оглавление
- Что понадобится
- Подготовка компьютера
- Установка роли Hyper-V
- Создание виртуального жесткого диска
- Создание виртуальной машины
- Редактирование параметров виртуальной машины
- Запуск и подключение к виртуальной машине
1. Что понадобится
- Компьютер с процессором, поддерживающим технологию аппаратной виртуализации. Проверить, поддерживает ли ваш процессор данную технологию можно на сайте производителя. Например, для процессоров Intel — смотрите здесь, для AMD — здесь.
- Установленная на данном компьютере Windows Server 2008 R2. Об установке этой операционной системы можно прочитать здесь.
2. Подготовка компьютера
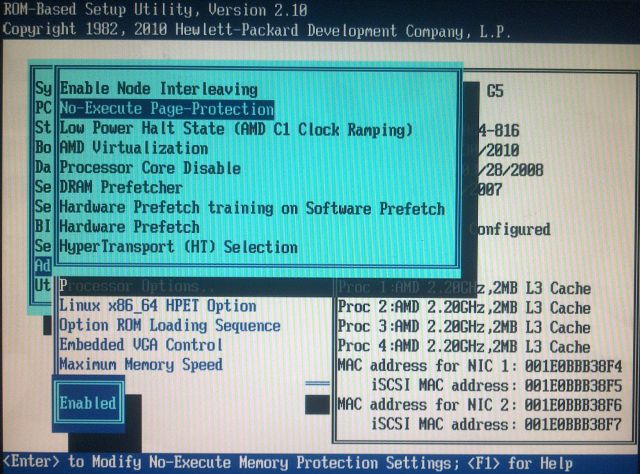
Перед тем, как начинать все действия необходимо включить в BIOS компьютера опции:
- «No Execute Page Protection» .
- «Intel Virtualization Technology» (Intel VT) для процессоров Intel или «AMD Virtualization» (AMD-V) для процессоров AMD.
Очень важно! После включения данных опций необходимо сохранить настройки BIOS, затем физически отключить питание компьютера и включить снова. Обычная перезагрузка не активирует эти режимы.
На скриншотах ниже показано включение этих опций для стоечного сервера ProLiant DL585 G5 на базе AMD.
3. Установка роли Hyper-V
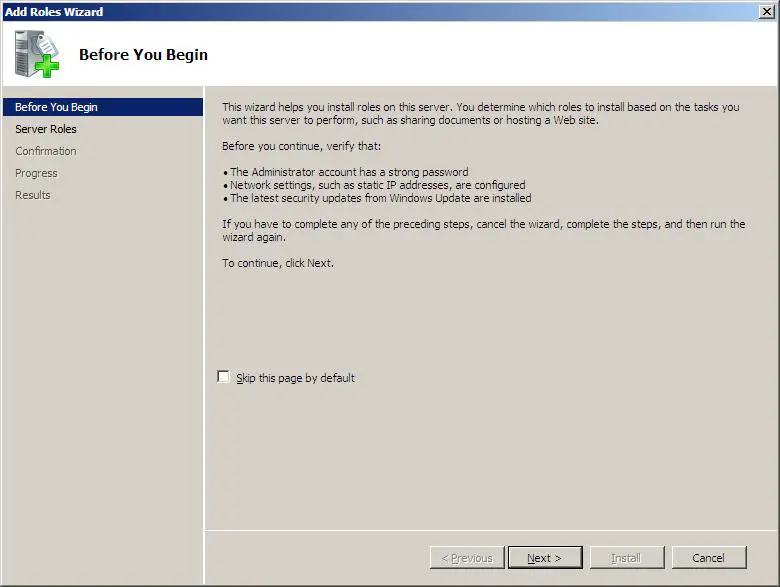
Теперь заходим в Windows Server с правами администратора и запускаем диспетчер сервера («Пуск» — «Администрирование» — «Диспетчер сервера»). Раскрываем вкладку «Роли» и нажимаем «Добавить роли» .
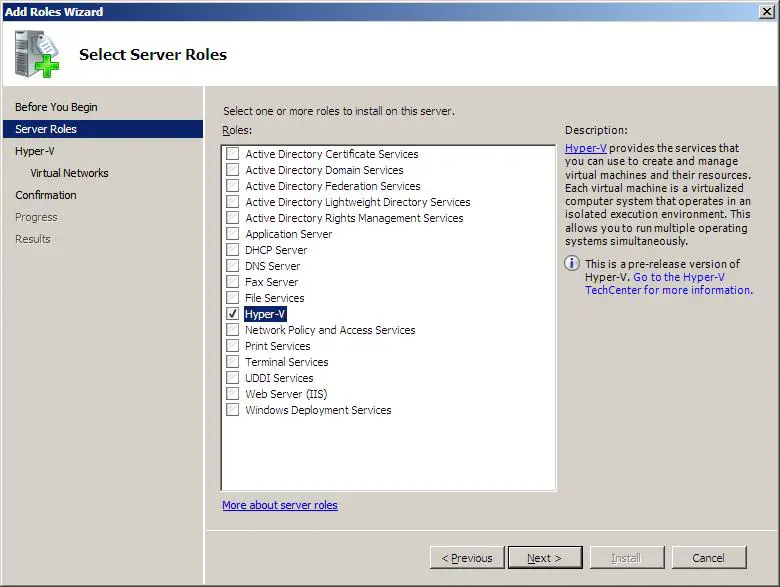
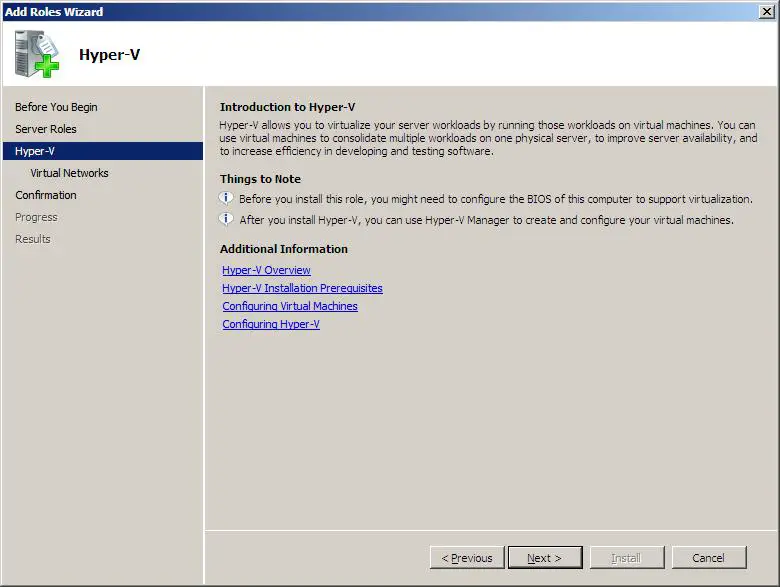
Запустится «Мастер добавления ролей» . Жмем «Далее» , затем выбираем в списке роль «Hyper-V» и снова 2 нажимаем «Далее» .
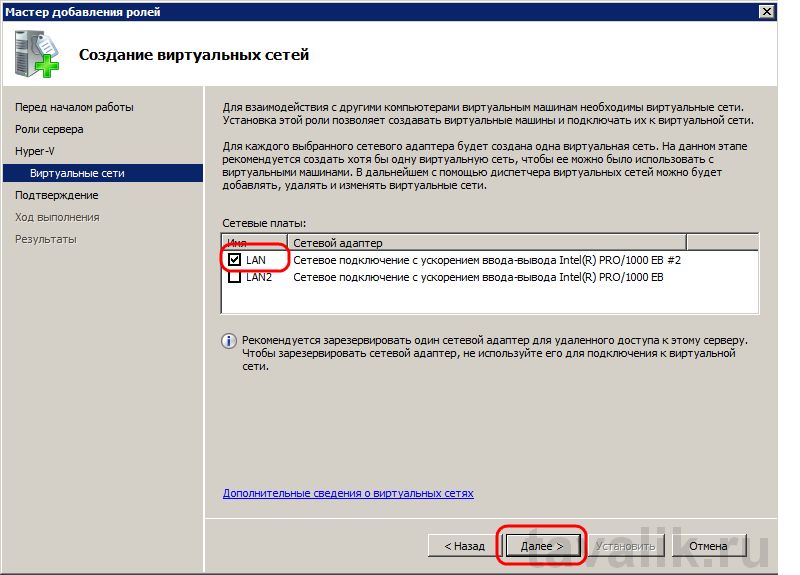
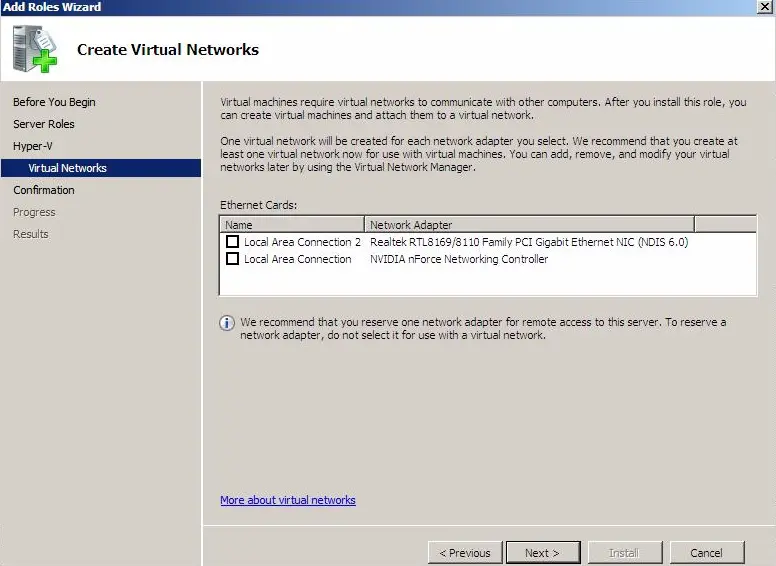
Теперь необходимо выбрать один или несколько сетевых адаптеров из имеющихся физических сетевых карт для создания виртуальной сети. Отмечаем необходимые и жмем «Далее» .
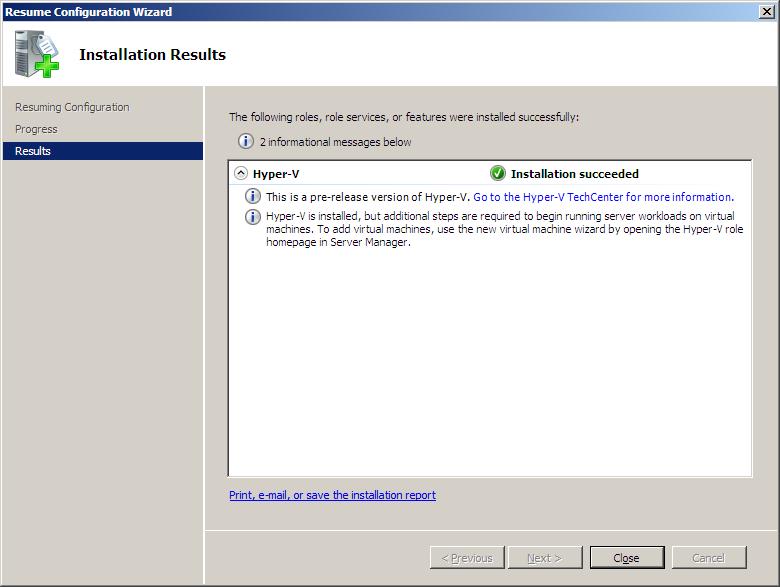
В следующем окне жмем «Установить» , дожидаемся конца установки и перезагружаем компьютер. После чего появится сообщение об успешной установке роли Hyper-V.
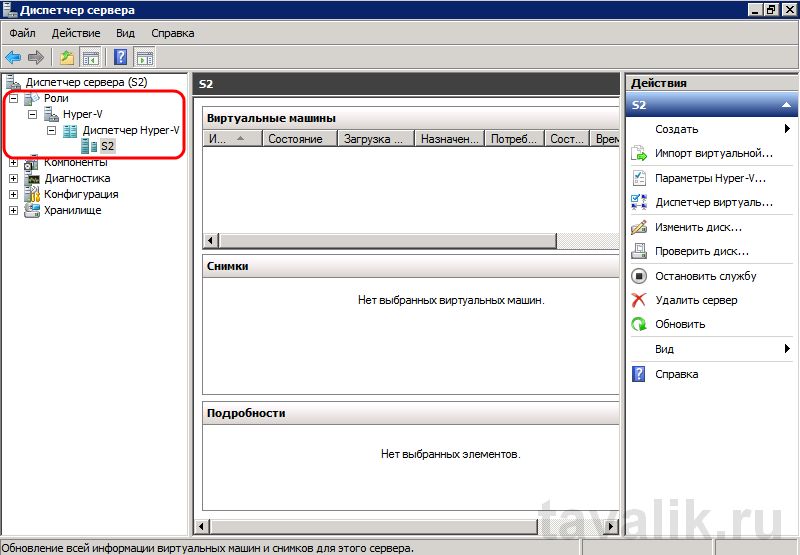
А в Диспетчере сервера раскрыв вкладку «Роли» увидим, что там появилась роль «Hyper-V«. Раскрыв ее попадем на оснастку «Диспетчер Hyper-V» (доступен также через «Пуск» — «Администрирование» — «Диспетчер Hyper-V» ) где найдем наш сервер виртуализации (совпадает с именем физического компьютера) .
4. Создание виртуального жесткого диска
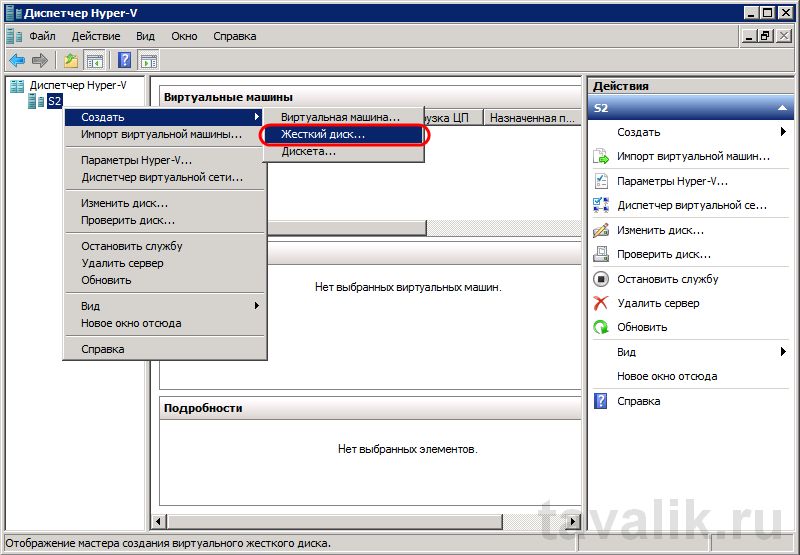
Теперь создадим виртуальный жесткий диск. Сделать это можно и во время создания виртуальной машины, но я отдельно опишу эту процедуру. Итак, в Диспетчере Hyper-V кликаем правой кнопкой мыши по нашему серверу виртуализации, в контекстном меню выбираем «Создать» — «Жесткий диск…» .
Запустится «Мастер создания виртуального жесткого диска» , жмем «Далее» и попадаем на окно выбора типа жесткого диска. Здесь приведено краткое описания для каждого типа. Выбирайте тот, который вам более подходит. Скажу только, что если нет необходимости экономить пространство физического диска, лучше выбрать диск «Фиксированного размера» т. к. он дает наибольшую производительность. Кроме того, если сомневаетесь, можно прочитать подробную справку по этому вопросу нажав на «Дополнительные сведения о виртуальных жестких дисках» . Выбрав нужный тип диска нажимаем «Далее» .
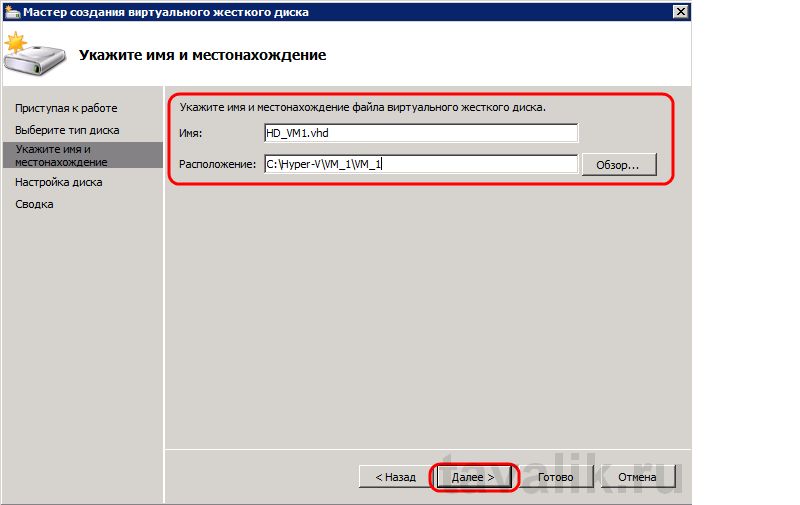
На следующей странице указываем имя виртуального диска и его расположение. Если на физическом компьютере имеется RAID-массив или SSD-диск, то для увеличения быстродействия логично расположить виртуальный диск именно там. Указав все данные жмем «Далее» .
Далее, указываем размер жесткого диска, если необходимо создать новый пустой виртуальный жесткий диск, или полностью копируем в виртуальный диск один из имеющихся физических. В этом случае размер виртуального диска будет равен размеру диска, с которого будет происходить копирование. Такая функция необходима в том случае если нужно перенести физический компьютер в виртуальный. Выбираем нужные параметры и жмем «Далее» .
Проверяем все настройки и нажимаем «Готово» . В зависимости от параметров системы и выбранного объема, создание виртуального жесткого диска может занять довольно продолжительное время. Дождавшись конца установки в указанной папке появится только что созданный файл с расширением «vhd» (Virtual Hard Disk).
5. Создание виртуальной машины
Теперь пришло время создать виртуальную машину. Для этого в Диспетчере Hyper-V в контекстном меню сервера виртуализации выбираем «Создать» — «Виртуальная машина…» .
Запустится «Мастер создания виртуальной машины» . Нажимаем «Далее» , попадаем в окно, где нужно указать имя и, если необходимо, изменить физический путь хранения виртуальной машины (по умолчанию «С:\ProgramData\Microsoft\Windows\Hyper-V\«). Необходимо позаботиться, чтобы на жестком диске было достаточно свободного места, для последующего сохранения снимков. После указания всех данных жмем «Далее» .
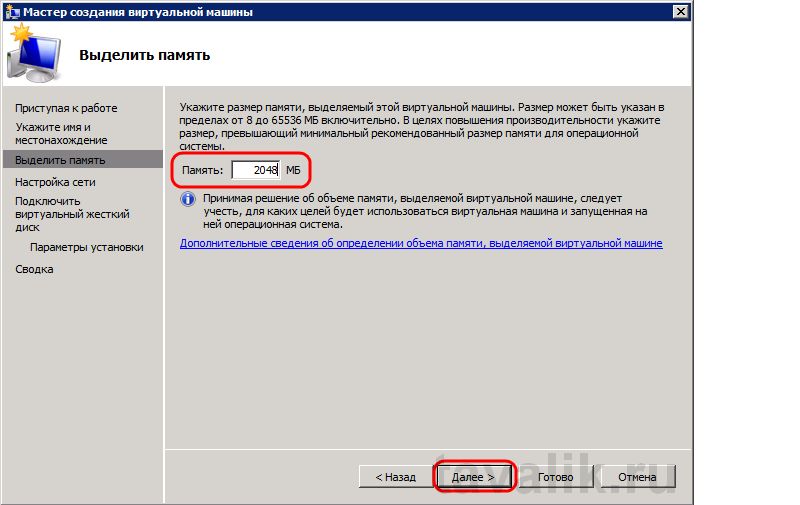
На следующей странице нужно указать объем оперативной памяти для виртуальной машины. Необходимо рассчитать этот параметр таким образом, чтобы имеющейся оперативной памяти хватило для всех виртуальных машин и для самого физического сервера. Жмем «Далее» .
На этом шаге надо определить, будет ли виртуальная машина подключена к виртуальной сети (созданной на шаге 2) выбрав соответствующий параметр и нажав «Далее» .
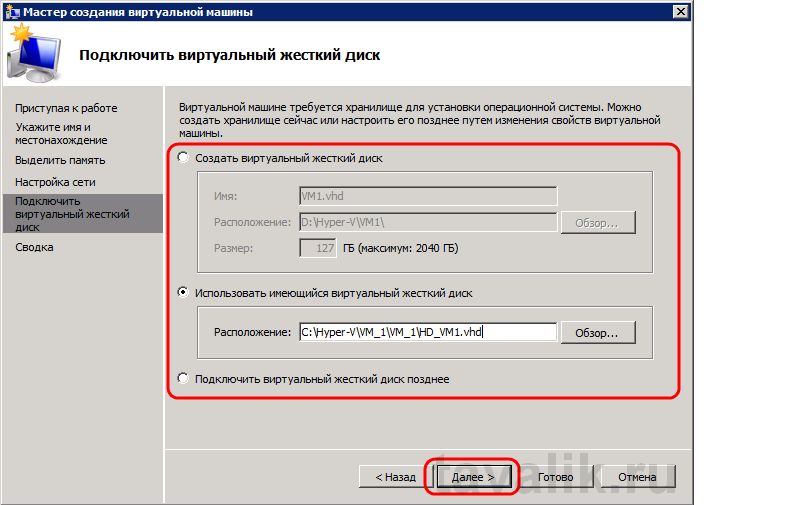
Теперь необходимо подключить в виртуальную машину виртуальный жесткий диск, созданный на предыдущем шаге, выбрав пункт «Использовать имеющийся виртуальный жесткий диск» и указав путь к нему. Или же можно создать новый виртуальный жесткий диск выбрав «Создать виртуальный жесткий диск» и заполнив все параметры (аналогично пункту 2 этой инструкции). Указав все данные жмем «Далее» .
Проверяем все настройки, нажимаем «Готово» и дожидаемся сообщения об успешном создании виртуальной машины.
6. Редактирование параметров виртуальной машины
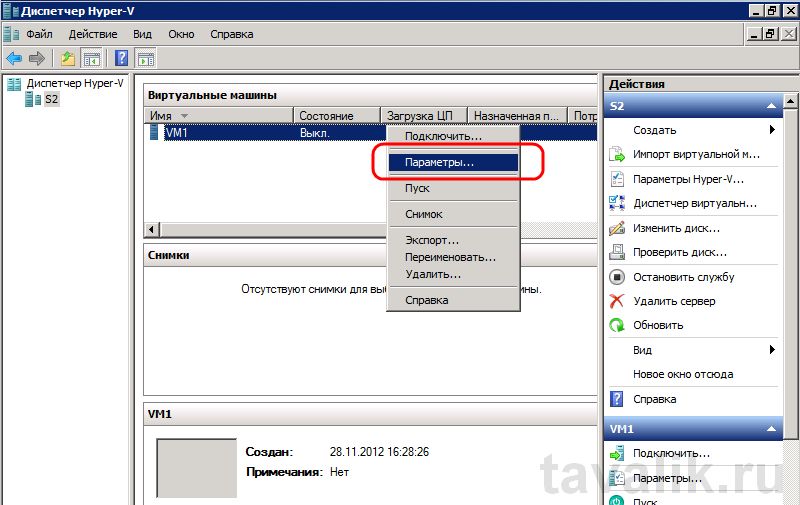
Если на предыдущем шаге все сделано правильно, то в диспетчере Hyper-V в окне «Виртуальные машины» появится только что созданная виртуальная машина. Для изменения параметров кликаем по ней правой кнопкой мыши и выбираем «Параметры» в контекстном меню.
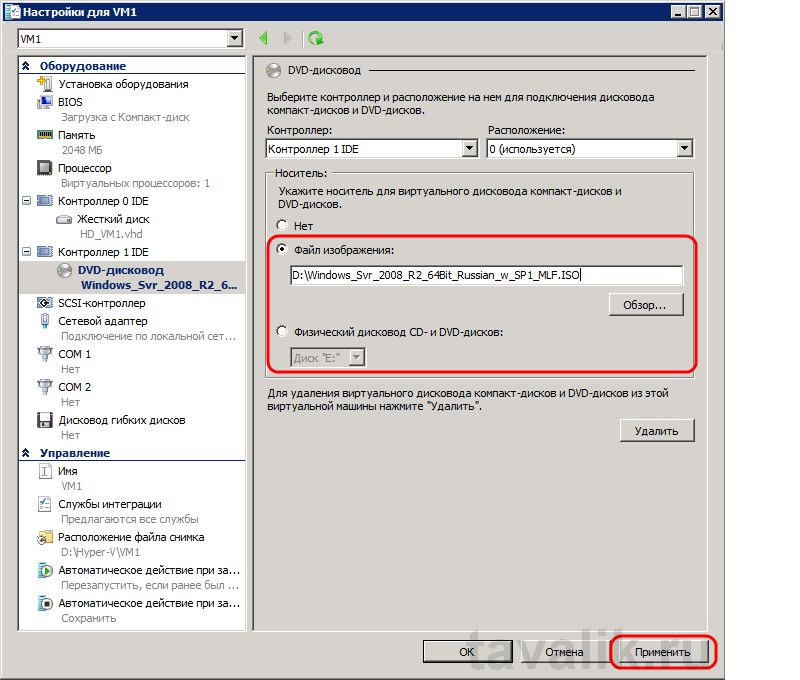
Откроется окно настроек для виртуальной машины. Здесь можно выбрать порядок проверки загрузки устройств во время запуска виртуальной машины, изменить объем виртуальной памяти (в том числе и выбрать динамический режим), установить число логических процессоров в диапазоне от 1 до 4 (как увеличить это значение читайте в статье «Увеличение числа логических процессоров в виртуальной машине Hyper-V »), добавить еще один виртуальный жесткий диск и много другое. Например чтобы добавить виртуальный дисковод компакт-дисков откроем вкладку «Контроллер 1т IDE» — «DVD-дисковод«, где можно указать iso образ диска для виртуального дисковода или подключить в виртуальную машину физический дисковод компьютера. Для установки операционной системы укажем путь к образу установочного диска или вставим установочный диск в физический дисковод компьютера в соответствии с выбранными параметрами. Для сохранения всех настроек нажимаем «Применить» и «ОК» .
7. Запуск и подключение к виртуальной машине
Наконец, когда все предварительные настройки выполнены, можно переходить к запуску виртуальной машины, что аналогично включению физического компьютера. Для этого в списке виртуальных машин в Диспетчере Hyper-V кликаем правой кнопкой мыши по созданной виртуальной машине и выбираем пункт «Пуск» . Состояние виртуальной машины изменится на «Работает» . Чтобы ее выключить нужно соответственно выбрать в контекстном меню «Выключить…» или «Завершение работы…» . Ну а чтобы подключиться к виртуальной машине (равносильно тому, чтобы оказаться перед монитором физического компьютера) необходимо выбрать пункт «Подключить…» .
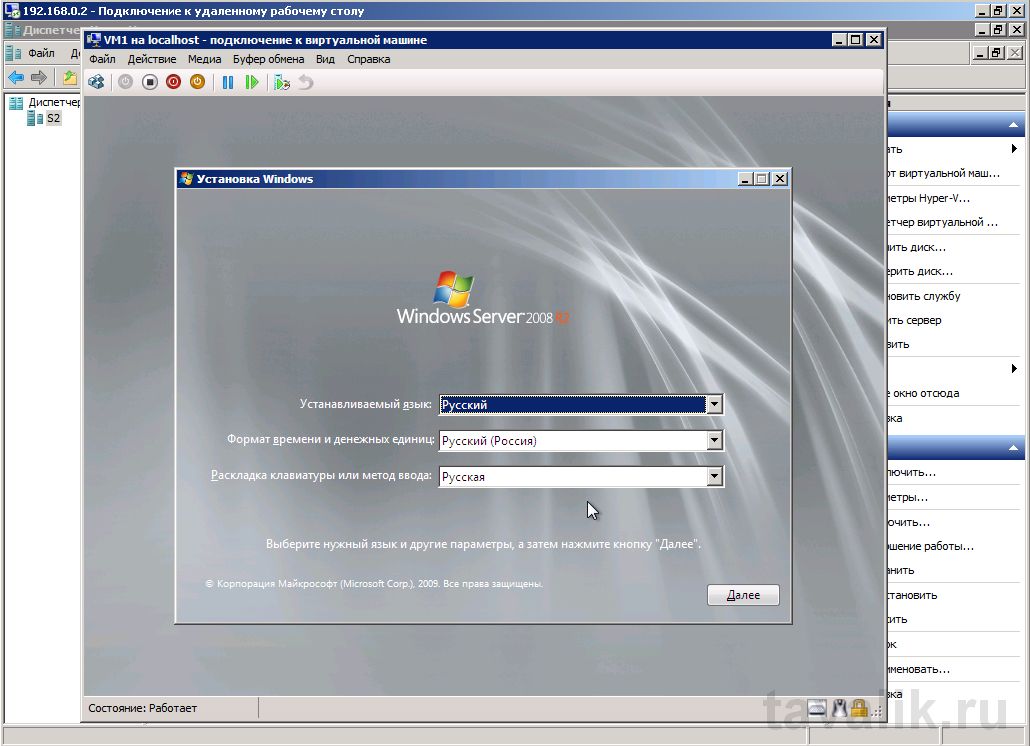
Откроется окно «Подключение к виртуальной машине» в котором увидим текущее состояние виртуальной машины. В данном случае это окно установки операционной системы. В дальнейшем все действия в виртуальной машине аналогичны действиям на любом физическом компьютере.
Время на прочтение
4 мин
Количество просмотров 130K
Вступление
Сегодня я расскажу вам как установить и настроить гипервизор от Microsoft, а так же как управлять им.
Итак, сначала небольшое лирическое отступление.
По мере оптимизации существующей инфраструктуры встал вопрос о виртуализации. Я тут же вспомнил про замечательное решение от VMware — ESXi, с которым раньше неоднократно работал и был более чем доволен и собрался уже было на него мигрировать, но судьба распорядилась иначе. В процессе планирования и выбора платформы виртуализации неожиданно победил Hyper-V.
Две вещи склонили чашу весов в его сторону: отличная поддержка железа, а так же тот фактор, что у меня в организации используются только продукты Microsoft, вследствие чего имеем более тесную интеграцию и лучшую управляемость. К сожалению, поддержка AD была анонсирована в ESXi 4.1 позже начала миграции, а то наверное я бы еще подумал.
Как многие знают, Hyper-V Server 2008 R2 — бесплатный продукт и представляет собой ОС Windows Server 2008 R2 Standard, работающую в режиме Server Core (то есть без GUI) и с включенной ролью Hyper-V. В связи с этим возникают некоторые сложности в настройке системы для «виндовых» админов, так как нет волшебных кнопочек «далее» и «готово», а уж для линуксоидов и подавно — синтаксис комманд в винде и рядом не лежал с никсами по удобству и понятности.
Установка
Начнем с установки.
Установка с компакт-диска не представляет собой ничего сложного — загрузились с диска, выбрали язык, согласились с лицензионным соглашением, выбрали раздел и «ушли курить» минут на 10.

Настройка
Теперь начинается самое интересное — настройка.
При первом входе в систему мы видим текстовое меню, позволяющее произвести первичную настройку сервера.
На мой взгляд, оно не очень удобное, к тому же по умолчанию вы не сможете удаленно подключиться к серверу с помощью Диспетчера Hyper-V, поэтому смело его закрываем и переходим в коммандную строку.
1. Установка пароля администратора
выполните команду net user administrator * и введите новый пароль
2. Настройка сети
По умолчанию сетевые адаптеры настроены на получение адреса по DHCP, если вас это устраивает, можете переходить сразу к шагу 3.
Выполните команду netsh interface ipv4 show interface, запомните IDx нужной сетевой карты.
Выполните команду netsh interface ipv4 set address name=‘2’ source=static address=192.168.0.2 mask=255.255.255.0 gateway=192.168.0.1 где 2 – тот самый IDx.
Для настройки днс серверов выполните netsh interface ipv4 add dnsserver name=‘2’ address=192.168.0.10
Вы всегда можете вернуть родные настройки командой netsh interface ipv4 set address name=‘2’ source=dhcp
3. Имя компьютера и ввод в домен
В принципе домен не обязательно нужен, но это сильно упрощает жизнь, позже я расскажу почему. Будем считать что домен есть и мы будем пользоваться этим достижением человеческой мысли.
Смотрим имя компьютера командой hostname
Меняем имя компьютера командой netdom renamecomputer WIN-KMTUYKKZPJQ /newname:vm1, где WIN-KMTUYKKZPJQ – старое имя вашего компьютера, а vm1 – новое.
Вводим компьютер в домен командой netdom join vm1 /domain:contoso.com /userd:administrator /password:* и вводим пароль указанной учетной записи.
Перезагружаемся.
На этом первичная настройка завершена.
Управление
Для управления сервером вам потребуется скачать и установить Remote Server Administration Tools (RSAT) для клиентской операционной системы и установить компонент Диспетчер Hyper-V, или добавить роль Hyper-V и установить компонент Диспетчер Hyper-V на Windows Server 2008 R2.
Пытаемся подключиться к нашему серверу и видим ошибку, которая говорит нам занести админу пива, чтобы он выдал нужные права. Вспомнив, что мы и есть тот самый админ, не падаем духом и читаем дальше.
John Howard, который занимает пост Senior Program Manager in the Hyper-V team at Microsoft, написал цикл статей, посвященный раздаче необходимых прав, а в последствии состряпал замечательную утилиту HVRemote, которая произведет хитроумную настройку сервера и клиента, не взрывая мозг админу.
Ей мы и воспользуемся. Итак, скачиваем, заходим на сервер по \\server\C$, кладем HVremote.wsf в папку Windows (или в любое другое место, но тогда не забываем указывать полный путь до нее). Запускаем на сервере:
cscript hvremote.wsf /add:domain\account ***, где domain\account – ваше имя пользователя в домене. Скрипт пропишет все необходимые привилегии, в том числе откроет нужные порты на фаерволе.
Затем, на клиенте cscript hvremote.wsf /mmc:enable, скрипт создаст исключения фаервола.
Теперь можно запускать Диспетчер Hyper-V и подключаться к нашему серверу, создавать виртуалки и радоваться жизни.
Заключение
Расскажу о некоторых моментах, с которыми мне пришлось столкнуться:
1. Используйте англоязычную версию Hyper-V – на русскоязычной скрипт не будет работать, поскольку названия групп в фаерволе будут отличаться. С клиента интерфейс hyper-v все равно будет русским.
2. Используйте домен. Если домена нет, нужно будет выполнить следующие шаги:
• Создать на сервере и на клиенте аккаунт с помощью net user
• Дать этому пользователю доступ cscript hvremote.wsf /add:accountname ***
• На клиенте разрешить анонимный доступ к DCOM cscript hvremote.wsf /anondcom:grant, залогиниться под тем же аккаунтом, которому разрешили доступ на сервере, или запустить Диспетчер Hyper-V из под нужного аккаунта, прописать учетные данные для подключения к серверу командой cmdkey /add:servername /user:servername\account /pass, а также создать исключения брандмауэра командой cscript hvremote.wsf /mmc:enable
Вот и все. Если будут вопросы – с удовольствием отвечу.
P.S: Автор — мой товарищ CLaiN.
Note: This article is based on Hyper-V 2.0, and might not apply to Hyper-V 3.0 (Server 2012)
Table of Contents
- Overview
- Prerequisites for Installation
- Installation
- To manage from Windows 7
- Resources
1-
Installing Hyper-V Server 2008 R2 SP1
Overview
Microsoft® Hyper-V™ Server 2008 R2 SP1 is the next generation of Microsoft Hyper-V Server 2008, which is a hypervisor-based product that was first released in September 2008. It’s a dedicated stand-alone product that contains only the Windows® hypervisor,
a Windows Server® driver model, and virtualization components.
Prerequisites for Installation
For install Hyper-V Server 2008 R2 SP1, you will need the following specific hardware requirements by the technology:
Processor:
• Minimum: An x64-based processor with hardware-assisted virtualization. This is available in processors that include a virtualization option—specifically, processors with Intel Virtualization Technology (Intel VT) or AMD Virtualization (AMD-V) technology.
• Hardware-enforced Data Execution Prevention (DEP) must be available and enabled. Specifically, you must enable the Intel XD (“execute disable”) bit or the AMD NX (“no execute”) bit.
Memory:
• Minimum: 1 GB RAM; recommended: 2+ GB RAM
• Maximum: 1 TB
Network adapters
• Minimum: 1
• Recommended: 2 or more
Additional considerations:
• The settings for hardware-assisted virtualization and hardware-enforced DEP are available in the BIOS. However, the names of the settings may differ from the names identified previously.
For more information about whether a specific processor model supports Hyper-V, check with the manufacturer of the computer.
• If you modify the settings for hardware-assisted virtualization or hardware-enforced DEP, you may need to turn off the power to the computer and then turn it back on. Restarting the computer may not apply the changes to the settings.
Installation
The installation of Microsoft Hyper-V Server 2008 R2 SP1 will be very familiar to those of you who have installed a Windows Server 2008 R2 SP1 edition because it uses a similar wizard-driven installation.
There are some sources for deploy Hyper-V Server 2008 R2 SP1: USB, Windows Deployment Services (WDS), downloading the ISO file (for free on Microsoft web site) and burning on DVD.
- For more information about download, licensing and features, go to the following link:
http://www.microsoft.com/hyper-v-server/en/us/how-to-get.aspx
After you choose the source installation, Power-up the server and boot;
After the boot completes, you will select the language of your interest;
Select the installation language, time and currency format, and the keyboard and input language, and then click Next;
To begin the installation, click Install Now;
After you click Install now, the setup will start;
Review the license terms, select I accept the license terms if you agree to them, and then click Next;
Click the Custom installation button. The Upgrade option is disabled because Microsoft Hyper-V Server 2008 R2 SP1 does not support upgrading from another version of Windows;
Select a disk and partition to install, and then click Next;
The installation process begins;
After the installation process completes, a logon screen will display. When you log on for the first time, you will be required to change the local administrator password;
After log on, a command line configuration tool automatically launches to allow you to modify the default system settings.

2-
Configuring Hyper-V Server 2008 R2 SP1 for remote management
- If it is not already running, start the Server Configuration tool by typing Sconfig.cmd in a command prompt and pressing ENTER;
- If the account you have used to log on to the computer is already in the Domain Administrators group, skip to the next step. If the account you have used to log on to the computer is not in the Domain Administrators group, add the account to the Administrators
group by typing 3 and pressing ENTER; - Type the domain name and user name and press ENTER.
For example, type: domain\domain user;
- Click OK;
- In the Server Configuration tool, configure remote management by typing 4 and pressing ENTER;
- Select any of the following remote management methods. These options are not exclusive—you can enable any or all of them by repeating this step. For remote management, you should enable all of them;
|
Allow MMC Remote Management |
a. Type 1 to enable MMC Remote Management. b. A message appears that says: “Enabling MMC firewall exceptions and Virtual Disk Service.” c. When the process is complete, the following message appears: «Remote Management allowed for all Windows Firewall profiles.” Click |
|
Enable Windows PowerShell |
a. Type 2 to enable Windows PowerShell. b. When the process is complete, the following message appears: “You must restart the computer to complete the Windows PowerShell installation. Restart now?” Click |
|
Allow Server Manager Remote Management |
Note You must enable Windows PowerShell and restart the computer before you can enable Server Manager Remote Management. a. Type 3 to allow the computer to be managed by using Remote Server Manager. b. When the process is complete, the following message appears: “Remote Server Management enabled.” Click |
- You may need to restart the computer to activate the option;
- If the computer running Hyper-V Server is in a workgroup or you have any problems during the configuration, see that link:
http://blogs.technet.com/b/jhoward/archive/2008/03/28/part-1-hyper-v-remote-management-you-do-not-have-the-requested-permission-to-complete-this-task-contact-the-administrator-of-the-authorization-policy-for-the-computer-computername.aspx
- If the computer running Hyper-V Server is in workgroup, use
HVRemote
Managing
Hyper-V Server 2008 R2 Remotely
After configuring remote management, you can remotely manage Hyper-V Server through any of the following methods:
• Use Hyper-V Manager in a Full installation of Windows Server 2008 R2.
• Use Hyper-V Manager in Windows 7 using Remote Server Administration Tools.
Choose the option that is right for you, and then follow the steps that correspond with your choice.
Notes:
• The Hyper-V Manager Microsoft Management Console (MMC) snap-in is automatically installed when the Hyper-V role is enabled on Full installations of Windows
Server 2008 R2.
• The System running Hyper-V Manager Microsoft Management Console (MMC) snap-in Must be in the same domain as the Server running Microsoft Hyper-V. Cross domain permissions do not work within this MMC snap-in
• If you will be using a computer with a 32-bit operating system to remotely manage a computer running Hyper-V Server that has failover clustering enabled, you must enable 32-bit support for failover clustering on the computer running Hyper-V Server. You
can do this with the following command: dism /online /enable-feature /featurename: FailoverCluster-Core-WOW64
To
manage from a Windows Server 2008 R2 computer
1. On the remote computer you will be managing Hyper-V Server from, enable the Hyper-V Manager MMC snap-in: On the Start menu, click Server Manager.
2. Right-click Features, and then click Add Features.
3. Under Remote Server Administration Tools, click Role Administration Tools, click Hyper-V Tools, and then click Next.
4. Click Install.
5. After the computer restarts, click the Start menu, click Administrative Tools, and then click Hyper-V Manager.
6. On the left side of the MMC window, click Hyper-V Manager.
7. From the Actions menu, click Connect to Server, select Another Computer, and then enter the name or IP address of the server that you want to connect to.
To manage from Windows 7
1. On the remote computer you will be managing Hyper-V Server 2008 R2 from, download and install the Hyper-V Manager MMC snap-in from Remote Server Administration Tools (http://go.microsoft.com/fwlink/?LinkID=130862).
2. After the computer restarts, click the Start menu, click Administrative Tools, and then click Hyper-V Manager.
3. On the left side of the MMC window, click Hyper-V Manager.
4. From the Actions menu, click Connect to Server, select Another Computer, and then enter the name or IP address of the server that you want to connect to.
Resources
http://www.microsoft.com/brasil/servidores/hyper-v-server/overview.mspx
http://technet.microsoft.com/pt-br/library/cc753637%28WS.10%29.aspx
 Hyper-V is one of the hardware virtualization technology used in the industry. This is based on hypervisor and one of the important features of Windows Server 2008. it offers a flexible, reliable and highly powerful virtualization platform.
It also offers a ability to manage various things by using the features like quick migration of the physical servers to the hyper-v virtual machines and another physical hosts, possible to integration with SCVMM (ie. System Center Virtual Machine Manager).
Lets, begin with the installation process of hyper-v on windows server 2008. Before starting with the installation procedure make sure you have the following required things.
Requirements for Installing Hyper-V:
Hyper-V required following Specific requirement to run.
1) x64-based Processor: The hyper-v can only be installed on the x64-based versions of Windows Server 2008, which are Windows Server 2008 Standard, Enterprise and DataCenter Edition.
2) Must have a processor that consists of virtualization options enabled or the HAV should be enabled in the BIOS. The Intel VT and AMD Virtualization includes such options. Along with the HAV, the Data Execution Protection should also be enabled in the BIOS. Make sure you enable the Intex XD bit or AMD NX bit.
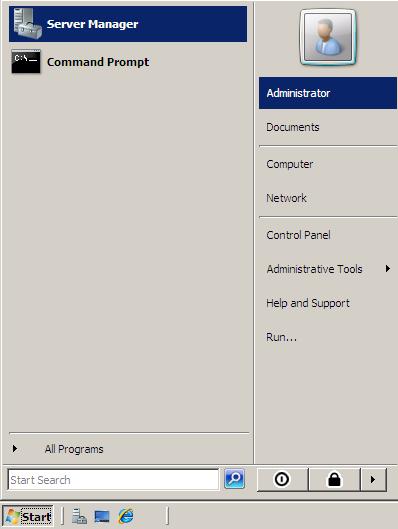
Step 1: Click Start —–> Server Manager.
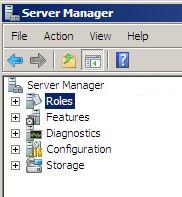
Step 2: Left side you will find the Role Section, Click On Roles.
Step 3: Roles page will open seperately, Click on Add Roles on the right side to add the Hyper-V role.
Step 4: Now the Add Role Wizard will open, Click Next to Continue.
Step 5: In the list you will find the Hyper-V, Select Hyper-V and Click Next to continue.
Step 6: The following screen will the introduction for the Hyper-V, if you like read it. Otherwise click Next to continue.
Step 7: You can create connections to a whole network simply by clicking one or more network adapters on the “Create Virtual Networks” window. It is recommended to have at least two network adapters, which can be used for different purposes. One for virtual network and another for server management.
it does the following.
- Communications between virtual servers only.
- Communications between the virtualization server and virtual servers.
- Communications between a virtual servers and a physical network by creating an association to a physical network adapter on the virtualization server.
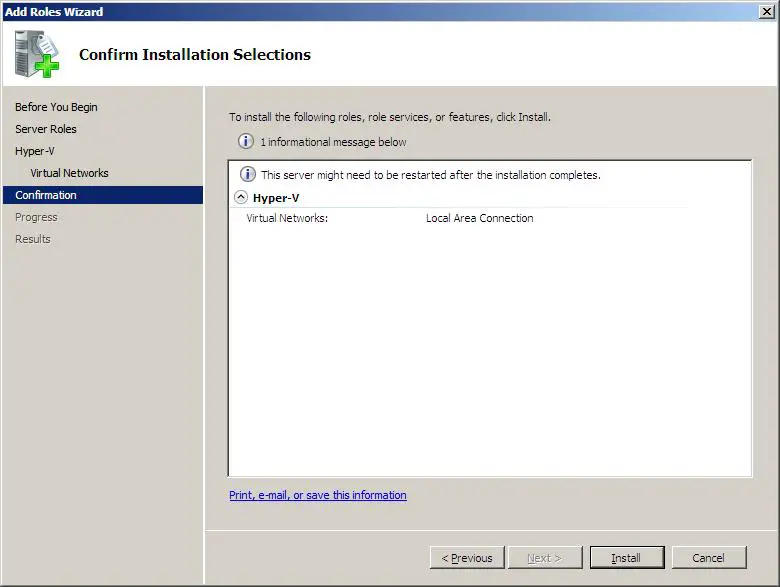
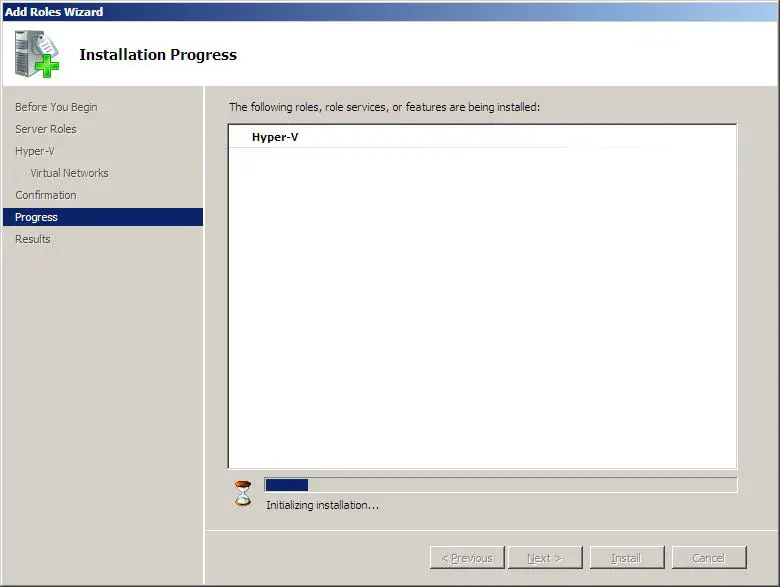
Step 8: Click on Install to start the installation Hyper-V.
The following screen shows the initialzing the installation of Hyper-V.
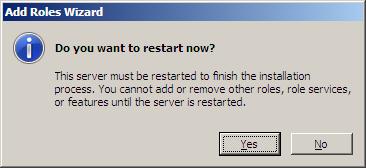
Step 9: Once the intialization is completed it will prompt you to reboot the server. Clic Yes on the Reboot window.
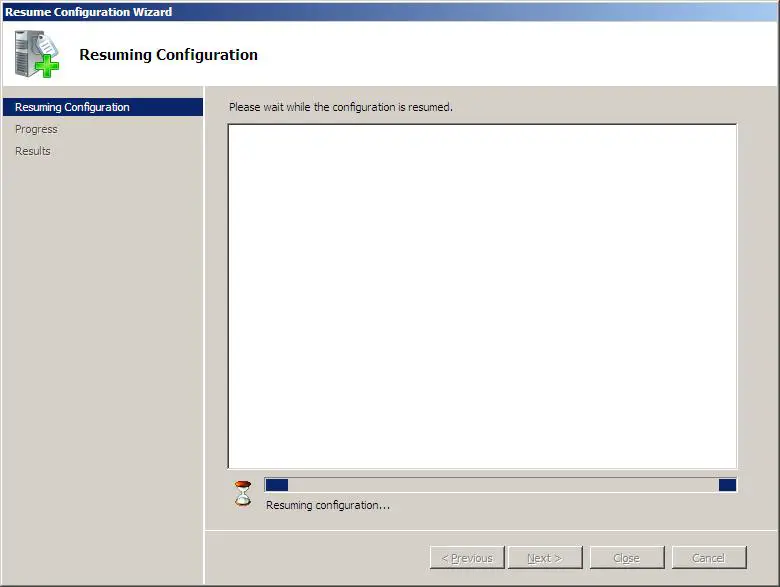
Step 10: Once the machine reboot, log in with your credential. The server manager start to resume the installation automatically.
Step 11: Once the installation is over, click close on Result window.
Now the Hyper-V successfully installed on Windows server 2008.
Follow the necessary steps to install Hyper-V on Windows Server 2008 Server Core and learn how to remotely manage your customers’ Hyper-V environments.
Phase 1 of the green initiative requires all development servers from this point forward to be virtual servers. It is perceived that the benefits of virtualization will include the following:
- Server consolidation
- Improved server utilization
- Reduced power consumption
- Reduced data center footprint
- Improved flexibility
Solution: Windows Server 2008 has an installable role, Hyper-V, that enables you to configure an environment to support virtual servers. There are a variety of specific requirements that you need to keep in mind, including the following:
- The Windows Server Virtualization role can be installed only on a system that has a 64-bit processor.
- Hardware must support hardware-assisted virtualization (Intel VT or AMD-V) technology and hardware data execution prevention (DEP).
- Best practice is to have at least two physical network interface cards (NICs): one for management of the server and one or more for the virtual servers.
NOTE: Why is there a Windows Server 2008 32-bit without Hyper-V edition available if you can only install the role on a 64-bit server? Although you can only install the Hyper-V role on a 64-bit server, you can install the management tools on both 64- and 32-bit machines. The Windows Server 2008 32-bit edition without Hyper-V does not give you the option to install the management tools.
Essentially, Hyper-V installs a hypervisor on top of your hardware but beneath your virtualized systems. This hypervisor makes it appear to all your virtualized systems as though they are running directly on the hardware, not sharing it with other virtualized systems. There is one parent system (running the full version of Windows Server 2008 or the Server Core version) that maintains the structure of Hyper-V.
NOTE: What is a hypervisor? A hypervisor, also called a virtual machine manager, is a program that runs in a layer between your hardware (processor, memory, disk, network) and your OS. It allows you to install multiple operating systems as long as you have enough hardware power to support them. Different hypervisors work in different ways. For example, the VMware hypervisor includes drivers for your software in the hypervisor itself. The Hyper-V hypervisor does not include those drivers but relies on the OS to hold its own drivers, making the Hyper-V hypervisor «thinner,» or smaller in size.
Install Hyper-V on a Full Installation of Windows Server 2008
To install Hyper-V on a system that is already running the full installation of Windows Server 2008, perform the following steps:
- Make sure your hardware is configured for Hyper-V in the BIOS:
- Security: Execute Disable = On
- Performance: Virtualization = On
- Performance: VT for direct I/O access = On
- Performance: Trusted Execution = Off
- Install the Hyper-V update KB950050 and then reboot.
- In Server Manager click Add Roles and select the Hyper-V role.
- Note the reminder to configure BIOS settings as well as the links to additional information. Click Next.
- On the Create Virtual Networks page, select a network adapter to allow for a virtual network connection for the virtual machines, as shown in Figure 7.1. You can always add, remove, or modify your virtual networks later, through the Virtual Network Manager.
- Review your role settings on the Confirm Installation Selections page and click Install.
- When the installation is complete, restart your computer by clicking Yes.
- After the computer restarts, you get a message about whether the installation was successful. If all went well, click Close. If you encounter errors, a good place to start your investigation is the event logs.
NOTE: Name references in BIOS may differ, depending on the BIOS version. Also, you might need to actually power down your computer, rather than simply restart, for the settings to take hold.
FIGURE 7.1
The Create Virtual Networks page to the Hyper-V installation process.
Now that you have it installed, you can use Server Manager or the Hyper-V Manager (shown in Figure 7.2) to see all the tools you have at your disposal to create and manage virtual machines.
FIGURE 7.2
The Hyper-V Manager, postinstallation.
Install Hyper-V on Server Core
To really improve server utilization and increase security, you might decide to install the Windows Server Virtualization role on the Server Core edition of Windows Server 2008.
To install on the Server Core edition, you follow these steps:
- Set the BIOS settings as in the section «Install Hyper-V on a Full Installation of Windows Server 2008.»
- Check to see if the edition of Windows Server 2008 supports Hyper-V by entering wmic OS get OperatingSystemSKU. Windows Server 2008 returns a number, and only a few numbers refer to editions that support Hyper-V:
- 12: Windows Server 2008 Datacenter Edition, Server Core
- 13: Windows Server 2008 Standard Edition, Server Core
- 14: Windows Server 2008 Enterprise Edition, Server Core
- Ensure that you are running on 64-bit architecture by typing wmic OS get OSArchitecture.
- Install the Hyper-V update KB950050 by typing wusa.exe
Windows6.0-KB950050-x64.msu /quiet
. This update reboots the server - Actually install the Windows Server Virtualization Role by entering start /w ocsetup Microsoft-Hyper-V and restart the server when you’re prompted to do so.
NOTE: Windows Server 2008 Standard edition includes a license for one free virtual instance, Enterprise edition includes a license for four free virtual instances, and Datacenter edition includes a license for an unlimited number of virtual instances.
At this point, you have installed the Windows Server Virtualization role. This is just a platform to build and manage virtual servers. Now let’s look at how to manage this role to build and support virtual servers.
Manage Hyper-V Remotely
|
|||
Scenario/Problem: Your infrastructure plan says that all Windows servers utilized for the virtualization project must be run on Server Core. How will you build and manage virtual servers on Server Core?
Solution: You need to install the Hyper-V Manager on client machines that are to be used to manage your Windows Server 2008 Hyper-V environment. Only two operating systems support the Hyper-V Manager:
- Windows Server 2008: You can add the Hyper-V Manager feature by using Server Manager. You can find the Hyper-V tools by selecting Remote Server Administration Tools, Role Administration Tools, Hyper-V Tools.
- Windows Vista: The Service Pack 1 KB925627 update package includes the Hyper-V Manager MMC snap-in and the Virtual Machine Console, a tool that enables you to establish an interactive session on a virtual server.
When you have the Hyper-V Manager installed, you can connect to remote Hyper-V servers that you need to administer by clicking the Connect to Server link in the Actions pane.
Hyper-V management leverages Windows Management Instrumentation (WMI) to manage Hyper-V. The Hyper-V WMI enables you to configure/manage all aspects of Hyper-V, such as the following:
- Configure server settings
- Build and configure virtual servers
- Create and manage virtual network switches
- Manage the state of virtual servers that are running
You can also remotely manage your Hyper-V server via Remote Desktop Protocol (RDP). The Terminal Services Remote application allows you to connect to Windows-based platforms from just about anywhere, which means you can connect to your Hyper-V server and, in effect, administer it locally. Virtual Machine Connection (vmconnect.exe) allows you to build and/or connect to the virtual servers that reside on your Hyper-V server. Virtual Machine Connection also uses RDP to establish connections.
NOTE: The primary supported tools for remotely administering your Hyper-V infrastructure are the Hyper-V Manager and the System Center Virtual Machine Manager (VMM).
Implement and Utilize Hyper-V
Installing and managing Hyper-V on Windows Server 2008 Server Core
Using Hyper-V Manager to create virtual machines and hard drives
Monitoring Hyper-V performance and utilizing System Center VMM
Printed with permission from Sams Publishing. Copyright 2009. Windows Server 2008 How-To by J. Peter Bruzzese, Ronald Barrett and Wayne Dipchan. For more information about this title and other similar books, please visit Sams Publishing.
Dig Deeper on MSP technology services
-
Get to know Hyper-V 2019 new features and functionality
By: Brien Posey
-
Microsoft Hyper-V Manager
By: Tayla Holman
-
Six alternative Hyper-V management tools
By: Trevor Pott
-
Windows Server 2012 (WS 2012)
By: Toni Boger
