Objective: Share a Windows share to a Linux client, via Network File System (NFS)
(Last Update: 28-Feb-2012)
Windows Server NFS services –> NFS –> Linux
Why? It is because NFS client is native to Linux/UNIX. There is no additional software needed to be installed at Linux/UNIX side.
At Windows side (assumptions):
- A folder will be shared via NFS e.g. S:\NFS
- A single Windows server runs all NFS related servers/services.
- A Windows user is needed to create for the UNIX user mapping (both domain or local user are fine)
- A Windows group is needed to create for the UNIX user mapping (both domain or local user are fine)
- Setup user mapping so that Linux users/groups will have their respective Windows user identity. On the other side, when a Linux user access a Windows file, the NFS service on Windows will convert Windows user and group to corresponding UID and GID.
At Linux side: (RedHat linux is tested at this tutorial)
- We will mount the share at UNIX under /mnt/winnfs
- Please do not access the NFS share using root users. Use another users instead
- Install NFS Server Components:

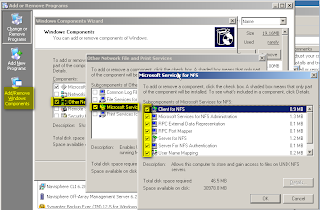
- Control Panel — Add or Remove Programs
- click «Add/Remove Windows Components»
- go to «Other Network File and Print Services»
- click «Details»
- go to «Microsoft Services for NFS»
- click «Details»
- Select «Client for NFS», «Microsoft Services for NFS Administration», «RPC External Data Representation», «RPC Port Mapper», «Server for NFS» and «User Name Mapping»
- Click OK. (You will be asked for Disc 2 to install the required files).
- User and Group Mapping Preparation
- Please create a Windows user and group. Domain or local user/group are both fine.
- Copy the /etc/passwd and /etc/group file from your Linux to your windows under C:\ETC
- Edit the two files. Remove unnecessary users and group. You may need advanced editor such as Notepad++ to edit UNIX format file.
- Enable User and Group Mapping
- Open «Microsoft Services for Network File System» mmc (You may use Start — Run — nfsmgmt.msc; or locate it under Start — Programs — Administrative Tools)
- Right click the root level (Microsoft Services for NFS). Select Properties.

- Make sure «localhost» is entered at «User Name Mapping Server».
- Click OK to save the setting.
- Expand the tree at root level (if not done so). You will find «User Name Mapping» just under «Microsoft Services for NFS».
- Right — click «User Name Mapping». Click «Properties».
- Select «UNIX User Source» tab.

- Click «Use Password and Group files»
- Enter the «Password file path and name:» e.g. c:\etc\passwd
- Enter the «Group file path and name:» e.g. c:\etc\group
- Click OK to save all setting
- Assign Advanced User mapping
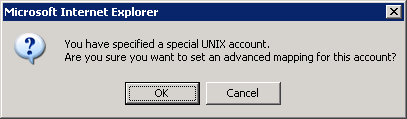
(If the user name is not the same on UNIX side and Windows side, we need to use Advanced user mapping which we tell Windows the mapping pairs.) - Right click «User Maps», click «Create Map…»
- On the left side, select the correct Windows domain. (In this example, we stick to local user. Please select \\WinServerName.)

- Click «List Windows Users»
- Select the Windows user you want to map. (Do not use Administrator. You need to create a new Windows user for the mapping.)
- Click «List UNIX Users».
- Select the UNIX user to be mapped.
- Click «Add» to save the mapping.
- Click «Close» to return to the MMC.

- Assign Advanced Group mapping
- Right click «Group Maps», click «Create Map…»
- On the left side, select the correct Windows domain. (In this example, we stick to local user. Please select \\WinServerName.)
- Click «List Windows Group»
- Select the Windows group you want to map.
- Click «List UNIX Group».
- Select the UNIX Groupto be mapped.
- Click «Add» to save the mapping.
- Click «Close» to return to the MMC.
- Share a folder
- Create a folder in Windows (e.g. S:\NFS)
- Right click the folder — Select Properties
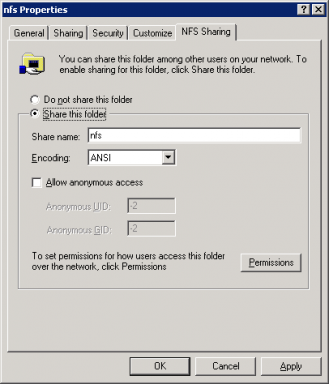
- Select «NFS Sharing»

- Click «Share this folder»
- (for testing only): Enable «Allow anonymous access»
(usually, we will further limit the access via “Security” tab.) - Click «Permissions»

- Change the «Type of access» of ALL MACHINES from Read Only to Read-Write
- (for testing only)Enable «Allow root access» (so that you can access the NFS share using root identify. This is not recommended because there is little protection for the server if root is used.)
(If this checkbox is not checked, root will be regarded as nobody or nfsnobody in default setup.) - Click all «OK» all the way.
- Add user access right in NFS
- Modify Rights
- Right click the folder — Select Properties
- Select «Security»

- click «Add»
- enter the corresponing “Windows User” which have mapping at “User Mapping”
(for testing only)If you have problem in user mapping, you can use ANONYMOUS LOGON as a temporary solution. Enter «ANONYMOUS LOGON» - click «OK»
- Ownership rights (in case you have difficulty in delete file in the share from a Linux)
- add «Modify» rights to the “Windows User”
(for testing only) add «Modify» rights to «ANONYMOUS LOGON» - Click “Advanced” button
- Click “Owner” Tab
- Click “Other Users or Groups”
- Add the mapped “Windows User” as owner of the folder.
- click «OK» to save the change
- Check if the NFS sharing is enabled
- Open command prompt in MS Windows
- type: showmount -e
- You should see the share is listed.
- Check if the NFS is accessible from Linux
- Go to Linux (e.g. RedHat)
- Make sure your are using the right login ID which has Windows user mapping at Windows NFS.
- Open a Terminal
- type: showmount -e WinServerName
- Create mount point and mount in Linux (temporary)
- mkdir /mnt/winnfs
- mount -t nfs WinServerName:/nfs /mnt/winnfs
- Permanent mounting at Linux (alternate to previous step (reference)
- Add the below line at /etc/fstab of your UNIX machine:
WinServerName:/NFS /mnt/winnfs nfs rsize=8192,wsize=8192,timeo=14,intr - To mount NFS using TCP (for better traffic control), use the below entry:
serverName:/nfs /mnt/winnfs nfs rsize=8192,wsize=8192,timeo=14,intr,tc
- Add the below line at /etc/fstab of your UNIX machine:
- Test the mount point
- test read: ls -al /mnt/winnfsYou should see the directory content
- test write: touch /mnt/winnfs/myfileYou should see a file created
- Hardening (optional) (application if you have enable «Allow anonymous access» in previous steps)
(Since we have successfully done «User Mapping», we need to disable Anonymous access which we have enabled for testing purpose)- Rememeber to disable «Allow anonymous access» under NFS sharing.
- Remove «ANONYMOUS LOGON» under Windows security of the share.
- Delete of file created during access as «ANONYMOUS».
- These file may not be able to delete at UNIX because there is no ANONYMOUS at UNIX side. If you use ls -l to see the details, you may see these files are owned by 4294967294 which means ANONYMOUS. You may delete them at Windows side.
- After correct user mapping and group mapping, the files created should be able to be deleted.


Advanced Topics:
NFS сервер на системе семейства Linux – это классическое и наиболее распространенное решение при организации службы NFS в сети. В интернетах можно найти множество инструкций по настройке NFS сервера на Linux/UNIX. А я вот наперекор интернетам решил проверить: можно ли установить службы NFS на ОС семейства Windows и воспользоваться ими в практических целях. В этой статье я опишу процесс установки Services for UNIX 3 на сервере Windows 2003 R2, а также настройку получившегося сервера NFS (при помощи службы User Name Mapping) для резервного копирования виртуальных машин VMware ESXi .
Сначала нужно скачать и установить дистрибутив Windows Services for UNIX (SFU). http://www.microsoft.com/downloads/en/details.aspx?FamilyID=896c9688-601b-44f1-81a4-02878ff11778&DisplayLang=en . Распакуем скачанный архив и запустим установочный файл setup.exe.
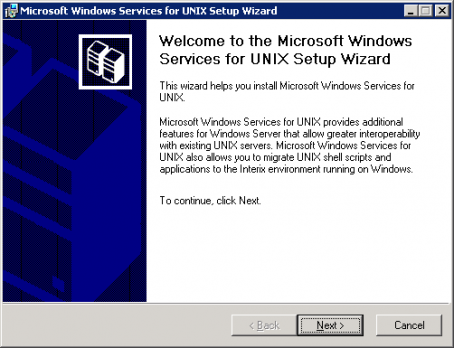
Нажмите Next.
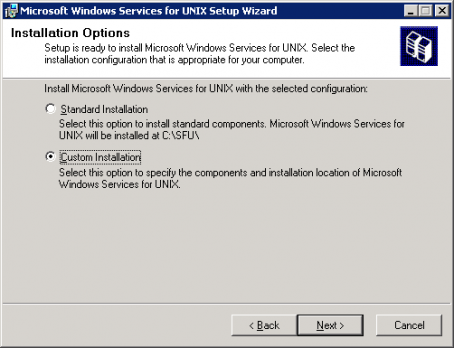
Выберите Custom Installation и затем Next.
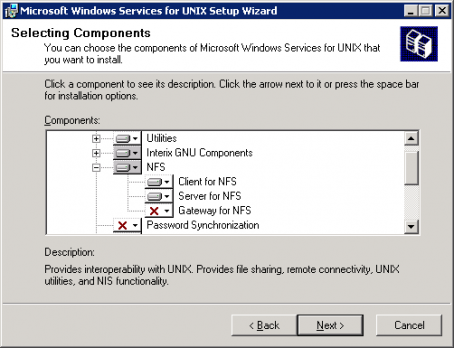
В разделе NFS выберите компоненты «Client for NFS» и «Server for NFS».
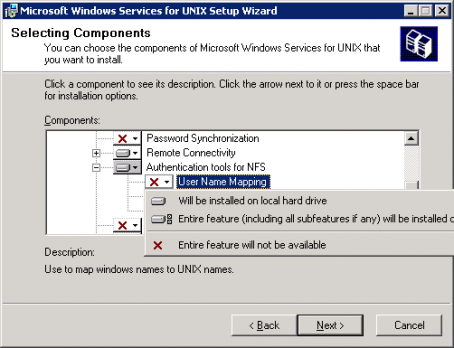
Чуть ниже найдите раздел «Authentication tools for NFS» и отметьте для установки «User Name Mapping». Нажмите Next.
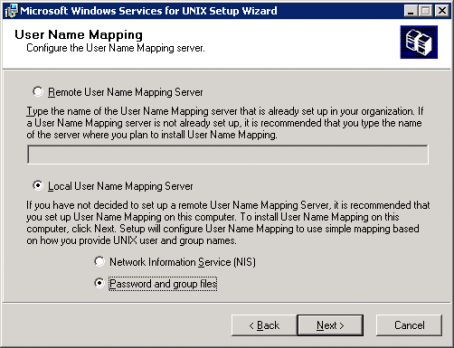
Выберите «Local Mapping Server», а также «Password and group». И опять Next.
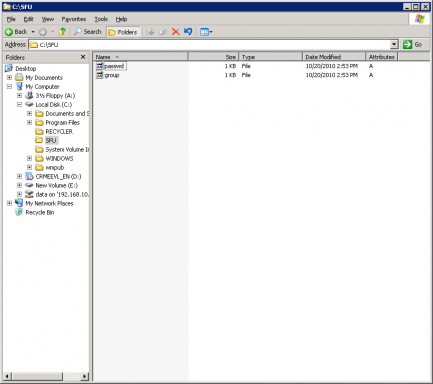
Откроем проводник Windows Explorer и создадим каталог, в котором будут храниться файлы с группами и паролями серверов VMware ESXi (это два файла password и group).
Для этих целей я создал каталог C:\SFU. К сожалению, в процессе установки SFU, все существующие в данной папке фалы password и group будут перезатерты, и придется копировать их заново. Однако для корректной работы установщика, необходимо чтобы в этой папке эти файлы все-таки находились. Ну что-ж, создадим их.

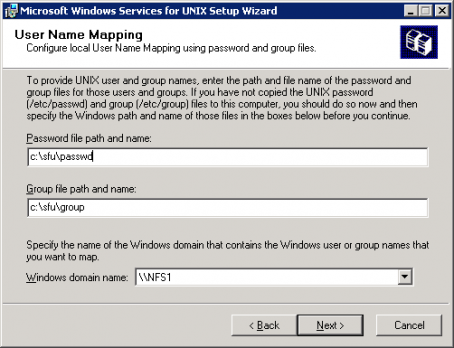
Введите путь к файлам password и group.

Затем Next, после чего запустится процесс установки.
Настраиваем сопоставление пользователей (User Name Mapping)
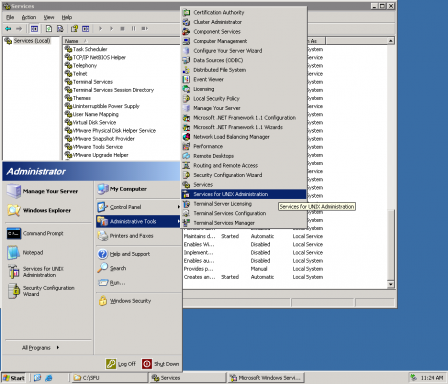
Идем в Start > Administrative Tools > Services for UNIX Administration.
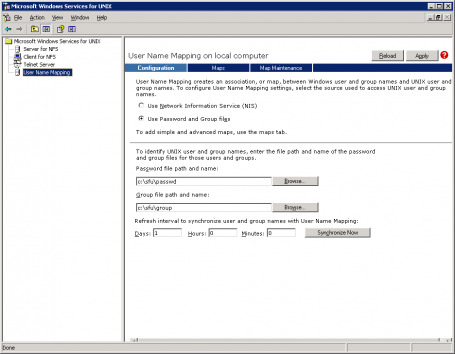
В левой панели перейдем в раздел «User Name Mapping», после чего в средней панели сверху нажмем Maps.
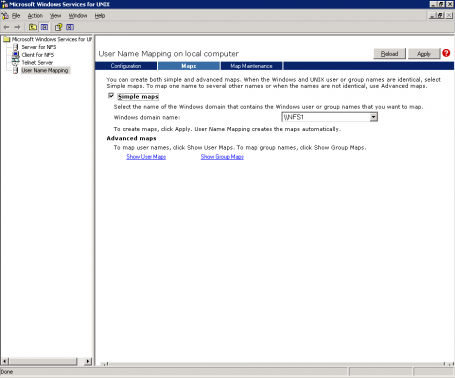
Снимем галочку с «Simple maps», а затем в раскрывшемся «Advanced maps», жмем на Show User Maps.
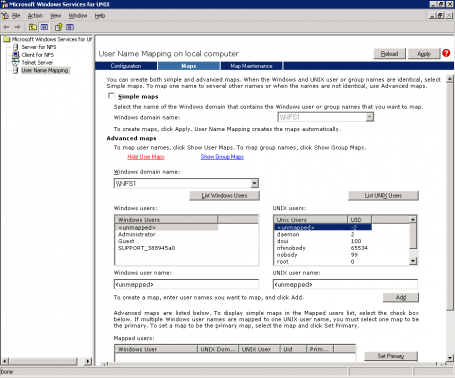
Теперь жмем на кнопки «List Windows Users» и «List UNIX Users».
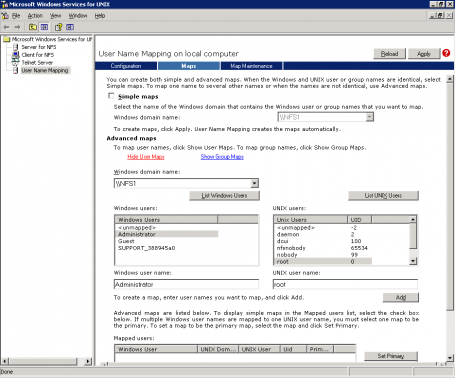
Теперь мы должны создать сопоставление между пользователями Windows и UNIX, я сопоставил пользователя root (UNIX/ESXi) с учетной записью Administrator. Затем жмем Add.
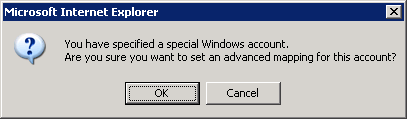
OK.
OK.
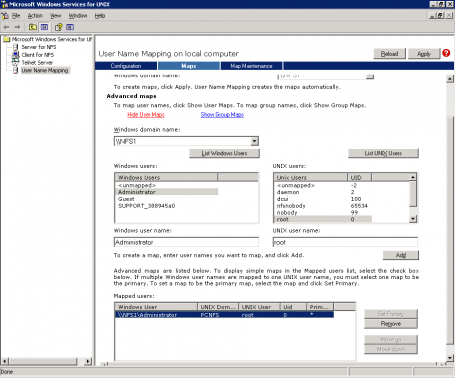
Теперь в окне можно увидеть, что у нас появилось первое сопоставление пользователей. В случае необходимости можно создать также сопоставление групп между Windows и Unix, но в этом примере в такой настройке необходимости нет.
Жмем Apply и закрываем окно.
Теперь нужно настроить папку, которую планируется «расшарить» при помощи службы NFS. Для чего щелкаем правой кнопкой по выбранной папке и жмем Properties.
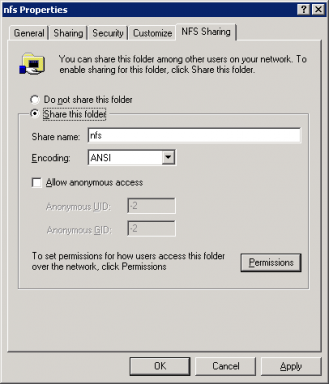
Перейдем на вкладку NFS Sharing, где необходимо выбрать «Share this folder». Затем нужно назначить разрешения на этот ресурс (кнопка Permissions).
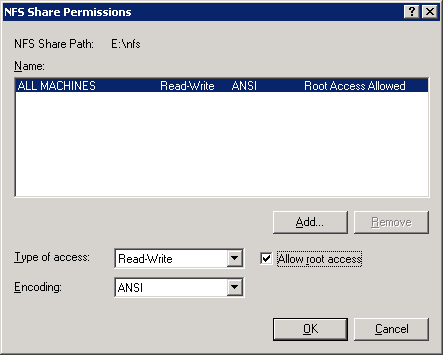
Тип доступа: Read-Write, а также галочкой отметим «Allow root access». Это, конечно не самая безопасная конфигурация, вы можете ее настроить в зависимости от ваших потребностей. Жмем OK.
OK.
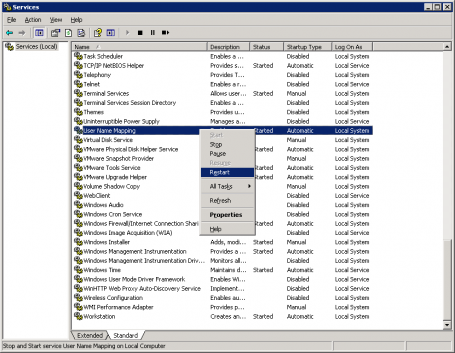
Открываем MMC оснастку Службы (Services), в которой нужно запустить службы User Name Mapping.
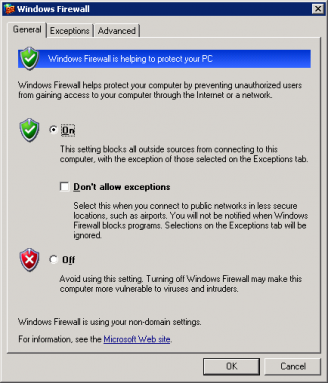
Для работы NFS требуется открыть некоторые сетевые порты, в моем случае, я просто остановлю службу Windows firewall.
Подключаем VMware ESXi к хранилищу NFS
Запускаем наш клиент vSphere Client.Находим нужный нам сервер ESXi host, переходим на вкладку Configuration, и в разделе оборудования (Hardware) жмем Storage.
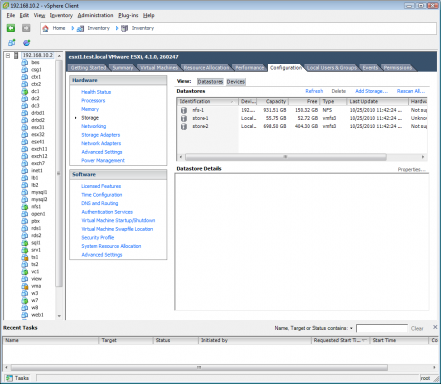
Добавляем новое хранилище типа NFS (Network File System).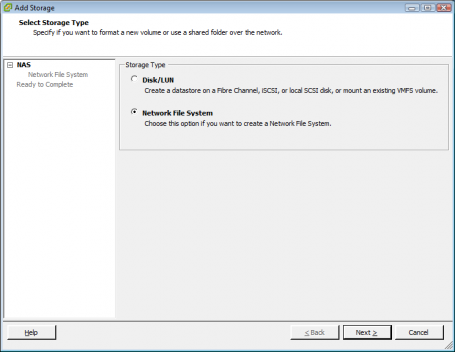
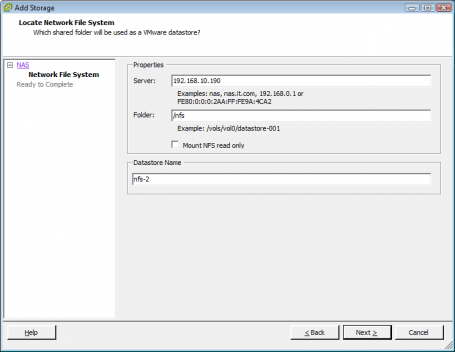
В окне настройки хранилища NFS, укажем имя/ IP адрес нашего Windows сервера, также нужно задать каталог (/nfs) и задать имя данного хранилища NFS в системе ESXi.
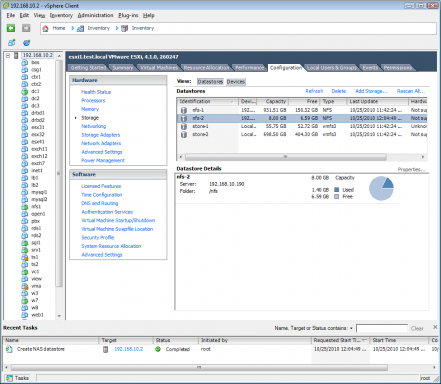
Вот и все! Мы настроили NFS папку на Windows, которую подключили в качестве хранилища в ESXi. Это хранилище можно использовать для хранения образов дистрибутивов, или дешевого хранилища для резервных копий виртуальных машин. Кроме того, я заметил, что производительность операций чтения/записи на сервере Windows NFS достаточно высокая!
ServerWatch content and product recommendations are editorially independent. We may make money when you click on links to our partners. Learn More.
In the previous installment of our series dedicated to Windows Server 2003 High Availability Solutions, we described cross-platform authentication mechanisms incorporated into Windows Services for Unix (focusing on the version included in Windows Server 2003 R2). The information we provided was necessary to introduce concepts critical to understanding clustered implementation of Network File System shares, the focus of this article.
|
Deploying a clustered implementation of Network File System shares is a complex process. Getting a handle on the basics is critical.
|
|
Need a Definition? |

To summarize, we have outlined three options that offer user, computer and group account integration between Unix and Windows environments. The first one is based on Active Directory lookup functionality, dependent on schema extensions (implemented via ldf files located on Windows Server 2003 R2 installation media) and the NIS component included with Windows Server 2003 R2. Obviously, in this case, target servers must reside in an Active Directory domain. The second option eliminates these dependencies by leveraging User Name Mapping service (built into Windows Services for Unix), which allows for simple (automatic and based on name matches) and advanced (arbitrary but manual) associations between Windows domain and Unix (NIS or passwd/group files-based) accounts. Lastly, it is possible to employ Server for NFS Authentication component, also included in Windows Server 2003 R2, if local Windows credentials must be used, which is not relevant in the context of our series, since authorization of clustered resources occurs on the domain level.
The NFS Implementation
Equipped with basic understanding of these options, let’s take a closer look at an actual NFS implementation. This involves installing Microsoft Services for NFS on a Windows Server 2003 R2 computer hosting NFS shares accessible to Unix clients. To initiate this process, log on to its console session, launch Add or Remove Programs Control Panel applet, and select Other Network File and Print Services from the list of its entries. Click on the Details … command button to display its subcomponents:
- Client for NFS: Allows access to resources hosted on NFS Unix servers.
- Microsoft Services for NFS Administration: Intended for managing configuration of Client for NFS, Server for NFS and User Name Mapping subcomponents (locally and remotely).
- RPC External Data Representation: Provides RPC data services, which is required by Client for NFS, Server for NFS, and User Name Mapping subcomponents.
- RPC Port Mapper: Required by Server for NFS component (since NFS is a RPC-based protocol).
- Server for NFS: Allowing Unix computers (or, in general, any NFS clients version 2 and 3) to access file share resources, including clustered ones, residing on Windows systems.
- Server for NFS Authentication: As mentioned earlier, enables Unix clients to connect to NFS Shares located on stand-alone Windows computers running Server for NFS, based on mappings between Unix and local Windows accounts.
- User Name Mapping: Responsible for associating Unix and Windows user accounts (with potentially dissimilar names), which facilitates resource sharing between users and groups accounts defined on one platform and resources residing on the other. This way, a Unix server is capable of recognizing Windows users accessing its file system via Client for NFS software as their Unix equivalents, along with their group membership. Alternatively, a Windows server running Server for NFS treats requests from native Unix users connecting to its NFS shares as those coming from its Windows clients.
For the purpose of this discussion, we will select the Microsoft Services for NFS Administration, RPC External Data Representation, RPC Port Mapper and Server for NFS. We will rely on Active Directory lookups to retrieve mappings between Unix and Windows user and group accounts. Before proceeding, make sure your Windows 2003 R2 Disk 2 is handy, since you will be prompted for it during the installation. Once the process completes, launch Microsoft Services for NFS console from the Administrative Tools menu and locate the Server for NFS subnode that appears under the root node in the tree window pane.
Its Properties dialog box is activated via its context-sensitive menu. It allows you to configure such parameters as NFS V3 and transport protocol (TCP and UDP) support, authentication renewal interval (determining how frequently NFS clients must resend their credentials), character translation options (helping maintain consistent display of NFS shares content presented to Unix and Windows clients), audit logging and lock handling (including the ability to release individual locks).
However, the most relevant attributes from our point of view are the authentication settings that enable Active Directory lookups. To configure them, switch to the top-level node in the console (labeled Microsoft Services for NFS) and invoke its Properties dialog box. On the General Settings tab, select the “Active Directory Lookup” checkbox, and type in the name of Active Directory domain that contains users and group accounts to which respective Unix user IDs and GIDs are mapped. Assuming you are using Unix NIS and that you installed and properly configured Microsoft Server for NIS (which was described in the previous article), your Unix NFS clients should be able to obtain appropriate credentials when accessing NFS shares hosted on the target server. Another possible arrangement, which also involves Active Directory lookups, relies on manually entered UID and GID values on the Unix Attributes tab of the Properties dialog box for each user and group account that must to map to a corresponding security principal on the Unix side. This approach, however, introduces additional maintenance overhead.
If for some reason taking advantage of Active Directory lookups is not feasible (e.g., you might encounter resistance to extending AD forest schema or some of your NFS shares might be hosted on pre-Windows Server 2003 R2 platform), you can resort to functionality offered by the User Name Mapping component. Its installation is performed via Windows Component Wizard. You will find its entry under Other Network File and Print Services container on the initial page of the wizard. By default, Server for NFS uses the localhost as its User Name Mapping server, although you can change this setting by specifying a remote UNM server name on the General Settings tab of the Microsoft Services for NFS Properties dialog box in the management console. This requires modifying %windir%msnfs.maphosts file on the target server, where you identify names of authorized remote systems allowed to retrieve mapping information.
In the same console, you will find User Name Mapping node, with User Maps and Group Maps subnodes. After you select the Properties item from its context sensitive menu, you will be able to designate the Unix User source on the Unix User Source tab. This can be either Network Information Service or User Password and Group files, locations you must then specify in two text boxes below.
In addition, you will also need to decide whether to enable simple maps (on the Simple Mapping tab) that apply whenever there is a match between names of Windows and Unix security principals (users or groups). Such mappings will appear under the User Maps and Group Maps subnodes (with Simple entry in the Type column) in the details pane of Microsoft Services for NFS console. Advanced maps, which are needed if Unix and Windows naming conventions do not match, are created via Create Maps item from the context-sensitive menu of User Maps subnode in the Microsoft Services for NFS console.
In the resulting dialog box, displaying Windows and Unix accounts from your authentication sources (these can be Active Directory and NIS domains, local SAM database, or local passwd/group files, depending on earlier configuration choices) in two listboxes positioned side by side, pick the ones you intend to map, and click on the Add command button. These pairs will appear under the same User Maps subnode, in the management console, as simple maps. You can then distinguish them by the Advanced entry in the Type column.
As soon as the NFS component is present on at least one member of a cluster, the NFS Share entry will appear under Resource Types node in the Cluster Administrator console. Be sure to repeat the installation on remaining cluster nodes to allow them to become possible owners, facilitating resource failover. Once this step is completed, you are ready to create a new NFS Share instance. To accomplish this, select a group containing a Physical Disk, IP Address and Network name resources, and launch a New Resource wizard. Next, provide an arbitrary name and select NFS Share option in the Resource type listbox. Designate nodes that will function as possible owners, add dependencies if appropriate (they are not enforced), and specify share parameters. Assigning its name and a path pointing to an existing folder on the Physical Disk resource located in the same group is straightforward, but other settings warrants additional explanation:
- “Share Sub-directories Only” (vs. “Share Root Only”) similarly to “Share subdirectories” option in Advanced File Share Properties dialog box allows you to automatically share all of subdirectories of a designated folder.
- Encoding (with possible choices including ANSI, BIG5 – Chinese, EUC-JP – Japanese, EUC-KR – Korean, EUC-TW – Chinese, GB2312-80 – Simplified Chinese, KSC5601 – Korean, Shift-JIS – Japanese) specifies encoding applied when creating files and directories. Typically, its value would need to be adjusted according to internationalization settings of NFS clients.
- Allow anonymous access (with default UID and GID set to -2) provides NFS share-level access to Unix users who do not have established mappings to Windows accounts. the ability to read, change or delete file system objects within the share depends on their individual permissions. If you decide to use this setting (it is disabled by default), you will need to modify Windows Group Policy on the target server by enabling “Network access: Let Everyone permissions apply to anonymous users” setting (located under
Computer ConfigurationWindows SettingsSecurity SettingsLocal PoliciesSecurity Optionsnode) and grant sufficient NTFS permissions to the Everyone group on content of the NFS share. Any files or folders created based on this arrangement will have ANONYMOUS LOGON security principal as their owner with NULL SID as their primary group. This can be verified by checking the Security tab in the Properties dialog box within Windows Explorer). - Permissions must also be considered. Unlike standard Windows-based shares, access to NFS share is determined based on NFS client computer, rather than user accounts. For each one, you can designate permission level (No Access, Read-Only, or Read-Write), Encoding (as listed earlier), and specify whether root access should be allowed. That last parameter facilitates scenarios where Unix administrators connected via NFS client software must be able to perform actions requiring root level privileges (such as using chown and chgrp utilities to alter user and group ownership of shared files and folders — although using them on Windows-hosted NFS shares is not recommended). Keep in mind that this also requires creating a mapping between the root UID/GID and a Windows account that has equivalent privileges on the target share.
By default, the only entry that appears in the NFS Share Permissions box is the ubiquitous ALL MACHINES, which grants every client Read-Only permissions, assigns ANSI Encoding and disallows root access. Although it is not possible to remove it, you might want to modify it to the minimum level of permissions desired and explicitly specify all NFS client computers from which elevated access will be permitted. Keep in mind that each of the names added must be resolvable to a valid IP address, albeit one that is not necessarily reachable.
This concludes our overview of Windows Server 2003 based clustered resources related to disks, volumes and file system. The next article, will begin the exploration of other clustered resource types that deal with more esoteric concepts related to highly available services and applications.
Скачать: Инструкция подключения NFS на Windows 2003.pdf
Содержание
1. Настройка NFS на СХД AERODISK
2. Подключение NFS на Windows
1. Настройка NFS на СХД AERODISK
ВАЖНО: Файловые системы доступны только на RDG
Для настройки NFS на СХД AERODISK необходимо:
• В основном меню выбрать «Файловые системы»
• Далее выбрать вкладку «NFS»
• Нажать на кнопку «Создать Директорию»
В появившемся окне «Создание файловой системы NFS» необходимо заполнить поля:
• Присвоить имя NFS
• Выбрать дисковую группу
• Указать необходимый объём
• Указать размер блока
• Указать при необходимости права на чтение и запись
2. Подключение NFS на Windows
После создания Файловой системы NFS на СХД для подключения на Windows 2008/2012/2016 необходимо:
1. Включить службу «Клиент для NFS»
2. Зайти в реестр по пути “HKLM\Software\Microsoft\ClientforNFS\CurrentVersion\Default\”
После чего добавить записи DWORD32
UseReservedPorts := 0
AnonymousGid := 1001
AnonymousUid := 1001
3. Подключить сетевой диск NFS
Home
> ESXi, NFS, VMware, Windows > Set Up Windows 2003 R2 NFS Server for VMware ESXi Backups
Generally my preference is to use Linux as an NFS server. On the internet you will see frequent reference to the belief that NFS works better on Linux/UNIX. Recently I decided to try and set up NFS services on Windows to see how well it would perform. In this tutorial I will set up Services for UNIX 3.5 on a Windows 2003 R2 server and configure it using the User Name Mapping service to allow a VMware ESXi to use it as a datastore for VMs or backups via non-anonymous connections.
First off grab the Windows Services for UNIX (SFU) installation files here. Extract the files from the download file and run the setup.

Click Next.

Select Custom Installation and click Next.

Under NFS select Client for NFS and Server for NFS for installation. Although in the image I have not unselected them you can unselect all the other UNIX utilities.

Scroll down and under Authentication tools for NFS select User Name Mapping to be installed. Again this and Client/Server NFS should be the only three options that need to be installed. Click Next.

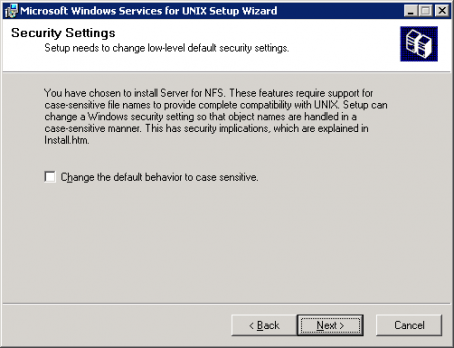
Click Next.

Select Local Mapping Server, and select Password and group files. Click Next.
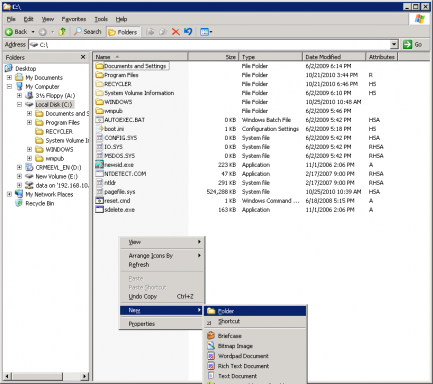
Now go to Windows Explorer and create a directory to store the password and group lists from the VMware ESXi host.

In this example I will create a directory C:\SFU for the password/group files. Unfortunately SFU will install the program files into this directory and will delete the password/group files, so after the install is completed you’ll need to recopy the files here. They do need to be placed here initially so the installer will find them. Or obviously you could use a different directory for the password/group files.


Pages: 1 2 3