Системные компоненты и настройки
Теперь, когда вы имеете краткое представление о типах доступных приложений и требований к уровню обслуживания, вы можете принять решение о том, какое программное обеспечение следует установить на вашей системе. Вы можете выбрать одну из четырех версий Windows 2000 и одну из трех версий SQL Server 2000. В данном разделе мы рассмотрим различия между этими версиями и причины, по которым вы можете предпочесть одни версии другим.
Версии Windows 2000
Для того чтобы вы могли выбрать программное обеспечение, соответствующее требующимся для вас приложениям, имеются четыре версии Windows 2000. Возможности операционных систем Windows 2000 растут при переходе от Windows 2000 Professional к Windows 2000 Server, затем к Windows 2000 Advanced Server и, наконец, к Windows 2000 Datacenter. Ниже будут даны описания возможностей каждой из версий Windows 2000. Следует выбирать ту версию Windows 2000, которая обеспечивает возможности, соответствующие вашим потребностям, а не просто покупать самую дорогую версию с наибольшими возможностями.
Windows 2000 Professional
Windows 2000 Professional является, по существу, версией Windows 2000 для настольных компьютеров. Как правило, компьютер под управлением Windows 2000 Professional сможет воспользоваться возможностями лишь клиентских компонент SQL Server 2000. Однако если вам понадобится запустить на этом компьютере SQL Server, то вы сможете инсталлировать SQL Server 2000 Personal Edition. Версия Personal Edition позволяет только локальный доступ к базе данных. Доступ с других компьютеров не разрешается.
 Примечание. В Windows 2000 Professional можно инсталлировать SQL Server Personal Edition и клиентские компоненты SQL Server.
Windows 2000 Server
Windows 2000 Server спроектирована как серверная операционная система. Это значит, что инсталлировав на компьютер Windows 2000 Server, вы позволите другим компьютерам осуществлять доступ к ресурсам этого компьютера. Windows 2000 Server поддерживает SQL Server 2000 Standard Edition. Windows 2000 Server не поддерживает компьютеры с более чем четырьмя центральными процессорами и более чем с 4 Гб оперативной памяти. SQL Server 2000 также позволяет удаленным клиентам осуществлять доступ к базе данных.
Примечание. На компьютеры под управлением Windows 2000 Server можно инсталлировать только SQL Server Standard Edition, SQL Server Personal Edition и клиентские компоненты SQL Server.
Windows 2000 Advanced Server
Windows 2000 Advanced Server также является серверной операционной системой. Как и для компьютеров под управлением Windows 2000 Server, компьютеры под управлением Windows 2000 Advanced Server позволяют другим компьютерам осуществлять доступ к их системным ресурсам, а также к SQL Server. В дополнение к возможностям Windows 2000 Server, Windows 2000 Advanced Server поддерживает до восьми центральных процессоров и до 8 Гб оперативной памяти. Если вы хотите пользоваться службами MSCS (Microsoft Cluster Services) для поддержки перехода к другому узлу кластера при отказах, то вам следует применять Windows 2000 Advanced Server. Кроме поддержки MSCS, Windows 2000 Advanced Server вместе с SQL Server 2000 поддерживает новую технологию кластеризации SQL Server – «обновляемые распределенные представления» (updatable distributed views).
Примечание.Чтобы иметь возможность применять SQL Server 2000 с восемью центральными процессорами и 8 гигабайтами памяти, вы должны запускать SQL Server Enterprise Edition. Кроме того, на компьютерах под управлением Windows 2000 Advanced Server можно инсталлировать SQL Server Standard Edition, SQL Server Personal Edition и клиентские компоненты SQL Server.
Windows 2000 Datacenter
Windows 2000 Datacenter – это «флагман» семейства операционных систем Windows 2000. Данная версия Windows 2000 поддерживает все компоненты, что и другие версии, а также может поддерживать до 64 центральных процессоров и до 64 Гб памяти. Поставки Windows 2000 Datacenter осуществляются только через поставщиков оборудования. Поставщики оборудования не только встраивают (интегрируют) Windows 2000 Datacenter в свое оборудование, но и обеспечивают наивысший уровень поддержки, доступный для операционных систем Windows 2000. Благодаря такой интеграции программного обеспечения и аппаратуры вы можете обращаться с вопросами технической поддержки аппаратуры и Windows 2000 в единую службу.
Примечание.Чтобы иметь возможность применять SQL Server 2000 с 64 центральными процессорами и 64 Гб памяти, вы должны запускать SQL Server Enterprise Edition. Кроме того, на компьютерах под управлением Windows 2000 Datacenter Server можно инсталлировать SQL Server Standard Edition, SQL Server Personal Edition и клиентские компоненты SQL Server.
Версии SQL Server
Вы можете выбирать не только среди версий Windows 2000, но и среди нескольких версий (редакций, editions) SQL Server. Выбор версии SQL Server очень прост и зависит от необходимого для вас объема оперативной памяти и количества центральных процессоров. Ниже даны описания версий SQL Server.
Клиентское программное обеспечение
Клиентские компоненты SQL Server 2000 состоят из сетевых библиотек и утилит, необходимых для доступа к удаленной или локальной системе SQL Server. Эти компоненты необходимы любой системе для доступа к SQL Server, и они одинаковые (не зависят от того, какая версия SQL Server инсталлирована).
Версия Personal Edition
Версия Personal Edition спроектирована для реализации небольших баз данных, доступных локально на компьютере-клиенте. SQL Server 2000 Personal Edition вполне может использоваться в качестве сервера для небольшой рабочей группы и допускает ограниченное (до 5) число клиентских подключений по сети.
Версия Standard Edition
Standard Edition является одной из двух серверных версий («редакций») SQL Server 2000. Standard Edition обладает такими же функциональными возможностями, как и SQL Server Enterprise Edition, но не может работать более чем с четырьмя центральными процессорами и более чем с 4 Гб оперативной памяти.
Версия Enterprise Edition
Версия Enterprise Edition поддерживает все средства и функциональные возможности всех версий Windows 2000. Для работы SQL Server 2000 Enterprise Edition требуется Windows 2000 Advanced Server или Windows 2000 Datacenter. Кроме прочего, SQL Server 2000 Enterprise Edition поддерживает двухузловую кластеризацию с переходом к другому узлу кластера при отказах и обновляемые распределенные представления (updatable distributed views).
Сравнительная таблица версий
Возможности различных версий Windows 2000 и SQL Server 2000 перечислены в табл. 4.1.
| SQL Server 2000 Personal Edition | SQL Server 2000 Standard Edition | SQL Server 2000 Enterprise Edition | |
|---|---|---|---|
| Windows 2000 Professional | Ограниченные возможности | Невозможное сочетание версий | Невозможное сочетание версий |
| Windows 2000 Server | Ограниченные возможности | Возможности сервера.
Поддержка до 4 центральных процессоров и до 2 Гб памяти |
Возможности сервера.
Поддержка до 4 центральных процессоров и до 4 Гб памяти |
| Windows 2000 Advanced Server | Ограниченные возможности | Возможности сервера.
Поддержка до 4 центральных процессоров и до 2 Гб памяти |
Возможности сервера.
Кластеризация MSCS. Поддержка до 8 центральных процессоров и до 8 Гб памяти |
| Windows 2000 Datacenter | Ограниченные возможности | Возможности сервера.
Поддержка до 4 центральных процессоров и до 2 Гб памяти |
Возможности сервера.
Кластеризация MSCS. Поддержка до 64 центральных процессоров и до 64 Гб памяти |
Как видите, у вас есть из чего выбрать. Следует тщательно обдумать выбор приобретаемых продуктов. Если вы поменяете свое решение уже после того, как инсталлируете систему, то вам придется начинать всю работу с самого начала.
Системные настройки
Кроме выбора версий SQL Server 2000 и Windows 2000 вы также можете воспользоваться еще некоторыми другими настройками. Эти настройки (опции) описаны ниже, они определяют применение кластеризации MSCS, репликацию SQL Server 2000 и обновляемые распределенные представления (эта новая возможность, появившаяся в SQL Server 2000 Enterprise Edition). Каждая из этих настроек имеет свои собственные возможности и требования и, следовательно, могут оказаться в вашей конфигурации полезными либо бесполезными. Мы расскажем об этом в нескольких абзацах ниже.
MSCS
Сокращение MSCS расшифровывается как Microsoft Cluster Services – «службы кластеризации Microsoft». Службы MSCS являются настройкой Windows 2000, работающей в сочетании с SQL Server. Благодаря MSCS компьютер может работать как резервный сервер (standby, failover server) для другого компьютера (сервер для перехода при отказе). Благодаря этому можно начинать процесс восстановления почти сразу же после случившегося аппаратного или даже программного отказа. Для MSCS требуется разделяемая дисковая подсистема, подключенная к обоим компьютерам кластера. Журнал транзакций SQL Server и файлы данных, а также исполняемые файлы должны размещаться на этой разделяемой дисковой подсистеме. В случае отказа, определяемого по отсутствию «сигнала пульса», резервный компьютер берет на себя функции SQL Server. Так как резервный компьютер захватывает себе IP-адрес и имя системы, то для внешнего мира он воспринимается просто как перезагрузившийся основной сервер базы данных.
Примечание.При переходе на другой кластер в случае отказа, после того как случится отказ, потребуется восстановление системы, такое же, как и при внезапной перезагрузке любого компьютера. MSCS обеспечивает не отказоустойчивость, а лишь возможность для быстрого восстановления.
Репликация SQL Server
Репликация SQL Server позволяет копировать данные из одной базы данных SQL Server на другие системы баз данных. Имеются разные схемы репликации –моментальная (snapshot replication), транзакционная (transactional replication) и репликация слиянием (merge replication), они будут описаны в нескольких абзацах ниже. Какая из схем репликации лучше всего подойдет вам – зависит от ваших предпочтений и от ваших потребностей. Репликация SQL Server работает по модели «опубликовать-подписаться» (publish-and-subscribe model), в которой издатель (publisher) публикует данные, а один или несколько подписчиков (subscribers) получают копии этих данных.
Моментальная репликация
При моментальной репликации периодически создается «картинка», «снимок» (snapshot) данных и предоставление этих данных в пользование другим системам. Моментальная репликации выполняется только во время создания и применения «снимков», поэтому при обычной работе она не затруднит вас дополнительными заботами. Недостатком моментальной репликации является то, что «свежесть» данных определяется последним «снимком», а он может быть довольно старым.
Транзакционная репликация
Транзакционная репликация начинается с моментальной репликации, но после этого производится непрерывное считывание журнала транзакций компьютера-издателя, и транзакции, применявшиеся к издателю, будут применены и к подписчику (подписчикам). Благодаря этому информация на подписчиках будет поддерживаться до некоторой степени «свежей». Конечно, все равно будет некоторая задержка между временем, когда транзакции поступают на компьютер-издатель и временем, когда транзакции применяются к подписчикам.
Репликация слиянием
Репликация слиянием отличается от транзакционной репликации и моментальной репликации тем, что обновления происходят и на компьютере-издателе, и на компьютерах-подписчиках. SQL Server применяет триггеры и метки времени (timestamps) для координации изменений между разными компьютерами, участвующими в репликации. Репликация слиянием полезна, когда требуется многонаправленная репликация, но по сравнению с транзакционной или моментальной репликацией она вызывает гораздо большую нагрузку.
Обновляемые распределенные представления
В SQL Server появились обновляемые распределенные представления (updatable distributed views). Благодаря этой возможности системы SQL Server могут разделять (использовать совместно) логическую базу данных, что повышает масштабируемость. Логическая база данных может стать большой, и вы можете разместить ее на многих компьютерах, это позволяет повысить ее мощность. (Об обновляемых распределенных представлениях см.
«Создание и использование представлений»
.)
In my last
article, I spoke extensively about the theory behind clustering a Windows 2000
and SQL Server machine. This week, I’ll detail how to actually accomplish this
task in a step-by-step guide. In this guide, I’ll use Windows 2000 Advanced
Server with SQL Server 2000 Enterprise to create an Active/Active cluster. These
two software components are the minimum requirement in a 2000 environment to
cluster SQL Server 2000. If you have not read my article on Clustering
SQL Server 2000 from 500 Feet, I would recommend that you do so before moving
forward since this guide will use terms that I assume you know from the last
article.
Common question: One of the number one questions I received after writing this article was how do you do an Active/Passive cluster. Essentially, you can follow this guide to cluster your SQL Server but stop before you add the second SQL Server. That’s all it takes!
Note: As with any type of configuration and installation,
there are multiple ways of doing this. I will show you towards the end of this
article how I configure clustering for optimal performance. This may not be the
best method of optimizing things in your environment.
Tip: Before attempting clustering, I would recommend
that you install service pack 2 for Windows 2000. There are a number of bug
fixes between the two service packs related to clustering.
Goal #1 – Cluster Windows 2000 Advanced Server
Before we
even install SQL Server, you will want to ensure that your Windows environment
is successfully installed and clustered. Although it is possible to cluster SQL
Server after it is installed, it makes it much easier if you have already have
this piece complete. If you already have this part done, SQL Server will
automatically detect that it is in a clustered environment when you try to
install it. Before you begin, make sure all of your drives you plan to share are
formatted. You will also want to ensure that your network is fully configured.
- Create
an account for Microsoft Cluster Service (MSCS) to use. This account will need to be a domain account and be
an administrator. Make sure you make the password non-expiring.
- Stop
the second node that will be in
the cluster.
This is only a precaution and is generally not required.
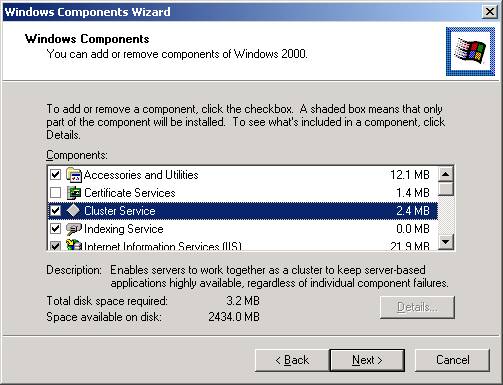
- Add
the Cluster Service component.
You can do this by going to Control Panel, clicking on Add/Remove Programs,
and then clicking on Windows Components. Click on Cluster Service as shown
below. Notice that some components of Internet Information Services (IIS)
are also added when you click Cluster Services. This small component of IIS
is required for Cluster Services to work properly.
Note: When
you install Windows 2000, you can also check this box when choosing your
components to install. After Windows boots up for the first time, you’ll be
able to launch the wizard by going to Control Panel and click on Add/Remove
Programs. The Configure Clustering option will be highlighted.
- When
you click Next, this will start the Cluster Service Configuration Wizard.
Click Next to continue in the wizard. This will take you to the Hardware
Configuration screen. You will need to make sure that all the equipment in
your cluster is on the Hardware Compatibility List (HCL). After looking at http://www.microsoft.com/hwtest/hcl
to confirm this, click I Understand and then Next.
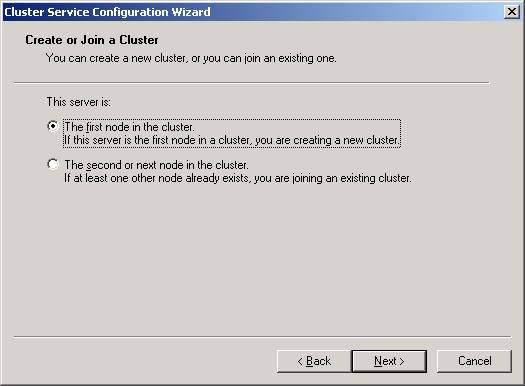
- You
will then need to select that this is the first node in the cluster.
By doing this, you’re creating a new cluster. The next node is much easier
to configure because you’ll only have to select the last option and much
of the configuration is read from the first node.
- You
will now need to provide a name for your cluster. This name will be used by many Windows tools like Performance
Monitor to designate the “floating” name for the cluster. If one machine
fails in your cluster, this name will move to the surviving node. I’ve
chosen the name CLUSTEREXAMPLE for this article.
- Next,
specify the account we created in Step 1. This account will be used to start the Cluster services.
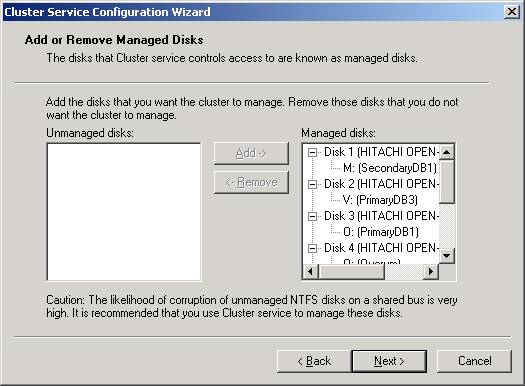
- After
clicking Next, specify each of the shared drives that you’d like to
cluster. Each
drive you specify is then managed by MSCS. I would recommend that you allow
all the shared drives to be managed my MSCS. Otherwise you risk corruption
of the drives. By default, all the drives will be selected but if you wish
to add more or remove some drives you can highlight the drives and click Add
or Remove. After you’ve added all the drives you need, click Next.
- Specify
your quorum drive.
The Quorum drive holds log files and health information about your cluster.
If one node fails, the surviving node depends on the quorum drive to start
the services. For simplicity, I always call my quorum drive the Q drive. It
should be about 815 MB in size typically, although much of that space will
go unused. After selecting the drive, click Next.
- You
now must configure the cluster’s network. Read the message about the types of networks that can be
configured and click Next. Essentially, you can configure the cluster to
communicate over a private network and/or a public network. I prefer to have
the heartbeat connection over a private network for security and everything
else go over the public network.
- Configure
each network card.
You will be presented a screen to configure each network connection. To use
the each network connection, click the Enable This Network For Cluster Use
and then select the type of use it will have. For example, if you want all
traffic to go out on a single network card, select All Communication (mixed
network). If you only configure you cluster for one connection, you will
receive a warning stating that you now have a single-point of failure.
Acknowledge the warning to proceed.
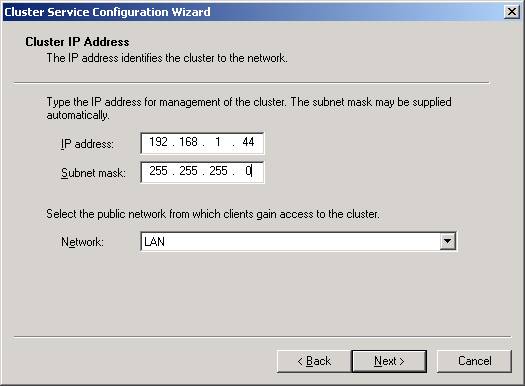
- The
last step in this node is to specify a virtual IP address for the cluster.
You will also need to specify the subnet for the IP address and which
connection will be used by clients to connect to the cluster.
- You’re
now done with the first node! Not too bad, is it? Now click Finish to
complete the wizard and acknowledge that the service was successfully
started. No reboot is required after installing a cluster.
- Boot
up any servers that need to be in the cluster.
- Repeat
the same steps on the second node to launch the wizard again. This time select the Second Node option as shown in
Step 5. By selecting that option and specifying a security account for
Windows to use, the wizard will read the configuration from the first node
and almost automatically configure itself.
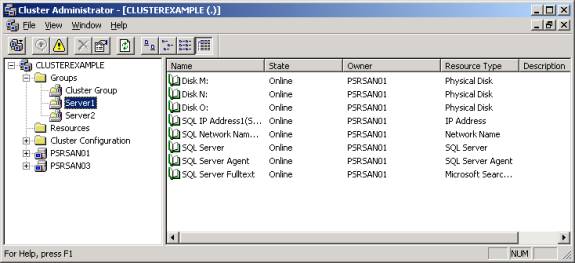
Goal #2 – Configure the Cluster
By
installing the cluster on both nodes, you have also created a new tool called
the Cluster Administrator. With this tool, you can configure your cluster for
optimal use. You can run the tool like you do most other tools in Windows 2000,
by going to Control Panel and selecting Administrative Tools. When you first run
Cluster Administrator, you’ll notice that the cluster is configured awkwardly.
By default, each shared disk you assigned earlier resides in its own group under
Groups.
I
prefer to keep similar resources together. Drives that I see that will be
primarily used by a SQL Server on Server1 will be grouped together and likewise
for Server2’s drives. With that in mind, I create two new groups: Server1 and
Server2. I then place the drives from each independent group into one of the two
groups. You’ll also notice that there is a Cluster Group where the quorum
drive resides. Leave this group alone.
In
Cluster Administrator, if you get lost, right-click. For example to move the
drive to one of the two groups right click on the resource and click Move to New
Group. Then, specify which group you’d like to move to. Once you have all the
drives except the quorum drive moved to one of the two new groups, delete the
empty groups. You can then test a failover by right clicking on the group and
selecting Move Group. You will then see the resources fail, go to Online
Pending, then to Online on the new server.
You
may also want to configure the primary owner of each drive. You can do this by
right-clicking on the resource and clicking Properties. Which group you place
your resources in is very important. A resource can only act as a dependent on
another resource that is in the same cluster group.
Goal #3 – Install SQL Server
So far,
we’ve only clustered the drives but nothing more. Let’s make this a little
interesting by adding some added resources like MS DTC and SQL Server. In
installing SQL Server there are only a few additional steps that you may not be
used to. Before we begin, make sure each of your nodes is online.
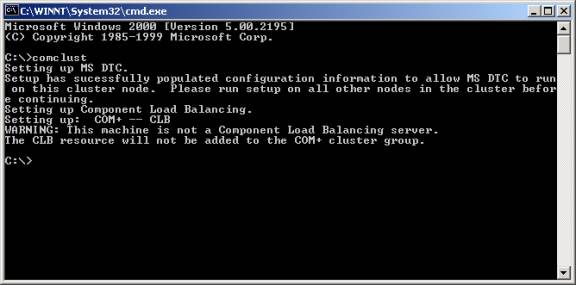
- Install
MS DTC separately.
To install the clustered version of MS DTC, go to a command line and type
comclust (it will be in your path). You will see the MS DTC resource created
as shown below. This resource is located in the Cluster Group in Cluster
Administrator. Perform the same action on the any other nodes in the cluster
as well.
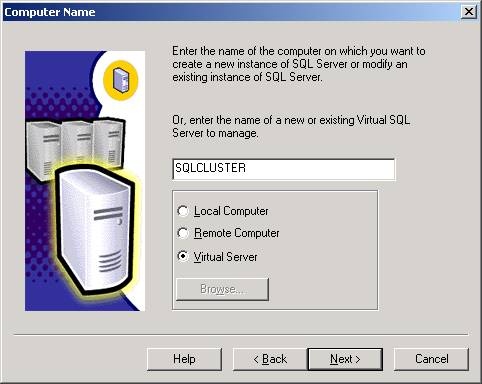
- Start
installing SQL Server 2000 as you would normally. The first unusual screen you will see is where you
normally specify if you’re going to install locally or remotely. You now
have an added option of a Virtual Server.
- After
you step through the license agreement, you will be asked to specify an
IP address and subnet for your virtual SQL Server name. Type the virtual
IP address and the subnet will automatically fill itself in for you. Next,
select the network connection to use then click Add. That will transfer the
data to the bottom box.
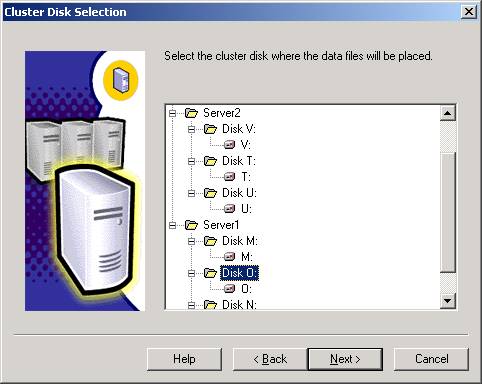
- You
will then need to specify the drives where the data files will be
placed as shown below. You will only see drives that the node owns. If
there is a drive that you don’t see in this list, go back to Cluster
Administrator and move the group over to the server where you’re
installing SQL Server. When click Back to go back a screen in the
installation wizard then Next to refresh the list of drives. There is a bug
in the installation wizard that you will need to watch carefully here. If
you specify a drive here, the wizard pretty much ignores the drive selection
and you will need to manually re-select the drive in a moment.
- In
the Cluster Definition screen, you will need to specify which nodes SQL
Server will be installed on.
- You
then need to specify an administrative account for the cluster. Again, I would use the clustacct that we
established in Step 1 of Goal 1.
- Specify
an instance name.
If this is the first SQL Server in the cluster, then you can make it the
default instance. If this is the second instance in your cluster, you must
use an instance name and a different virtual server name a few steps ago.
There are special notes about this in my previous article.
- Confirm
the directories and type of installation. Again, there is a bug in the wizard that will require you to
possibly change the Data Files option again. The wizard will default to the
first drive in the group so if you wish to specify a new drive, change it
here.
- Continue
the installation as you would normally in SQL Server. The rest of the installation is exactly like the
normal installation path. The only difference is when SQL Server goes to
copy the files, you cannot see the progress because it’s copying the files
and configuring both nodes. This process may take up to 15 minutes so be
patient. Don’t assume that nothing is happening on the server.
- Reboot
both servers.
Reboot the server where you installed SQL Server from first, followed by the
second node.
After
rebooting the servers you can install SQL Server on the second node. Install it
exactly the same way but you’ll need to assign another virtual SQL Server name
and IP address. You’ll also need to use and instance name for the second node.
There are special notes in my previous article about using an instance name. I
would recommend rebooting one more time after you’ve installed the second
instance, although it is not required.
After that, you’re ready to install Service Pack 1 for SQL Server 2000.
Goal #4 – Configuring the Cluster for SQL Server
SQL Server
is now running on both instances. If you’ve installed two instances of SQL
Server (one on each node), then you’re running in Active/Active mode. You’re
now ready to go to Cluster Administrator and perform the final configuration
steps for SQL Server. By default, if you’re using multiple shared drives, SQL
Server in a cluster will not be optimally configured.
To
configure the resources properly, open Cluster Administrator and go to your
first server’s group that you installed SQL Server on. If you’re running
multiple data drives for a SQL Server, they will not be accessible until you
make the SQL Server service a dependency on these drives. In other words, you
can’t place backups or any data files on the M drive until the SQL Server
service is set as dependency to the M drive. You wouldn’t want the SQL Server
service starting until all your drives are ready. To make the SQL Server service
dependent on the drives, you must first fail the service by right-clicking on
the SQL Server service in Cluster Manager (shown below) and select Failover. You
can then right-click on the SQL Server service here and select properties.
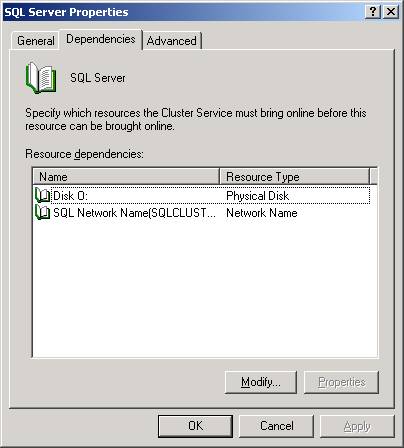
You will
notice by going to the Dependencies tab that the service is only dependent on
the primary data drive and the virtual SQL Server name. To add additional
resources click Modify.
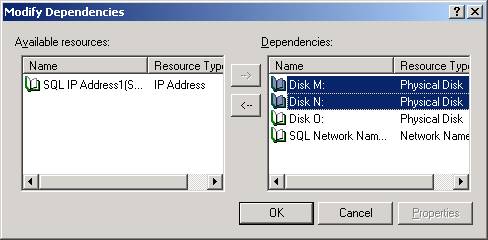
As you can
see below, I’ve made the SQL Server service additionally dependent on the M
and N drive by selecting the drives then clicking the à
button. After you’ve added your resources click OK.
You will
then need to restart the SQL Server service by right-clicking on the service and
selecting Start. Now, all the drives you specified will be available to
Enterprise Manager and T-SQL. To complete the configuration, you can perform the
same action on the second node if necessary.
You’ve
now completed the basic clustering of SQL Server and Windows 2000! For
additional help on this topic, you can post questions in the In
The Enterprise forum. In future articles, I will discuss how to cluster
Analysis Services, which is not nearly as simple as clustering SQL Server.

- Remove From My Forums
-
Question
-
I have a windows server 2008 , running SQL server 2000 , and running very old application .
As windows server 2008 will be EOL soon , I will upgrade windows server to 2016 , if I keep the SQL server 2000 , as I not sure if the newer SQL server version compatible to the old application , therefore , I consider to keep SQL server 2000 version .
is it possible ?
thanks
All replies
-
No, it is not possible to run SQL Server 2000 on Windows Server 2016 (or 2019).
Given you are 8 SQL Server versions behind the current RTM version (SQL Server 2019), upgrading to a supported SQL Server version is long overdue. Unfortunately, there is no direct upgrade path because you’ve waited so long.
Dan Guzman, Data Platform MVP, http://www.dbdelta.com
-
Proposed as answer by
Wednesday, November 6, 2019 7:55 AM
-
Proposed as answer by
-
Hello Friend,
I see your situation is complicated.
I recommend that you make a virtual machine and migrate your DB to higher versions of Sql Server (express or Developer Edition) and check which one the application is working on.
Hopefully it works at the latest possible and you can work smoothly and benefit from the features of the latest versions.
If this answer has helped you, mark it helpful so that someone else with a question or similar problem can find an answer or help more easily. Jefferson Clyton Pereira da Silva — [MCSA | MCP | MCTS | MTA | Database Analyst — Sql Server and Oracle]
-
Edited by
Jefferson Silva DBA
Tuesday, November 5, 2019 12:53 PM
translate -
Proposed as answer by
Olaf HelperMVP
Wednesday, November 6, 2019 7:57 AM
-
Edited by
-
thanks reply ,
the best way to upgrade is setup a new SQL 2016/2017 , and export data from existing SQL 2000 and import to it ?
thanks
-
Hi patrick chan 701,
SQL Server 2000 is out of support for many years, so you can’t run SQL Server 2000 on Windows Server 2016.
In addition, if you want to migrate SQL Server 2000 to higher version, you must migrate SQL Server 2000 with SP4 to SQL 2005 SP4 or SQL 2008 SP2 or SQL 2008 R2 SP1, then make a second migration from SQL Server SQL 2005 SP4 or SQL 2008 SP2 or SQL 2008
R2 SP1 to higher version. You can only migrate by backup and restore method. For more details, please refer to
this blog.
Hope this could help you.
Best Regards,
Amelia Gu
MSDN Community Support
Please remember to click «Mark as Answer» the responses that resolved your issue, and to click «Unmark as Answer» if not. This can be beneficial to other community members reading this thread. If you have any compliments or complaints to
MSDN Support, feel free to contact MSDNFSF@microsoft.com.-
Proposed as answer by
Olaf HelperMVP
Wednesday, November 6, 2019 7:57 AM
-
Proposed as answer by
-
Hi patrick chan 701,
SQL Server 2000 is out of support for many years, so you can’t run SQL Server 2000 on Windows Server 2016.
In addition, if you want to migrate SQL Server 2000 to higher version, you must migrate SQL Server 2000 with SP4 to SQL 2005 SP4 or SQL 2008 SP2 or SQL 2008 R2 SP1, then make a second migration from SQL Server SQL 2005 SP4 or SQL 2008 SP2 or SQL 2008
R2 SP1 to higher version. You can only migrate by backup and restore method. For more details, please refer to
this blog.
Hope this could help you.
Best Regards,
Amelia Gu
MSDN Community Support
Please remember to click «Mark as Answer» the responses that resolved your issue, and to click «Unmark as Answer» if not. This can be beneficial to other community members reading this thread. If you have any compliments or complaints to
MSDN Support, feel free to contact MSDNFSF@microsoft.com.Thanks reply ,
I have to follow the migration way ? I can’t export data from SQL 2000 and import it to SQL 2016 ?
-
Hi patrick chan 701,
>>I can’t export data from SQL 2000 and import it to SQL 2016 ?
Yes, you can.
For more details, please refer to
this similar thread and
MS Doumentation.Hope this could help you.
Best Regards,
Amelia Gu
MSDN Community Support
Please remember to click «Mark as Answer» the responses that resolved your issue, and to click «Unmark as Answer» if not. This can be beneficial to other community members reading this thread. If you have any compliments or complaints to
MSDN Support, feel free to contact MSDNFSF@microsoft.com.
Hardware and Software Requirements for Installing SQL Server 2000
The minimum hardware and software requirements for running Microsoft® SQL Server™ 2000 are listed in the following tables.
Hardware Requirements
This table shows hardware requirements for installing Microsoft SQL Server 2000 or SQL Server client management tools and libraries.
| Hardware | Minimum requirements |
|---|---|
| Computer | Intel® or compatible
Pentium 166 MHz or higher. |
| Memory (RAM)1 | Enterprise Edition: 64 MB minimum, 128 MB or more recommended
Standard Edition: 64 MB minimum Personal Edition: 64 MB minimum on Windows 2000, 32 MB minimum on all other operating systems Developer Edition: 64 MB minimum Desktop Engine: 64 MB minimum on Windows 2000, 32 MB minimum on all other operating systems |
| Hard disk space2 | SQL Server database components: 95 to 270 MB, 250 MB typical
Analysis Services: 50 MB minimum, 130 MB typical English Query: 80 MB Desktop Engine only: 44 MB |
| Monitor | VGA or higher resolution
800×600 or higher resolution required for the SQL Server graphical tools |
| Pointing device | Microsoft Mouse or compatible |
| CD-ROM drive | Required |
1 Additional memory may be required, depending on operating system requirements.
2 Actual requirements will vary based on your system configuration and the applications and features you choose to install.
Note Microsoft SQL Server 2000 does not have a hardware compatibility list (HCL). If your computer meets the minimum requirements listed in the preceding table, SQL Server 2000 software works on the hardware certified for use with the Microsoft Windows® operating system. For more information about hardware certified for use with the Windows operating system, see the Microsoft Windows Hardware Compatibility List at Microsoft Web site.
Operating System Requirements
This table shows the operating systems that must be installed to use the various editions or components of Microsoft SQL Server 2000.
| SQL Server edition or component | Operating system requirement |
|---|---|
| Enterprise Edition | Microsoft Windows NT Server 4.0, Microsoft Windows NT Server Enterprise Edition 4.0, Windows 2000 Server, Windows 2000 Advanced Server, and Windows 2000 Data Center Server.
Note that Microsoft Windows 2000 Server (any version) is required for some SQL Server 2000 features. |
| Standard Edition | Microsoft Windows NT Server 4.0, Windows 2000 Server, Microsoft Windows NT Server Enterprise Edition, Windows 2000 Advanced Server, and Windows 2000 Data Center Server. |
| Personal Edition | Microsoft Windows Me, Windows 98, Windows NT Workstation 4.0, Windows 2000 Professional, Microsoft Windows NT Server 4.0, Windows 2000 Server, and all the more advanced Windows operating systems. |
| Developer Edition | Microsoft Windows NT Workstation 4.0, Windows 2000 Professional, and all other Windows NT and Windows 2000 operating systems. |
| Client Tools Only | Microsoft Windows NT 4.0, Windows 2000 (all versions), Windows Me, and Windows 98. |
| Connectivity Only | Microsoft Windows NT 4.0, Windows 2000 (all versions), Windows Me, Windows 98, and Windows 95. |
Note Microsoft Windows NT® Server 4.0, Service Pack 5 (SP5) or later must be installed as a minimum requirement for all SQL Server 2000 editions.
SQL Server 2000 is not supported on Windows NT 4.0 Terminal Server.
For installations of SQL Server 2000 Personal Edition on Windows 98 computers without a network card, Windows 98 Second Edition is required.
Internet Requirements
This table shows Internet requirements related to using Microsoft SQL Server 2000.
| Component | Requirement |
|---|---|
| Internet software | Microsoft Internet Explorer 5.0 is required for all installations of Microsoft SQL Server 2000, as it is required for Microsoft Management Console (MMC) and HTML Help. A minimal install is sufficient, and Internet Explorer is not required to be the default browser.
Exception to the Internet Explorer 5.0 requirement: If using the Connectivity Only option and not connecting to a server that requires encryption, Microsoft Internet Explorer 4.01 with Service Pack 2 is sufficient. |
| Internet Information Services | If writing XML applications, see System Requirements for the IIS Virtual Directory Management for SQL Server Utility. |
Network Software Requirements
Microsoft Windows NT, Windows 2000, Windows Me, Windows 98, and Windows 95 have built-in network software. Additional network software is required only if you are using Banyan VINES or AppleTalk ADSP. Novel NetWare IPX/SPX client support is provided by the NWLink protocol of Windows Networking.
Note TCP/IP must be enabled at the operating system level before installing SQL Server 2000. For more information, see Network Libraries.
Supported Clients
Microsoft SQL Server 2000 supports the following clients: Windows NT Workstation, Windows 2000 Professional, Windows 98, Windows 95, Apple Macintosh®, OS/2, and UNIX. Macintosh, OS/2, and UNIX do not support the SQL Server graphical tools and require ODBC client software from a third-party vendor.
Considerations for Other Microsoft Products
The following Microsoft products require Service Release or Service Packs to operate correctly with SQL Server 2000.
Access 2000
Microsoft Access 2000 requires the installation of either Microsoft Office 2000 Service Release 1 (SR1) or Access 2000 SR1 to operate correctly with SQL Server 2000. If running an earlier version of Access 2000, you cannot test automatic data processing (ADP) applications against SQL Server 2000. You cannot access database diagrams, stored procedures, table designs, or view designs.
Other issues to be addressed in a future Access Service Release:
- When you run Access 2000 with SR1, you can test ADP applications. You can also alter database diagrams, stored procedures, table designs, or view designs, but you cannot save any changes. A future Access Service Release will allow limited ability to save changes.
- The Access 2000 Create Database Wizard cannot successfully create a SQL Server 2000 database. You can work around this by first creating the database using SQL Server Enterprise Manager, and then creating an ADP for the database using the Project (Existing Database) option on the New dialog box in Access 2000.
- The Access 2000 Upsizing Wizard does not support upsizing to SQL Server 2000. You can work around this by using Data Transformation Services in the Enterprise Manager to import your MDB database file into SQL Server. You can then rename your MDB tables and create linked tables to the resulting SQL Server database with the same names as your original MDB table names.
Visual Studio 6.0
When you run Microsoft Visual Studio® 6.0, you cannot access database diagrams, stored procedures, table designs, or view designs in SQL Server 2000. Visual Studio 6.0 Service Pack 4 allows you to alter database diagrams, stored procedures, table designs, or view designs, but you cannot save them. A future Visual Studio Service Pack will allow a limited ability to save changes.
The SQL Server 2000 tools cannot access database diagrams saved using the design tools in Visual Studio 6.0 until you have modified the dtproperties table in the database. For more information, see Backward Compatibility.
See Also
Editions of SQL Server 2000
SQL Server 2000: Editions and Components
Operating Systems Supported by the Editions of SQL Server 2000
Аппаратные требования
Эта таблица показывает аппаратные требования для установки Microsoft SQL Server 2000 или SQL Server client инструментов управления и библиотек.
| Оборудование | Минимальные требования |
| Компьютер | Intel® или совместимый
Pentium 166 MHz или выше. |
| Память (RAM)1 | Enterprise Edition: 64 MB минимум, 128 MB или больше рекомендуется
Standard Edition: 64 MB минимум Personal Edition: 64 MB минимум для Windows 2000, 32 MB минимум для остальных операционных систем Developer Edition: 64 MB минимум Desktop Engine: 64 MB минимум на Windows 2000, 32 MB минимум на других операционных системах |
| Пространство на жестком диске2 | SQL Server компоненты базы данных: от 95 до 270 MB, 250 MB типично
Analysis Services: 50 MB минимум, 130 MB типично English Query: 80 MB Desktop Engine только: 44 MB |
| Монитор | VGA или выше разрешение
800×600 или выше разрешение SQL Server графические инструменты |
| Устройство ввода | Microsoft мышь или совместимое устройство |
| CD-ROM привод | Рекомендуется |
1 Дополнительная память может быть рекомендована в зависимости от требований операционной системы.
2 Фактические требования могут меняться, основываясь на Вашей конфигурации системы и установленном программном обеспечении.
![]()
Note Microsoft SQL Server 2000 не имеет листа совместимого оборудования (HCL). Если Ваш компьютер отвечает минимальным требованиям, указанным в предыдущей таблице, SQL Server 2000 работает на аппаратных средствах, сертифицированных для операционных систем Microsoft Windows®. Для большей информации о сертифицированных аппаратных средствах для использования с операционными системами Windows, смотрите Microsoft Windows лист совместимого оборудования на
сайте Microsoft.
Требования к операционной системе
Эта таблица показывает требования к операционным системам, на которые может быть установлена выбранная редакция или компоненты Microsoft SQL Server 2000.
| SQL Server редакция или компоненты | Требования к операционным системам |
| Enterprise Edition | Microsoft Windows NT Server 4.0, Microsoft Windows NT Server Enterprise Edition 4.0, Windows 2000 Server, Windows 2000 Advanced Server, и Windows 2000 Data Center Server.
Microsoft Windows 2000 Server (любой версии) рекомендуется для некоторых особенностей SQL Server 2000. |
| Standard Edition | Microsoft Windows NT Server 4.0, Windows 2000 Server, Microsoft Windows NT Server Enterprise Edition, Windows 2000 Advanced Server, и Windows 2000 Data Center Server. |
| Personal Edition | Microsoft Windows Me, Windows 98, Windows NT Workstation 4.0, Windows 2000 Professional, Microsoft Windows NT Server 4.0, Windows 2000 Server, и все более продвинутые операционные системы Windows. |
| Developer Edition | Microsoft Windows NT Workstation 4.0, Windows 2000 Professional, и все Windows NT и Windows 2000 операционные системы. |
| Client Tools Only | Microsoft Windows NT 4.0, Windows 2000 (все версии), Windows Me, и Windows 98. |
| Connectivity Only | Microsoft Windows NT 4.0, Windows 2000 (все версии), Windows Me, Windows 98, и Windows 95. |
![]()
Примечание: Microsoft Windows NT® Server 4.0, Service Pack 5 (SP5) или более поздние могут быть установлены как минимальные требования для всех SQL Server 2000 редакций.
SQL Server 2000 не поддерживается на Windows NT 4.0 Terminal Server.
Для установки SQL Server 2000 Personal Edition на Windows 98 компьютер без сетевой карты, Windows 98 Second Edition рекомендуется.
Описание инициализационного файла установки
В комплект установки программы «Medbase» включен следующий инициализационный файл установки SQL Server Desktop Engine (MSDE):
setup.ini
[Options]
SAPWD=2007
SECURITYMODE=SQL
DISABLENETWORKPROTOCOLS=0
Основные параметры инициализационного файла:
| Параметр | Описание |
| SAPWD=»Пароль« | Пароль для логина администратора sa. |
| INSTANCENAME=»Имя_установки« | Указывает имя установки. Если INSTANCENAME не казано, используется установка по умолчанию (default). Данный параметр используется для установки нескольких SQL сервер на одном компьютере. |
| DISABLENETWORKPROTOCOLS=n | Определяет возможность сетевой работы. По умолчанию DISABLENTWORKPROTOCOL=1, сетевые протоколы отключены. DISABLENETWORKPROTOCOLS=0 включает сетевые протоколы. |
| SECURITYMODE=SQL | Указывает включение смешанного режима аутентификации (проверки пользователей) Windows (по имени пользователя Windows) и SQL (имя и пароль указываются вручную). |
| DATADIR=»путь_к_папке_данных« | Определяет папку, где будут установлены системные базы данных, журналы ошибок и инсталляционные скрипты. |
| TARGETDIR=»путь_к_папке_исполняемых_файлов« | Определяет папку, куда будут установлены исполняемые файлы. |
Когда Вы используете DISABLENETWORKPROTOCOLS=0 для включения поддержки сети MSDE 2000, приложение подключается, используя Microsoft Data Access Components (MDAC). Для большей информации о сетевых подключениях, смотрите сайт Microsoft.
Вернуться к содержанию