Although Windows defines the file type on the basis of the file extension, some types cover multiple extensions (e.g., «JPEG Image» covers .JPG and .JPEG), and others use extensions that are substrings of other extensions for unrelated types (e.g., «Markdown files» are .md, which is a substring of .mdb (an Access database) and .mdi (Microsoft Document Image file). If I want to search for «JPEG Image», or «Markdown file», and get only the required file types… how do I do it?
- Explorer, batch, or PowerShell solutions are acceptable.
- The ideal solution will work for both Windows 7 and Windows 10, but separate solutions for Windows 7 and Windows 10 are also acceptable.
- I would prefer not having to analyze and use explicit file extensions in the search.
asked May 16, 2017 at 19:39
![]()
Jeff ZeitlinJeff Zeitlin
4,4692 gold badges16 silver badges30 bronze badges
5
A few things about Windows and the search function in the File Explorer:
- Windows doesn’t know about mime-types such as «JPEG Image» or «Markdown file» (or their respective (sub-/super-)types
- The search is very powerful, if used correctly.
To answer your question:
To search for a specific extension (file type in Windows) use the search query:
- Search for all
.mdfiles and only those files (should be markdown files):type:".md"(remember the quotation marks, if you want an exact match) - Search for all images:
kind:=image(yes, you can search for this) - You can combine all filters and search terms how you like it.
More info and examples here: https://www.howtogeek.com/73065/learn-the-advanced-search-operators-in-windows-7/
answered May 16, 2017 at 19:57
![]()
6
To search in Windows using the «type:» syntax, you want to do
type:~ Note the tilde.
For example I wanted to find Word Documents, where if you’re looking in explorer browser, the «Type» column will identify as «Microsoft Word Document», I used:
type:~"Microsoft Word Document"
The results returnd only Word Docs and even highlighted the text in the «Type» column.
I had tried repeatedly with type: and type:= to no avail, only the tilde ~ worked.
Hope this helps someone.
answered Jan 30, 2019 at 23:22
![]()
3
You must log in to answer this question.
Not the answer you’re looking for? Browse other questions tagged
.
Not the answer you’re looking for? Browse other questions tagged
.
Пропажа файлов – одна из наиболее распространенных проблем, с которой сталкиваются как опытные пользователи, так и новички. К счастью, в операционной системе Windows 10 предусмотрены достаточно мощные инструменты поиска. С помощью которых можно найти любой файл, где бы он не находился.
В этой статье мы расскажем, как найти файл на компьютере с операционной системой Windows 10. Будут рассмотрены несколько способов, в зависимости от информации, которая известна пользователю.
Как найти файлы по названию
Самый простой способ – это поиск по названию документа. Поэтому, если вы знаете, как называется нужный вам файл, то найти его не составит труда.
Для начала откройте папку, в которой предположительно должен находиться нужный вам файл, и после этого воспользуйтесь поисковой строкой в правой верхнем углу окна. Введите название документа и нажмите клавишу Enter, после этого операционная система Windows 10 выполнит поиск и покажет результат.

Если вы не знаете, в какой папке может находиться файл, то откройте один из дисков (например, диск D или C) или просто откройте окно «Этот компьютер», в этом случае поиск будет выполняться не в папке, а по всему диску или по целому компьютеру. Но, нужно учитывать, что поиск по диску или всему компьютеру займет намного больше времени, чем в одной конкретной выбранной папке.

Процесс поиска будет отображаться в виде зеленой полоски в адресной строке. Введите запрос и дождитесь, пока она дойдет до самого конца.
Как найти файлы по дате создания
Если вы не знаете, как называется искомый документ, но примерно помните дату его создание и место расположения, то можно выполнить поиск файла по дате создания.
Для этого откройте папку (диск или компьютер) и установите курсор в поисковую строку в правом верхнем углу экрана. После этого в верхней части окна появится новая вкладка под названием «Поиск».

На вкладке «Поиск» нужно нажать на кнопку «Дата изменения» и выбрать один из предложенных вариантов. Среди стандартный вариантов есть: сегодня, вчера, на этой неделе, на прошлой неделе, в прошлом месяце, в этом году, в прошлом году.

После выбора одной из этих дат система выполнит поиск файлов в указанном временном диапазоне. При этом в поисковой строке появится команда «дата изменения», которая будет указывать на используемый временной отрезок.

Если вы хотите указать конкретную дату или другой отрезок времени, то вы можете кликнуть по текущему значения справа от команды «дата изменения» в поисковой строке и с помощью календаря выбрать нужное время. Для указания отрезка времени нужно зажать клавишу Shift кликнуть сначала по первой дате, а потом по последней.

Команду «дата
изменения» можно дополнить поиском по названию файла. Это позволит найти файлы с определенным названием и датой изменения. Для этого после команды «дата
изменения» поставьте пробел и введите название файла.

Используя комбинацию названия и даты, можно легко находить документы за определенный период.
Как найти файлы по типу
Также Windows 10 позволяет найти файлы определенного типа. Для этого нужно установить курсор в поисковую строку, перейти на вкладку «Поиск», нажать на кнопку «Тип» и в открывшемся списке выбрать один из предложенных типов документов. Список здесь достаточно большой и включается в себя такие распространенные типы как: документ (текстовый), папка, фильм, музыка, изображение и т.д.

После выбора одного из типов в поисковой строке появится команда «вид», которая будет указывать на выбранный тип файла.

Если вам нужно найти файл с определенным расширением (например, DOCX или TXT), то вы можете указать это расширение как название документа. Для этого вместо названия введите в поиск звездочку, точку и нужно расширение. На скриншоте внизу показано, как это должно выглядеть для поиска документов с расширением DOCX.

Как и в предыдущем случае, поиск по типу можно комбинировать с другими способами поиска
Как найти файлы по размеру
Также в Windows 10 вы можете найти все файлы с определенным размером. Для этого нужно установить курсор в поисковую строку, перейти на вкладку «Поиск», нажать на кнопку «Размер» и выбрать один из предложенных вариантов. Здесь можно указать какого размера должны быть искомые документы: пустые (0 КБ), крошечные (0 – 16КБ), маленькие (16КБ – 1МБ) и т.д.

После этого в поисковой строке появится команда «размер», указывающая на размер искомых объектов.

При желании, после команды «размер» можно указать конкретное значение в килобайтах, мегабайтах или гигабайтах.

Как и для предыдущих случаев, поиск по размеру можно комбинировать с другими способами поиска. Например, вы можете найти файлы с определенным названием, размером и типом.
Посмотрите также:
- Чем открыть DJVU формат в Windows 7 и Windows 10
- Чем открыть PDF файл в Windows 7 или Windows 10
- Чем открыть MDF файл в Windows 7 или Windows 10
- Поиск по картинке в Интернете
- Чем открыть mkv
A few things about Windows and the search function in the File Explorer:
- Windows doesn’t know about mime-types such as «JPEG Image» or «Markdown file» (or their respective (sub-/super-)types
- The search is very powerful, if used correctly.
To answer your question:
To search for a specific extension (file type in Windows) use the search query:
- Search for all
.mdfiles and only those files (should be markdown files):type:".md"(remember the quotation marks, if you want an exact match) - Search for all images:
kind:=image(yes, you can search for this) - You can combine all filters and search terms how you like it.
More info and examples here: https://www.howtogeek.com/73065/learn-the-advanced-search-operators-in-windows-7/
Related videos on Youtube

02 : 57
Windows 10: How to Search Files, Folders & Text Content (Windows 7, 8.1 & 10)

02 : 21
Search Files & Folders by Their Text Contents in Windows 10/8/7

03 : 09
Find Large Files in Windows | Computer Search | How to Search by File Type

08 : 44
How to search for files in Windows 10 like a pro

01 : 18
How to search a file type in windows 10
Comments
-
Although Windows defines the file type on the basis of the file extension, some types cover multiple extensions (e.g., «JPEG Image» covers
.JPGand.JPEG), and others use extensions that are substrings of other extensions for unrelated types (e.g., «Markdown files» are.md, which is a substring of.mdb(an Access database) and.mdi(Microsoft Document Image file). If I want to search for «JPEG Image», or «Markdown file», and get only the required file types… how do I do it?- Explorer, batch, or PowerShell solutions are acceptable.
- The ideal solution will work for both Windows 7 and Windows 10, but separate solutions for Windows 7 and Windows 10 are also acceptable.
- I would prefer not having to analyze and use explicit file extensions in the search.
-
I’m unsure what you are asking. Are you trying to sort or search for files with a specific type? If you are trying to search for a specific type (Like
.JPEG), why do you not wish to search by the extension? -
Search, not sort; and searching by the extension in some cases will not get all of the files of the type (e.g.,
.JPEGmisses the «JPEG Images» that are.JPG), and in other cases will get too many files (e.g.,.mdin the Explorer search box will get not only «Markdown files», but «Access database files» (.mdb)). -
For the case of
.JPGand.JPEG, since they are both technically.JPEGfiles. You can search using explorer by typingtype:=.JPEGin the search box and it should find all .JPEG files, regardless of their extension -
Nope.
type:=.JPEGomits.JPG. -
Sorry, I mistyped. Give
type:.jpega try. I just tested it now and it returned both.jpgand.jpegfiles.
-
+1. Although you can search for some files regardless of the sub types. Not sure about all types, but some allow you to. Such as
.JPEG, which will find all of the sub types such as.JPE .JPG .JFIFif you search withtype:.jpegAlso, it does not seem quotations are required, but return the same result. -
@CheesusCrust the quotation marks are required when searching for an exact match. Otherwise
.mdbfiles (like the OP stated) are found. -
Ah, I see. I thought the OP meant to find more rather than less. Whoops! Thanks for sharing the link too.
-
The link doesn’t really make it clear how to do what I needed — I’d actually found that link in my research — but between the answer and comments here, plus a bit of digging for information on Windows Search Advanced Query Syntax, I’ve been able to put together what I need. (Next step: see if I can figure out how to do it in PowerShell…)
-
type:".md"did not work (false negatives — no matches) when I tried it on Windows 10 (in a folder with 11 .md files). -
Does this work for partial matches, and is it case-sensitive? For example, do I have to use «Microsoft Word Document», or is «word doc» going to be adequate (assuming that I don’t have another application that calls itself ««something» Word»)
-
In any search I’ve done anywhere the tilde has always meant partial match search or similar, so I’m going to say yes.
-
@GiantTree, as Peter Mortensen explains,
type:".md"is not correct. It should betype:=".md"with an =. I’d suggest testing it, and then please update your answer. -
In spite of the time lapse, I’ve rechecked this, and I need explicit wildcards to match on the «type name» — that is, if I want to match Word documents (and I don’t have something other than MSWord that calls itself «Word»), I need to use
type:~"*Word*"
Recents
Related
There must be a lot of files on your computer. At times, you may forget the exact location of a file. When you want to use that file, things will be messy. How to search for files in Windows 10? MiniTool will show you some methods focusing on different situations. You can select a suitable method accordingly.
Where Are My Files in Windows 10?
Physically, you can save your files on your computer hard drive or some other type of digital data storage device like an SD card, memory card, pen drive, and more. Additionally, you can also store your files using OneDrive (if you are running Windows 10, OneDrive is already installed on your computer).
As time goes on, your files become more and more. Unless you have a good memory, it is really hard to remember the exact location of one specified file, folder, or program on your computer. For example, you have saved one item on the computer and you don’t use it for a long time. Suddenly one day, you need to use it, but, you forget where you have saved it.
Here comes the question: how to search in Windows 10?
Here are some different situations:
- If your needed files are still kept on the computer and you still remember the files’ names or part of the names, you can perform a Windows file search to find these files one by one.
- If you forget the names of the files, you should still remember the text content in the file. In a situation like this, you can search for file contents in Windows 10 and then find your needed file. But, this Windows 10 file search method is always limited to some certain files’ types that contain text contents.
- If the above two methods can’t help you find your needed files, these items should be missing from your computer. To find the lost files, you can try professional data recovery software. We recommend using MiniTool Power Data Recovery.
We have proposed different problem-solving ideas for different situations. Next, we will show you how to carry out these ideas in the following contents.
How to Search for Files in Windows 10?
How to Search for Files in Windows 10?
- Search for files using the taskbar
- Search for files using File Explorer
- Search for files using Everything
There are three methods that can be used to search for files in Windows 10. You can select one according to your actual situation. Additionally, you can use these three methods to search for files from computer hard drives, One Drive, SD cards, memory cards, and more.
Method 1: Search for Files Using Taskbar (by Name)
This method is very simple. You can follow these steps to search for files by the name or a keyword.
- Press Win + X and select Search from the WinX Menu to open the Windows 10 search box. Or, you can directly click Cortana to open it.
- Type the name or a keyword of the file you want to find into the search box and you will see the search results across your computer and OneDrive under Best match.
You can select the file to open it and check whether it is the file you want to find.
If you think this method can’t help you find the needed files or you need to search for file contents in Windows 10, you can use File Explorer instead.
Method 2: Search for Files Using File Explorer (by Name/File Contents/Type…)
Performing a Windows 10 file search with File Explorer is a commonly-used method to find your needed files.
Here is a step-by-step guide:
Note: If your File Explorer is set to start from Quick Access, when you open File Explorer, you will enter Quick Access directly. You should not perform a Windows 10 file search in Quick Access. You need to switch to This PC before searching. Or, you can refer to this post to make File Explorer start from This PC: How to Use Windows 10 Quick Access: A Full Introduction.
- Go to File Explorer and access the drive that should contain the files you want to find. If you are not sure the file location, you can just select This PC from the left list to make File Explorer show all drives in This PC.
- The search box is on the upper right corner of File Explorer. You need to input the file name or a keyword. Then the Windows 10 file search process will automatically start.

When the search process ends, you can see the search results. It is quite possible that you see more than one choice. Then, you need to find the target one from the results.
Perform an Advanced Search in File Explorer:
If there are so many files, you can then perform an advanced search in File Explorer. You can click the arrow next to the question mark on the upper right corner and then make a further selection like file size, kind, date modified, etc. You can use these features according to your actual situations.

Tip: You can also use File Explorer to search for files in external drive: If you want to search for files in an external drive, you need to select that drive in File Explorer and then use the universal Windows file search approach to do the job.
How to Search File Contents in Windows 10?
The above guide is just the universal usage of searching for files using File Explorer. Maybe, you are also interested in another search approach: searching file contents in Windows 10
Perhaps, you want to find a Word, Excel, or a text file. But, you forget the name of the file. Take it easy. You can try to remember some text contents that are especially exist in that file and then search files content via File Explorer.
To do this work, you need to do some preparation beforehand: enabling the File contents feature of Windows 10 file search in File Explorer. You can follow these steps to enable the File contents feature:
- Open File Explorer.
- Click the Search mark (the magnifying glass mark) on the upper right corner.
- Click Search on the top toolbar.
- Click the Arrow Down button of the Advanced options.
- Select File contents from the drop-down menu.

Now, the File contents feature is enabled. You can type the content text into the search box to search for your needed files.
Click to Tweet
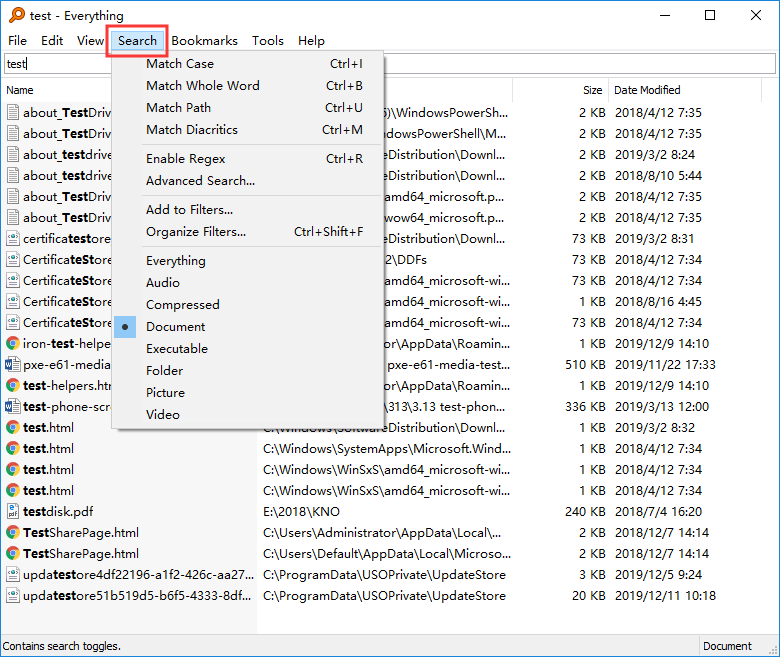
Method 3: Search for Files Using Everything (by Name/Type)
Besides using the Windows snap-in tool to search for files in Windows 10, you can also use a third-party utility to do the work. Everything is just such a tool.
Everything is a desktop search utility for Windows. You can use it to search for your needed files and folders by name. In addition, this utility can also show you all the computer files by type (limited to some certain types). If you only remember the type of file you want to find, you can set this tool to only show the target file type.
It is a totally free tool. You can go to the https://www.voidtools.com/ to free download it on your computer for further use.
Tip: You can only use this tool to search for files in computer hard drives.
Search for Files in Windows 10 by Name:
- Open Everything.
- Input the file name to make the tool show the related items.
- Go to find your needed files from the list of the search results.

If there are so many search results, you can click Search from the toolbar and select the target file type to narrow down the search range.
After finding the needed file, you can click on it to open it immediately. Or you can go to File > Open path to access the storage location.
Search for Files in Windows 10 by Type:
If you really forget the name of the file, you can use the Search feature of Everything to select the data type of your needed file. This can shorten the search time relatively.
For example, if you want to search for all video files on Windows 10, you can press Search and then select Video from the drop-down menu. Everything will show you all the video files.
Other types of files you can search by category are audio files, compressed files, documents, executable files, folders, and pictures.
Everything also has other useful features like copy the selected file to another folder, move the select file to another folder, and more. You can discover more features by yourself.
Click to Tweet
If you have lost the files you want to use, the methods mentioned in the above parts are unavailable. You need to use data recovery software to get your lost data back. We suggest using MiniTool Power Data Recovery.
This is a free file recovery tool. As long as the deleted files are not overwritten by new data, you can use this software to restore files from computer hard drives, memory cards, SD cards, and more.
With the trial edition of this software, you can check whether it can find the files you want to use. Now, you can press the following button to get this freeware.
MiniTool Power Data Recovery TrialClick to Download100%Clean & Safe
After downloading and installing this software on your computer, you can follow this guide to rescue your lost data:
1. Open MiniTool Power Data Recovery.
2. Select the target drive and press the Scan button to start the scanning process.

3. You need to wait until the whole scanning process ends. Then, this software will show you the scan results by path. You can open each path to find your needed data.
At the same time, you can also use the Type feature to search for files by type or use the Find feature to search for files by name. You can select these two features based on your actual situation.
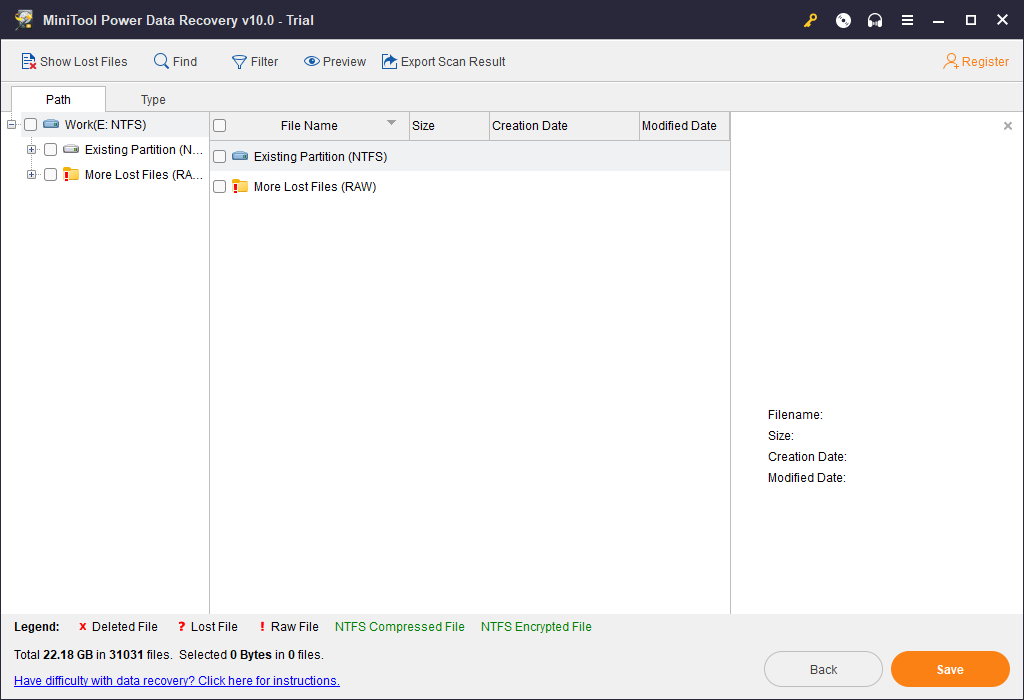
4. If you discover that this software can find your desired files, you can update this software to a full edition to recover all of them without limits. If you are a personal user, the Personal Ultimate edition can fully meet your requirements.
5. When you get a full edition, you can select the needed files and click on the Save button to choose a suitable location to store these files. The recovered files can be used directly.
After reading this part, you must know how to find your lost files in Windows 10. Just use this MiniTool software to help you out.
Click to Tweet
Bottom Line
When you can’t find a file in Windows 10, you can read this article to learn how to search for files in Windows 10. Whether you want to search for your files by name, by type, or by file contents, you can always find a good solution here.
Should you have any questions when performing a Windows 10 file search or using MiniTool software, you can just contact us via [email protected], or let us know in the comment.
How to Search for Files in Windows 10 FAQ
How do I find the search box in Windows 10?
- You can click Cortana to open the Windows 10 search box.
- You can press Win + X and then select Search from the WinX menu.
How do I Search for Files in Windows 10?
- You open Windows search and then type the file name to search for files in Windows 10.
- You can go to File Explorer > This PC and then type the file name to the search box (upper right corner in File Explorer) to search for files in Windows 10.
- You can use the third-party toll Everything to search for files by name and type in Windows 10.
How do I find a lost file in Windows 10?
If your needed file is missing from the computer, you can use MiniTool Power Data Recovery to find it back:
- Download and install this software on your computer.
- Select the target drive to scan.
- Find the target file from the scan results.
- Select the target file to restore.
How do I see hidden files?
To make the hidden files to be shown on your computer, you need to go to Control Panel > Appearance and Personalization > Folder Options > View. Under Advanced settings, you need to select Show hidden files, folders, and drives, and then press OK to keep the change. After that, you can see the hidden files on your computer.
Windows Search and its Advanced Query Syntax (AQS) is a freaking awesome feature in Windows. It lets you quickly find a particular file or group of files with a specific name or metadata, in a folder and sub-folders.
Along with indexing file properties or metadata, most known plain-text files are also content indexed by default. When a file type is content indexed, Windows Search lists out the files that contain the word or phrase in the file contents when you type a search phrase in the Search box.
Which Plain-Text Files are “Content Indexed” by Default?
By default, known plain-text file types such as .BAT, .CMD, .CPP, .VBS. Here is the full list of file types that are, by default, content indexed on a Windows 10 computer:
A, ANS, ASC, ASM, ASX, AU3, BAS, BAT, BCP, C, CC, CLS, CMD, CPP, CS, CSA, CSV, CXX, DBS, DEF, DIC, DOS, DSP, DSW, EXT, FAQ, FKY, H, HPP, HXX, I, IBQ, ICS, IDL, IDQ, INC, INF, INI, INL, INX, JAV, JAVA, JS, KCI, LGN, LST, M3U, MAK, MK, ODH, ODL, PL, PRC, RC2, RC, RCT, REG, RGS, RUL, S, SCC, SOL, SQL, TAB, TDL, TLH, TLI, TRG, TXT, UDF, UDT, USR, VBS, VIW, VSPSCC, VSSCC, VSSSCC, WRI, WTX
Enable Searching File Contents of Any File Type
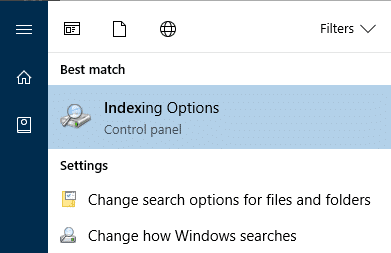
If you have a custom file type that is of plain-text format, and want to fully index (except the stop words) the contents, you can add the file extension manually in indexing options. Type Indexing Options in the Start/Cortana search box and click on the search result.
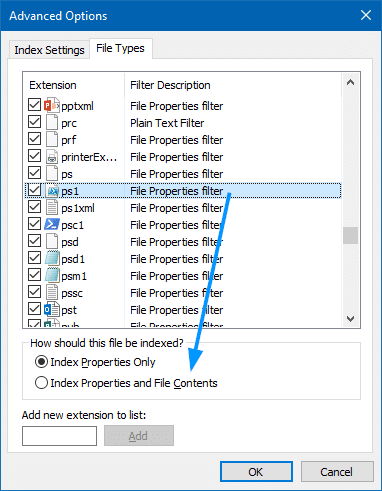
To add custom or unknown plain-text files like, .AHK or .PHP, in the Indexing Options dialog, click Advanced, and click File Types.
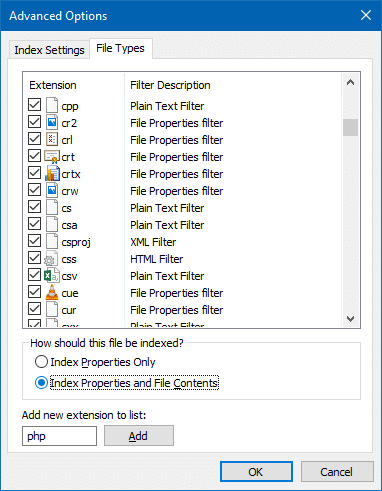
Type the file extension PHP, select Index Properties and File Contents radio-button, and click OK. After you press OK, the prompt “Rebuilding the index might take a long time to complete. Some views and search results might be incomplete until rebuilding is finished.” appears.

Click OK, and give the indexer considerable time (maybe even hours) to do its job.
Example: Enable Searching File Contents of PowerShell Scripts (.PS1)
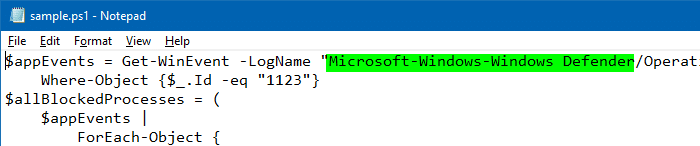
PowerShell script file type .PS1, although it’s a known plain-text file, is not content indexed by default. To demonstrate this, I have two files with different file extensions, but containing exactly the same PowerShell code.

As you can see, the file contains a word named Defender.
However, when I typed defender in the Search text box, it listed only the text (.txt) file. Although the .PS1 file has got the same contents, the file wasn’t listed in the search results.

To search file contents of .PS1 using Windows Search, enable content indexing for the file extension. In Indexing Options, click Advanced, and select the File Types tab. Select .PS1 from the list and enable Index Properties and File Contents radio-button.
Click OK, and give ample time for Windows Search to index the chosen file type. Rebuilding may take anywhere from minutes to hours depending upon the system configuration, number of files waiting to be indexed, and the user activity level in the system. Don’t expect Windows to content index your additional file types immediately.
After some time, Windows Search indexed the contents of all .PS1 files duly, and here are the search results:

Exclude Files in Specific Folders to Prevent the Contents Indexed
Content indexing additional file types mean additional database file size and additional resources consumed by the Search Indexer. To keep the database size down, enable the option only for the files you need. For the rest of the file types, you can choose to index only the file properties and metadata.
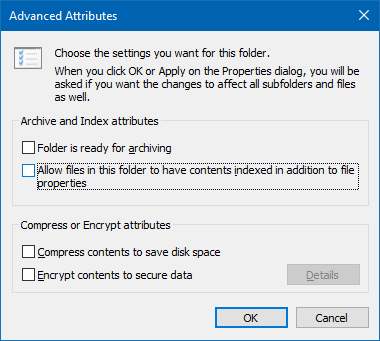
Besides configuring content indexing on a per-file type basis, you can exclude certain folders (or files) as well. Right-click on a file or folder, click Properties, and click Advanced.
Note: You can do this on a per-file or per-folder basis.
Uncheck Allow files in this folder to have contents indexed in addition to file properties, and click OK. For folders, Windows asks you whether to apply the settings for files from the current folder only, or for sub-folders as well. Choose the appropriate option and click OK.
From now on, Windows Search will not index the contents of the files present in that particular folder, regardless of your per-file type setting in the File Types dialog in Indexing Options. This helps lower the burden of Windows Search, and keeps the database size smaller.
Search file names only, not contents (even with content indexing enabled)
Sometimes, you may want to prevent Windows search from indexing the contents of documents and archives (without turning off the file content indexing feature), restricting the results to filenames only.
To make Windows Search search only for the file name (not contents), use the search operator filename:
For example, the advanced search query filename:*audit* lists out files that contain the word audit in the file name, regardless of file contents. For accurate searches, always use advanced search operators.
Refine your searches using Search tab Ribbon commands
Don’t like manually typing or memorizing the advanced query syntax? No problem! use the advanced search ribbon buttons in File Explorer Search tab to refine your searches. It fills up the search operators automatically in the search text box.

For demonstration, I added a 0-byte file named defender.txt along with sample.txt and sample.ps1.

The files sample.txt and sample.ps1 contain the word defender inside the file. In this case, typing defender in the search box lists all three files:

That’s because, for freestyle keyword searches, Windows Search looks for the filename, as well as searches the contents (of included file types) for the keyword used. If I used the Advanced Query Syntax (AQS) syntax filename: or name: it searches for the file name only, as seen in the following screenshot.

The
filename: operator is always preferred to name: because the name: operator will only search from the beginning of the file name, as opposed to anywhere in the file name.
Similarly, there are many such advanced search operators that you’d like to be familiar with. For example, using the AQS, you can search for Files created between two dates. You can mix and match multiple search operators to refine your searches. With Windows Search’s AQS, the opportunities are endless.
Search file contents even in non-indexed locations
Thus far, everything written in this article applies to indexed locations. For non-indexed paths, Windows has to scour through each file or folder in the file system and fetch the results. This will be accurate, but very slow and drains the system resources more.
By default, in non-indexed locations, Windows Search doesn’t search file contents. If you wish to search file contents in non-indexed locations, there is a setting you can enable.
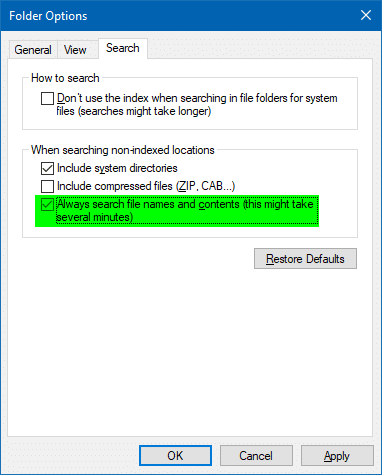
- Open File Explorer, click the File menu, and select “Change folder and search options”.
- Click the Search tab and enable the option named Always search file names and contents (this might take several minutes)
- Click OK.

It’s worth reiterating that the above setting when enabled, will cause the searches to slow down very much, and the system performance certainly takes a hit with constant churning of the hard drive. Please use the above setting judiciously — enable it only when it’s absolutely necessary.
The Windows Search feature, despite the occasional search indexer service hiccups (which can be fixed) which you may experience, is a real time-saver when it works, and it’s a productive tool that eases our workflow.
Information in this article applies to Windows Vista and higher, which includes Windows 10 and Windows Server Operating Systems.
Featured image Credit: earvine95, pixabay.com
One small request: If you liked this post, please share this?
One «tiny» share from you would seriously help a lot with the growth of this blog.
Some great suggestions:
- Pin it!
- Share it to your favorite blog + Facebook, Reddit
- Tweet it!
So thank you so much for your support. It won’t take more than 10 seconds of your time. The share buttons are right below. 