If the Windows 10 search bar is not working for you, the issue is probably caused by a newly installed Windows update, interference from the Bing search tool, a halted Windows search service, or damaged system files. These are the most typical factors that might lead to this problem occurring.
| Workable Solutions | Step-by-step Troubleshooting |
|---|---|
| Fix 1. Restart Windows Search Bar | The first method to resolve this issue is by restarting the Windows search bar, following …Full steps |
| Fix 2. Rebuild Windows Search Index | You may also try rebuilding the Index if you’re using Windows and have trouble with a search…Full steps |
| Fix 3. Using the Troubleshooter | The Windows Indexing Services may be restored with the aid of the Windows Troubleshooter…Full steps |
| Fix 4. Use SFC and DISM Tools | Corrupted system files may also cause Windows search to malfunction. The SFC command…Full steps |
| Fix 5. Install Windows Updates | Microsoft often updates its software with new features, optimizations, and bug fixes…Full steps |
After installing a problematic Windows update, the Windows search function will often cease providing results for searches, making it impossible for you to use. Nevertheless, you may correct it by clicking on the space on the Windows search page; however, this is not a long-term solution. To solve this problem once and for all, you need to follow this article in the order given.
[In Advance] Recover Your Data Before Your Windows Getting Worse
Windows 10 users may need to restart their operating system if the search bar stops responding or not working. Therefore, you should have the plan to recover deleted files. A data recovery program designed for Windows may be useful.
If you want to get rid of any bothersome background apps and delete any unnecessary files from your hard drive, resetting or restoring your PC to an earlier state is the way to go. When your PC is up and operating properly, you should first make a backup of any important data, particularly on the C drive.
EaseUS Data Recovery Wizard is the ideal tool for the job. Data recovery is its specialty, and it has helped millions of satisfied clients get their files back. Files lost on a hard drive may be recovered using the RAW format with the help of this dependable data recovery software. Since only EaseUS Data Recovery Wizard fully satisfies your needs, it is imperative that you quickly recover your files. Those who have accidentally deleted important data after doing a factory reset on their laptops may download this program and perhaps retrieve them.
EaseUS Data Recovery Wizard
- Even a novice may use it with ease thanks to its simple user interface, which distinguishes it from many others.
- Recover deleted files from SD card, USB flash drive, HDD, SSD, external hard drive, and more devices.
- It specifically seeks to recover deleted or lost files from a variety of digital data storage devices, such as CDs/DVDs, memory cards, SD cards, computer hard drives, etc.
Download EaseUS deleted data recovery software and follow a straightforward process to restore deleted data from a dead laptop or PC on Windows 10.
Why Is Windows 11/10 Search Bar Not Working
Following are some reasons why is windows 11/10 search bar not working:
Due to Windows 11’s immaturity, flaws are to be anticipated. It is planned that Windows upgrades in the future will fix search problems caused by bugs.
It’s also possible that the issue is psychological since some configurations might falsely indicate a failure. Since the Ctfmon.exe program controls the Office language bar and alternative your input, its absence may be to blame for the problem.
The Text Service Framework is a system service that deals with text input and the MaCtfMonitor monitors it. If the search bar is blank, the scheduled task MsCtfMonitor may have failed to start or become corrupted.
According to Microsoft, Cortana is a tool that helps us save time and pay attention to what’s important. But if it fails, you may be unable to look for anything. The preinstalled software might get damaged or malfunction on occasion.
You May Also Like:
How to Fix Windows 11/10 Search Bar Not Working
This part will tell you how t fix Windows 10 search bar not working problem. If one of the solutions does not work for you, you should try another solution since all of them be effective for impacted people in various situations. And here is a short video that can help you know how to do it. You can also check the highlights here:
- 00:09 — Restart Search and Windows Explorer
- 01:00 — Search and Indexing Troubleshooting
- 01:49 — Reset
- 02:20 — Closing
Fix 1. Restart Windows Search Bar
The first method to resolve this issue is by restarting the Windows search bar, following the steps below:
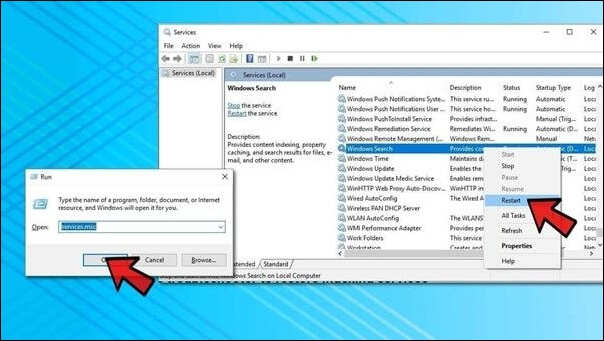
Step 1. You may restart the search service using the Services panel in Windows.
Step 2. To open the Run prompt, hit the Windows key plus R. enter services.msc and press the Enter key to proceed.
Step 3. Locate the Windows Search program. Restart it by right-clicking on it. You may try using the search again right now.
Step 4. Right-clicking a process allows access to its properties, where you may change its startup mode to «Automatic.» After making these changes, remember to hit the Apply and OK buttons.
Fix 2. Rebuild Windows Search Index
You may also try rebuilding the Index if you’re using Windows and have trouble with a search. Here are the measures you should take:
Step 1. To access the Run window, click the Windows key plus the letter R.
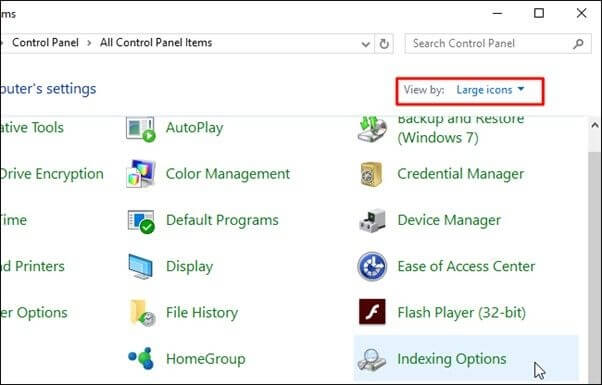
Step 2. Enter «Control Panel» and hit Enter to open the panel.
Step 3. Select Indexing Options from the menu that appears.
Step 4. Access the more complex settings by selecting the Advanced tab under Indexing Options.
Step 5. Navigate to the Troubleshooting menu and then choose Rebuild.
Step 6. If you get a warning that says something will take a long time, click OK.
Step 7. When rebuilding the Index is finished, you may restart your computer and ensure that the Search bar is functioning correctly.
Fix 3. Using the Troubleshooter
The Windows Indexing Services may be restored with the aid of the Windows Troubleshooter. Troubleshooters are helpful since they perform the hard work for you; run them and follow the instructions.
Step 1. Open the Control Panel using the Run prompt. For the Windows control panel, use the Windows key plus R and enter the control panel.
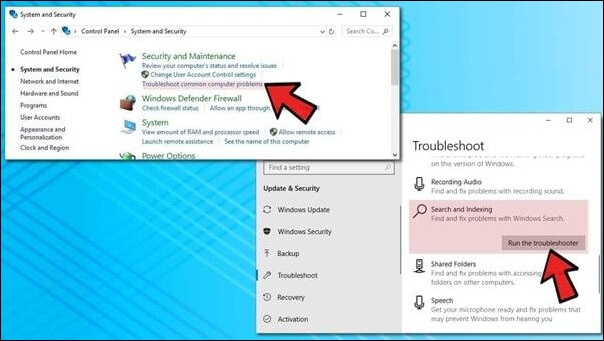
Step 2. Select System and Security under Troubleshooting. Next, choose Common computer issues and click it. A new window needs to load. Then, choose Search and Indexing and click the box labeled «Run the Troubleshooter.»
Step 3. The troubleshooter should recommend using Administrator mode. Use the recommended adjustments.
Step 4. Confirm the persistence of the «Windows 10 search bar not working» issue.
Fix 4. Use SFC and DISM Tools
Corrupted system files may also cause Windows search to malfunction. The SFC command makes it simple to retrieve them from the cached version. System File Checker (SFC) is a command line tool for repairing and restoring broken system files. So, why not test it out by typing in the command:
Step 1. Choose New Task from the File menu after right-clicking the Task Manager.
Step 2. In the box provided, enter «cmd,» then choose the «Create This Task With Administrative» checkbox.
Step 3. When ready to use the administrator’s command prompt, click the OK button.
Step 4. Then, hit the Enter key after typing sfc /scannow.
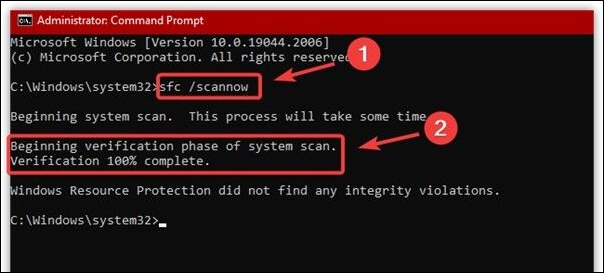
Step 5. Upon completion of the verification, examine whether the problem has been fixed.
Fix 5. Check and Install Windows Updates
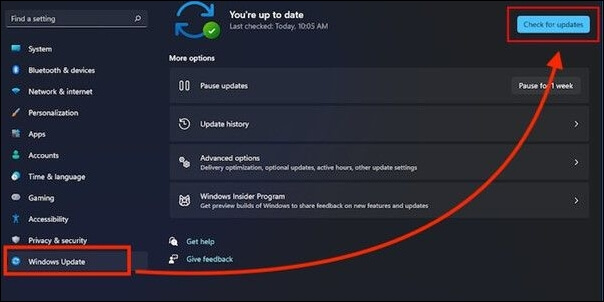
Microsoft often updates its software with new features, optimizations, and bug fixes. Installing the latest Update may fix the issue if you suspect a Windows flaw. Here’s how to see whether there are any newer versions available and download them if you need to:
Step 1. To access Windows Update, press Windows + I to launch the Settings app and then choose the Update & security option on the left side.
Step 2. To check for updates, choose the corresponding option in the right-hand panel and click it. If they are located, it should immediately begin downloading them.
Step 3. Alternatively, you may use the Download button to initiate a manual download.
Final Thoughts
There are more than a dozen configurations and applications that may be accessed on our computer, and the Windows search function is the quickest method to go to any of them. When it suddenly stops operating, it’s only reasonable to be concerned about what could happen next.
Windows 11/10 Search Bar Not Working FAQs
Here are 4 additional questions about Windows 10 search bar not working. Check here for the answers.
1. How do I reset the Windows search bar?
Windows has a built-in troubleshooter. This is the first step towards fixing Windows’ search bar. Here’s how:
Step 1. Click ‘Update and Security’ in Windows Settings.
Step 2. Click on the left sidebar. ‘Troubleshoot,’ ‘Additional troubleshooters.’
Step 3. Click ‘Search and indexing’ then ‘Run the troubleshooter.’
Step 4. A new window with choices appears. You may choose ‘Can’t search or view results’ or ‘Indexing search is sluggish.’
2. Why is my search bar not working?
Searching is required to utilize anything on your computer. The Windows Search bar lets you easily access File Explorer, programs, registries, and documents. The Windows 11 Search bar problem disables the bar, preventing typing. Windows 11’s Start menu (with a new search box) may not react to clicks. No Shutdown or Restart buttons!
3. How do I restart search indexing?
Suppose you need to restart the Windows 10 search indexing service and type ‘net start search’ at a command prompt. You may retry the command if you get the ‘The Windows Search service could not be launched’ problem.
4. How do I reactivate my search bar?
Taskbar settings may be accessed by either pressing and holding (or right-clicking) the taskbar. Choose items from the taskbar to expand the section, then turn the Search switch to the ‘On’ position.
Windows 10 is definitely the best and most praised version of Windows so far. But still, there are a few issues that pop every now and then. These issues cause quite a bit of irritation to users on daily basis. One such issue is “Windows 10 search bar or search stops working”. This wasn’t a huge problem in the previous version of windows as users were barely using the search bar. But that can’t be said in case of Windows 10.
Microsoft introduced their own personal assistant “Cortana” in addition with the fresh and fluent start menu user interface in Windows 10. As a result, many users started using the personal assistant along with the search bar. The search bar in Windows 10 is a huge improvement as compared to the previous versions. This search bar is linked with Bing search engine and Microsoft store which automatically suggests searchable content which redirects the user to the result page or to the application which might be available on Microsoft store.
The search bar is a combination of billions of micro-processes. Hence it tends to display a couple of bugs every now and then. As a result, the search bar stops working and the user is left with a dissociated block on their home screen. If you are also experiencing a similar issue, check out some workarounds provided below to help you get through with the problem.
Table of Contents
Windows 10 Search Bar Not Working, How to Fix?
1. Restart Your Computer
Most of the time, the constant running of windows is the reason behind this problem. Hence, you can resolve the problem by simply rebooting your system. Rebooting the system will give the system a fresh start that it requires to work flawlessly.
2.Restart Windows Explorer
If you can’t afford to restart the system, you can simply restart the ‘Windows Explorer’ process from task manager. This will reboot the Windows Explorer only instead of the complete system. This is a lot quicker as compared to the system reboot. Thankfully plenty of issues like blank taskbar icons issue and start menu icons can be fixed with this solution.
To reboot Windows Explorer, Follow the steps provided below:
1. Press ‘Ctrl+Shift+Esc’. This will quickly open the task manager.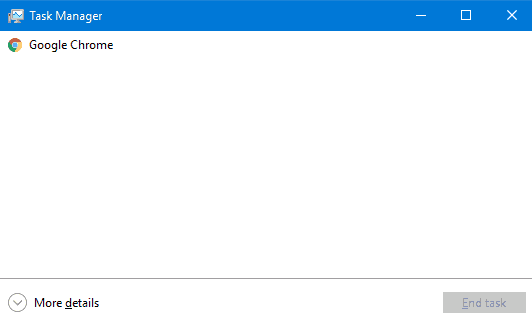
2. Click on ‘More details’ on task manager.
3. After that, head to ‘Processes’ tab. Here you will find all the processes which are currently active.
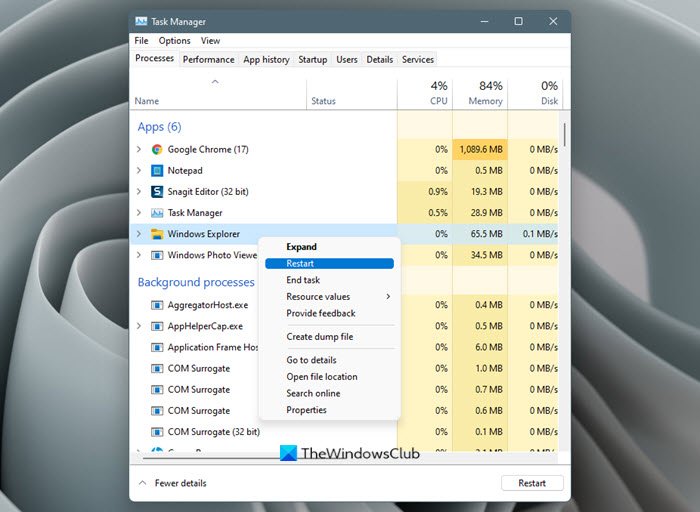
4. Look for “Windows Explorer” in the list of processes.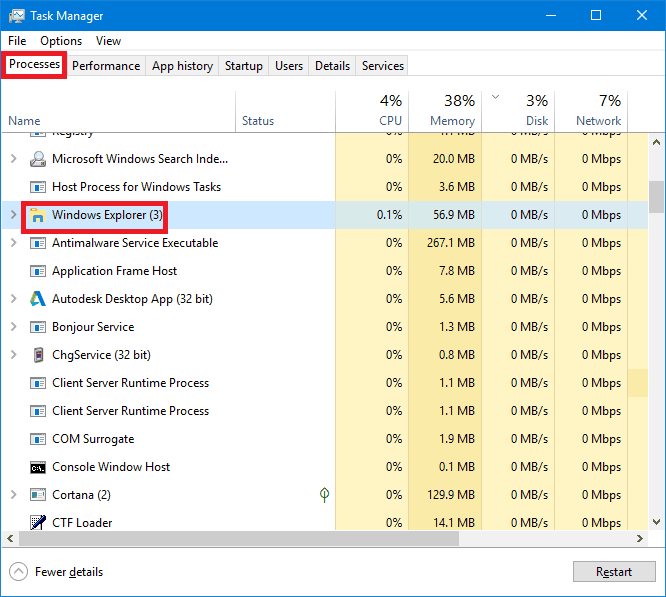
5. Right click on Windows Explorer and click ‘Restart’.
This will restart your Windows Explorer. Make sure to have no operation running in the background to avoid data loss.
3. Update your system
Microsoft takes care of the common windows problems all by itself. All you have to do is head to ‘Update and Security’ tab and click on ‘Check for update’. Windows will check for update and then automatically download and install the update on your system.
4. Use Windows Troubleshooter
If the above steps didn’t work out for you, you can use Windows troubleshooter to analyze and troubleshoot the problem.
To use Windows Troubleshooter for the problem, Follow the steps provided below:
1. Press ‘Windows key+R’. This will open a ‘Run” Window.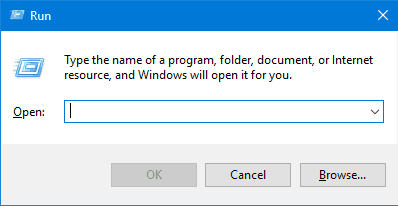
2. Type ‘Control Panel” in the window and hit enter. This will open control panel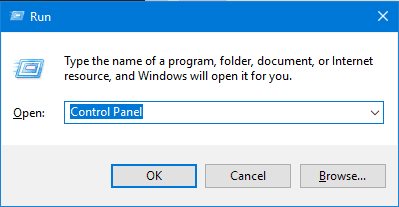
3. In the control panel, set the ‘View by’ option to small and click on ‘troubleshooting’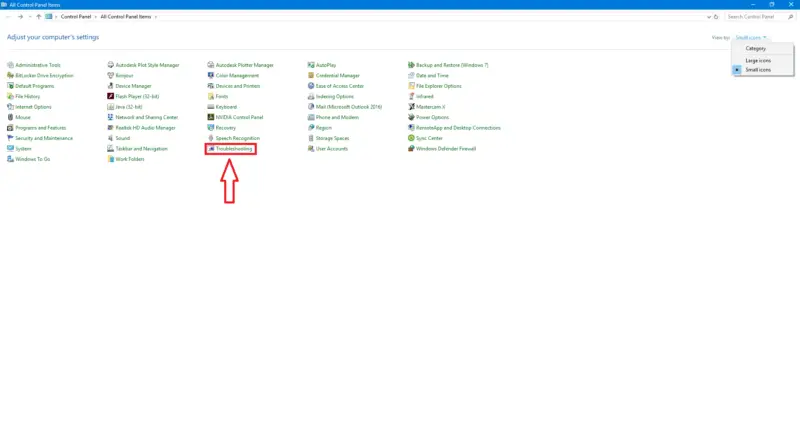
Popular Stories Right now
4. Click on ‘View all” option in troubleshooting window.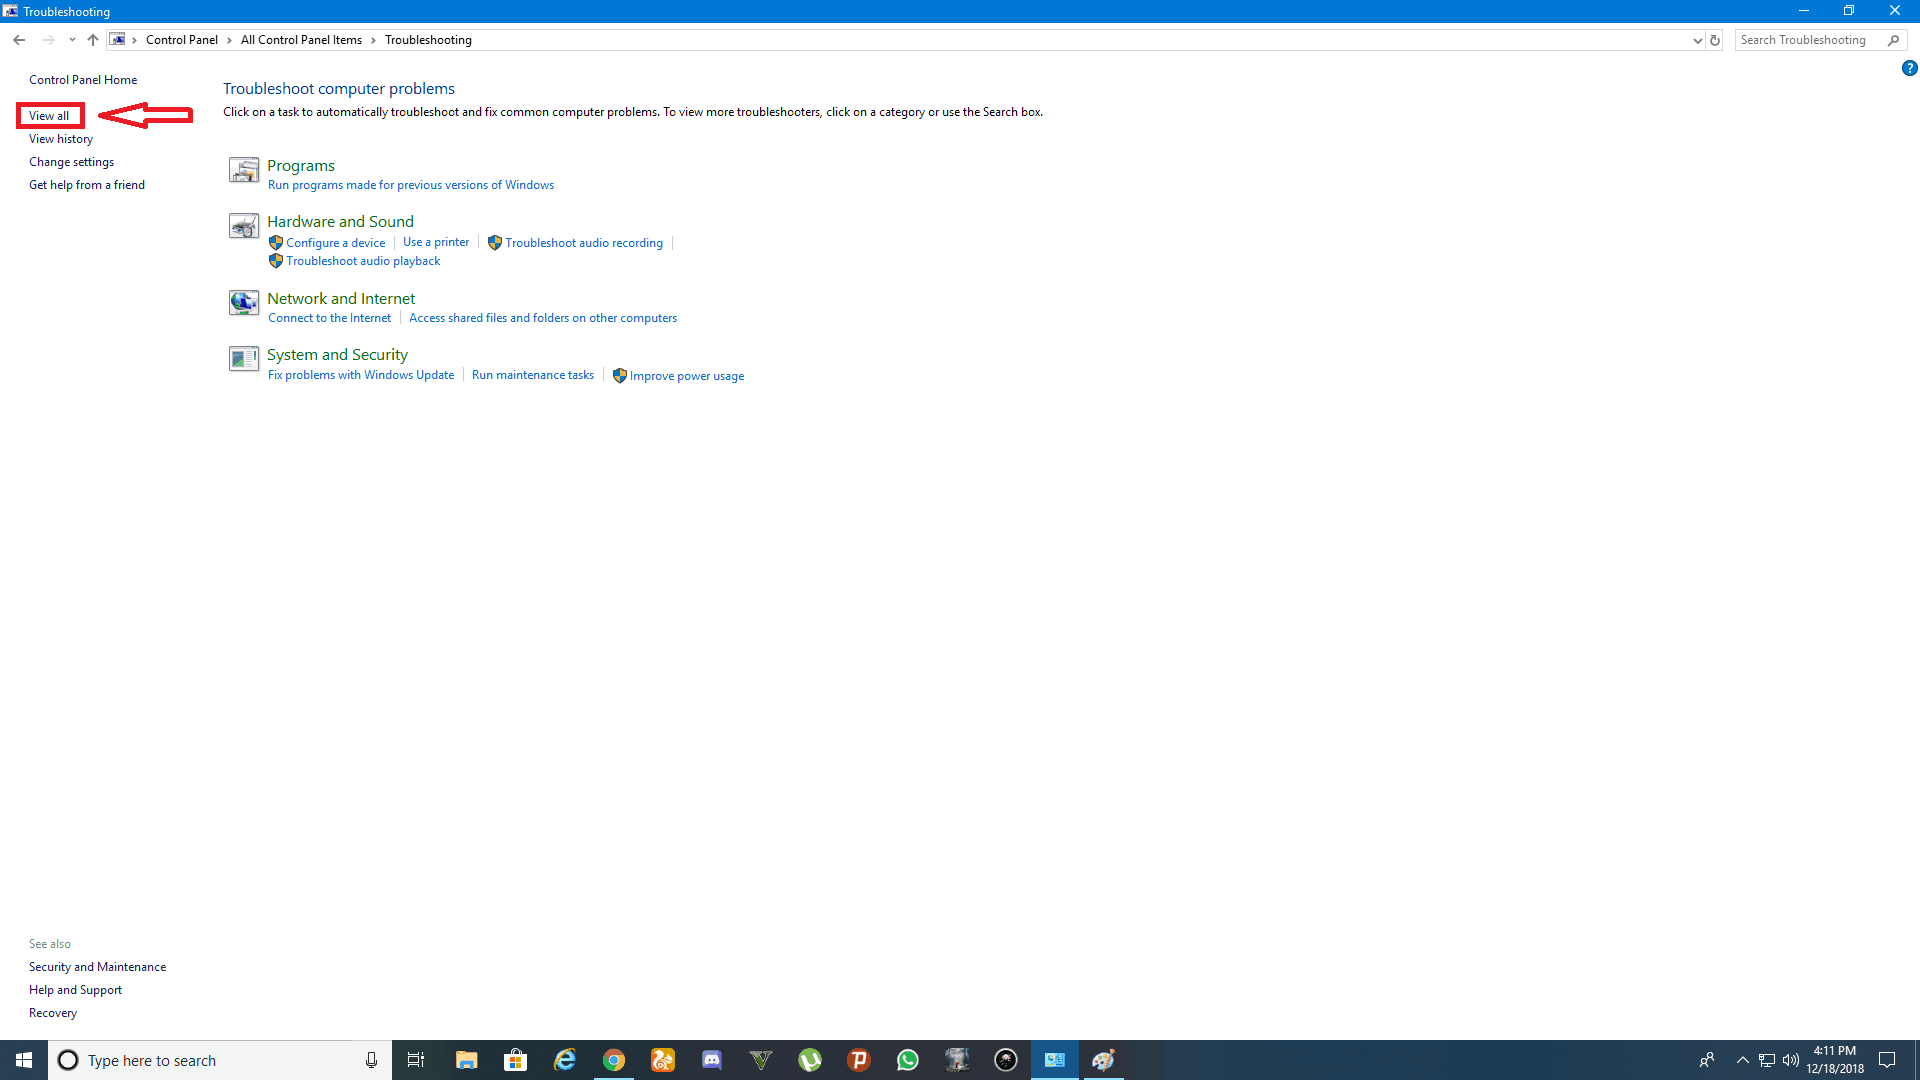
5. Select ‘Search and Indexing’ option from the list.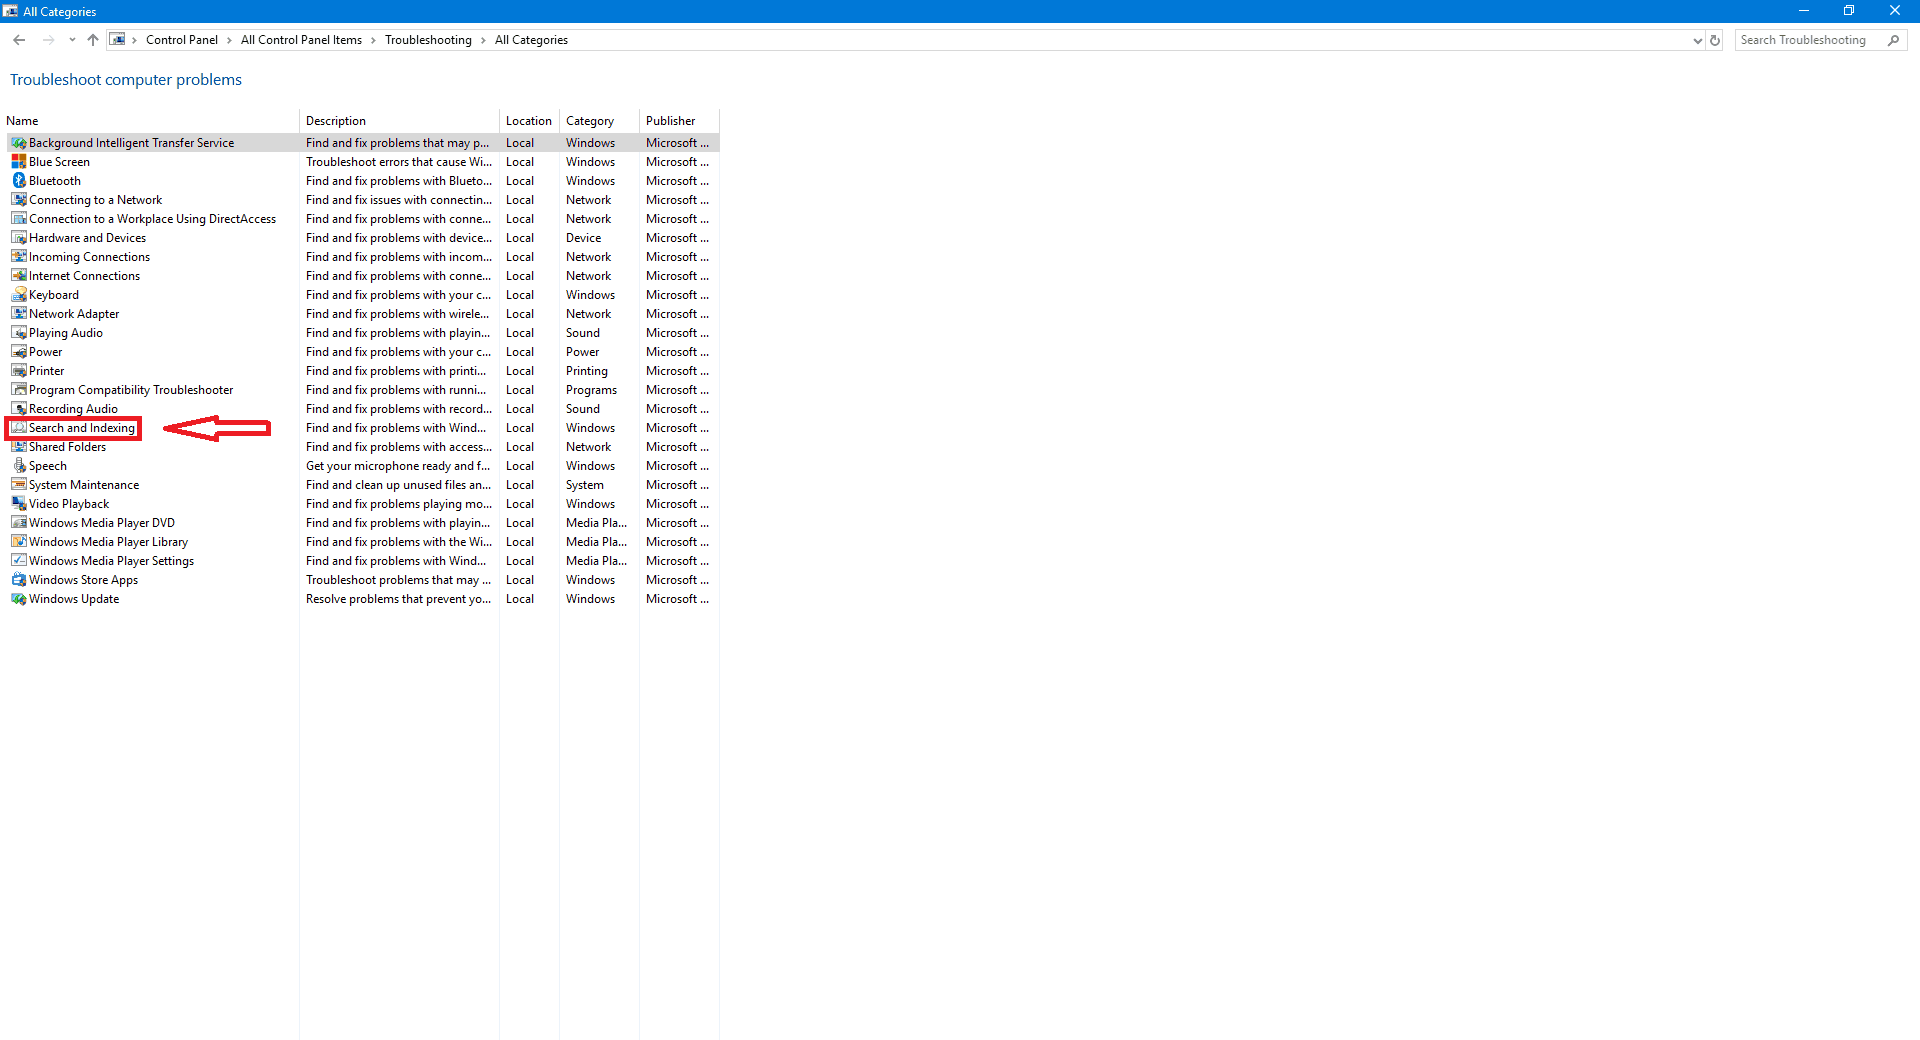
6. Run the troubleshooter. This will identify and solve the problem itself if possible.
5. Disable Third-party Antivirus Programs & Use Windows Defender Instead
Various third-party antivirus programs can also cause this trouble. The third-party antivirus programs have a high impact on RAM usage and have the ability to prioritize the background processes according to requirement. We will suggest you remove/disable the third-party antivirus programs and use Windows Defender instead. Windows Defender is a system integrated software hence it does not require a lot of resources to run. Also, Windows defender his quite developed and powerful in Windows 10 as compared to previous versions.
6. Modify Startup Type of Windows Search Service
Another reason behind this issue could be the startup type of Windows Search Service. In many cases, the Windows Search Service startup type is set to manual. Due to this, Windows doesn’t start the process automatically at the time of boot.
To solve this, follow the steps provided below:
1. Press ‘Windows key+R’. This will open a ‘Run” Window.
2. Type ‘Services.msc’ in the window and hit enter. This will open the services tab.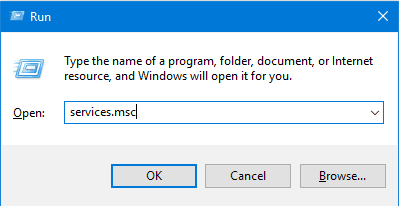
3. Find ‘Windows search‘ in the list of services.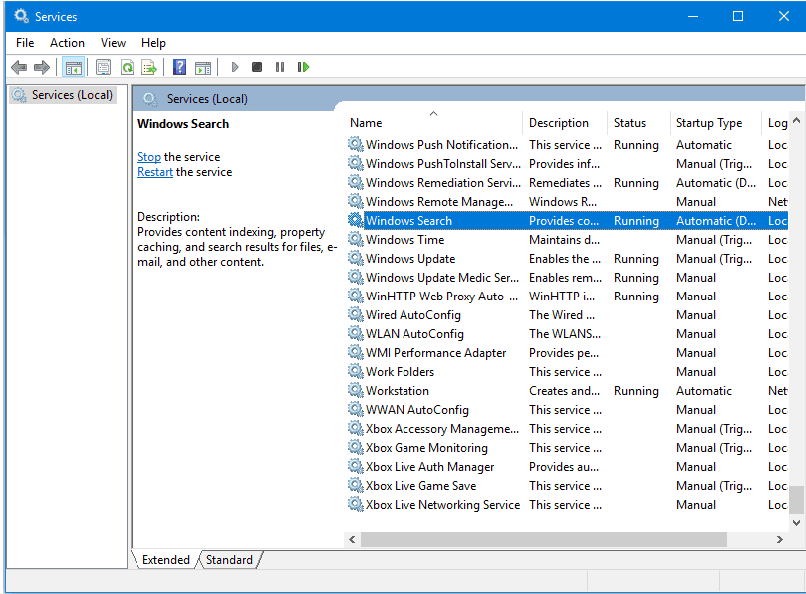
4. Right click on ‘Windows Search‘ and click on ‘Properties’ from the options.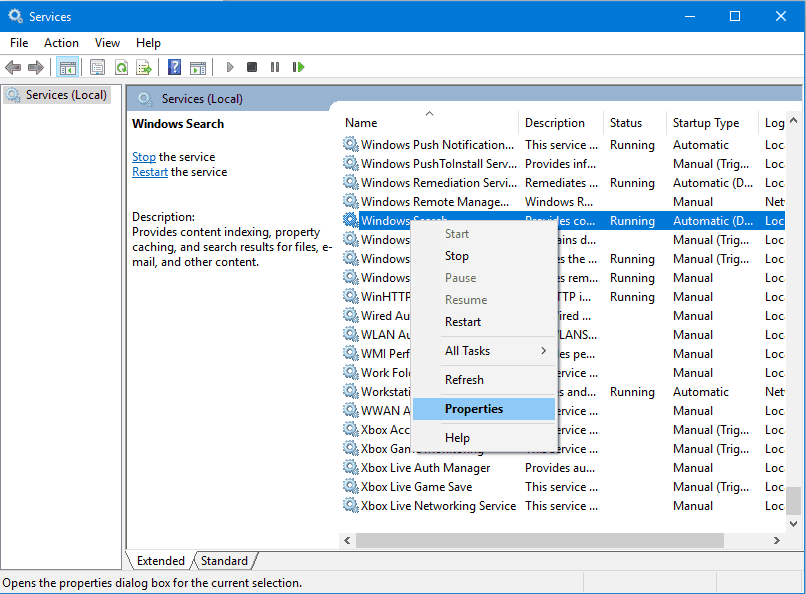
5. In the next window, make sure that the startup type is set to ‘Automatic’ and click ‘Start’ button if available. Then click apply.
This will ensure that the Windows search process begins at the time of boot.
7. Rebuild Your Index
Windows uses indexing to organize all the files and folders generated in the system for the easy search. This process is carried out in the background and generally doesn’t require the user’s attention. However, it is possible that some interference in the indexing procedure may cause an error in index generation. This will relatively affect Windows search service. To resolve the issue, the user has to rebuild the index manually.
To rebuild your index, Follow the steps provided below:
1. Press ‘Windows key+R’. This will open a ‘Run” Window.
2. Type ‘Control Panel” in the window and hit enter. This will open control panel
3. In the control panel, set the ‘View by’ option to small and click on ‘Indexing options’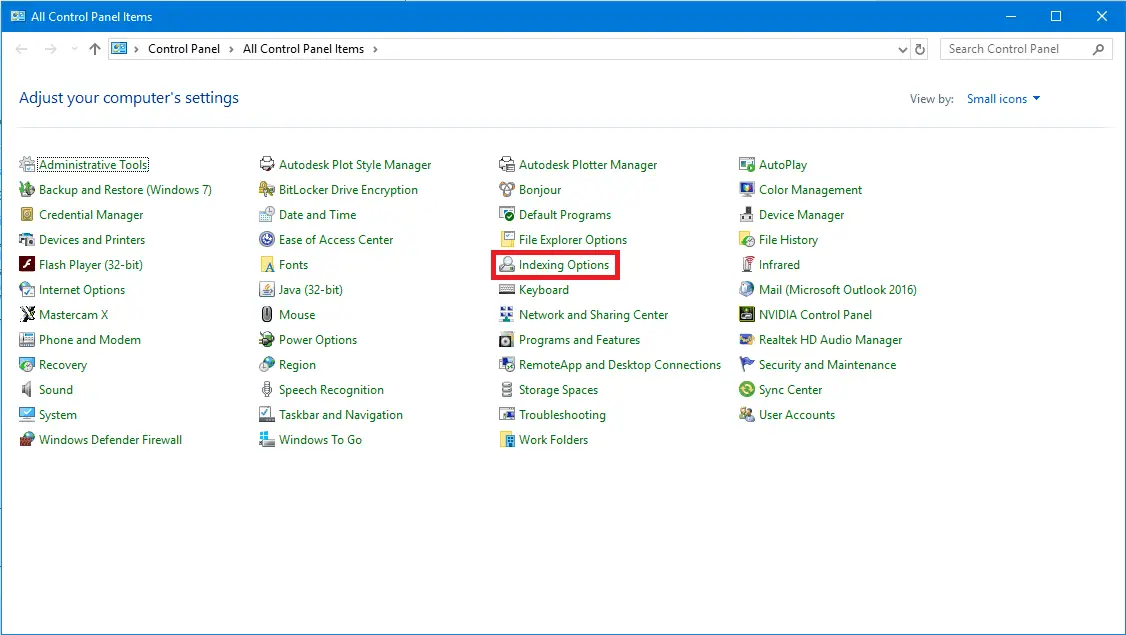
4. In the ‘Indexing Options’ window, click on advanced.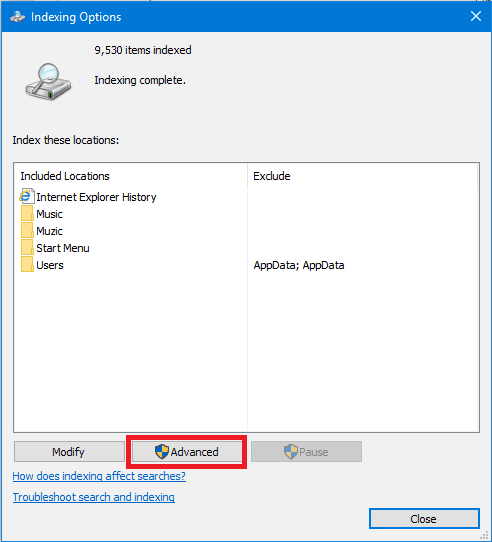
5. Then click on ‘Rebuild’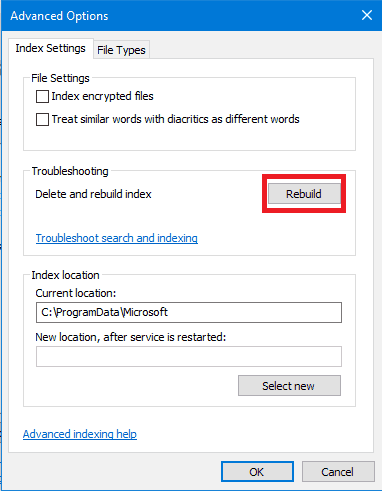
This will delete your previous indexing build and create a new one. This process takes quite some time. Make sure the process is not interrupted by any means to obtain successful results.
By following simple solutions provided above, you can easily solve the problem by yourself. If the above methods don’t help you, you might have to re-install Windows on your system again.
Windows 10 and 11 features a search bar with Cortana integrated right into it for voice search. But many users find that they can’t type in Windows 10/11 search bar when they click on it. The reasons for Search bar error include a glitched service or process, corrupt Cortana installation, and search index corruption. If you face the same issue, try these fixes to resolve the issue and get the search feature working again.
1. Restart Windows Explorer and Cortana Processes
Windows Explorer and Cortana are two crucial processes required by the search feature to work properly. If the search is acting up, you must restart these two processes using Task Manager.
1. Press the Ctrl + Shift + Esc keys at once to open Task Manager.
2. Locate the Windows Explorer process in the list and right-click on it. Select the Restart option from the context menu.

3. Now, find the Cortana process in the list and right-click on it. Select the End Task option.

4. Close the Task Manager.
5. Press the Windows key + C to open Cortana.
2. Configure the Windows Search Service
Windows Search service not running due to a glitch or being disabled could be another reason why you can’t type in the Windows search bar. Here’s how to tweak the service:
1. Press the Windows key + R to open the Run dialog box. Type Services and press Enter.

2. Locate the Windows Search service and right-click on it. Select the Restart option.

3. Close the Services window.
3. Try Search and Indexing Troubleshooter
Windows offers multiple troubleshooters to diagnose and fix operating system features. You can use the Windows Search and Indexing troubleshooter to find the problems with the search bar.
1. Press the Windows key + I to open the Settings app. Navigate to Troubleshoot > Other troubleshooters.
2. Find the Search and Indexing troubleshooter and click on the Run button.

3. Select the Can’t start a search and see results checkbox. Click on Next.

4. Wait for the utility to find and fix issues with the search. Close the troubleshooter window.
4. Rebuild Search Index
An outdated and corrupt search index can result in incorrect or slow search results. Since this feature is related to the search bar, you must rebuild the index manually.
1. Press the Windows key + R to open the Run dialog box. Type control /name Microsoft.IndexingOptions and press Enter.

2. In the Indexing options window, click on the Advanced button.

3. Go to the Troubleshoot section. Click on the Rebuild button next to the Delete and rebuild index option.

4. You will see a popup window. Click on the OK button.

It will take some time to rebuild the index. But you can use your computer while the process completes.
5. Manually Run the CTFMON Process
The CTFMON process manages all the voice and textual input on Windows. If the process is not running, you will be unable to type anything in the Windows search bar. Here’s how to run it manually:
1. Press the Windows key + R to launch the Run dialog box. Type ctfmon.exe and press Enter.

You won’t see any pop-up messages. It will just start the ctfmon utility in the background.
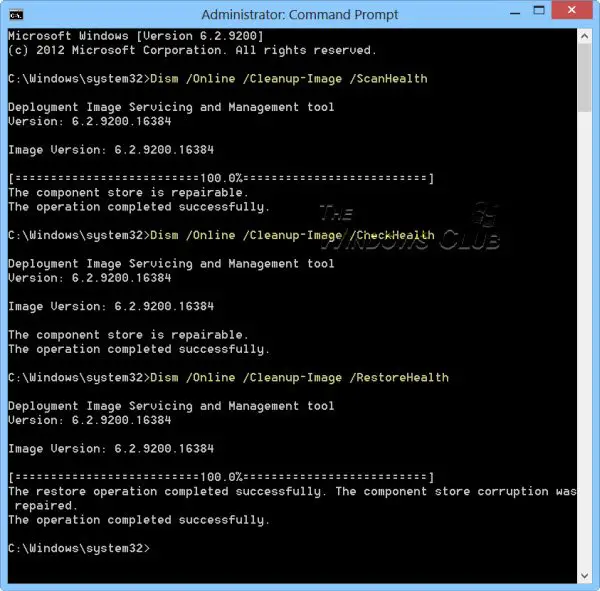
6. Run SFC and DISM Scan
SFC and DISM are inbuilt system tools that can help you fix system file corruption and replace them and also service the component store of Windows. You must run these scans one by one and have internet access. Repeat the following steps:
1. Open Command Prompt with administrator privileges on your PC.
2. Type the following command and press Enter:
DISM.exe /Online /Cleanup-image /Restorehealth3. After that, type the following command and press Enter:
sfc /scannowThese two scans will take a long time to complete.
7. Re-Register System Apps
If the search bar or any other system app isn’t working properly, you can register all system apps in one go with a PowerShell command. It will remove and then add all the system apps on your PC. Here’s how to do it:
1. Press the Windows key + R to launch the Run dialog box. Type powershell and press Ctrl + Shift + Enter keys.

2. User Account Control will pop up. Click on the Yes button.

3. Type the following command and press Enter to execute it:
Get-AppXPackage -AllUsers |Where-Object {$_.InstallLocation -like "SystemApps"} | Foreach {Add-AppxPackage -DisableDevelopmentMode -Register "$($_.InstallLocation)\AppXManifest.xml"} 
4. Close the PowerShell window.
8. Reinstall Cortana
Still can’t type in the Windows Search bar? Many users uninstalled Cortana which enabled them to type into the Windows Search bar again. That’s because Cortana and Search are integrated. You cannot uninstall Cortana using the Settings app, so you must use a PowerShell command instead.
1. Open PowerShell with admin privileges as you did in the previous step.
2. Type the following command and press Enter to execute it:
Get-AppXPackage -Name Microsoft.Windows.Cortana | Foreach {Add-AppxPackage -DisableDevelopmentMode -Register "$($_.InstallLocation)\AppXManifest.xml"} 
3. Close the PowerShell window. Restart your PC and check if the search bar works now.
9. Use System Restore
If all the above methods ended in despair, you can use System Restore to revert to the last known good configuration. This way, you can avoid resetting your Windows PC.
1. Open the Run dialog box, type rstrui.exe, and press Enter.

2. Click on the Next button. Select an appropriate restore point and then follow the on-screen instructions to apply the restore point.

3. Your PC will restart to apply the changes.
10. Try PowerToys
If you are still unable to type in the Windows Search bar, simply install a new and more powerful one.
PowerToys is a free Microsoft app that is also open-sourced. It will supercharge your Windows computer with a number of features including a powerful and universal search bar. Other features include extracting text from anywhere on the fly, finding where the mouse pointer is on the screen, and batch renaming multiple files in one go.
Make Search Bar Work Again
Search is a crucial feature. It cripples your productivity when you can’t type in Windows 10/11 search bar. Begin by restarting the Windows Explorer and Search service. After that run the Search and Index troubleshooter and rebuild the search index. Lastly, re-register system apps, reinstall Cortana, or use System Restore.
Did you know you can now set your Windows Search to Google Search? Try it for it’s fun and productive too.
Abhishek Mishra
Abhishek likes to tinker with operating systems and is always hunting for apps that can improve his Windows and Android experience. He devotes his spare time to keeping track of the latest developments in anime and cinema. But he occasionally goes for short rides if the weather is forgiving enough.
If the Windows Search Bar or icon is not working on your Windows 11/10 PC then this post will help you resolve the issue. Some users have reported when they try to click it or insert text into the search box, nothing happens. Some say that the search box is missing. There are also reports of the search icon becoming too big after a new install. All these annoying issues can be fixed by following these suggestions.
![]()
Why is the Windows Search icon not working?
Search system glitches are the main cause of the Windows search icon not working. These are temporary issues that come after an update or restart. It can also be caused by taskbar settings and configuration. In rare cases, the problem can be caused by corrupt system files or malicious attacks.
If the Windows search bar or icon is not working, is too big, not responding, or it’s missing, use the following solutions to resolve the issue:
- Restart Explorer
- Run Search and Indexing troubleshooter
- Tweak Taskbar settings
- Check for Updates
- Restart Windows Search
- Scan system files
- Rebuild the Windows Search index
- Reset Windows Search
Let us delve into these solutions in detail.
1] Restart Explorer
Restarting the Explorer process on your PC can resolve temporary glitches that may have caused the Windows Explorer, Taskbar and the Search icon not to work.
If this doesn’t resolve the issue, then you can try the next methods in this post.
Read: Windows Search Bar or Icon is missing
2] Run Search and Indexing troubleshooter
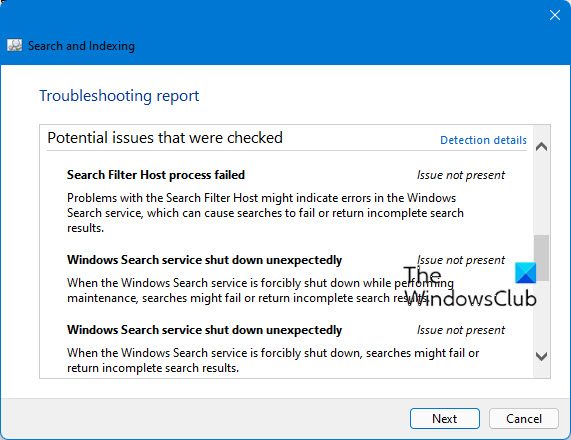
You can use the Windows in-built Search troubleshooter to fix Windows search issues. The tool will find and fix the issues or suggest what you need to do. To run the Search and Indexing troubleshooter, perform the following steps;
- Open Windows Settings and go to Update & Security > Troubleshoot.
- Select Additional troubleshooters and then choose Search and Indexing.
- Click Run the troubleshooter and let the tool find issues automatically. Follow the on-screen directions to complete the process. This depends on what the tool will find.
You may also use Command Prompt to run the troubleshooter by copying and pasting the following command line and then pressing Enter;
msdt.exe -ep WindowsHelp id SearchDiagnostic
3] Tweak Taskbar settings
![]()
If the Windows 10 Search icon is too big, most probably it’s because you haven’t enabled the small taskbar icons.
Right-click on an empty space on the Taskbar and select Taskbar settings. Locate and toggle on the button next to Use small taskbar icons. For Windows 11 users, you may need to enable the search icon if it’s missing. Open the Settings app and go to Personalization and select the Taskbar option. On the left side, locate the Search Windows option and toggle on the button next to it to enable the search icon.
Windows 11 users may use this method to show Small Taskbar Icons. You will have to use the Registry.
4] Check for Updates
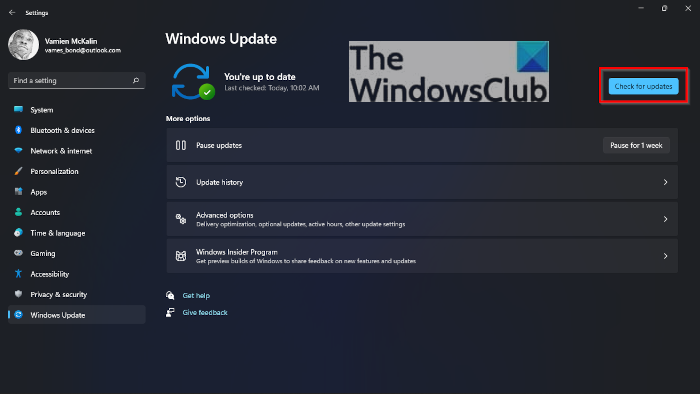
Windows search feature may have issues because your Windows system is not up-to-date. So update your Windows manually and see.
5] Restart Windows Search
![]()
Restarting Windows Search process ensures that you end the SearchUI process and initiate a new one on the restart. This will ensure that the search process starts afresh and restore the icon on the taskbar. Follow the steps below to restart Windows Search.
- Open Windows Task Manager by pressing Ctrl + Alt + Delete and choose Task Manager.
- Go to Details > Name, then right-click SearchUI.exe, and click End Task. You will get a prompt; select End process.
6] Scan system files
Sometimes, corrupted system files may be the reason why the Windows search icon is not working. To fix these files you need to run the System File Checker and the DISM tool in the Command Prompt.
7] Rebuild the Windows Search Index
![]()
The search index is crucial as Windows relies on it to deliver search results for users. If the index has issues, it may cause the search icon not to work. To fix this, we need to rebuild the Windows search index and see if the problem is resolved. Follow the steps below:
- Open Windows Settings and go to Search > Searching Windows.
- Scroll down, locate, and click on Advanced Search Indexer Settings.
- A new small Indexing Options window will pop up. Click Advanced and click on Rebuild.
- You will get a prompt to confirm your action; select OK to continue. Click OK and follow the on-screen directions to complete the process. It takes a longer time to finish this method.
For Windows 11 users, open Settings and go to Privacy & Security > Searching Windows > Advanced indexing options > Indexing Options > Advanced > Rebuild > OK.
8] Reset Windows Search
![]()
Resetting Windows Search may also fix the search icon if it is missing, not working, or too big than expected. We can use PowerShell to reset Windows Search. First, download the reset Windows search PowerShell script here at microsoft.com. Right-click on the script and choose Run with PowerShell. Follow on-screen directions to complete the process.
We hope one solution works for you.
Read: Icons not showing in Windows Search Box
Why can’t I type in the search bar Windows 10?
If you can’t type in the Windows search bar, then there could be a problem with a bug that can be resolved by restarting your PC. If the problem persists, consider restarting Explorer or your PC, updating your Windows OS, or resetting Windows Search, among other solutions, we discussed in this post.
Read: How to clear or disable Taskbar Search Box History in Windows
Why is my search bar suspended?
Your search bar may be suspended due to the SearchUI.exe error in Windows 11 or Windows 10. The reasons behind this error are glitches or background apps that mess up related processes. To fix a suspended search bar, run the Search and Indexing troubleshooter, restart Explorer and update Windows OS.
The Windows Start Menu search used to be simple. Things got a bit messy in Windows 10. Then Windows 11 came along with a subtle interface and a solid search process that integrates with Microsoft services and can show you results from OneDrive, Outlook, SharePoint, and others.
Although the Start menu search is much more stable and less bloated, it can sometimes stop working. Here are some tips to permanently fix the Windows Start Menu not working.
Content
- 1. Disable Processes through Task Manager
- 2. Reinstall the Start Menu
- 3. Roll back the Windows update
- 4. Enable/disable background apps
- 5. Rebuild the search index
- 6. Run Windows troubleshooter
- 7. Use the System File Checker (SFC)
- 8. Disable/restart third-party Antivirus or Windows firewall
- 9. Move or rebuild the swapfile.sys
- 10. Restart the Windows search service
- 11. Restart Windows Cortana
- 12. Disable Windows search integration with Microsoft Bing
- 13. Repair Windows installation
- 14. Use «Everything» instead
- Frequently Asked Questions
Tip: Tired of seeing ads in Windows? Learn how to disable Microsoft ads in Windows.
1. Disable Processes through Task Manager
It goes without saying that the first thing you should try is rebooting your PC. But if that fails, it’s worth checking your Task Manager to see if you can restart the search process in other ways.
- Right-click on the «Start Menu» and open «Task Manager.»

- Click «More details» in the bottom left corner to get the full view.

- Go to the «Processes» section, right-click on «Windows Explorer,» and select «Restart.»

Note: Have a moment of panic as it looks for a second that your computer might crash, then breathe a sigh of relief as you see that it’s still working and your Start menu search button is hopefully fixed!
If that didn’t help, you could target the search app specifically:

Check if the Start Menu search function works now. If not, move on to the following fixes.
2. Reinstall the Start Menu
There is a way to reinstall the Start menu, which will also reinstall other Windows apps you may have uninstalled. Don’t get surprised if you see a few new apps after this.
- Right-click on your «Start Menu» and open «Windows Terminal (Admin).»

- Confirm the UAC prompt by clicking «Yes.»

- Once in «PowerShell,» paste the following command and press Enter:
Get-AppXPackage -AllUsers | Foreach {Add-AppxPackage -DisableDevelopmentMode -Register "$($_.InstallLocation)\AppXManifest.xml"}

- Wait until it finishes, and reboot your computer.

Check if the Start Menu search function works now. If not, move on to the next fix.
Find out more: about the «You Don’t Currently Have Permission to Access This Folder» error in Windows, and how to fix it.
3. Roll back the Windows update
It’s often the case that the Start menu search bar can stop working after a Windows update. Although some solutions can fix the issues with the new Windows update, if you want to play things safe, you should undo the latest update you installed.
Here’s how to roll back the Windows update:
- Right-click on your «Start Menu» and open «Settings.»

- Navigate to «Windows Update» and click «Update history.»

- Select «Uninstall updates.»

- Select the desired update, and hit «Uninstall.»

4. Enable/disable background apps
Ever since the Creator’s Update back in 2017, there have been issues affecting some Windows users involving background apps. Specifically, enabling or disabling some apps in Windows could have unintended effects on rendering the Start menu search function.
- Right-click on your «Start Menu» and open «Settings.»

- Navigate to «Apps «and select «Apps & features.»

- Find the desired app from the list, click the «Ellipses» icon, and hit «Advanced options.»

- Open the drop-down under «Background apps permission,» and select the preferred option.

Tip: Taskbar icons missing in Windows? Here the fixes.
5. Rebuild the search index
There’s a possibility that the search indexing files in your Windows have become corrupted, therefore disabling the search function. Some people have reported this problem since Windows 10 and the following as a possible solution.
- Right-click on your «Start Menu» and open «Run.»

- Type «Control» in the search bar and hit «OK.»

- Once the «Control Panel» opens, select «Category» and change it to «Large icons.»
- Find and open «Indexing Options» from the list.

- Click on «Advanced» when the Indexing Options appear.

- Select «Rebuild» from the following window.

- Confirm the process by hitting «OK.»

6. Run Windows troubleshooter
The simplest solution is to use the tools built into Windows to help you out. Granted, this is far from a 100 percent solution, but it’s quick and worth a shot.
- Right-click on your «Start Menu» and open «Settings.»

- Navigate to «System» and select «Troubleshoot.»

- Pick «Other troubleshooters» in the following window.

- Locate «Search and Indexing» from the list and hit «Run.»

- Follow the on-screen guideline to find and resolve possible indexing issues.

Tip: When the Windows troubleshooter is not working, learn how you can troubleshoot it.
7. Use the System File Checker (SFC)
The System File Checker (SFC) is a built-in utility in Windows devices capable of scanning and restoring corrupted installation files.
- Right-click on your «Start Menu» and open «Windows Terminal (Admin).»

- Confirm the UAC prompt by clicking «Yes.»

- Once in «PowerShell,» paste the following command and press Enter:

- Reboot your computer when the process finishes.

Note: Running the SFC scan in Windows Safe Mode could solve the problem for you if doing it in regular Windows 10 fails.
8. Disable/restart third-party Antivirus or Windows firewall
We’re not suggesting you disable and remove all third-party antivirus software from your device. However, based on feedback here and across the Internet, specific programs cause Windows Search to malfunction.
Here’s how to enable/disable the Windows firewall:
- Right-click on your «Start Menu» and open «Run.»

- Type «Control» in the search bar and hit «OK.»

- Open «System and Security» on Control Panel.

- Select «Windows Defender Firewall» from the following window.

- From the left-side panel, select «Turn Windows Defender Firewall on or off.»

- Select «Turn off Windows Defender Firewall (not recommended)» under «Private network settings,» pick «Turn off Windows Defender Firewall (not recommended)» under «Public network settings,» then select «OK.»

Note: Windows search and indexing are oddly sensitive to your security settings, so tinkering around with them may yield results. Additionally, try enabling/disabling your Antivirus software using the program’s support guidelines.
9. Move or rebuild the swapfile.sys
The Pagefile and Swapfile are two inextricably linked and essential functions of Windows. Pagefile relieves the weight from your RAM by allocating a certain amount of hard drive space to function as RAM. Swapfile performs the same function but specifically for modern Windows apps, so it’s more targeted.
- Right-click on your «Start Menu» and open «Settings.»

- Navigate to «System» and select «About.»

- Click «Advanced system settings» from the following window.

- Go to the «Advanced» tab, and hit «Settings» under «Performance.»

- Go to the «Advanced» tab, and hit «Change.»

- Uncheck the option for «Automatically manage paging file size for all drives,» pick the desired disk from the list, click «Custom size,» enter the «Initial size (MB)» and «Maximum size (MB),» then select «OK.»

10. Restart the Windows search service
Another reason your Start menu search may not work is that the Windows Search service is not running. Windows Search service is an internal service that runs automatically on the system startup.
Here’s how to restart the Windows search service:
- Right-click on your «Start Menu» and open «Run.»

- Type
services.mscin the search bar and hit «OK.»

- Right-click on «Windows Search» from the list and hit «Restart.»

- Right-click on «Windows Search» once more and hit «Properties.»

- While on the «General» tab, set the «Startup type» to «Automatic» or «Automatic (Delayed Start),» then hit «OK.»

Do you know: There are multiple ways you can perform a search in Windows.
11. Restart Windows Cortana
Although Cortana is a powerful voice assistant on Windows 10 and 11, it integrates with the search function and could often cause issues.
Accordingly, you can restart Cortana (or even disable it if you don’t use it often) to ensure it doesn’t stand in the way of Windows search.
- Right-click on the «Start Menu» and open «Task Manager.»

- Then click «More details» in the bottom left corner to get the full view.

- Go to the «Processes» tab, right-click on «Cortana,» and select «End Task.»

12. Disable Windows search integration with Microsoft Bing
Windows 10 and 11 send your search information to Microsoft servers, which return results from Bing cloud search services.
However, if the cloud services fail to respond, you can fix the issues by disabling the integration between Windows Search and Microsoft Bing.
- Right-click on your «Start Menu» and open «Run.»

- Type
regedit.exein the search bar and hit «OK.»

- Once the Registry Editor opens, go to the following address and double-click on «BingSearchEnabled:»
HKEY_CURRENT_USER\SOFTWARE\Microsoft\Windows\CurrentVersion\Search\

- Change the parameters to «0» and click «OK.»

- Reboot your computer when the process finishes.

Tip: If you don’t like Bing, you can also prevent all Windows links from opening in Edge and Bing.
13. Repair Windows installation
Before you start worrying that this will delete all your data and files, there’s a way to refresh your Windows installation while keeping your vital data. It’s still a more extreme measure than others on this list, so try other solutions before opting for this one.
- Create a bootable Windows installation disk or USB, then launch it.
- Follow the instructions to upgrade your Windows and ensure to choose «Keep personal files and apps» under «Change what to keep.»

- Click «Install» and wait until the process finishes.

14. Use «Everything» instead
The Everything app is a far more in-depth search option than Windows’ in-built option. It indexes your drive faster, its search method works by eliminating and filtering search terms as you type, so you’re literally ‘narrowing down’ your search, and it’s super-lightweight at 0.5MB, with a minimal interface that shows you everything you need.
Here’s how to download and install Everything on Windows:
- Go to VoidTools and click «Download Installer.»

- Install the downloaded file and enjoy.

If you still need help with the Windows Start Menu search, contact Microsoft’s official support line for further assistance.
Having problems with the Photos app in Windows 10? We can fix that, too. Or for something a little more cheery, check out our list of new and retro Windows 10 screensavers.
Frequently Asked Questions
How do I fix the black Search bar on Windows?
Right-click on the «Start Menu» and open «Task Manager.» Then click «More details» in the bottom left corner to get the full view. Go to the «Processes» tab, right-click on «Search,» and select «End Task.» This will restart the Search bar and possibly fix your issue if it’s not something serious like missing system files.
Why can’t I type in the Windows Search bar?
The typing issue often surfaces due to corrupt system files, and the best way to fix it is to update your OS. Just right-click on the «Start Menu» and open «Settings.» Navigate to «Windows Update» and install the latest updates.
How do I activate the Search function in the Windows Start menu?
You can enable/disable items on your Taskbar through its settings. Just right-click on an empty part of your Taskbar and select «Taskbar Settings.» On the following window, turn on the toggle next to «Search.»

As a technophile, Farhad has spent the last decade getting hands-on experience with a variety of electronic devices, including smartphones, laptops, accessories, wearables, printers, and so on.
When he isn’t writing, you can bet he’s devouring information on products making their market foray, demonstrating his unquenchable thirst for technology.
Subscribe to our newsletter!
Our latest tutorials delivered straight to your inbox