Download Windows Speedup Tool to fix errors and make PC run faster
If you have enabled Windows Sandbox on your Windows 11 or Windows 10 computer, you can configure & manage a sandbox on your device using the Sandbox Configuration Manager. In this post, we will show you how to transfer Files to Windows Sandbox in Windows 11/10.
To get the most out of the sandbox, with the Windows Sandbox running, you can easily transfer files. As a security precaution, you might want to transfer an application’s exe file from the host machine to Windows Sandbox to test that application. By copying or transferring, you can install and execute the application in the sandbox.
If you need to copy, move, or get files into Windows Sandbox on your Windows 11/10 machine, you can do so in either of two ways as follows:
- Copy and Paste into Windows Sandbox
- Map a shared folder to Windows Sandbox
Let’s see both of the aforementioned methods in detail.
1] Copy and Paste into Windows Sandbox
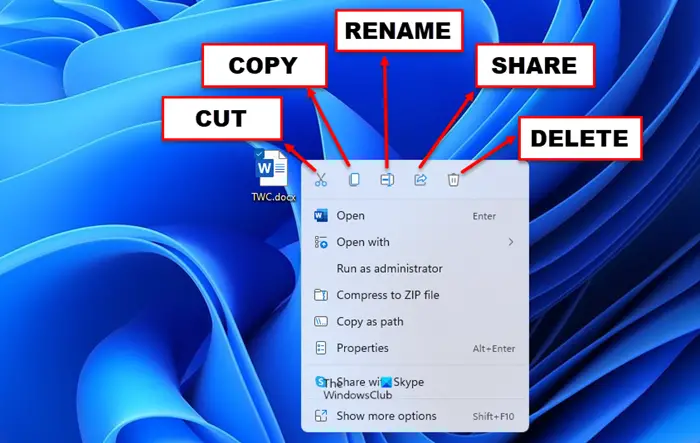
The good old copy and paste is the easiest and quickest way to transfer files to Windows Sandbox in Windows 11/10. To transfer a file from your main Windows operating system (the Host), simply right-click on a file you want to transfer and select Copy, then go into the Windows Sandbox (the Guest) and right-click on the desktop and click on Paste to transfer the file. Likewise, you can transfer files from the Sandbox to the main OS.
The drawback or disadvantage of this easy method is that the transferred files are deleted as soon as you close or shut down the Windows Sandbox.
2] Map a shared folder to Windows Sandbox
In contrast to the above, with this method, the transferred files are persistent – which means the files will be always available in the sandbox. For this method, you have to map a Shared folder with Windows Sandbox. Once done, you can then transfer the target file or folder to the shared folder, and you can access it from the Windows Sandbox.
To map a shared folder to Windows Sandbox on Windows 11/10, you simply need to create a Windows Sandbox configuration file – here’s how:
- On the host OS, press Windows key + E to open File Explorer.
- In File Explorer, in the root directory, create a new folder and name the folder WS Config Files.
- Next, double-click the new folder to open it.
- In the open folder, right-click and select New > Text Document and name the file, say, MappedFolders.wsb (or any preferred name but must have the .wsb extension).
- Next, right-click the WSB file and select Open with > Notepad or any Text Editor.
- Now, copy and paste the code below into the Notepad. Replace the C:\Path\to\Folder placeholder with the actual path of the folder you want to share or map.
<Configuration>
  <MappedFolders>
    <MappedFolder>
      <HostFolder>C:\Path\to\Folder</HostFolder>
      <ReadOnly>false</ReadOnly>
    </MappedFolder>
  </MappedFolders>
</Configuration>
- Finally, save the file and exit Notepad.
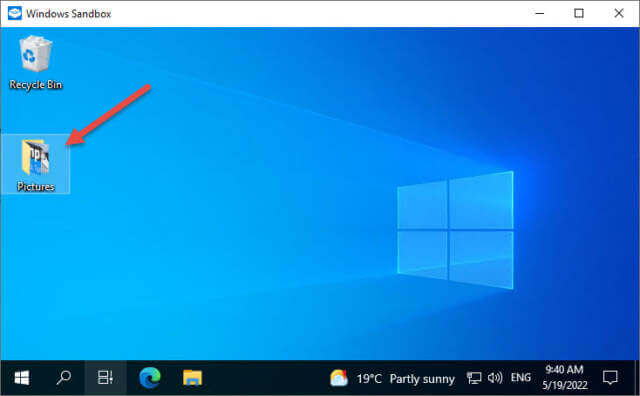
Now, double-click on the MappedFolders.wsb file to launch Windows Sandbox. In the sandbox, you will see the shared folder directly on the Desktop because Windows Sandbox mounts shared folders directly on the desktop and not in the Network node in File Explorer navigation pane.
On a final note, if you launch Windows Sandbox directly from the Start menu, you will not see the shared folders. So, to access the shared folders in Windows Sandbox, you have to launch the folder using the configuration file.
You can read more about the Windows Sandbox Config Files here on microsoft.com.
That’s it!
Where does Windows Sandbox store files?
Behind every Hyper-V based VM there is a VHDx file, a virtual disk that is used by the machine. The working folder of an actively running sandbox can be accessed in the following location %PROGRAMDATA%\Microsoft\Windows\Containers.
What can you do with Windows Sandbox?
In a nutshell, Windows Sandbox is a half app, half virtual machine. It lets PC users quickly create a live virtual clean OS imaged from your system’s current state so that you can test programs or files in a secure environment that’s isolated from your main system. When you close the sandbox, it destroys that state.
Can you get a virus in Windows Sandbox?
But while malware executed within the sandbox cannot directly access the drives of the primary operating system, it can still communicate with other devices on your network. Because of this, Windows Sandbox is unable to provide network-level isolation. Sandbox can prevent viruses/malware from escaping into your real computer. However, common sense dictates that it is preferable to prevent the virus from running in the first place.
Is Windows Sandbox completely isolated?
While fully isolated in terms of code execution, Windows Sandbox doesn’t provide network isolation. Malware can access and attack other devices accessible by the host, even if behind a Network Access Control (NAC). So, it’s imperative to point out that Windows Sandbox is not completely isolated. Windows Sandbox runs as a virtual machine and its contents are destroyed when you shut it down.
Obinna has completed B.Tech in Information & Communication Technology. He has worked as a System Support Engineer, primarily on User Endpoint Administration, as well as a Technical Analyst, primarily on Server/System Administration. He also has experience as a Network and Communications Officer. He has been a Windows Insider MVP (2020) and currently owns and runs a Computer Clinic.

В этой инструкции подробно о том, как включить (установить) песочницу Windows 10, о возможных настройках, а также некоторая дополнительная информация, которая может оказаться полезной. На всякий случай отмечу, что функция доступна только начиная с Windows 10 версии 1903 в Профессиональной и Корпоративной редакциях, но при желании, включить песочницу можно и в Windows 10 Домашняя. Также может быть полезным: Использование бесплатной песочницы Sandboxie для запуска программ в изолированной среде.
Установка песочницы Windows 10 (Windows Sandbox)
Для установки песочницы в Windows 10, при условии, что ваша система соответствует указанным выше параметрам, достаточно выполнить следующие действия:
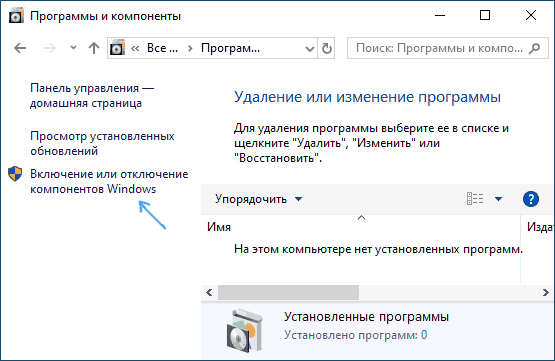
- Откройте панель управления (для этого можно использовать поиск в панели задач или нажать Win+R и ввести control), переключите вид панели управления на «Значки», а затем откройте пункт «Программы и компоненты».
- В меню слева нажмите «Включение и отключение компонентов Windows».
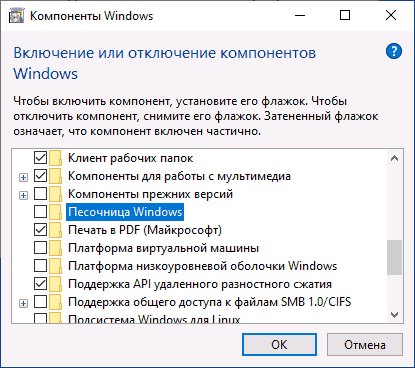
- В списке компонентов найдите «Песочница Windows» и включите его.
- Нажмите Ок, дождитесь завершения установки и перезагрузите компьютер.
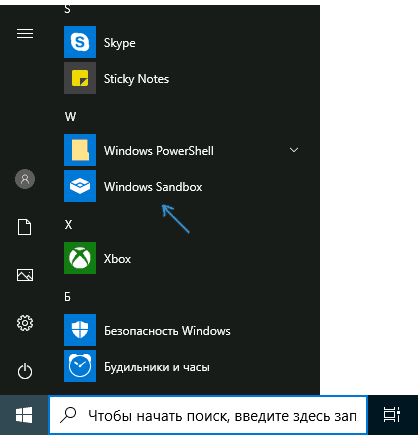
- На этом Windows Sandbox установлен и готов к работе: соответствующий пункт появится в меню «Пуск».
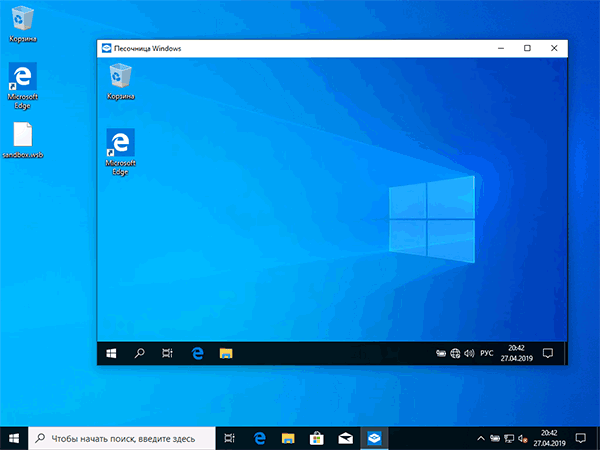
- При запуске песочницы запускается чистая виртуальная машина Windows 10 с доступом к сети и возможностью безопасно запускать практически любые программы внутри (доступа к вашим программам и файлам по умолчанию нет).
В случае если пункт «Песочница Windows» неактивен, а при наведении на него указателя мыши вы видите сообщение «Не удается установить Песочницу Windows: у процессора нет требуемых возможностей виртуализации», это может говорить о том, что в БИОС/UEFI отключена виртуализация или ваш компьютер оснащен недорогим процессором без поддержки виртуализации.
Для включения виртуализации в БИОС, при наличии функции, найдите пункт VT-x (Intel Virtualization Technology) или AMD-v в параметрах (обычно в Advanced Configuration) и включите его (установите в Enabled), затем сохраните сделанные изменения и перезагрузите компьютер.
Настройки Windows Sandbox
После запуска Песочница Windows — это чистая система, без доступа к вашим файлам в основной системе (что может быть нужно), зато с доступом к сети (что представляет потенциальную опасность). При необходимости, вы можете настроить поведение Windows Sandbox с помощью специальных файлов конфигурации, представляющих собой обычный текстовый файл XML с расширением .wsb. Таких файлов может быть несколько: в зависимости от того, с какими параметрами требуется запустить песочницу, запускаете нужный файл. Обновление: появилась утилита для автоматического создания файлов конфигурации, подробно: Настройка Песочницы Windows 10 в Sandbox Configuration Manager (Sandbox Editor).
Содержимое файла должно начинаться с <Configuration> и заканчивать </Configuration>, а среди доступных параметров, которые указываются внутри этих тегов есть следующие.
Отключение доступа к сети:
<Networking>Disable</Networking>
Отключение доступа к виртуальному графическому адаптеру (изображение не исчезнет, но исчезнут функции ускорения графики):
<VGpu>Disable</VGpu>
Проброс папок с основной системы в песочницу Windows (параметр ReadOnly задает доступ только для чтения, при указании False возможна будет и запись):
<MappedFolders>
<MappedFolder>
<HostFolder>Путь_к_папке_в_системе</HostFolder>
<ReadOnly>True</ReadOnly>
</MappedFolder>
</MappedFolders>
Подключенные папки будут отображаться на рабочем столе (также возможен доступ по пути C:\Users\WDAGUtilityAccount\Desktop\Имя_папки внутри песочницы).
Запуск команды при открытии песочницы:
<LogonCommand>
<Command>какая_либо_команда</Command>
</LogonCommand>
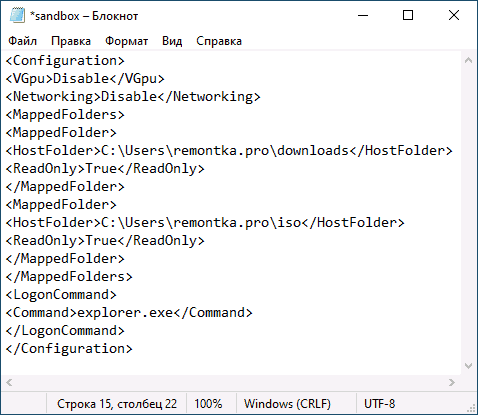
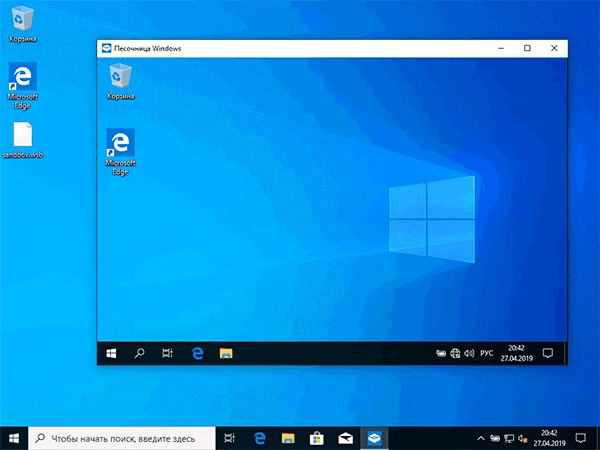
Все эти параметры можно компоновать в рамках одного файла конфигурации .wsb, который можно создать с помощью любого текстового редактора, даже встроенного «Блокнота» (при его использовании в диалоге сохранения в поле «Тип файла» выберите «Все файлы» и при сохранении укажите расширение .wsb). На скриншоте ниже — пример такого файла конфигурации.
В этом файле отключается доступ к сети и GPU, подключаются две папки с основной машины и при входе запускается Проводник.
Видео по установке и настройке Песочницы
Дополнительная информация
Дополнительные нюансы, которые могут быть полезны:
- Между основной системой и песочницей Windows работает буфер обмена, с помощью которого вы можете легко «передать» файлы в Sandbox без создания wsb файлов конфигурации.
- Каждый раз при закрытии песочницы всё её содержимое очищается. При необходимости сохранять результаты работы, используйте общие папки.
- Как уже было отмечено выше, невозможность включить песочницу Windows (неактивна в компонентах) связана с отключенной виртуализацией или с отсутствием её поддержки процессором.
- Ошибка 0x80070002 «Не удается найти указанный файл» при запуске песочницы может говорить о разных проблемах. В первую очередь, на финальном релизе с этим столкнулись владельцы ОС на языке, отличном от английского и Майкрософт обещает это исправить. Обновление: ошибка исправлена в обновлении KB4512941. Самостоятельное исправление (уже не актуально): установить английскую ОС, а уже затем на нее русский языковой пакет.
Need to copy, move, or get files into Windows Sandbox? It is pretty straightforward. Here is how to transfer files to the Windows sandbox.
If there is one feature that I’m glad Microsoft added to Windows 10 and 11 is the Windows Sandbox. As the name implies, Windows Sandbox is a simple yet effective way to test Windows settings, configurations, and trusted or untrusted applications.
To get the most out of the sandbox, you should be able to transfer files to Windows Sandbox. For example, you might have to transfer an application’s exe file from the host machine to Windows Sandbox to test that application. Copying or transferring a file helps you install and execute the application in the sandbox.
However, to make Windows Sandbox as secure as possible, there are limited ways to transfer files to and from Windows Sandbox. The good thing is, if you want to move files to Windows Sandbox or get files into Windows Sandbox, it is pretty easy to do.
Let me show you how to transfer files to Windows Sandbox in simple and easy steps.
Table of contents:
- Copy and paste to transfer files
- Use a Windows Sandbox configuration file
- What is Windows Sandbox?
Note: The steps below will work in Windows 10 and 11.
Note: I assume you have already enabled Windows Sandbox. If not, enable Windows Sandbox and then follow the below steps.
Copy and paste to transfer files to Windows Sandbox
One of the easiest ways to transfer files to Windows Sandbox is copying and pasting. i.e., copy the file or folder you want to transfer and paste it into the sandbox. It is that simple. Of course, you can copy and paste multiple files at a time.
Here are the exact steps if you need more guidance.
First, open the Windows Sandbox. You can search for it in the Start menu.
After opening the Windows Sandbox, copy the file or folder you want to transfer with the “Ctrl + C” keyboard shortcut.
Next, go to the Windows Sandbox desktop and paste it with the “Ctrl + V” keyboard shortcut. Depending on the file or folder size, it can take a couple of seconds to transfer. Once done, you will see it on the sandbox desktop.
Remember that the transferred file or folder is deleted from the sandbox environment when you close the Windows Sandbox. This is because Windows will revert all changes made to the sandbox environment when you close it. This includes deleting files or folders you created or transferred. If you want the transferred files to be always available, follow the second method.
Note: You would think drag and drop would work in Windows Sandbox. However, as of writing this, Windows Sandbox doesn’t support drag and drop.
Use a Windows Sandbox configuration file to transfer files
The disadvantage of the first method, though easy, is that the transferred files are not persistent. The transferred files are deleted as soon as you close or shut down the Windows Sandbox.
If you want the files to be always available, you have to map a shared folder with Windows Sandbox. Once done, transfer the target file or folder to the shared folder, and you can access it from the Windows Sandbox.
The good thing is, it is pretty easy to do.
You need to create a Windows Sandbox configuration file called “MappedFolders.wsb” using Notepad, paste a configuration script, type the shared folder path in the added script, save it, and launch Windows Sandbox using that script. All this will show the mapped folder on the Windows Sandbox desktop.
You can access all the files and folders as and when needed, provided that you’ve first transferred them to the shared folder.
I’ve already written a detailed guide on mapping a shared folder to Windows Sandbox. Follow the linked guide, and you are good to go. You should be able to transfer files to Windows Sandbox in Windows 10 and 11 via the mapped shared folder.
What is Windows Sandbox?
If you don’t know, Windows Sandbox is a virtual OS environment within Windows 10 and 11. Windows Sandbox acts as a full-fledged OS with some minor limitations. However, it is still pretty lightweight compared to complete virtual machines created using VMware or VirtualBox. The good thing is that anything you do in Windows Sandbox stays inside the sandbox. That means you can safely test software and Windows settings without worrying about how it affects your main computer.
—
That is all. It is simple to copy, move, or transfer files to Windows Sandbox in Windows 10 and 11.
I hope this simple and easy Windows how-to guide helped you.
If you are stuck or need some help, comment below, and I will try to help as much as possible.
Windows Sandbox is a terrific feature introduced into Windows 10 and 11 (Pro versions only) which allows users to test software or surf around unknown sites in a safe/secure isolated environment.
- Please read: Surf & Test Software Safely in Windows Sandbox
But did you know you can easily share files and/or folders from the host system with the Windows Sandbox? Here’s how.
Believe it or not, this is achieved via a simple copy and paste.
- Navigate to the file or folder in the host system that you want to share with Windows Sandbox
- Right-click the file/folder and select Copy
- Move your mouse cursor into the Windows Sandbox and right-click any blank space
- From the menu, select Paste
That’s all there is to it. Because you’re working with a “copy” the original file or folder remains secure and untouched.
There is another method for sharing folders from the host system with Windows Sandbox through mapping which is achieved via the Windows Sandbox Configuration file. However, this method is somewhat complex and, as such, more suited for advanced users. Plus, as far as I am aware, mapping “shares” a folder with the host system rather than “copying” the folder from the host system which, in my opinion, creates a security risk.
That said, if you want to know more about mapping a folder, here is a guide from Microsoft: Windows Sandbox Configuration
—
С выходом версии 1903 в Windows 10 пришло много интересных функций, одной из которых стала Windows Sandbox. Она нацелена на пользователей, которым требуется установить сторонний софт либо изменить настройки реестра без каких-либо последствий. Все, что сделано в этой среде, остается там навсегда – таким тезисом можно описать всю суть работы утилиты.
В сегодняшней статье мы поговорим о том, что представляет собой Sandbox, как ее установить и для каких задач она может быть полезна.
Что такое Windows Sandbox
Windows Sandbox – своего рода виртуальная машина, подобная Oracle VirtualBox. Она позволяет внутри Windows развернуть еще одну систему. Это может помочь в проверке подозрительного программного обеспечения. Вспомните, как часто мы скачиваем софт с сомнительных источников, после установки которого получаем десятки опасных вирусов. Избежать подобных случаев можно с помощью антивирусного средства, но помогает оно далеко не всегда. Альтернативой этому как раз выступает Windows Sandbox – поставил на него софт и смотришь, есть ли с ним какие-либо проблемы. Даже если в нем сотни вирусов, то ничего страшного не произойдет. Происходящие действия внутри виртуальной машины остаются там и никак не влияют на основную систему.
Отличительной особенностью Sandbox от других популярных виртуальных машин является то, что она «вшита» в Windows 10. Ее установка занимает всего несколько минут, а вес не превышает 100 Мб. Но есть один минус – работает песочница только в Pro- и Enterprise-версиях.
Системные требования:
- не менее 4 ГБ ОЗУ (рекомендуется 8 ГБ);
- не менее 1 ГБ свободного места (рекомендуется SSD);
- как минимум 2 ядра CPU (рекомендуется 4 ядра с HT/SMT);
- виртуализация, включенная в BIOS.
Песочница подойдет под любой немощный компьютер, главное, чтобы хватало оперативной памяти.
Комьюнити теперь в Телеграм
Подпишитесь и будьте в курсе последних IT-новостей
Подписаться
Включаем Windows Sandbox
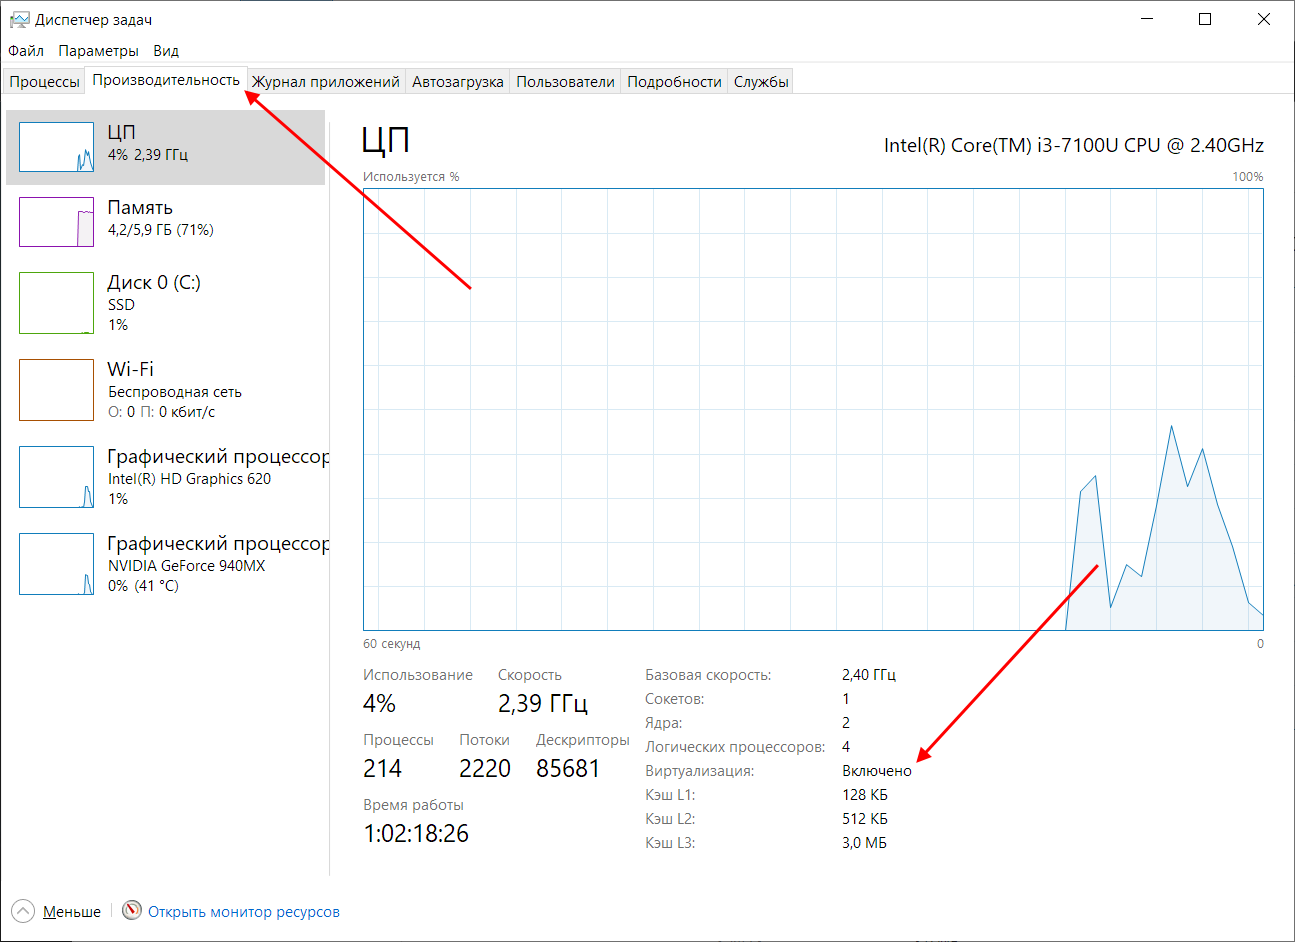
Обратите внимание, что запуск среды может быть выполнен только со включенной виртуализацией, которая в большинстве случаев поддерживается исключительно процессорами Intel. Проверить ее активность можно через «Диспетчер задач»:
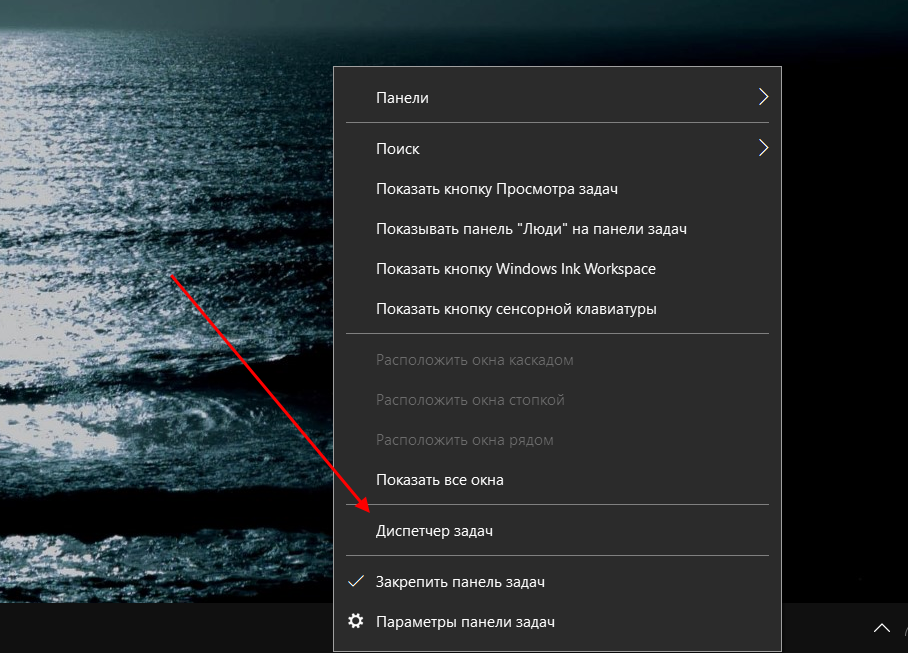
- Кликаем правой кнопкой мыши по панели задач и открываем нужное нам окно.
- В отобразившемся окне переходим в «Производительность» -> «ЦП» и смотрим в нижний левый блок – там есть строчка «Виртуализация».
Если по какой-либо причине виртуализация отключена, то ее нужно включить через BIOS. На эту тему есть довольно много подробных инструкций, поэтому не будем на этом останавливаться и перейдем сразу к включению Sandbox.
Способ 1: Через компоненты Windows
Воспользуемся инструкцией:
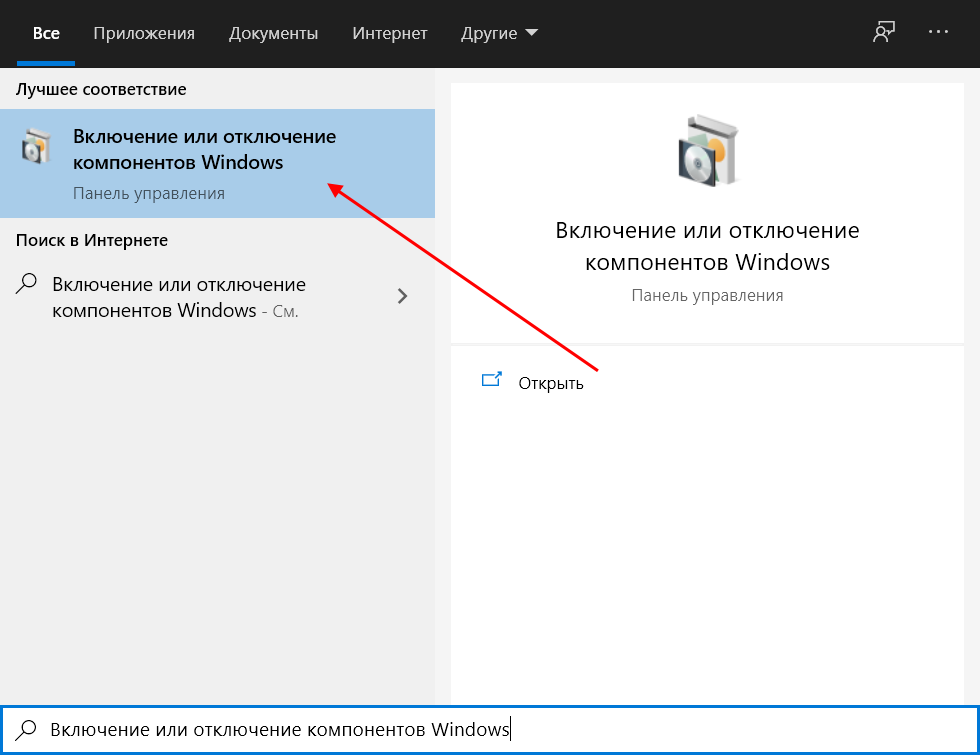
- Открываем меню «Пуск» и вводим запрос «Включение или отключение компонентов Windows». В отобразившемся окне открываем соответствующий запрос.
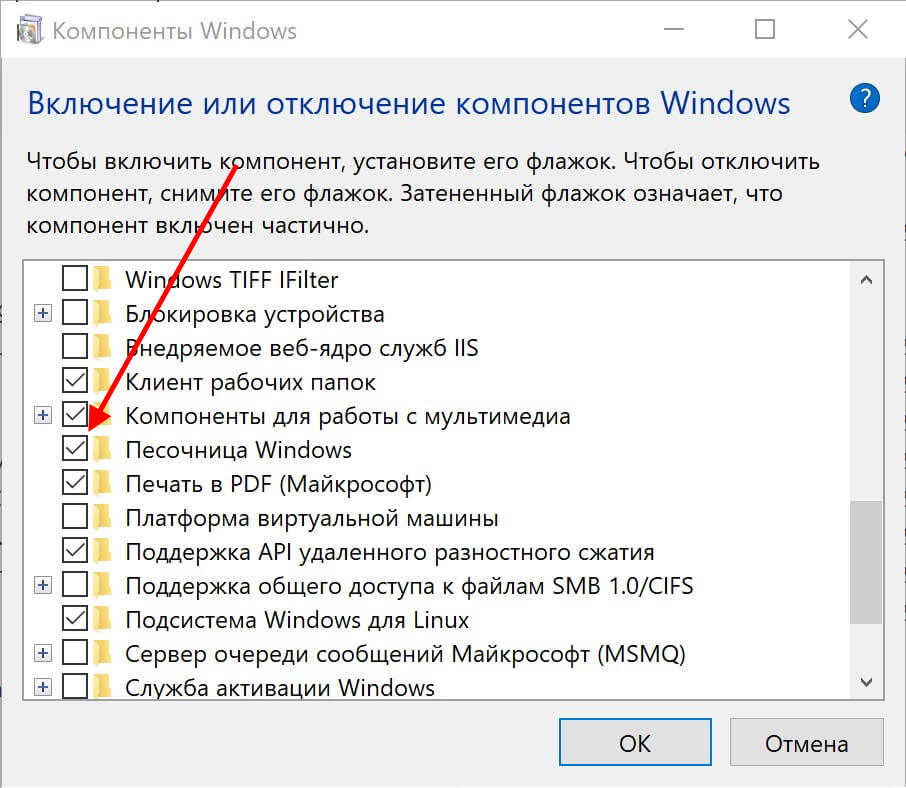
- Мы попадем в окно «Компоненты Windows». Находим там пункт «Песочница Windows» и отмечаем его галочкой.
Готово! Осталось только перезагрузить компьютер, и можно переходить к запуску песочницы. О том, как это сделать, читайте ниже.
Способ 2: Через PowerShell
PowerShell – это та же командная строка, но активация Sandbox через нее немного отличается. Выглядит она следующим образом:
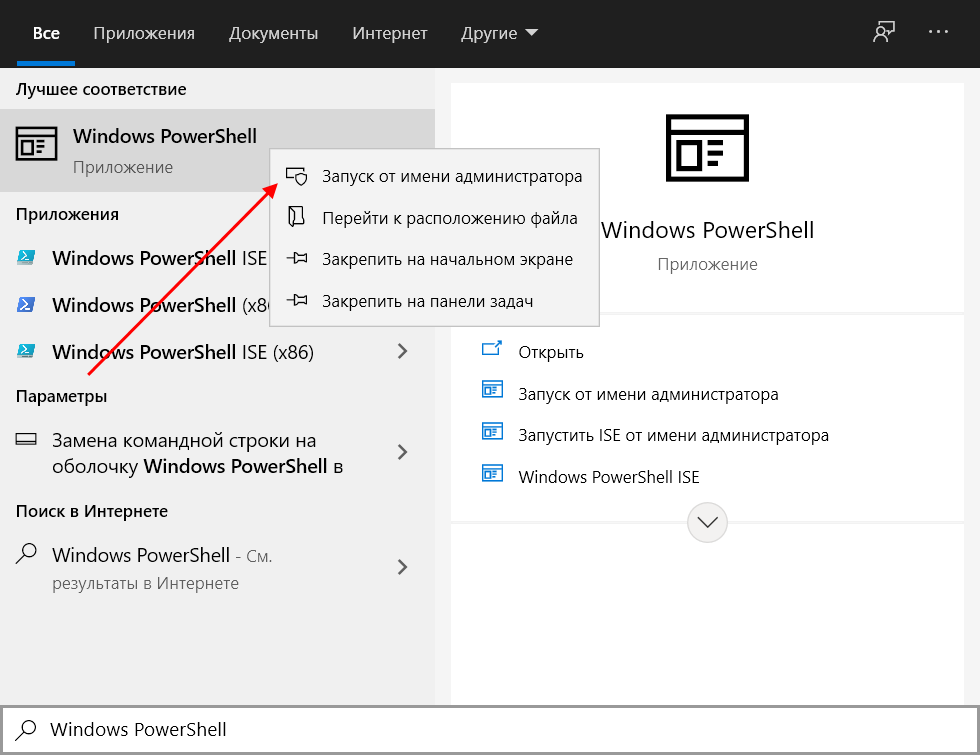
- Открываем меню «Пуск», вводим запрос «Windows PowerShell» и кликаем правой кнопкой мыши по необходимому пункту. В отобразившемся меню выбираем «Запуск от имени администратора».
- Осталось прописать строчку кода: Enable-WindowsOptionalFeature –FeatureName «Containers-DisposableClientVM» -All -Online. Просто копируем ее и вставляем в окно, затем жмем Enter. После этого нам предложат перезагрузить компьютер – соглашаемся простым нажатием клавиши Y.
Отключить песочницу мы можем через тот же PowerShell – для этого достаточно воспользоваться командой: Disable-WindowsOptionalFeature –FeatureName «Containers-DisposableClientVM» -Online.
Способ 3: Через командную строку
Данный случай практически аналогичен предыдущему:
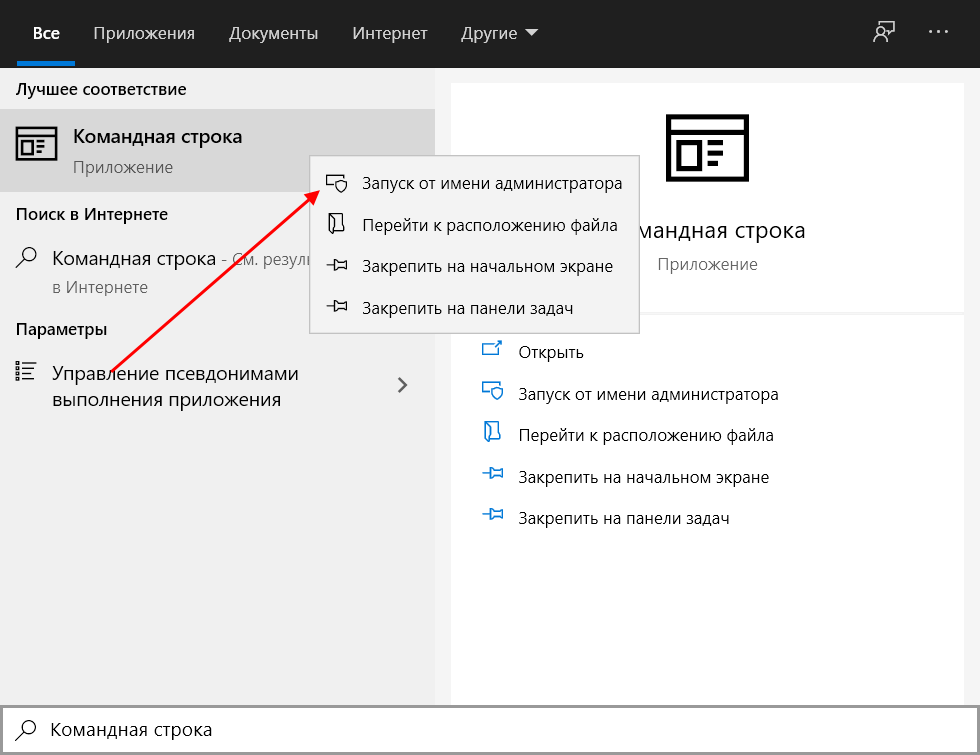
- Переходим в «Пуск» и прописываем «Командная строка». Затем правой кнопкой мыши кликаем по соответствующему запросу и выбираем «Запуск от имени администратора».
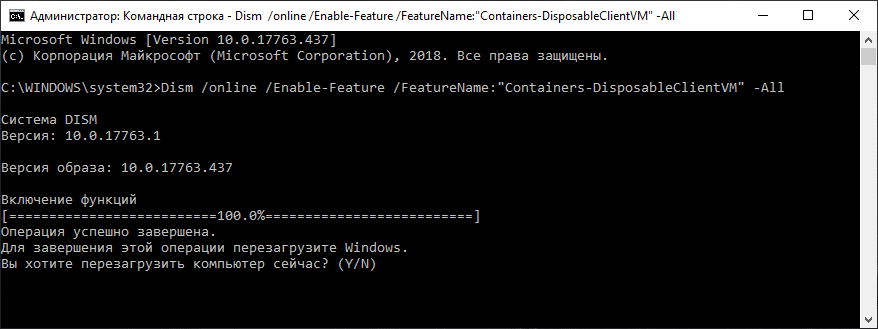
- Для запуска Windows Sandbox вводим команду: Dism /online /Enable-Feature /FeatureName:»Containers-DisposableClientVM» -All. После этого перезагружаем компьютер с помощью клавиши Y.
Как и в случае с PowerShell, отключить песочницу мы можем командой. Выглядит она следующим образом: Dism /online /Disable-Feature /FeatureName:»Containers-DisposableClientVM».
Запускаем Windows Sandbox
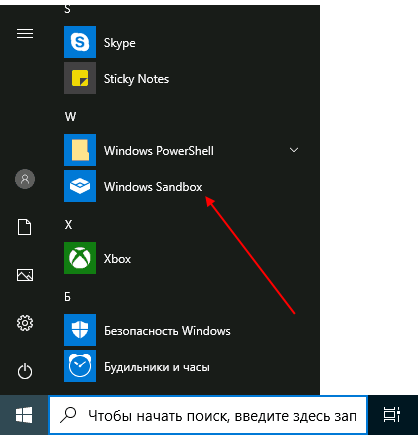
После вышеупомянутых инструкций Windows Sandbox станет активной и готовой к работе. Все, что от вас требуется – найти ее в списке программ:
В результате перед нами отобразится чистая система с доступом к сети без каких-либо программных средств – есть только те, что доступны по умолчанию.
Вот так просто у нас получилось активировать и запустить песочницу Windows 10.
Настройка Windows Sandbox
По умолчанию Windows Sandbox использует чистый образ операционной системы. Однако мы можем самостоятельно отредактировать среду с помощью специальных конфигурационных файлов. Доступны такие параметры, как активация или деактивация виртуального графического адаптера, управление доступом к сети и многое другое. Вводимые конфигурационные данные автоматически запускаются при загрузке ОС в песочнице.
Файл настроек представляет собой XML-документ с расширением .wsb. Создать его можно следующим образом:
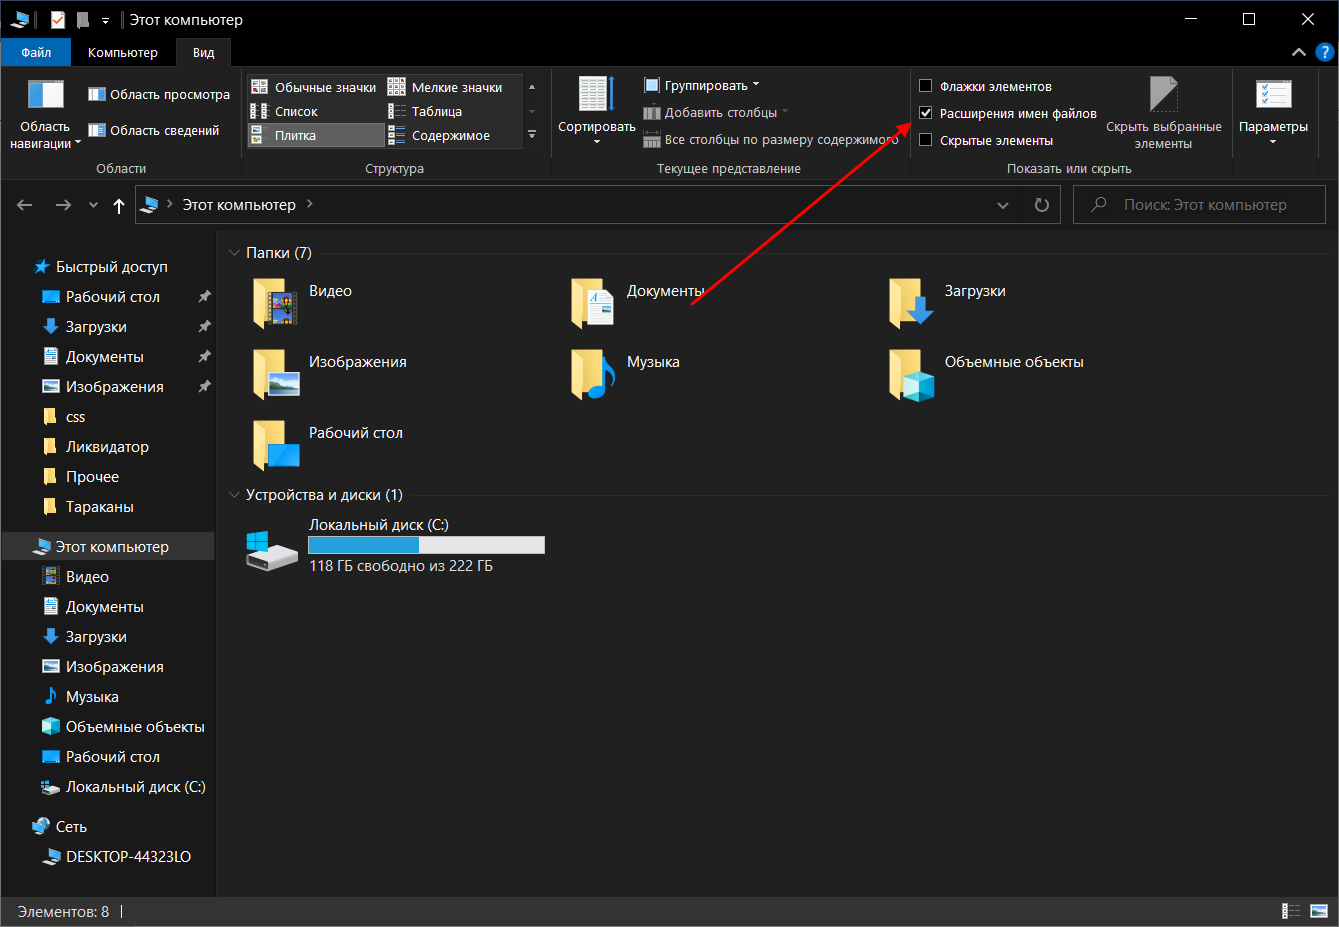
- Первым делом нужно включить отображение расширения имен файлов. Для этого открываем любую папку, в верхней части переходим во вкладку «Вид» и отмечаем необходимый пункт.
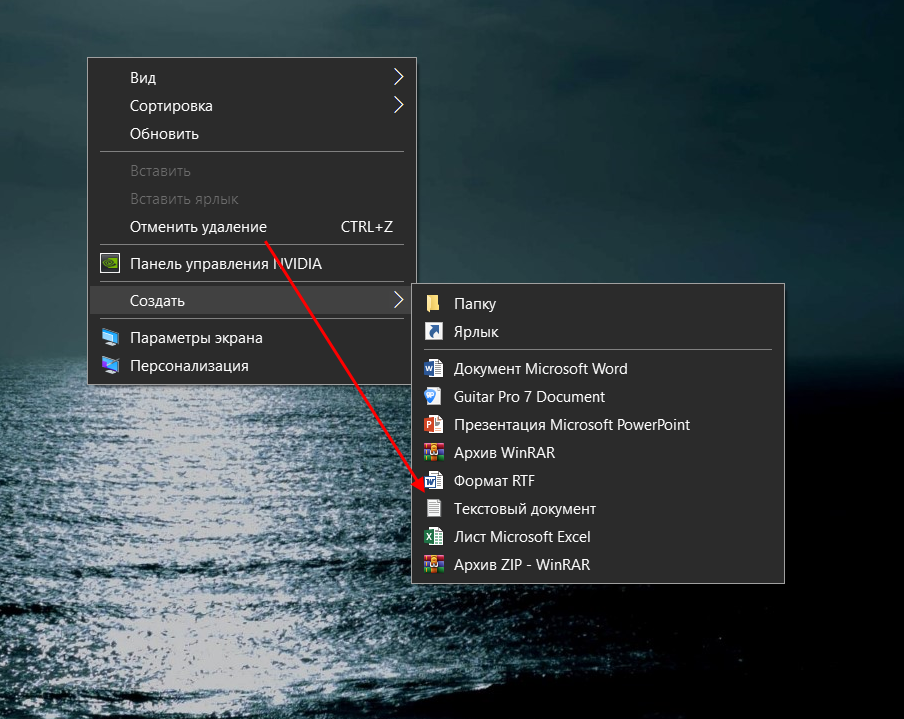
- Переходим на рабочий стол и создаем текстовый документ.
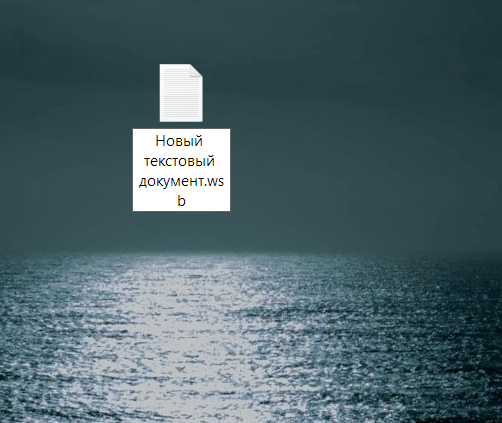
- Кликаем правой кнопкой по файлу и жмем «Переименовать». Стираем после точки старое расширение и прописываем новое – wsb.
Рассмотрим небольшой пример реализации файла с комментариями:
<configuration>

<vgpu>Disable</vgpu> // включает или отключает доступ к графическому адаптеру

<networking>Disable</networking> // включает или отключает доступ к сети

<mappedfolders>

<mappedfolder>

<hostfolder> C:\Users\root\Downloads </hostfolder> // путь к папке в системе

<readonly>true</readonly>

<!— Подключенные папки будут отображаться на рабочем столе (также возможен доступ по пути C:\Users\WDAGUtilityAccount\Desktop\Имя папки внутри среды) —>

</mappedfolder>

</mappedfolders>

<logoncommand>

<command> C:\users\WDAGUtilityAccount\Desktop\Downloads\SandboxScript\preconfigure.bat <command /> // команда будет запущена после загрузки среды Sandbox

</logoncommand>

</configuration>
Весь код вы можете скопировать и вставить в созданный файл. Обратите внимание на комментарии – их нужно удалить.
Подробнее о файле конфигурации вы можете почитать в официальной документации.
Дополнительная информация
Это может быть полезно:
- Работа между Windows и песочницей выполняется через единый буфер обмена, с помощью которого можно легко передавать различные файлы.
- Сохранить данные в Sandbox можно только с помощью общей папки. Связано это с тем, что после каждого отключения среды вся информация полностью очищается.
- Виртуализация – основа, без которой запустить песочницу не получится.
- Если вы столкнулись с ошибкой 0x80070002 «Не удается найти указанный файл», то, скорее всего, ваша система не обновлена до последней версии. Проблема была исправлена в обновлении KB4512941.
Подводя итоги, хочется сказать, что Windows Sandbox – лучшее решение для тех, кто хочет быстро и надежно проверить работоспособность той или иной программы. С ней не нужно загружать дополнительное ПО на несколько гигабайт – все вшито в систему. Достаточно активировать песочницу, и она отобразится в списке программ.
