-
Select the Start button and scroll to find the app you want to run at startup.
-
Right-click the app, select More, and then select Open file location. This opens the location where the shortcut to the app is saved. If there isn’t an option for Open file location, it means the app can’t run at startup.
-
With the file location open, press the Windows logo key + R, type shell:startup, then select OK. This opens the Startup folder.
-
Copy and paste the shortcut to the app from the file location to the Startup folder.
See how to change which apps run automatically at startup
Need more help?
Want more options?
Explore subscription benefits, browse training courses, learn how to secure your device, and more.
Communities help you ask and answer questions, give feedback, and hear from experts with rich knowledge.
Download Windows Speedup Tool to fix errors and make PC run faster
There may be some programs that you may want to always run on startup or boot. Let us say that the first thing you always do is fire up your browser and start browsing the web. Sure, when your Windows PC boots to desktop, you can always fire up your browser manually and enter the URL, but if you wish to make it auto-start, then you can easily make Programs, like say a Browser, run on startup automatically every time in Windows 11/10/8/7.
First, you want to check in the Program’s settings and see if there is a setting that allows you to make it run at every startup. If there is then it answers the question easily. If not, then there are three other ways you can do it. Let us take a look at them:
1] Place Program shortcut in Startup folder

The simplest way would be to place a shortcut of the Program in the Windows Startup folder.
The Current Users Startup folder in Windows is located at:
C:\Users\Username\AppData\Roaming\Microsoft\Windows\Start Menu\Programs\Startup
These programs start up for the current logged in user only. To directly access this folder, open Run, type shell:startup and hit Enter.
The All Users Windows startup folder is located at:
C:\ProgramData\Microsoft\Windows\Start Menu\Programs\StartUp
To open this folder, bring up the Run box, type shell:common startup and hit Enter.
You can add shortcuts to the programs you want to start with your Windows in this folder.
Read: Program in Startup folder not starting on startup.
2] Add Programs to startup using freeware
While the built-in MSCONFIG or System Configuration Utility allows you to disable or delete startup entries, it does not allow you to add startup programs.
There are many free tools that let you manage startup programs.
To add startup programs easily, you can make use of freeware like Chameleon Startup Manager or Quick Startup. Both are feature-rich startup managers that let you easily add startup programs along with their launch parameters.
3] Make Program run with Windows boot via Registry
You can make use of the Registry Startup Paths to add programs to start with every boot. You can use the Run and RunOnce registry keys to make programs to run each time that a user logs on or run just once.
The registry keys are located here. They are for Current User and for All Users – Run every time or run just once:
HKEY_LOCAL_MACHINE\Software\Microsoft\Windows\CurrentVersion\Run

HKEY_CURRENT_USER\Software\Microsoft\Windows\CurrentVersion\Run

HKEY_LOCAL_MACHINE\Software\Microsoft\Windows\CurrentVersion\RunOnce

HKEY_CURRENT_USER\Software\Microsoft\Windows\CurrentVersion\RunOnce
You can read more about this on MSDN.
4] Use Task Scheduler to make programs run at startup
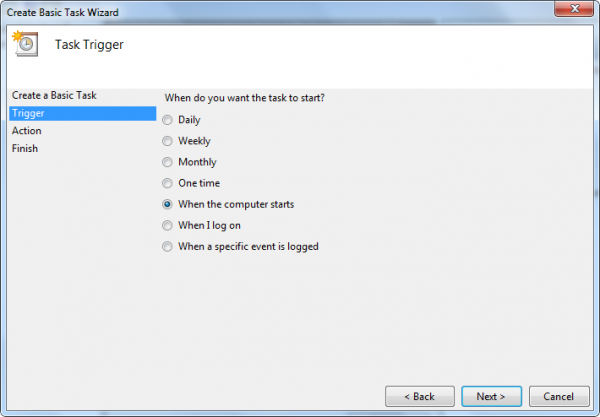
You can create a Basic Task Wizard using Windows Task Scheduler to make a program start at boot every time, by using the When the computer starts option as the Task Trigger.
Having done this, you might want to set a delay time for the Startup programs. If you wish, you can also autostart Programs as Administrator.
Read:
- How to open Files or Folders automatically when Windows starts
- This post will show you how to open Microsoft Store apps on startup
- Disable Startup programs in Windows using Task Manager, WMIC, GPEDIT, Task Scheduler, MSCONFIG, Settings.
Anand Khanse is the Admin of TheWindowsClub.com, a 10-year Microsoft MVP (2006-16) & a Windows Insider MVP (2016-2022). Please read the entire post & the comments first, create a System Restore Point before making any changes to your system & be careful about any 3rd-party offers while installing freeware.
How to Run Program Automatically at Startup in Windows 10 – Certain programs run in the background whenever a computer boots up and certain numbers of software don’t get an appearance on the taskbar though some can be visible at System Tray of Taskbar. The applications that are not even visible on the System tray are stacked in the memory and run every time a system boots up. And these are the programs that are termed as Startup Programs.
In the earlier version of Windows operating system, you could make certain to Run Program Automatically at Startup and it was quite an easy task. You just needed to make a shortcut for that particular program or task which you wished to run at boot and then shift it to the Startup folder. And access to the Startup folder was at fingertips. But in Windows 10 it doesn’t seem that easy because accessing Startup folder is itself a difficult task. To make the system more secure, certain things have changed from the previous versions. But here we are for How Run Program Automatically at Startup on Windows with a few steps.
In today’s our share of knowledge, we will share you the steps following which you can run program automatically at Startup in Windows 10. Follow the steps mentioned below.
- First of all, you need to locate your Startup folder. But before that, you must know that each user on Windows 10 has a separate Startup folder. So if you add a shortcut to any program to the Startup folder from the user account that you are logged into then it will run only when you are logged into.
- So bring the Run command dialog box onto your computer screen by pressing Windows and R
- Type shell:startup on the command field and click Ok.

- The Startup folder for the logged in user account will come on the screen.
- For the programs that you wish to run automatically at boot add their shortcuts to the Startup
- To create a program shortcut right click on an empty area of the Startup folder and select New followed by Shortcut.
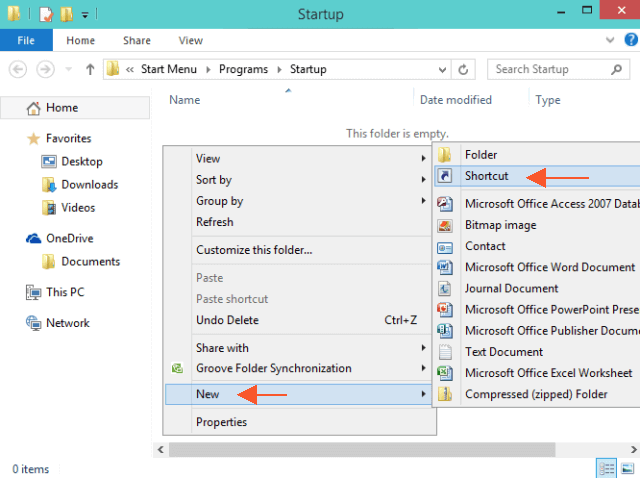
- On the newly opened Create Shortcut window click on the Browse link and find the file that you wish to run automatically.
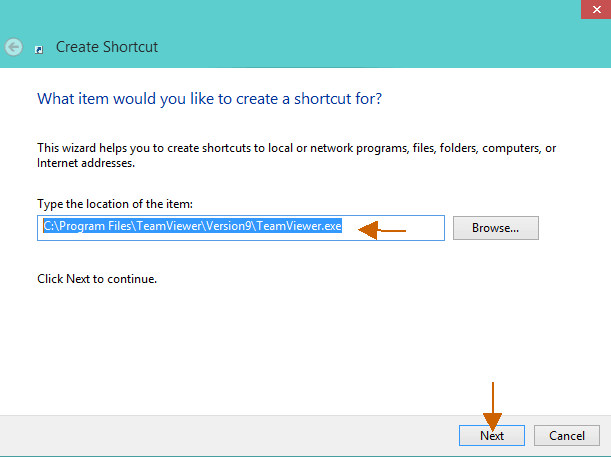
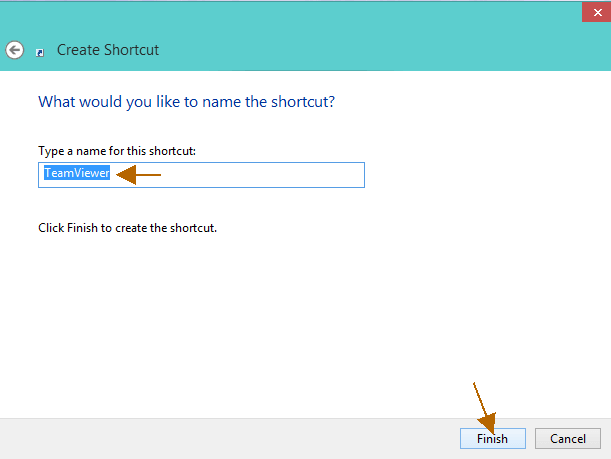
- Provide a name to the shortcut created.
- And click Finish.
- For the programs whose shortcuts are already created, you can shift them to the Startup
- In case you want to disable the created shortcuts then you can do from Task Manager.
- Or you can easily remove the shortcut from the Startup folder.
Boot Windows 10 Without Logging in Microsoft Account
Некоторые программы Windows позволяют настроить себя так, чтобы они запускались при запуске Windows. Но такая возможность есть далеко не у всех программ. Однако запускать при старте системы можно абсолютно любую программу. Более того, при запуске можно открывать нужные папки или запускать какой-либо скрипт (.bat). Ниже рассмотрим как добавить программу в автозагрузку, а также как удалить программу из автозагрзуки Windows.
Обратите внимание, что чем больше программ вы запускаете при загрузке, тем дольше будет длиться процесс запуска. Если есть какие-то приложения, которые вы не хотите запускать при старте, то их можно отключить.
-
Простой способ добавить программу в автозагрузку
-
Шаг 1: Откройте папку автозагрузки Windows
-
Шаг 2: Создайте ярлык в папке Startup
-
Авто-запуск программы с правами администратора
-
Автозагрузка программ в Windows 10 через реестр
-
Добавление/удаление программы из автозапуска из реестра
-
Включение/отключение автозапуска через Диспетчере задач
-
Программа для управления авто-запуском
Простой способ добавить программу в автозагрузку
Все что нужно сделать — это добавить нужный файл (ссылка на основной .exe файл программы), папку, скрипт в папку Windows “Startup”. Для этого
- Нажмите Windows+R, чтобы открыть диалоговое окно “Выполнить”.
- Впишите в поле shell:startup, а затем нажмите Enter. Откроется папка Startup.
- Создайте ярлык в папке «Startup» для любого файла, папки или исполняемого файла приложения. Он откроется при запуске при следующей загрузке.
Этот метод будет работать с любой версией Windows, от Vista до Windows 7 и 8, и 10.
Разберем подробнее:
вверх
Шаг 1: Откройте папку автозагрузки Windows
Startup (автозагрузка) — это скрытая системная папка, в которую можно перейти в проводнике (при условии, что у вас включен показ скрытых файлов).
Технически эта папка находится по пути:
- Для отдельного пользователя:
C:\Пользователи\Имя_Пользователя\AppData\Roaming\Microsoft\Windows\Главное меню\Программы\Автозагрузка - Для всех пользователей:
C:\ProgramData\Microsoft\Windows\Главное меню\Программы\Автозагрузка
Однако совсем не обязательно открывать проводник искать где там эта папка находится, гораздо проще и быстрее использовать команду shell. С помощью этой команды можно открывать многие скрытые или специальные папки Windows, достаточно знать название папки.
Команду shell можно запускать прямо из диалогового окна Run.
Для этого нажмите комбинацию клавиш Windows+R, в поле ввода напишите shell:startup и нажмите Enter.


вверх
Шаг 2: Создайте ярлык в папке Startup
Теперь, чтобы запустить приложение, файл или папку вместе с Windows, нужно создать ярлык программы/папки в открытой папке Startup.
Давайте в качестве примера добавим в авто-запуск бесплатный почтовый клиент Thunderbird. Для этого нужно найти папку где находится программа. У меня она лежит в папке C:\Program Files (x86)\Mozilla Thunderbird.
Теперь нужно создать ярлык основного файла программы в папке Startup. Существуют различные способы создания ярлыков в Windows, но я поклонник супер быстрого метода «правого перетаскивания»: хватайте файл правой кнопкой мыши и удерживая её тащите в папку “Startup”. Когда вы отпустите кнопку, появится всплывающее меню с параметрами перемещения. Нажмите “Создать ярлык.”

Готово!
При следующем запуске Windows приложение, файл или папка будут запущены вместе с ним.
вверх
Авто-запуск программы с правами администратора
Вариант 1
Создать задание:
- Windows+R > Taskschd.msc. Или Пуск > Все программы > Стандартные > Служебные > Планировщик заданий.
- Создать простую задачу (кнопка в правом меню). Или Действия > Создать простую задачу.
- Откроется окно в котором настраиваем задачу:
- Вводим Имя задачи.
- Выбираем когда запускать: «При запуске компьютера».
- Выбираем какую программу запускать.
- Остальные настройки.
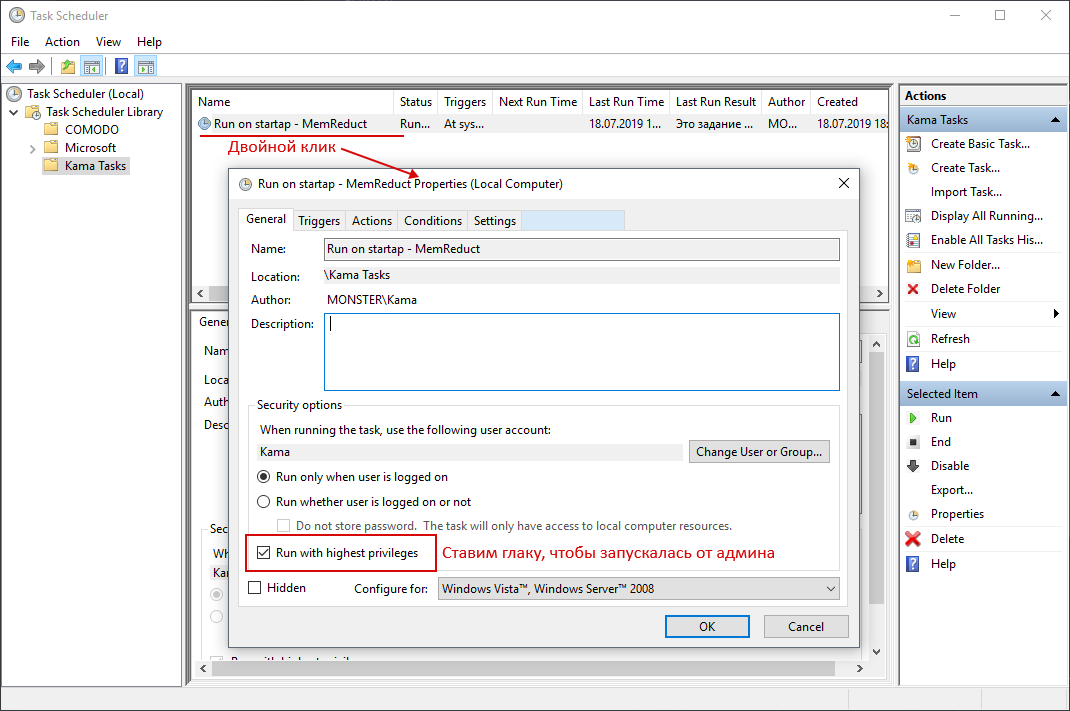
- После создания задачи, кликаем по ней два раза и в открывшемся окне свойств задания ставим галочку «Запускать с наивысшими правами».
- Готово!
Рекомендую создать отдельную папку в планировщике задач, и туда складывать свои задачи.
Вариант 2 (не всегда работает)
Чтобы запускать программу как администратора по клику на иконку (ярлык), нужно установить соответствующую опцию этому ярлыку.
Для этого:
- Кликните правой кнопкой мышки по ярлыку и выберите пункт Свойства.
- В модальном окне нажмите кнопку Дополнительно.
- Поставьте галочку Запускать как администратор.

Автозагрузка программы с правами администратора
вверх
Автозагрузка программ в Windows 10 через реестр
Есть еще одно место, откуда Windows запускает программы — это раздел реестра Windows 10. Как правило этот раздел используется другими программами, чтобы добавить себя в авто запуск. Но мы с вами также можем добавлять или, что более важно, удалять от туда программы.
Для удаления автозапускающихся программ из реестра нужно нажать Win+R и там написать команду regedit. В открывшемся реестре перейти в одну из веток:
- Для отдельного пользователя:
HKEY_CURRENT_USER\Software\Microsoft\Windows\CurrentVersion\Run. - Для всех пользователей:
HKEY_LOCAL_MACHINE\Software\Microsoft\Windows\CurrentVersion\Run.
вверх
Добавление/удаление программы из автозапуска из реестра
Для удаления кликаем на ненужной программе правой кнопкой и жмем Удалить (Delete):

Для добавления кликаем правой кнопкой в пустом месте окна и жмем Создать > Строковой параметр:

После создания строкового ключа, на нем нужно кликнуть правой кнопкой и выбрать Изменить, далее нужно добавить пусть до файла программы которую нужно запустить:

вверх
Включение/отключение автозапуска через Диспетчере задач
Диспетчер задач Windows 10 содержит информацию какие программы запускаются при старте системы. Там же можно быстро включить или отключить программу из автозапуска. Добавить программу от туда невозможно.
Для управления нужно:
- Нажать Ctrl+Shift+Esc и перейти на вкладку Автозагрузка. В ней находится список программ и данные о них.
- Кликните правой кнопкой и включите/отключите авто-запуск.

вверх
Программа для управления авто-запуском
Для комплексного управления программами автозапуска есть хорошая программа:
Autorun Organizer (ссылка на сайт производителя).
Программа показывает сразу все точки автозапуска: папка автозапуска, реестр (пользователя и общий). А также показывает другую информацию о том как была запущена программа, сколько времени занял запуск и т.д.
Интерфейс программы:

 Running programs at startup in Windows is pretty easy, but there are actually several ways to do it, each of them being better suited for different purposes.
In this article, I’ll show you how to run software at Windows startup/boot using three methods.
Running programs at startup is one of the most important parts of any modern OS – after all, many features that people need are provided by third party software, which needs to be initialized alongside with the OS itself or at least as soon as possible. In Windows (starting with XP), you’ve got three ways to do it, each of which could be used in different cases.
Running software at startup using the Startup folder
Using the Startup folder is by far the easiest way to run programs at startup in Windows. It can be done in two easy steps:
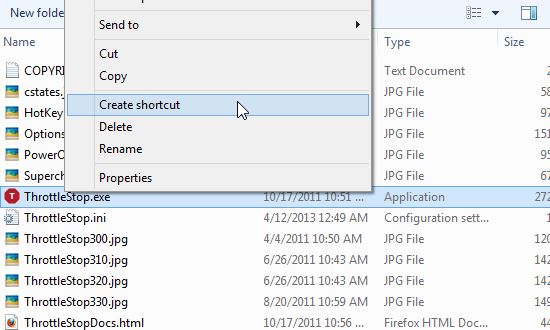
1. Step First find an existing shortcut or create one for the program you want to run at startup (you might need to find the right .exe file in the Program Files folder) and move it to the Startup folder. In my example, it’s Throttlestop:
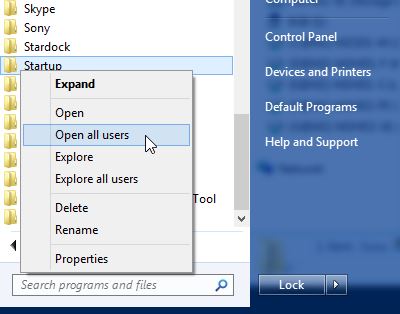
2. Step It’s best to open the “All Users” Startup folder, unless you specifically want to restrict this program to start only when you log into your profile. Find the folder in “Start Menu -> All Programs”, right click it and select “Open all users”:
Then just move or even copy the shortcut (not the main .exe file!) to the Startup folder and restart to test it.
But this method has a drawback if you’re running programs for other users – the shortcut may get deleted, either accidentally or if the system crashes (both of which happen surprisingly often with the average user). In that case, you might want to try another, more reliable method – use the Windows Registry.
Running software at startup using the Windows Registry
It might seem a bit risky, but it’s really not – you just create an entry in the registry that will start your program at boot. The way to do it is as follows:
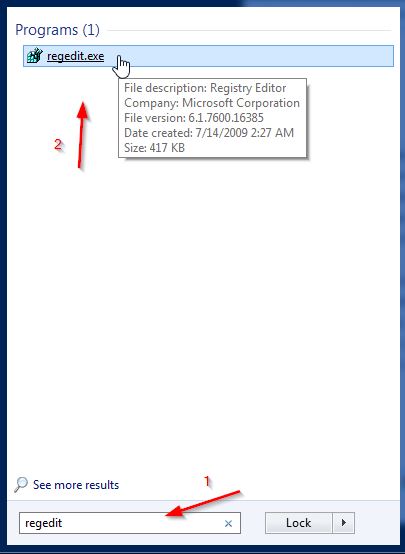
Step 1. Open Registry Editor by typing “regedit” into the “Search Programs and Files” field in the Windows Start Menu, and then clicking the Regedit.exe shortcut that will appear above:
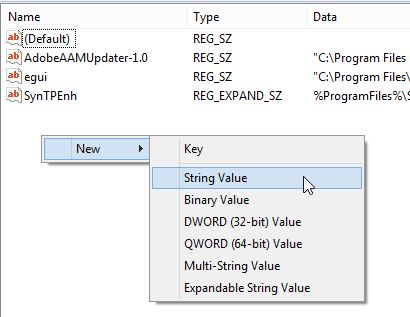
Step 2. Navigate to “HKEY_LOCAL_MACHINE\SOFTWARE\Microsoft\Windows\CurrentVersion\Run”. You might already see a few programs there that run at startup. Now, create a new string value (right click on the empty space, select “New -> String Value”):
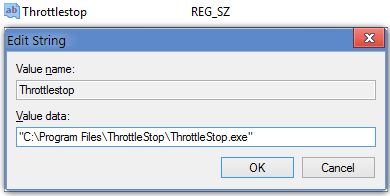
Step 3. Give your new string value a name, then right click on it and select “Modify”. The string itself is simple – you just add the address of the .exe file you want to launch, surrounded by double quotes. In my example, it will be “C:\Program Files\ThrottleStop\ThrottleStop.exe”:
That’s it – your program will boot at startup next time, for all users, and the only way to stop it is to delete the string or the original file. The registry is very resilient, so the only way to lose the entry accidentally is through a very serious crash or a very nasty virus.
Running software at startup using Windows Task Scheduler
If you want to make it simpler and more complicated at the same time, then Task Scheduler is for you. It’s suitable for most programs, can have a few advanced settings that are unavailable in the other two methods, but generally it’s slower at loading the programs because Windows needs to load the Scheduler itself, which then begins to process the tasks. It’s also susceptible when changing user names – it doesn’t find the tasks under the new name, so you have to move task files manually. But in general, it’s easy and safe to use Task Scheduler to start any program. Here’s how to do it:
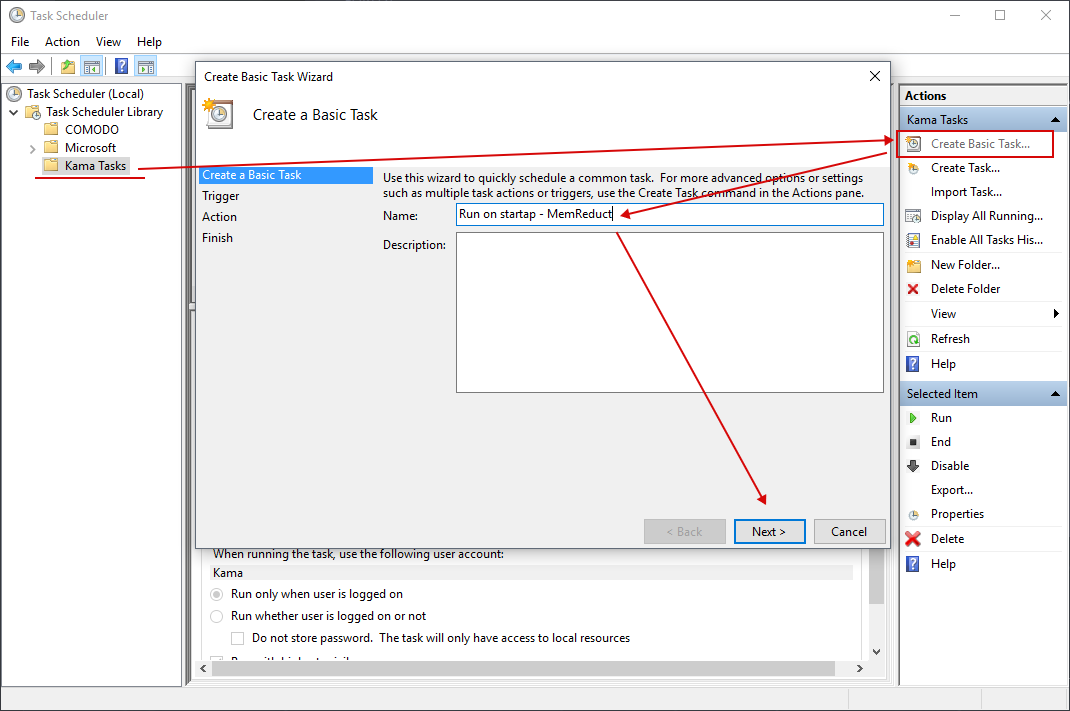
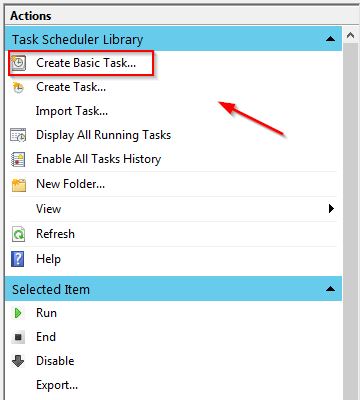
Step 1. Open Task Scheduler by typing “task scheduler” in the “Search Programs and Files” in the Start Menu and clicking the shortcut link. If not selected, select the “Task Scheduler Library” folder on the left side, then click on “Create Basic Task” on the right side:
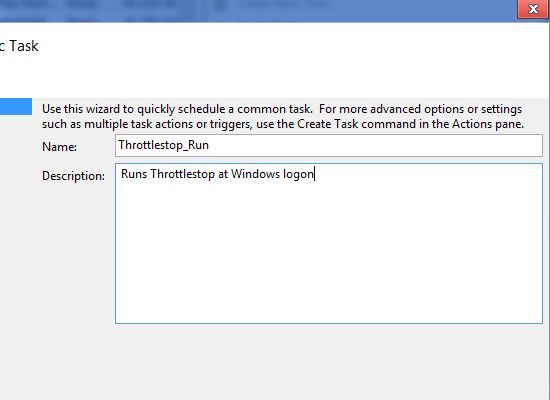
Step 2. Give the task a name and optionally, a description, then click “Next”:
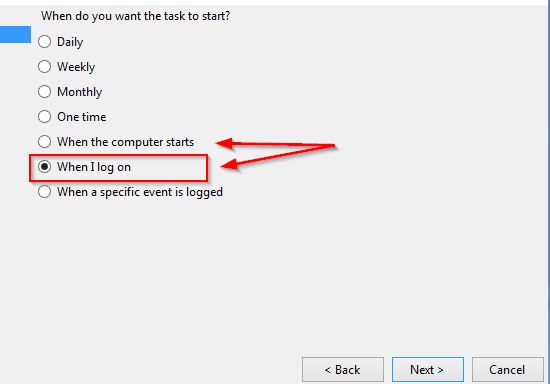
Step 3. Select when the task needs to run – you can select “When the computer starts” or “When I logon” – the latter will make the system start a bit faster, depending on what program you’re starting. For a non-vital program, I recommend starting it at logon:
Step 4. On the next screen select “Start a Program”, then click next and browse/type/paste the address to the desired .exe file:
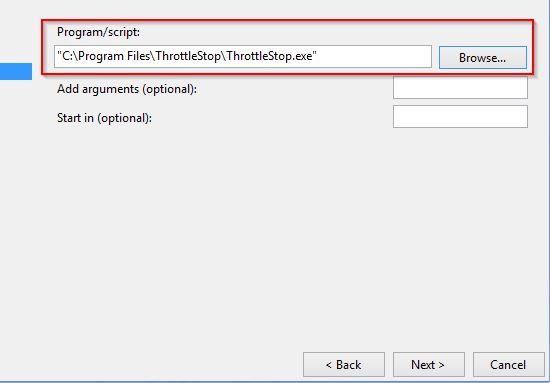
The “Start In (optional)” field is useful for starting command line (or .bat) files, by the way. Anyway, now you can click Next, then Finish and that’s it – your program will start at the next logon. You can browse the task library and edit tasks – in advanced settings, you can set to run the programs as Administrator, set more triggers, set error resolution and more, but those aren’t needed 99% of the time.
Conclusion
And here you go – three methods you can start programs at startup in Windows – if you ever need to start any program automatically when Windows starts, be sure to try any of them – they all work great!