Время на прочтение
2 мин
Количество просмотров 96K
Заинтересовал меня Rails. Купил пару книг, прочитал… достаточно чтобы, зачесались руки и пришло время ставить сабж. И приступать… хотя бы к экспериментам.
Задача: поставить Rails под Windows 7 (не спрашивайте меня почему) и запустить сервер.
Оказалось — это квест. Пары щелчков мышью недостаточно. Конечно, если не использовать Railsinstaller, на что мне правильно намекнули в комментариях (спасибо, dreamfall).
Несколько же часов моих поисков, завершившихся таки полной и безоговорочной инсталляцией, под катом.
1. Ставим Ruby. Строго отсюда rubyinstaller.org/downloads. Ибо тут он собран под gcc MinGW 32, который будет использоваться и для сборки ruby-модулей
1.1 Нам понадобиться версия 187. Версия 192 треует более мощного шаманства, на которое у меня маны не хватило.
1.2 Ставим Development Kit (он нам понадобиться, чтобы собрать Rails), распаковывая прямо поверх каталога Ruby (если ставили по умолчанию — это C:\Ruby187, в дальнейшем обзовем его $Ruby)
1.3 Можно заодно и документацию по Ruby скачать
2. Нам понадобиться SQLite www.sqlite.org. Архив c dll-кой и def файлом распаковываем прямо в каталог $Ruby\bin. Это кстати был первый сюрприз (раньше RDBMS «по умолчанию» был mySQL)
3. Запускаем Comand Prompt wiht Ruby (вы найдете его в start-меню windows)
4. В comand prompt ставим модули:
4.1. gem install sqlite3-ruby — SQLite
4.2. gem install rails — собственно сами «рельсы». Возможно, что установка прервется с ошибкой, в этом случае повторяем команду
4.3. Даже если ошибки не случилось, всё равно потребуется шаманство. Ибо, на каждый наш чих, будет вылезать вот такое непотребство:
Invalid gemspec in [C:/Ruby187/lib/ruby/gems/1.8/specifications/json-1.6.1.gemspec]: invalid date format in specification: «2011-09-18 00:00:00.000000000Z».
Это ошибка связанная с форматом даты. Лечится просто. Переходим в каталог $Ruby\lib\ruby\gems\1.8\specifications и в файлах «с ошибкой» меняем строчку
s.date = %q{2011-09-18 00:00:00.000000000Z}
на
s.date = %q{2011-09-18}
4.4. Для успокоения совести gem update rails —include-dependencies
5. Создаем тестовое приложение. Там же, в Command prompt
5.1 Переходим в каталог «для игр» например cd \test (или mkdir \test;cd \test — если такого каталога нет)
5.2 Создаем приложение rails new hello. Второй сюрприз — в книжках ничего не говорилось про «new».
5.3 Запускаем наше приложение. cd hello; rails server . И последний сюрприз — в тех же книжках ссылка на несуществующий больше скрипт rails server/script
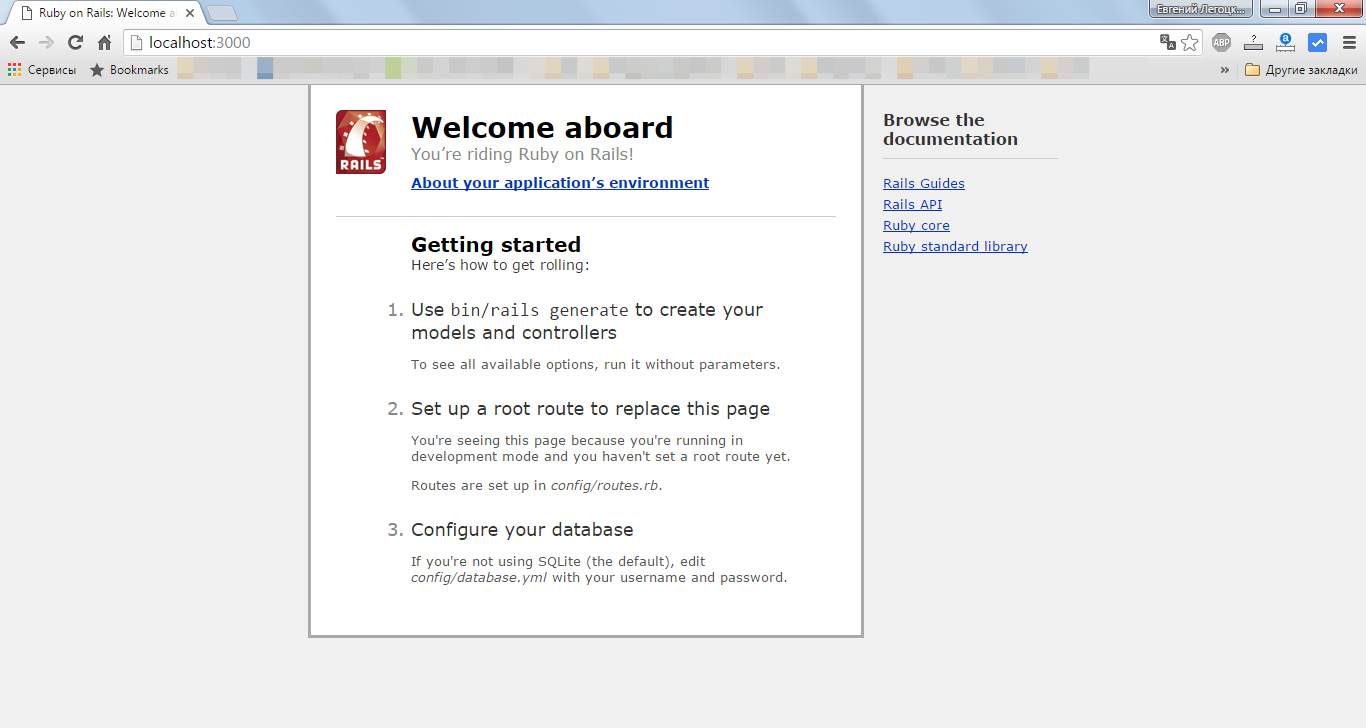
5.4 по адресу localhost:3000
внезапно
мы обнаруживаем наше долгожданное приложение.
Вуаля!
Продолжение воспоследует, если по мере углубления обнаружатся еще подводные камни.
This will take about 30 minutes.
In this guide, we will be installing Ruby on Rails on Windows 10.
We’re going to use the Windows Subsystem for Linux (WSL) to accomplish this. This allows you to install a Linux distribution natively on Windows without a virtual machine.
Ruby on Rails will always be deployed to a Linux server, so it’s best for us to use the same for development.
Windows allows you to run various Linux operating systems inside of Windows similar to a virtual machine, but natively implemented. We’ll use this to install Ruby and run our Rails apps.
You must be running Windows 10 version 2004 and higher (Build 19041 and higher) or Windows 11.
Open Powershell and run:
wsl --install -d Ubuntu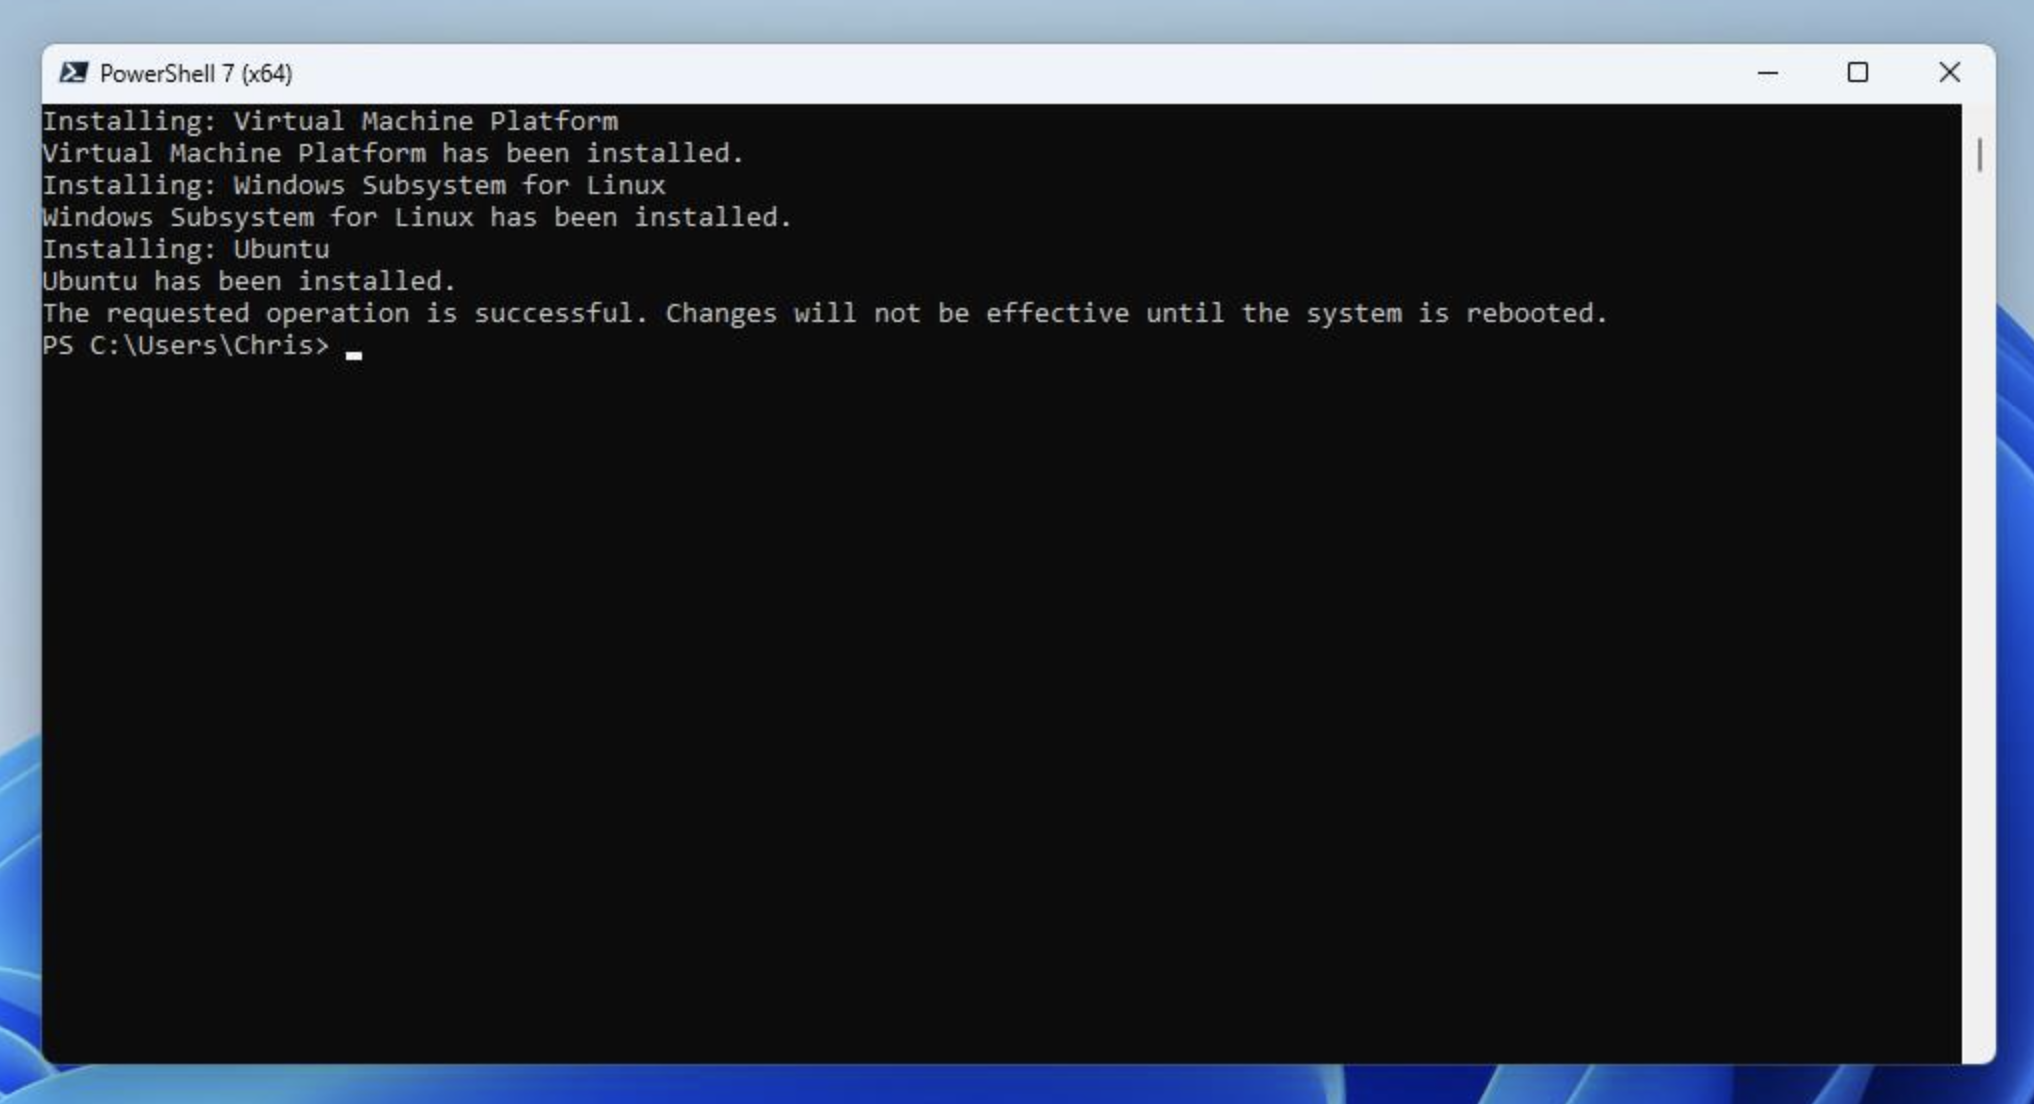
Reboot your computer to finish the installation.
Once initial setup is finished, you will be prompted to create a username and password for your Ubuntu install.
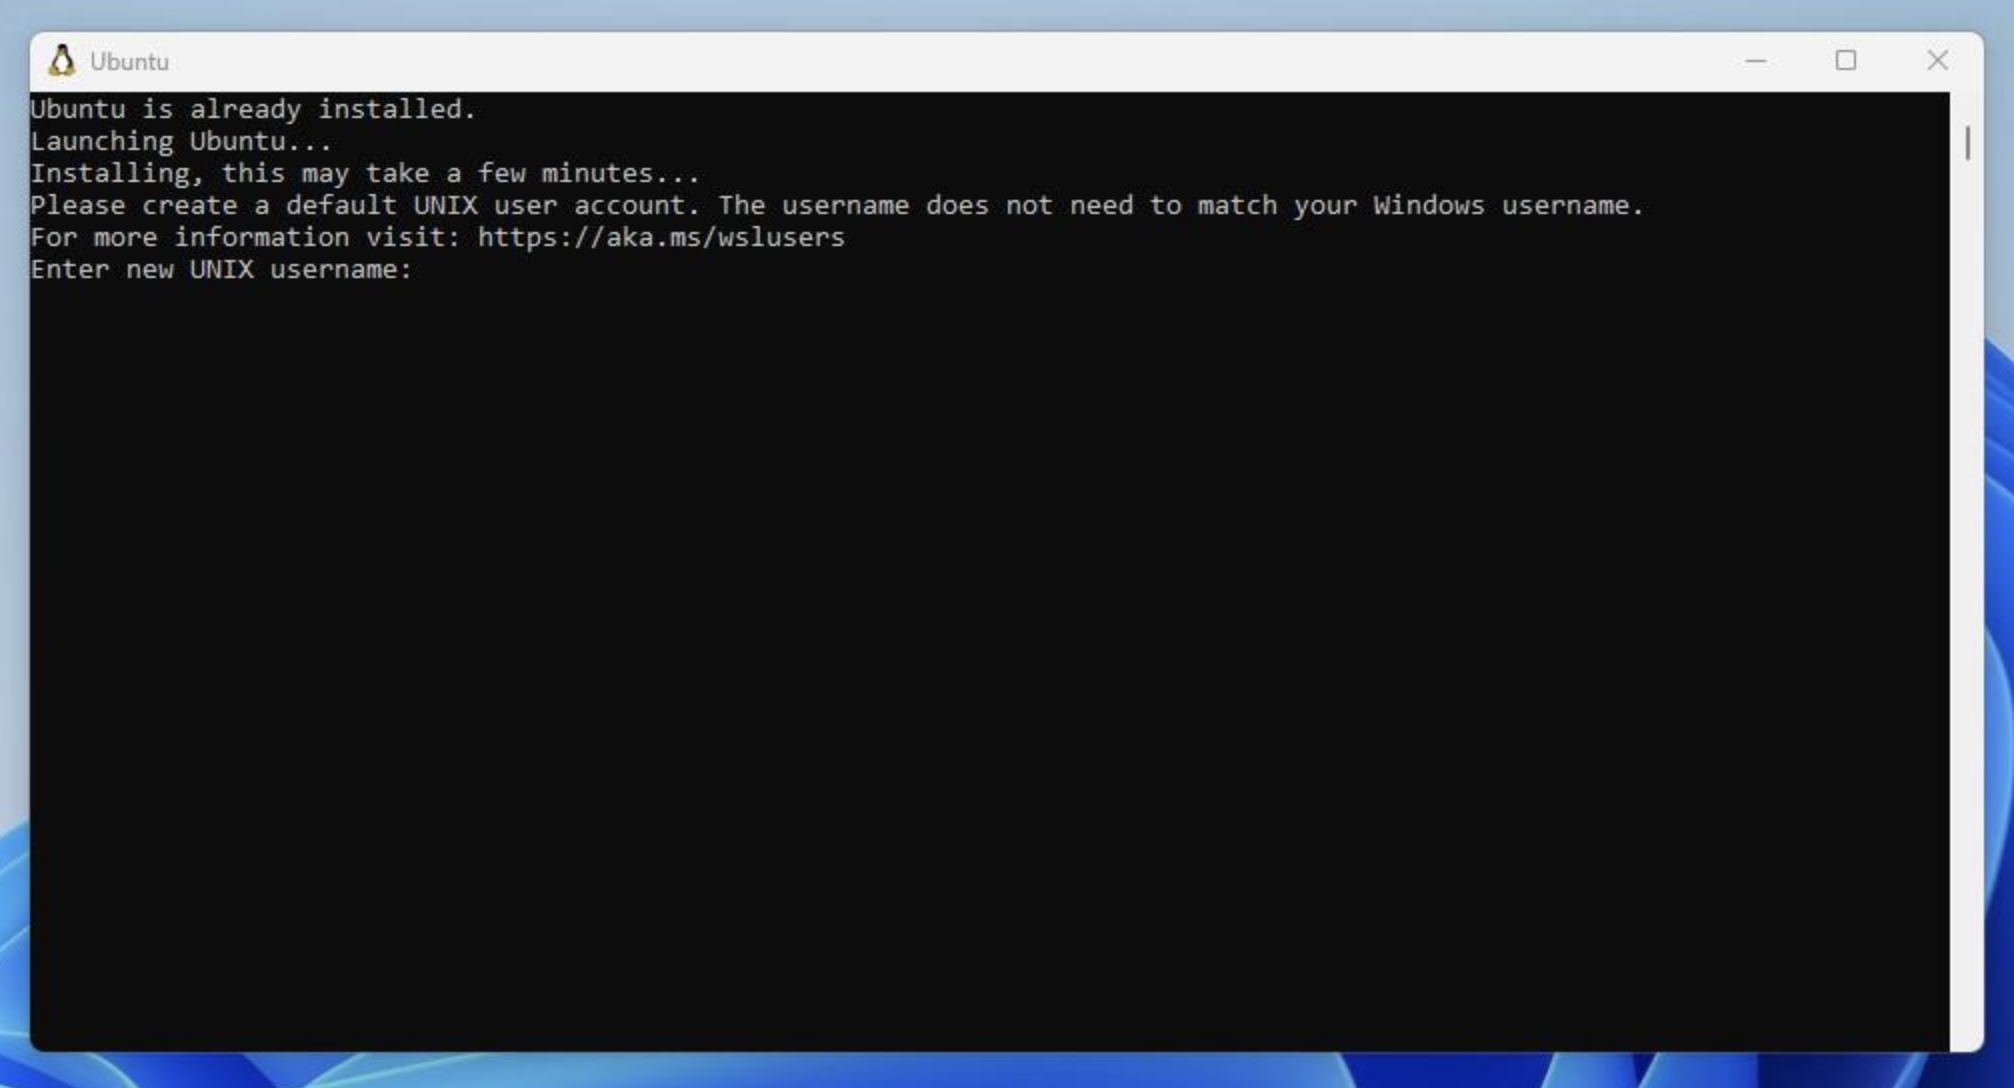
You can search for «Ubuntu» in the Windows Start Menu anytime to open the Ubuntu terminal.
Congrats! You now have Ubuntu installed on Windows with WSL. You’ll use this to run your Rails server and other processes for development.
The first step is to install dependencies for compiling Ruby. Open your Terminal and run the following commands to install them.
sudo apt-get update
sudo apt-get install git-core zlib1g-dev build-essential libssl-dev libreadline-dev libyaml-dev libsqlite3-dev sqlite3 libxml2-dev libxslt1-dev libcurl4-openssl-dev software-properties-common libffi-dev
Next we’re going to be installing Ruby using a version manager called ASDF.
The reason we use ASDF over rbenv, rvm or others is that ASDF can manage other languages like Node.js too.
Installing asdf is a simple two step process. First you install asdf, and then add it to your shell:
cd
git clone https://github.com/excid3/asdf.git ~/.asdf
echo '. "$HOME/.asdf/asdf.sh"' >> ~/.bashrc
echo '. "$HOME/.asdf/completions/asdf.bash"' >> ~/.bashrc
echo 'legacy_version_file = yes' >> ~/.asdfrc
echo 'export EDITOR="code --wait"' >> ~/.bashrc
exec $SHELL
Then we can install ASDF plugins for each language we want to use. For Rails, we can install Ruby and Node.js for our frontend Javascript.
asdf plugin add ruby
asdf plugin add nodejs
Choose the version of Ruby you want to install:
To install Ruby and set the default version, we’ll run the following commands:
asdf install ruby 3.2.2
asdf global ruby 3.2.2

# Update to the latest Rubygems version
gem update --system
Confirm the default Ruby version matches the version you just installed.
which ruby
#=> /home/username/.asdf/shims/ruby
ruby -v
#=> 3.2.2
Then we can install the latest Node.js for handling Javascript in our Rails apps:
asdf install nodejs 18.16.1
asdf global nodejs 18.16.1

which node
#=> /home/username/.asdf/shims/node
node -v
#=> 18.16.1

# Install yarn for Rails jsbundling/cssbundling or webpacker
npm install -g yarn
Configuring Git
We’ll be using Git for our version control system so we’re going to set it up to match our Github account. If you don’t already have a Github account, make sure to register. It will come in handy for the future.
Replace my name and email address in the following steps with the ones you used for your Github account.
git config --global color.ui true
git config --global user.name "YOUR NAME"
git config --global user.email "YOUR@EMAIL.com"
ssh-keygen -t ed25519 -C "YOUR@EMAIL.com"
The next step is to take the newly generated SSH key and add it to your Github account. You want to copy and paste the output of the following command and paste it here.
cat ~/.ssh/id_ed25519.pubOnce you’ve done this, you can check and see if it worked:
ssh -T git@github.comYou should get a message like this:
Hi excid3! You've successfully authenticated, but GitHub does not provide shell access.Choose the version of Rails you want to install:
gem install rails -v 7.0.6Now that you’ve installed Rails, you can run the rails -v command to make sure you have everything installed correctly:
rails -v
# Rails 7.0.6
If you get a different result for some reason, it means your environment may not be setup properly.
For PostgreSQL, we’re going to add a new repository to easily install a recent version of Postgres.
sudo apt install postgresql libpq-dev
sudo service postgresql start
You’ll need to start postgresql each time you load your WSL environment.
The postgres installation doesn’t setup a user for you, so you’ll need to follow these steps to create a user with permission to create databases. Feel free to replace chris with your username.
sudo -u postgres createuser chris -s
# If you would like to set a password for the user, you can do the following
sudo -u postgres psql
postgres=# \password chris
Let’s create your first Rails application on Windows!
rails new myapp -d postgresql

#### Or if you want to use MySQL
rails new myapp -d mysql

# Then, move into the application directory
cd myapp

# If you setup MySQL or Postgres with a username/password, modify the
# config/database.yml file to contain the username/password that you specified

# Create the database
rake db:create

rails server
You can now visit http://localhost:3000 to view your new website!
Getting an «Access Denied» error?
If you received an error that said Access denied for user 'root'@'localhost' (using password: NO) then you need to edit the config/database.yml file to match the database username and password.
Editing Code
Install VS Code on Windows and install the WSL extension. This will allow you to edit code in Windows but run commands and extensions in WSL. Read more about Developing in WSL.
That’s it! Let us know in the comments below if you run into any issues or have any other protips to share!
How to Install Ruby on Rails Windows 10/11 (Step by Step Tutorial). With so many programming languages in our IT environment that play a important role Ruby is one of those languages. It is pretty powerful and used for many dynamic tasks but mostly in web application development. Also there are many famous software built using this language. Therefore today we are going to learn how to install Ruby on Windows 11. In this article we will set up Ruby on Rails development environment on Windows 10/11.
What is Ruby on Rails?
")
Ruby on Rails or RoR, is a framework that is built on Ruby, a programming language that was created in the 1990s. There is a simple idea behind making RoR available to developers: to provide an intuitive framework for developing robust, high performance web pages.
Often referred to as “RoR” or just “Rails,” Ruby on Rails is a free and open source for developing web applications in Ruby, an object oriented programming language that is similar to Python and Perl.
In comparison to other frameworks, Ruby on Rails has a great advantage, which is its speed and ease of use that the developers enjoy while working within the environment. A change made to an application is immediately reflected, eliminating the lengthy and time consuming web development process normally associated with it.
Benefits of Ruby on Rails
Cost effective
Ruby on Rails is an open source framework which is 100% free and based on Linux. From a developer’s perspective, it’s also easy to use. Using ruby, developers can save a lot of their time and effort that leads to reducing the overall cost, due to the availability of so many gems (plugins).
Based on the Model View Controller architecture (MVC)
An application developed using this MVC architecture consists of three interconnected layers. These layers contain the code that interacts with the application data. Also, it centralizes both the application’s business logic and the rules for manipulating the data. Among the various formats that the data is presented to the users are HTML, XML, RSS, PDF, and other formats.
Managing changes is easy
Adding new features and editing existing code for a site is easy with Ruby on Rails. You can quickly and easily perform future modifications to your website (for example, changing the data model significantly) after launching your site.
Secure
Ruby framework contains some security features that are enabled by default. Furthermore, using Ruby on Rails means adhering to the secure development lifecycle, which can be a complicated method in terms of security assurance.
There is an active Rails community that works to identify and patch new vulnerabilities, and documentation of the framework is available both officially and unofficially.
Flexibility
Ruby on Rails offers a high level of flexibility and offers many advantages such as easy integration with frameworks and technologies such as AngularJS. Developers can use multiple technologies and separate layers of an application because of its flexibility.
Productivity
When you combine Ruby and third party libraries, you will be able to develop features that are incredibly fast. This makes Ruby an extremely productive programming language. In most cases, these libraries are available as gems, which are packaged libraries and applications that are installed by using a tool referred to as Ruby Gems.
Consistent
In order to stay structured and readable, developers adhere to standardized file management and programming conventions. This also helps save time.
Large Online Community
On GitHub, a social coding site, this language is among the most popular. Among the community’s developers are many who are continually improving code as well as assisting others with their projects.
Whenever you need a particular piece of functionality, there is a high probability that someone else has already created it or is willing to provide assistance to you for fixing any issues. But still, you’ll need a team of skilled programmers to handle the code.
An extensive collection of free plugins
Another RoR advantage is the abundance of free gems or plugins. You can use RoR to create your own website that meets your business needs – for example, you can provide advanced eCommerce services or set up an exclusive social network that guarantees a high level of data security to your users.
Follow this post to show you how to install Ruby on Rails on Windows 10/11.
Install Ruby on Rails on Windows 10/11
Install Git
Before starting, you will need to install the Git software package on your system. You can download it from the Git download page.
Once the Git package is downloaded, follow the below steps to install Git on your system.
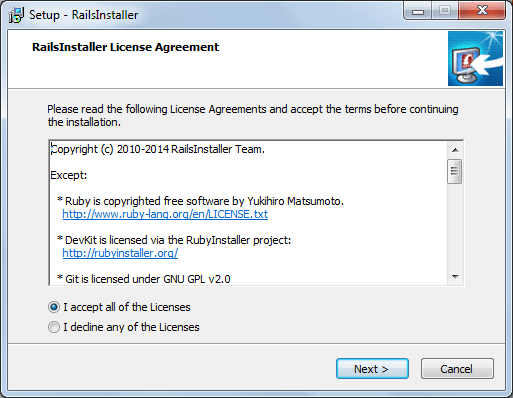
Step 1 – Double click on the Git downloaded file. You should see the Git License screen:

Step 2 – Click on the Next. You should see the destination selection screen:

Step 3 – Click on the Next. You should see the component selection screen:

Step 4 – Click on the Next. You should see the Start Menu selection screen:

Step 5 – Click on the Next. You should see the Editor selection screen:

Step 6 – Click on the Next. You should see the adjust Git branch screen:

Step 7 – Click on the Next. You should see the path selection screen:

Step 8 – Click on the Next. You should see the choose SSH executable screen:

Step 9 – Click on the Next. You should see the Choose HTTPS backend screen:

Step 10 – Click on the Next. You should see the Git line ending conversions screen:

Step 11 – Click on the Next. You should see the Terminal emulation configuration screen:

Step 12 – Click on the Next. You should see the Git default behavior screen:

Step 13 – Click on the Next. You should see the Credential helper selection screen:

Step 14 – Click on the Next. You should see the extra option selection screen:

Step 15 – Click on the Next to finish the installation.
Install Ruby on Windows
First, visit the Ruby installer website and download the latest version of Ruby to your system. Once the Ruby installer is downloaded, follow the below steps to install Ruby to your system:
Step 1 – Double click on the Ruby installer to start the installation. You should see the License page:

Step 2 – Accept the License agreement and click on the Next button. You should see the installation location selection page:

Step 3 – Select your installation path and click on the Install button. You should see the component selection page:

Step 4 – Select your desired components and click on the Next button. Once the Ruby is installed, you should see the following page:

Step 5 – Click on the Finish button. You should see the Ruby toolchain selection page:

Step 6 – Type 3 to install the Ruby development toolchain and press the Enter key to finish the installation.
Launch the Ruby Shell
After installing Ruby, search for “Ruby” in the Windows Desktop. You should see the following page:

Click on the “start command prompt with Ruby” to launch the Ruby command prompt. Now, verify the Ruby version using the following command:
You should see the Ruby version in the following page:

To verify the Gem installation and list all installed Gems, run the following command:
You should see the following page:

If you want to update the Ruby gems, run the following command:
Install Rails on Windows via Gem command
Rails is one of the Ruby gems and you can install it using the gem command as shown below:
Once the Rails is installed, you should see the following page:

Rails applications cannot operate without a database. Rails support MySQL or the SQLite database. SQLite3 is the default Rails database and it can be installed using the following command:

Create a Rails Application
After installing Ruby and Rails, we will create a simple Rails application to check the Ruby on Rails installation. Let’s create a simple application named app with the following command:
You will get some tzinfo-data related error. To resolve this error, open the Gemfile located inside the app directory using the NotePad editor.
gem 'tzinfo-data', platforms: [:x64_mingw, :mingw, :mswin]
And, replaced it with the following line:
gem 'tzinfo-data', '~> 1.2021', '>= 1.2021.5'
Save and close the file then open the Ruby shell and change the directory to your app directory:
Next, update all gems using the following command:
Now, start the Rails application using the following command:
Once the application is started, you will get the following screen:

Access Rails Application
At this point, Rails is started and listens on port 3000 on localhost. Now, open your web browser and access your Rails application using the URL http://localhost:3000. You should see the Rails application page on the following screen:

Great job about learning how to Install Ruby on Rails Windows 10/11. Let’s summarize.
How to Install Ruby on Rails Windows 10/11 Conclusion
Ruby is a programming language and development environment for web applications, data analysis and general programming. Now your installation is ready and you will be able to create your rails apps and have fun! In this post, we have learned how to install Ruby on Rails on a Windows machine. We also learned how to create a simple Rails application. I hope you have now enough knowledge of Ruby on Rails installation. You can now start developing your own Rails application.
- 1. Установка Ruby on Rails
- 2. Установка с RailsInstaller
Работая с
WordPress
на хостинг-провайдере
TimeWeb
уже почти год, начинаю проявлять всё больший интерес к веб-разработке. В частности это также связано с тем, что данная CMS всё же достаточно прожорлива до ресурсов, а также и с тем, что начинают появляться мысли по поводу новых проектов. Да и в плане расширения кругозора в области программирования хотелось бы попробовать чего-нибудь иного, отличного от
Qt/C++
.
Поэтому выбор пал на
Ruby on Rails
. Здесь я получаю и нечто иное, отличное от
Qt/C++
, а также и возможность поработать в области веб-разработки в своё удовольствие.
Полистав немного документацию и примеры первого запуска веб-сервиса в стиле
«Hello world!»
, я решил поделиться тем, что из этого вышло.
Установка Ruby on Rails
Для первоначальной разработки понадобятся следующие компоненты:
-
Сам
Ruby,
который необходимо скачать по следующей ссылке:http://rubyinstaller.org/downloads/
-
Для сборки модулей
Ruby
понадобится компилятор
MinGW,
но погодите, у меня же Qt установлен, так что с этим всё нормально. -
Так же понадобится
DevelopmentKit
для сборки
Rails.
Распаковать нужно поверх каталога с Ruby. -
SQLite — начинать надо всегда с малого, поэтому не будем замахиваться на MySQL и PostgreSQL. Чтобы сильно не заморачиваться берём
Precompiled Binaries for Windows.
Архив нужно распаковывать в в каталог
Ruby\bin.
-
Далее в меню
Пуск
находим
Comand Prompt with Ruby,
запускаем (откроется коммандная строка в каталоге с сайтами, по умолчанию C:\Sites) и выполняем следующие команды:
gem install sqlite3
— установка SQLite
gem install rails
— установка рельс- Создание тестового приложения:
rails new blog
cd blog
rails server
— будет запущен веб-сервер, страничку которого вы найдёте по следующему адресу: localhost:3000
Такой вариант установки и запуска тестового приложения может использоваться в том случае, если не использовать специальные сборки. Но
Ruby
же позиционируется как язык программирования для быстрой разработки. Так почему же не воспользоваться средствами, позволяющими по быстрому установить Ruby on Rails и увидеть результат практически сразу? Этой благой цели служит
RailsInstaller
. Скачиваем последнюю версию и запускаем установку.
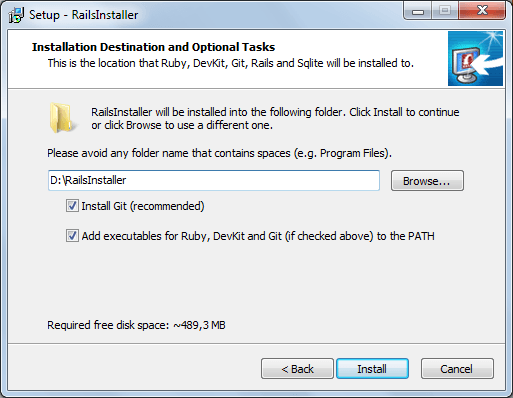
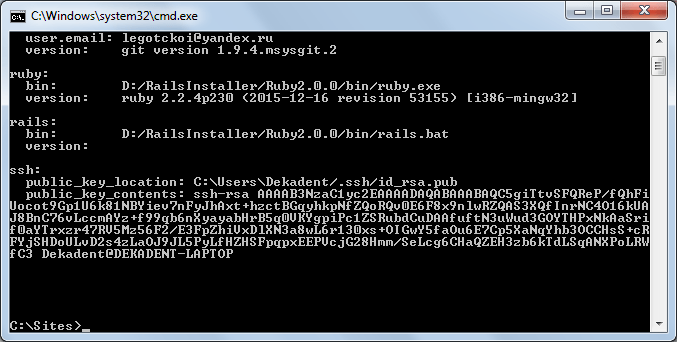
Установка с RailsInstaller
В процессе установки необходимо пройти три простых шага, продемонстрированных на ниже следующих изображениях. По завершению установки откроется
Comand Prompt with Ruby and Rails.
После чего повторите шаги 5-6, описанные выше.

Вам это нравится? Поделитесь в социальных сетях!
Ruby on Rails install on windows using gem installer with step by step, create a application.
This tutorial explains step by step to install Ruby on Rails on a Windows machine.
Before installing of Rails framework, Please make sure that Ruby and Gem is installed
Verify ruby is installed using --version option
A:\work>ruby --version
ruby 2.7.0p0 (2019-12-25 revision 647ee6f091) [x64-mingw32]
A:\work>gem --version
3.1.2
Install the Latest or specific Ruby on Rails version On windows
Once ruby and gem are installed, You can install rails directly.
gem installs command downloads and installs rails and their dependencies.
If you want to install the latest rails, run the below command
gem install rails
It installs the latest version.
A:\work\railsapp>rails --version
Rails 7.0.4
if you want to install a specific version, use the -v option with the version number
gem install rails -v 5.0.1
Here is an example
A:\work>gem install rails
Fetching rack-2.2.4.gem
Fetching crass-1.0.6.gem
Fetching activesupport-7.0.4.gem
Fetching tzinfo-2.0.5.gem
Fetching rack-test-2.0.2.gem
Fetching loofah-2.19.0.gem
Fetching rails-dom-testing-2.0.3.gem
Fetching rails-html-sanitizer-1.4.3.gem
Fetching builder-3.2.4.gem
Fetching erubi-1.11.0.gem
Fetching actionview-7.0.4.gem
Fetching activemodel-7.0.4.gem
Fetching actionpack-7.0.4.gem
Fetching activerecord-7.0.4.gem
Fetching globalid-1.0.0.gem
Fetching activejob-7.0.4.gem
Fetching mini_mime-1.1.2.gem
Fetching mail-2.7.1.gem
Fetching net-protocol-0.1.3.gem
Fetching net-imap-0.3.1.gem
Fetching actionmailer-7.0.4.gem
Fetching nio4r-2.5.8.gem
Fetching websocket-extensions-0.1.5.gem
Fetching websocket-driver-0.7.5.gem
Fetching actioncable-7.0.4.gem
Fetching marcel-1.0.2.gem
Fetching activestorage-7.0.4.gem
Fetching actionmailbox-7.0.4.gem
Fetching actiontext-7.0.4.gem
Fetching thor-1.2.1.gem
Fetching method_source-1.0.0.gem
Fetching zeitwerk-2.6.2.gem
Fetching railties-7.0.4.gem
Fetching rails-7.0.4.gem
Successfully installed tzinfo-2.0.5
Successfully installed activesupport-7.0.4
Successfully installed rack-2.2.4
Successfully installed rack-test-2.0.2
Successfully installed crass-1.0.6
Successfully installed loofah-2.19.0
Successfully installed rails-html-sanitizer-1.4.3
Successfully installed rails-dom-testing-2.0.3
Successfully installed builder-3.2.4
Successfully installed erubi-1.11.0
Successfully installed actionview-7.0.4
Successfully installed actionpack-7.0.4
Successfully installed activemodel-7.0.4
Successfully installed activerecord-7.0.4
Successfully installed globalid-1.0.0
Successfully installed activejob-7.0.4
Successfully installed mini_mime-1.1.2
Successfully installed mail-2.7.1
Successfully installed net-protocol-0.1.3
Successfully installed net-imap-0.3.1
Successfully installed actionmailer-7.0.4
Temporarily enhancing PATH for MSYS/MINGW...
Building native extensions. This could take a while...
Successfully installed nio4r-2.5.8
Successfully installed websocket-extensions-0.1.5
Building native extensions. This could take a while...
Successfully installed websocket-driver-0.7.5
Successfully installed actioncable-7.0.4
Successfully installed marcel-1.0.2
Successfully installed activestorage-7.0.4
Successfully installed actionmailbox-7.0.4
Successfully installed actiontext-7.0.4
Successfully installed thor-1.2.1
Successfully installed method_source-1.0.0
Successfully installed zeitwerk-2.6.2
Successfully installed railties-7.0.4
Successfully installed rails-7.0.4
Parsing documentation for tzinfo-2.0.5
Installing ri documentation for tzinfo-2.0.5
Parsing documentation for activesupport-7.0.4
Installing ri documentation for activesupport-7.0.4
Parsing documentation for rack-2.2.4
Installing ri documentation for rack-2.2.4
Parsing documentation for rack-test-2.0.2
Installing ri documentation for rack-test-2.0.2
Parsing documentation for crass-1.0.6
Installing ri documentation for crass-1.0.6
Parsing documentation for loofah-2.19.0
Installing ri documentation for loofah-2.19.0
Parsing documentation for rails-html-sanitizer-1.4.3
Installing ri documentation for rails-html-sanitizer-1.4.3
Parsing documentation for rails-dom-testing-2.0.3
Installing ri documentation for rails-dom-testing-2.0.3
Parsing documentation for builder-3.2.4
Installing ri documentation for builder-3.2.4
Parsing documentation for erubi-1.11.0
Installing ri documentation for erubi-1.11.0
Parsing documentation for actionview-7.0.4
Installing ri documentation for actionview-7.0.4
Parsing documentation for actionpack-7.0.4
Installing ri documentation for actionpack-7.0.4
Parsing documentation for activemodel-7.0.4
Installing ri documentation for activemodel-7.0.4
Parsing documentation for activerecord-7.0.4
Installing ri documentation for activerecord-7.0.4
Parsing documentation for globalid-1.0.0
Installing ri documentation for globalid-1.0.0
Parsing documentation for activejob-7.0.4
Installing ri documentation for activejob-7.0.4
Parsing documentation for mini_mime-1.1.2
Installing ri documentation for mini_mime-1.1.2
Parsing documentation for mail-2.7.1
Installing ri documentation for mail-2.7.1
Parsing documentation for net-protocol-0.1.3
Installing ri documentation for net-protocol-0.1.3
Parsing documentation for net-imap-0.3.1
Installing ri documentation for net-imap-0.3.1
Parsing documentation for actionmailer-7.0.4
Installing ri documentation for actionmailer-7.0.4
Parsing documentation for nio4r-2.5.8
Installing ri documentation for nio4r-2.5.8
Parsing documentation for websocket-extensions-0.1.5
Installing ri documentation for websocket-extensions-0.1.5
Parsing documentation for websocket-driver-0.7.5
Installing ri documentation for websocket-driver-0.7.5
Parsing documentation for actioncable-7.0.4
Installing ri documentation for actioncable-7.0.4
Parsing documentation for marcel-1.0.2
Installing ri documentation for marcel-1.0.2
Parsing documentation for activestorage-7.0.4
Installing ri documentation for activestorage-7.0.4
Parsing documentation for actionmailbox-7.0.4
Installing ri documentation for actionmailbox-7.0.4
Parsing documentation for actiontext-7.0.4
Installing ri documentation for actiontext-7.0.4
Parsing documentation for thor-1.2.1
Installing ri documentation for thor-1.2.1
Parsing documentation for method_source-1.0.0
Installing ri documentation for method_source-1.0.0
Parsing documentation for zeitwerk-2.6.2
Installing ri documentation for zeitwerk-2.6.2
Parsing documentation for railties-7.0.4
Installing ri documentation for railties-7.0.4
Parsing documentation for rails-7.0.4
Installing ri documentation for rails-7.0.4
Done installing documentation for tzinfo, activesupport, rack, rack-test, crass, loofah, rails-html-sanitizer, rails-dom-testing, builder, erubi, actionview, actionpack, activemodel, activerecord, globalid, activejob, mini_mime, mail, net-protocol, net-imap, actionmailer, nio4r, websocket-extensions, websocket-driver, actioncable, marcel, activestorage, actionmailbox, actiontext, thor, method_source, zeitwerk, railties, rails after 263 seconds
34 gems installed
Next, Check Rails version installed on the machine using the below command.
rails --version
Next, create an application using the below command
rails new railsapp
change to railsapp directory
cd railsapp
Next, start the rails application using the rails server
rails server
It starts the server at the listening 3000 port number.