 Среди распространенных ошибок при запуске проверки и восстановления целостности системных файлов с помощью SFC /scannow сообщение «Защите ресурсов Windows не удается запустить службу восстановления».
В этой пошаговой инструкции подробно о способах исправить ошибку «Защите ресурсов Windows не удается запустить службу восстановления» при выполнении команды sfc /scannow в Windows 11, Windows 10 и предыдущих версиях системы.
Прямое указание пути к sfc.exe в команде
Первый метод решить проблему, не гарантированно работающий, но очень быстрый: указать прямой путь к файлу sfc.exe в команде для запуска проверки и восстановления системных файлов.
Шаги будут следующими:
- Запустите командную строку от имени Администратора, Терминал Windows или Windows PowerShell от администратора также подойдут. Как запустить командную строку Windows 11 от администратора, Как запустить командную строку Windows 10 от администратора.
- Введите команду
C:\Windows\sysNative\sfc.exe /scannow
и нажмите Enter.


С большой вероятностью вы увидите стандартное сообщение «Начато сканирование системы. Этот процесс может занять некоторое время».
Командная строка x86 и x64
В 64-разрядных системах Windows присутствует 32-битные (x86) и 64-битные (x64) версии приложений командной строки и Windows PowerShell. При этом, если в 64-битной системе попробовать выполнить команду sfc /scannow в x86 варианте консоли, вы получите сообщение об ошибке «Защите ресурсов Windows не удается запустить службу восстановления».

При использовании стандартных средств Windows для запуска командной строки от имени администратора, почти всегда запускается «нужная», x64 версия. Однако, при использовании запуска из сторонних средств: какого-либо виджета, стороннего файлового менеджера, может быть запущена 32-битная x86 версия, что и будет являться причиной ошибки.
Если есть предположения о том, что это ваш случай, вы можете:
- Запустить командную строку от имени Администратора средствами Windows (ссылки на способы приведены в первой части этой инструкции).
- Зайти в папку C:\Windows\System32 (независимо от разрядности Windows), найти файл cmd.exe, нажать по нему правой кнопкой мыши и выбрать «Запуск от имени администратора», выполнить команду sfc /scannow
Запуск служб Установщик модулей Windows и Установщик Windows
В случае, если в системе отключены необходимые службы, sfc /scannow также может сообщать о рассматриваемой ошибке. Проверить службы и включить их можно следующим образом:
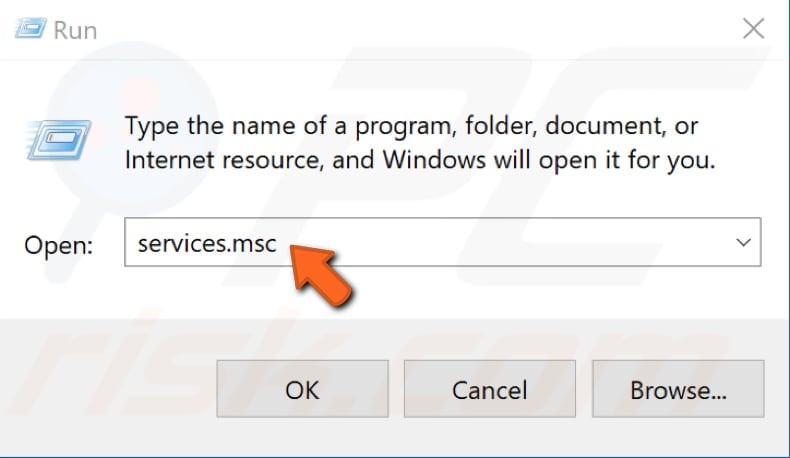
- Откройте «Службы». Для этого нажмите клавиши Win+R на клавиатуре, введите services.msc и нажмите Enter.
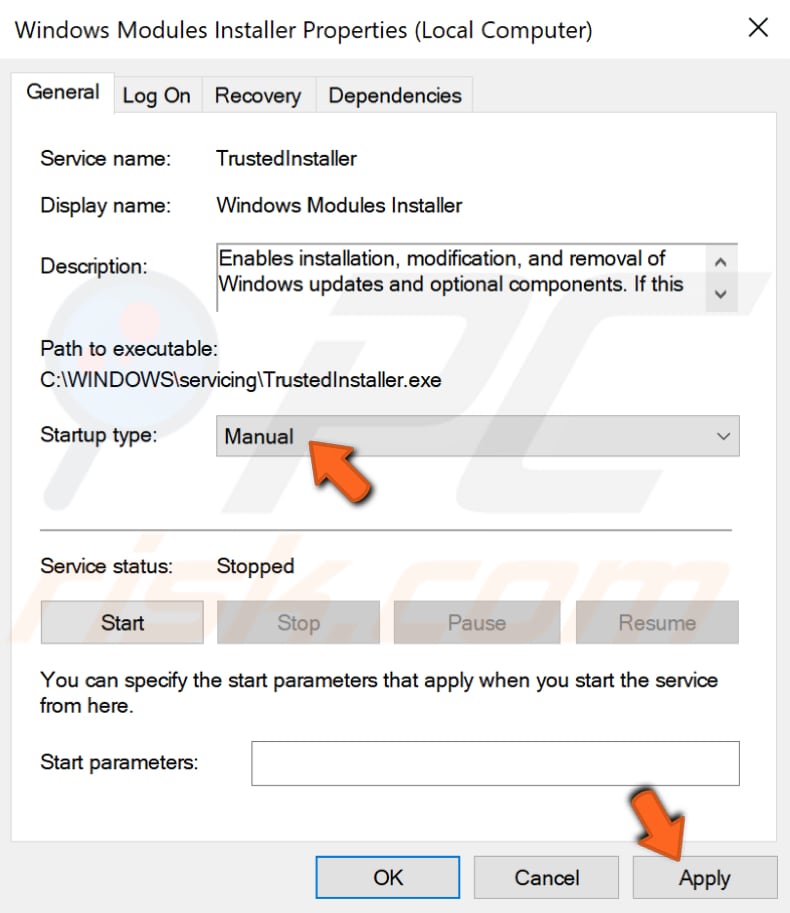
- В списке служб найдите «Установщик Windows» и «Установщик модулей Windows».

- Дважды нажмите по имени службы, чтобы открыть её свойства. По умолчанию для этих служб в «Тип запуска» должен быть установлен в значение «Вручную». Если это не так — измените тип запуска и примените настройки. В этом же окне можно вручную запустить службы с помощью соответствующей кнопки (кнопка не активна, если тип запуска — «Отключена»).

- После применения всех настроек снова запустите командную строку от имени администратора и попробуйте выполнить команду sfc /scannow


Исправление букв дисков при выполнении команды
Если ошибка «Защите ресурсов Windows не удается запустить службу восстановления» возникает при выполнении команд вида:
sfc /scannow /offbootdir=C:\ /offwindir=C:\Windows
с загрузочного накопителя, причиной этого может быть то, что буквы разделов диска при загрузке с флешки отличаются и в результате папка Windows находится не на привычном диске C. Способ определить актуальную букву системного диска:
- В командной строке по порядку вводим команды
diskpart
list volume
- Отобразится список разделов с текущими буквами, где мы и можем посмотреть букву системного раздела, чтобы в дальнейшем использовать в командах sfc
- В некоторых случаях системный раздел может не иметь буквы. В этом случае её можно назначить командами (здесь N — номер системного тома, а Z — назначаемая буква):
select volume N
assign letter=Z
- По завершении работы с diskpart введите команду exit
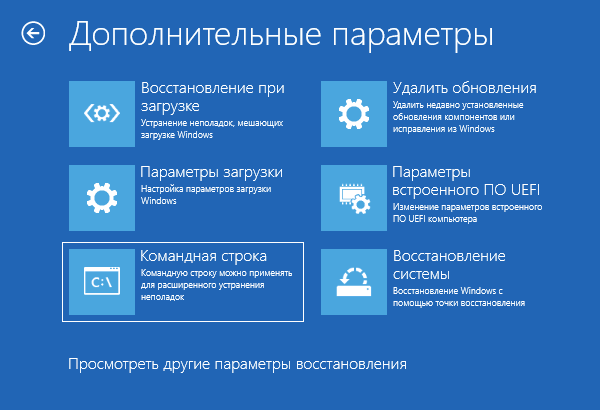
Запуск проверки целостности системных файлов в среде восстановления
Если ни один из способов выше не сработал, попробуйте выполнить команду в командной строке среды восстановления Windows 11 или Windows 10:
- Зайдите в среду восстановления — Как зайти в среду восстановления Windows 11, Как зайти в среду восстановления Windows 10.
- Перейдите в раздел Поиск и устранение неисправностей — Дополнительные параметры — Командная строка.

- Запустите сканирование sfc /scannow
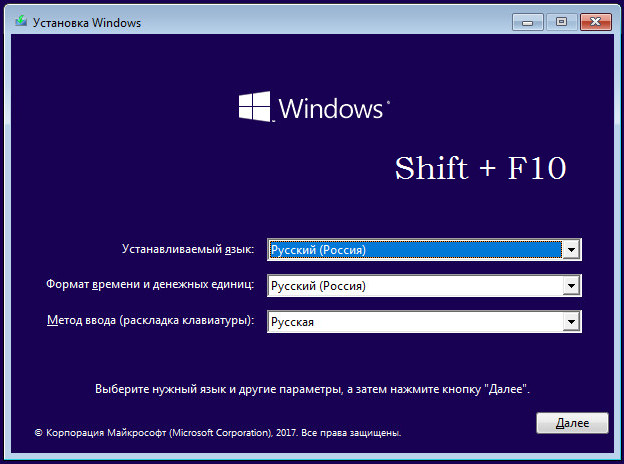
Запуск sfc /scannow с загрузочной флешки
Если у вас есть загрузочная флешка с вашей версией Windows или возможность создать её, можно использовать команду sfc /scannow с неё. Для этого:
- После загрузки компьютера с флешки, нажмите клавиши Shift+F10 (на некоторых ноутбуках — Shift+Fn+F10) откроется командная строка.
- В командной строке используйте команду
sfc /scannow /offbootdir=C:\ /offwindir=C:\Windows
Внимание: при загрузке с флешки буква системного диска может отличаться от C и в этом случае приведенная выше команда также сообщит о том, что защите ресурсов Windows не удается запустить службу восстановления. Чтобы исправить ситуации, прочтите раздел «Исправление букв дисков при выполнении команды» выше в статье.
Безопасный режим
И ещё один вариант, который иногда может сработать, если причина ошибки — какие-либо сторонние службы и процессы, мешающие выполнению команды: попробуйте запуск проверки в безопасном режиме. Здесь могут быть полезными материалы: Как зайти в безопасный режим Windows 11, Как зайти в безопасный режим Windows 10.
How to Fix the «Windows Resource Protection could not start the repair service» Error on Windows 10
System File Checker (SFC) is a utility in Windows that allows users to scan for corrupt Windows system files and restore them. Unfortunately, you may get the «Windows Resource Protection could not start the repair service» error when running the «SFC /Scannow» command. This article will show you how to fix this problem.

Windows Resource Protection (WRP) prevents the replacement of essential system files, folders, and registry keys part of the operating system. Permission for full access to modify WRP-protected resources is restricted to TrustedInstaller.
WRP-protected resources can only be changed using the Supported Resource Replacement Mechanisms with the Windows Modules Installer service.
TrustedInstaller is a process belonging to the Windows Modules Installer service in Windows 10, 8, 7, and Vista. Its primary function is to enable installing, removing, and modifying Windows Updates and optional system components.
Sometimes TrustedInstaller.exe may become corrupted, and you may get an error message. In such a case running the System File Checker may help.
However, sometimes, even the Windows Resource Protection service, which runs the System File Checker (SFC), is affected. In such a case, if you try to run the «sfc /scannow» command, you may get the error message saying: «Windows Resource Protection could not start the repair service».
Read the guide below to fix the «Windows Resource Protection could not start the repair service» error while trying to run the System File Checker.
Video Showing How to Fix the «Windows Resource Protection could not start the repair service» Error:
Table of Contents:
- Introduction
- Enable Windows Modules Installer Service
- Run System File Checker in Safe Mode
- Run DISM Scan
- Video Showing How to Fix the»Windows Resource Protection could not start the repair service» Error
Enable Windows Modules Installer Service
Windows Services (also known as services.msc), are used to modify how Windows services run on your system. You can modify a service’s settings for security, troubleshooting, and performance-related reasons.
You will need to access the Windows Installer service, which enables installation, modification, and removal of Windows updates and optional components. If this service is disabled, install or uninstall of Windows updates might fail for your computer.
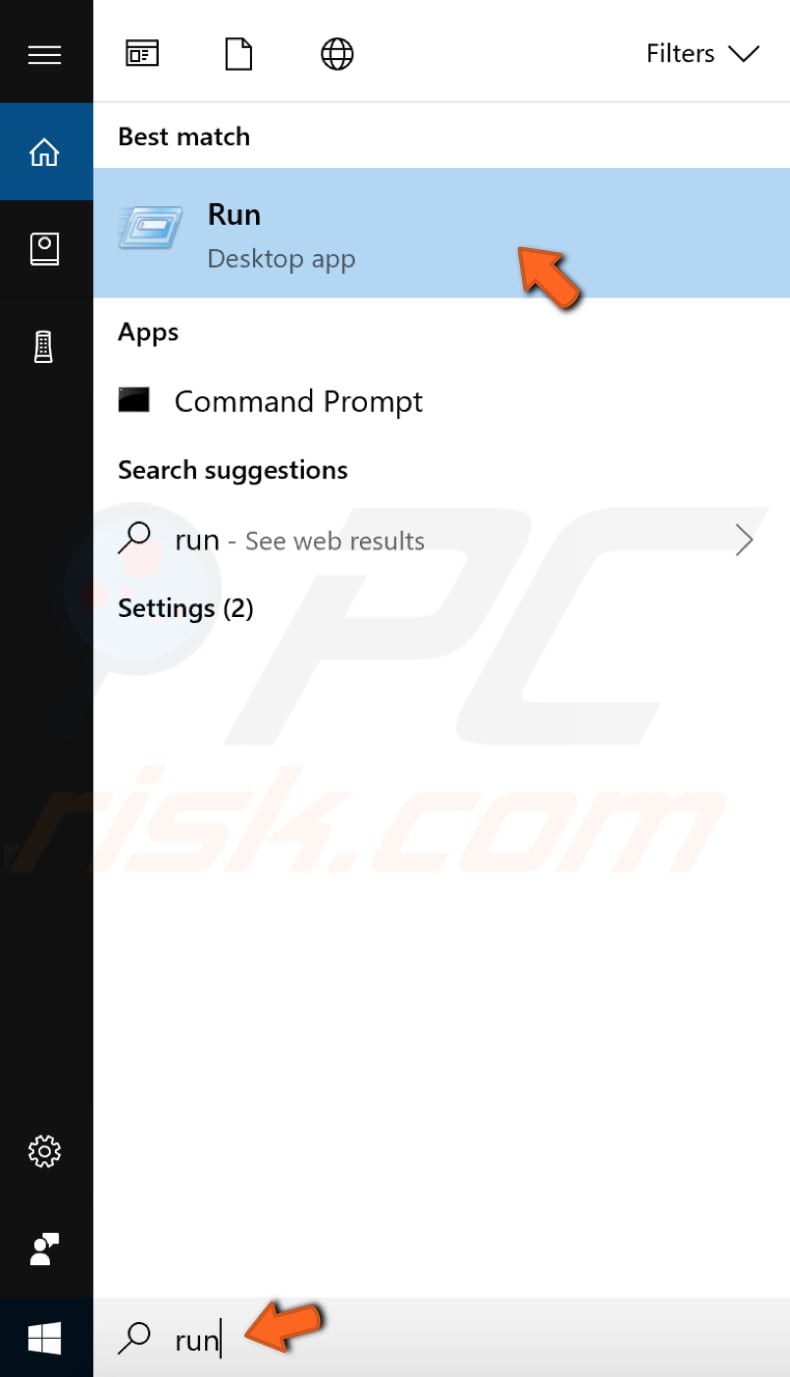
To access the Windows Modules Installer service type «run» in Search and click the «Run» result.
In the Run dialog box, type «services.msc» and click «OK» to open Windows Services.
Now scroll down through the services list to find the «Windows Modules Installer» service. Right-click it and select «Properties» in the dropdown menu. Or simply double-click the Windows Modules Installer service.

Make sure that «Startup type» is set to «Manual». If it is not set to Manual, then set it this way and click «Apply» to save the changes made.
You can also try to enable the TrustedInstaller using Command Prompt and its commands. Some commands available in Windows require that you run them from an elevated Command Prompt. This means you have to be running it with administrator-level privileges.
To open Command Prompt, type «command prompt» in Search and then right-click on the «Command Prompt», select «Run as administrator» from the dropdown menu to run Command Prompt with administrator privileges.
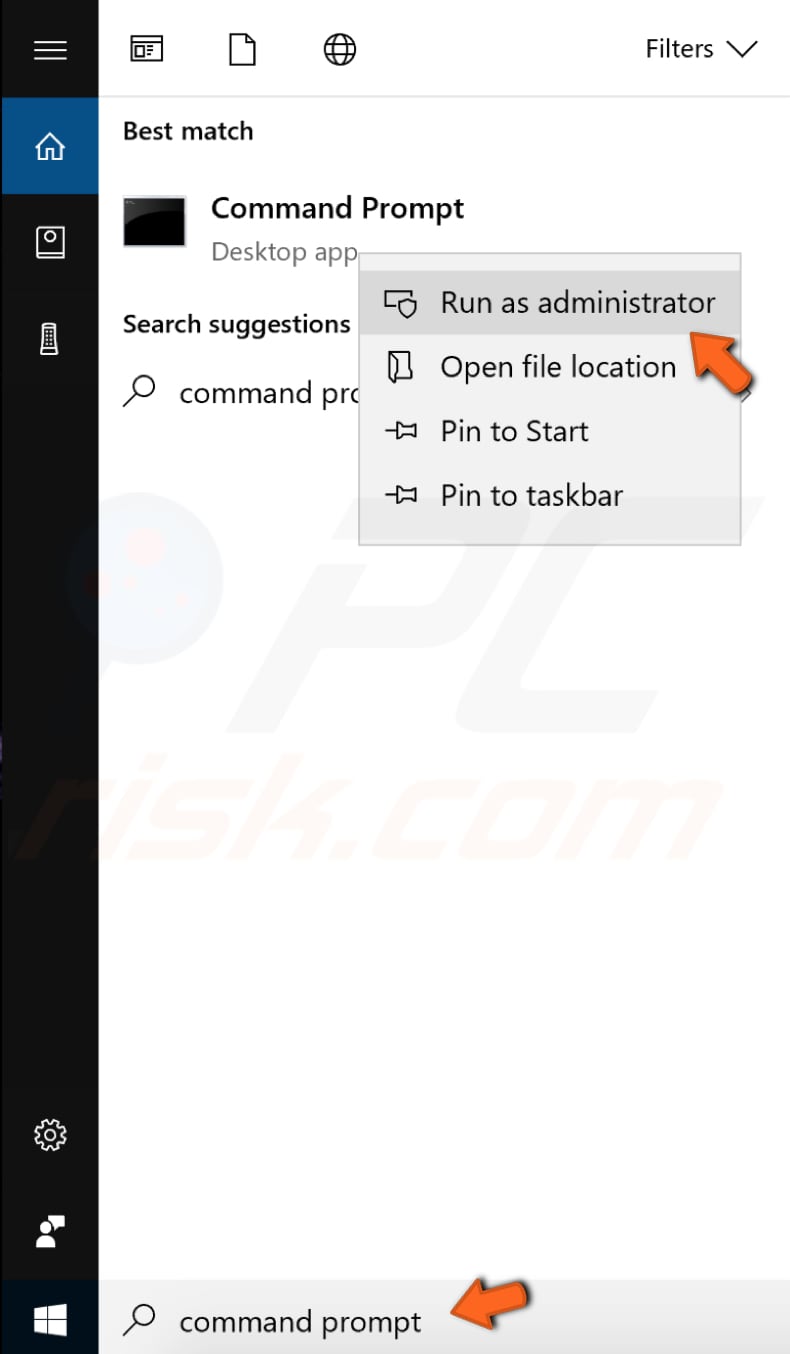
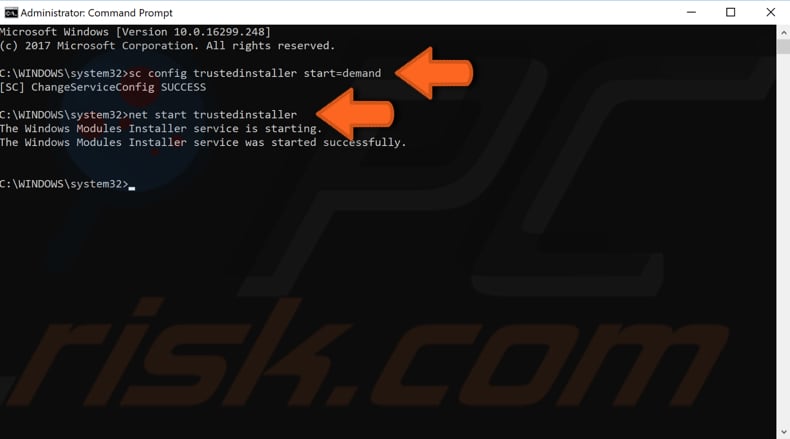
Now you will need to execute a couple of commands. Type «sc config trustedinstaller start=demand» and press Enter on your keyboard.
Then type «net start trustedinstaller», and press Enter on your keyboard again.
Now try to run the System File Checker and see if you are still getting the «Windows Resource Protection could not start the repair service» error.
[Back to Table of Contents]
Run System File Checker In Safe Mode
Another thing you might want to try is to run the System File Checker in Safe Mode. Safe Mode is a diagnostic start-up mode in Windows operating systems used to obtain limited access to Windows when the operating system does not start or function normally.
If you are not sure how to start your Windows in Safe Mode, read this article.
[Back to Table of Contents]
Run DISM Scan
DISM stands for Deployment Image Servicing and Management, and it can be used to repair and prepare Windows images, including the Windows Recovery Environment, Windows Setup, and Windows PE.
To run DISM scan, you need to open Command Prompt as administrator again and type in this command: «DISM /Online /Cleanup-Image /RestoreHealth». Press Enter on your keyboard to execute it.
See if this fixes the «Windows Resource Protection could not start the repair service» error while trying to run the System File Checker.

We hope this article was helpful in trying to fix the «Windows Resource Protection could not start the repair service» error, and now you can run the System File Checker without any problems. Do not hesitate to write a comment in the comment section below if you found another workaround for this error!
[Back to Top]
The Windows Resource Protection Could Not Start The Repair Service occurs when the system fails to run the System File Checker (SFC) Scan. There could be several causes for this problem, but it is most likely to occur if the Windows Module Installer service fails to function.
Bugs in the Windows, corrupted system files and issues in the System drive volume also can lead to this problem. On some Windows devices, viruses and malware infections could also trigger this problem while initiating the repair service.
Most Users have reported resolving this issue by restarting the Module Installer service. However, this issue has been reported on some Windows devices after installing Windows updates, and restarting the Windows service may not work in those cases.
Today, we’ll discuss how to fix this problem and get the Windows repair service back up and running.
Table of Contents
A system restart is recommended before proceeding with the fixes to eliminate the possibility of minor operating system glitches causing this issue.
- Open the Command prompt with administrative privileges.
- Type the command
SFC /scannowand hit enter. This should start the scan normally.
If it still shows the Windows Resource Protection Could Not Start The Repair Service error, try these suggested fixes to solve the problem.
Change the Startup type of the Windows Module Installer
Windows module installer is responsible for updating, modifying and removal of different Windows Services. It is also associated with the system files of Windows resource protection. It is seen that if this service fails to startup, the SFC scan fails to run and prompts Windows Resource Protection Could Not Start the Repair Service message.
- Press Windows Key + R, type
services.mscand hit enter.
- In the Services list, locate Windows Modules Installer and double-click to open its Properties.
- Set the Startup Type to Manual and Click on the Start Button.

- Click on Apply to save these changes.


If you cannot start the Module from the Windows Services, you can also force start it using the command line.
- Press Windows Key + X, and open Terminal ( Admin).
- Use this command to set the automatic startup type for the Windows module Installer.
sc config trustedinstaller start= auto
- Now, run the following command to restart the service.
net start trustedinstaller


Run the Repair service from the Safe Mode
In safe mode, Windows operates with minimal features and drivers. If there are some system processes causing the conflicts while carrying out the SFC scans, you can boot into safe mode and try running the scans.
- Go to the Start menu.
- Click on the power button, and select Restart while holding down the Shift key.
- The System will restart into recovery environment.
- Go to Troubleshoot > Advanced options > Startup Settings.

- Click on Restart Button.
- After the computer restarts, press F4. The system will now boot into Safe mode.

- Finally, try running the SFC scans.


Copy the Missing Dll to the System Directory
On some early builds of Windows 10 the wrprint.dll module that is used by many Windows applications seems to be missing. This is a common issue encountered in the insider build 14279 and 14291. This issue was later solved by rolling a stable update.
Here’s how to fix this problem without having to update the Windows.
- Open the notepad and copy the command into it.
@echo off cls setlocal set root=%SystemRoot%\WinSxS\%PROCESSOR_ARCHITECTURE%_microsoft-windows-servicingstack for /f "delims=" %%A in ('dir /ad /b %root%-onecore*') do set "from=%SystemRoot%\WinSxS\%%A" for /f "delims=" %%A in ('dir /ad /b %root%_*') do set "to=%SystemRoot%\WinSxS\%%A" takeown /F %to%\* /R /A 1>nul icacls %to%\*.* /T /grant administrators:F 1>nul echo on echo F|xcopy /C /R /O /Y %from%\wrpint.dll %to%\wrpint.dll pause - Save the file with a name
scanfix.cmd( it’s a batch file, thus avoid naming it asscanfix.cmd.txt)
- Now, run the file as an administrator.
- The command line will copy the
wrprint.dllto the relevant directory. You will see 1 File(s) message when this happens.
- At last open the command prompt with administrative privileges and run the SFC command.


Run SFC Offline
If you are not able to run the SFC scans from the Recovery environment or the safe mode, you can use a bootable installation media and then run the SFC command offline.
- Connect your Windows Installation Media to your Device.
- Change the Boot Priority and boot the device using the installation media.
- Click on Next in the Installation prompt.
- Select the options to Repair your computer.
- Go to Troubleshoot > Advanced Options > Command Prompt.
- Now, use this command to determine the system partition.
BCDEDIT
- Under the Windows Boot loader section, check for the partition drive letter and system root.
- Finally, use this command to perform the SFC scans.
sfc /scannow /offbootdir=<SysPartition_Drive_Letter>:\ /offwindir=<Windows_Drive_Letter>:\windows


For instance, if the partition drive letter is C: and the system root is \Windows, use the above command as,sfc /SCANNOW /OFFBOOTDIR=C:\ /OFFWINDIR=C:\windows
Perform DISM scans
When the Windows image file (.WIM) gets corrupted or has some potential issues with it, it can trigger problems with the repair service as well. The system file related to the repair service might get affected because of different reasons. To repair these underlying issues with the service, you can run the DISM scans.
- Open the Windows terminal with elevated privileges.
- Execute this command to run the DISM scan.
DISM /Online /Cleanup-Image /RestoreHealth
- When the process gets completed, try running the SFC scan.

Run CHKDSK Scans
Logical errors in the disk and problems with the file system metadata can result in different system-related issues. If the system partition gets affected by such logical errors, different Windows services can face functional hitches. This might also be the case that is causing the Windows repair service (SFC in specific) not to function as intended.
You can perform the CHKDSK scans to fix such drive-related problems and then see if the SFC scans work.
- Open Command Prompt with administrative privileges.
- Now, run the following command to start the
chkdskscan.chkdsk /r
- Type Y and hit enter. The scans will start after a system restart.
- Run the SFC scans after the disk check process gets completed.

Uninstall Windows Update
Some of the rolled-out Windows Update builds are reported to have issues with the System File Checker. For instance, packages like the KB2821895 are said to bring problems to the repair service.
If you have encountered a similar problem after the windows update, then it is recommended to uninstall it to get a resolve.
- Press Windows Key + I to open the Settings apps.
- Go to Windows Update > Update History.

- Scroll down and locate Uninstall updates options.
- Find the most recently installed update that you suspect is causing this error.
- Click on the Uninstall button


Perform System Restore
If the issue with the Windows repair service has suddenly popped up, system restore also becomes a viable option to fix this issue. System restore takes your system back to the point where the problem exists.
However, you must have created a restore point before the occurrence of this problem.
- Press Windows Key + R, type
rstrui.exeand hit enter. This will open the System restore utility.
- Select the Choose a different restore point option and click on Next.
- Choose the restore point that was created prior to the occurrence of the issue.
- Click on Next and follow the prompt.
- Verify if the issue has been solved after the restoration process is complete.


Windows Reset
If the system restore does not work, you can reset the whole Windows operating system to default using the Windows Reset service. Here’s how to do it.
- Press Windows Key + R, type
systemreset –factoryresetand hit enter to launch the Windows Reset utility.
- Choose the option Keep my files.
- Now, select the Local reinstall option.

- Follow the prompt and complete the reset process.
- When the reset is complete, open the command prompt and run the SFC command.


It is best to perform a clean Windows installation to resolve this issue altogether. However, you must back up your files before doing it. We have a comprehensive guide for you on performing a clean Windows installation.
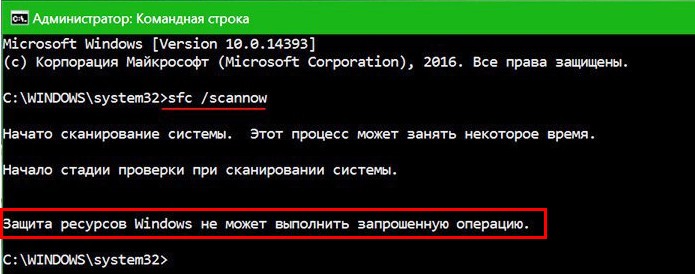
Повреждение системных файлов далеко не всегда означает крах Windows, всё зависит от того, какие именно компоненты были повреждены. Если они не являются для системы критичными, проблемы ограничатся сбоями в работе отдельных приложений и функций, к тому же такие неполадки часто удаётся устранить, запустив командой sfc /scannow встроенное средство восстановления системных файлов. Но и здесь пользователя может поджидать неприятность. Инструмент или не запускается, или запускается, но вскоре начатое сканирование завершается ошибкой «Защита ресурсов Windows не может выполнить запрошенную операцию».
Означает ли это, что всё так плохо, что даже SFC не работает? Не всегда, просто во время проверки в системе происходит сбой или инструмент не может получить доступ к каталогу WinSxS, в коем расположены важные файлы. Вероятны и другие причины — повреждение файловой системы, наличие физически нечитаемых секторов на диске, отсутствие у пользователя соответствующих прав доступа. Что делать и с чего начинать поиск причин неполадки?
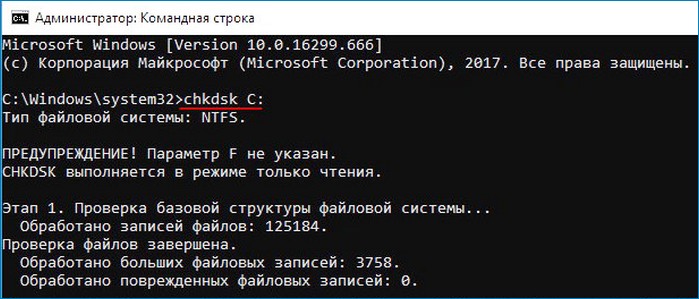
Для начала убедитесь, что командная строка запущена от имени администратора,
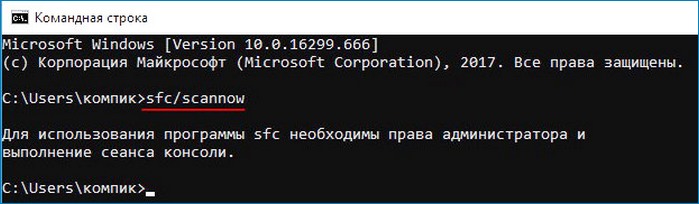
хотя вообще-то Windows должна сама об этом предупреждать. Если вы запускаете инструмент как положено с админскими привилегиями, а ошибка всё равно появляется, проверьте состояние файловой системы, выполнив тут же в консоли команду chkdsk C:
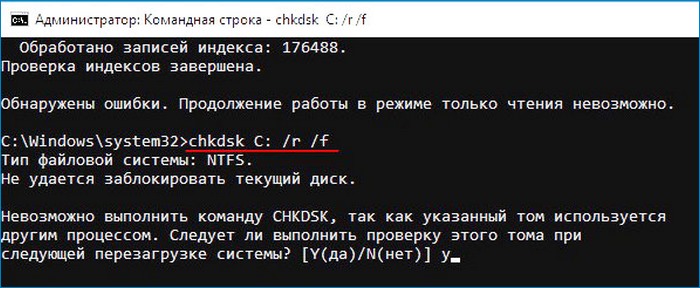
Если будут обнаружены ошибки, повторите команду, но уже с параметрами /r /f, как показано на скриншоте. Действие потребуется подтвердить вводом Y, при этом компьютер будет перезагружен, а сканирование и исправление выполнено до загрузки рабочего стола.
Причиной ошибки сканирования может быть ограничение доступа SFC к каталогу WinSxS. Попробуйте снять их, выполнив в консоли CMD команду
icacls c:\windows\winsxs
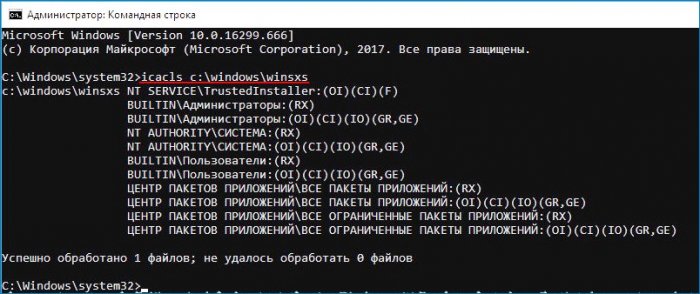
и перезагрузив компьютер.
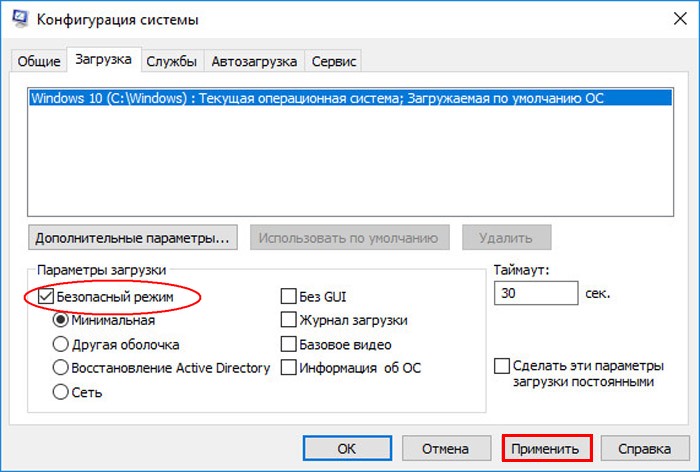
Следующий шаг — запуск процедуры сканирования SFC в безопасном режиме. Загрузиться в него проще всего с помощью утилиты msconfig, переключившись на вкладку «Загрузка» и установив галочку в соответствующем чекбоксе.
Далее всё как обычно, открываем командную строку с повышенными привилегиями и выполняем команду sfc/scannow.
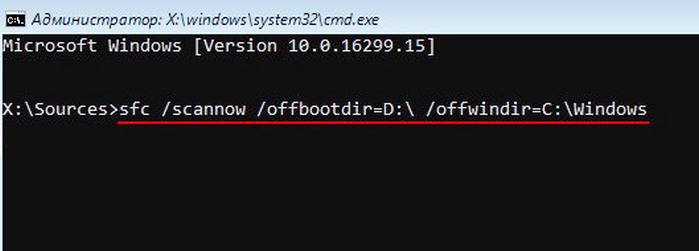
Будет еще лучше, если запустить сканирование SFC оффлайн. Для этого нужно загрузиться с установочного диска Windows, при появлении окна мастера установки нажать Shift + F10,
открыв тем самым командную строку, определить в ней буквы дисков, а затем выполнить такую команду:
sfc /scannow /offbootdir=D:\ /offwindir=C:\Windows
Где:
offbootdir=D:\ раздел, содержащий папку WinSxS.
offwindir=C:\Windows — раздел с установленной ОС.
- Примечание: определить буквы томов в загрузочной среде проще всего с помощью Блокнота, запустив его командой notepad и выбрав Файл → Сохранить как.
Если приведенные выше способы не дали результатов, высока вероятность, что отказ защиты ресурсов Windows вызван повреждением самого хранилища системных компонентов, то есть содержимого папки WinSxS. Проверить его состояние можно командой
Dism /Online /Cleanup-Image /ScanHealth
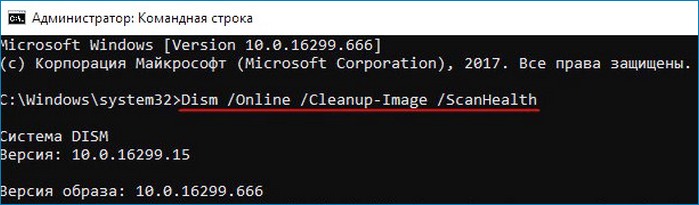
если она выдает сообщение о необходимости восстановление хранилища, выполняем в консоли такую команду:
Dism /Online /Cleanup-Image /RestoreHealth
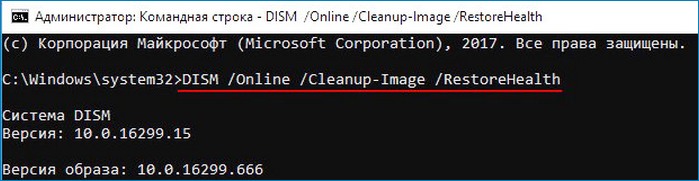
Компьютер при этом должен быть подключен к интернету, поскольку Windows может потребоваться подключиться к серверу Microsoft и скачать недостающие файлы. По завершении процедуры перезагружаемся. Теперь, когда хранилище восстановлено, sfc/scannow должна заработать как надо.
In this guide, we will show you quick ways to fix this issue and restore normalcy on your PC.
How to fix the Windows resource protection SFC error?
1. Run SFC in Safe Mode
If you are getting the Windows resource protection could not start the repair service error while trying to run the SFC scan on normal boot, you might need to run the scan in Safe Mode.
If the scan works normally, the problem could be due to a third-party app or process.
2. Make some security changes
SFC might be interrupted if the winsxs folder cannot be accessed for some reason. The might be why you are getting the Windows resource protection could not start the repair service error.
You can fix this by modifying security descriptors for that folder.
3. Run CHKDSK from Command Prompt
Another reason for the Windows resource protection could not start the repair service is related to hard disk errors. The easiest way to fix this is to run the CHKDSK command.
The three methods detailed in this tutorial should help you solve the Windows resource protection could not start the repair service error on Windows 10. It means that now you can run the SFC scan without any sort of problems.
If the SFC scan is still not working on your PC, check our detailed guide to fix it quickly.
Let us know which of the methods worked best for you by leaving us a message in the comments below.
Name *
Email *
Commenting as . Not you?
Save information for future comments
Comment
Δ