A wired Ethernet connection lets you get a fast internet connection—plug one end of the Ethernet cable into your router at home, then plug the other end into the Ethernet port on your Windows PC. (If your PC doesn’t have an Ethernet port but you want to try this option, you might consider getting a USB to Ethernet adapter.)
If you’re using an Ethernet connection and can’t connect to the internet, there are a few things you can try to try to fix the problem and get connected.
On your home router
Try these things first to help you fix or narrow down the connection problem.
-
Check the Ethernet cable and connection. Make sure the Ethernet cable is securely plugged into the Ethernet port on both your router and Windows 11 PC. On your router, make sure the Ethernet cable is plugged into the correct Ethernet port—not the Internet port that’s used to connect your modem and router.
If one Ethernet cable doesn’t work and you have another one nearby, try the other Ethernet cable to see if that works. If it does, it might be a problem with the first cable.
-
Restart your modem and wireless router. This helps create a new connection to your internet service provider (ISP). When you do this, everyone that is connected to your Wi-Fi network will be temporarily disconnected. The steps you take to restart your modem and router can vary, but here are the general steps.
Note: If you have a cable modem/Wi-Fi router combo device, you only need to follow the steps for the single device.
-
Unplug the power cable for the router from the power source.
-
Unplug the power cable for the modem from the power source.
Some modems have a backup battery. If you unplug the modem and lights stay on, remove the battery from the modem.
-
Wait at least 30 seconds or so.
If you had to remove the battery from the modem, put it back in.
-
Plug the modem back into the power source. The lights on the modem will blink. Wait for them to stop blinking.
-
Plug your router back into the power source.
Wait a few minutes for the modem and router to fully power on. You can usually tell when they’re ready by looking at the status lights on the two devices.
-
On your PC, try to connect again using the Ethernet connection.
On your PC
-
Check the network status in Settings. Open Settings > Network & internet. Check your Ethernet connection status at the top of the screen. Make sure it says Connected underneath the network connection name. If there’s an error, such as one that says Action needed, select Ethernet to view your Ethernet connection settings.
If one Ethernet cable doesn’t work and you have another one nearby, try the other Ethernet cable to see if that works. If it does, it might be a problem with the first cable.
-
Connect to Wi-Fi instead. If your router is a Wi-Fi router, try to connect to Wi-Fi and see if you can get connected. This can do two things—help you get an internet connection and help you narrow down the source of the problem. For more info, see Connect to a Wi-Fi network in Windows.
-
Run network commands. Try running these network commands to manually reset the TCP/IP stack, release and renew the IP address, and flush and reset the DNS client resolver cache:
-
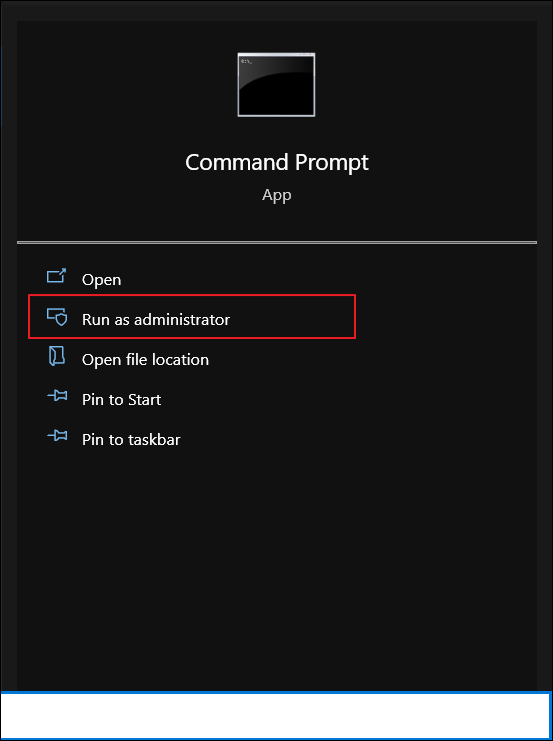
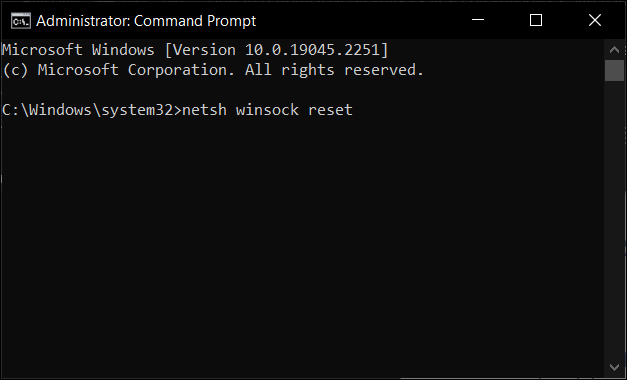
Select Search on the taskbar, type Command prompt. The Command Prompt button will appear. To the right of it, select Run as administrator > Yes.
-
At the command prompt, run the following commands in the listed order, and then check to see if that fixes your connection problem:
-
Type netsh winsock reset and select Enter.
-
Type netsh int ip reset and select Enter.
-
Type ipconfig /release and select Enter.
-
Type ipconfig /renew and select Enter.
-
Type ipconfig /flushdns and select Enter.
-
-
Uninstall the Ethernet network adapter driver and restart. If the previous steps didn’t work, try to uninstall the network adapter driver, and then restart your computer. Windows will automatically install the latest driver. Consider this approach if your network connection stopped working properly after a recent update.
Before uninstalling, make sure you have drivers available as a backup. Visit the PC manufacturer’s website and download the latest network adapter driver from there. If your PC can’t connect to the internet, you’ll need to download a driver on a different PC and save it to a USB flash drive so you can install the driver on your PC. You’ll need to know the PC manufacturer and model name or number.
-
Select Search on the taskbar, type Device Manager, and then select Device Manager from the list of results.
-
Expand Network adapters and locate the Ethernet network adapter for your device.
-
Select the network adapter, press and hold (or right-click), and then select Uninstall device > the Attempt to remove the driver for this device check box > Uninstall.
-
After uninstalling the driver, select the Start button > Power > Restart.
After your PC restarts, Windows will automatically look for and install the network adapter driver. Check to see if that fixes your connection problem. If Windows doesn’t automatically install a driver, try to install the backup driver you saved before uninstalling.
-
Use network reset. Using network reset should be the last step you try. Consider using it if the steps above don’t help to get you connected.
This can help solve connection problems you might have after upgrading from Windows 10 to Windows 11. It can also help to fix the problem where you can connect to the internet but can’t connect to shared network drives. Network reset removes any network adapters you have installed and the settings for them. After your PC restarts, any network adapters are reinstalled, and the settings for them are set to the defaults.
-
Select the Start button, then enter settings. Select Settings > Network & internet > Advanced network settings > Network reset.
Open Network & internet status settings
-
On the Network reset screen, select Reset now > Yes to confirm.
Wait for your PC to restart and see if that fixes the problem.
Notes:
-
After using network reset, you might need to reinstall and set up other networking software you might be using, such as VPN client software or virtual switches from Hyper‑V (if you’re using that or other network virtualization software).
-
Network reset might set each one of your known network connections to a public network profile. In a public network profile, your PC is not discoverable to other PCs and devices on the network, which can help make your PC more secure. However, if your PC is used for file or printer sharing, you’ll need to make your PC discoverable again by setting it to use a private network profile. To do this, select the Start button, then enter settings. Select Settings > Network & internet > Ethernet . On the Ethernet screen, under Network profile type, select Private.
-
On another PC
-
Try to connect to the same network on a different device. If you have another Windows PC in your home and a USB to Ethernet adapter, try to connect using that PC. If you can connect, the source of the problem is likely due to your first PC. If you can’t connect to the Ethernet network on either PC, it might be a problem with your router, internet service provider, or USB to Ethernet adapter.
On your home router
Try these things first to help you fix or narrow down the connection problem.
-
Check the Ethernet cable and connection. Make sure the Ethernet cable is securely plugged into the Ethernet port on both your router and Windows 10 PC. On your router, make sure the Ethernet cable is plugged into the correct Ethernet port—not the Internet port that’s used to connect your modem and router.
If one Ethernet cable doesn’t work and you have another one nearby, try the other Ethernet cable to see if that works. If it does, it might be a problem with the first cable.
-
Restart your modem and wireless router. This helps create a new connection to your internet service provider (ISP). When you do this, everyone that is connected to your Wi-Fi network will be temporarily disconnected. The steps you take to restart your modem and router can vary, but here are the general steps.
Note: If you have a cable modem/Wi-Fi router combo device, you only need to follow the steps for the single device.
-
Unplug the power cable for the router from the power source.
-
Unplug the power cable for the modem from the power source.
Some modems have a backup battery. If you unplug the modem and lights stay on, remove the battery from the modem.
-
Wait at least 30 seconds or so.
If you had to remove the battery from the modem, put it back in.
-
Plug the modem back into the power source. The lights on the modem will blink. Wait for them to stop blinking.
-
Plug your router back into the power source.
Wait a few minutes for the modem and router to fully power on. You can usually tell when they’re ready by looking at the status lights on the two devices.
-
On your PC, try to connect again using the Ethernet connection.
On your PC
-
Check the network status in Settings. Open Settings > Network & Internet > Status. Check your Ethernet connection status there. It should display You’re connected to the Internet underneath the Ethernet network connection.
If one Ethernet cable doesn’t work and you have another one nearby, try the other Ethernet cable to see if that works. If it does, it might be a problem with the first cable.
-
Connect to Wi-Fi instead. If your router is a Wi-Fi router, try to connect to Wi-Fi and see if you can get connected. This can do two things—help you get an internet connection and help you narrow down the source of the problem. For more info, see Connect to a Wi-Fi network in Windows.
-
Run network commands. Try running these network commands to manually reset the TCP/IP stack, release and renew the IP address, and flush and reset the DNS client resolver cache:
-
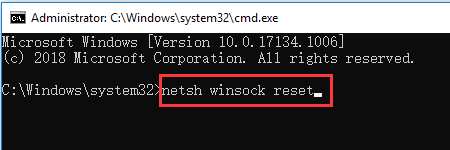
In the search box on the taskbar, type Command prompt. The Command Prompt button will appear. To the right of it, select Run as administrator > Yes.
-
At the command prompt, run the following commands in the listed order, and then check to see if that fixes your connection problem:
-
Type netsh winsock reset and select Enter.
-
Type netsh int ip reset and select Enter.
-
Type ipconfig /release and select Enter.
-
Type ipconfig /renew and select Enter.
-
Type ipconfig /flushdns and select Enter.
-
-
Uninstall the Ethernet network adapter driver and restart. If the previous steps didn’t work, try to uninstall the network adapter driver, and then restart your computer. Windows will automatically install the latest driver. Consider this approach if your network connection stopped working properly after a recent update.
Before uninstalling, make sure you have drivers available as a backup. Visit the PC manufacturer’s website and download the latest network adapter driver from there. If your PC can’t connect to the internet, you’ll need to download a driver on a different PC and save it to a USB flash drive so you can install the driver on your PC. You’ll need to know the PC manufacturer and model name or number.
-
In the search box on the taskbar, type Device Manager, and then select Device Manager from the list of results.
-
Expand Network adapters and locate the Ethernet network adapter for your device.
-
Select the network adapter, press and hold (or right-click), and then select Uninstall device > the Attempt to remove the driver for this device check box > Uninstall.
-
After uninstalling the driver, select the select the Start button > Power > Restart.
After your PC restarts, Windows will automatically look for and install the network adapter driver. Check to see if that fixes your connection problem. If Windows doesn’t automatically install a driver, try to install the backup driver you saved before uninstalling.
-
Use network reset. Using network reset should be the last step you try. Consider using it if the steps above don’t help to get you connected.
This can help fix the problem where you can connect to the internet but can’t connect to shared network drives. Network reset removes any network adapters you have installed and the settings for them. After your PC restarts, any network adapters are reinstalled, and the settings for them are set to the defaults.
-
Select the Start button, then select Settings > Network & Internet > Status > Network reset.
Open Network & internet status settings
-
On the Network reset screen, select Reset now > Yes to confirm.
Wait for your PC to restart and see if that fixes the problem.
Notes:
-
After using network reset, you might need to reinstall and set up other networking software you might be using, such as VPN client software or virtual switches from Hyper‑V (if you’re using that or other network virtualization software).
-
Network reset might set each one of your known network connections to a public network profile. In a public network profile, your PC is not discoverable to other PCs and devices on the network, which can help make your PC more secure. However, if your PC is used for file or printer sharing, you’ll need to make your PC discoverable again by setting it to use a private network profile. To do this, select the Start button, then select Settings > Network & Internet > Ethernet . On the Ethernet screen, select the Ethernet network connection you want to change, then select Private under Network profile.
-
On another PC
-
Try to connect to the same network on a different device. If you have another Windows PC in your home and a USB to Ethernet adapter, try to connect using that PC. If you can connect, the source of the problem is likely due to your first PC. If you can’t connect to the Ethernet network on either PC, it might be a problem with your router, internet service provider, or USB to Ethernet adapter.
Need more help?
Want more options?
Explore subscription benefits, browse training courses, learn how to secure your device, and more.
Communities help you ask and answer questions, give feedback, and hear from experts with rich knowledge.
Статья обновлена: 02 мая 2023
ID: 12378
Если у вас возникли проблемы с подключением к сети, сбросьте сетевые настройки в Windows.
Сброс сетевых настроек также сбрасывает настройки прокси-сервера.
Как сбросить сетевые настройки с помощью командной строки
Как сбросить сетевые настройки в Windows 10 и Windows 11
Спасибо за ваш отзыв, вы помогаете нам становиться лучше!
Спасибо за ваш отзыв, вы помогаете нам становиться лучше!
Обычно сброс сетевых настроек в Windows это последнее средство, которое стоит попробовать для решения сложных проблем с доступом к локальной сети или Интернету. При этом на компьютере сбрасываются настройки сетевых адаптеров, настройки стека TCP/IP до стандартных настроек в чистой Windows, удаляются и переустанавливаются все сетевые адаптеры компьютера. В этой статье мы рассмотрим особенности сброса сетевых настроек в Windows из графического интерфейса и с помощью командной строки.
Прежде чем прибегать к сбросу сетевых настроек, убедитесь, что вы попробовали все стандартные средства диагностики работы с сетью: проверили настройки IP, работу маршрутизатора/роутера/провайдера, обновили драйвера сетевых адаптеров, перезагружали компьютер, воспользовались встроенным Windows Network Troubleshooter (команда
msdt.exe /id NetworkDiagnosticsNetworkAdapter
) и т.д. Если ни один инструментов не помог исправить сетевую проблему, можно попробовать сбросить сетевые настройки.
Содержание:
- Сохраните текущие сетевые настройки Windows
- Сброс сетевых настроек из панели управления Windows
- Сброс сетевых настроек из командной строки Windows
Сохраните текущие сетевые настройки Windows
При сбросе сети в Windows будут потеряны все настройки, которые вы задали вручную: IP адреса, DNS сервера, статические маршруты, настройки сетевых драйверов, очищены сохраненные Wi-Fi сети и т.д. Поэтому перед сбросом важно сохранить текущие настройки.
Выведите список сетевых адаптеров:
Get-NetAdapter|select name,InterfaceIndex,InterfaceDescription,InterfaceOperationalStatus,MediaConnectionState,DriverInformation|ft

Для всех подключенных сетевых адаптеров проверьте, получают ли они настройки автоматически (через DHCP) или вручную:
Get-NetIPInterface -InterfaceIndex 7

Если для интерфейса значение
Dhcp=Disabled
, значит для адаптера настройки IP заданы вручную и вам нужно сохранить текущие настройки в файл:
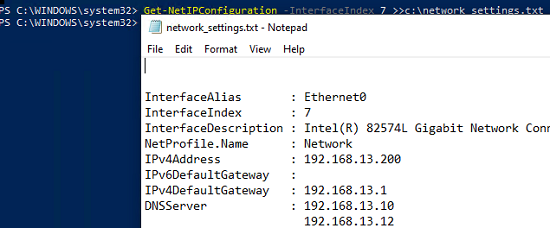
Get-NetIPConfiguration -InterfaceIndex 7 >>c:\network_settings.txt
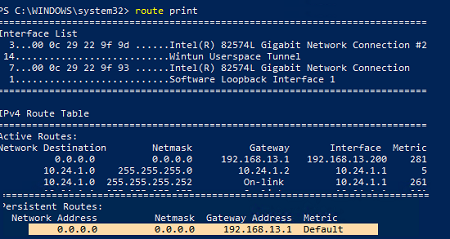
Выведите и запишите все статические маршруты в таблице маршрутизации (из секции Persistent Routes):
Route print
С помощью PowerShell выведите список VPN подключений, запишите их настройки:
Get-VpnConnection
В моем случае настройки сохраненных VPN подключений не были сброшены. Также не был удален виртуальный адаптер OpenVPN Wintun (адаптер для подключения к OpenVPN серверу).
Выведите WLAN профили и сохраните настройки беспроводных сетей в файл:
netsh wlan show profile
netsh wlan export profile name="Xiaomi_20F5" key=clear folder=c:\ps
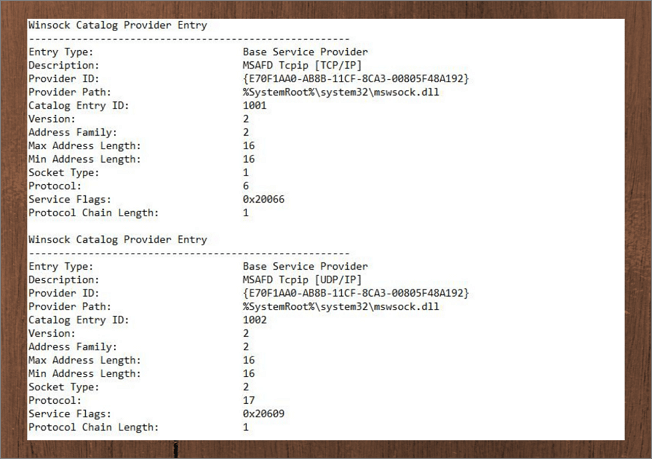
Сохраните настройки Winsock:
netsh winsock show catalog > c:\winsock-backup.txt
После сброса сети сохраненная информация поможет вам восстановить все сетевые настройки, заданные вручную.
Сброс сетевых настроек из панели управления Windows
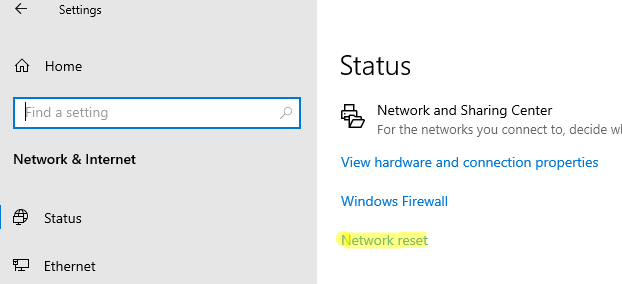
В Windows 10 (1607+), Windows 11 и Windows Server 2019/2022 можно сбросить сетевые настройки из панели Параметры (Settings). Перейдите в раздел Settings -> Network (или выполните команду быстрого доступа к ms-settings: ms-settings:network). Нажмите кнопку Network reset -> Reset now.
Подтвердите сброс сетевых настроек. Windows очистит все сетевые настройки и удалит сетевые карты (сетевые адаптеры не будут отображаться в Панели Управления). Настройки сети будут сброшены до заводских. Windows автоматически перезагрузится через 5 минут.
После загрузки Windows обнаружит все подключенные сетевые адаптеры и устанвит драйвера. Останется настроить параметры сетевых подключение и проверить, исправлена ли проблема.
Сброс сетевых настроек из командной строки Windows
Все те же действия, которая выполнила процедура сброса сети из панели Settings можно выполнить из командной строки.
Сбросьте кэш DNS:
ipconfig /flushdns
Сбросьте настройки WinSock:
netsh winsock reset
Sucessfully reset the Winsock Catalog.
You must restart the computer in order to complete the reset.
Команда сбрасывает настройки в ветке реестра HKEY_LOCAL_MACHINE\SYSTEM\CurrentControlSet\Services\WinSock2\Parameters . При этом старые настройки сохраняются в ветку Protocol_Catalog_Before_Reset. 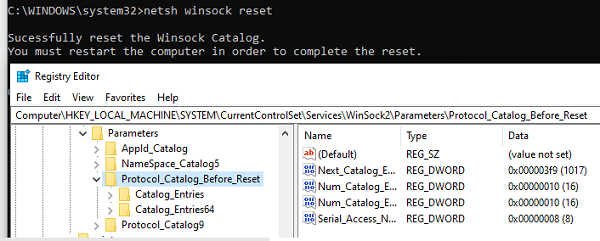
Сброс настроек стека TCP/IP:
netsh int ip reset
Для сброса настроек TCP/IPv6:
netsh int ipv6 reset
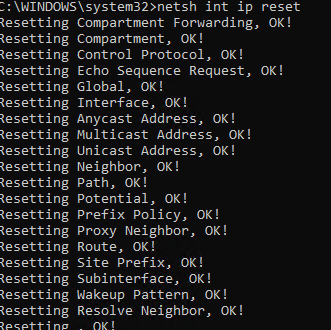
Resetting Compartment Forwarding, OK!
Resetting Compartment, OK!
Resetting Control Protocol, OK!
Resetting Echo Sequence Request, OK!
Resetting Global, OK!
Resetting Interface, OK!
Resetting Anycast Address, OK!
Resetting Multicast Address, OK!
Resetting Unicast Address, OK!
 Resetting Neighbor, OK!
Resetting Path, OK!
Resetting Potential, OK!
Resetting Prefix Policy, OK!
Resetting Proxy Neighbor, OK!
Resetting Route, OK!
Resetting Site Prefix, OK!
Resetting Subinterface, OK!
Resetting Wakeup Pattern, OK!
Resetting Resolve Neighbor, OK!
Resetting , OK!
Restart the computer to complete this action.
Сбрасываются настройки в ветках реестра HKLM\SYSTEM\CurrentControlSet\Services\Tcpip\Parameters и \SYSTEM\CurrentControlSet\Services\DHCP\Parameters.
Удалите все сетевые адаптеры:
netcfg -d
Successfully removed all MUX Objects.
Removing device "Intel(R) 82574L Gigabit Network Connection"
Removing device "WAN Miniport (PPPOE)"
Skipping the removal of "Wintun Userspace Tunnel"
Removing device "WAN Miniport (PPTP)"
Removing device "WAN Miniport (IKEv2)"
Check to see if the "Microsoft Kernel Debug Network Adapter" bindings should be reset
"Microsoft Kernel Debug Network Adapter" binding check complete
Removing device "WAN Miniport (Network Monitor)"
Removing device "WAN Miniport (IP)"
Removing device "WAN Miniport (SSTP)"
Removing device "WAN Miniport (IPv6)"
Removing device "WAN Miniport (L2TP)"
Please reboot the computer...
Сброс всех правил Windows Defender Firewall:
netsh advfirewall reset
В PowerShell также есть отдельная команда для сброса расширенных настроек конкретного сетевого адаптера. Сначала вы можете получить текущие настройки адаптера:
Get-NetAdapterAdvancedProperty -Name Ethernet0|ft -AutoSize
Name DisplayName DisplayValue RegistryKeyword RegistryValue
---- ----------- ------------ --------------- -------------
Ethernet0 Flow Control Rx & Tx Enabled *FlowControl {3}
Ethernet0 Interrupt Moderation Enabled *InterruptModeration {1}
Ethernet0 IPv4 Checksum Offload Rx & Tx Enabled *IPChecksumOffloadIPv4 {3}
Ethernet0 Jumbo Packet Disabled *JumboPacket {1514}
Ethernet0 Large Send Offload V2 (IPv4) Enabled *LsoV2IPv4 {1}
Ethernet0 Large Send Offload V2 (IPv6) Enabled *LsoV2IPv6 {1}
Ethernet0 Maximum Number of RSS Queues 2 Queues *NumRssQueues {2}
Ethernet0 Packet Priority & VLAN Packet Priority & VLAN Enabled *PriorityVLANTag {3}
Ethernet0 Receive Buffers 256 *ReceiveBuffers {256}
Ethernet0 Receive Side Scaling Enabled *RSS {1}
Ethernet0 Speed & Duplex Auto Negotiation *SpeedDuplex {0}
Ethernet0 TCP Checksum Offload (IPv4) Rx & Tx Enabled *TCPChecksumOffloadIPv4 {3}
Ethernet0 TCP Checksum Offload (IPv6) Rx & Tx Enabled *TCPChecksumOffloadIPv6 {3}
Ethernet0 Transmit Buffers 512 *TransmitBuffers {512}
Ethernet0 UDP Checksum Offload (IPv4) Rx & Tx Enabled *UDPChecksumOffloadIPv4 {3}
Ethernet0 UDP Checksum Offload (IPv6) Rx & Tx Enabled *UDPChecksumOffloadIPv6 {3}
Ethernet0 Adaptive Inter-Frame Spacing Disabled AdaptiveIFS {0}
Ethernet0 Interrupt Moderation Rate Adaptive ITR {65535}
Ethernet0 Log Link State Event Enabled LogLinkStateEvent {51}
Ethernet0 Gigabit Master Slave Mode Auto Detect MasterSlave {0}
Ethernet0 Locally Administered Address -- NetworkAddress {--}
Ethernet0 Wait for Link Auto Detect WaitAutoNegComplete {2}
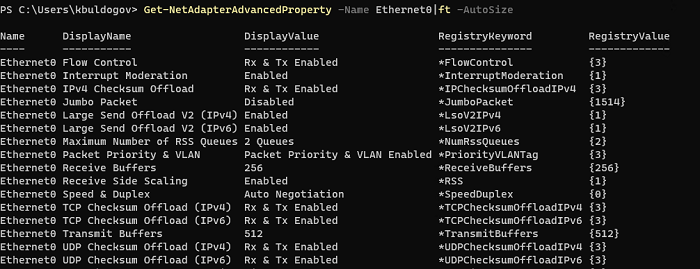
Здесь можно вывести настройки Jumbo Packet, VLAN, настройки буферов и т.д.
Для сброса этих параметров, выполните:
Reset-NetAdapterAdvancedProperty -Name Ethernet0
Перезагрузите компьютер и задайте все сетевые настройки заново. Если компьютер настроен на автоматическое получение IP адреса и настроек сети от DHCP сервера, ничего дополнительно настраивать не придется.
What Is Winsock
Winsock is an application programming interface (API) that operates between applications such as a web browser. Belonging to the field of networking, Winsock, also known as Windows Socket, is used to describe the data within the computer that is used by programs to access a network. While it creates network protocols between different applications, it stores the settings that explain how the entities interact in the database. Any issues with network connectivity within applications are also related to Winsock, which might need resetting in such circumstances.
The database created and stored by Winsock is referred to as the Winsock Catalog. Whenever you consider resetting Winsock under the netsh Winsock reset option, the configurations made across the Winsock Catalog will reset. The networking programs associated with the catalog will get a fresh start as they reconnect to the TCP/IP traffic with default settings.
When to Perform a Winsock Reset
As you understand the terminology associated with the concept of Winsock, it is necessary to know why one performs a netsh Winsock reset. Some multiple considerations and situations are associated with this particular operation. We have outlined the initials of these events that should provoke you to use the Winsock reset option:
- If there are DNS lookup issues in your computer, you must consider resetting the network configurations by netsh Winsock reset.
- Any particular attack of viruses and malware on the computer will also require you to reset your device’s network settings.
- On observing «limited or no connectivity» errors, the need to have a Winsock reset gets necessary.
- If the internet connection is not working on your device in specific, it is pretty important for you to resolve the problem.
- Programs like VPNs and other firewall programs can cause hindrances in the operations of resetting Winsock, which needs resetting.
How to Perform a Netsh Winsock Reset
Let’s find out how you can perform a netsh Winsock reset properly on your Windows computer. Looking into the details will help you outperform this task properly:
Step 1. To start with the process, you must tap on the «Search» icon and proceed to search for Command Prompt. As the results are shown, navigate to the right panel and select «Run as administrator» to launch CMD.
Step 2. On opening cmd, you must come up with the following command to reset Winsock properly:
netsh winsock reset
This will reset the Winsock Catalog, which will be displayed on the screen of the Command Prompt. Once done, try restarting the computer and check if the problem is resolved with your computing device.
Winsock Reset FAQs
1. Why do we use netsh Winsock reset?
Whenever there are issues with network connectivity with your device, you have to look into the applications and platforms being used. If any particular virus or malware is causing issues, or the computer has activated the firewall and other VPN services, the netsh Winsock reset command is necessary for putting back all network settings and configurations to default.
2. How do I fix corrupted Winsock?
To fix the corrupted Winsock, you must repair the Winsock Catalog that holds all the data. The perfect way to fix it is to use the netsh Winsock reset as a solution to corrupted Winsock.
3. Does Winsock reset flush DNS?
There is a dedicated flush DNS command available used for removing stored cache and retrieving all information from the DNS again. Winsock reset fixes all the issues, thus restarting the established communication.
-
Home
-
News
- Use Netsh Winsock Reset Command to Fix Windows 10 Network Problem
By Alisa |
Last Updated
You can use Netsh Winsock reset command to reset Winsock catalog and reset your network adapter’s software to default setting when you have Internet or network problems on Windows 10. Check the detailed step-by-step guide in this tutorial. MiniTool software also provides you many useful solutions in computer hard drive management, data recovery, system backup and restore, etc.
When you have network problems on Windows 10 computer, you can use Netsh Winsock reset command to reset Winsock Catalog, and reset your computer network adapter’s software back to default settings.
Winsock, short for Windows Socket, contains data that programs use to access the network. If a program needs to access the Internet, it has to use Windows Socket.
For how to troubleshoot Internet connection problems, performing a Netsh Winsock reset Windows 10 is a common troubleshooting step. Check the step-by-step guide below for how to use Netsh Winsock reset command to fix Windows 10 network problems.
How to Use Winsock Reset Command Windows 10 – 3 Steps
It’s quite easy to run Winsock reset command on Windows 10 to reset Winsock Catalog to default setting. Just follow the instructions below.
Step 1 – Run Command Prompt as Administrator
You can press Windows + R on the keyboard at the same time to open Run dialog. Type cmd in the search box. Press Ctrl + Shift + Enter to open and run Windows 10 Command Prompt as administrator.

You can also click Start, type cmd, right-click Command Prompt desktop app in the list, and choose Run as administrator to open the elevated Command Prompt.
Step 2 – Run Netsh Winsock Reset Command Windows 10
Then you can type the Netsh Winsock reset command line below in Command Prompt window, and hit Enter button to execute the command.
netsh winsock reset
Step 3 – Restart Your Windows 10 Computer
After the Netsh Winsock reset process is completed, you can restart your Windows 10 computer to let this Windows 10 Winsock reset take effect.

Download VeePN for PC, Mac, Mobile, and Browser
This post gives a VeePN review and offers guides on how to download VeePN for Chrome, Edge, Firefox, PC, Mac, Android, iOS, etc. to use this VPN service.
Read More
What Internet Connection Problems Can Winsock Reset Command Tackle?
Winsock reset Win 10 can resolve many networking problems for you. Normally it can repair these Internet connection problems.
- Fix network problem after you remove malware, virus, etc.
- Can’t access Internet or can’t open some webpages like meeting an error “This site can’t be reached” when trying to visit a website.
- See some pop-up network connections errors on your Windows 10 computer.
- WiFi connected but no Internet access error due to registry errors.
- Resetting TCP/IP didn’t fix Internet connectivity issue.
- Find some problems in DNS lookup.
- Fail to renew IP address.
- Fix some other DHCP errors.
- Limited Internet connectivity in Windows 10.
- Other devices can connect to the same Internet but your Windows 10 PC can’t.
- Other network problems in Windows 10.

Hola VPN Free Download for Chrome, PC, Mac, Android, iOS, etc.
Learn how to download free Hola VPN for Chrome, Edge, PC, Mac, Android, iOS, etc. to use it to unblock and access worldwide content online with no limit.
Read More
Bottom Line
When you are facing network connection problems on Windows 10, you can follow the guide above to fix Internet problems with Netsh Winsock reset command Win 10.
If you have other problems on your Windows 10 computer, you can further repair Windows 10 with Startup Repair, SFC Scannow, etc.
To recover lost data or mistakenly deleted files on Windows 10/8/7 computer, please turn to MiniTool Power Data Recovery. The free edition of this software allows you to recover up to 1GB data totally for free. Extremely intuitive interface and 100% clean.

About The Author
Position: Columnist
Alisa is a professional English editor with 4-year experience. She loves writing and focuses on sharing detailed solutions and thoughts for computer problems, data recovery & backup, digital gadgets, tech news, etc. Through her articles, users can always easily get related problems solved and find what they want. In spare time, she likes basketball, badminton, tennis, cycling, running, and singing. She is very funny and energetic in life, and always brings friends lots of laughs.