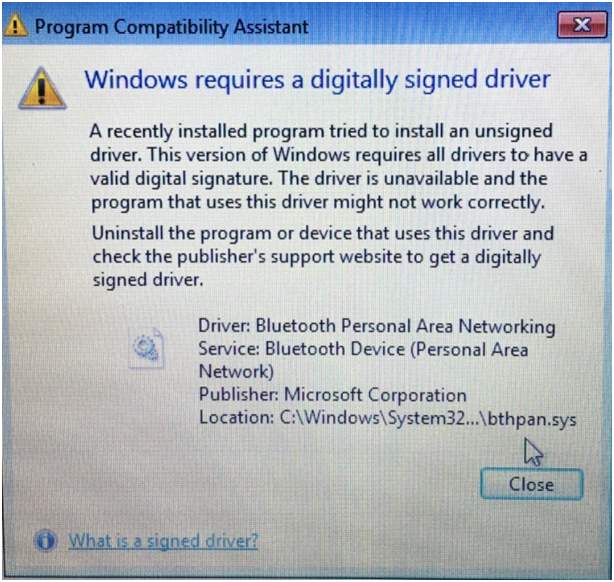
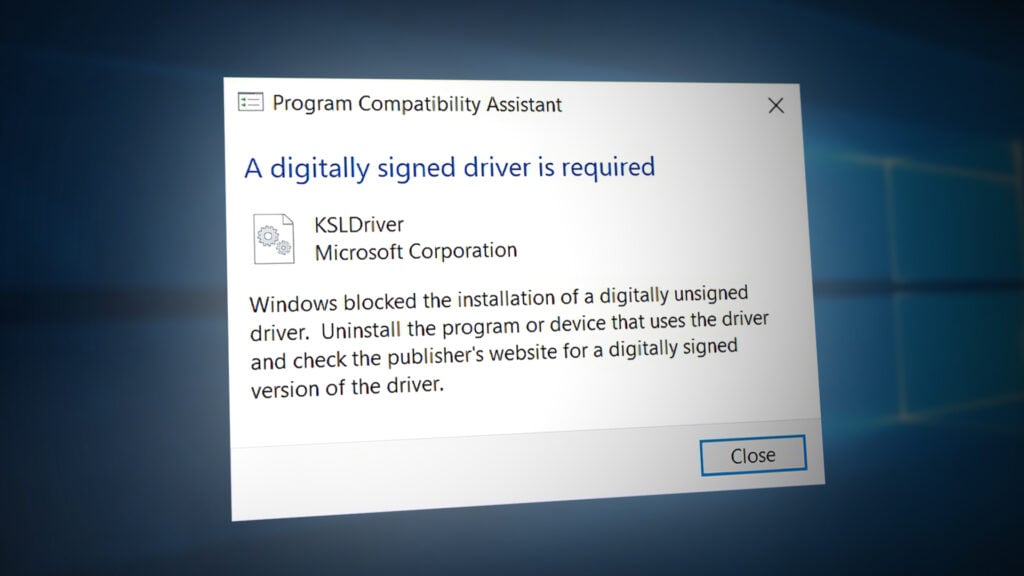
When you are trying to install a driver, if you get warning message “Windows requires a digitally signed driver“, it means the driver is unsigned. There’re two methods to install the driver successfully. Just pick up the method you like.
Method 1: Install the Driver using Driver Easy
Method 2: Disable the driver signing in Windows
Method 1: Install the Driver using Driver Easy
Updating drivers manually can take risky and forever. It is possible that you don’t even find the right driver after spending hours. Instead of updating drivers manually, you can do it automatically with Driver Easy.
Driver Easy will automatically recognize your system and find the correct drivers for it. You don’t need to know exactly what system your computer is running, you don’t need to risk downloading and installing the wrong driver, and you don’t need to worry about making a mistake when installing.
You can update your drivers automatically with either the FREE or the Pro version of Driver Easy. But with the Pro version it takes just 2 clicks (and you get full support and a 30-day money back guarantee):
1) Download and install Driver Easy.
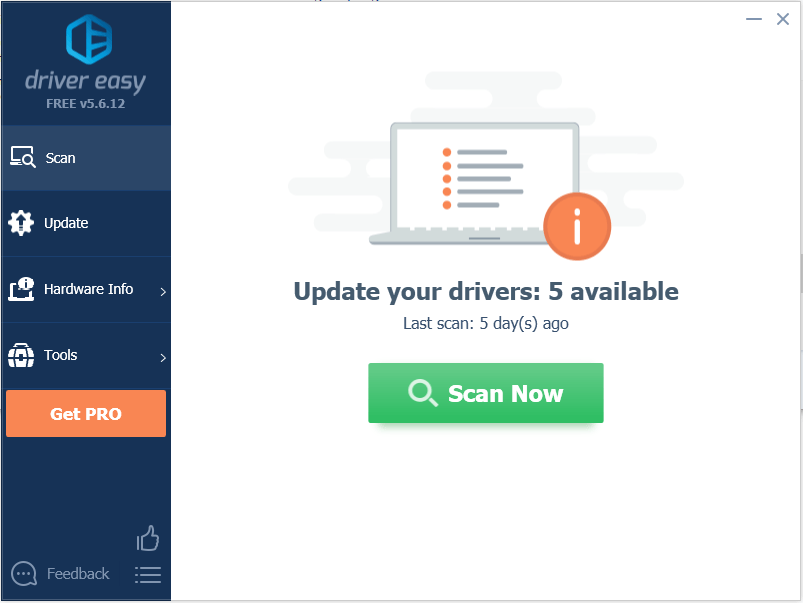
2) Run Driver Easy and click Scan Now. Driver Easy will then scan your computer and detect any problem drivers.
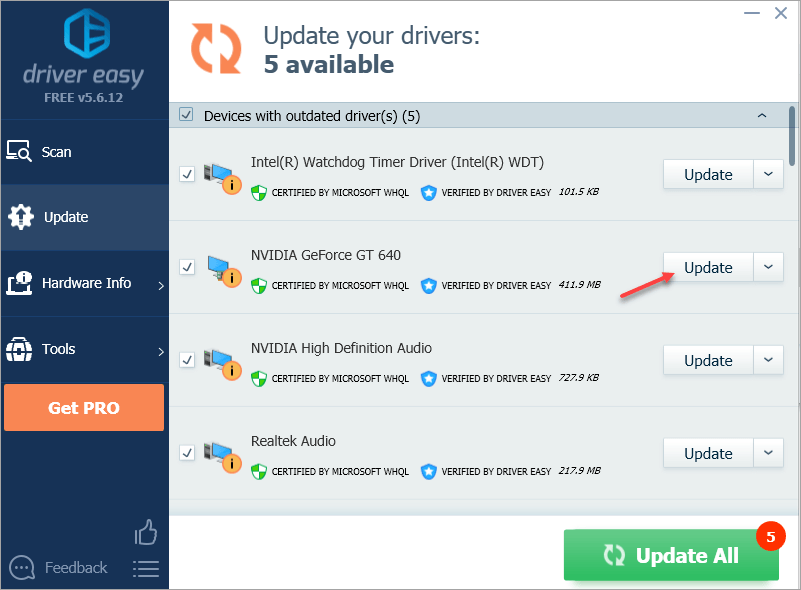
3) Click the Update button next to one driver to automatically download the correct version of this driver, then you can manually install it (you can do this with the FREE version).
Or click Update All to automatically download and install the correct version of all the drivers that are missing or out of date on your system (this requires the Pro version – you’ll be prompted to upgrade when you click Update All).
Method 2: Disable the driver signing in Windows
It is not recommended you install unsigned driver or application. But if you got the driver from official manufacturer’s website, you can install it anyway, which will guarantee the safety. To install the driver, you need to disable the driver signing in Windows.
IMPORTANT: Ensure you get the driver from official manufacturer’s website. If you get this error when trying to install the driver from the third party, it may cause problems.
Follow these steps to disable the driver signing.
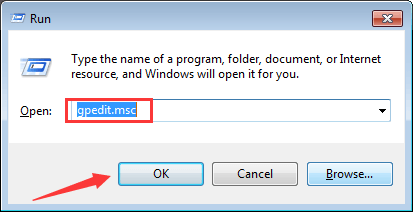
1) Press Win+R (Windows key and R key) at the same time. A Run dialog box will appear.
2) Type gpedit.msc in the run box and click OK button.
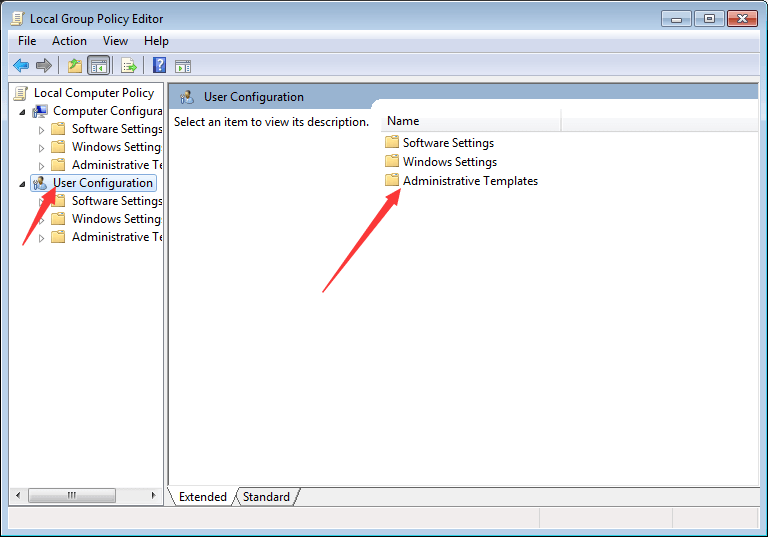
3) Click User Configuration in left pane and double-click on Administrative Templates in the right pane.
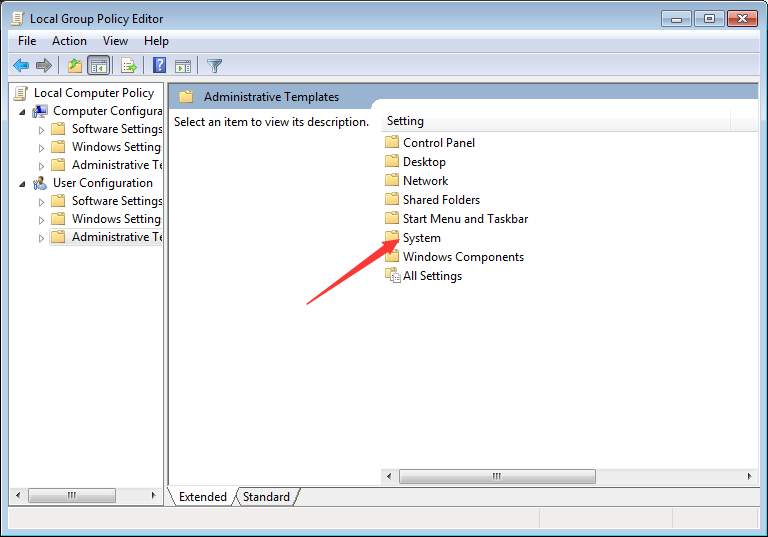
4) Double-click on System.
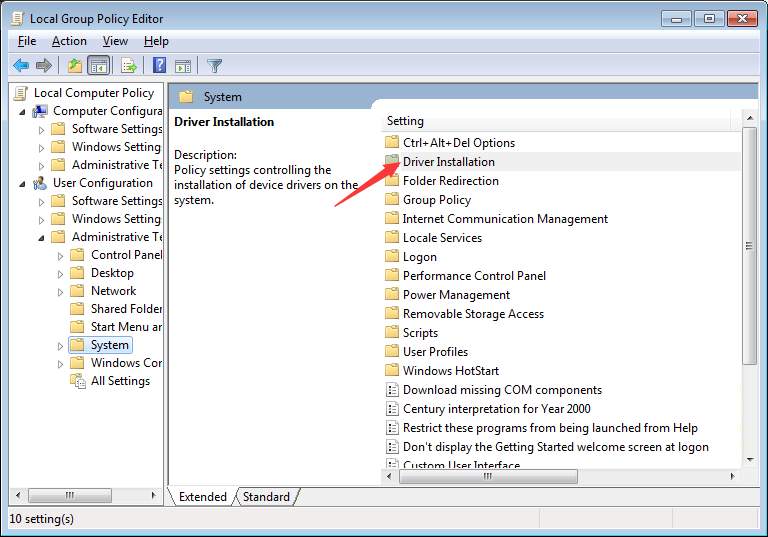
5) Double-click on Driver Installation.
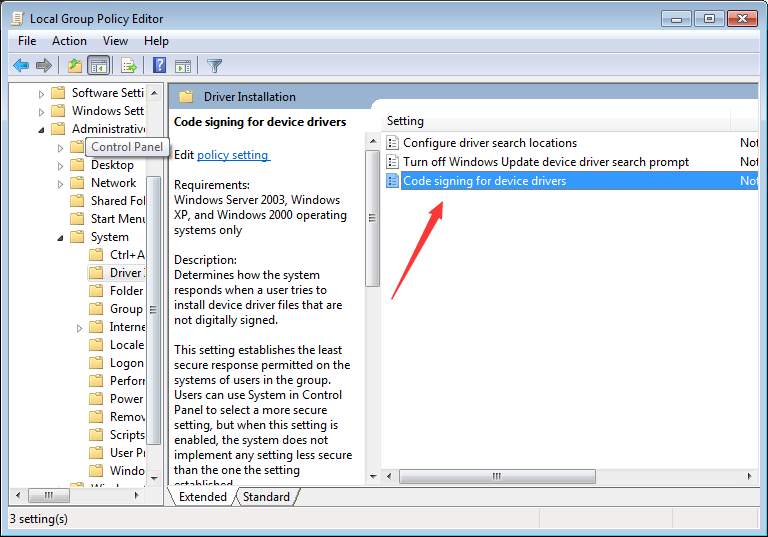
6) Double-click on Code signing for device drivers.
7) Select Enabled change it to Ignore from the drop-down menu. Then click OK button.
After disabling the code signing for device drivers, install the driver and it should work this time.
IMPORTANT: Remember to enable the code signing for device drivers after installing the driver, as this will prevent your computer from installing any unsigned application or driver without any warning.
Hopefully you find this article helpful. If you have any questions, ideas or suggestions, feel free to leave a comment below.
113
113 people found this helpful
Содержание
- Системе Windows требуется драйвер с цифровой подписью
- Способ 1: ReadyDriver Plus
- Способ 2: Отключение проверки цифровой подписи
- Заключение
- Вопросы и ответы
Пользователи Windows 7 могут неожиданно столкнуться со следующей проблемой: при установке программного обеспечения для одного из подключённых устройств возникает окно с предупреждением, в котором указано, что системе требуется драйвер с цифровой подписью. Далее мы рассмотрим методы устранения этой ошибки.
Причина появления такого предупреждения очень проста – у системного ПО, которое вы пытаетесь установить, отсутствует зарегистрированная цифровая подпись. Суть в том, что начиная с седьмой версии Виндовс, в ОС этого семейства встроена система защиты, которая отклоняет инсталляцию драйверов без этого компонента, заверенного Microsoft. Сделано это в целях безопасности: некоторые вредоносные программы использовали такую лазейку для получения полного доступа к зараженному компьютеру. Однако разработчики предусмотрели ситуации, в которых эта функция будет только вредной, поэтому добавили возможность её отключения.
Внимание! Манипуляции, описываемые далее, при неправильном исполнении могут нанести вред вашему компьютеру, поэтому вы совершаете их на свой страх и риск!
Способ 1: ReadyDriver Plus
Самый простой метод отключения озвученной проверки заключается в использовании специальной утилиты под названием ReadyDriver Plus. Программа работает по следующему принципу: устанавливает собственные файлы в загрузочный каталог Windows, что позволяет при старте системы выбрать вариант загрузки.
Скачать ReadyDriver Plus
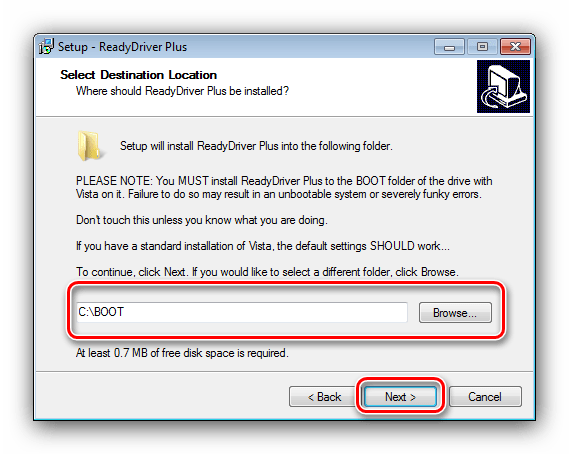
- Рассмотрим подробно наиболее важный процесс работы с приложением – его инсталляцию. Для работы ему нужно поместить свои данные в папку BOOT, о чём и предупреждает инсталлятор. В обычных условиях «Мастер по установке» самостоятельно находит этот каталог, руководствуясь системным реестром, но в случае изменения настроек директории по умолчанию её понадобится выбрать вручную. В нормальных условиях она скрыта, поэтому понадобится сделать её видимой.

Урок: Как показать скрытые файлы и папки в Windows 7
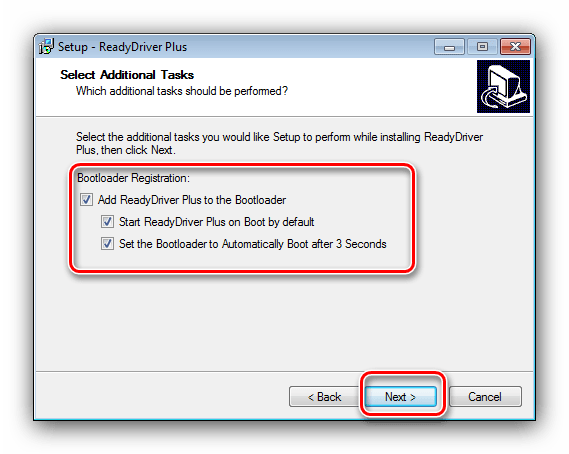
- После выбора загрузочной папки инсталлятор ReadyDriver Plus предложит настроить дополнительные параметры. Как правило, здесь менять ничего не нужно, поэтому просто нажмите «Next».
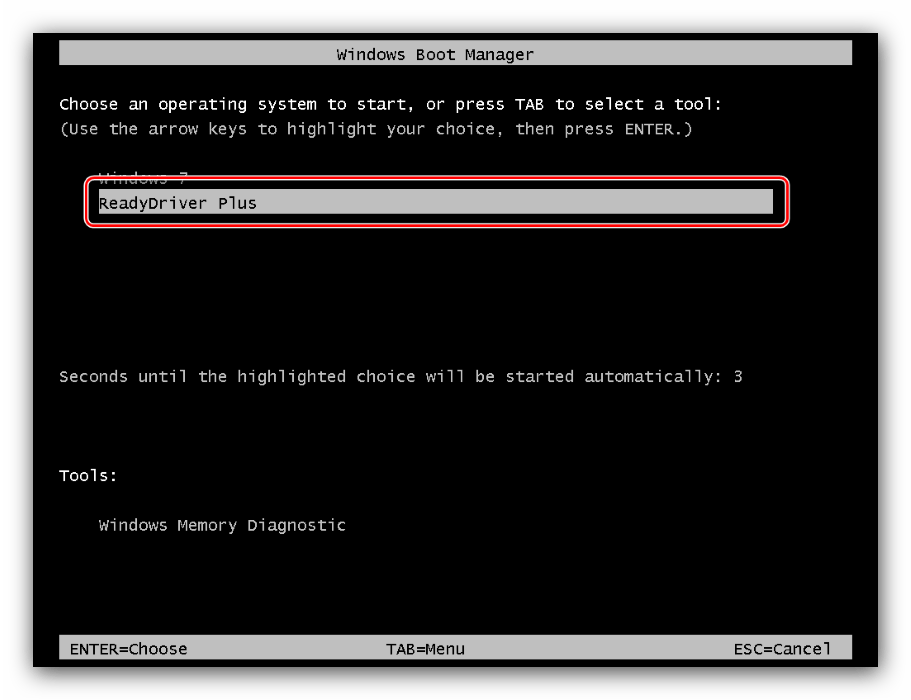
- Дождитесь, пока установка будет завершена. Для проверки работоспособности утилиты попробуйте перезагрузить компьютер – должен появиться экран с выбором режимов загрузки, обычным и с названием приложения. В последнем средство проверки подписи будет отключено.
Данный метод удобен, однако в некоторых специфических вариантах инсталляции «семёрки» он работает со сбоями.
Способ 2: Отключение проверки цифровой подписи
Представленная выше утилита, конечно, далеко не единственный вариант устранения рассматриваемой ошибки. Существует также множество других путей выключения сверки подписи, в том числе и чисто системными средствами. Все они перечислены в отдельном подробном руководстве, ссылку на которое приводим ниже.
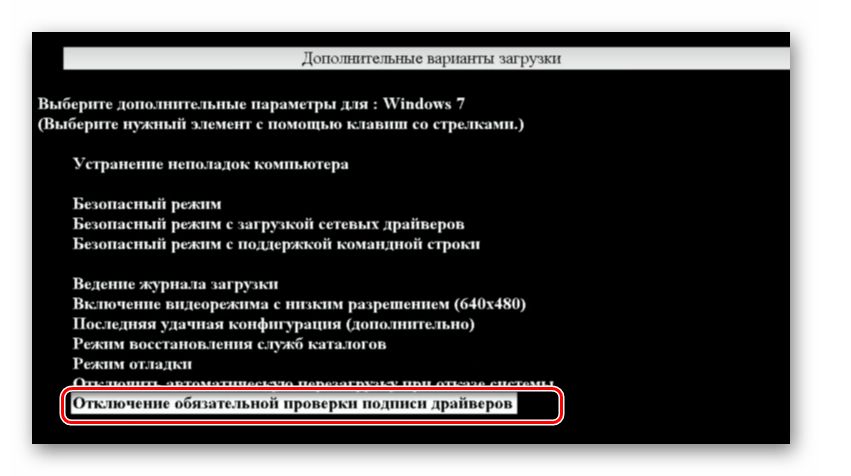
Урок: Отключаем проверку подписи драйверов в Windows
Заключение
Как видим, у ошибки «Системе Windows требуется драйвер с цифровой подписью» есть только одно надёжное решение, и заключается оно в обходе установленных ограничений. При этом стоит иметь в виду, что непосредственное отключение проверки цифровой подписи может негативно сказаться на работоспособности ОС, поэтому прибегайте к этому только в самом крайнем случае.
Еще статьи по данной теме:
Помогла ли Вам статья?
by Andrew Wafer
Andrew is not just trying to bring you closer to Windows, but he’s truly interested in this platform. He just happens to be passionate about sharing that knowledge… read more
Updated on
XINSTALL BY CLICKING THE DOWNLOAD
FILE
If you are receiving an error message which is blocking the installation process of a new device driver or any other similar software, don’t panic. Your Windows 10 system still runs properly and you are not facing a system malfunction.
However, it means that the implied driver cannot be ‘verified’ by Windows 10 and, for security reasons, the installation process has been blocked by default.
Usually, the error message that appears is Windows requires a digitally signed driver and it means that Windows needs a verified driver by the Signing Authority.
To be specific, vendors are signing the drivers to ensure their integrity and to be certain that the file wasn’t modified in any way. If you try to install an unsigned driver, Windows will always let you know that that specific file is unsafe and it comes from an unknown source.
How we test, review and rate?
We have worked for the past 6 months on building a new review system on how we produce content. Using it, we have subsequently redone most of our articles to provide actual hands-on expertise on the guides we made.
For more details you can read how we test, review, and rate at WindowsReport.
The good news is that there are some solutions that you can use to fix this error and resume the driver installation process. Here’s what you can do if Windows requires a digitally signed driver.
How can I fix Windows requires a digitally signed driver error?
1. Install the required drivers automatically
The easiest way to install the drivers you need is to use professional driver updater software that installs all the unsigned drivers in seconds. By choosing a dedicated tool you are safe from errors.
Outbyte is a lightweight driver updater software that will safely keep your drivers in check. You can use it to schedule regular updates to prevent errors related to out-of-date drivers to occur again.
Most common Windows errors and bugs can result from faulty or incompatible drivers. An outdated system can lead to lags, system issues, or even BSoDs.
You can prevent these problems by using an automatic tool that will search and install the correct drivers on your computer with just a few clicks. That’s why we recommend you use Outbyte Driver Updater.
Here’s how to do it:
- Download and install the Outbyte Driver Updater app.
- Launch the software.
- Wait for the app to detect all incompatible drivers.

- Afterward, it will show you a list of the drivers found to select the ones to Update or Ignore.
- Click on Update & Apply Selected to download and install the newest versions.
- Restart your PC to ensure the applied changes.


Outbyte Driver Updater
Use this software and solve all driver-related issues from your PC.
Disclaimer: You may need to upgrade the app from the free version to perform specific actions.
2. Disable driver signing
- On your computer open Local Group Policy Editor: press the Win+R hotkeys and in the Run box enter gpedit.msc.

- In Local Group Policy Editor, from the left panel, click on User Configuration option.
- Then, from the main window double-click on Administrative Templates.
- From the menu that will open double-click on System and then go to Driver Installation.
- Next, select the Code signing for device drivers entry.
- Select Enabled and from the dropdown located beneath, change to Ignore.
- Click Ok and apply your changes.
- Restart your Windows 10 system in the end.

Most Windows 10 users have no idea how to edit the Group Policy. Learn how you can do it by reading this simple article.
3. Put Windows in test mode
If the above method isn’t working for you, or if you don’t want to disable driver signing, you can choose to enter Windows 10 test mode.
In test mode you can install any drivers you want without experiencing any problems. Of course, go to normal Windows 10 mode afterwards:
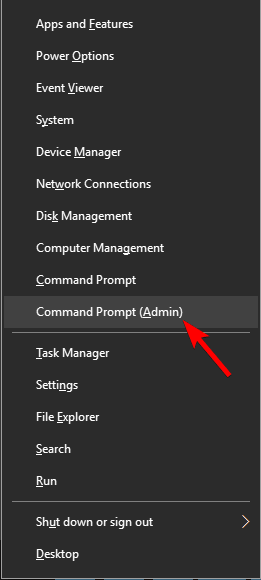
- Open an elevated command prompt window on your PC: right-click on the Windows Start icon and select Command prompt (Admin).

- In cmd type bcdedit /set TESTSIGNING OFF.
- Close the cmd window and restart your computer.
- Install your drivers.
- Revert back to normal mode: open elevated cmd, enter bcdedit /set TESTSIGNING ON and restart your Windows 10 system.
4. Permanently disable driver signature enforcement
- Open an elevated command prompt window as explained above.
- In the cmd window type bcdedit.exe /set nointegritychecks on and press Enter.
- This will disable the driver signature enforcement in Windows 10 permanently.
- You can restore this operation by tapping into cmd: bcdedit.exe /set nointegritychecks off.
Well, these are the troubleshooting solutions that can help you fix the issue where a digitally signed driver is required.
Tell us more about your experience in the comments field below. Let us know if the problem is still there we will try to find the perfect solution for your particular situation.
READ ALSO:
- Block Windows 10 from auto updating specific drivers [QUICK METHODS]
- Windows cannot download drivers? Fix it now with these solutions
- FIX: Windows setup could not install one or more boot-critical drivers
![]()
What are Digitally Signed Drivers? Digitally Signed Drivers are signed drivers from it’s vendors that ensures driver integrity and checksum to make sure that the Driver file being installed isn’t modified in anyway other then what the Signing Authority has allowed or modified.
The error “Windows requires a digitally signed driver” occurs when Windows blocks the installation of a driver when it is without a digital signature.
Windows allows you to proceed with the installation by turning off the digital signature check – which isn’t recommended but needed sometimes when the Driver isn’t signed but it is an original driver. There are several fixes that we have gathered and tested that would fix this issue. This guide applies to fixing Digitally Signed Driver is Required Error on Windows 10, Windows 8 or Windows 7
Disable Driver Signing
Driver signing, like mentioned before, is enabled by default in Windows operating system as a way to make sure that malicious software disguised as drivers are not installed on your computer. It adds an extra layer of security for your computer. However, if this is causing errors and not letting you install third-party drivers, you can disable the driver signing using the steps below:
- Press Windows + R, type “gpedit.msc” in the dialogue box and press Enter.
- Once in the group policy editor, navigate to the following path:
User configuration > Administrative templates > System > Driver installation> Code signing for device drivers
- Select the option Enabled and from the drop-down, select Ignore (under ‘When Windows detects a file without drivers’).
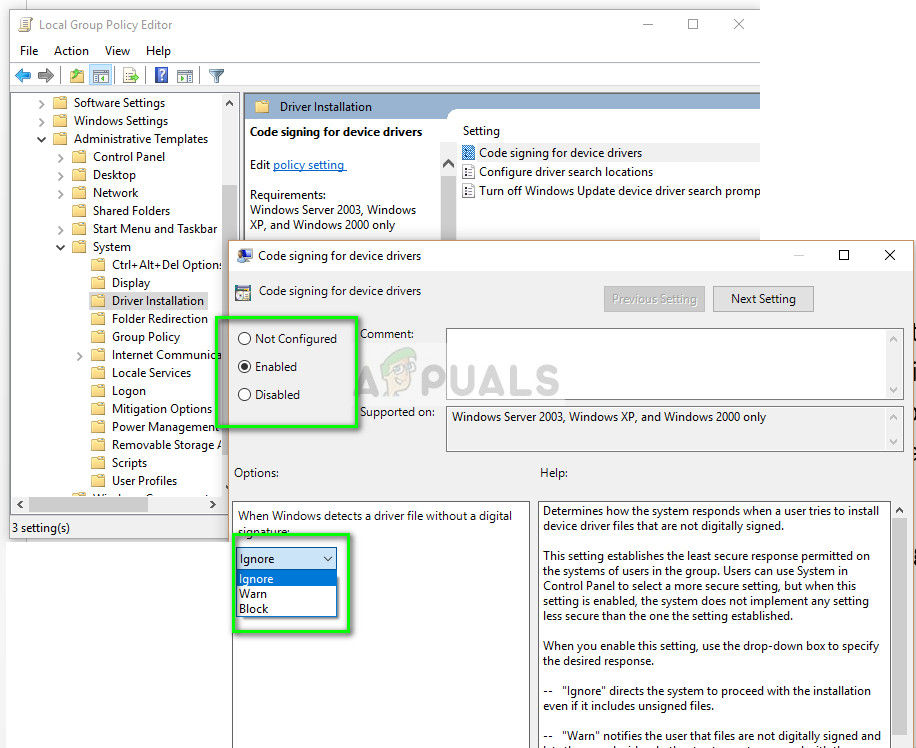
- Press OK to save changes and exit. Now check if the problem is solved.
Turning TESTSIGNING On
The TESTSIGNING determines whether Windows will install any test-signed kernel-mode code which is not digitally signed by relevant software companies. This is another safe guard which acts like a firewall to prevent any kernel-level drivers from being installed unless they are in the whitelist. If you really want to install the driver despite the safe measures by Windows, you can turn TESTSIGNING on.
- Press Windows + S, type “command prompt” in the dialogue box, right-click on the application and select “Run as administrator”.
- Once in the command prompt, execute the following command:
bcdedit /set testsigning on
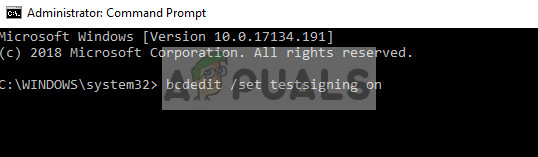
- Now restart your computer properly. After restarting, log back in and try installing the driver.
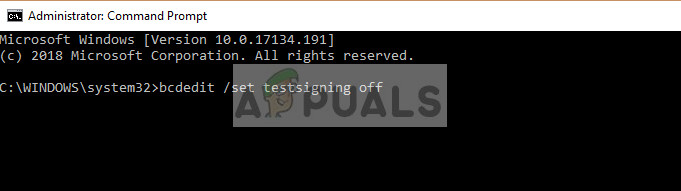
- If you ever want to turn the test mode off, execute the following command:
bcdedit /set testsigning off
Permanently disabling driver signature enforcement
Another you can try if all the above methods fail is disabling the driver signature enforcement on your computer off permanently. You will have to manually turn the mechanism on again and there will be no safe guards for any drivers installed on your computer. Make sure you keep this method as a last resort.
- Press Windows + R, type “command prompt” in the dialogue box, right-click on the application and select “Run as administrator”.
- Once in the command prompt, execute the following command:
bcdedit.exe /set nointegritychecks on

Restart your computer completely and try installing the driver.
- If you ever want to turn the enforcement mechanism back on, execute the following command:
bcdedit.exe /set nointegritychecks off
Note: Usually all verified and genuine drivers are digitally signed. Make sure that you are completely positive of the driver before installing.

Kevin Arrows
Kevin Arrows is a highly experienced and knowledgeable technology specialist with over a decade of industry experience. He holds a Microsoft Certified Technology Specialist (MCTS) certification and has a deep passion for staying up-to-date on the latest tech developments. Kevin has written extensively on a wide range of tech-related topics, showcasing his expertise and knowledge in areas such as software development, cybersecurity, and cloud computing. His contributions to the tech field have been widely recognized and respected by his peers, and he is highly regarded for his ability to explain complex technical concepts in a clear and concise manner.
Device drivers are needed in order for the hardware and software to communicate in an operating system. Some of these drivers are digitally signed. These kinds of drivers are drivers that are signed by their issuing authority in a way that the end-user or any third party won’t be able to modify them. And there are times when you encounter an error that says, “Windows requires a digitally signed driver” when you try to install or update device drivers.
Driver Signing is the process of associating a digital signature with a driver package. Digital signatures are used in Windows device installations to verify the identity of the vendor providing the driver packages as well as to verify the integrity of the driver packages.
All the drivers you usually install on your PC from Windows Update, Original Equipment Manufacturers, or some other third-party driver download software and so on must be verified digitally by Microsoft through the digital signature. A digital signature is an electronic security mark that verifies the publisher for the driver and all the relevant information related to it. That’s why Windows won’t run a driver if it isn’t certified by Microsoft, be it a 32-bit or 64-bit system – this is called the Driver Signature Enforcement.
The only Kernel-mode drivers that Windows 10 will load are the ones that are digitally signed by the Dev Portal. However, the changes only affect the new installations of the operating system with Secure Boot on while the non-upgraded fresh installations would require drivers that are signed by Microsoft.
The “Windows requires a digitally signed driver” error indicates that the driver you are trying to update or install hasn’t been signed digitally by the issuing authority, preventing you from installing or updating it. To resolve this issue, you can try to update the drivers directly from the manufacturer’s site. You could also disable driver signing via Group Policy Editor.
Option 1 – Update the device drivers directly from the manufacturer’s site
The reason why you’re getting the “Windows requires a digitally signed driver” error in the first place is that you might have downloaded the drivers from external media. It could also be that the drivers didn’t update for some time now and the issuing authority changed its policies. Thus, you can try to update the drivers straight from the manufacturer’s website and install them. If this option didn’t work, then you’ll have to disable the driver signing or its recognition in Windows 10. Keep in mind that doing so is not advisable if you have to use the concerned driver.
Option 2 – Disable driver signing via Group Policy Editor
- Tap the Win + R keys to open the Run utility and type “gpedit.msc” in the field and tap Enter to open the Group Policy Editor.
- After that, navigate to this policy setting: User configuration > Administrative templates > System > Driver installation
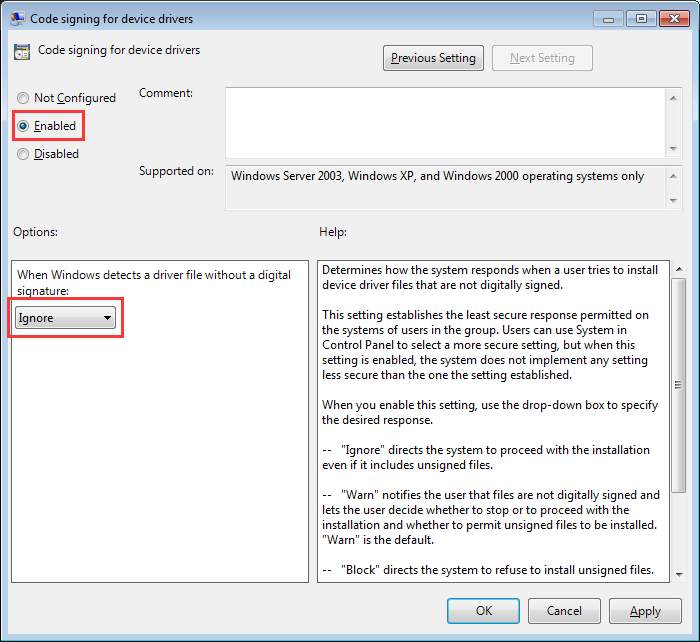
- Next, double click on the “Code signing for device drivers” entry located on the right pane to open its properties where you’ll see the following description:
“This setting determines how the system responds when a user tries to install device driver files that are not digitally signed. It establishes the least secure response permitted on the systems of users in the group. Users can use the System in Control Panel to select a more secure setting, but when this setting is enabled, the system does not implement any setting less secure than the one the setting established.
When you enable this setting, use the drop-down box to specify the desired response.
“Ignore” directs the system to proceed with the installation even if it includes unsigned files.
“Warn” notifies the user that files are not digitally signed and lets the user decide whether to stop or to proceed with the installation and whether to permit unsigned files to be installed. “Warn” is the default.
“Block” directs the system to refuse to install unsigned files. As a result, the installation stops, and none of the files in the driver package are installed.
To change driver file security without specifying a setting, use System in Control Panel. Right-click My Computer, click Properties, click the Hardware tab, and then click the Driver Signing button.”
- Now select the radio button for “Enabled” and select Ignore from the drop-down menu under “When Windows detects a driver file without a digital signature”.
- Then click on the Apply and OK buttons to save the changes made. This will get rid of the “Windows requires a digitally signed driver” error but take note that this will also make your system less secure.
Do You Need Help with Your Device?
Our Team of Experts May Help

Troubleshoot.Tech Experts are There for You!
GET HELP
Troubleshoot.Tech experts work with all versions of Microsoft Windows including Windows 11, with Android, Mac, and more.
Share this article:
You might also like
When we get ourselves a new USB stick, new hard drive, or any storage device not including optical drives they are usually preformatted and ready to be used out of the box. However, reformating them has several benefits and while we are reformatting we can choose in which file system format we want the memory to be formatted.
In this article, we will compare and explore 3 typical and standard format options you can get while formating a new media in Windows 10.
FAT32
The oldest one on the list, coming all the way from DOS days. Great for devices that need to be plugged in different operating systems and for USB flash drives. Its advantages are compatibility with all major operating systems and little memory usage comparing to other ones. However, the file system is limited to file sizes of the maximum capacity of 4GB and partitions can not exceed more than 32GB.
NTFS
First introduced in Windows NT this file system offered slower performance than FAT32 and somewhat limited usability but the main advantages were more stability and fewer errors. Its main advantages are support for files larger than 4GB and partitions larger than 32GB along with the ability for on the file encryption, main disadvantage would be limited operating system usage, NTFS can not be used on systems that work on FAT32 like MS-DOS for example or older versions of Windows. The best usage for this file system is in internal hard disk drives and system drives.
exFAT
New kid on the block, well at least from the perspective of the previous 2. exFAT offers unlimited file sizes and unlimited partition sizes but at a price that is even more limiting than NTFS. Some Linux distributions will require a driver to be installed in order to see the exFAT partition. The best use is in storage, in external hard drives.
That’s it, 3 major file systems, we hope that you have managed to learn something new today, and remember to drop by tomorrow for more articles about advice, tips, tricks, and troubleshooting.
Read More
Error Code 0x80070020 – What is it?
One of the problems encountered by Windows users when upgrading to Windows 10 from Windows 7 or Windows 8/8.1 is the Error Code 0x80070020. This error code normally occurs when users try to download updates from the Windows Update Website or simply by upgrading to Windows 10. Error Code 0x80070020 also occurs when the device already has a Windows 10 installed.
Once this error is encountered, it will cause malfunction of update installs and display the following message:
An error (-5006 : 0x80070020) has occurred while running the setup. Or The process cannot access the file because it is being used by another process”
Solution
Error Causes
In an attempt to fix Error Code 0x80070020, it is important to pinpoint what the cause is. The most probable cause of this error is due to interference. This error code most likely occurs when there is another automatic update running, for instance, an Antivirus scanning in real-time. If you’re scheduled to have an automatic update during real-time scanning, the Windows 10 update might malfunction.
Further Information and Manual Repair
In trying to fix Error Code 0x80070020, you can perform manual repair methods to resolve the issue effectively and efficiently. Most Windows users can easily employ these manual repair methods, even those who do not have technical abilities. However, there are certain instances where a Windows professional’s help is needed. If you don’t want to face any risk in resolving the issue, it would be best to consult a professional Windows technician or you can also make use of a powerful automated tool.
NOTE: It is best to attend immediately to errors encountered since unresolved errors can result in slowing down your computer’s performance. This might also cause other error messages to arise such as Error Code 0x80070057.
Method One: Restart Your Device
Since Error Code 0x80070020 is most likely encountered due to interference during your update, the easiest method you can do is to close all opened programs and restart your device. After restarting, try to start the update process again.
Method Two: Disable Antivirus Temporarily
Another quick and safe way to fix Error Code 0x80070020 is to disable your antivirus. You must take note though that in doing so, your computer will be susceptible to virus attacks. If you want to proceed with this method, follow these steps:
- Locate all programs in process in the notifications area, found in the lower right-hand section of your screen. If in case the antivirus icon is not visible on the taskbar, you may have to click an arrow pointing up to show what programs are currently running.
- Right-click on the antivirus icon then select the disable option.
Method Three: Run the Update Troubleshooter for Windows
The Windows Update Troubleshooter may resolve many of the errors encountered by Windows users when installing updates from Windows Update. To execute the troubleshooter, follow the steps below:
- Access a menu by holding the Windows key and X. Wait for the menu to appear on the bottom left corner of the screen.
- Open the Control Panel.
- Change the appearance of files by selecting large or small icons in the View by option located on the upper right section of your screen.
- Once you change the appearance of the files, choose the troubleshooting
- Run the Windows Update Troubleshooter.
- Restart your device then check if this resolves the problem.
Method Four: Execute A Clean Boot
Executing a clean boot means starting Windows using only a few resources, including startup programs and drivers. This safeguards minimizing conflicts and prevent software clash when an update is received. In performing a clean boot, you will be able to pinpoint what caused the manifestation of error code 0x80070020. Check Microsoft’s Support website to know how to execute a clean boot.
Method Five: Reset Windows Update Components
Performing this method is a bit risky and should be your last option if all methods were unsuccessful. This process will alter your device’s registry so you must ensure to perform accurately the steps. A single mistake can lead to modifying your registry erroneously, which might result in the occurrence of other error messages. Carefully follow the steps found on Microsoft’s Support website to successfully reset Windows Update components.
Resetting Windows Update components can also be done by implementing the following steps:
- Open the Command Prompt by pressing Windows Key + X. Select Command Prompt (Admin) from the menu.
- Stop the BITS, MSI Installer, Cryptographic, and the Windows Update Services.
- Rename both the SoftwareDistribution and Catroot2 folders to <name of folder> old.
- Start now the BITS, MSI Installer, Cryptographic, and the Windows Update Services.
- Exit the Command Prompt then restart your device. After restarting, try installing the updates again.
Method Six: Disable Third-Party Antivirus
A third-party antivirus such as BitDefender may recognize the Windows Update as a threat since the new update of Windows 10 is probably not yet registered with this third-party antivirus vendor. To solve this, you must disable temporarily the antivirus before performing the update. Once the third-party antivirus is disabled, you can now proceed with the updating process. Update as well your third-party antivirus.
Method Seven: Use the DISM Tool for Windows 10
The Deployment Image Servicing and Management (DISM) is a command-line utility that is installed by default in Windows 10 system. This program is used to fix images in Windows. In the case of Error Code 0x80070020, the DISM can repair the recovery image in Windows 10 and can perform as a virtual hard disk as well.
- Scan and check files for errors.
- Open the Command Prompt by pressing Windows Key + X. Select Command Prompt (Admin) from the menu.
- Type sfc /scannow
- You can also use the following commands to check for corrupted files:
/CheckHealth – to check for corrupted files or components
/ScanHealth – to check for corrupted Windows image. This may take up to 10 minutes to finish
/RestoreHealth – to check for corrupted Windows image and do an automatic repair. This may take up to 20 to 30 minutes to finish
NOTE: In an instance where you cannot locate the good files in your computer, the system image files may be corrupted. If this happens, you need to have a copy of install.wim from a computer with good Windows 10 OS or the Windows 10 ISO file. Make sure that the source of the good files has the same language, version, and edition of your OS.
Cleaning corrupted files using DISM utility:
Enter the following commands one by one to perform the /RestoreHealth switch using the source path location of good files you copied:
- DISM /Online /Cleanup-Image /RestoreHealth /Source:repairSource install.wim
- DISM /Online /Cleanup-Image /RestoreHealth /Source:repairSource install.wim /LimitAccess
- DISM /Online /Cleanup-Image /RestoreHealth /Source:repairSource install.wim:1 /LimitAccess
For example purposes, the “repairSource” is the source of the good files.
Read More
It is no longer a secret that websites, social media, and other various places on WEB are tracking you and your messages and emails for keywords that they will later use to promote and serve your specific ads linked to those keywords. Altho the process is fully automated it does feel a little forced and uneasy.
That is why we are bringing you this article in which we will show you how to stop website tracking in the most popular and used browsers.
SAFARI
Apple’s Safari browser gives you the option to block cross-site tracking. It also has a Privacy Report that displays all the sites and agencies that are gathering information about you.
Before blocking these trackers, you may want to review exactly which sites are tracking you online and gathering information about you. Armed with this information, you may decide that cross-site tracking isn’t a huge issue for your particular browsing habits, or you may decide to avoid certain websites entirely.
To access Safari’s Privacy Report:
- Launch the Safari web browser.
- In the toolbar, select Safari > Privacy Report.
- Select the Websites tab. This will display information about all the websites that are profiling you.
- Select the Trackers tab. This displays a list of all the trackers that are gathering information about you. This includes the companies that created these trackers and the number of times Safari detected these trackers during your browsing sessions.
You can also check how intrusive a particular website is by navigating to the website in question and then selecting the shield icon that appears alongside Safari’s address bar. You can then select Trackers on This Web Page, and Safari will display a list of all the trackers that are active on this particular webpage.
Once you’ve seen all the websites and agencies who are tracking you, if you want to block these trackers:
- In the Safari toolbar, select Safari > Preferences …
- Select the Privacy tab.
- Select the following checkbox: Prevent Cross-Site Tracking.
Safari will now prevent these trackers from following you across the World Wide Web.
CHROME
As you’re browsing the web, Chrome can send a request for websites not to collect or track your browsing data.
It’s important to note that this is a request, so there’s no guarantee that every website will honor the request. Frustratingly, Chrome doesn’t provide information about the websites that are tracking you online. However, we still recommend enabling this feature, as it can help minimize the number of websites that are tracking your online movements:
- In Chrome’s upper-right corner, select the three-dot menu icon, then Settings.
- In the menu on the left, select Privacy and security.
- Click Cookies and other site data.
- Find the Do not track slider and push it into the On position.
Now Chrome will send a Do Not Track request to every website you visit. Since this is only a request, you may want to take additional steps to protect your online privacy.
Ghostery is a Chrome extension that enables you to view and block online trackers. After installing Ghostery, you can view all the trackers that are active on a particular website:
- Head to the site in question.
- Click the Extensions icon in the Chrome toolbar.
- Select Ghostery to see a list of all the trackers this extension has detected.
- You can block all of these trackers by selecting the Detailed tab and then clicking Restrict site.
Repeat this process for every site you visit.
MOZILLA FIREFOX
Firefox has an Enhanced Tracking Protection feature that can block all the cross-site trackers identified by Disconnect. This feature can also preserve your online privacy by blocking social media trackers, fingerprints, and crypto miners, making this a great all-arounder for the security-conscious Internet user.
Enhanced Tracking Protection should be enabled by default. However, you can verify whether it’s active for your particular Firefox installation by navigating to any website. Next, click the little shield icon that appears alongside Firefox’s address bar and you should see a message confirming that Enhanced Tracking Protection is enabled.
If Enhanced Tracking Protection isn’t enabled, we recommend activating it:
- In Firefox’s upper-right corner, select the three-line icon, then Preferences.
- In the menu on the left, select Privacy & Security.
- You can now select either Standard or Strict. Note that Strict may affect the functionality of certain websites, so it’s recommended you opt for Standard unless you specifically require a greater level of protection.
Similar to Chrome, Firefox can send a Do Not Track request. While you’re in the Privacy & Security menu, you may want to consider activating Mozilla’s Do Not Track feature.
OPERA
When you first installed Opera, it gave you the option to block trackers. If you didn’t take Opera up on the offer then, you can start blocking trackers now:
- Along the left side of the Opera browser, click the cog icon. This opens Opera’s settings.
- In the menu on the left, select Basic.
- Find the Block Trackers slider and push it into the On position.
- Blocking trackers can impact the functionality of certain websites. If you start noticing strange behavior on a particular website, you may want to add that site to your Exceptions list. By allowing this site to use trackers, you should be able to resolve any issues you’re experiencing.
To make an exception for one or more websites:
- Launch Opera’s settings by clicking the little cog icon.
- Navigate to Basic > Manage Exceptions.
- Click Add and then type the address of the site where you want to permit trackers.
Repeat for all the sites that you want to add to your exceptions list.
Read More
If you encounter an error message saying, “The ordinal xxx could not be located in the dynamic link library C:/Program Files (x86)/Microsoft VS Code Insiderscode – insiders.exe“ and you see a reference of a missing DLL file, then this indicates that the software is trying to locate the related DLL file, however, it is missing, hence the error.
The error mentioned “Ordinal” which refers to the order of a number mathematically, e.g. 1st, 2nd, etc. And in this error message, the ordinal is referring to an Xth file of an XX.DLL file which is missing which is why you’re getting this kind of error.
When you get this particular error, it means that your computer is missing the Microsoft Visual C++ Redistributable program. As per the error message, XXX is a number that in turn is the Ordinal. There is also another common error related to Ordinal which says, “The ordinal 12404 could not be located in the dynamic link library mfc90u.dl”.
The error message could be referring to any DLL in the message. And since all these DLL files are part of the package, the error changes quite a bit as the Visual Studio looks for that DLL file. To fix this error, here are some suggestions that might be of help.
Option 1 – Try installing Microsoft Visual C++ Redistributable
As pointed out earlier, the error pops up when the Microsoft Visual C++ Redistributable program is missing on your computer. Thus, you need to download it from the official website of Microsoft. Once you’ve downloaded the Microsoft Visual C++ Feature Pack Redistributable Package, install it and then check if the error is now fixed.
Option 2 – Try to install OpenSSL
If you encounter the same error message but it points out that the LIBEAY32.DLL file is missing, then you have to install OpenSSL. In such a case, you will see the following error message:
“Ordinal not found. The Ordinal [Xxxx] could not be located in the Dynamic Link Library Libeay32.dll.”
Make sure that when you install OpenSSL, you do it into the Windows system directory since the Libeay32.dll file is related to security.
Option 3 – Try to check Windows Updates
There are instances when Microsoft rolls out the framework and related updates via Windows Updates. It could be that an update related to DLL is still pending which is why you need to check Windows Updates. To do so, go to Settings > Update and Security and from there check if there is any pending update. If there is, you need to install that update and then restart your computer if needed.
Read More
Error Code 0xc00007b – What is it?
Error code 0xc00007b usually manifests itself via the inability to start an application properly. It can occur when users attempt to run a game or other programs on their computer. In such a case, the application will not start and a message box will pop up stating that error code 0xc00007b has occurred. The error code is likely to occur when users attempt to run a program in the incorrect or inappropriate bit. For instance, if you try to load a 32bit location with a 64bit location.
Solution
 Error Causes
 Error Causes
Error code 0xc00007b affects various versions of the Windows operating system, including Windows 7, 8, 8.1, and Windows 10. In the case of error code 0xc00007b for Windows 10, the error may be caused by issues related to software you’ve installed on your machine. This may cause software conflict resulting in the need to install programs like DirectX. Left unchecked, error code 0xc00007b could incite other error codes in Windows 10, such as error code 0xc004f034.
Further Information and Manual Repair
To repair error code 0xc00007b for Windows 10 devices, users will need to implement at least one manual repair procedure. Manual repair methods are effective in combating these issues as they can address the issues causing the error in the first place, thus fixing the problem.
The manual repair procedures for fixing error code 0xc00007b are very straightforward and can be implemented with little technical knowledge. However, you may need to contact a Windows repair technician if you have difficulty fixing the error code after completing the manual repair methods listed below.
Method One: Install Microsoft DirectX
Microsoft DirectX is an application usually included in the Microsoft operating system. It enables users to access high-speed gaming and multimedia on their PC. The latest version of this Windows technology is available on Microsoft’s official site.
Visit the Microsoft website and search for DirectX End-User Runtime Web Installer. Once you have located the latest version of the program, select the preferred language you would like DirectX to run in, and then click download. Run the program, then be sure to reboot your computer.
Note that this solution should only be applied if you are having issues running or displaying a gaming or multimedia application. Once you’ve correctly installed the latest version of DirectX, it should be able to fix underlying issues that may be causing error code 0xc00007b to occur. If you are still unable to run applications after completing this manual repair procedure, however, you will need to apply another method to fix error code 0xc00007b for Windows 10.
Method Two: Install Latest Version of .NET Framework
.NET Framework, a framework developed by Microsoft, provides solutions for users who may be having problems with applications. To download the latest version of the .NET framework, follow the steps listed below.
- Step one: Open your favorite web browser
- Step two: Enter www.microsoft.com/net
- Step three: Click Downloads
- Step four: Select the latest version of the .NET Framework by clicking the framework at the top of the list. (Currently, the latest version is .NET Framework 4.6.2.)
- Step five: Select preferred language, then download
- Step six: Run software.
To ensure you successfully download the latest version of the .NET Framework, verify your computer is properly connected to the Internet while downloading the software. Also, follow the instructions provided on the Microsoft website.
After completing the download process, reboot your computer then check if you have successfully resolved error code 0xc00007b for Windows 10. If this manual repair method is successful, you will be able to access your gaming and multimedia programs. Otherwise, the error code message box will reoccur, stating that the application error code is present on your device. Apply the next manual repair procedure to correct the error code if this reoccurs.
Method Three: Install Windows Updates
In certain instances, application error codes like error code 0xc00007b affect PC users who fail to install the most current Windows updates on their device. That is why it’s important to check your system and ensure you have installed all the latest updates.
The updates, if any are available, will automatically be installed on your PC once you access Windows Update in Settings. Reboot your computer then check if you are able to run programs that previously would not open due to error code 0xc00007b. If problems persist resulting in the reoccurrence of the error code, reinstall the applications you are unable to open or get help from a Windows repair technician.
Method Four: Download an Automated Tool
If you wish to always have at your disposal a utility tool to fix these Windows 8 and other related issues when they do arise, download and install a powerful automated tool.
Read More
If you find that your headphones are suddenly not working, read on as this post will help you sort out the problem. There could be several reasons why your headphone is malfunctioning, it could be due to an update you just installed, or it could also be due to incompatible operating system, drivers, and so on.
Although updates are created to fix bugs on a computer, there are times when it also causes some issues in the computer. One of the issues it causes is the broken headphone. When this happens, the computer will stop playing any audio using the headphones. The problem, as pointed out, could be due to Windows Updates or incompatible or corrupted drivers in the system.
To resolve this problem with the headphones, there are several fixes you can check out. Make sure that you follow each one of the given potential fixes below.
Option 1 – Try to set the headphone as the default device manually
There are times when you plug a headphone, it does not toggle the default audio device. Thus, to fix this issue, you have to set the default audio device to the headphones manually. To do that, follow these steps:
- First, right-click on the volume icon located on the system tray.
- Next, select the Open sound settings option to open the Sound section in the Windows 10 Settings app.
- After that, go to the Output section and select Headphones for the “Choose your output device” option. This should fix the problem for you.
Option 2 – Try to update, rollback or reinstall the Audio driver
If the glitch in your audio has something to do with software, chances are it might be related to the audio driver – it could be that the newest version of your Windows 10 does not work well with the old version of the driver. This is why you have to update your audio driver to the newest available version.
- Tap the Win + R keys to open the Run dialog box and then type in MSC and tap Enter or click OK to open the Device Manager.
- Expand the section for the outdated device drivers.
- And then select the outdated driver(s) and right-click on it/them.
- From the drop-down menu, select the Update Driver option and follow the on-screen instructions to install the latest version of the driver.
- Then also click on the option, “Search automatically for updated driver software.
- Restart your PC after the installation.
Note: If updating the Audio driver didn’t work, you can go to the website of your PC manufacturer and look for the support section where you can download the drivers for your computer. You just need to take note of your PC’s correct model and model number so you can find the appropriate driver.
Option 3 – Try checking the status of the audio-related Windows Services
The Windows Services manages audio for all Windows-based programs and if this service is stopped, audio devices, as well as effects, will also be affected and if this service is disabled, any services that depend on it explicitly will fail to start. So you need to check the status of this service. How? Follow the steps below.
- Tap the Win + R to open the Run dialog box.
- Then type in “MSC” in the field and tap enter to open the Windows Service Manager.
- Next, navigate down to the Windows Audio Service and double-click on it to open Properties.
- After that, set the Startup Type to Automatic and then click on the Start button and if it has already started, stop it and then start it again.
Note: You should also make sure that the following Dependency Services are started and have Automatic Startup type:
- Remote Procedure Call
- Windows Audio Endpoint Builder
You should also start the Multimedia Class Scheduler and set it on Automatic if you have it in your system. The Multimedia Class Scheduler Service or MMCSS is a service in Windows that allows multimedia applications to get prioritized access to CPU for time-sensitive processing like the multimedia applications as well as prioritized disc access to make sure that the process does not lack data to process.
Option 4 – Try running the Playing Audio Troubleshooter
Since the Windows 10 operating system has the Playing Audio Troubleshooter, you can use this troubleshooter to try and fix the problem with the headphones. You can access this tool in the Control Panel or in the Taskbar Search and even on the Troubleshooters page of Windows 10.
Run this troubleshooter and see if it can fix the issue or not.
Option 5– Try to rollback or install a newer Windows Update
As mentioned earlier, the issue with the headphones could be due to a Windows Update. Thus, to fix the problem, you can try to either roll back or install a newer Windows Update.
Read More
Mingwm10.dll Error Code — What is it?
Mingwm10.dll is a dynamic link library file. This file is associated with the gaming program called the Adventures of Tintin developed for Windows OS by Ubisoft.
Like all other DLL files, Mingwm10.dll file also contains small programs that are used to load and run this gaming program on your PC and several other programs developed by Ubisoft.
Mingwm10.dll error code may occur when this file fails to run and load the Adventures of Tintin, the game on your PC. This error may appear on your PC in different formats such as:
- «Mingwm10.dll not found.»
- «The file mingwm10.dll is missing.»
- «Cannot register mingwm10.dll.»
- «Cannot find C:\Windows\System32\mingwm10.dll.»
- «Mingwm10.dll Access Violation.»
- «Cannot start The Adventures of Tintin The Game. A required component is missing: mingwm10.dll.Please install The Adventures of Tintin The Game again.»
- «This application failed to start because mingwm10.dll was not found. Re-installing the application may fix this problem.»
Solution
Error Causes
Mingwm10.dll error code is triggered due to a plethora of reasons. These include causes like:
- Registry damage or corruption
- Viral infection
- Hardware failure
- Corrupt or missing Mingwm10.dll file
Though this error is not fatal nonetheless it is advisable to fix it promptly to ensure you are able to access your desired program successfully without any restriction.
Please note, this error can become a major PC threat as the underlying causes are registry corruption or viral infection.
Further Information and Manual Repair
Listed below are some of the best, proven, and easy DIY methods to help you resolve the Mingwm10.dll error code on your system. These are simple methods and require no technical expertise or know-how.
Method 1 — Restore the Missing File
As mentioned above DLL are shared files, there is a possibility that you accidentally deleted the Mingwm10.dll file on your system while uninstalling a program developed by Ubisoft.
In such an event, the best and the easiest way to fix the error is to check your recycle bin and restore the deleted Mingwm10.dll file on your system.
Method 2 — Download Mingwm10.dll File from a Reliable Website
If you are unable to locate the missing Mingwm10.dll file in the recycle bin, then another method to fix the issue can be to download the Mingwm10.dll file from a trusted website.
The reason why we say trusted is that viruses often enter computer systems when users download files from unreliable websites.
So, to avoid bigger problems first make sure the site you select to download the Mingwm10.dll file is authorized and trusted.
Method 3 — Update Outdated Drivers
Hardware failure is related to outdated drivers. If the cause of the Mingwm10.dll error code is hardware failure, simply update the outdated drivers to resolve.
Since the Mingwm10.dll file is used to run and load Adventures of Tintin, a gaming software program, then most probably the error is caused because of the outdated video card driver.
Therefore update it to fix the issue. For this, go to the start menu, type Device Manager in the search bar. Once it opens use the driver update wizard to make updates. The wizard will walk you through the entire process, making the driver update task easy.
Method 4 — Repair the Corrupt Registry
The registry is the part that stores all the information and activities performed on your system. From important files to obsolete files it saves everything.
If the obsolete files like the junk files, bad entries, invalid registry keys, and cookies are not removed from the registry frequently, these files accumulate in the registry and corrupt important system files like DLL files, popping error codes like Mingwm10.dll error.
To resolve, download Restoro. It is a PC Fixer embedded with a registry cleaner. The registry cleaner scans and removes all the obsolete files. It cleans the registry and the corrupted system files in just a few clicks, thereby fixing the problem.
Click here to download Restoro to resolve the Mingwm10.dll error code on your PC
Read More
Code 0x80200056 – What is it?
The Error Code 0x80200056 will appear in a few different instances, though always applies to an interrupted download. Windows 10 will quickly discover that their upgrade and/or download did not work correctly. Not every user who upgrades to Microsoft Windows 10 will face this issue, only a select few random instances will occur.
Common symptoms include:
- A dialog box appears with the Error Code 0x80200056
- Microsoft Windows 10 upgrade is unsuccessful
- Users are unable to open any applications after completing the Microsoft Windows 10 install
Solution
Error Causes
This error can be caused by a number of common problems, the first of which is the easiest to diagnose.
- If during the upgrade process, you accidentally restarted your PC, or inadvertently signed out of your PC, the error will occur.
- Third-party software conflicts can cause this error message during the Microsoft Windows 10 upgrade.
- Error Code 0x80200056 may also appear if you have corrupted system files on your PC.
- A change in date and time during the Microsoft Windows 10 upgrade could potentially cause this error.
None of these causes should overtly affect the operation of your PC, but merely prevent the upgrade and/or download from functioning correctly. If your PC is exhibiting other operating system errors in addition to Error Code 0x80200056, it would be wise to contact Microsoft Support before the issues lead to a possible catastrophic failure.
Further Information and Manual Repair
With the very recent release of Microsoft Windows 10, we are seeing a number of users discuss Error Code 0x80200056. Luckily, there are three different methods that any home user can perform to alleviate the error and complete the Microsoft Windows 10 download successfully.
Method 1
Use if your PC restarted accidentally during the upgrade, or if you accidentally signed out of Windows during the upgrade.
- Make sure that your PC or Laptop is plugged in, to avoid another accidental restart.
- Turn your PC on, or make sure that it is running. (Close any and all unnecessary programs)
- Attempt the upgrade again, you should be able to run the upgrade successfully without further issue.
The following solution methods will apply if corrupted files, date/time changes, or third-party software interference is the issue causing Error Code 0x80200056.
Method 2
The following solution methods will apply if corrupted files, date/time changes, or third-party software interference is the issue causing Error Code 0x80200056.
- Click on your “start” icon and choose the CMD (command prompt) option.
- Right-click on “command prompt” and choose “run as administrator”.
- Paste the command “bitsadmin.exe /reset /allusers” into the command prompt and press ENTER.
- Restart your PC and attempt the Microsoft Windows 10 upgrade again.
Method 3
- Click on your “start” icon and choose the CMD (command prompt) option.
- Select “run as administrator” (enter a password if asked to do so).
- Enter the following command into the command prompt- “sfc/scannow”, press ENTER.
- Do not close the command prompt window until the entire process is complete.
- The scan will determine if you have any missing or corrupted files. You will receive a message that says either: “Windows Resource Protection did not find any integrity violations”.Or “Windows Resource Protection could not perform the requested operation”.
- If you received the first message, then your files are fine. The second message indicates that there are file corruption issues.
- To repair the disjointed files, restart your PC in SAFE MODE, and reopen the command prompt window.
- Enter the following command into the command prompt- “sfc/scannow”, press ENTER.
- After the scan is run again, you will receive a message stating that the files have been successfully repaired.
- Restart your PC in normal mode and start the Microsoft Windows 10 upgrade again.
To use a powerful tool to resolve Windows 10 upgrade Error Code 0x80200056 issue, download a powerful tool.
Click here to download Restoro.
If any of these methods do not allow for the successful upgrading of your Windows system, contact the Microsoft Support team. Make sure to include in your message to support what fixes you have attempted, and what the outcomes were. As Microsoft Windows 10 is so incredibly new, there are bound to be issued while the program is in its infancy. Fortunately, a majority of these issues should be worked out by Microsoft relatively quickly.
Read More
If you have been stuck on allocating disk space on steam you know how annoying this error could be. Here you are, with your new game eager to play it and relax a little and all of the sudden steam gets stuck on allocating disc space.
Luckily this error is fixable, follow provided guide to fix the error and continue with installing the game.
-
Restart computer
An old age solution of turning it off and turning it back on but in this case, it works 90% of the time.
-
Run Steam as administrator
Allocating disk space when done by a third-party application can be a task that requires privileges higher than the normal user. Find the steam executable file in the installation folder, right-click on it and run it as an administrator
-
Clear Steam cache
Launch Steam in admin mode.
Once in the client, click on Steam at the top left corner of the screen.
From the drop-down box, click on Settings.
Once in the Settings, navigate to the Downloads tab.
Click the Clear Download Cache option.
Click OK on the prompt to confirm your action. Wait for the process to complete.
When done, save changes and exit the client. -
Change download server
Launch Steam client in admin mode.
Once in the client, click on Steam at the top left corner of the screen.
From the drop-down box, click on Settings.
Once in the Settings, navigate to the Downloads tab.
Click the drop-down menu under the Download Region.
Choose a different server to download from.
Exit the Steam client. -
Refresh installation files
- Kill a Steam process in Task Manager.
- Navigate to your Steam folder
- Inside the Steam folder, select everything except the steamapps folder and the Steam.exe executable file.
- Tap the Delete key on your keyboard.
-
Turn off firewall
Firewall can prevent steam and cut access to system operations, disable firewall to fix this issue.
-
Stop overclocking
If you have overclocked your PC, you can simply reverse the change. The steps you will need to take depends on the overclocking software. Launch the software and look for the option to stop the overclocking. Once done, restart your computer, rerun the game installation.
Read More
Windows defender error 0x800700AA, service can not be started comes when the user is trying to run Windows defender scan on their system.
This kind of behavior happens for two reasons mostly, third-party application conflict or corrupted system files.
In this article, we will tackle both scenarios and provide you with solutions in both cases.
Third-party application conflict
In this rare scenario when Windows defender can not start scan due to conflict with installed service or application in the system solution is quite simple. Restart your PC into safe mode and run the scan from there. In a safe mode environment, minimum drivers and services are only loaded eliminating any conflicts that might occur when everything is booted. If Windows defender can not run the scan in safe mode and you get the same 0x800700AA error then you can eliminate application conflict as a reason and move to the next solution which will tackle corrupted system files. If you, however, managed to run a scan then you have a rare third-party application conflict, you can boot normally into windows and try to eliminate one by one to see which one is causing the issue. The safest bet would be to start with security software because most of the time that is what causes conflicts in running services and applications.
Corrupted system files
If the previous solution has not provided you with results then you have system file corruption that needs to be fixed. Move from one solution to another as presented below:
-
Run SFC scan
SFC scan is a built-in Windows tool for solving corrupted system files issues, it is fully automated and does not require from the user any kind of knowledge or information. To run it and scan the system do the following:
Press ⊞ WINDOWS + X to open the secret menu
Left-click on the command prompt (admin)
In command prompt type SFC /SCANNOW and press ENTER
Wait for the process to finish, do not interrupt it and once it is done, restart your computer -
Run DISM scan
DISM scan is similar to SFC scan but it tackles different types of system file corruption and it is recommended to run it also after SFC has been completed. Please note that for DISM scan to be successful you will need a stable internet connection since DISM will replace corrupted files with new ones downloaded from Microsoft. To run it do the following:
Press ⊞ WINDOWS + X to open the secret menu
Left-click on the command prompt (admin)
inside command prompt type: exe /online /cleanup-image /scanhealth followed by ENTER, then type: Dism.exe /online /cleanup-image /restorehealth also followed with ENTER.
Leave scan to finish and reboot your PC
Read More
![]()
Copyright © 2023, ErrorTools. All Rights Reserved
Trademark: Microsoft Windows logos are registered trademarks of Microsoft. Disclaimer: ErrorTools.com is not affiliated with Microsoft, nor claims direct affiliation.
The information on this page is provided for information purposes only.
![]()