System recovery options can help you repair Windows if a serious error occurs. To use system recovery options, you’ll need a Windows installation disc or access to the recovery options provided by your computer manufacturer. If you don’t have either of those choices, you can create a system repair disc to access system recovery options.
-
Open Backup and Restore by clicking the Start button, clicking Control Panel, clicking System and Maintenance, and then clicking Backup and Restore.
-
In the left pane, click Create a system repair disc, and then follow the steps.
 If you’re prompted for an administrator password or confirmation, type the password or provide confirmation.
 If you’re prompted for an administrator password or confirmation, type the password or provide confirmation.
Note: If you’re prompted to insert a Windows installation disc, it means that the files needed to create the system repair disc can’t be found on your computer. Insert a Windows 7 installation disc.
-
Insert the system repair disc into your CD or DVD drive.
-
Restart your computer using the computer’s power button.
-
If prompted, press any key to start the computer from the system repair disc.
-
If your computer isn’t configured to start from a CD or DVD, check the information that came with your computer. You might need to change your computer’s BIOS settings.
-
-
Choose your language settings, and then click Next.
-
Select a recovery option, and then click Next.
Tip: Print these instructions and keep them in a safe location with your system repair disc.
Start your computer from a Windows 7 installation disc or USB flash drive
You might need to start, or boot, your computer using the Windows 7 installation disc or a USB flash drive if you want to:
-
Install or reinstall Windows 7.
-
Recover Windows 7 from a serious error. If your computer won’t start Windows at all, you can access Startup Repair and other tools in the System Recovery Options menu from the Windows 7 installation disc or USB flash drive. These tools can help you get Windows 7 running again.
Note: If you use a Tablet PC or other computer with a touchscreen, you might need to attach a keyboard and mouse in order to use Startup Repair and other tools in the System Recovery Options menu.
-
Turn on your computer, insert the Windows 7 installation disc or USB flash drive, and then turn off your computer.
-
Restart your computer.
-
Press any key when prompted to do so, and then follow any instructions that appear.
-
When the Install Windows page appears, click Install now to begin the installation process or click Repair your computer to access system recovery options.
-
Follow the instructions.
If the Install Windows page doesn’t appear, and you aren’t asked to press any key, you might have to specify that your computer uses its DVD drive or a USB flash drive as the first startup device. To do this, you need to change settings in the computer’s basic input/output system (BIOS).
Note: Most newer computers can start from a USB device, but some older computers might not have this capability. For more information, check the documentation that came with your computer or go to the manufacturer’s website.
Before you change BIOS settings, check the information that came with your computer or go to the computer manufacturer’s website. Specific procedures for accessing the BIOS and changing settings can differ depending on your computer’s manufacturer, or you might be able to choose which startup device your computer uses without changing BIOS settings.
Warning: Be careful when changing BIOS settings. The BIOS interface is designed for advanced users, and it’s possible to change a setting that could prevent your computer from starting correctly.
-
Turn on your computer, insert the Windows 7 installation disc or USB flash drive, and then restart your computer.
-
Newer computers often display a startup (or boot) menu. On the startup menu, choose «BIOS setup,» or «BIOS settings,» or something similar.
Procedures vary depending on the BIOS manufacturer. Usually, you must press a key (such as F2, F12, Delete, Esc) or a key combination immediately after you turn on your computer but before Windows starts. If the Windows logo appears, you need to try again by waiting until the Windows logon prompt appears, and then shutting down and restarting your computer again.
-
The BIOS setup screen appears. On the BIOS setup screen, choose the option called «Boot order,» or something similar. Boot order settings might also be listed under «Advanced settings» or something similar.
-
Select your DVD drive or USB flash drive as the first startup device. (The USB flash drive might be listed under «Removable devices» or something similar.)
-
Save the setting changes, and then exit the BIOS.
-
Restart your computer, and then start Windows 7 from the installation disc or USB flash drive as previously described.
Need more help?
Want more options?
Explore subscription benefits, browse training courses, learn how to secure your device, and more.
Communities help you ask and answer questions, give feedback, and hear from experts with rich knowledge.
Find solutions to common problems or get help from a support agent.
- Topics
- Windows 7, Repair, Recovery
This is the repair disc iso for a Windows 7 x64 machine. This disc does not include the full Windows 7 operating system, just the recovery only.
- Addeddate
- 2020-12-26 20:24:06
- Identifier
- windows-7-64-bit-repair-disc
- Scanner
- Internet Archive HTML5 Uploader 1.6.4
plus-circle Add Review
plus-circle Add Review
comment
Reviews
There are no reviews yet. Be the first one to
write a review.
Discord — популярный голосовой и текстовый мессенджер, который широко используется для общения и координации в играх. Однако, некоторые пользователи старых операционных систем, таких как Windows 7 32 bit, могут столкнуться с проблемами при установке и запуске Discord.
Основным ограничением для работы Discord на Windows 7 32 bit является отсутствие поддержки 64-битных приложений. Тем не менее, существует несколько способов обойти это ограничение и заставить Discord работать на вашей системе.
Прежде всего, убедитесь, что ваш компьютер соответствует минимальным требованиям для запуска Discord. Это включает в себя наличие процессора с поддержкой SSE2, 2 ГБ оперативной памяти и свободного места на жестком диске.
Если ваш компьютер соответствует минимальным требованиям, попробуйте скачать и установить предыдущую версию Discord, которая поддерживает 32-битные системы. Однако, имейте в виду, что эта версия может быть менее стабильной и не получать обновления безопасности.
Если у вас все еще возникают проблемы при установке или запуске Discord, вы можете попробовать использовать совместимый с Windows 7 32 bit клиент, такой как Mumble или TeamSpeak. Эти программы также предназначены для голосового общения в играх и могут быть отличной альтернативой Discord.
Содержание
- Руководство по установке и запуску Discord на Windows 7 32 bit
- Шаг 1: Скачайте Discord
- Шаг 2: Установите Discord
- Шаг 3: Запустите Discord
- Шаг 4: Настройте Discord
- Шаг 5: Подключитесь к серверам
- Шаг 6: Начните общаться
- Проверка системных требований
- Загрузка и установка Discord
- Настройка Discord для работы на Windows 7 32 bit
Руководство по установке и запуску Discord на Windows 7 32 bit
Шаг 1: Скачайте Discord
Первым шагом в установке Discord на Windows 7 32 bit является скачивание установочного файла с официального сайта Discord. Перейдите на страницу загрузки и нажмите кнопку «Скачать для Windows».
Шаг 2: Установите Discord
После завершения загрузки откройте скачанный файл и следуйте инструкциям установщика Discord. Принимайте установленные по умолчанию параметры и дождитесь завершения процесса установки. После этого Discord будет доступен на вашем компьютере.
Шаг 3: Запустите Discord
Найдите ярлык Discord на рабочем столе или в меню «Пуск» и запустите приложение. Поприветствуйте, войдите в свою учетную запись Discord или зарегистрируйтесь, если у вас еще нет учетной записи.
Шаг 4: Настройте Discord
После входа в учетную запись Discord вы можете настроить различные параметры и предпочтения, такие как настройка микрофона, громкости звука и оповещений. Изучите интерфейс Discord и настройте его на свой вкус.
Шаг 5: Подключитесь к серверам
Discord позволяет подключаться к различным серверам, где вы можете общаться с другими участниками. Чтобы присоединиться к серверу, вам нужно знать его адрес или получить ссылку-приглашение от другого пользователя Discord. Введите адрес сервера или перейдите по ссылке-приглашению, чтобы присоединиться к серверу.
Шаг 6: Начните общаться
После подключения к серверу Discord вы можете начать общаться с другими участниками через текстовые сообщения, голосовые или видео-звонки. Используйте интерфейс Discord, чтобы отправлять сообщения и вызывать других пользователей.
Теперь вы знаете, как установить и запустить Discord на Windows 7 32 bit. Наслаждайтесь общением с другими геймерами и пользуйтесь всеми возможностями, предоставляемыми этой программой!
Проверка системных требований
Перед установкой Discord на Windows 7 32-bit необходимо убедиться, что ваш компьютер соответствует системным требованиям приложения. Следующий список поможет вам проверить совместимость вашей системы с Discord:
- Операционная система: Windows 7 или более новая версия
- Архитектура: 32-bit
- Процессор: 1 ГГц или быстрее
- Оперативная память: 2 ГБ или более
- Свободное место на жестком диске: минимум 250 МБ
- Графическая карта: поддержка Direct X 9 и совместимая видеокарта
- Звуковая карта: поддержка Direct X 9 и совместимая звуковая карта
- Интернет-соединение: широкополосное соединение для наилучшего опыта
Убедитесь, что все эти требования выполняются на вашем компьютере перед установкой Discord. Если какое-либо из указанных условий не соответствует вашей системе, возможно, вам потребуется обновить ваше оборудование или операционную систему, чтобы использовать Discord.
Загрузка и установка Discord
| 1. | Посетите официальный сайт Discord по адресу https://discord.com/. |
| 2. | На главной странице, нажмите на кнопку «Скачать» в верхней части экрана. |
| 3. | Вы будете перенаправлены на страницу загрузки. Нажмите на кнопку «Скачать для Windows». |
| 4. | Ожидайте завершения загрузки файла установщика. |
| 5. | После завершения загрузки, откройте файл установщика Discord. |
| 6. | Следуйте инструкциям мастера установки, чтобы установить Discord на ваш компьютер. |
| 7. | После завершения установки, запустите Discord, введя имя пользователя и пароль. |
Поздравляю! Теперь вы можете использовать Discord и присоединиться к сообществам, создать свой сервер или общаться с друзьями через голосовые каналы.
Настройка Discord для работы на Windows 7 32 bit
Чтобы заставить Discord работать на Windows 7 32 bit, следуйте инструкциям ниже:
- Установите последнюю версию Discord: Посетите официальный веб-сайт Discord и загрузите последнюю доступную версию приложения. Обязательно выберите версию для 32-битной Windows 7.
- Проверьте системные требования: Убедитесь, что ваш компьютер соответствует системным требованиям Discord. Например, убедитесь, что у вас установлен Service Pack 1 для Windows 7 32 bit и все обновления установлены.
- Запустите Discord в режиме совместимости: Щелкните правой кнопкой мыши на ярлыке Discord на рабочем столе или в меню «Пуск» и выберите «Свойства». В диалоговом окне свойств перейдите на вкладку «Совместимость» и установите флажок возле опции «Запустить эту программу в режиме совместимости». В выпадающем списке выберите Windows Vista или более раннюю версию операционной системы.
- Отключите аппаратное ускорение аудио: Если у вас возникают проблемы с аудио при использовании Discord на Windows 7 32 bit, попробуйте отключить аппаратное ускорение аудио. Для этого откройте настройки Discord, перейдите во вкладку «Видео и аудио» и снимите флажок возле «Аппаратное ускорение аудио».
- Перезапустите Discord: После внесения всех необходимых настроек перезапустите Discord, чтобы изменения вступили в силу.
- Обновите драйверы: Если Discord продолжает работать неправильно на Windows 7 32 bit, обновите драйверы вашей звуковой карты и графического адаптера, так как устаревшие драйверы могут вызывать проблемы с работой Discord.
Следуя этим инструкциям, вы сможете настроить Discord для работы на Windows 7 32 bit. При возникновении проблем вы всегда можете обратиться за помощью к команде поддержки Discord или к сообществу пользователей, которые также могут использовать эту операционную систему.
Обратите внимание, что авторы данной статьи не гарантируют, что Discord будет работать стабильно на Windows 7 32 bit, так как это не официально поддерживаемая операционная система.
199
199 people found this article helpful
Creating a repair disc now could save you time and money later
Updated on February 9, 2023
What to Know
- Insert a blank disc, and go to Start > All Programs > Maintenance > Create a System Repair Disc.
- Choose disc drive from Drive menu, and select Create disc.
- To use it, boot from this disc to access System Recovery Options.
This article explains how to create a Windows 7 System Repair Disc. This will give you access to System Recovery Options, a powerful set of Microsoft-created diagnostic and repair utilities like Startup Repair, System Restore, System Image Recovery, Windows Memory Diagnostic, and Command Prompt.
How to Create a Windows 7 System Repair Disc
You’ll need an optical drive that supports disc burning (you probably have one; this is very common) to create the disc. Unfortunately, a flash drive isn’t a supported bootable media in this case.
As of January 2020, Microsoft is no longer supporting Windows 7. We recommend upgrading to Windows 10 or Windows 11 to continue receiving security updates and technical support.
This whole process is very easy and should only take around 5 minutes:
-
Insert a blank disc in your optical drive.
An empty CD should be large enough for a System Repair Disc. We’ve created a Windows 7 repair disc on a new Windows 7 32-bit installation, and it was only 145 MB. If you only have a blank DVD or BD available, that’s okay, too, of course.
-
Go to Start > All Programs > Maintenance.
You can also execute recdisc from the Run box or a Command Prompt window. If you do that, skip directly to Step 4 below.
-
Select Create a System Repair Disc.
-
Choose your optical disc drive from the Drive drop-down box.
-
Select Create disc.
Windows 7 will now create the System Repair Disc on the blank disc you inserted in the previous step. No special disc-burning software is required.
-
After the System Repair Disc creation is complete, Windows displays a dialog box that you can close. Select OK on the original Create a system repair disc window that’s now on the screen.
Using the Windows 7 System Repair Disc
Now that you’ve created the repair disc, label it something relevant like «Windows 7 Repair,» and keep it somewhere safe.
You can now boot from this disc to access System Recovery Options, the set of system recovery tools available for Windows 7. As with booting from any disc, you’ll need to watch for a Press any key to boot from CD or DVD message on screen.
Thanks for letting us know!
Get the Latest Tech News Delivered Every Day
Subscribe
What is a Windows 7 system repair disc? How to create a Windows 7 system repair disc using a CD/DVD or a USB flash drive? This post from MiniTool provides a guide with one-by-one steps. Now, continue to read to get more details.
What Is a Windows 7 System Repair Disc
Windows 7 includes a built-in tool for creating system repair discs that can be used to access advanced troubleshooting options. If your Windows 7 installation is corrupted or unbootable, the system repair disc is useful.
Windows 7 recovery media are bootable CDs or DVDs that contain Windows recovery tools. These tools can be used to automatically repair or resolve various issues, including startup issues and malware infections. Besides, recovery discs can restore your Windows 7 system to a previous state.
Creating a Windows 7 system repair disc is mainly used for the following purposes:
- Recovers Windows from critical errors – The system can be affected by a hard drive failure, viruses, hacking, physical damage, etc. Therefore, if you make a system repair disk, you can easily repair system errors.
- Install or reinstall the Windows system image – The system repair CD contains not only system recovery tools, but also system startup programs. Therefore, you can reinstall your Windows 7 with it.
- Create system repair discs for another computer – For computers with the same hardware, you can create a repair disk on one computer to repair the system of another computer.
Note: As of January 2020, Microsoft is no longer supporting Windows 7. It’s highly recommended to upgrade to Windows 10 or Windows 11 to continue receiving security updates.
How to Create a Windows 7 System Repair Disc
How to create a Windows 7 system repair disc? Follow the guide below:
Step 1: Type Control Panel in the Seach box to open it.
Step 2: Under System and Security, click Back up your computer.
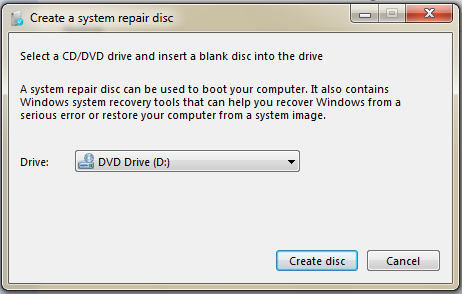
Step 3: Then, click the Create a system repair disc option.

Step 4: Select a CD/DVD drive and insert a blank disc into the drive. Then, click Create disc.
Step 5: Windows 7 will now start to create the System Repair Disc. You just need to wait for the process to be complete.
How to Boot from the Windows 7 System Repair Disc
After creating Windows 7 recovery disk, you can boot your PC from the Windows 7 system repair disc. Here is how to do that:
Step 1: Change the boot order in the BIOS so that the CD, DVD, or Blu-ray drive is listed first.
Step 2: Insert the Windows 7 system repair disc into your disc drive.
Step 3: Restart your computer. When you see the Press any key to boot from CD or DVD message, you need to press a key to boot from the disc.
Alternative to Windows 7 System Repair Disc
There is another way to create a bootable USB recovery drive and that is to use MiniTool ShadowMaker. It is a Windows backup software that allows you to create a system image and then perform system image recovery in case of system breakdown. You can use it on Windows 7/8/10/11, Windows XP as well as Windows Server.
If your computer fails to run, you can also back up the system on another PC with different hardware and then restore the system to your non-working computer. The Universal Restore feature is quite helpful.
Now, you can download MiniTool ShadowMaker to create a system recovery drive.
MiniTool ShadowMaker TrialClick to Download100%Clean & Safe
Part 1: Perform the System Backup
Step 1: Launch MiniTool ShadowMaker. Click Keep Trial to continue.
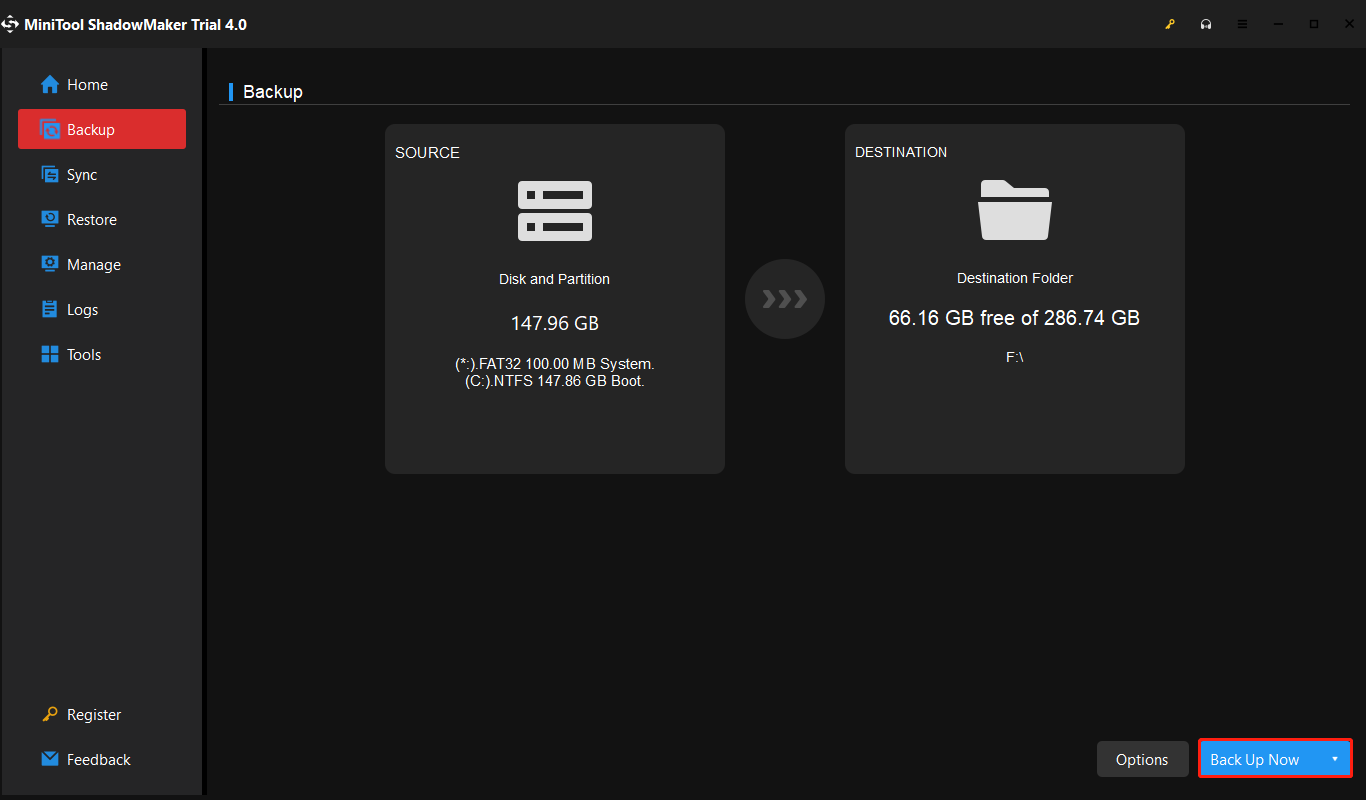
Step 2: Then, go to the Backup page. MiniTool ShadowMaker chooses the system as the backup source by default.
Step 3: Click the DESTINATION module to choose the backup destination. Here are four available paths including User, Computer, Libraries, and Shared.
Step 4: Click the Back Up Now button to execute the system immediately.
Part 2: Create a Bootable USB Drive
Then, prepare an empty USB flash drive and connect it to your computer.
Step 1: Open MiniTool ShadowMaker and go to its Tools page.
Step 2: Choose the Media Builder feature. Click WinPE-based media with MiniTool plug-in to continue.

Step 3: Then, you need to choose a media destination. You can choose the ISO file, USB flash drive, and CD/DVD driver based on your needs. After that, it will start to create.
Part 3: Restore the System Using the Recovery USB Drive
you can boot the computer from the bootable device you have created and go to the Restore page to perform a system image recovery. Since the incompatibility between the system and the hardware, maybe the system can’t boot and you need to perform a universal restore with MiniTool ShadowMaker.
Step 1: You need to go to the Tools page and click the Universal Restore feature.
Step 2: This feature will automatically list the operating system on the left pane and you need to click the RESTORE button to continue.

Bottom Line
What is a Windows 7 system repair disc? How to create a Windows 7 system repair disc using a CD/DVD or a USB flash drive? This post has introduced detailed information for you. Besides, there is another way to create a bootable USB recovery drive and that is to use MiniTool ShadowMaker.