It’s a good idea to create a recovery drive. That way, if your PC ever experiences a major issue such as hardware failure, you’ll be able to use the recovery drive to reinstall Windows 11. Windows updates to improve security and PC performance periodically, so we recommend you recreate the recovery drive annually. Personal files and any apps that did not come with your PC will not be backed up. You’ll need a USB drive that’s at least 16 gigabytes.
Warning: Use an empty USB drive because this process will erase any data that’s already stored on the drive.
To create a recovery drive in Windows 11:
-
In the search box on the taskbar, search for Create a recovery drive and then select it. You might be asked to enter an admin password or confirm your choice.
-
When the tool opens, make sure Back up system files to the recovery drive is selected and then select Next.
-
Connect a USB drive to your PC, select it, and then select Next.
-
Select Create. Many files need to be copied to the recovery drive, so this might take a while.
If you ever need to use the recovery drive to reinstall Windows 11 on your PC, see Recovery options in Windows for further instructions. It’s a good idea to Back up your Windows PC frequently because the recovery drive isn’t a system image. It doesn’t contain your personal files, settings, or programs.
Need more options for creating a recovery drive?
-
For Windows 7, see Create a system repair disc.
-
For Windows 8.1, see Create a USB recovery drive.
-
To download Windows 11 installation media, see Recovery options in Windows.
It’s a good idea to create a recovery drive. That way, if your PC ever experiences a major issue such as hardware failure, you’ll be able to use the recovery drive to reinstall Windows 10. Windows updates to improve security and PC performance periodically, so we recommend you recreate the recovery drive annually. Personal files and any apps that did not come with your PC will not be backed up. You’ll need a USB drive that’s at least 16 gigabytes.
Warning: Use an empty USB drive because this process will erase any data that’s already stored on the drive.
To create a recovery drive in Windows 10:
-
In the search box next to the Start button, search for Create a recovery drive and then select it. You might be asked to enter an admin password or confirm your choice.
-
When the tool opens, make sure Back up system files to the recovery drive is selected and then select Next.
-
Connect a USB drive to your PC, select it, and then select Next.
-
Select Create. Many files need to be copied to the recovery drive, so this might take a while.
If you ever need to use the recovery drive to reinstall Windows 10 on your PC, see Recovery options in Windows for further instructions. It’s a good idea to Back up your Windows PC frequently because the recovery drive isn’t a system image. It doesn’t contain your personal files, settings, or programs.
Need more options for creating a recovery drive?
-
For Windows 7, see Create a system repair disc.
-
For Windows 8.1, see Create a USB recovery drive.
-
To download Windows 10 installation media, see Recovery options in Windows.
Updated by
Cici on Sep 22, 2023
Discover how to repair Windows 10 from USB device to regain control over your computer’s performance. Follow our expert guidance to resolve errors, crashes, and software glitches effectively. This comprehensive passage offers detailed instructions, tips, and insights on repairing Windows 10 from a USB drive. Gain the knowledge and tools to tackle common system problems for a smoother Windows 10 experience.
View the Necessary Information to Repair Windows 10 from USB:
| ⏱️Duration | 5-10minutes |
| 🎈Preparations |
✔️Prepare a USB drive and format it as FAT32 ✔️Download ISO file and burn it to USB ✔️Windows Installation tool — EaseUS Partition Master |
| 👣Steps |
1️⃣Create the Windows 10 Bootable USB 2️⃣Boot from the Installation USB 3️⃣Choose the Suitable Tool to Repair Windows 10 From USB |
| 🧑💻Suitable Users | Easy steps, and it’s suitable for all users |
Yes, you can repair Windows 10 from USB. Windows provides many Windows boot repair tools such as Command Prompt, System Restore, and Startup Repair. If your computer is not booting, then you will not be able to use these tools. Therefore, you need to create Windows 10/11 installation USB media and repair Windows from USB.
The need for a Windows 10 repair boot USB arises when your system encounters crashes or fails to boot. By preparing a bootable drive in advance, you can troubleshoot and fix various issues impacting your operating system’s functionality. Keep reading, continue to understand the entire process, and take extraordinary measures in advance to avoid any annoyance in the future. If you like this guide, click the buttons and share it with others.
How to Repair Windows 10 From USB?
With the significance of a Windows 10 repair boot USB in mind, let’s explore the detailed process of repairing Windows 10 using a USB drive. This comprehensive guide will provide step-by-step instructions, ensuring a clear path towards repairing Windows 10 from USB. Repairing Windows 10 from USB consists of three processes:
1️⃣Create the Windows 10 Installation USB
2️⃣Boot Windows 10 PC from the Installation USB
3️⃣Choose the Suitable Tool to Repair Windows 10 From USB
This comprehensive guide will provide step-by-step instructions, ensuring a clear path towards repairing Windows 10 from USB.
Guide 1. Create the Windows 10 Bootable USB
Before we can repair Windows 10 from a USB drive, creating a bootable USB with the necessary Windows 10 installation files is essential. Follow these steps to make a Windows 10 bootable USB using EaseUS Partition Master, a reliable and versatile partition manager tool. This tool allows you easily burn Windows 10 ISO to USB.
1. Prepare a USB drive with at least 8 GB of space and format USB to FAT32:
- Right-click on the Windows icon in the taskbar and select «Disk Management.»
- Right-click on the target USB and click «Format.»
- Follow the on-screen instructions to format the USB.
2. Go to the Windows 10 software download page and download the Windows ISO file.
- Open the download link: https://www.microsoft.com/en-ca/software-download/windows10
- Under Create Windows 10 installation media, choose Download tool now.
3. Burn Windows 10 ISO to USB using EaseUS Partition Master
After you have downloaded the Windows ISO file, you need to burn it onto a USB drive with a professional tool. EaseUS Partition Master provides the «Burn ISO» feature specially designed for creating Windows installation disks. With simple pages, even newcomers can operate it easily.
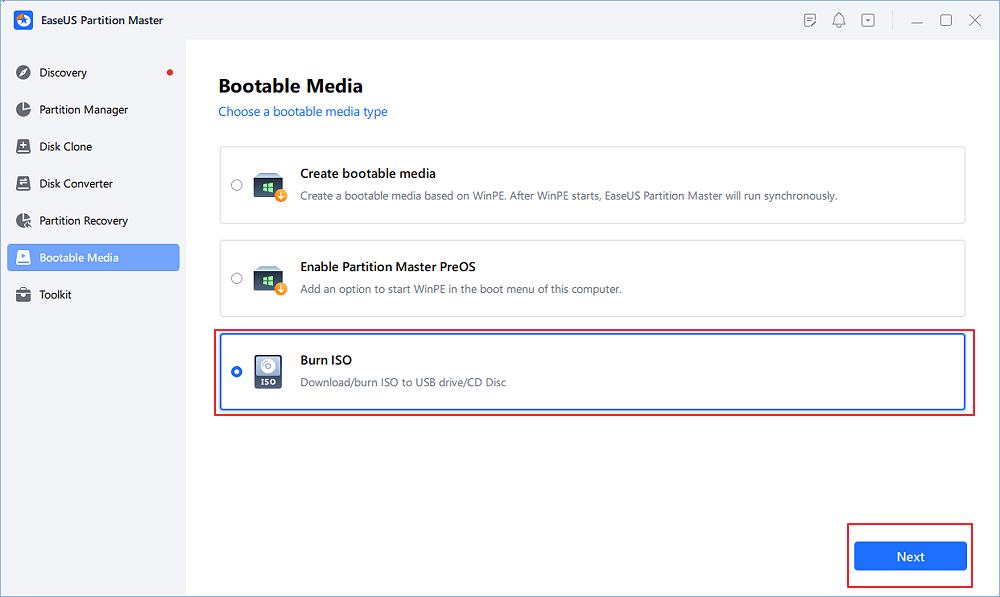
Step 1. Launch EaseUS Partition Master and go to the Bootable Media section. Click «Burn ISO» and click «Next».
Step 2. Select the ISO image that you have downloaded on your PC, and click «Open».
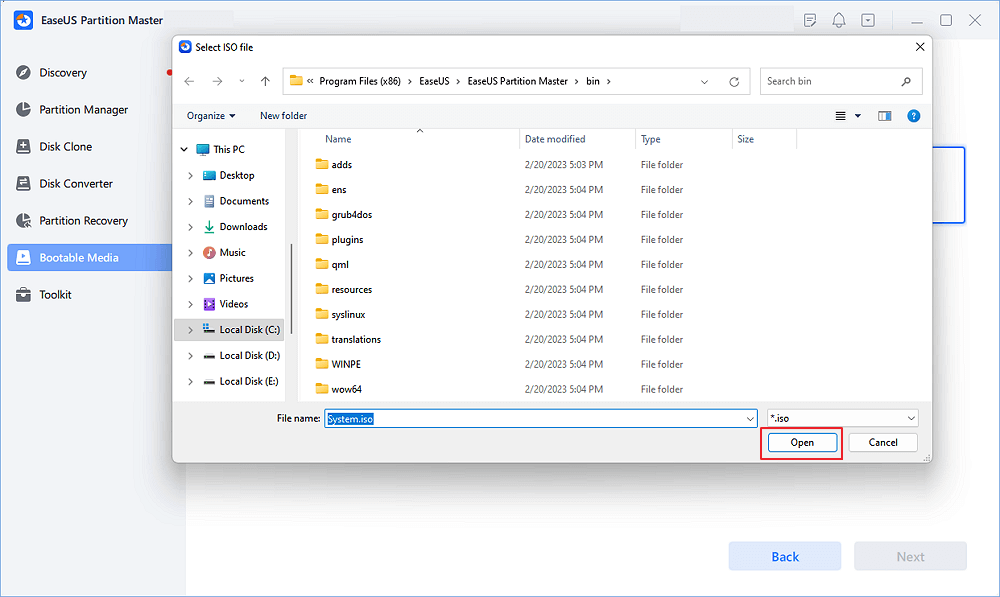
Step 3. Click «Next» and select the target USB as destination and click «Burn» to execute the operation.
As one of the best free ISO burners, you can also apply EaseUS Partition Master to the following occasion:
Guide 2. Boot from the Installation USB
So, as you know, before starting to boot from the installation USB, we have to create the installation media by following the above guide 1, which will be read by your computer and used to boot up. After creating a bootable USB, you must change the BIOS boot drive. By performing this action, you will elevate the USB flash drive’s position in the boot order priority list, resulting in your computer prioritizing the reading of files from it. As a result, your computer will load the installation media rather than the pre-existing system.
1. Change the Boot Order
Follow the steps to change the boot drive in BIOS before booting from the installation USB:
Step 1. Power on your computer and access the BIOS Setup by pressing ESC, F1, F2, F8, or F10 during startup.
Step 2. Navigate to the BOOT tab using the arrow keys in the BIOS Setup.
Step 3. Adjust the boot priority to make the USB drive the first device.
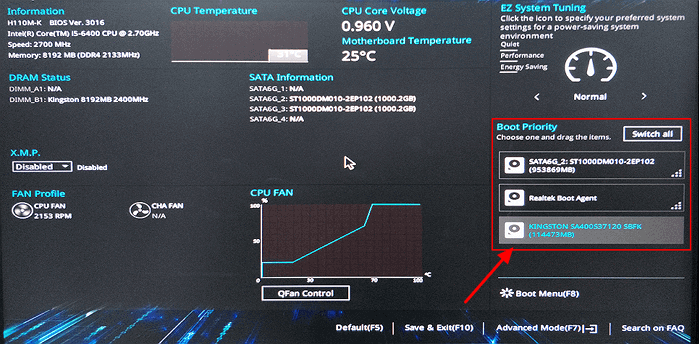
Step 4. Save the changes and exit the BIOS Setup.
Step 5. The computer will reboot using the new settings, booting from the USB drive.
Step 6. Stay alert for a prompt to press any key to boot from the external device, as you only have a few seconds to respond.
Changing the boot order is important when you want to boot from other external hard drives. You may also like the following topics:
2. Boot from the Installation USB
Following these steps, you can change the boot drive in the BIOS and boot from the installation USB. Now, it’s time to learn how to boot from the installation USB, but we recommend if you have crucial data on your device, please try to create a backup to preserve your data and avoid data loss.
Follow the steps to boot from the installation USB:
Step 1. Connect your bootable USB to your PC/Laptop and power it on. You might receive a prompt to press a key to initiate the USB booting process.
Step 2. Select your preferred language, timezone, currency, and keyboard settings and click «Next.»
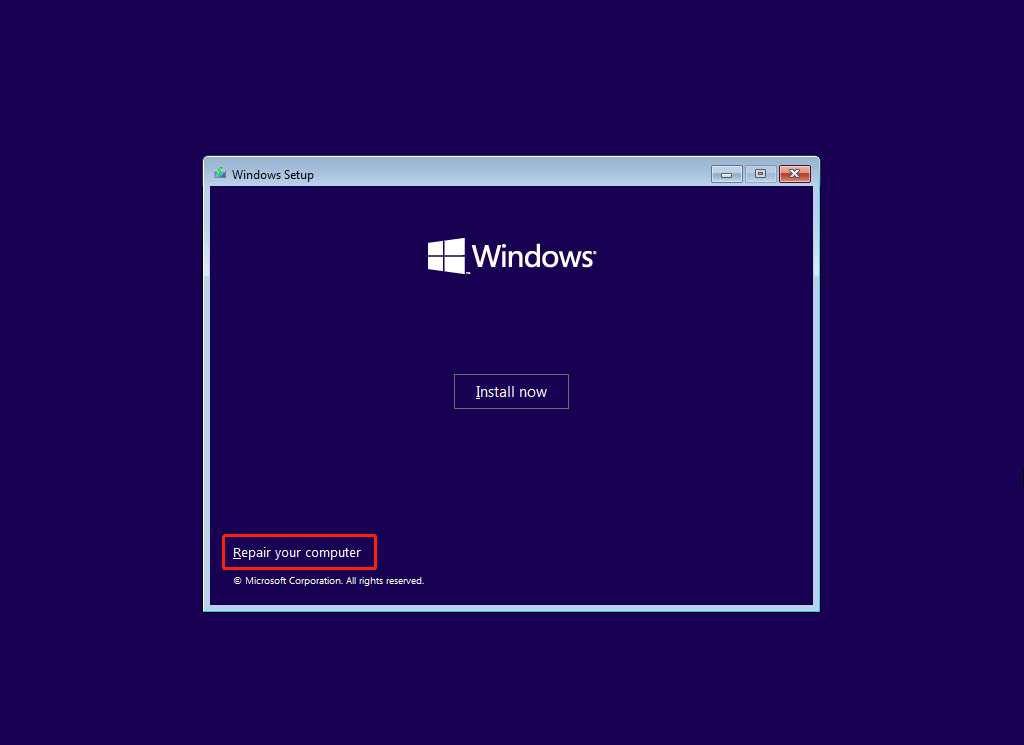
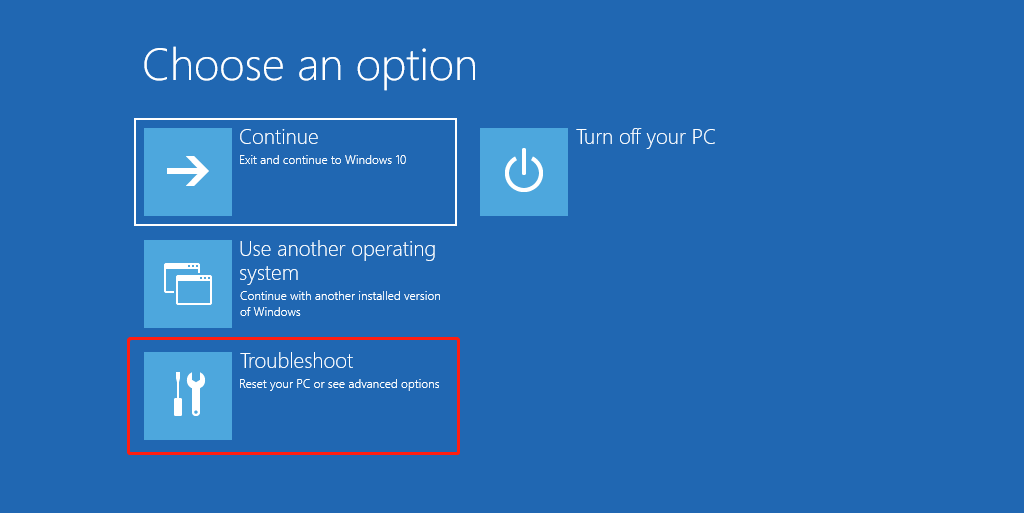
Step 3. Click on «repair your computer» in the lower left corner and go to «Troubleshoot.»
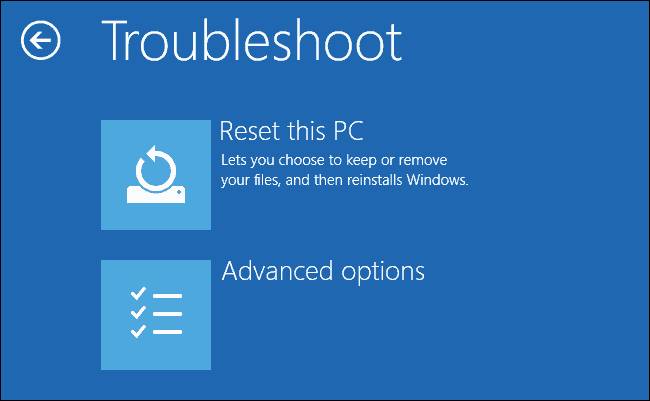
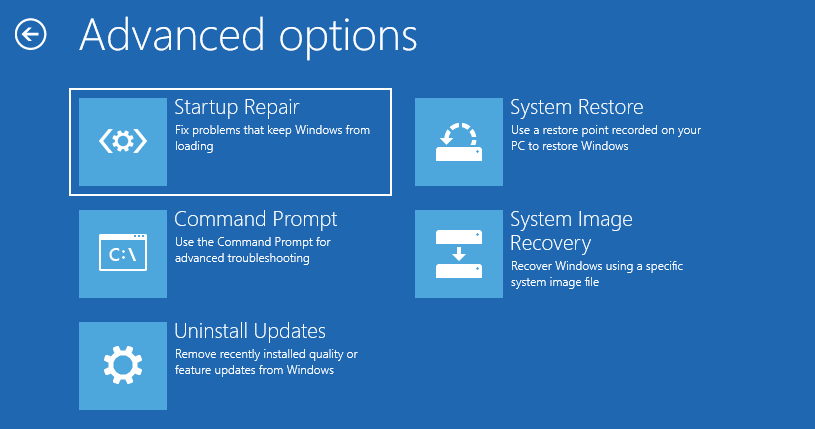
You will then be taken to the advanced options screen. In the advanced options screen, you will see different tools to help you repair Windows 10.
Guide 3. Choose the Suitable Tool to Repair Windows 10 From USB
When repairing Windows 10 from a USB drive, it’s important to select the right tools to address the specific issues you’re facing. Windows 10 offers various tools to repair your Windows 10 system from USB. Here are the steps to follow:
Step 1: Choose the Suitable Tool to Repair Windows 10.
Windows 10 provides several tools that can help in repairing your system. You can select the appropriate tool depending on the specific issue you’re facing. Here are three common tools:

1. Startup Repair: This tool is designed to fix problems that prevent Windows from starting correctly, such as missing or corrupted system files. It scans for system issues and attempts to repair them automatically.
2. Command Prompt: The Command Prompt allows you to execute commands to troubleshoot and fix various problems manually. It provides a command-line interface to run specific commands to repair your system. You can use the appropriate command to perform the repair operation. For example:
- Use the CHKDSK command to check the volume file system for errors.
- Use BCDBoot to repair a corrupted boot file system.
You can also use other functions, such as DISM, SFC, etc., as long as you are proficient with the commands.
3. Uninstall Updates: This feature is typically used when your computer is having problems after installing a quality update or feature update. You can uninstall the most recent update to see if the problem is resolved.
4. System Restore: This tool lets you restore your computer to a previous working state. If you have created a system restore point before encountering the issue, you can use this tool to revert your system files, registry, and settings to that point.
5. System Image Recovery: This feature is a copy of the drive that Windows needs to run. You can use it to recover your computer in case your hard drive or device stops working.
Step 2: Choose the appropriate tool based on your specific needs.
Consider the nature of the problem you’re experiencing and select the tool that is most likely to address it effectively. For example, try Startup Repair if your computer fails to start properly. If you prefer manual control over the repair process, Command Prompt might be the tool of choice. And if you recently installed new software or drivers that caused problems, System Restore can be a valuable option.
Note: The available tools may vary depending on the Windows 10 version and any specific recovery or repair options you have installed on your USB. Remember to follow each tool’s on-screen instructions to initiate the repair process effectively.
Conclusion
This guide taught us how to repair Windows 10 from a USB drive. We discussed the importance of having a Windows 10 repair boot USB and provided step-by-step instructions for creating one. We also explored the process of booting from the USB and selecting the suitable tool to repair Windows 10.
The best solution depends on the specific issue you’re facing. Startup Repair is useful for fixing startup-related problems, Command Prompt provides manual control for troubleshooting, and System Restore is effective for reverting to a previous working state. Following this guide’s instructions, you can effectively repair your Windows 10 system from a USB drive and restore your computer’s performance.
FAQs About Repair Windows 10 From USB
If you have further questions about repairing Windows 10 from a USB drive, we have gathered a list of frequently asked questions (FAQs) to provide more information. Read on to find answers to common queries.
1. How to repair Windows 10 from the command prompt?
To repair Windows 10 from the command prompt, you can use various commands to troubleshoot and fix issues manually. SFC (System File Checker) is a command-line utility that scans for and repairs Windows’s corrupted or missing system files. It helps fix startup problems and other computer issues. To use SFC to repair Windows 10/11, follow these steps:
Step 1. Open the Command Prompt as an administrator.
Step 2. Type «sfc /scannow» and press Enter.
If SFC fails to fix the problem, it might be due to a broken Windows image. In that case, you can try an alternative solution.
2. How to repair install Windows 10 with ISO file?
If you want to repair install Windows 10 using an ISO file, follow these steps:
Step 1. Create a bootable USB or DVD from the Windows 10 ISO file.
Step 2. Boot your computer from the USB or DVD.
Step 3. Select «Install Now» and choose the «Upgrade» option.
Step 4. Track the on-screen instructions to finish the installation.
3. Why unable to repair Windows 10 from USB?
You might be unable to repair Windows 10 from a USB drive for several reasons. Here are a few possibilities:
- The USB drive is not properly created or formatted as a bootable device.
- The USB drive is not recognized or detected by your computer during the boot process.
- The Windows 10 installation files on the USB drive are corrupt or incomplete.
- Your computer’s BIOS settings are not configured correctly to boot from a USB device.
A Windows installation USB medium can not only help you install Windows on your computer but also repair Windows if your device can’t boot normally. In this MiniTool post, we will show you how to repair Windows from USB. No matter you are using Windows 10 or Windows 11, you can try this way.
When Do You Need to Repair Windows 10/11 from USB?
Windows has many built-in tools like Command Prompt, System Restore, and Startup Repair for you to repair your computer issues. However, if your Windows 10/11 computer can’t boot normally or corrupts, you will be unable to use the universal methods to open and use these tools. Well then, what should you do next? You can create a Windows 10/11 installation USB medium and repair Windows from USB using these tools.
Some users may not know how to repair Windows using the installation USB medium. We will show you a full guide on how to do this. In addition, if you lose your files due to some issues, you can try the best free data recovery software: MiniTool Power Data Recovery.
Preparation before Repairing Windows 10/11: Rescue Your Data
If your Windows computer won’t boot normally and you want to repair it, you’d better recover your files in advance to keep them safe. You can use the bootable edition of MiniTool Power Data Recovery, a professional data recovery software, to retrieve your files.
This software is specially designed to recover all kinds of files from different data storage devices like computer internal hard drives, external hard drives, USB flash drives, memory cards, SD cards, and more.
This software has a trial edition, which allows you to scan your drive to find your files on your computer. You can first try this free data recovery tool on a normal working device to see whether it works to find the data on it.
MiniTool Power Data Recovery TrialClick to Download100%Clean & Safe
However, if your computer is unbootable, you need to use the bootable edition of this software to recover your data.
Step 1: Get a Suitable Edition of MiniTool Power Data Recovery
You can’t directly get a bootable edition of this software. You need to go to the MiniTool official site to select a suitable edition. If you are a personal user, the Personal Ultimate can fully meet your needs.
Next, you can use the software download link you get to download this secure data recovery software to a normal working computer and use the license key you receive to register the software.
Step 2: Create a Bootable MiniTool USB Drive
1. Connect a USB drive that has at least 8 GB of space to your computer. There should be no important files on that USB drive. Otherwise, you need to back up the files in it.
2. Open the software to enter its main interface.
3. Click the disc icon from the top toolbar.
4. On the pop-up interface, select WinPE-based media with MiniTool plug-in to continue.

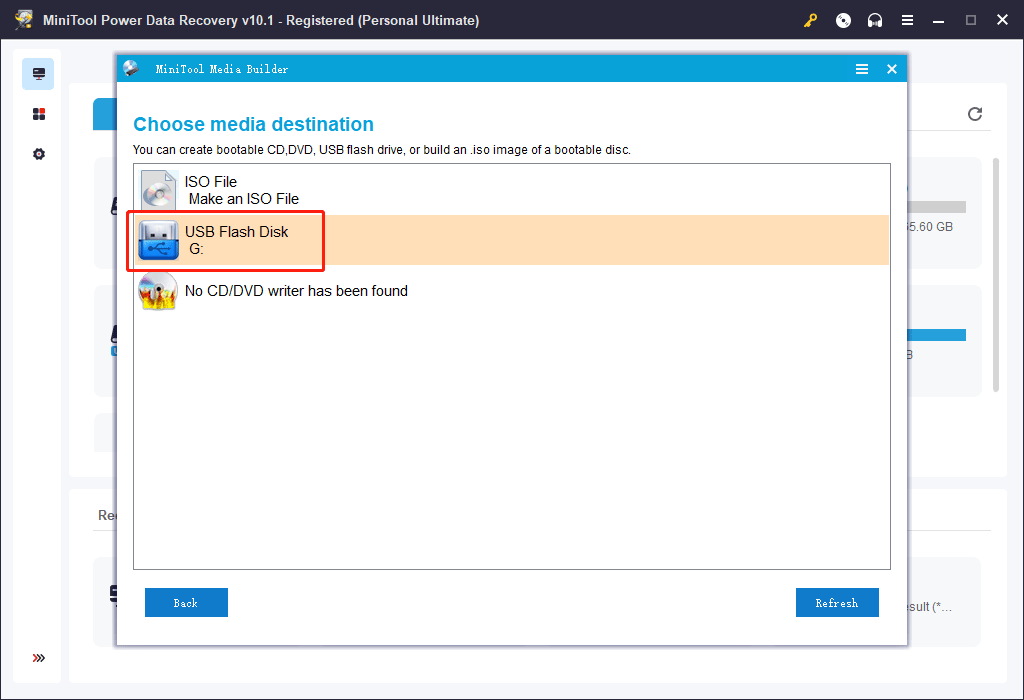
5. Select the connected USB on the next page.
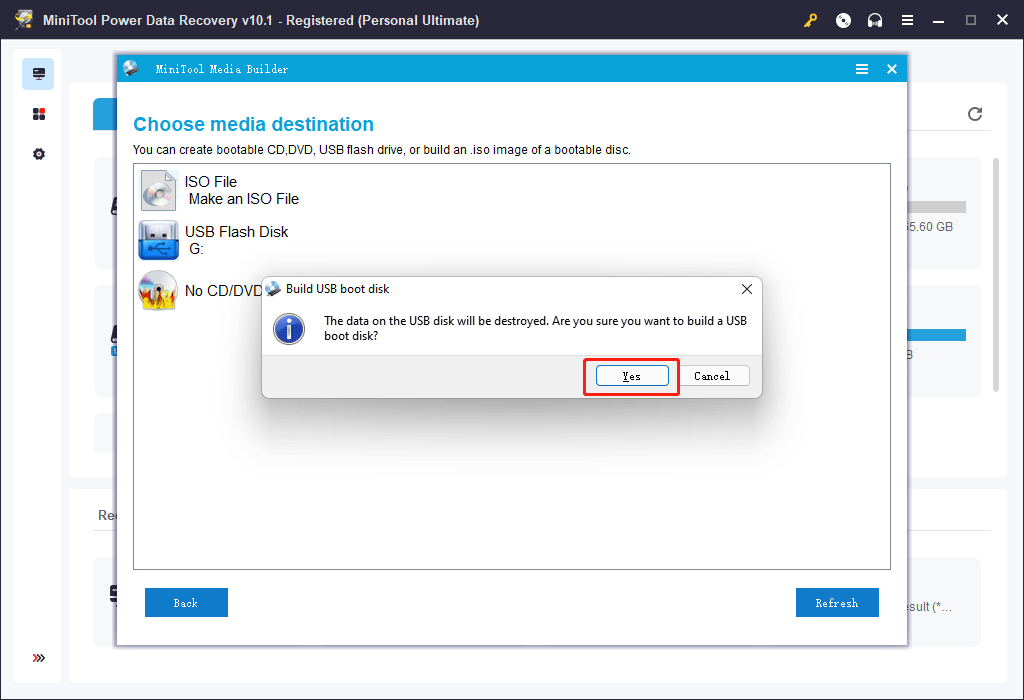
6. A warning pops up to remind you of the risk of data loss. Click Yes to continue.
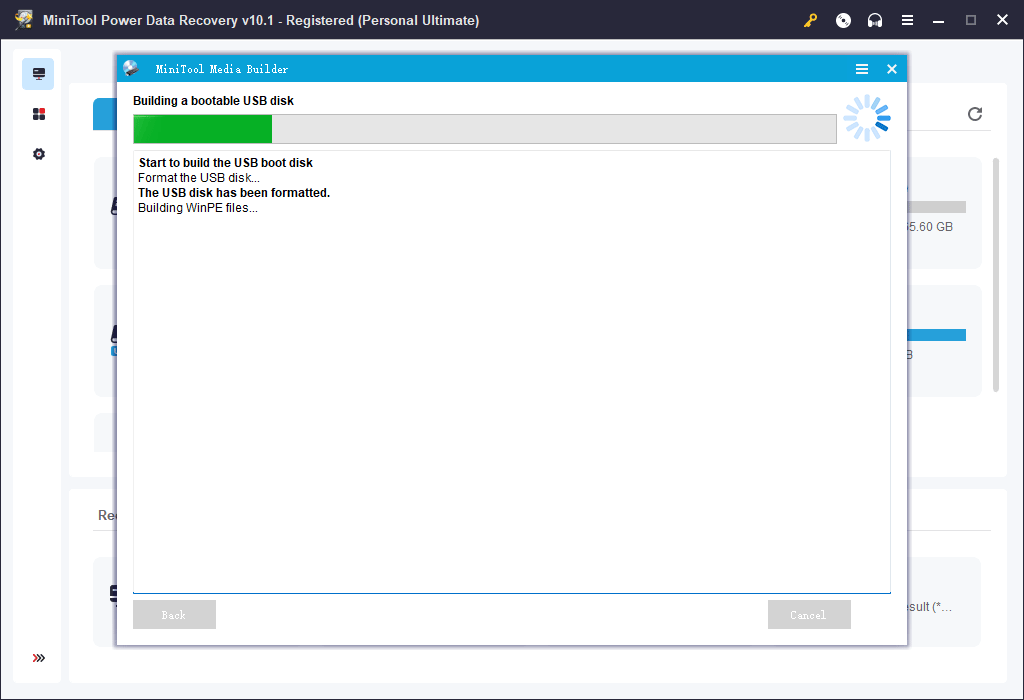
7. The MiniTool Media Builder begins to create a bootable MiniTool USB drive. You should wait until the whole process ends successfully. Then, click Finish and unplug the USB drive.
The MiniTool bootable USB drive is prepared.
Step 3: Boot Your Computer from the USB Drive and Recover Data
1. In this step, you also need to prepare an external hard drive that has enough free space to save the files you want to rescue and connect the external drive to your computer.
2. Connect the MiniTool bootable USB drive you have created to your computer that won’t boot.
3. Boot your computer into BIOS and set your device to boot from the bootable USB drive.
4. After a few seconds, your computer will automatically boot into the software. Under Logical Drives, you can see all the partitions on your computer. Select the drive you want to scan and click Scan.

5. After scanning, you can see the scan results including existing and deleted files on the selected drive. These scan results are listed by path by default. You can also click Type to make the software show the scan results by type. If you still remember the name of the file you want to restore, you can click Find, type the file name, and click Find to directly locate the file.
6. Select the files or folders you want to recover and click Save.
7. On the pop-up interface, select the connected external data storage drive to save the selected files.

Now, your important files are saved in a safe place. You can feel free to repair your Windows 10/11 computer from USB.
If your Windows corrupts or fails to boot, you’d better rescue your data using MiniTool Power Data Recovery Bootable Edition and then take measures to fix the system issue.Click to Tweet
How to Repair Windows with USB?
It is not a single step to complete the whole process. It contains the following steps:
- Step 1: Create a Windows 10/11 installation USB drive
- Step 2: Boot your computer from the installation USB drive
- Step 3: Select a suitable tool to repair your Windows computer
Step 1: Create a Windows 10/11 Installation USB Drive
If you want to repair Windows from USB, the first thing you need to do is to create a Windows installation USB drive. The Windows installation USB drive is not just a tool to help you install Windows 10/11 on your computer. You can also use it to repair your computer’s boot issues via Advanced Options. So, you can also call it a Windows repair USB.
You also need to create the Windows repair USB drive on a computer that can work normally.
Tip: In theory, you can also create a Windows 10/11 installation CD/DVD drive and repair your computer with CD/DVD.
Create a Windows 10 Installation USB Drive
1. You need to have a USB drive that has at least 8 GB of space. There should be no important files in it because the creation process will erase all files in the USB drive. Then, connect it to your computer.
2. Go to the software download page for Windows 10.
3. Click the Download tool now button under Create Windows 10 installation media.

4. Double-click the downloaded Windows 10 media creation tool (it is a .exe file) to open it. Then, follow the on-screen guide to create a Windows 10 installation USB drive.
Create a Windows 11 Installation USB Drive
- Likewise, you also need to prepare a USB drive that has 8 GB or more storage space and connect it to your computer.
- Since Windows 11 is not officially released to everyone, you need to download a Windows 11 Insider preview ISO file and use Rufus to burn the ISO file to your USB drive. After the release of Windows 11, there should be a Windows 11 Media Creation Tool. At that time, you can use the tool to create a Windows 11 installation medium.
Now, the Windows installation USB drive is prepared.
Step 2: Boot Your Computer from the Installation USB Drive
- Start your computer into BIOS.
- Change the boot order and set your computer to boot from the connected Windows installation USB drive.
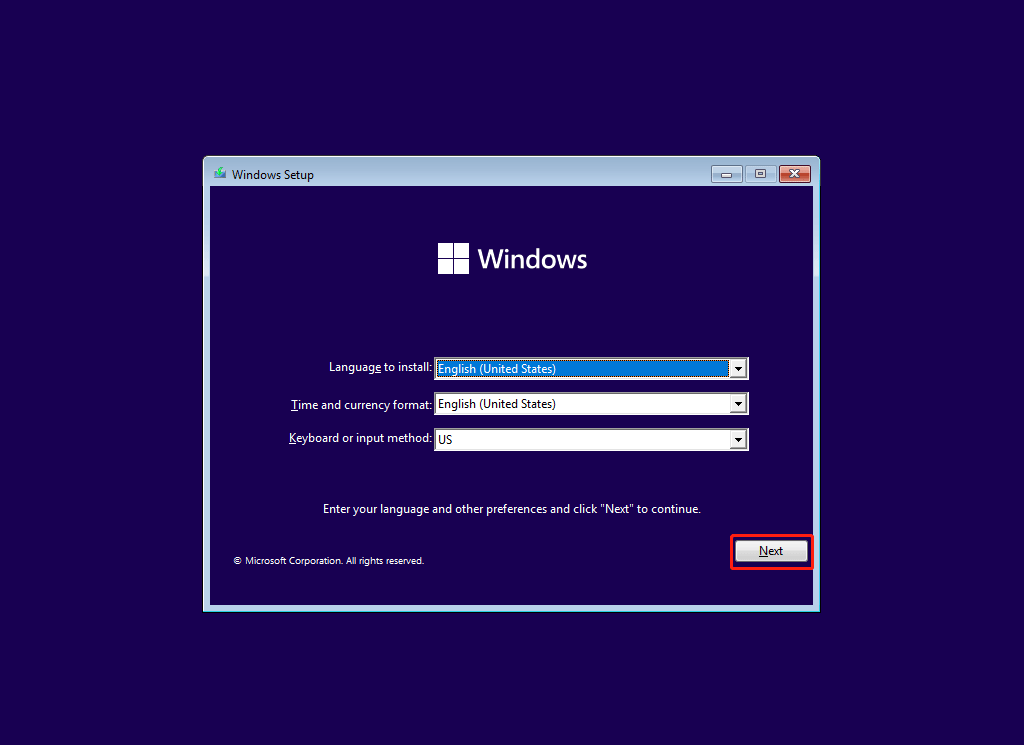
- When you see the following Windows Setup interface, it means that your device successfully boots from the Windows installation USB drive.
Step 3: Select a Suitable Tool to Repair Your Windows Computer
1. Click Next on the Windows Setup interface to continue.
2. On the next page, click Repair your computer.
3. Click Troubleshoot.
4. You will enter the Advanced options interface, on which you can see the following options:
- Startup Repair
- Command Prompt
- Uninstall updates
- System Restore
- System Image Recovery
Which tool should you use to solve your Windows issue? It depends on.
Startup Repair
If you can’t start up your Windows computer properly, you can use this Startup Repair tool to fix the problem.
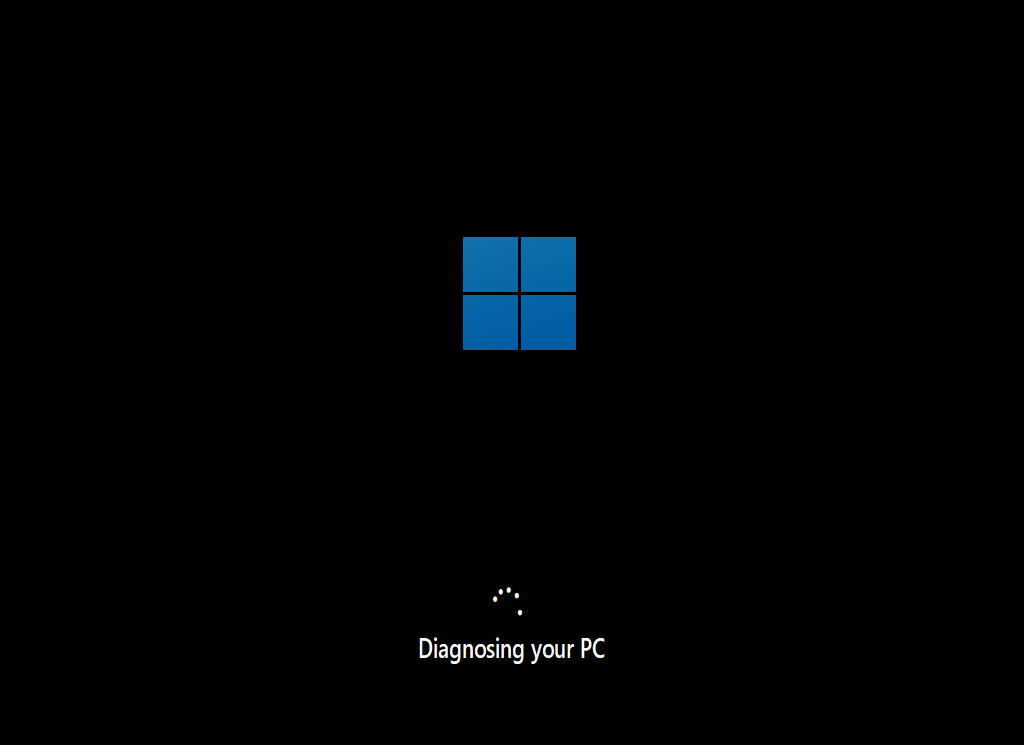
This tool can scan your computer for issues like missing or corrupt system files. If problems are found, Windows Startup Repair can automatically fix them. During the repairing process, your computer may restart several times.
Note: This tool can’t fix hardware issues and Windows installation issues.
Command Prompt
Command Prompt is a very powerful Windows tool. It is a command-line application that is available on most versions of Windows. By using this tool, you need to enter corresponding commands.
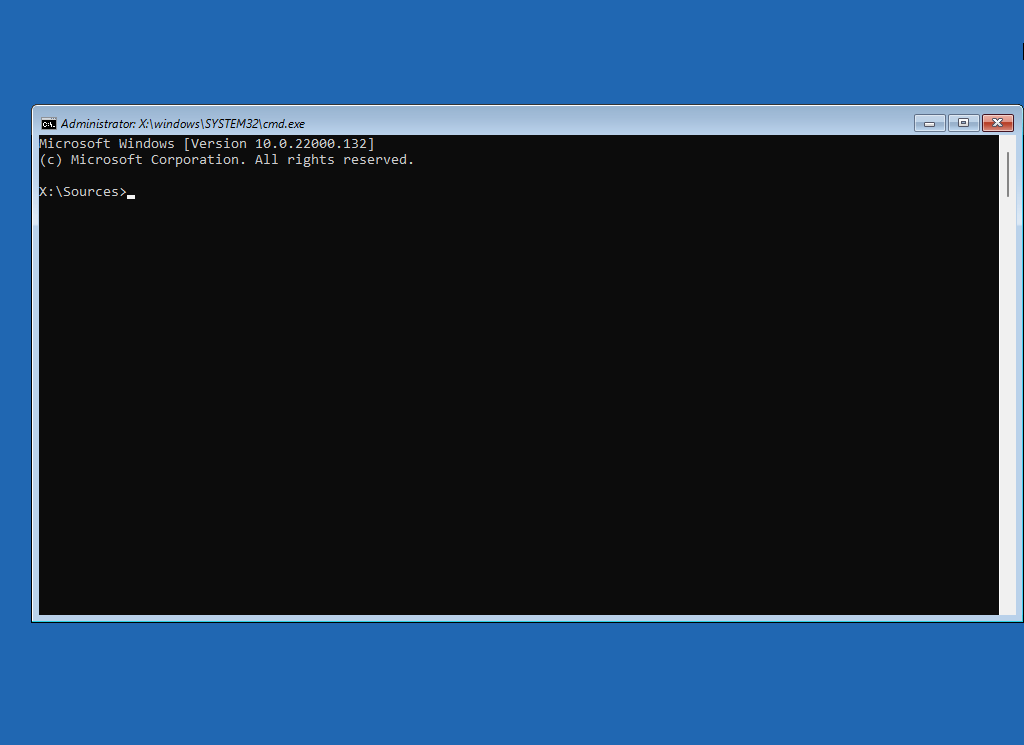
The most commonly-used commands are CHKDSK, BCDBoot, CHKNTFS, DISM, SFC, and more.
For example, you can use the CHKDSK command to check the file system of a volume for logical and physical errors. If you use the CHKDSK command without any parameter, this tool will only show you the status of the volume but not fix any errors. If you use the CHKDSK command with the /f, /r, /x, or /b parameters, it will fix the found errors on the volume.
Uninstall Updates
If your computer issue happens after you install a quality update or a feature update, this latest update could be the cause. You can uninstall the latest update to have a try. In this case, Uninstall Updates is useful.
After clicking Uninstall Updates, you can see two options: Uninstall latest quality update and Uninstall latest feature update. Just select one to uninstall the update according to your situation.

System Restore
If you have ever created a system restore point when your computer was still running, this system restore point is very useful when your Windows fails to load. You can restore your computer from a previous restore point. This can help you make your Windows go back to a normal working state, allowing you to use your computer as usual again.

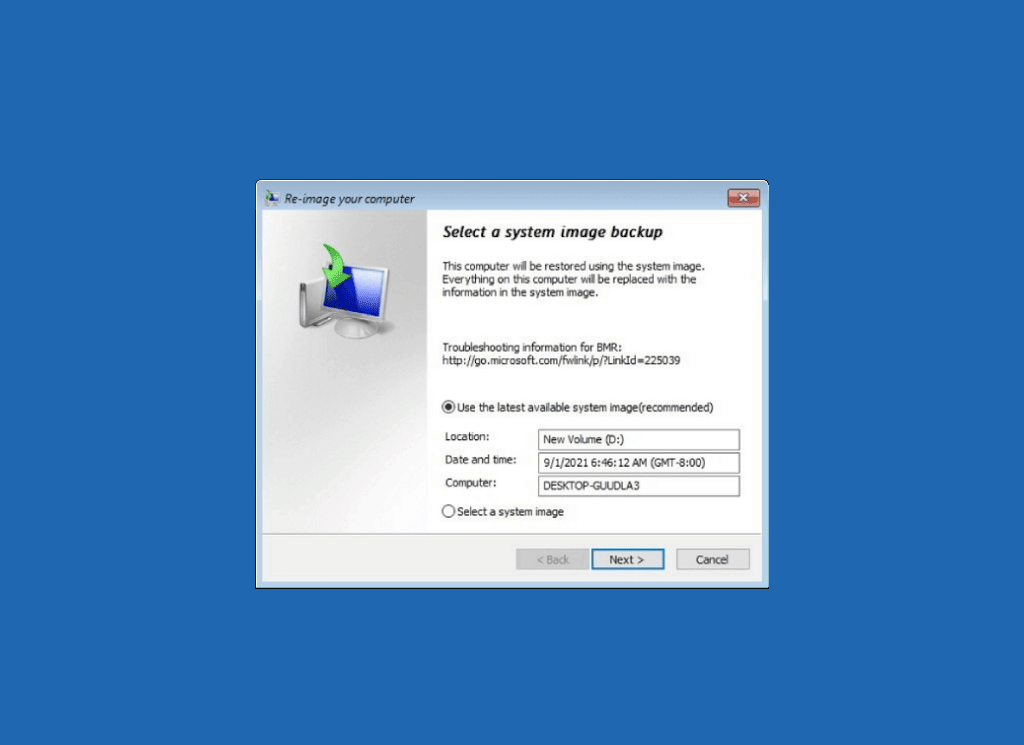
System Image Recovery
A system image backup is a copy of the drives required for Windows to run. If you have made a system image, you can use it to restore your computer if the hard drive or device stops working.
After clicking System Image Recovery in Advanced options, you will enter the Re-image your computer interface, in which the latest available system image is selected by default. You can also check Select a system image instead and click Next to select another system image.
Those are the tools you can use to fix your Windows 10/11 issues via a Windows repair USB drive. Hope the above contents can help you select a suitable tool to solve the issue you are facing.
Bottom Line
Want to repair Windows from USB but don’t know what to do? Don’t worry! Just read this article to learn what you should do before a Windows repair with USB and how to repair your Windows 11/10 from USB. There are many available tools. If you don’t still know which one matches the case, you can search for the issue on the internet to help you make a decision.
If you are looking for a data restore tool, you can try MiniTool Power Data Recovery. You can use this software to perform SSD data recovery, SD card data recovery, Seagate data recovery, Samsung data recovery, RAID data recovery, and more.
Should you have any other related issues, you can let us know in the comments. You can also contact us via [email protected].
Having problems with your Windows 10? Repairing it from a USB drive is a great way to quickly and easily restore your PC to its original pristine condition. In this tutorial, we’ll cover the steps you’ll need to take in order to repair Windows 10 from a USB drive.
- Create the USB Repair Drive – Download the Windows 10 ISO image and use a USB burning software to create the repair drive.
- Boot from the USB Drive – Start your computer and press the boot option key to boot from the USB drive.
- Choose an Option – Choose the “Repair your computer” option on the Install Windows screen.
- Troubleshoot – Select the “Troubleshoot” option and choose the “Reset this PC” option.
- Reset – Follow the instructions to reset your computer and restore it to its original condition.

How To Repair Windows 10 Boot From USB?
Repair Windows 10 Boot From USB
If your Windows 10 computer is not starting up properly, it is possible to repair it by booting it up from a USB drive. This process is also known as a “repair boot” or “recovery boot”. In order to repair Windows 10 from a USB drive, you will need a USB drive with at least 8GB of free space, a copy of the Windows 10 installation media, and a copy of the Windows 10 product key.
Steps to Repair Windows 10 Boot From USB
- Insert the USB drive into your computer and make sure it is recognized by the system.
- Download the Windows 10 installation media from Microsoft’s website and save it on your USB drive.
- Connect the USB drive to your computer and boot it up.
- When prompted, select the USB drive as the boot device.
- Follow the on-screen instructions to repair Windows 10. You will need to enter the product key when prompted.
- Once the repair process is completed, you can then boot up your computer normally.
By following the steps above, you can repair Windows 10 from a USB drive. It is important to note that this process will not delete any of your personal data, but it may take some time to complete. If you have any questions or need additional assistance, please contact Microsoft support.
Can You Repair Windows From A USB Drive?
It is possible to repair Windows from a USB drive. The process requires creating a bootable USB drive, downloading Windows installation files to the drive, and then booting from the drive. This process can be used to repair or reinstall Windows, repair or reset components of Windows, or to access the command line for troubleshooting and repair.
Creating a bootable USB drive requires downloading a Windows installation ISO file, which can be done from the Microsoft website. Once you have the ISO, you can burn it to the USB drive using a tool like Rufus. After the ISO is burned to the drive, you can boot from the drive and follow the on-screen instructions to repair or reinstall Windows.
If the repair process requires resetting components of Windows or accessing the command line, you can select the “Repair Your Computer” option after booting from the USB drive. This will open a screen with options like “System Restore” and “Command Prompt”. You can select the option you need to repair Windows, and follow the on-screen instructions.
In conclusion, it is possible to repair Windows from a USB drive by creating a bootable USB drive, downloading Windows installation files, and then booting from the drive. This can be used to repair or reinstall Windows, repair or reset components of Windows, or to access the command line for troubleshooting and repair.
How Do I Run Windows Repair Tool From USB?
Repairing your Windows installation can be done with a USB drive. To run the Windows repair tool from a USB drive, you will need a Windows 10 installation media in ISO format and a USB drive with at least 4GB of free space.
First, create a bootable USB drive with the Windows 10 ISO image. Connect the USB drive to your computer, and then open the Windows 10 ISO image in the Windows USB/DVD Download Tool. Select the USB drive from the drop-down menu and click Begin Copying. This will create a bootable USB drive with the Windows 10 installation media.
Next, boot from the USB drive. Enter your computer’s BIOS menu and change the boot order so that the USB drive is the first option. Save the changes, and then restart your computer. When the computer starts up, it will boot from the USB drive.
Finally, run the Windows repair tool. You will be presented with a Windows Setup screen. Select the language, time, and currency format, and then select Repair your computer. Choose Troubleshoot, and then select Advanced options. Select Command Prompt and type in “reagentc /enable” to enable the Windows repair tool. Finally, type in “reagentc /repair” to run the repair tool.
Once the repair tool is finished, restart your computer and you should be able to use Windows normally. Running the Windows repair tool from a USB drive is a convenient way to fix common Windows issues.
How To Repair Windows 10 Using Bootable?
Repairing Windows 10 using a bootable USB drive is a great way to get your computer up and running again if you’re experiencing issues. It’s important to keep in mind that when you repair your Windows 10 installation, you won’t be able to keep any changes or personal files you’ve made since the last update.
Here’s how to repair Windows 10 using a bootable USB drive:
- Download the Windows 10 ISO file from the Microsoft website.
- Create a bootable USB drive using the ISO file.
- Turn off your computer and boot from the USB drive.
- Choose the “Repair your computer” option.
- Select the “Troubleshoot” option.
- Choose the “Advanced Options” option.
- Select the “Startup Repair” option.
- Follow the instructions to repair your Windows 10 installation.
After the repair is finished, your computer will restart and you’ll be able to log in and use Windows 10 again. It’s important to keep in mind that this process will remove any apps or programs you’ve installed since your last update. So, make sure to back up any important data before you start the repair process.
Repair Windows 10 From Usb Command Prompt
To repair Windows 10 from USB via command prompt, the following steps should be taken:
1. Insert the Windows 10 USB drive into your computer.
2. Restart your computer and press any key to boot from the USB drive.
3. On the setup page, select the Repair your computer option.
4. Select Troubleshoot > Advanced Options > Command Prompt.
5. Type the following command in the command prompt window and press Enter: DISM.exe /Online /Cleanup-image /Restorehealth.
6. Wait for the process to complete.
7. Type the following command in the command prompt window and press Enter: sfc /scannow.
8. Wait for the scan and repair process to complete.
9. Restart your computer and check if the issue is fixed.
Repair Windows 10 From Usb Without Losing Data
Repairing Windows 10 from a USB drive offers a convenient and reliable way to restore your computer to its original settings without losing any data. This process can be completed without the use of a CD or DVD, and can be done in a few simple steps.
Before starting, make sure you have a USB drive with at least 8GB of space available, as well as a Windows 10 installation file. If you don’t have an installation file, you can download it from the Microsoft website and save it to the USB drive.
Once the USB drive is prepared, plug it into your computer and restart the device. When the computer is booting up, press the F12 key to enter the boot menu. Select the USB drive as the boot device, and then follow the on-screen instructions to repair Windows 10. Once the repair is complete, restart the computer and the system should be restored to its original settings without losing any data.
- Step 1: Prepare the USB drive by creating a Windows 10 installation file.
- Step 2: Connect the USB drive to the computer, and restart the device.
- Step 3: Enter the boot menu by pressing F12.
- Step 4: Select the USB drive as the boot device.
- Step 5: Follow the on-screen instructions to repair Windows 10.
- Step 6: Restart the computer when the repair is complete.
Windows 10 Repair Usb Download
Repairing Windows 10 from a USB drive is a relatively straightforward task. It can be done in two stages: creating a bootable USB drive and running the repair process.
Creating a Bootable USB Drive
1. Download the Windows 10 media creation tool from Microsoft’s website.
2. Connect the USB drive to your computer.
3. Launch the Windows 10 media creation tool.
4. Select “Create installation media (USB flash drive, DVD, or ISO file) for another PC”.
5. Select your language and edition of Windows 10, and then click “Next”.
6. On the “Choose which media to use” screen, select “USB flash drive” and then click “Next”.
7. Select the USB drive from the drop-down menu and then click “Next”.
8. The Windows 10 media creation tool will now start downloading Windows 10 and creating the bootable USB drive.
Running the Repair Process
1. Insert the bootable USB drive into your computer.
2. Restart your computer and press the appropriate key to enter the boot menu. The key you need to press is usually displayed on the screen.
3. Select the USB drive from the boot menu and press “Enter”.
4. Windows 10 setup will now start.
5. Select “Repair your computer” from the Windows 10 setup screen.
6. On the next screen, select “Troubleshoot”.
7. Select “Advanced options”.
8. Select “Automatic Repair” and then follow the on-screen instructions to complete the repair process.
Repair Windows 10 Boot
Repairing Windows 10 from a USB drive is an effective way to fix system errors and other issues without losing data or reinstalling the entire operating system. This process involves booting the computer from a USB drive and running a repair tool to diagnose and fix the problem. The repair tool can be either a dedicated Windows 10 repair tool or a recovery environment such as a live Linux distro.
To repair Windows 10 using a USB drive, you’ll need to create a bootable USB drive with the repair tool. This can be done using the Windows USB/DVD Download Tool or a third-party tool such as Rufus. Once the bootable USB drive is created, boot your computer from it and follow the on-screen instructions. In most cases, you will be presented with a recovery environment which will allow you to diagnose and repair the problem. The recovery environment will provide access to the command line, file manager, and other tools to help you troubleshoot and fix the issue.
Once you have determined the cause of the problem, you can use the recovery environment to repair the system. This may involve running commands such as chkdsk, sfc, and other system tools. You can also use the recovery environment to access the Windows registry and make changes as needed. Once the repair process is complete, you can reboot your system and it will be back to normal.
Windows 10 Bootable Usb
If you need to repair Windows 10 from a USB drive, you’ll need to create a bootable USB drive. This process involves downloading the latest version of Windows 10 from Microsoft, creating a bootable USB drive, and then running the Windows 10 installation from the USB drive.
- Download the Windows 10 ISO image from Microsoft’s website. Make sure you download the correct version for your system.
- Insert your USB drive into your PC and launch the Windows 10 Media Creation Tool.
- Select “Create installation media for another PC” and click Next. Choose the language, version, and architecture for your version of Windows 10, and then click Next.
- Select “USB flash drive” as the media to use, and then click Next.
- Select your USB drive from the list of available drives and click Next. The tool will then create the bootable USB drive.
- Once the USB drive has been created, insert it into your PC and reboot the system.
- Once your PC has rebooted, enter the BIOS and set the USB drive as the first boot device.
- The Windows 10 installation will now begin and you can follow the on-screen instructions to complete the repair process.
Repair Windows 11 From Usb
Windows 10 can be repaired from a USB drive without the need for a full reinstall of the operating system. To repair Windows 10 from USB, you will need a Windows 10 installation media such as a USB flash drive. This installation media can be used to boot into the Windows 10 setup and repair the system.
To repair Windows 10 from USB, firstly, you need to create a bootable Windows 10 USB drive. This can be done by downloading the Windows 10 ISO image from Microsoft’s website and then using a USB creation tool like Rufus to create the bootable Windows 10 USB drive. Once the bootable USB drive is created, you will need to boot your system with it. You can do this by pressing the boot key on your system while it is booting up and then selecting the USB drive as the boot device.
Once the USB drive is selected, the Windows 10 setup will start. On the first screen of the setup, you will need to select the ‘Repair your computer’ option. This will open the Windows 10 Recovery Environment where you can perform a variety of tasks such as resetting your computer, running the System Restore tool or running a virus scan. You can then select the option to repair the Windows 10 installation which will start the Windows 10 repair process. This process will fix any corrupted system files as well as any other problems that may be causing issues with your Windows 10 system. Once the repair process is finished, you can restart your system and it should now be working properly.
Unable To Repair Windows 10 From Usb
If you need to repair Windows 10 from USB, you will need a few things. The first is to create a bootable USB drive that contains the Windows 10 installation files. You can do this by downloading the Windows 10 ISO file from Microsoft’s website and using a program such as Rufus to create the bootable USB drive.
Once you have the bootable USB drive ready, you will need to boot your computer from the USB drive. To do this, you need to access the BIOS settings by pressing a key on your computer’s keyboard when you turn it on. Once you are in the BIOS settings, you need to find the boot options and set the boot order to boot from the USB drive first.
Once you have your computer booting from the USB drive, you will need to select the “Repair your computer” option from the Windows setup menu. From there, you will be given several options to repair your computer, such as resetting Windows, running a system restore, etc. Select the option that best suits your needs, and follow the on-screen instructions to repair Windows 10. Once the process is complete, you can restart your computer and you should be back up and running.
Windows 10 Repair Install From Boot
Repairing Windows 10 from a USB drive is a great way to repair a computer that won’t boot. This process can be used to fix a wide variety of software issues, including corrupted system files and viruses. To repair Windows 10 from a USB drive, you’ll need your original Windows 10 installation media and a 4GB or larger USB drive.
- Start by downloading the Windows 10 media creation tool from the Microsoft website.
- Launch the tool and select “Create installation media for another PC” and then click Next.
- Choose the language, edition, and architecture for Windows 10 and click Next.
- Select USB flash drive, and then select the USB drive from the list and click Next.
- The tool will start downloading the Windows 10 installation files to the USB drive.
- Once the download is complete, restart your computer and boot from the USB drive.
- Follow the instructions to install Windows 10, and then select the “Repair your computer” option.
- Choose the “Advanced Options” and select “Automatic Repair” or “Command Prompt” to repair your Windows installation.
Once the repair is complete, restart your computer, and you should be able to log in to Windows 10 without any issues. Using the Windows 10 media creation tool and a USB drive is the easiest way to repair Windows 10 without an installation disc.
How to Boot or Repair Windows 10 using the Installation Media
In conclusion, the steps to repairing Windows 10 from USB are simple and straightforward. It is a great way to quickly fix any errors that may be occurring on your system and restore it to its full functionality. By following the steps outlined in this guide, you should be able to successfully repair your system and get back to work in no time. With the help of a USB bootable drive, you can easily repair your Windows 10 system, allowing you to get back to work faster and with fewer hassles.
If you’re having trouble getting your Windows 10 to boot, repairing it from a USB drive can be the ideal solution. It’s a simple process that can help you get your system up and running again. In this guide, we’ll walk you through the steps of how to repair Windows 10 from a USB drive and get your system running again.
Repair Windows 10 From USB
- Download and install the Windows USB/DVD Download Tool.
- Insert the USB drive into your computer.
- Open the Windows USB/DVD Download Tool.
- Click “Browse” and locate the Windows 10 ISO file.
- Click “Next”.
- Select “USB Device” as the media type.
- Click “Begin Copying”.
- Wait for the process to finish.
- Remove the USB drive from your computer.
- Insert the USB drive into the computer you want to repair.
- Boot from the USB drive.
- Follow the instructions on the screen to repair Windows 10.

Creating a Windows 10 Repair USB
Windows 10 is an advanced operating system that comes with a wide range of features and options. But, just like all other operating systems, it can sometimes have issues that need to be addressed. Fortunately, there is an easy way to repair Windows 10 – by creating a Windows 10 Repair USB.
The Windows 10 Repair USB is a USB drive that has the Windows 10 installation files on it. It can be used to reinstall Windows 10 or to repair any issues that may be preventing the operating system from working properly. To create a Windows 10 Repair USB, you will need a USB drive with at least 8GB of storage space, as well as an internet connection.
Step 1: Download the Windows 10 ISO File
The first step in creating a Windows 10 Repair USB is to download the Windows 10 ISO file. This file is an image of the Windows 10 installation files that will be used to reinstall or repair the operating system. To download the ISO file, you will need to go to the Microsoft website and select the version of Windows 10 that you are using. From there, you can download the ISO file to your computer.
Step 2: Create the Bootable USB Drive
Once the ISO file has been downloaded, the next step is to create a bootable USB drive. This can be done using a program such as Rufus or Windows USB/DVD Download Tool. Both of these programs will allow you to create a bootable USB drive from the ISO file that you have downloaded.
Step 3: Boot From the USB Drive
Once the bootable USB drive has been created, the next step is to boot from it. To do this, you will need to change the boot order in your computer’s BIOS settings so that the USB drive is the first device to boot from. Then, when you turn on your computer, it will boot from the USB drive instead of the hard drive.
Using the Windows 10 Repair USB
Once you have booted from the Windows 10 Repair USB, you will be presented with a menu that will allow you to select the repair options that you want to use. Depending on the issue that you are trying to fix, you may have the option to repair the installation, or to reinstall Windows 10.
Repairing the Installation
If you are experiencing problems with the Windows 10 installation, then you can use the repair option to try and fix the issue. This option will scan the operating system for any issues and attempt to fix them. If the repair is successful, then Windows 10 will be back to normal.
Reinstalling Windows 10
If the repair option does not fix the issue, then you may need to reinstall Windows 10. This can be done using the Windows 10 Repair USB. The installation process is the same as if you were doing a clean install of the operating system, and it will take a few minutes to complete.
Conclusion
Creating and using a Windows 10 Repair USB is a great way to repair or reinstall the operating system in the event of any issues. By following the steps outlined above, you can easily create a Windows 10 Repair USB and use it to fix any issues that you may be experiencing.
Frequently Asked Questions
What is a USB Repair Tool?
A USB repair tool is a type of software utility used to repair, restore and diagnose problems with Windows 10. It can be used to create a recovery drive, restore system settings, fix corrupted files, update drivers, and more. It is typically used when your computer is unable to boot up and you need to access the system files to fix the issue.
What are the Benefits of Using a USB Repair Tool?
Using a USB repair tool has several benefits. One of the main benefits is that it allows you to troubleshoot and repair your Windows 10 system without having to re-install the operating system. This can save you time, effort, and money. Additionally, it is often much easier to use a repair tool than to manually attempt to repair Windows 10 by tinkering with the system files.
How Do You Create a USB Repair Tool?
Creating a USB repair tool is fairly straightforward. First, you will need to download the appropriate tool from the Microsoft website. Once the download is complete, you will need to plug in the USB drive and run the tool. The tool will then guide you through the process of creating a repair drive.
What is the Difference Between a USB Repair Tool and a Recovery Drive?
A USB repair tool is used to troubleshoot and repair your Windows 10 system, while a recovery drive is used to reinstall Windows 10 from scratch. A recovery drive is typically used when your computer is no longer able to boot up and you need to start from scratch.
What Do I Need to Use a USB Repair Tool?
In order to use a USB repair tool, you will need a USB drive with at least 8GB of storage space. You will also need a compatible version of Windows 10. Finally, you will need to download the appropriate tool from the Microsoft website.
What Issues Can a USB Repair Tool Help to Fix?
A USB repair tool can help to fix a wide variety of issues with your Windows 10 system. It can be used to fix corrupted files, update drivers, repair damaged system settings, and more. It can also be used to create a recovery drive, which can be used to reinstall Windows 10 from scratch.
Windows 10 Automatic Repair From USB
If you’re looking for an effective way to repair Windows 10 from USB, you now have all the information you need to do so. With the right tools and instructions, you can easily repair your Windows 10 computer from a USB drive. Don’t forget to backup your data before starting the repair process and make sure to follow the instructions carefully. With the right approach, you can easily repair your Windows 10 computer from USB in no time.