Instead of fix-it tools, Windows 10 uses troubleshooters to help you solve problems with your PC. To run a troubleshooter:
-
Select Start > Settings > Update & Security > Troubleshoot, or select the Find troubleshooters shortcut at the end of this topic.

-
Select the type of troubleshooting you want to do, then select Run the troubleshooter.
-
Allow the troubleshooter to run and then answer any questions on the screen. If you see a message that no changes or updates were necessary, you can try recovery options, or find out more about Outlook error codes and upgrade and installation error codes.

Find troubleshooters
Need more help?
Want more options?
Explore subscription benefits, browse training courses, learn how to secure your device, and more.
Communities help you ask and answer questions, give feedback, and hear from experts with rich knowledge.
Windows is the most popular operating system in the world, but it’s not without its fair share of problems. Over time, Windows can cause various issues that can lead to performance problems, instability, and even data loss. Some Windows issues include slow or unresponsive performance, frequent crashes or blue screens, incomplete updates, strange error messages or pop-ups, or programs not working correctly.
Suppose you’re experiencing any of the Windows system problems. Don’t fret. Fortunately, there are many ways for Windows repair. In this article, we’ll look at some of the most common Windows problems and repair tools. Read on for help.
4 Biggest Windows Problems (Detailed Info)
Windows has several well-known issues that can cause inconveniences for users. Here are four of the most severe Windows system issues:
1. Getting Windows Ready Stuck
The «Getting Windows ready. Don’t turn off your computer» message appears when Windows is in the process of applying updates to your system. These updates can include new features, security patches, and other improvements. When the updates are being installed, it’s important not to turn off your computer, as this can cause the updates to fail and create problems with your system.
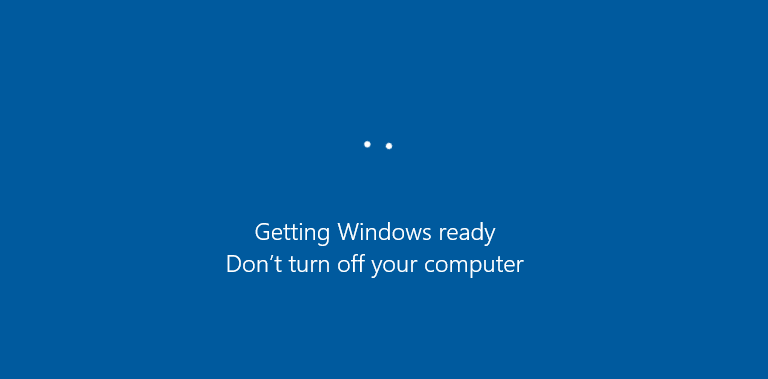
If your computer is stuck on getting windows ready screen, it’s best to wait until the process is finished. Depending on the size and number of updates being installed, this process can take a few minutes or even an hour or more. Once the updates are installed, your computer will restart, and you’ll be able to use it as usual.
Learn more:
The computer may still not respond after you wait a long time. So you need to take other methods to troubleshoot getting Windows ready stuck problem.
2. WHEA Uncorrectable Error
WHEA uncorrectable error is a type of hardware error that can occur when your computer starts up. When the problem arises, your computer will typically display a blue screen with an error message like the following screenshot displays.
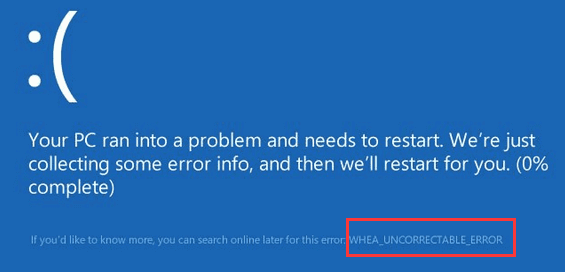
WHEA uncorrectable error is a severe problem that can cause your computer to crash, and in some cases, it can even lead to data loss. So, taking care of it as soon as possible is essential. To fix the issue, you’ll need to identify the cause. In most cases, it will either be an overheating processor, faulty memory, failing hard drive, or an improperly configured CPU.
If your processor is overheating, try cooling it down with a cooling pad or fan. Or you can reset the memory modules if the WHEA uncorrectable error is being caused by faulty memory.
Learn more:
Except for the above two quick fixes, other advanced solutions to solving Windows 10 WHEA uncorrectable error are ready to help you.
3. Windows 10 Won’t Shut Down
If your Windows 10 won’t shut down, don’t worry — you’re not alone. Many Windows 10 users have reported this issue, which can be frustrating.
A few things that can lead Windows 10 to refuse to shut down. One reason could be that there are still programs running in the background, even though it may appear that all programs have been closed. Windows 10 automatically updates itself, which can sometimes lead to the computer not shutting down properly. Still, power settings, corrupted system files, or BIOS can interfere with the shutting down process.
Luckily, you can fix the Windows won’t shut down issue differently. From easy to difficult, these methods include checking your power settings, updating drives, fixing corrupted system files, troubleshooting Windows updates, etc.
Learn more:
If you’re a regular user and don’t know how to deal with Windows 10 won’t shut down error, here’s a beginner’s guide step-by-step.
4. Blue Screen of Death
A blue screen of death (also known as a blue screen or BSOD) is an error screen that is displayed on a Windows computer system after a fatal system error.
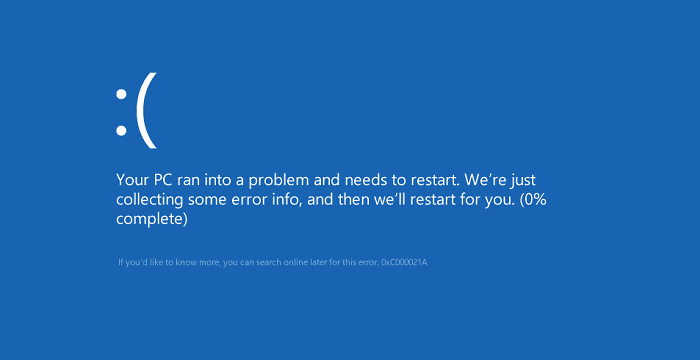
Blue screen of death errors are usually caused by hardware problems, such as faulty RAM, overheating components, or hardware that is not compatible with the rest of the system. Software errors can also result in BSOD when the software is not compatible with the hardware or if it is not properly configured. If you are getting Blue Screen of Death, it is crucial to find out what is causing them and fix the problem before it seriously damages your computer or even causes data loss.
Learn more:
Do you want to know how to solve the blue screen of death without losing any data? Here’s what to do.
How to Repair Windows 10 Without Losing Data
The Windows problems are certainly not limited to those stated above. No matter what problems you are running into, keeping your computer data secure is the ultimate goal. Therefore, we strongly recommend that you recover data from your computer first.
EaseUS Data Recovery Wizard enables you to restore lost data from both bootable and unbootable computers. It supports data recovery on Windows 11, Windows 10, Windows 8, Windows 7, and all the Windows Server versions.
Windows 10 can’t boot properly? Learn how to use EaseUS Data Recovery Wizard Pro with Bootable Media to recover data from a dead hard drive and inaccessible Windows computer.
Step 1. Download EaseUS Data Recovery Wizard WinPE Edition to create a bootable disk.
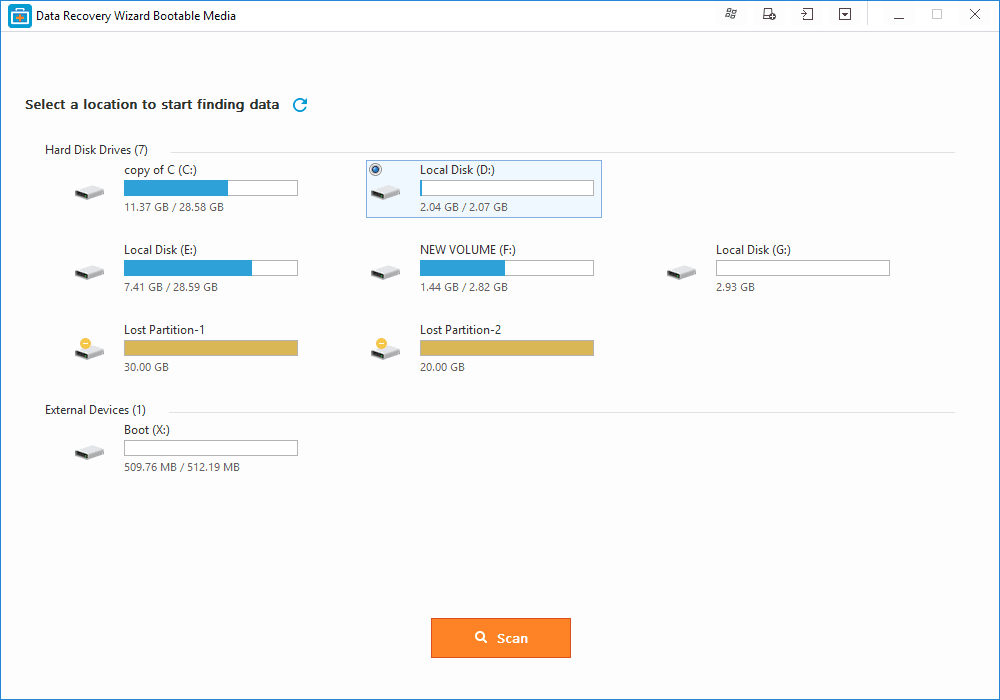
Step 2. Connect the bootable disk to your computer. Restart your computer and press F2 at the same time to enter BIOS. Choose to boot your device from the bootable USB.
Step 3. Run EaseUS Data Recovery Wizard. Scan for your lost files to recover.
After successful data recovery, follow the approaches below for Windows 10 repair.
Fix 1. Run Command Prompt for Windows Repair
Some Windows malfunctions or crashes result from system file corruption. Use the DISM (Deployment Image Servicing and Management) and SFC (System File Checker) Windows repair tools to scan and fix Windows.
Here’s how to do it:
Step 1. First, you’ll need to boot into the recovery environment. To do this, simply hold down the Shift key while clicking the Restart option in the Start menu.
Step 2. Once in the recovery environment, select «Troubleshoot > Advanced options > Command Prompt».
Step 3. Type the following commands in order to repair your Windows 10.
- Input DISM /Online /Cleanup-Image /RestoreHealth to repair any corrupt files that may be causing issues.
- Input sfc /scannow to scan for and replace any corrupted system files.
- Type in Dism /Online /Cleanup-Image /RestoreHealth once again to ensure that all necessary files are in place.
After you’ve run these commands, reboot your computer, and you should be good to go!
Fix 2. Use Automatic/Startup Repair Windows 10
Automatic repair, also called startup repair, is a built-in repair tool that can troubleshoot and fix common problems with your Windows installation on Windows 10/8/7.
To use Automatic Repair, follow these simple steps:
Step 1. Press Windows + I keys to open Settings. Then, go to Update & Security > Recovery > Advanced startup > click Restart now.
Step 2. On the WinRE screen, select «Troubleshoot»> «Advanced Options».
Step 3. Select «Automatic Repair» under Advanced options, and click select «Automatic/Startup» Repair.

Windows 10 will now attempt to repair your installation. The process takes some time, and your computer may even boot. If it is successful, click «Finish» and reboot your PC.
If Automatic Repair is unsuccessful and you ran into preparing automatic repair loop or Windows cannot repair this computer automatically, you’ll need to troubleshoot the issue further to find a solution. But in many cases, Automatic Repair can successfully repair a corrupt or damaged Windows 10 installation.
Fix 3. Windows Repair Services
The final way for Windows repair is using a professional and reliable Windows repair service. EaseUS Data Recovery Service can help you solve any system startup errors without data loss, including system failure, system blue screen, system black screen, and so on. Click here to contact our experts for a free evaluation, they could offer the following services after FREE diagnosis:
- Fix Windows boot issues, including BSOD
- Fix Windows error and configure Windows environment
- Restore the system when it fails to boot
- Optimize Windows computer to make it run quickly
Here we show you three of the most common methods for Windows repair. If these don’t solve your problems, don’t be discouraged. Go to our Windows 10 fixes feature page for more instructions.
Learn more:
To obtain the complete tutorials for Windows 10 repair, check all the 6 effective ways to repair Windows 10.
Windows 11 Repair in Every Way
As with Windows 10, you will encounter many system problems when running Windows 11, such as boot problems, upgrade troubles, black of screen death, etc.
Fix 1. Boot Into Safe Mode
One of the most common issues with Windows 11 is that it won’t boot up properly. If this is happening to you, one of the first things you should try is using the «Safe Mode» option. To do this:
Step 1. restart your computer and press the «F8» key when the boot screen appears. This will bring up a menu of options.
Step 2. Select «Safe Mode» from this menu and press Enter.
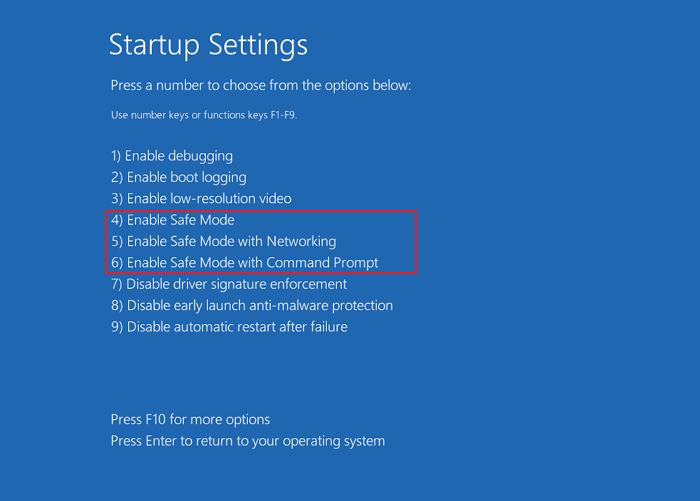
Step 3. Once your computer has booted into Safe Mode, try restarting it to see if the issue has been resolved.
Fix 2. Perform System Restore to Repair Windows 11
If you’re still having trouble with your Windows 11 system, you can try using the «System Restore» to repair Windows 11. This will restore your system to a previous state of working properly. To use this feature:
Step 1. Click on the «Start» button and type «System Restore» into the search box.
Step 2. Once the System Restore window appears, select a restore point before the date you started experiencing issues with your system.
Step 3. Follow the prompts to complete the restore process and restart your computer.
Fix 3. Perform a Clean Install of Windows 11
If these don’t work, you may need to perform a clean install of the operating system. This should only be done as a last resort, as it will erase all of the data on your hard drive. So, remember to restore data from unbootable at the beginning. To do a clean install:
Insert the Windows 11 installation disc into your computer and follow the prompts to complete the process. Be sure to back up your important data before starting the clean install process.
Learn more:
We’ll walk you through the most effective and comprehensive methods for Windows 11 repair. Complete the entire reading.
Conclusion
You may encounter various Windows problems, ranging from failed startup, blue screen of death, crashed or inaccessible system. The reasons might be corrupted Windows registry, incompatible or outdated drivers, virus or malware attack, corrupt or damaged Windows installation, etc.
Once you are stuck in Windows startup or update issues, you can troubleshoot in several ways, including running the Windows Startup repair tool, fixing system files with CMD, resorting to Windows repair services, or even performing a system restore.
No matter which method you take, rescue and recover your data first with a reliable file recovery tool in advance to avoid further damage.
A lot of freeware applications are available using that you can fix your Windows 11/10 errors. Due to some mistakes, drivers, system services, or Windows updates stuck, the tools mentioned in this gearupwindows may help you fix the issues.
It is hard to pinpoint the actual cause when your PC starts showing problems. Manually fixing the issues is very difficult. Instead, you can use a good Windows 11/10 repair tool that automatically fixes your Windows installation. Many great tools out there to repair the most common issues of Windows 11/10, such as Windows Repair or FixWin, Advanced SystemCare, etc. These work great when you are unsure what the actual causes are behind the errors.
However, if you want to update your drivers, Snappy Driver Installer may be your best choice. It auto-detects driver updates to the hardware components of your PC and installs them for you.
Finally, when dealing with privacy-related issues in Windows 11/10, you should have O&O ShutUp10++. The app can effectively alter most Windows settings intruding on your privacy and collecting unnecessary data. Let me see in detail.
Windows Repair

Windows Repair is a free and all-in-one Windows 11/10 repair tool that takes care of fixing issues. It does exactly what it promises. Let it be the file permissions, registry errors, or obscure settings; the app takes care of it all.
Just reboot your computer in safe mode and then use the Windows Repair tool to fix the problems so that you can ensure that all the tweaks made by this application are applied without any interference.
Download Windows Repair
You can download Windows Repair here.
AVG TuneUp
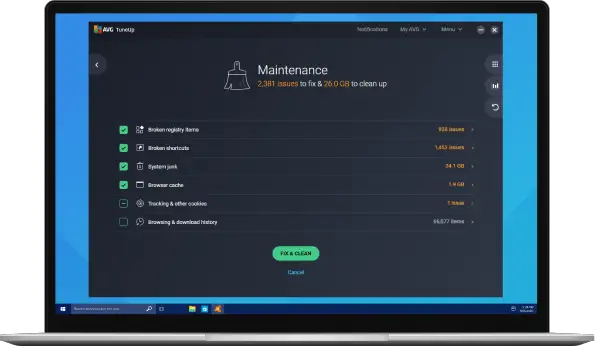
Next comes on the list is AVG TuneUp. This is another good general-purpose fixing tool for Windows 11/10. Unlike Windows Repair, it focuses more on tuning up performance than correcting errors.
AVG TuneUp removes unnecessary programs, deletes leftover cache files, and disables useless startup processes. That helps your computer runs much more smoothly, with fewer crashes and instability.
While the app is good and helps you, it isn’t exactly free. It comes with a free trial and works for just 30 days. After that, you need to get a paid license to keep using it. Still, if you are in trouble while fixing your PC, you can use the trial version to give your PC a one-time tune-up for sure.
Download AVG TuneUp
Grab AVG TuneUp from its official website.
Snappy Driver Installer
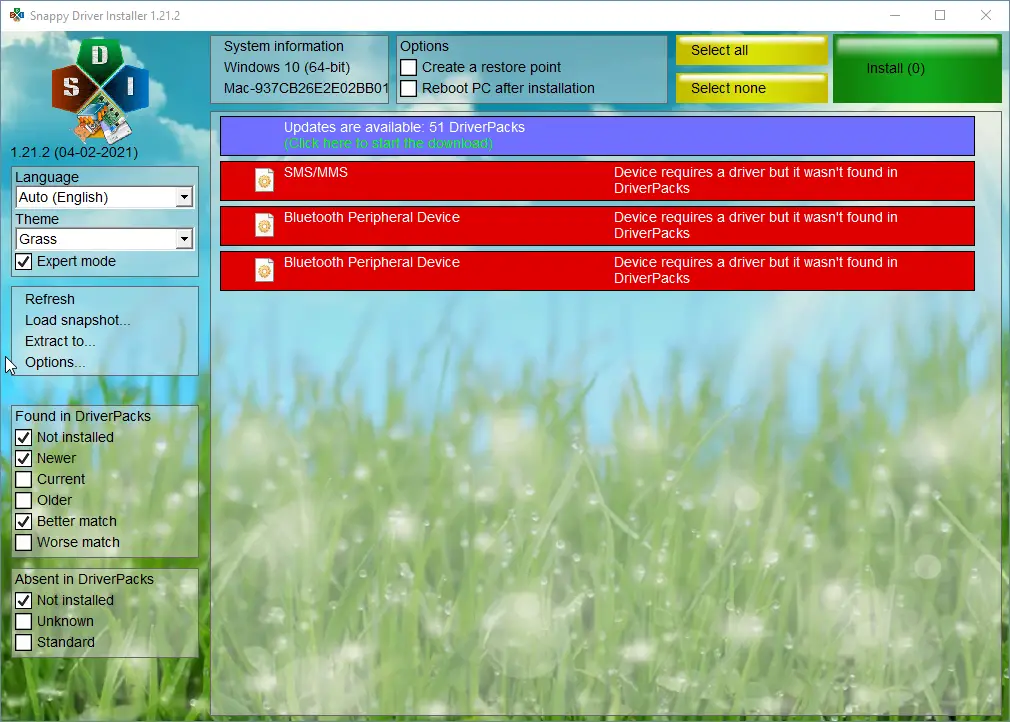
Most time, Windows 11/10 problems are due to incorrect or outdated drivers. While Windows automatically updates drivers for your PC components, it often fails to provide the most suitable drivers for each piece of hardware.
Snappy Driver Installer is an excellent tool that helps you find out the best drivers for your PC hardware and solve the issues. The app scans your entire computer and then finds the latest matching drivers. You can choose one or all to update, and then the application will download and install the selected drivers.
Download Snappy Driver Installer
Get Snappy Driver Installer
FixWin

FixWin is a freeware application from thewindowsclub.com. It is one of the best software to repair Windows 10 issues. Like the above-mentioned ‘Windows Repair’ app, FixWin is also a general-purpose tool that goes over many potential problems and tries to fix them.
The FixWin allows you to fix several issues related to File Explorer, Internet & Connectivity, System Tools, etc. It lets you run System File Checker, create a system restore point, re-registry Store apps, and many more.
Download FixWin
If you need, you can download FixWin here.
Advanced SystemCare
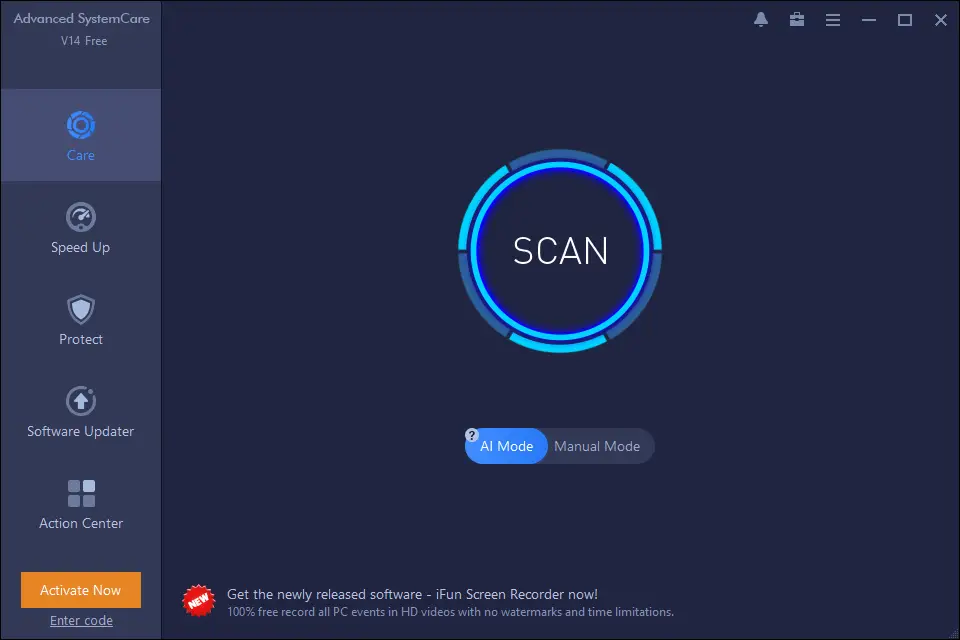
iObit Advanced SystemCare is a big name when we talk about optimizing our Windows PCs. In function, it is similar to AVG TuneUP; however, this is free for personal use. The software removes unneeded files and applications that slow down your computer and boost performance.
Apart from tuning up your PC, it can even disable startup applications cluttering your system RAM, speeding up boot times. You can toggle between various automatic modes or even perform a manual scan to find issues.
Download Advanced SystemCare
If you need it, you can get Advanced SystemCare here.
O&O ShutUp10++
Above mentioned all tools help you fix outright Windows errors, such as missing drivers or a slow computer. But O&O ShutUp10++ is different from others. This freeware application enables you to stop spying from Microsoft. Microsoft collects data from your computer in the background and using O&O ShutUp10++, and you can say Microsoft good bye. We will not share more personal data.
Download O&O ShutUp10++
Grab O&O ShutUp10++ here.
Conclusion
In conclusion, there are several freeware applications available that can help you fix errors and optimize your Windows 11/10 system. Tools like Windows Repair, AVG TuneUp, Snappy Driver Installer, FixWin, Advanced SystemCare, and O&O ShutUp10++ offer various functionalities to address common issues such as system errors, outdated drivers, performance optimization, and privacy concerns. These tools provide automated solutions and simplify the process of troubleshooting and maintaining a healthy Windows installation. By utilizing these applications, users can effectively address and resolve problems, ensuring a smoother and more efficient computing experience.
 Microsoft выпустила новую утилиту для исправления ошибок Windows 10 — Software Repair Tool, которая ранее (в период тестирования) называлась Windows 10 Self-Healing Tool (и появилась в сети не совсем официально). Также может быть полезным: Программы для исправления ошибок Windows, Средства устранения неполадок Windows 10.
Первоначально утилита предлагалась для решения проблем с зависаниями после установки юбилейного обновления, однако может исправить и другие ошибки с системными приложениями, файлам и самой ОС Windows 10 (также в окончательной версии появилась информация о том, что средство служит для исправления проблем с планшетами Surface, однако все исправления работают на любом компьютере или ноутбуке).
Использование Software Repair Tool
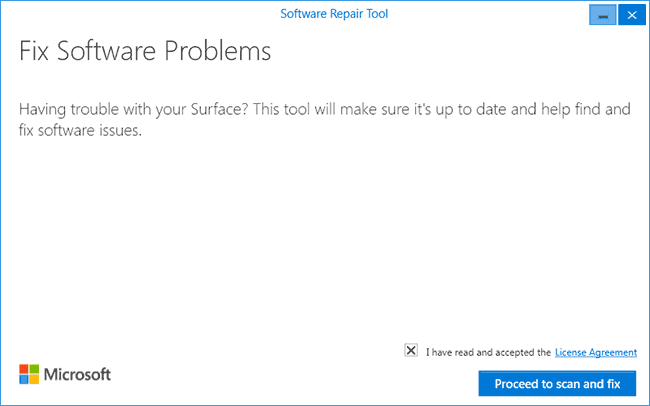
При исправлении ошибок, утилита не дает пользователю какого-то выбора, все действия выполняются автоматически. После запуска Software Repair Tool потребуется только отметить пункт о принятии условия лицензионного соглашения и нажать «Proceed to scan and fix» (Перейти к сканированию и исправлению).
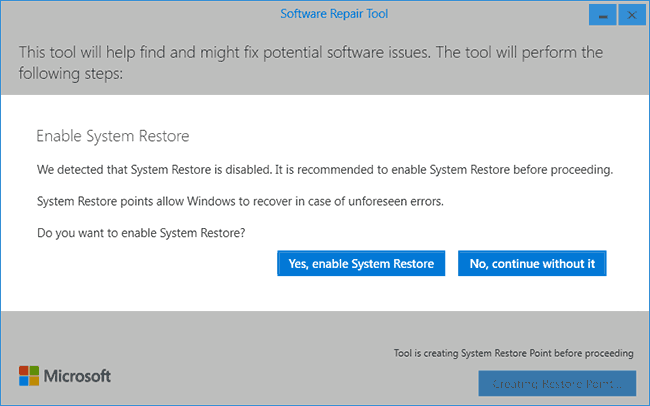
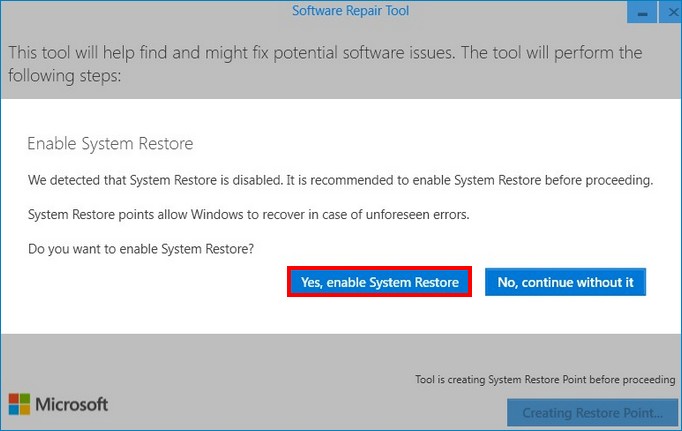
В случае, если у вас в системе отключено автоматическое создание точек восстановления (см. Точки восстановления Windows 10), будет предложено включить их на тот случай, если что-то в результате пойдет не так. Рекомендую включить кнопкой «Yes, enable System Restore».
На следующем шаге начнут выполняться все действия по поиску неисправностей и исправлению ошибок.

Информация о том, что именно выполняется в программе дана кратко. По факту выполняются следующие основные действия (ссылки ведут на инструкции по выполнению указанного действия вручную) и несколько дополнительных (например, актуализация даты и времени на компьютере).
- Сброс сетевых настроек Windows 10
- Переустановка приложений с помощью PowerShell
- Сброс магазина Windows 10 с помощью wsreset.exe (как сделать вручную рассмотрено в предыдущем пункте)
- Проверка целостности системных файлов Windows 10 с помощью DISM
- Очистка хранилища компонентов
- Запуск установки обновлений ОС и приложений
- Восстановление схемы электропитания по умолчанию
То есть по сути, выполняется сброс всех настроек и системных файлов без переустановки системы (в отличие от сброса Windows 10).
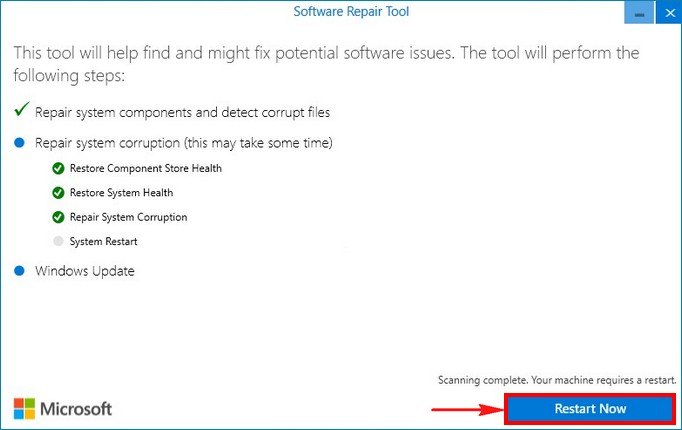
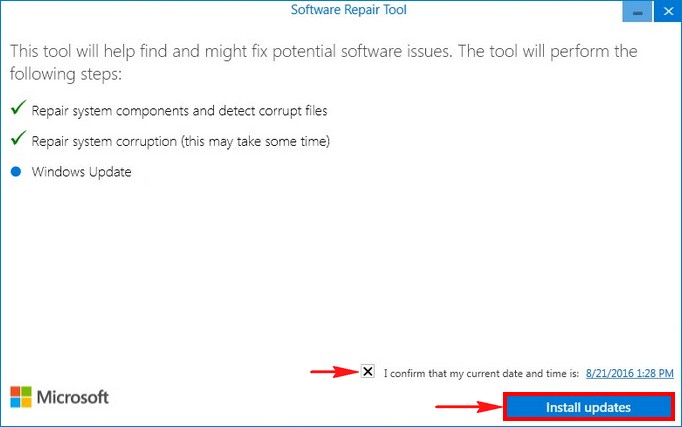
В процессе выполнения Software Repair Tool сначала выполняет одну часть исправлений, а после перезагрузки выполняет установку обновлений (может занять продолжительное время). По завершении потребуется еще одна перезагрузка.
В моем тесте (правда, на исправно работающей системе) каких-то проблем эта программа не вызвала. Однако, в тех случаях, когда вы можете примерно определить источник проблемы или хотя бы ее область, лучше попробовать исправить ее вручную. (например, если не работает Интернет в Windows 10 — лучше просто сбросить сетевые настройки для начала, а не использовать утилиту, которая сбросит далеко не только это).
Скачать Microsoft Software Repair Tool можно из магазина приложений Windows — https://www.microsoft.com/ru-ru/store/p/software-repair-tool/9p6vk40286pq
Привет друзья! Неделю назад на форуме https://social.technet.microsoft.com/forums/ru-ru/home я узнал о существовании новой утилиты для автоматического устранения неполадок Windows 10 под названием Windows Software Repair Tool (замечу, что утилита пока находится в стадии тестирования). Написать статью об этом инструменте я решил после одного интересного случая. На одном ноутбуке с установленной Windows 10 перестал запускаться Windows Store — магазин приложений для Windows 10, никакие мои ухищрения не помогли и я решил возвратить ноутбуку исходное состояние, но перед этим всё же решил рискнуть, и запустил утилиту Windows Software Repair Tool. Что вы думаете, через пару минут Windows Store открылся и заработал!
После недели экспериментов с другими компьютерами я не могу сказать, что программка решает абсолютно все вопросы (зависания, проблемы с Меню «Пуск» и так далее), также информации об этом инструменте довольно мало даже на англоязычных сайтах, поэтому прошу пользователей, знакомых с ним, написать свои отзывы (положительные или отрицательные).
Новый инструмент для автоматического устранения неполадок Windows 10 — Windows Software Repair Tool
Итак, давайте ближайшим образом рассмотрим в подробностях работу этого нового инструмента автоматического устранения неполадок в операционной систем Windows 10.
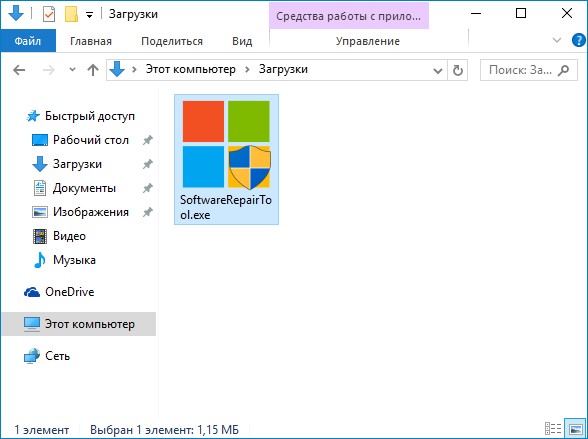
скачиваем
Windows Software Repair Tool
и запускаем.
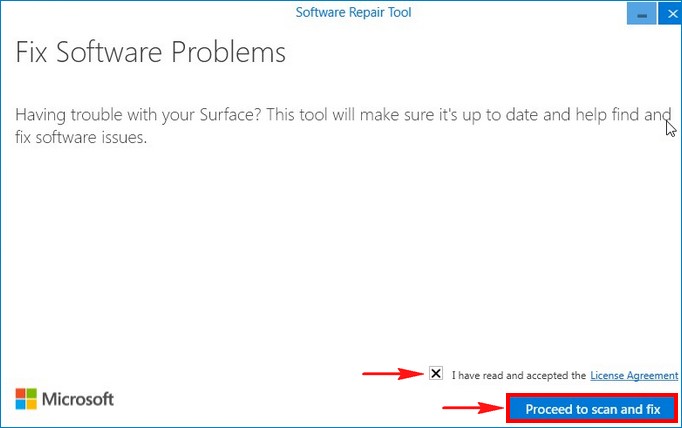
Отмечаем галочкой пункт «Я прочитал лицензионной соглашение» (прочесть его можно, если щёлкнуть на ссылке License Agreement) и жмём на кнопке «Proceed to scan and fix»
Утилита говорит нам, что восстановление системы на этом компьютере отключено и предлагает его включить, соглашаемся, жмём на кнопку «Yes, enable System Restore»,
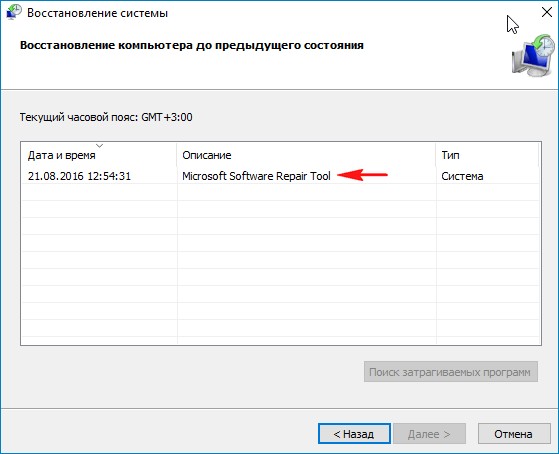
тут же создаётся точка восстановления системы.
Утилита Windows Software Repair Tool начинает основную работу:
1. Создание точки восстановления (Create System Restore Point)
2. Синхронизация системной даты и времени (Resync System Date and Time)
3. Сброс настроек системы (Reset System Settings)
4. Переустановка стандартных системных приложений Windows 10 (Reinstall System Applications)
5. Восстановление целостности системных файлов Windows 10 (Repair system corruption)
6. Скачивание и установка недостающих обновлений Win 10.

Жмём на кнопку «Перезагрузка»

После перезагрузки опять отмечаем галочкой пункт «Я прочитал лицензионной соглашение» и жмём на кнопке «Proceed to scan and fix», программа продолжает свою работу.
Утилита закончила свою работу.
Жмём на кнопку «Перезагрузка»
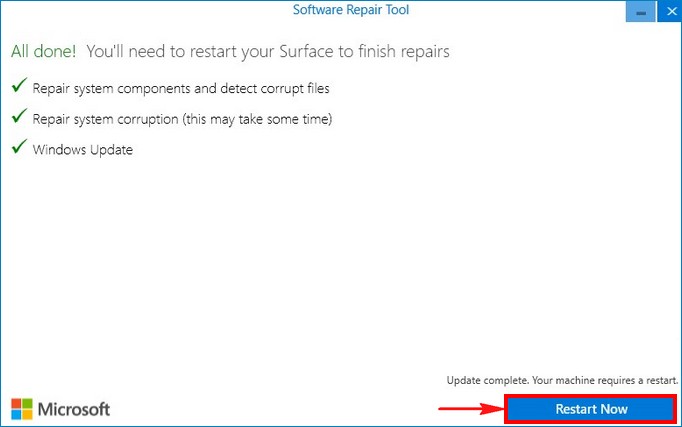
и загружается Windows 10.
Если после работы утилиты в работе Windows 10 что-то пойдёт не так, то просто откатитесь с помощью точки восстановления на тот период, когда ваша система работала стабильно.
Статья по этой теме: Устранение неполадок Windows 10