Have you ever used the Windows app Remote Desktop Connection? This app, included in all Windows installations, allows you to remotely access another Windows PC or a server with Windows Server. For this purpose, it employs the Remote Desktop Protocol (RDP).
Organizations can install applications on a central server instead of various computers. To use those applications, employees must remotely access that server. Such centralization can make maintenance and troubleshooting easier. This technology was formerly known as Terminal Services (TS). Currently, web systems are more common. But, in some scenarios, Windows remote apps are still needed.
In those scenarios, Linux users can remotely access Windows computers and servers from their favorite system using an RDP client.
There are a few RDP clients available for Linux and we are going to talk about them today:
- Remmina
- FreeRDP
- rdesktop
- Vinagre
You can choose the one you like best or the one that best suits your needs.
Out of curiosity, FreeRDP is both an app and a library, which provides reusable features for other apps. Except for rdesktop, all of the other clients above use the FreeRDP library.
Enabling remote desktop on Windows
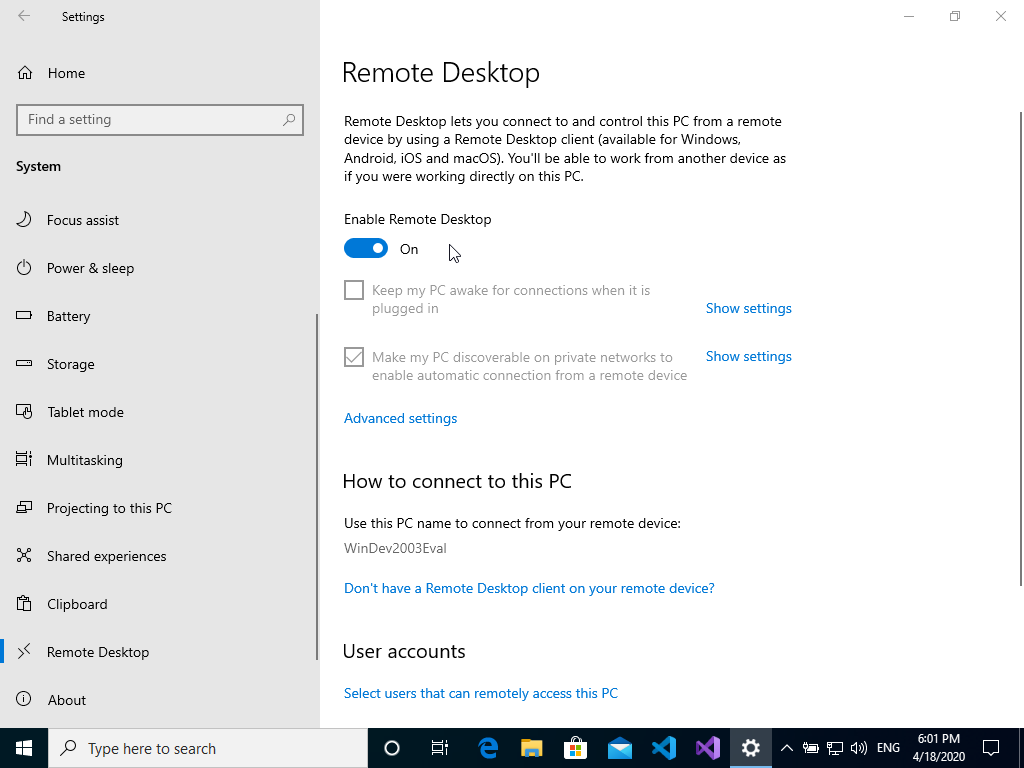
First of all, you must set up the computer you want to connect to so it allows remote connections. On the Windows machine you want to connect to, logged on with an administrator account, open the Start menu and click Settings. To do that, on the window that appears, open the System category, and then Remote Desktop. Finally, enable it:
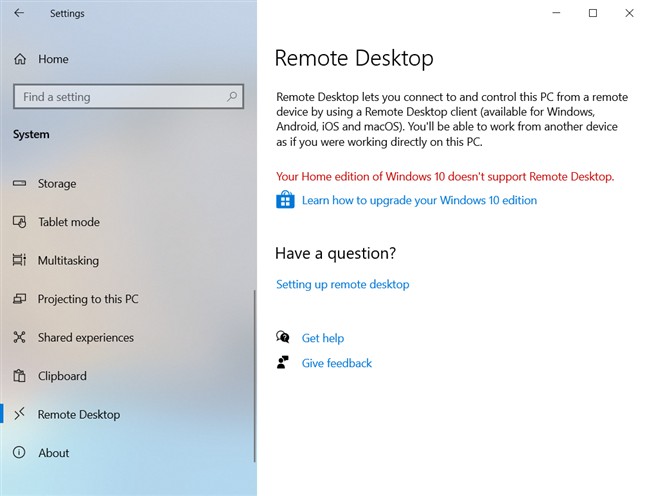
Note that you can’t connect to computers running a Windows Home edition (for instance, Windows 10 Home). This screen informs you, if that is the case:
Your Home edition of Windows 10 doesn’t support Remote Desktop.
Source of the image: Digital Citizen
If you want more information about remote desktop on Windows, take a look at:
- How to use Remote Desktop — Windows Support
- Remote Desktop — Allow access to your PC — Microsoft Docs
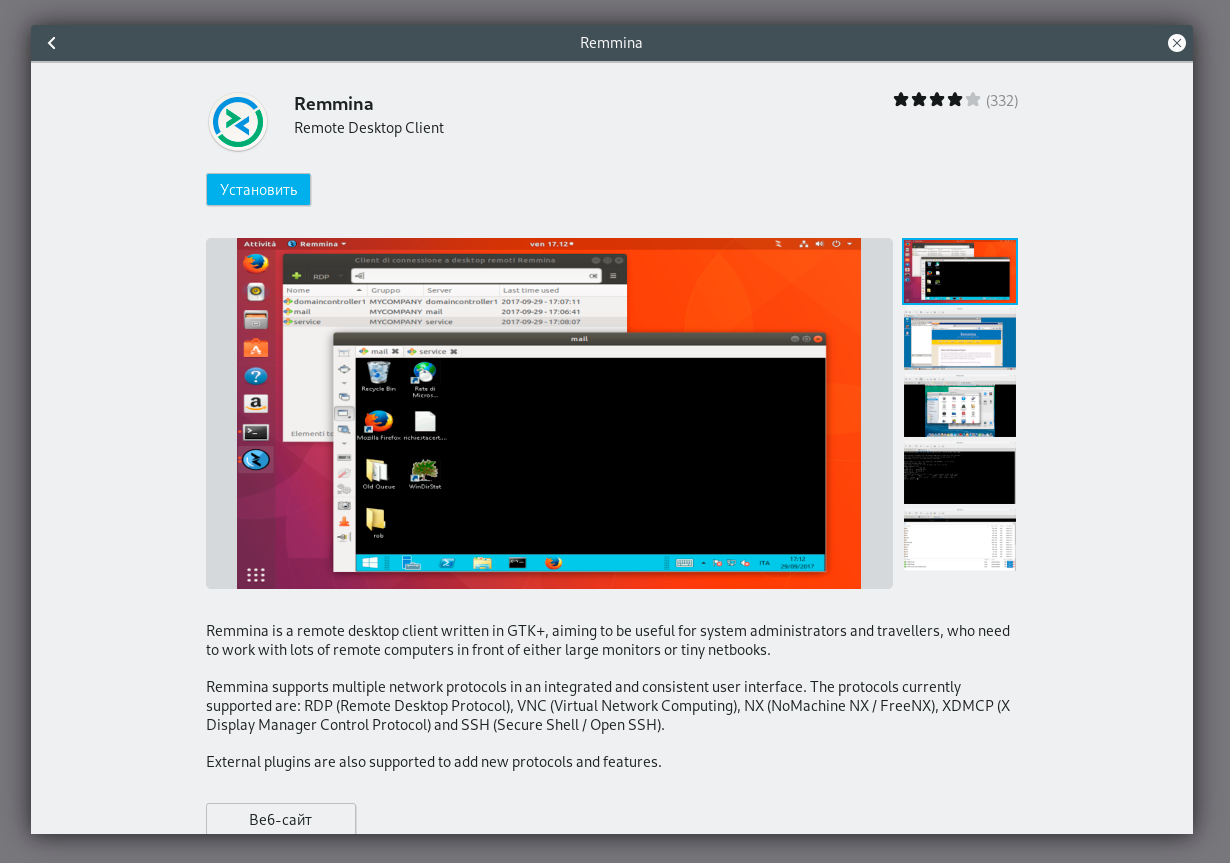
Remmina is a remote desktop client that supports many remote access protocols such as RDP, VNC, NX, XDMCP and SSH. It aims to be useful for system administrators and travellers, who need to work with lots of remote desktops and/or servers. Remmina is included in the Ubuntu Linux distribution and is its default remote desktop client.
To install Remmina on Linux Kamarada and openSUSE, run:
1


# zypper in remmina remmina-plugin-rdp
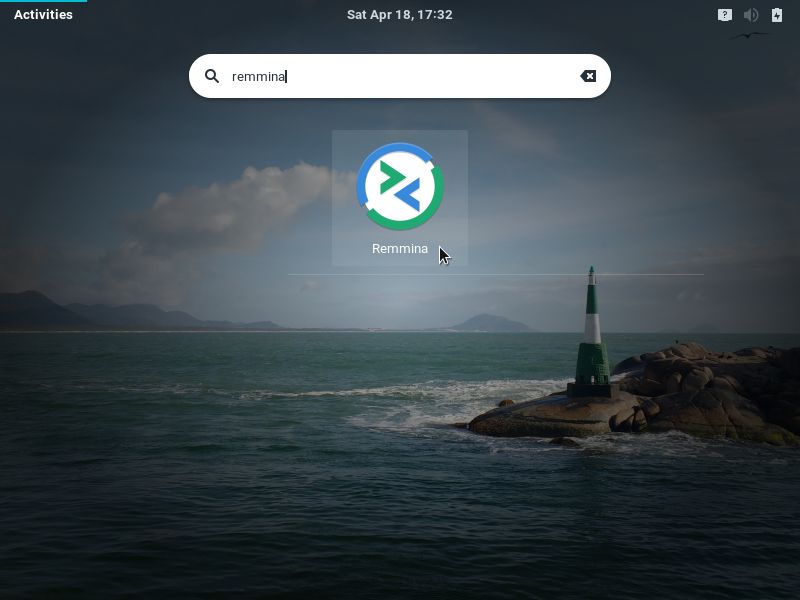
Once installed, to start Remmina, if you use the GNOME desktop environment, open the Activities menu, on the top-left screen corner, type remmina and click its icon:
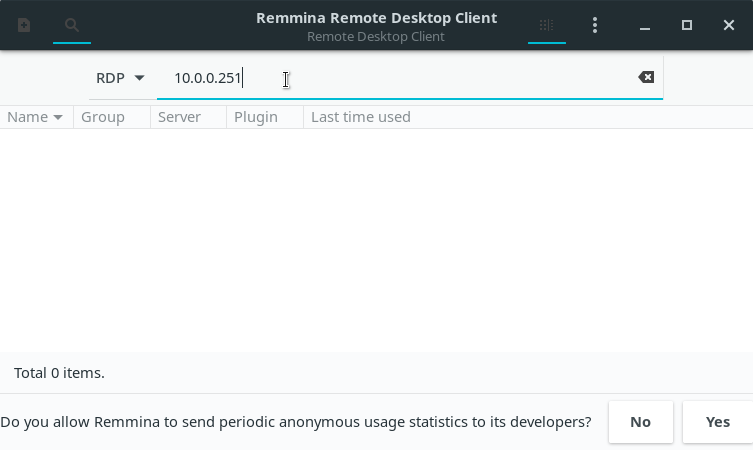
To quickly start a remote access, select the RDP protocol, type the hostname or IP address of the computer you want to connect to (e.g. 10.0.0.251) and hit Enter:
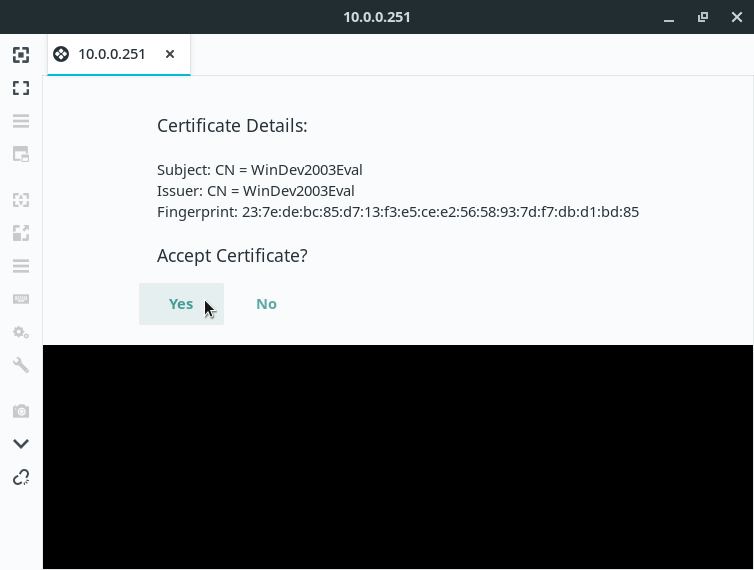
If it’s the first time you connect to this computer, Remmina asks whether to trust its certificate, click Yes:
On the next screen, enter your User name and Password on the remote computer. Also inform the Domain, if necessary. Optionally, you can choose to Save password. Click OK:
You will see the remote computer’s desktop in the Remmina window:
From now on, you are using that computer, but remotely, without sitting in front of it. Each clicking and typing is sent to be processed on the remote computer.
If the remote computer is a Windows desktop, its screen is locked during remote access.
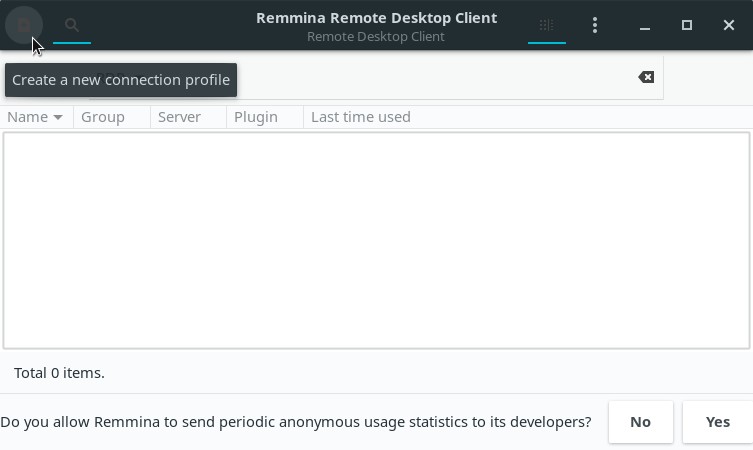
If you are going to access this computer often, consider saving the connection settings, so that remote access can be easily initiated. To do this, click the Create a new connection profile button on the top-left corner of the Remmina main window:
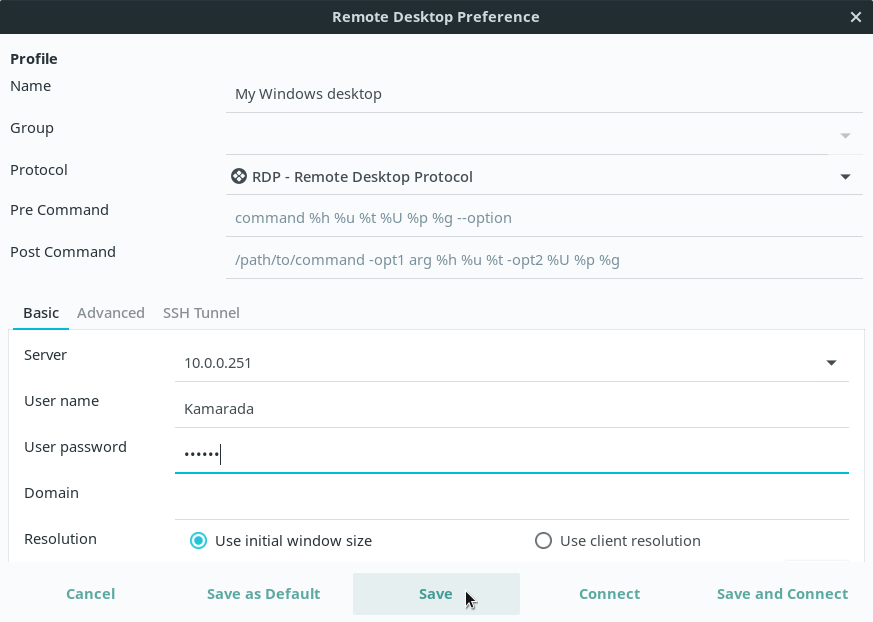
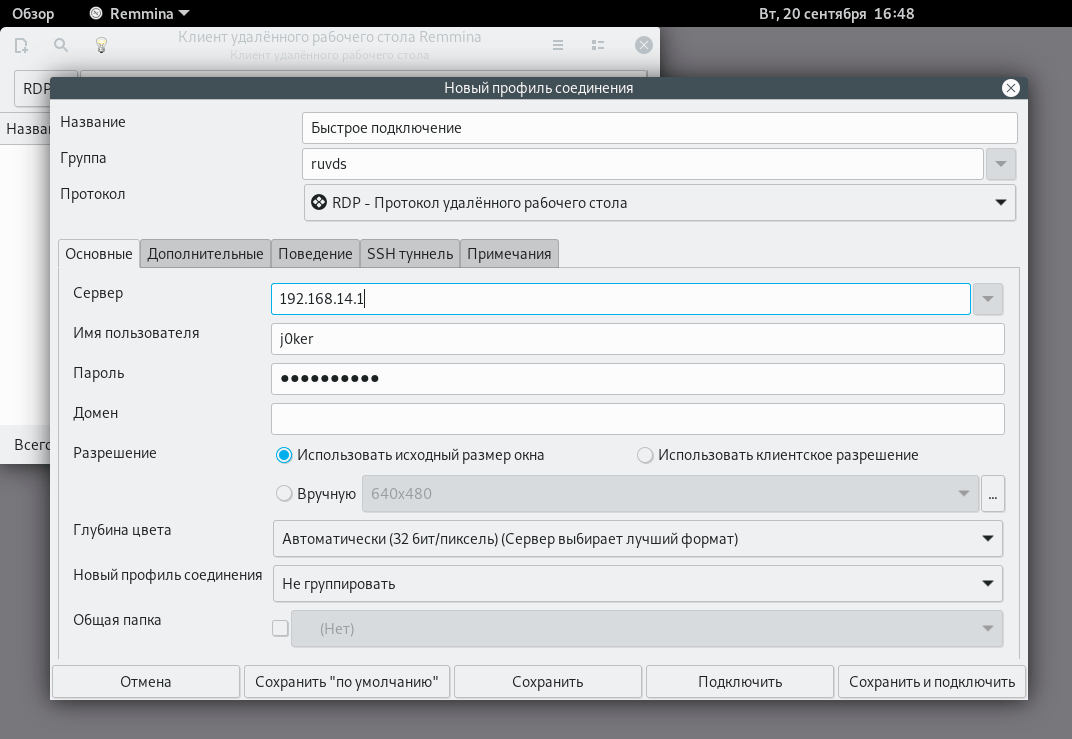
On the next screen, give a Name to identify the connection, select RDP in the Protocol field and enter the connection settings: Server, User name, User password and Domain (if necessary). When you’re finished, click Save:
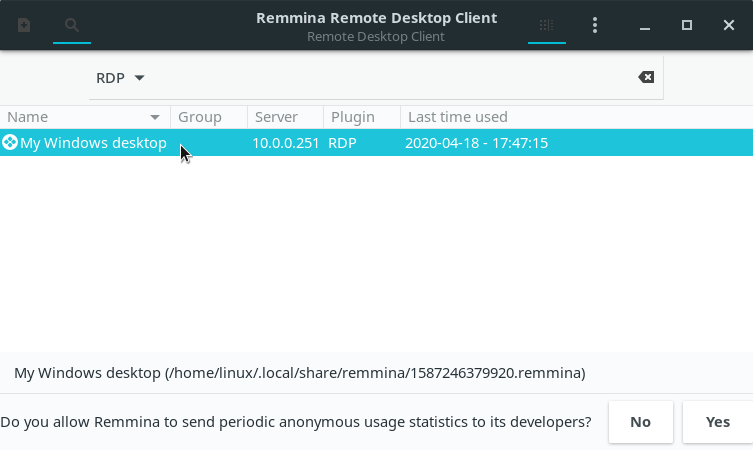
After that, the connection becomes listed on the Remmina main window:
When you want to remotely access that computer, just double-click it on the list.
FreeRDP is a free implementation of the Remote Desktop Protocol following the Microsoft Open Specifications. This implementation provides both the client and the server applications as well as a library, which allows other applications to use the RDP protocol. Today, we are interested in the FreeRDP client application.
To install the FreeRDP client on Linux Kamarada and openSUSE, run:
The FreeRDP client does not have a main screen like Remmina. To start a remote access using the FreeRDP client, run this command from a terminal:
1


$ xfreerdp /v:hostname_or_ip_address /u:username
Making the appropriate substitutions. For example:
1


$ xfreerdp /v:10.0.0.251 /u:Kamarada
If you need to inform the computer’s domain, use the /d parameter:
1


$ xfreerdp /v:hostname_or_ip_address /d:domain /u:username
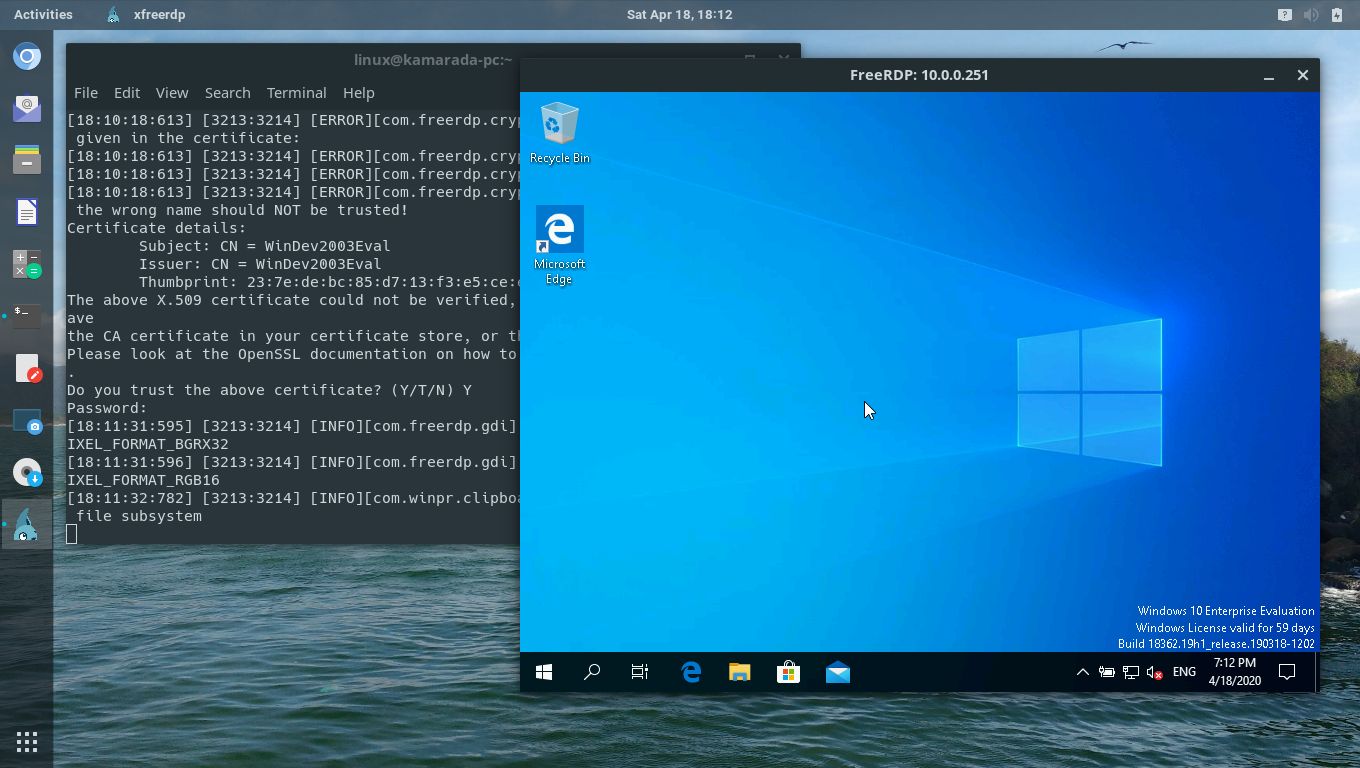
If it’s the first time you connect to this computer, the FreeRDP client asks whether to trust its certificate:
1
2
3
4
5
6
7
8
9
10
11
12
13
14
15
16
17
18
19
20


[18:10:18:588] [3213:3214] [INFO][com.freerdp.client.common.cmdline] - loading channelEx cliprdr
[18:10:18:604] [3213:3214] [INFO][com.freerdp.crypto] - creating directory /home/linux/.config/freerdp
[18:10:18:604] [3213:3214] [INFO][com.freerdp.crypto] - creating directory [/home/linux/.config/freerdp/certs]
[18:10:18:604] [3213:3214] [INFO][com.freerdp.crypto] - created directory [/home/linux/.config/freerdp/server]
[18:10:18:613] [3213:3214] [ERROR][com.freerdp.crypto] - @@@@@@@@@@@@@@@@@@@@@@@@@@@@@@@@@@@@@@@@@@@@@@@@@@@@@@@@@@@
[18:10:18:613] [3213:3214] [ERROR][com.freerdp.crypto] - @           WARNING: CERTIFICATE NAME MISMATCH!           @
[18:10:18:613] [3213:3214] [ERROR][com.freerdp.crypto] - @@@@@@@@@@@@@@@@@@@@@@@@@@@@@@@@@@@@@@@@@@@@@@@@@@@@@@@@@@@
[18:10:18:613] [3213:3214] [ERROR][com.freerdp.crypto] - The hostname used for this connection (10.0.0.251:3389)
[18:10:18:613] [3213:3214] [ERROR][com.freerdp.crypto] - does not match the name given in the certificate:
[18:10:18:613] [3213:3214] [ERROR][com.freerdp.crypto] - Common Name (CN):
[18:10:18:613] [3213:3214] [ERROR][com.freerdp.crypto] - 	WinDev2003Eval
[18:10:18:613] [3213:3214] [ERROR][com.freerdp.crypto] - A valid certificate for the wrong name should NOT be trusted!
Certificate details:
	Subject: CN = WinDev2003Eval
	Issuer: CN = WinDev2003Eval
	Thumbprint: 23:7e:de:bc:85:d7:13:f3:e5:ce:e2:56:58:93:7d:f7:db:d1:bd:85
The above X.509 certificate could not be verified, possibly because you do not have
the CA certificate in your certificate store, or the certificate has expired.
Please look at the OpenSSL documentation on how to add a private CA to the store.
Do you trust the above certificate? (Y/T/N)
Type Y (yes) and hit Enter. Then type your user password on the remote computer and hit Enter:
1
2
3
4
5


Do you trust the above certificate? (Y/T/N) Y
Password:
[18:11:31:595] [3213:3214] [INFO][com.freerdp.gdi] - Local framebuffer format  PIXEL_FORMAT_BGRX32
[18:11:31:596] [3213:3214] [INFO][com.freerdp.gdi] - Remote framebuffer format PIXEL_FORMAT_RGB16
[18:11:32:782] [3213:3214] [INFO][com.winpr.clipboard] - initialized POSIX local file subsystem
After that, the remote desktop connection is initiated:
If you have ever started the remote desktop connection on Windows by the Command Prompt (using the mstsc command), you may have noticed that the FreeRDP client uses the same command syntax. It was implemented that way on purpose, to keep compatibility.
If you are a curious person and want to check it out by yourself:
- on Windows, run:
- on Linux, run:
rdesktop was the first RDP client for Linux and, for many years, it was the most used. But since November 2019, the project is looking for a new maintainer.
In contrast, FreeRDP was born in 2009 as a fork of rdesktop, when Microsoft decided to open the RDP specifications. As time passed and the FreeRDP project evolved, it became the standard RDP client on systems where no native Microsoft client is available.
I present rdesktop here for information purposes only. Unless you have a good reason to use it, you are advised to use one of the other RDP clients, based on FreeRDP.
To install rdesktop on Linux Kamarada and openSUSE, run:
Then, to start a remote access using rdesktop, invoke it from a terminal followed by the hostname or IP address of the computer you want to connect to. For example:
In the past, that would suffice and rdesktop would just work. But now we face a problem that comes from the lack of proper maintenance and updates:
1
2
3


Autoselected keyboard map en-us
ERROR: CredSSP: Initialize failed, do you have correct kerberos tgt initialized ?
Failed to connect, CredSSP required by server.
At some point, Microsoft released an Windows update that has since made the use of Network Level Authentication (NLA) required by default. FreeRDP does support NLA, while rdesktop does not. You can still use rdesktop for remote access, as long as you disable NLA on the computer you want to connect to. Note that this makes the connection less secure.
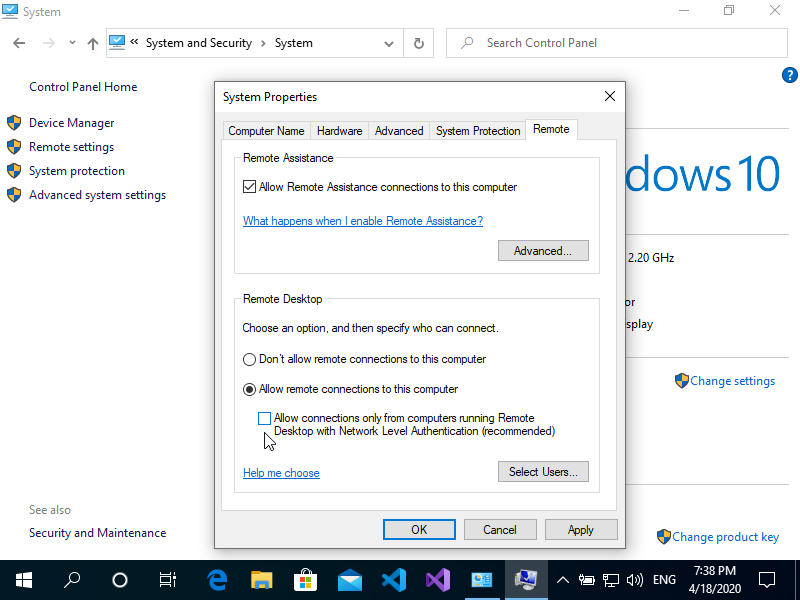
To disable NLA on the Windows machine you want to connect to, logged on with an administrator account, open the Control Panel, open the System and Security category, then click the System icon. On the next screen, click the Remote settings link by the left. On the dialog box that appears, select the Remote tab. Finally, disable the option Allow connections only from computers running Remote Desktop with Network Level Authentication and click OK:
With NLA disabled, back to the Linux computer that will start the remote access, try again:
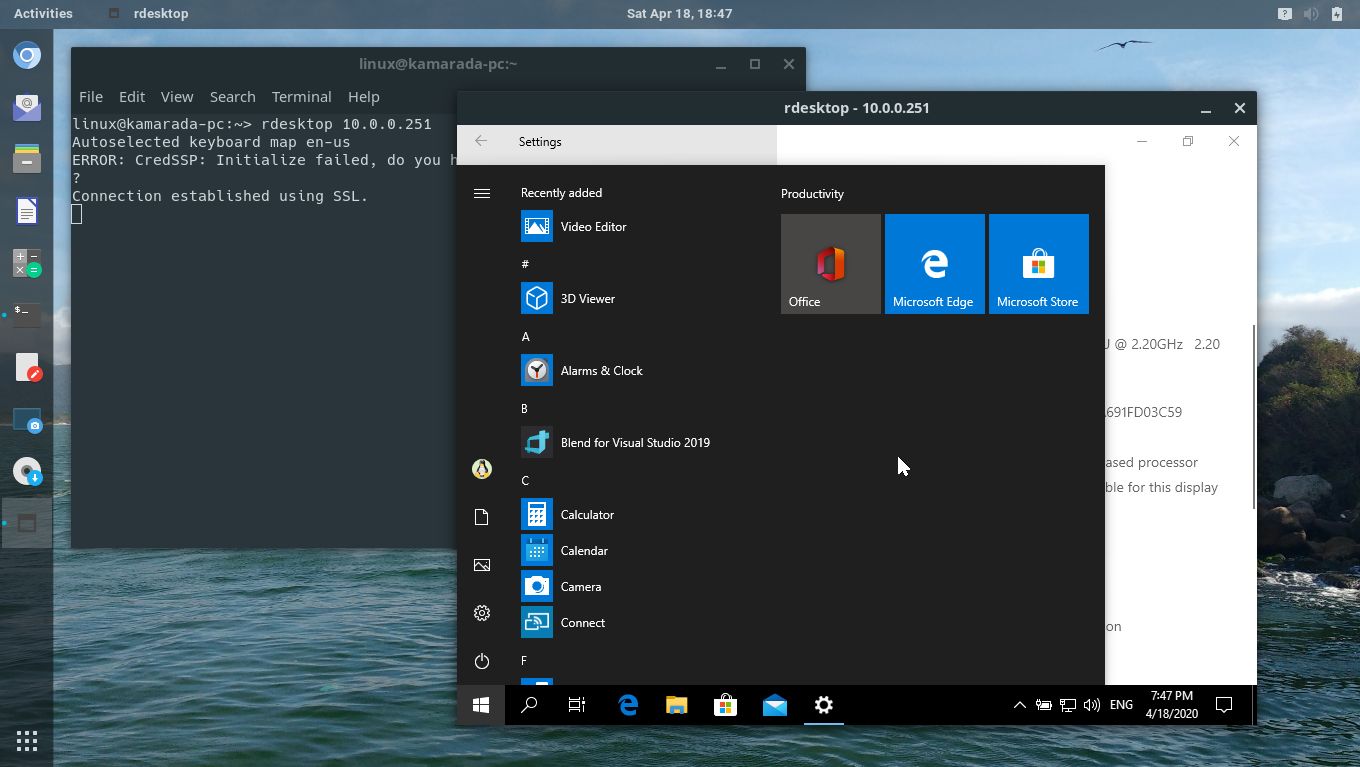
This time, rdesktop will work. A window presents the Windows logon screen. Enter your username and password and press Enter to start the remote access:
If you want more information about that rdesktop bug, see:
- CredSSP does not work — Issue #71 — rdesktop/rdesktop — GitHub
- Add support for Network Level Authentication — Issue #279 — rdesktop/rdesktop — GitHub
- Doesn’t work if there is Fortress machine between connecting to the remote server — Issue #261 — rdesktop/rdesktop — GitHub
- Network Level Authentication (NLA) — rdesktop/rdesktop Wiki — GitHub
Vinagre is the default remote desktop client for the GNOME desktop. That’s why it is also the default remote desktop client for Linux Kamarada 15.1, the current stable release. Like Remmina, it supports some connection protocols: SSH, RDP, SPICE and VNC. However, like rdesktop, Vinagre is unmaintained for some time now.
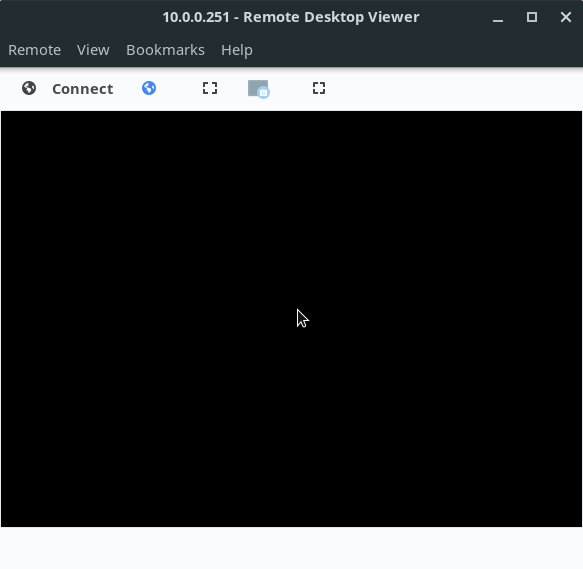
When trying a RDP access, Vinagre only displays a black screen, as I reported on the openSUSE mailing list some time ago:
- [opensuse-factory] Black screen when trying a RDP access to Windows 10 using Vinagre (Leap 15.1/15.2 and Tumbleweed)
On some distributions, like Debian, Vinagre works. I believe that those distributions applied some patch to Vinagre.
Probably, the next Linux Kamarada release will come with Remmina instead of Vinagre, following the Ubuntu Linux distribution.
Because of that, I present Vinagre here just for information purposes as well.
Vinagre comes already installed by default on Linux Kamarada and openSUSE, if you chose the GNOME desktop, but if you need or want to install it, you can do this by running:
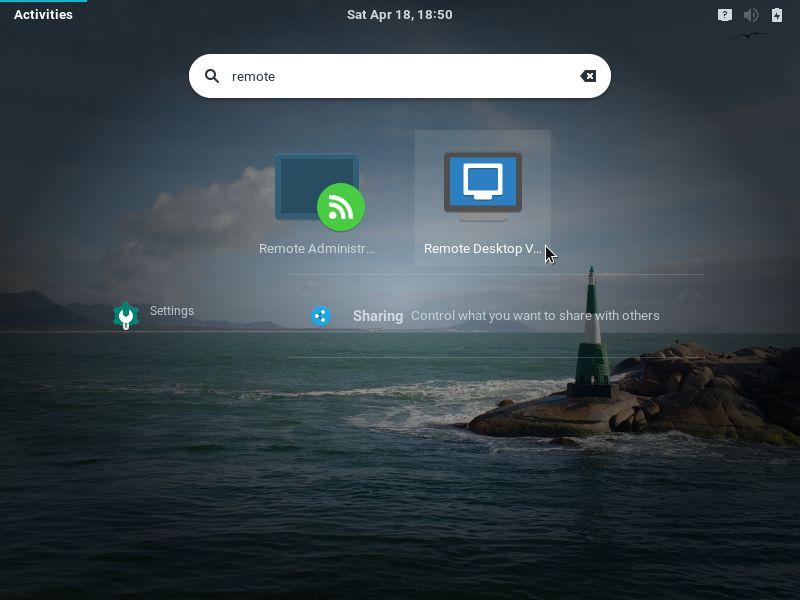
To start Vinagre, which appears as Remote Desktop Viewer on the applications list, open the Activities menu, on the top-left screen corner, type remote or vinagre and click the corresponding icon:
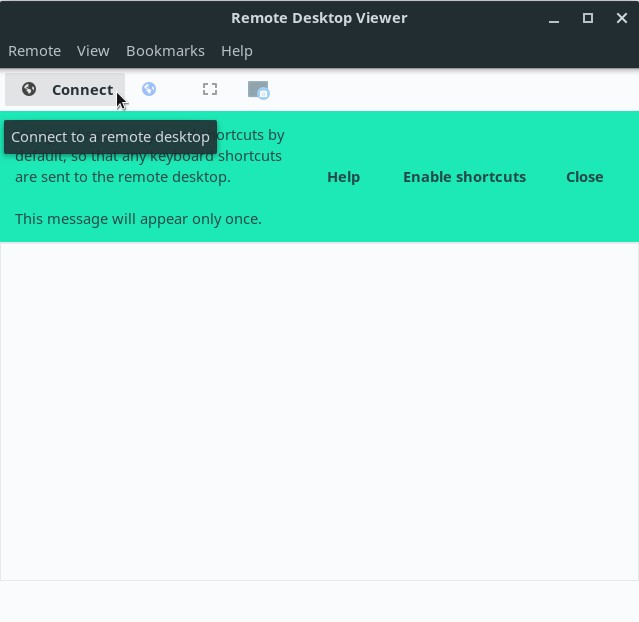
On the Vinagre main screen, click Connect:
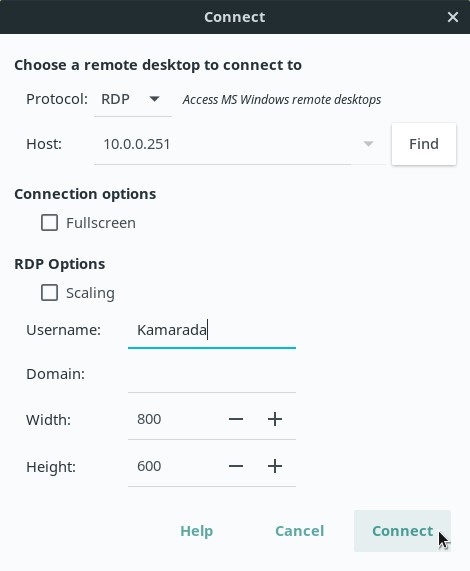
Fill in the next screen fields with the connection settings:
- on the Protocol field, select RDP;
- on the Host field, enter the hostname or IP address of the computer to connect to;
- enter your Username on the remote computer; and
- enter the Domain, if necessary.
When you are finished, click Connect.
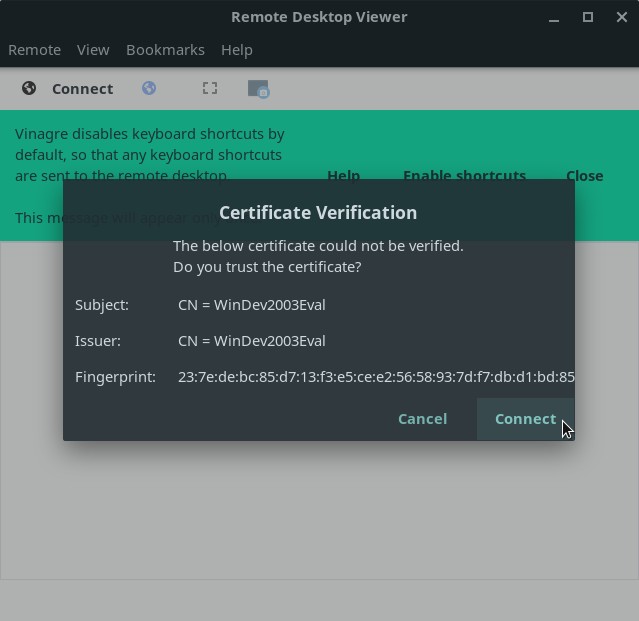
If it’s the first time you connect to this computer, Vinagre asks whether to trust its certificate:
Tell it to do so by clicking Connect.
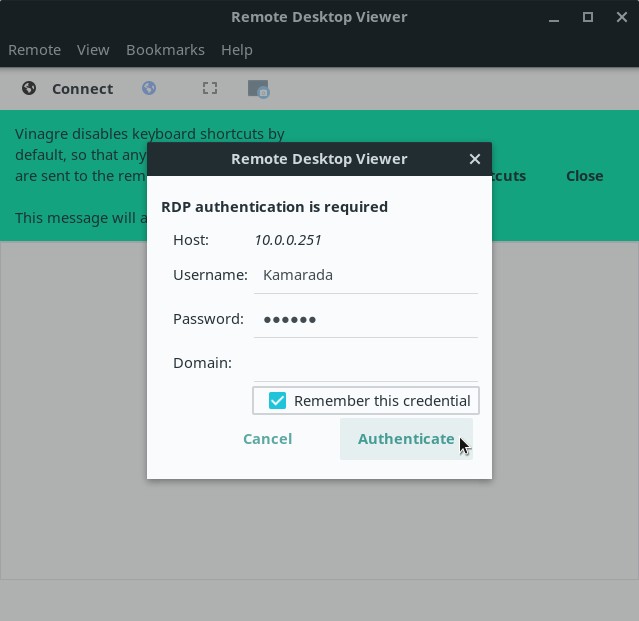
Enter your Password, optionally enable Remember this credential and click Authenticate:
At this point, you should see the remote computer’s desktop. You can notice it has its screen locked (as it normally does during RDP accesses). But, as I said, Vinagre only displays a black screen:
Like Remmina, Vinagre allows you to memorize the connection settings, to easily connect to the same computer again in the future. To do this, during the remote access, open the Bookmarks menu and click Add Bookmark.
After you created the bookmark, it will now be listed on the Bookmarks menu. When you want to remotely access this computer again, just open this menu and click the bookmark.
References
- How to use Remote Desktop — Windows Support
- Remote Desktop — Allow access to your PC — Microsoft Docs
- Remote Graphical Sessions with VNC — Reference — openSUSE Leap 15.1
- Hi! — The history of the FreeRDP project — FreeRDP
Since it’s not possible to remotely access computers running Windows 10 Home, to write this how-to I used a VirtualBox virtual machine with a Windows 10 Enterprise evaluation version legally downloaded from:
- Download a Windows 10 virtual machine — Windows app development
Время на прочтение
6 мин
Количество просмотров 64K
Что делать, если нужно получить удалённый доступ к серверу или десктопу Linux? Или подключиться к Windows-машине с Linux-десктопа? Какие клиенты RDP и FTP подходят лучше всего под Debian и Red Hat / CentOS? Интересно посмотреть, что нового появилось в последнее время.
Как известно, Remote Desktop Protocol (RDP) — проприетарный протокол Microsoft для удалённого управления десктопом. Ориентирован на передачу по сети графического интерфейса и всех функций управления.
Хотя протокол выпустила Microsoft, к настоящему моменту создано множество свободных серверов и клиентов RDP с открытым исходным кодом, под свободной лицензией и для всех операционных систем. В последние годы появились достойные серверы RDP под Linux, хотя раньше хосты всегда работали под Windows, а под Linux выпускались только клиенты. Однако к 2022 году ситуация сильно изменилась, так что стали возможно и противоположные сценарии.
Выбор сервера и клиента зависит от операционной системы хоста. RDP-сессия устанавливается между клиентом и сервером. Соответственно, для серверной и клиентской части RDP и FTP существуют разные инструменты, в том числе доступные в репозиториях Debian, Red Hat, CentOS и др.
Сервер RDP под Linux
В современных системах GNOME — сервер RDP уже интегрирован, но там много чего не хватает, так что приходится пока использовать сторонние решения. Судя по всему, сервер RDP в GNOME пока не доработан до окончательного вида. По крайней мере, там отсутствуют некоторые важные функции. Руководство по использованию и планы на доработку программы см. здесь.
▍ xRDP
Неплохой вариант для Linux-сервера — xRDP. Последняя версия 0.9.20 вышла 15 сентября 2022 года.
Эта программа специализируется на управлении Linux-десктопом по RDP, при этом xRDP как бы мимикрирует под Windows-систему, нативную для данного протокола.
Предполагается, что клиенты — это обычно системы под Windows, мобильные устройства или дешёвые RDP-терминалы типа Wyse Winterm (на Windows CE), которые можно дёшево купить б/у на «Авито» или найти списанные вообще бесплатно.
Старый терминал WYSE-530 Winterm S30 на процессоре AMD Geode 366 МГц (ноябрь 2008)
Поднимаете RDP-сервер под Linux с десятком X-сессий — и практически без усилий получаете сеть из десятка компьютеров, которые могут вводить информацию на сервер. Это просто пример, как использовать RDP-клиенты под Windows для доступа к Linux-серверу.
xRDP обеспечивает удалённый доступ по Microsoft Remote Desktop Protocol (RDP) и принимает соединения по порту 3389/tcp от следующих RDP-клиентов:
- FreeRDP.
- rdesktop.
- KRDC.
- NeutrinoRDP.
- Windows MSTSC (Microsoft Terminal Services Client, она же
mstsc.exe). - Microsoft Remote Desktop (есть Microsoft Store, отличается от MSTSC).
Некоторые из этих клиентов доступны только на определённых ОС, например, только на Windows. Другие поддерживают более широкий список платформ, включая Linux, MacOS, iOS и/или Android.
xRDP поддерживает повторные подключения к прерванной сессии, изменение размера дисплея, функцию RDP/VNC-прокси (подключение к другому серверу RDP/VNC через xrdp), двусторонний буфер обмена между хостом и клиентом, в том числе передачу через него туда и обратно текста, изображений и файлов, перенаправление аудиопотока и микрофона (требует сборки дополнительных модулей), перенаправление дисков (монтирование локальных клиентских дисков на удалённой машине).
В большинство популярных дистрибутивов включены последние версии пакетов xrdp и xorgxrdp, они есть также в Debian и CentOS.
▍ Установка на Ubuntu / Debian
apt install xrdp▍ Установка на RedHat / CentOS / Fedora
На RedHat / CentOS сначала нужно активировать пакеты EPEL:
yum install epel-release
Потом можно установить xrdp
yum install xrdpogon
Один из многочисленных альтернативных вариантов сервера RDP под Linux — проект ogon. Это набор инструментов на C/C++, которые предоставляют удобный GUI для удалённого десктопа по RDP. Проект поддерживает большинство современных расширений протокола RDP, кодеки сжатия растровых изображений, отключение и повторное подключение к сессиям, перенаправление устройств.
Сервер совместим практически со всеми существующими клиентами RDP, сессии можно устанавливать через приложение X11, Weston или QT. Благодаря модульной конструкции, сервер легко расширяется, в него можно добавить новые функции или новые бэкенды. Ставится на Debian, CentOS и т. д.
xpra
Известный сервер под Linux с терминальными GUI-сессиями (экран для X11) — xpra. Во многом работает как xRDP, хотя и не поддерживает RDP. Но мы решили помянуть его здесь для сравнения с решениями на RDP и VNC.
Тут встроенный HTML5-клиент, аппаратное ускорение графики, поддержка множества пользователей, GUI для настройки, синхронизация клавиатуры и буфера обмена, перенаправление принтера, курсора, звука, системных уведомлений, поддержка IPv6, SSL, десктопный режим и проч.
Официальные стабильные сборки:
- Microsoft Windows: EXE, ZIP, MSI
- MacOS: DMG, PKG
- Linux: RPM, DEB
Клиенты RDP и FTP под Linux
Пожалуй, лучшие клиенты RDP под Debian — это Remmina и Apache Guacamole, хотя есть и другие варианты.
Remmina
Remmina — клиент RDP по умолчанию в некоторых дистрибутивах, в том числе в Ubuntu. Это одна из самых удобных и функциональных программ для удалённой работы, поддерживает RDP, SSH, SPICE, VNC, X2Go, HTTP/HTTPS.
В июне 2022 вышла последняя версия 1.4.27 с исправлением ошибок и рядом не самых существенных изменений вроде новых цветовых схем для SSH.
Некоторые из основных функций Remmina, которые можно настраивать на стороне клиента RDP:
- Запоминание последнего режима просмотра для каждого соединения.
- Конфигурация двойным щелчком.
- Качество масштабирования.
- Размер шага автоматической прокрутки.
- Максимальное количество последних элементов.
- Нажатия клавиш.
- Папка для скриншотов.
- Предотвращение попадания скриншотов в буфер обмена.
- Настройка разрешения экрана.
- Конфигурация вкладок.
- Видимость панели инструментов.
- Режим просмотра по умолчанию.
- Настройка поведения в полноэкранном режиме.
- Строка поиска в главном окне.
- Установка горячих клавиш для хоста: включение полноэкранного режима, автоподгонка окна, переключение страниц вкладок, переключение режима масштабирования, захват клавиатуры, минимизировать окно, показать/скрыть панель инструментов, сделать скриншот, режим просмотра.
- Локальный порт SSH-туннеля.
- Парсинг
~/.ssh/config. - Логи SSH.
- Выбор шрифта терминала.
- И др.
В наборе плагинов есть SFTP для защищённой передачи файлов.
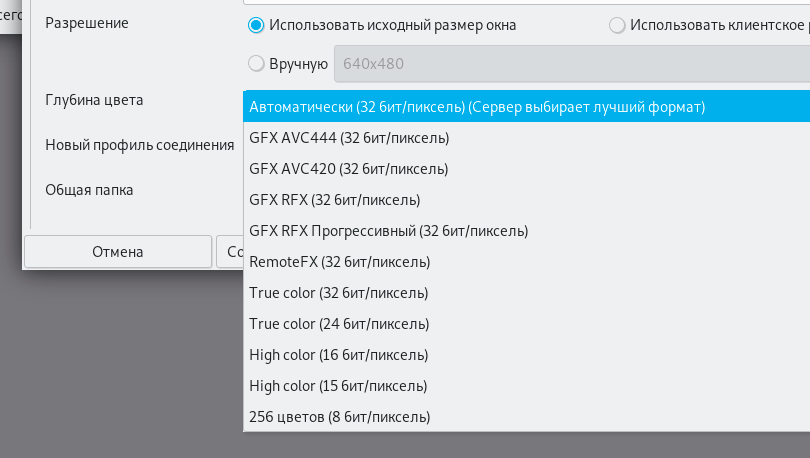
Из специфических настроек RDP — установка глубины цвета, качества передачи видео и звука, редирект локального микрофона, подключение консоли, распознавание сервера через Remote Desktop Gateway, возможность отключить автоматические реконнекты, синхронизацию буфера обмена и некоторых других функций.
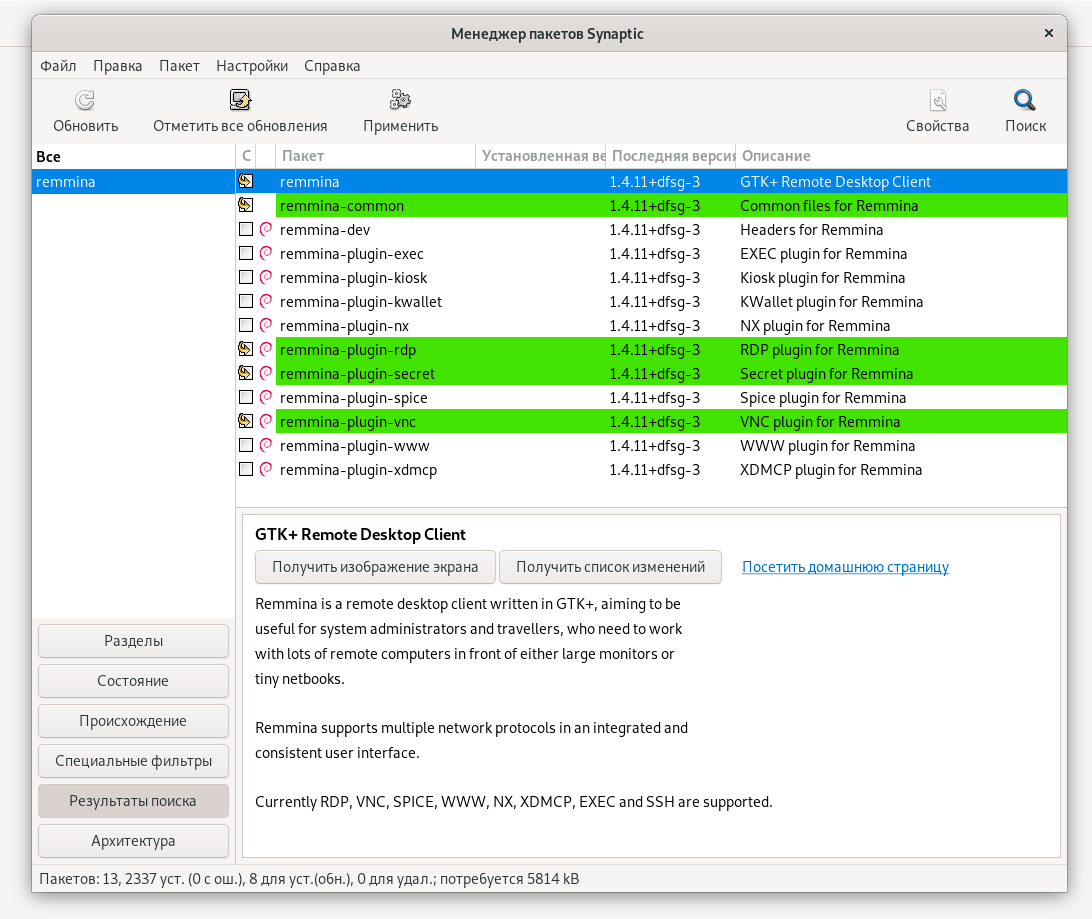
Remmina входит в состав большинства популярных дистрибутивов, включая Debian 11:
В старых версиях Debian для установки Remmina можно скопировать строки в консоль:
echo 'deb http://ftp.debian.org/debian stretch-backports main' | sudo tee --append /etc/apt/sources.list.d/stretch-backports.list >> /dev/null
sudo apt update
sudo apt install -t stretch-backports remmina remmina-plugin-rdp remmina-plugin-secret remmina-plugin-spice
Сразу после установки предлагается сделать Remmina клиентом RDP по умолчанию:
Инструкции по установке для всех систем см. на этой странице, а руководство по сборке из исходников — в справочном вики.
На CentOS есть вариант установки из репозитория EPEL, вставив в консоль следующие строчки:
wget http://dl.fedoraproject.org/pub/epel/epel-release-latest-7.noarch.rpm
rpm -ivh epel-release-latest-7.noarch.rpm
В качестве альтернативы — Remmina устанавливается через универсальный пакет Flatpak, который работает буквально на всех дистрибутивах:
flatpak remote-add --user --if-not-exists flathub https://flathub.org/repo/flathub.flatpakrepo
# In order to have H.264 codecs
flatpak install org.freedesktop.Platform
flatpak install org.freedesktop.Platform.openh264
flatpak install --user flathub org.remmina.Remmina
flatpak run --user org.remmina.Remmina
Apache Guacamole
Apache Guacamole (HTML5, в браузере) предоставляет доступ к хосту без клиента, то есть без инсталляции на компьютер клиентской части. Работает просто через браузер. Последняя версия 1.4.0 вышла 1 января 2022 года.
Понятно, что браузерный клиент имеет определённые преимущества, поскольку запускается абсолютно на любом устройстве, где есть браузер, независимо от операционной системы.
Более того, сам десктоп необязательно должен существовать физически, это может быть просто виртуальная машина на сервере.
Из других RDP и VNC-клиентов под Linux можно упомянуть Vinagre, Boxes, TightVNC (для доступа к Windows-хостам), FreeRDP (xfreerdp/wlfreerdp, пакет для Debian) и rdesktop.
Telegram-канал и уютный чат
In this blog, you will learn the step-by-step procedure for installing and configuring an RDP server using XRDP on your Ubuntu 22.04. Furthermore, you will also learn how to access the RDP server from Windows.
Before beginning the procedure, let’s get familiar with the RDP and XRDP.
What is RDP?
RDP (stands for “Remote Desktop Protocol”) is a network protocol offered by Microsoft to share the graphical interface of a machine (server) and access it remotely from another machine (client), which is similar to a VNC Server in functionality.
It operates on a server/client model and is available for Windows. However, you can set up an RDP server on your Ubuntu by utilizing the XRDP tool.
What is XRDP?
XRDP stands for X Window System Remote Desktop Protocol, which is a popular open-source implementation of an RDP server that allows operating systems other than Windows to offer a complete functional RDP-compatible remote desktop experience.
In short, XRDP allows you to connect to a Linux machine from another computer using the Remote Desktop Connection (RDP) protocol, which is commonly used for remote access in the Windows, macOS, or Linux operating systems.
To install and configure the RDP server using XRDP in your Ubuntu, simply stick to the end of this guide and implement the provided procedure.
Let’s install the XRDP in Ubuntu, it’s a straightforward process, which ensures a smooth installation journey, run the following apt command to update the package index and upgrade the already installed packages:
$ sudo apt update && sudo apt upgrade -y
Once the system is updated and upgraded, install the XRDP from Ubuntu’s official repository by utilizing the stated command:
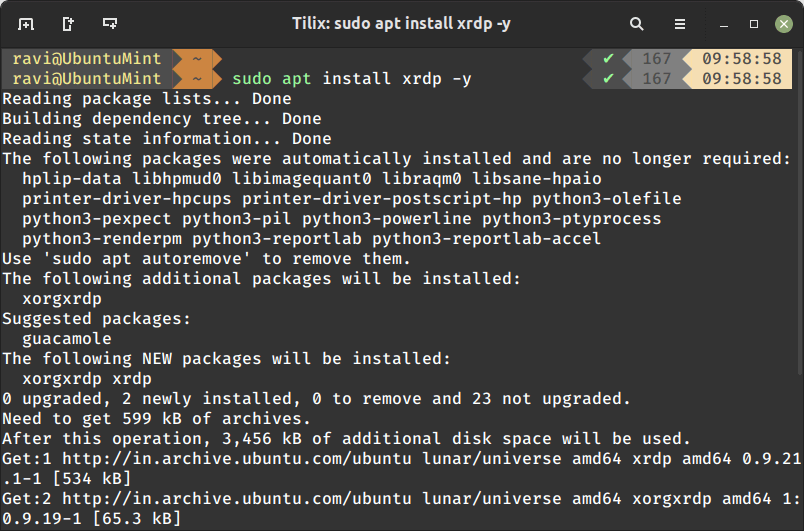
$ sudo apt install xrdp -y
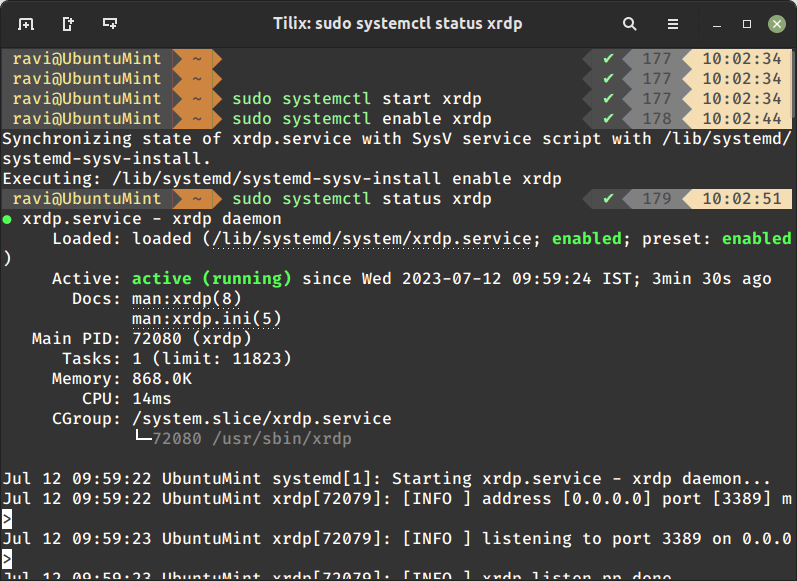
After successfully installing XRDP, start its service by executing the systemctl command:
$ sudo systemctl start xrdp
The next step is to enable XRDP to start automatically after reboot by running the following command:
$ sudo systemctl enable xrdp
Afterward, you can check the status of the XRDP service by using the “systemctl status” command:
$ sudo systemctl status xrdp
As we can see, the XRDP service is active and running, which means we have successfully installed the RDP server using XRDP. Now the next step is to configure our RDP server.
Configure XRDP in Ubuntu
The XRDP session utilizes a certificate key named “ssl-cert-snakeoil.key” which is located in the “/etc/ssl/” directory. To add the certificate key for the current user, run the following command:
$ sudo usermod -a -G ssl-cert xrdp
Now, let’s restart the XRDP services by running the provided command:
$ sudo systemctl restart xrdp
The next step is to configure the firewall by allowing the incoming connections to the XRDP server through port number “3389”. To do so, execute the command stated below:
$ sudo ufw allow 3389
As the firewall rule is updated, let’s reload the firewall by running the “ufw reload” command:
$ sudo ufw reload
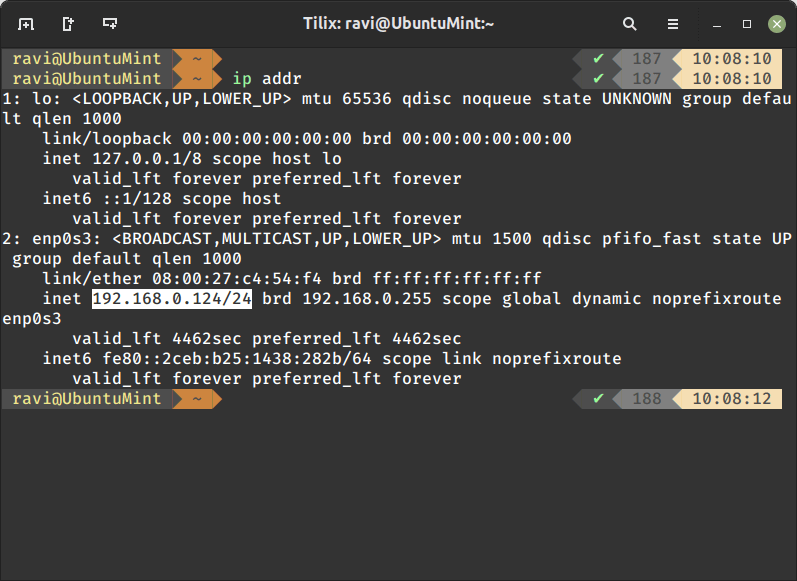
Now that the firewall is reloaded, we have successfully configured the XRDP server. Let’s execute the “ip” command to check the IP address of your Ubuntu:
$ ip addr
Point to Note: The latest RDP server does not allow users to create multiple sessions of a single user, so to sort out this issue we have two solutions.
Either create a new user and log in to the RDP client using the new user’s credentials or log out of the current session and log in to the RDP client using the current user’s credentials.
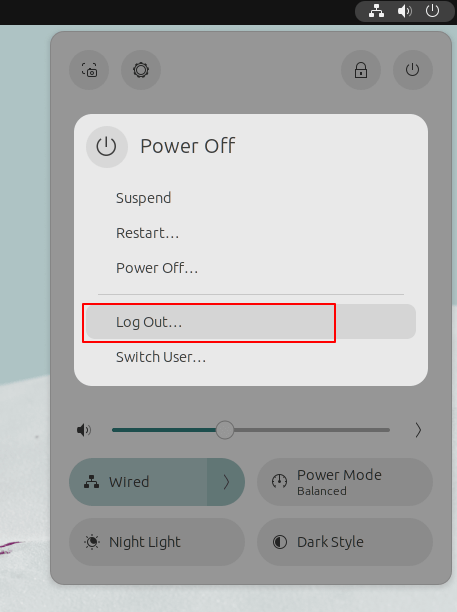
In this blog, we will log out of the current session so that we can access this server remotely without any error from the RDP client. For this purpose, click on the “Power” icon and then click on the “Power Off/ Log Out” drop-down list. Finally, click on the “Log Out” option:
Congrats! Finally, you are ready to access this RDP Server from your Windows machine.
Access Ubuntu Desktop Remotely from Windows
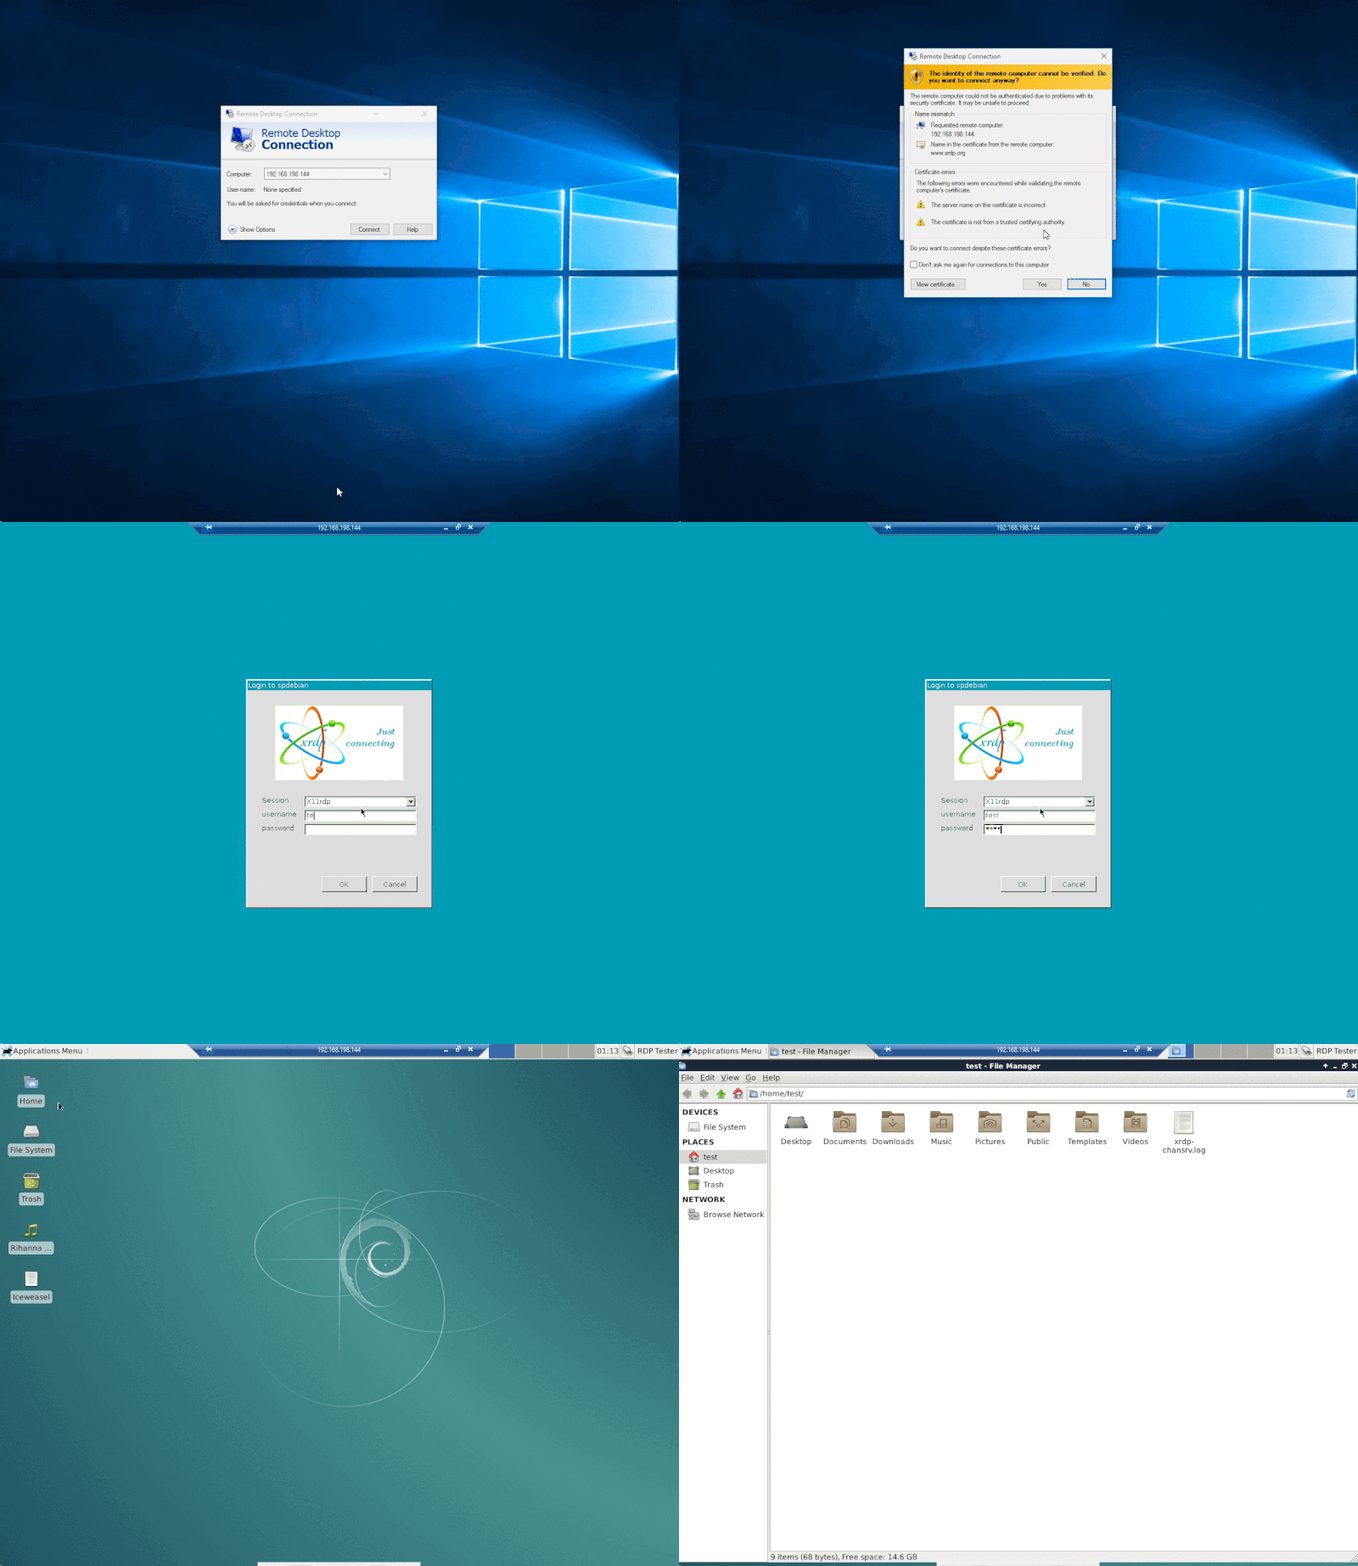
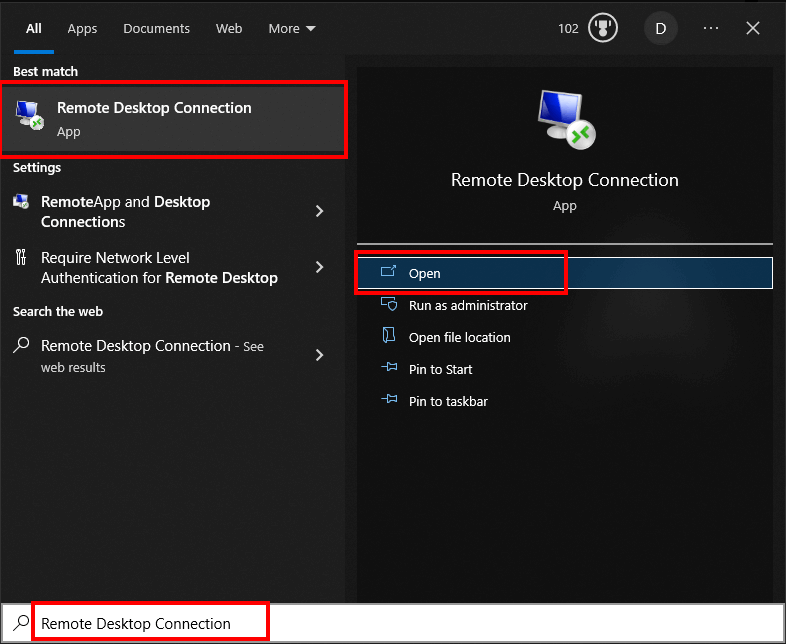
In the Windows machine, press the “Windows Logo + S” keys and search “Remote Desktop Connection”. Now, click on the “Open” button:
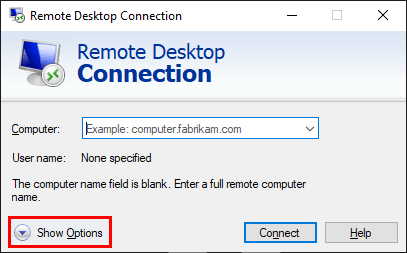
In the Remote Desktop Connection, click on the “Show Options”:
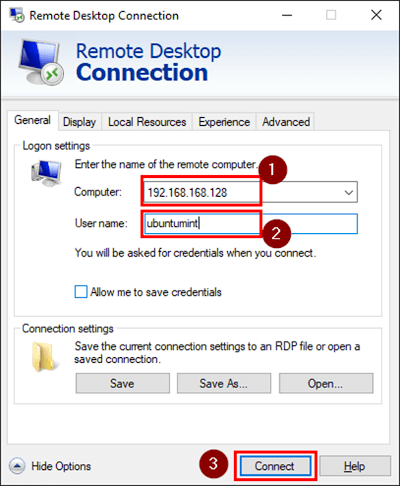
Now, provide the IP address of the RDP server in the “Computer” field and the “User name”. Then, click on the “Connect” button:
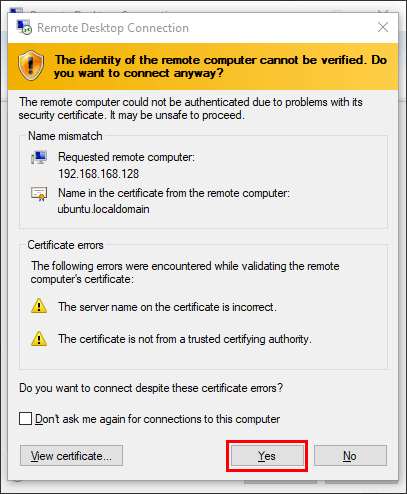
A window will prompt asking about the security concern, just simply press the “Yes” button:
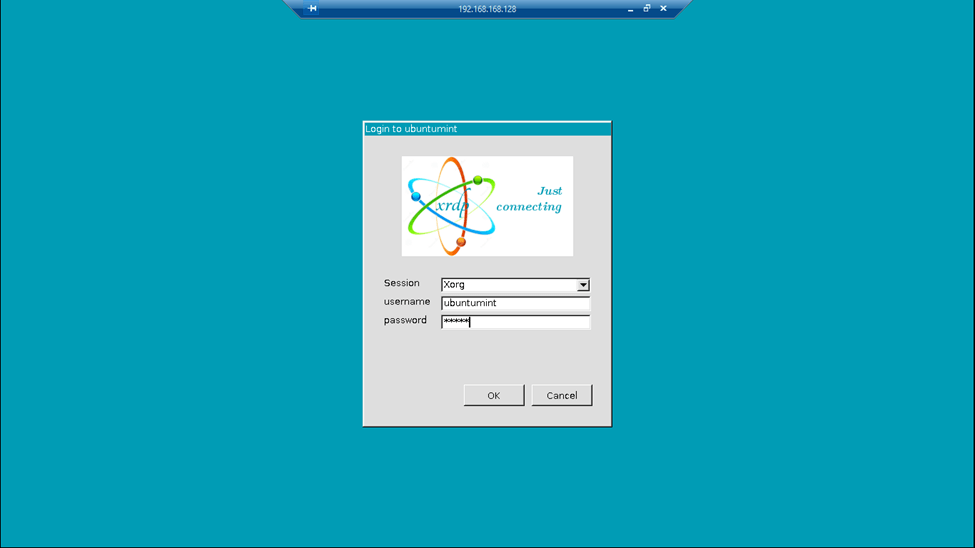
After doing so a login screen of XRDP will open, enter the “username” and “password”. Then, click on the “OK” button:
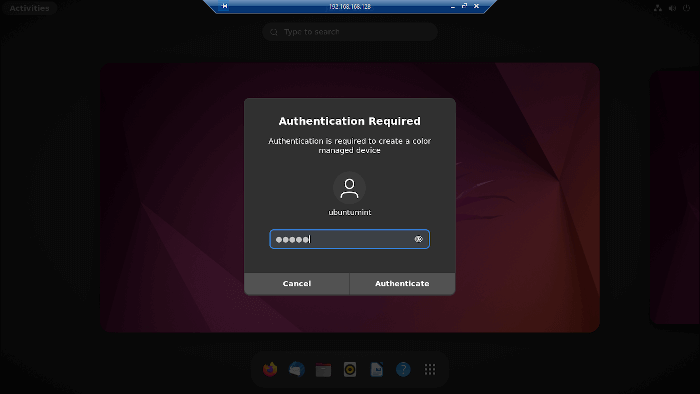
The authentication screen will pop up for confirmation, provide your Ubuntu password and click on the “Authenticate” button:
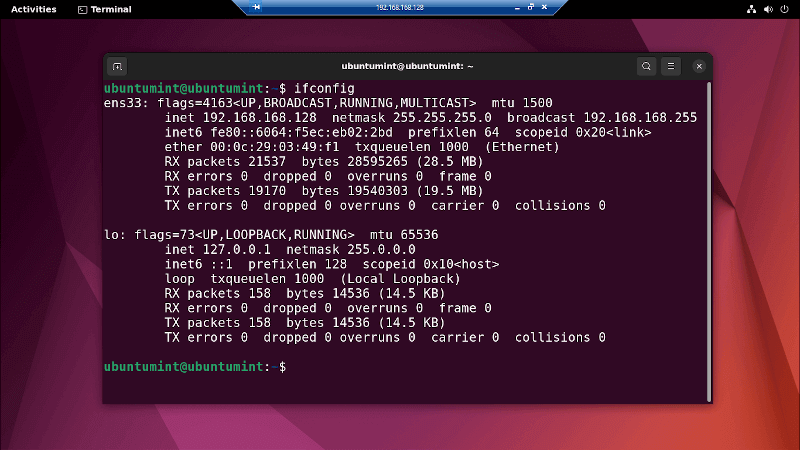
After the authentication, your RDP server will connect to your Ubuntu desktop successfully which can be then controlled easily. You can also execute Linux commands in your RDP server’s terminal. Here, we executed the “ifconfig” command in our RDP server from Windows:
Conclusion
RDP is a network protocol for sharing the graphical desktop environment of a Windows server. However, the user can set up the RDP server on Ubuntu by using the XRDP tool.
This guide provided a comprehensive solution for installing an RDP server using XRDP and then configuring it. Additionally, this blog provided the procedure for accessing this server from Windows.
That was all for now, I will see you soon with another interesting topic.
You must have heard about the Windows app “Remote Desktop Connection“. This application comes with default windows installation and allows you to access another PC or server remotely. It uses remote desktop protocol to establish remote desktop connection sessions.
Some of the Linux distributions may provide you RDP clients to connect to the Windows system. However, for some linux distributions you may need to install RDP clients to establish remote desktop connection.
As a Linux user there are some rdp tools available which you can install and use for windows remote connection. In this article we are going to explain how to install RDP clients on Ubuntu linux and use them to access (or connect) remote windows desktop.
Reminna
Reminna is a free,open source and powerful remote desktop client for remote desktop sharing. As it provides useful features most of the Linux and UNIX users adopt reminna client to connect remote desktop.
You can install reminna on your linux system by using the following command.
On Ubuntu,
$ sudo apt update
$ sudo apt install -y remmina remmina-plugin-vnc
Once remmina is installed on your system, you can access gui for remote desktop connection.
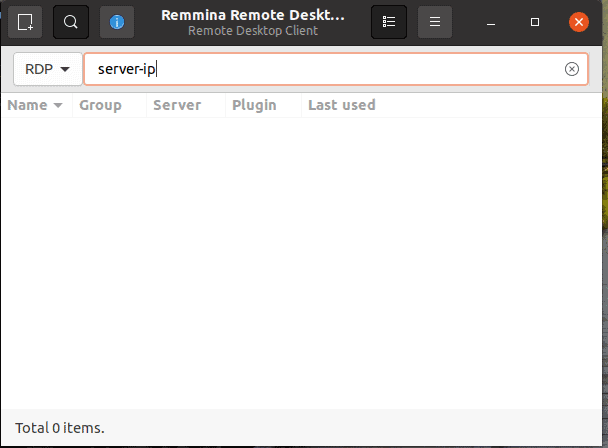
Enter your windows system IP address and press enter. You will be prompted for username and password details. Submit all the details and control your remote desktop.
Vinagre
Vinagre is an ssh, vnc and rdp client for the Gnome desktop environment. It has advanced features like connecting multiple servers simultaneously and switching between them using tab. Vinagre also supports copy/paste between client and server.
To install Vinagre on Ubuntu, use the following command.
$ sudo apt update
$ sudo apt install -y vinagre
After completing installation go to your application list and search for a remote desktop.
Click on the application as shown in the below image.
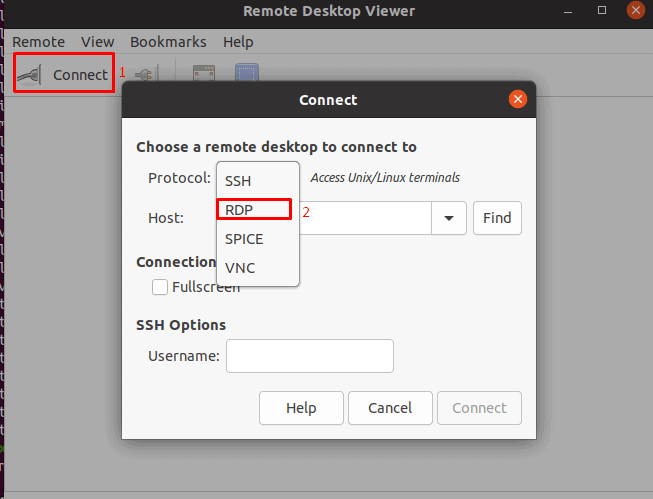
Click on Connect , select RDP from the drop down menu. Enter your remote desktop credentials and click connect.
KRDC
KRDC is a remote desktop tool designed for the KDE desktop environment. Installation of KRDC comes with two protocols VNC and RDP which gives you hassle free access to your remote desktop.
To install and configure KRDC in your system follow the commands:
$ sudo apt update
$ sudo apt install -y krdc
Once the installation is completed you are now good to use the KRDC client. You can type krdc in the command line which opens the new gui tool. You can also search krdc in your application list and launch
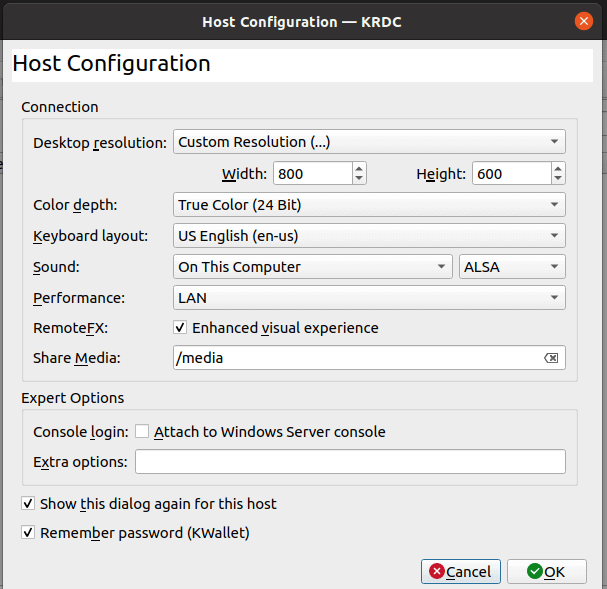
Click on the KRDC application and you will get the following gui on your screen.
Select RDP protocol from the drop down menu, enter your remote desktop IP address and click Enter.
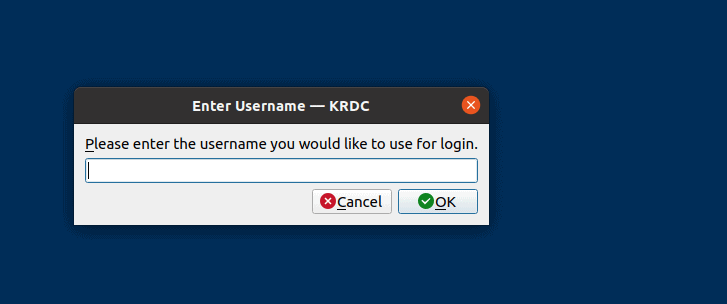
You can customize your configuration and once you are done with customization, click on ok. You will be asked to enter your username and password in the next prompt as :
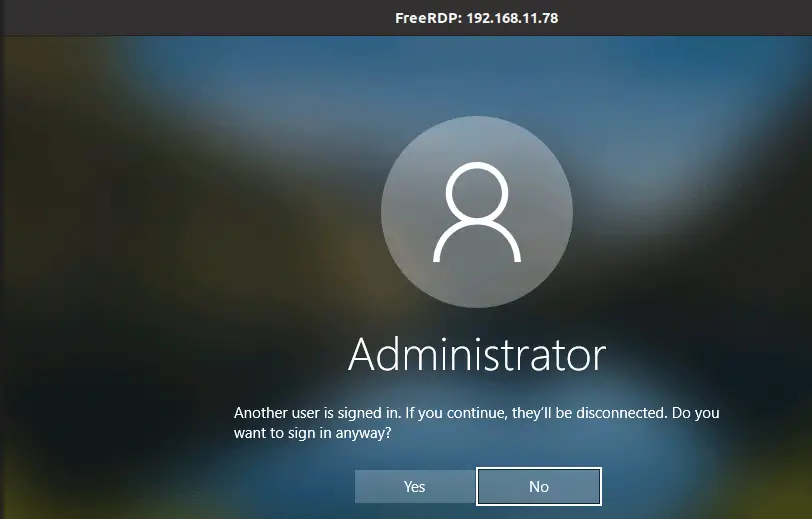
Enter your username and password as asked and you are ready to use your remote desktop.
FreeRDP
FreeRDP is a free and open-source client for the remote desktop protocol. FreeRDP is a portable rdp protocol released under Apache license. To install and configure freeRDP in Ubuntu use the following command. freerdp2-x11 performs installation of freeRdp client in Ubuntu.
$ sudo apt update
$ sudo apt install -y freerdp2-x11
Once the installation is complete, you can use following command to access your remote desktop
$ sudo xfreerdp /u:remote_user /p:remote_password /v:remote_host_ip
Once you run this command, you may get warning to accept certificates. Enter “yes” to the warning and now you will be able to access your remote desktop as:
Conclusion
From this article, you have learned how to access remote windows desktop from your linux machine. Also you got to know about different tools available for RDP connection, how to configure these tools and use for remote connection.
Also Read : Top 8 Music Player for Ubuntu and Linux Mint
Gnome 42 has a fantastic new feature that allows Linux users to share their desktops with Microsoft’s Remote Desktop Protocol remotely, namely GNOME remote desktop. In this tutorial, we’ll show you how you can use this great new feature.
Without this feature, an alternative solution is xrdp. However, xrdp cannot provide a consistent desktop environment as used in current Linux.
Enable Automatic Login and Disable Screen Lock
For the remote desktop to work on GNOME, we have to enable automatic login and disable automatic screen lock. Otherwise, it is unable to connect to the Linux PC remotely from Windows 10/11 using the Remote Desktop Connection app.
Enable Remote Desktop
For Ubuntu 22.04 (or other Linux distributions with GNOME>=42), the RDP-based remote desktop can be enabled from Settings ➜ Sharing ➜ Remote Desktop.
The username and password should be set in the authentication section.
The image below shows the Ubuntu desktop connected from Microsoft Remote Desktop (for macOS).
For several distributions like Arch Linux, the remote desktop client may show a blank/black screen after connected.
The following command may help (run as root), where the archuser should be replaced with your username.
groupadd pipewire
usermod -a -G pipewire archuser
mv /etc/pipewire /tmp/pipewire
pacman -S pipewire pipewire-media-session gst-plugin-pipewire
reboot
The image below shows the Arch Linux desktop connected from Microsoft Remote Desktop (for macOS).
References
- https://linuxhint.com/enable-remote-desktop-ubuntu-access-from-windows/
- https://www.addictivetips.com/ubuntu-linux-tips/how-to-use-the-new-gnome-shell-remote-desktop-feature/
- https://forum.manjaro.org/t/gnome-remote-desktop-blank-screen/122345/4
