Use Remote Desktop on your Windows, Android, or iOS device to connect to a Windows 10 PC from afar. Here’s how to set up your PC to allow remote connections and then connect to the PC you set up.
Note: While a Remote Desktop server (as in, the PC that you are connecting to) needs to be running a Pro edition of Windows, a client machine (the device you are connecting from) can be running any edition of Windows (Pro or Home), or even a different operating system altogether.
-
Set up the PC you want to connect to so it allows remote connections:
-
Make sure you have Windows 11 Pro. To check this, select Start , and open Settings . Then, under System , select About , and under Windows specifications, look for Edition. For info on how to get Windows 11 Pro, go to Upgrade Windows Home to Windows Pro.
-
When you’re ready, select Start , and open Settings . Then, under System , select Remote Desktop, set Remote Desktop to On, and then select Confirm.
-
Make note of the name of this PC under PC name. You’ll need this later.
-
-
Use Remote Desktop to connect to the PC you set up:
-
On your local Windows PC: In the search box on the taskbar, type Remote Desktop Connection, and then select Remote Desktop Connection. In Remote Desktop Connection, type the name of the PC you want to connect to (from Step 1), and then select Connect.
-
On your Windows, Android, or iOS device: Open the Remote Desktop app (available for free from Microsoft Store, Google Play, and the Mac App Store), and add the name of the PC that you want to connect to (from Step 1). Select the remote PC name that you added, and then wait for the connection to complete.
-
-
Set up the PC you want to connect to so it allows remote connections:
-
Make sure you have Windows 10 Pro. To check this, go to Start > Settings > System > About and look for Edition. For info on how to get Windows 10 Pro, go to Upgrade Windows 10 Home to Windows 10 Pro.
-
When you’re ready, select Start > Settings > System > Remote Desktop, and turn on Enable Remote Desktop.
-
Make note of the name of this PC under How to connect to this PC. You’ll need this later.
-
-
Use Remote Desktop to connect to the PC you set up:
-
On your local Windows PC: In the search box on the taskbar, type Remote Desktop Connection, and then select Remote Desktop Connection. In Remote Desktop Connection, type the name of the PC you want to connect to (from Step 1), and then select Connect.
-
On your Windows, Android, or iOS device: Open the Remote Desktop app (available for free from Microsoft Store, Google Play, and the Mac App Store), and add the name of the PC that you want to connect to (from Step 1). Select the remote PC name that you added, and then wait for the connection to complete.
-
Enable Remote Desktop
Need more help?
Want more options?
Explore subscription benefits, browse training courses, learn how to secure your device, and more.
Communities help you ask and answer questions, give feedback, and hear from experts with rich knowledge.


*We updated this article to include the tutorial for Windows 11.
Microsoft Remote Desktop provides an easy-to-use option to connect to a remote computer. As long as the remote computer is turned on and remote desktop connections are allowed, you can enjoy full remote access to run programs, access files, and all peripheral devices.
Read on for an in-depth guide on how to create a remote desktop connection using a classic Remote Desktop Connection or a modern Remote Desktop app for Windows 10 and 11.
Note: Remote Desktop enables remote device access only on Windows Pro and Business. Hence, you will not be able to gain remote access to a computer running Windows 10 and 11 Home editions. To find out your Windows version, check your computer’s System properties.
To connect to a remote PC, you should allow the Remote Desktop in Windows 10 or Windows 11 settings or via the Control Panel first as it is disabled by default.
Enable Remote Desktop Access In Windows 10 Settings
The steps to permit Remote Desktop on the Windows 10 machine via the Settings app:
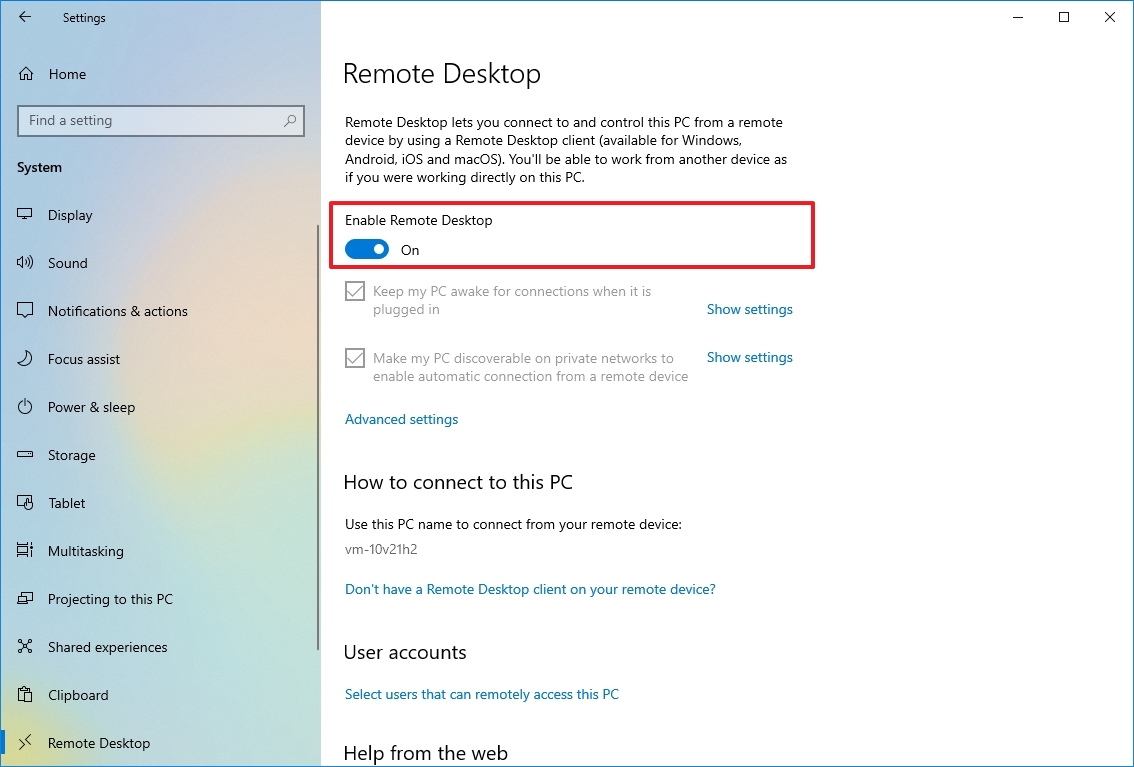
- Go to Start → Settings → System → Remote Desktop.
- Change the position of the “Enable Remote Desktop” slider to On.
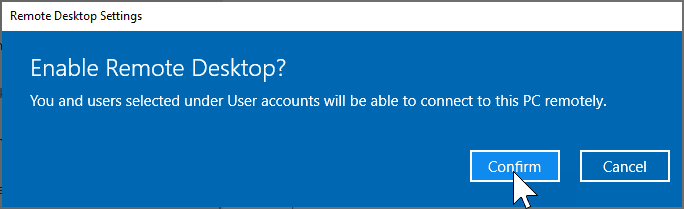
- Click the “Confirm” button in the invoked Remote Desktop Settings window.


After that, every user in your local network having administrator permissions will be able to connect to this Windows 10 computer remotely.
Enable Remote Desktop In The Windows 11 Settings
If your machine runs the latest OS, then you should not experience any issues with enabling Remote Desktop in the Windows 11 setting as the steps are pretty much similar.
- Open Start → Settings → System → Remote Desktop.

- Change the slider position from “Off” to “On”, and click “Confirm” in the “Remote Desktop Settings” window.


That’s all you need to do to successfully enable Remote Desktop on your Windows 11 PC via the Settings app.
Allow Remote Access To Your Computer Via The Control Panel
For old-time Windows users, Control Panel is a more universal method allowing Remote Desktop access on their computers.
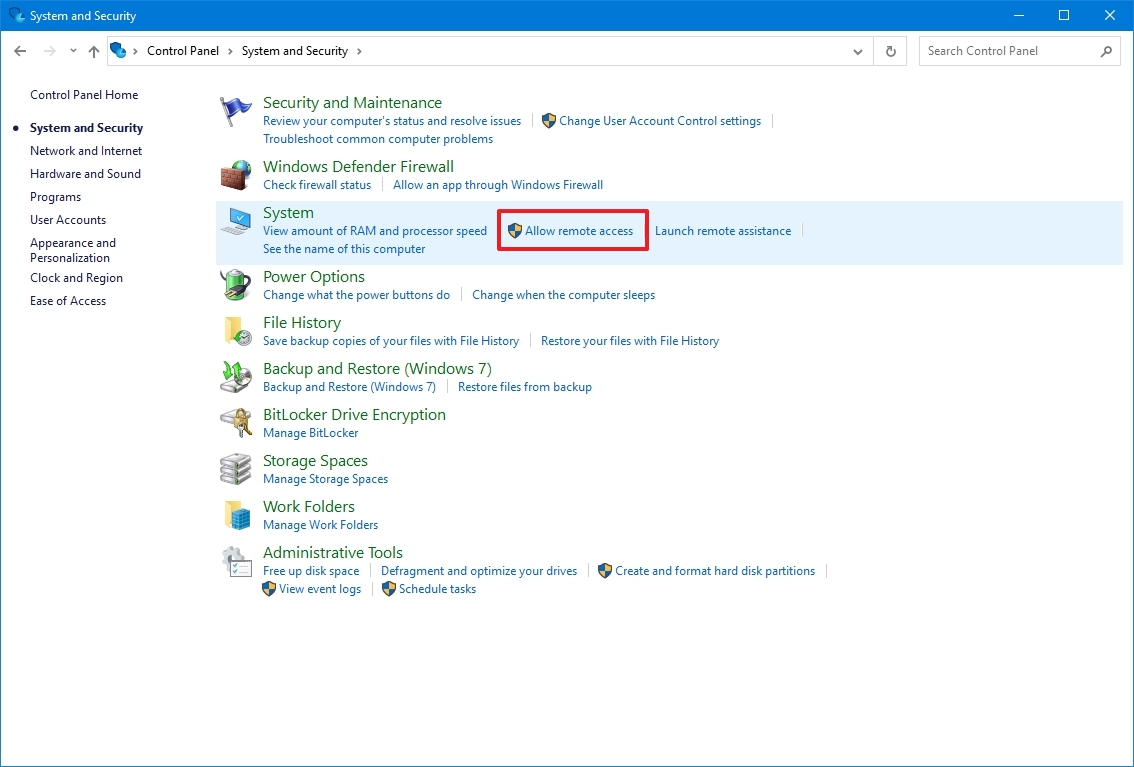
- Launch the Control Panel from the Start menu or the search box.
- Click the “System and Security” option.

- Select the “Allow remote access” option under the “System” category.

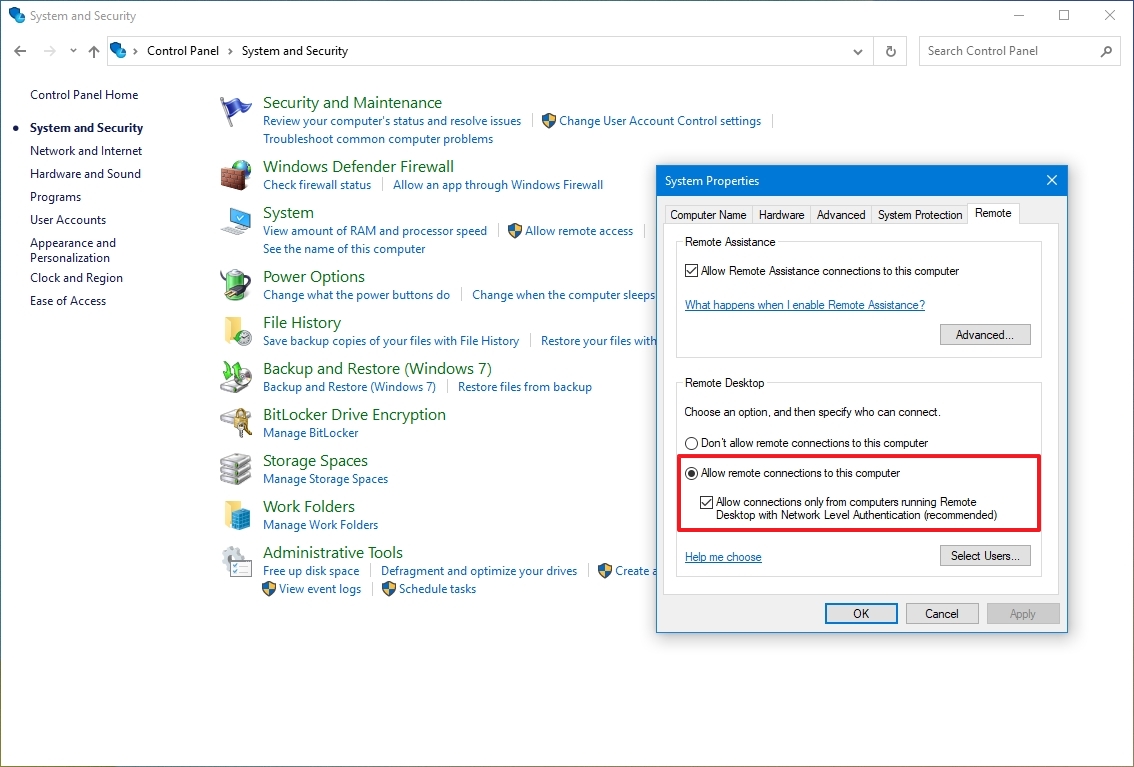
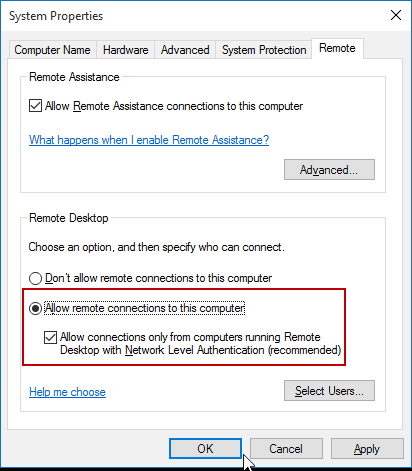
- Click the “Allow remote connections to this computer” radio button in the Remote Desktop section.

- Ensure that the “Allow connections only from a computer running Remote Desktop with Network Level Authentication (recommended)” checkbox is in position.
- Click “Apply” and “OK” to save changes.


Now that you made your computer accessible via the Remote Desktop Protocol, you can proceed and connect to it remotely.
If your computer is behind a firewall, you should configure it accordingly to enable remote connections. The only exception to this is if you are using Microsoft Defender. Windows will then add the required rules to allow remote connections through your firewall.
To find out how to disable remote access to your computer, you should read our guide for Windows 10 and 11.
How To Use The Remote Desktop App For Windows 10 & 11
The new Microsoft Remote Desktop app for Windows 10 and 11 gradually replaces the traditional Remote Desktop Connection application. Redesigned with the user experience in mind, the app is easy to use and provides all the necessary features and settings for accessing remote computers.
Steps to install the Remote Desktop app
Firstly, you should install the Microsoft Remote Desktop app which can be downloaded right from the branded store.
- Open the Microsoft Store app.
- Search for the “Microsoft Remote Desktop” app.
- Download and install the app onto your machine by clicking the “Install” button.


When the installation is complete, you will see the application on your Start Menu, or you can run the application directly from within the Microsoft Store.
Connecting to a remote computer with the Microsoft Remote Desktop app
Once you are all set, you are ready to make a remote connection. Follow these steps:
-
Launch the Remote Desktop app.
-
Select the “➕ Add” option from the top menu options. Choose “PCs” from the available options.

-
Enter the required details in the text fields. In the “PC Name” field, use the computer’s TCP/IP address to connect to a remote desktop:
◦ Use the local IP address for remote computers that are within a private network.
◦ For devices on a public network or if you’re connecting via the internet, use the computer’s public IP. -
Click the ➕ option next to the User account section.
-
You will need to confirm the account login details to sign in to the remote computer:
◦ Use the computer’s Microsoft account login details.
◦ If the remote device does not have a Microsoft login account, then simply use the local username and password. -
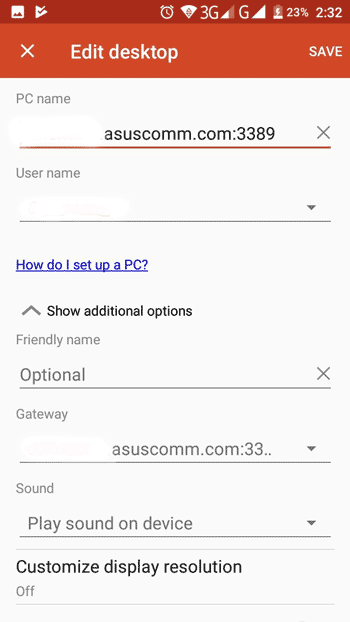
Additionally, you can specify a nickname for the connection in the optional “Display name” field.
-
Click the “Show more” arrow.
There, you can configure the additional settings parameters if necessary. The parameters include resolution settings of the remote session, the option to connect as an admin, etc. These settings are optional and you can leave them as the default values. -
When done click “Save” to confirm your settings.
-
You’ll notice a “Saved Desktops” section within the app. Click the computer icon to connect to a remote Windows 10 or 11 desktop to start your remote session.
-
You’ll be prompted about a certificate the first time you connect. You can select the “Don’t ask about this certificate again” option to prevent seeing this each time you connect.
-
Click “Connect” to start the remote session.


 There, you can configure the additional settings parameters if necessary. The parameters include resolution settings of the remote session, the option to connect as an admin, etc. These settings are optional and you can leave them as the default values.
If you’ve successfully followed all the steps and configured your app correctly, you will now be able to access your remote Windows 11(10) device.
To terminate a session, simply close the app, or click the “…” link to access the “Disconnect” option.
Windows Remote Desktop app settings overview
You may find you need to make changes to your setup configuration. Changes to Windows 10 or 11 remote access settings can be done quite easily.
Changing general settings
To make any configuration changes to the app, simply open the settings page:
- Open the app.
- Select “⚙️Settings”.
- Select the user account that you wish to edit.
- Click the “Edit” option (🖊️ icon).
- When done, simply click “Save”.


If you need to create additional user accounts, you would do this in the settings screen. Simply click the ➕ plus button. You may want to connect to different devices with different user accounts or you may be sharing with other users.
You’ll notice there’s an option to select a Gateway server, although you’ll find that there is rarely any need in using it.
You can also create groups and organize your users into specific groups. This doesn’t change the functionality at all, but simply provides a means to organize your user accounts should you have many different users.
Adjust session settings
The steps to edit your Remote Desktop session settings are as follows:
- Launch the Remote Desktop app.
- Select the “Settings” option from the top menu bar.
- You can toggle whether you want the remote connection to start in full screen or not.
- You can opt for new connections to open in a new window or not.
- You can even determine how the app should handle the remote desktop display when the app is resized. Available options include:
◦ Stretch the content, preserving the aspect ratio (recommended).
◦ Stretch the content.
◦ Show scroll bar. - You can determine whether keyboard shortcuts like Ctrl+C(Copy) work within the remote desktop session. To change the options select the “Use keyboard command with a” dropdown and select from the available options:
◦ My local PC only.
◦ My remote session when it’s in full screen (recommended).
◦ My remote session when it’s in use. - You can also toggle the option to prevent the screen from timing out.


The Remote Desktop app also offers a preview feature that shows a snapshot of the remote machine helping with determining the right connection.
Changing connection settings
Follow the following steps to make connection setting changes:
- Open the app.
- Select the additional options (“…”) from the saved desktop that you want to edit.

If you want to delete a connection, simply select “Remove” from the additional options menu (“…”).
When done your changes will be saved automatically and the changes will take effect immediately.
How To Use Classic Windows Remote Desktop Connection App
The classic Remote Desktop Connection application is still very popular among Windows users. Unlike the modern counterpart, this software package comes pre-installed with every Windows version so you don’t have to go to a store to download it and can start using it right away.
How to create a remote desktop connection
Follow these steps to initiate a remote desktop session with a distant PC:
- Open Windows search and type “remote desktop connection” to search for the RDC app. Then, click on “Open” to launch the Remote Desktop Connection app.

- Select the IP address or name of the computer that you want to connect to. Type your username in the User name field. For ease of use for future connections, you can save your credentials by selecting the “Allow me to save credentials” checkbox.
- To connect to a remote computer via Remote Desktop Connection, click the “Connect” button.

- Enter your account password when prompted to do so. Check the “Remember Me” checkbox to avoid having to enter your credentials each time you connect to a remote desktop.
- If you see an alert that the identity of the remote computer can not be verified, you can ignore it, and simply tick the “Don’t ask me again for connections to this computer” to dismiss the message and remember your choice. When done, click “Yes” to save and continue.

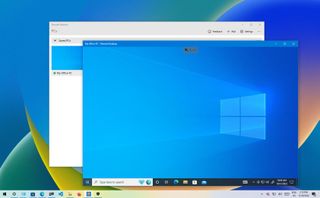
- The remote computer’s toolbar at the top of the screen will indicate that you have successfully launched a remote desktop session.


Closing the remote session window will terminate the remote connection.
The classic Remote Desktop Connection app’s settings
Use the Remote Desktop Connection setup screen to change the remote session’s settings. The following are available options:
Summing Up
So, now you should be equipped with all the necessary knowledge on using Microsoft Remote Desktop. We have reviewed all the different methods that will help you enable remote access to your computer and then connect to it with the classic Remote Desktop Connection or the modern Remote Desktop app for Windows 10 and 11. Should you need to tweak any remote desktop settings, you can come back to this article at any time to read more detailed info about them.
Frequently Asked Questions
There may be over a dozen different reasons why your remote desktop connection is not working. The network connectivity issues, like Firewall blocking the Remote Desktop application, are the most common ones. For a quick fix, go to the Firewall settings and add Remote Desktop to the exclusion list.
Remote Desktop Connection allows you to remotely view and share your local files and folders using RDP. To transfer files over RDP, open Remote Desktop Connection, click “Show Options” and go to the “Local Resources” tab. Finally, click “More” at the bottom, under the Local devices and resources section, and check the “Drives” box to share your local files and folders.
If you prefer, you can enable Remote Desktop using Command Prompt. An example of a command to enable remote desktop:
reg add "HKEY_LOCAL_MACHINE\SYSTEM\CurrentControlSet\Control\Terminal Server" /v fDenyTSConnections /t REG_DWORD /d 0 /f
When using the Command Prompt, use the Run as administrator option.
(Image credit: Future)
On Windows 10, the «Remote Desktop» app makes connecting to other computers easy over the local network and internet. It’s also the experience that replaces the built-in legacy «Remote Desktop Connection» program, which is still available.
The app is user-friendly, but depending on the computer you need to establish a connection, the app is only one of the steps since you may have to configure additional settings, including forwarding the appropriate port in the router to connect to another device. Also, there’s a small problem. You can install the Remote Desktop app on any edition of Windows 10. However, the remote desktop protocol (RDP) that makes the connection possible is only available on the «Pro» edition and business variants of the operating system. (Windows 10 Home doesn’t allow remote connections.)
This guide will walk you through the steps to allow remote connections from within the local network or internet and how to use the Remote Desktop app to start a remote session.
How to allow remote connections on Windows 10
Remote Desktop makes it easy to connect to other computers. However, the configuration will depend on whether the connection happens over the local network or through the internet.
Enable remote connections
In a local area network (LAN), you only need to enable the option to allow remote desktop connections on your computer. You can complete this task from the Settings app or Control Panel.
Settings app
To enable the Remote Desktop feature using the Settings app, use these steps:
- Open Settings.
- Click on System.
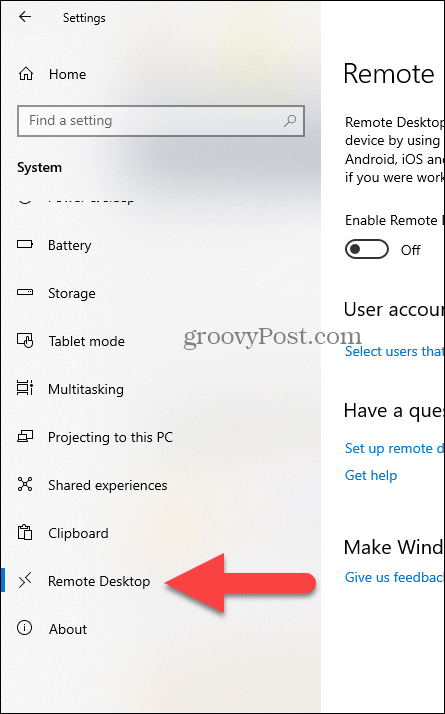
- Click on Remote Desktop.
- Turn on the «Enable Remote Desktop» toggle switch.
- Click the Confirm button.
Once you complete the steps, remote desktop connections will be allowed on the device. Windows 10 will also add the necessary rules in the built-in Microsoft Defender Firewall. However, you may need to configure the rules manually if you have a third-party security solution.
Control Panel
To enable remote connections on Windows 10, use these steps:
- Open Control Panel.
- Click on System and Security.
- Under the «System» section, click the «Allow remote access» option.
- Click the Remote tab.
- Under the «Remote Desktop» section, check the «Allow remote connections to this computer» option.
- Check the «Allow connections only from computers running Remote Desktop with Network Level Authentication» option.
- Click the OK button.
- Click the Apply button.
- Click the OK button.
Continue with the steps below if you need to configure a remote desktop using an internet connection. If you have to connect to another device within the local network, skip to the steps below, and continue with the start a remote desktop connection instructions.
Enable remote connections on router
If the remote connection happens over an internet connection, you will also have to configure the router to allow the remote connection. In addition, you will need to know the public address to contact the remote computer.
Configure static IP address
A computer usually receives a dynamic IP address from the DHCP server (router), which means it can change. If you plan to use the remote desktop feature for some time, you may want to configure a static IP address to avoid reconfiguring port forwarding on the router when the device changes the network configuration.
Control Panel
To configure a permanent network configuration, use these steps:
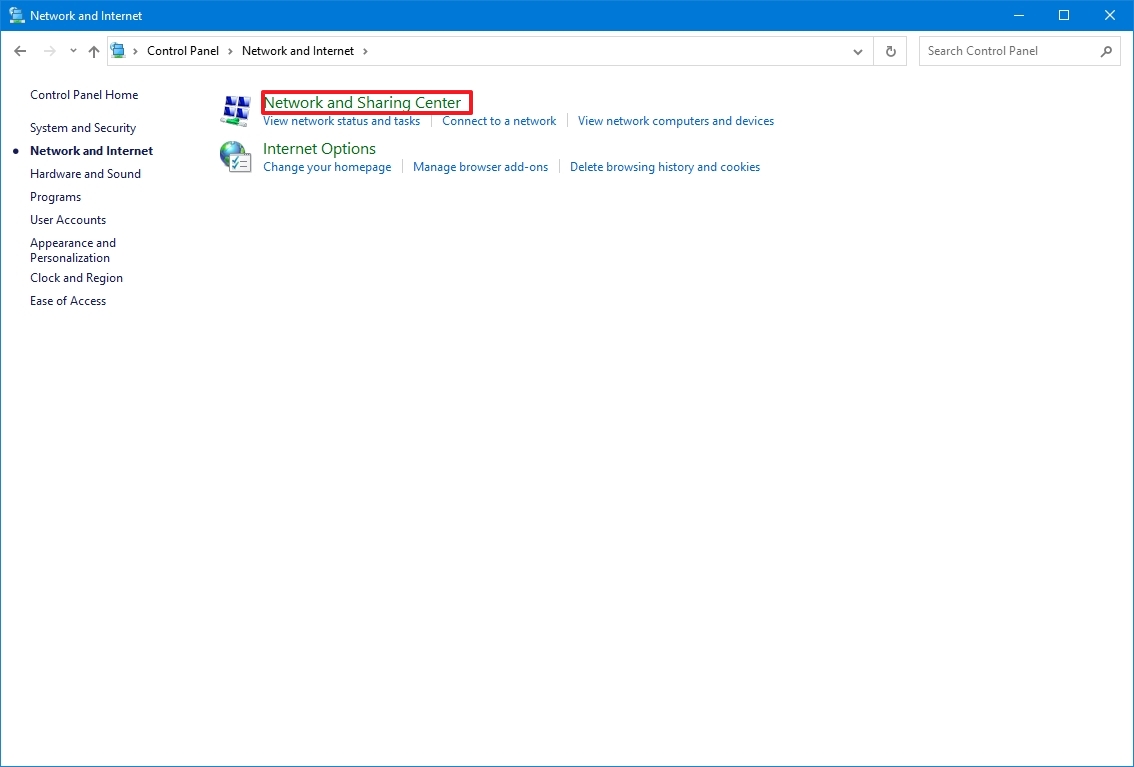
- Open Control Panel.
- Click on Network and Internet.
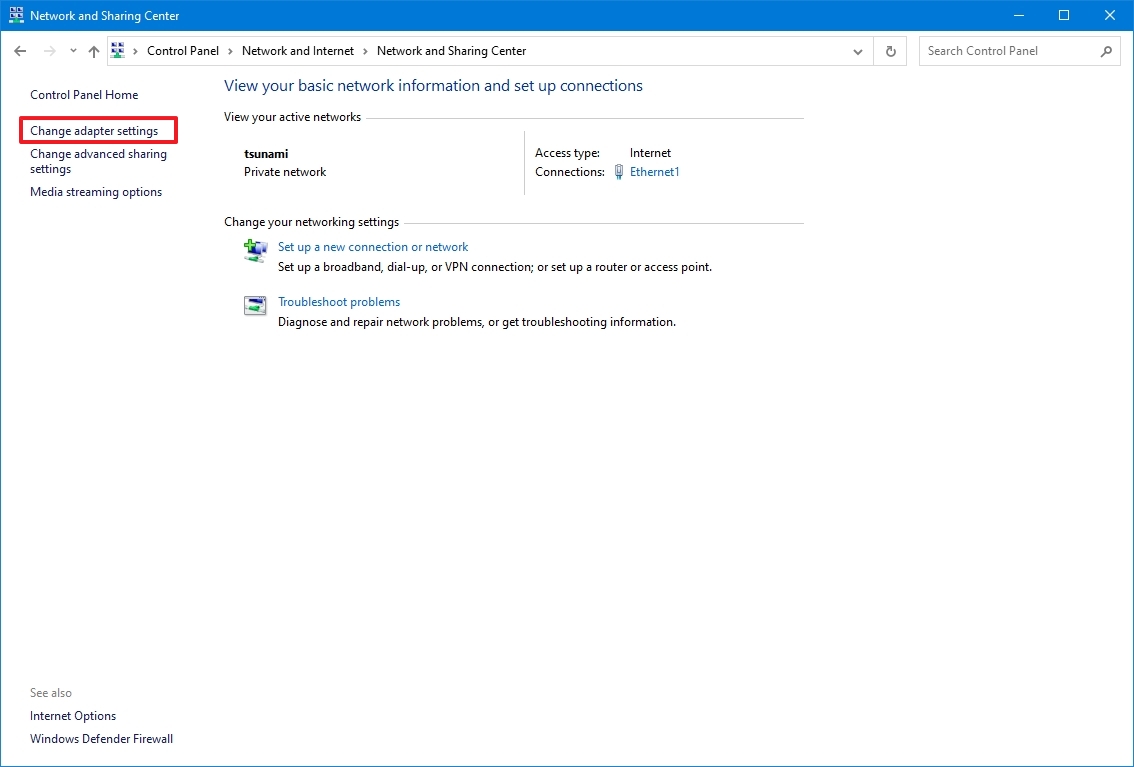
- Click on Network and Sharing Center.
- Click the «Change adapter settings» option from the left navigation pane.
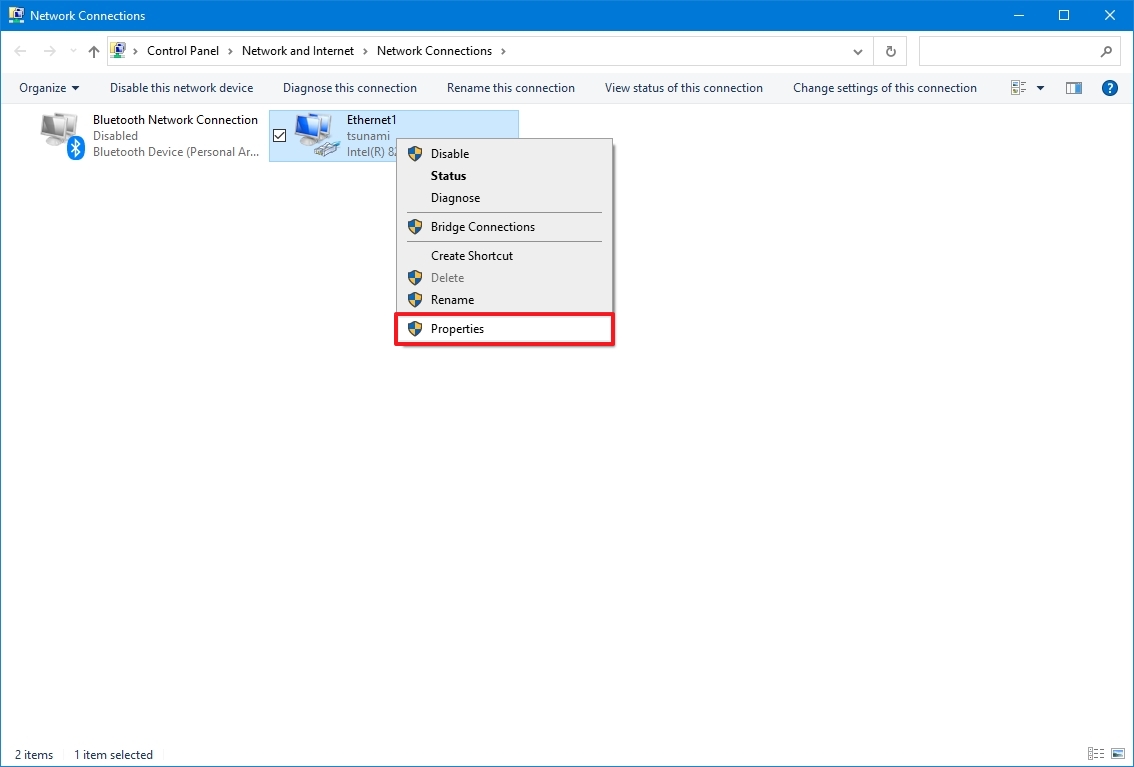
- Right-click the active network adapter and select the Properties option.
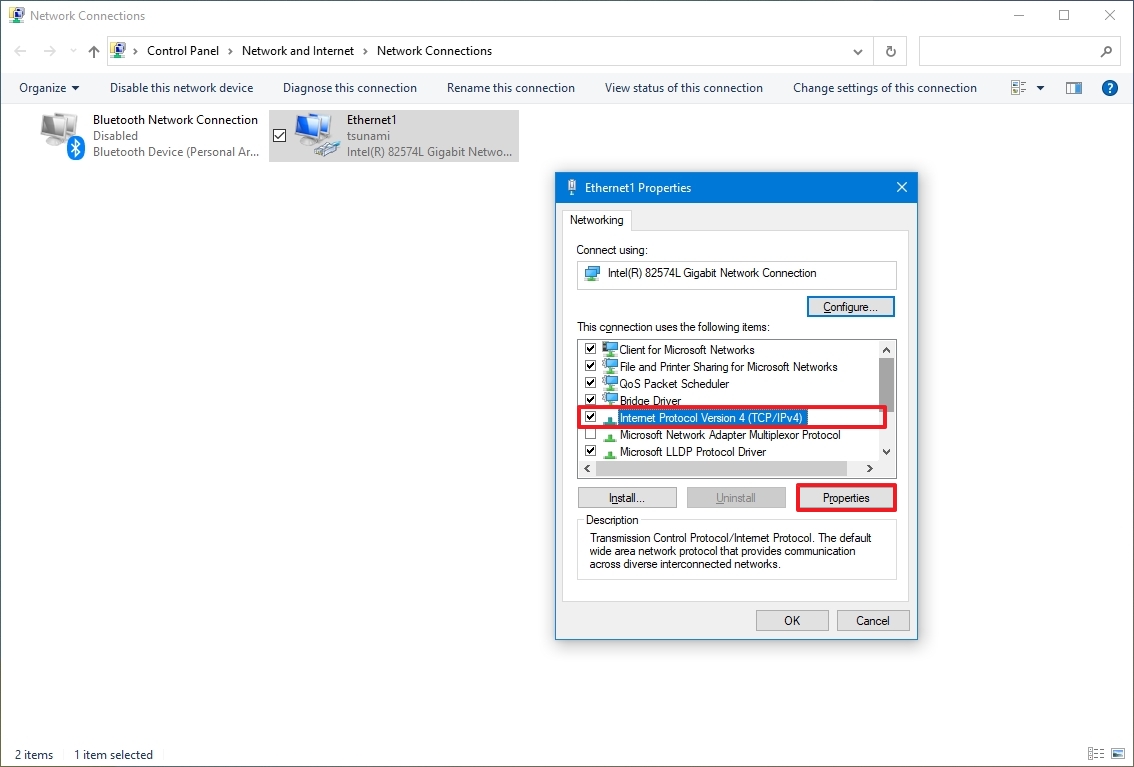
- Select the «Internet Protocol Version 4 (TCP/IPv4)» option.
- Click the Properties button.
- Click the General tab.
- Select the «Use the following IP address» option.
- Specify a local IP address outside the local DHCP scope to prevent address conflicts – for example, 10.1.4.201.
- Quick tip: Usually, you’ll find this information inside the DHCP settings section on the router. Since not every router is created equal, you may need to consult your manufacturer support website for more specific details to find this information. If you’re unsure of the configuration you have to use, use your current TCP/IP configuration as a reference, which you can review with the ipconfig /all command in Command Prompt.
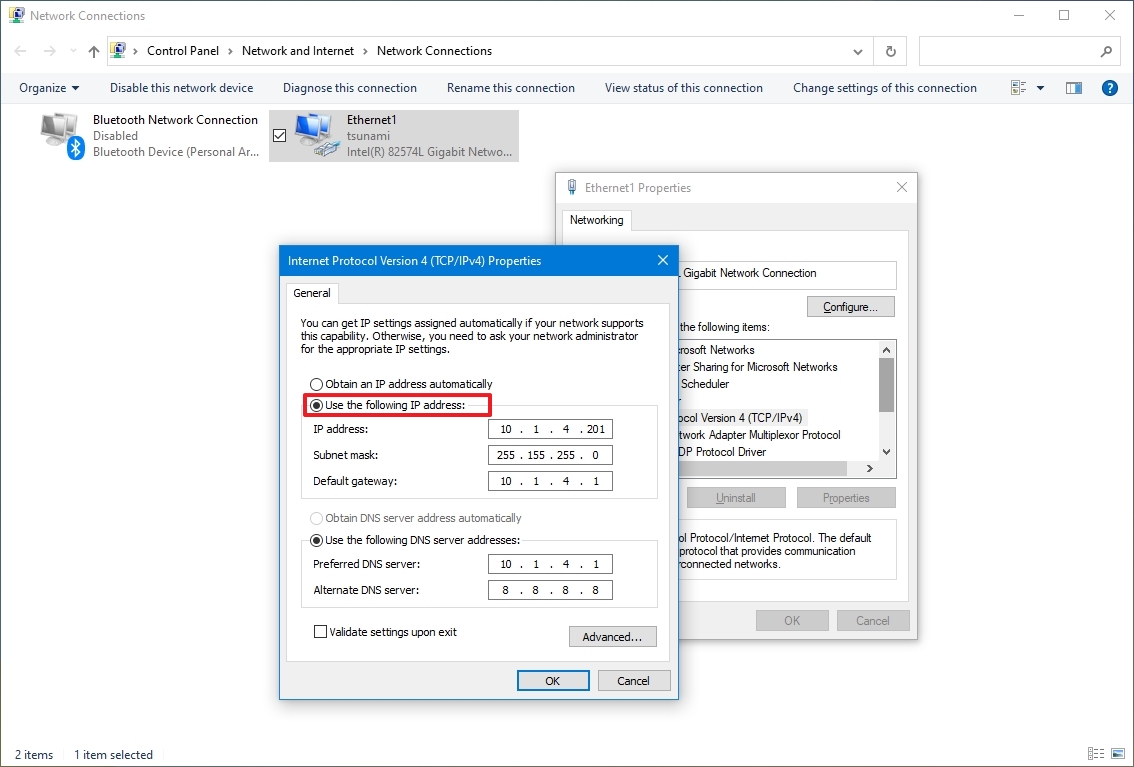
- Specify a subnet mask for the network (255.255.255.0), but the system usually fills this information from you based on the «IP address.»
- Specify the default gateway address, which should be the router’s address — for example, 10.1.4.1.
- Under the «Use the following DNS server addresses» section, in the «Preferred DNS server» field, specify the IP address of your DNS server, which in most cases is also the router’s address — for example, 10.1.4.1.
- Quick tip: If you can’t connect to the internet, try using one of the Google Public DNS addresses (such as 8.8.8.8) for the «Alternate DNS server» option.
- Click the OK button.
- Click the Close button.
After you complete the steps, the network configuration will apply, and the IP settings will never change.
Some routers include a feature to make the current TCP/IP configuration static. If you want to use this option, consult your manufacturer support website for specific steps to complete this task.
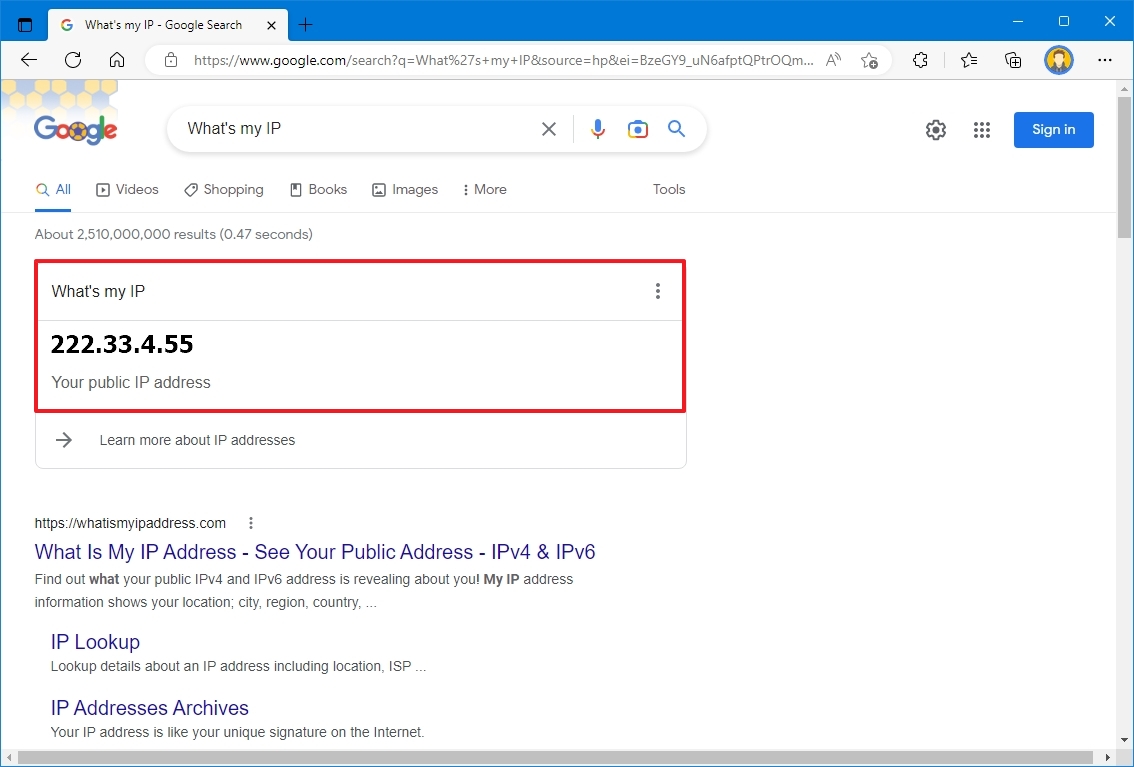
Identify network public IP address
You will also need the remote network’s public IP address to contact the device over the internet.
To determine the IP address assigned by the Internet Service Provider (ISP), use these steps:
- Open the web browser.
- Visit Bing.com or Google.com.
- Search for «What’s my IP.»
- Confirm the public IP address in the first result.
Typically, internet providers also offer dynamic public IP addresses for residential customers, which means that your public IP address may change from time to time.
If you need a more reliable solution, you may want to look into «Dynamic Domain Name System» (DDNS) services (such as DynDNS, OpenDNS, No-IP, or Asus.com for Asus routers), which can track public IP changes. Alternatively, you can also contact your ISP to request a static IP address, which might cost you extra since this is typically a feature reserved for businesses.
Configure port forwarding
You must also forward the TCP port 3389 on the router to allow connections through the internet to the computer in the local network.
Quick note: The router interface experience can vary depending on the manufacturer. However, you can use these instructions as a reference to configure your router. You can always check the manufacturer support website for more specific details.
To forward a port on your router, use these steps:
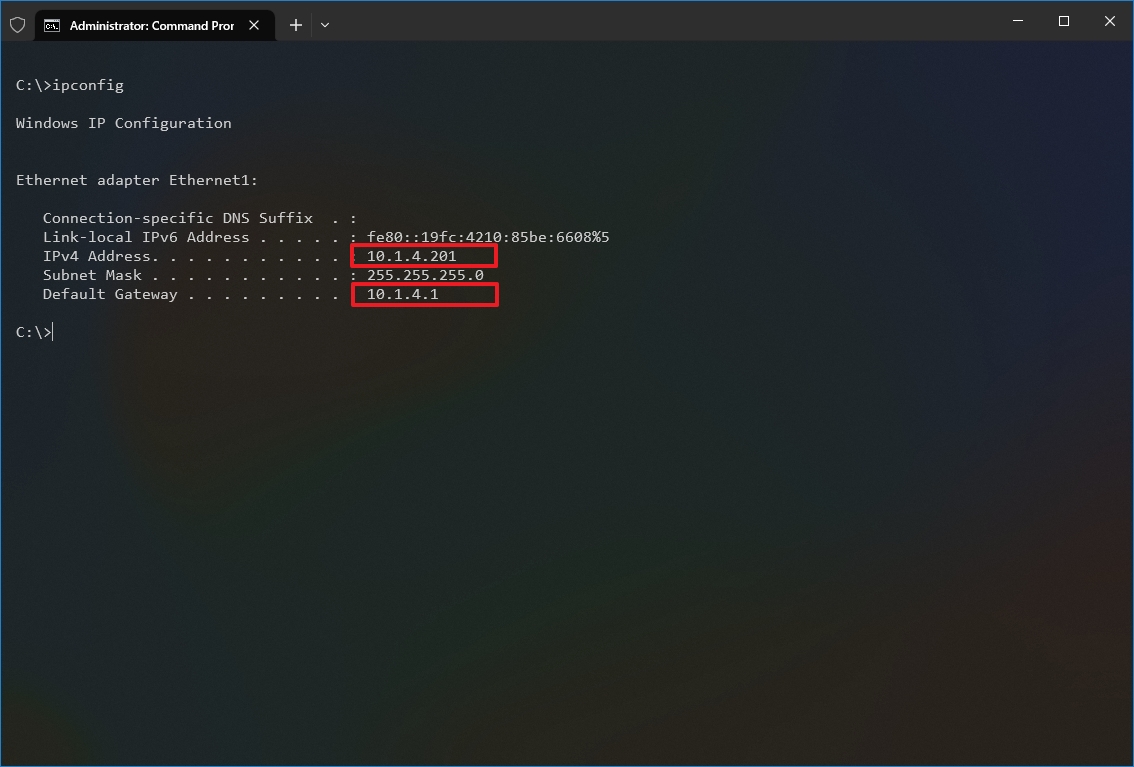
- Open Start.
- Search for Command Prompt and click the top result to open the app.
- Type the following command to check the current TCP/IP configuration and press Enter: ipconfig
- Under the «IPv4 Address» field, confirm the device address — for example, 10.1.4.201.
- Under the «Default Gateway» field, confirm the device gateway address (the router address) — for example, 10.1.4.1.
- Open your preferred browser.
- Type the router’s IP address (default gateway) in the address bar and press Enter.
- Sign in to the router using the correct username and password.
- Quick tip: If you have never done this, and you are using the router provided by the ISP, you may be able to find the information on a sticker attached to the device.
- Open the Port Forwarding settings page.
- Confirm that the Port Forwarding service is enabled (if applicable).
- Under the port forwarding list, click (in this case) the Add profile button.
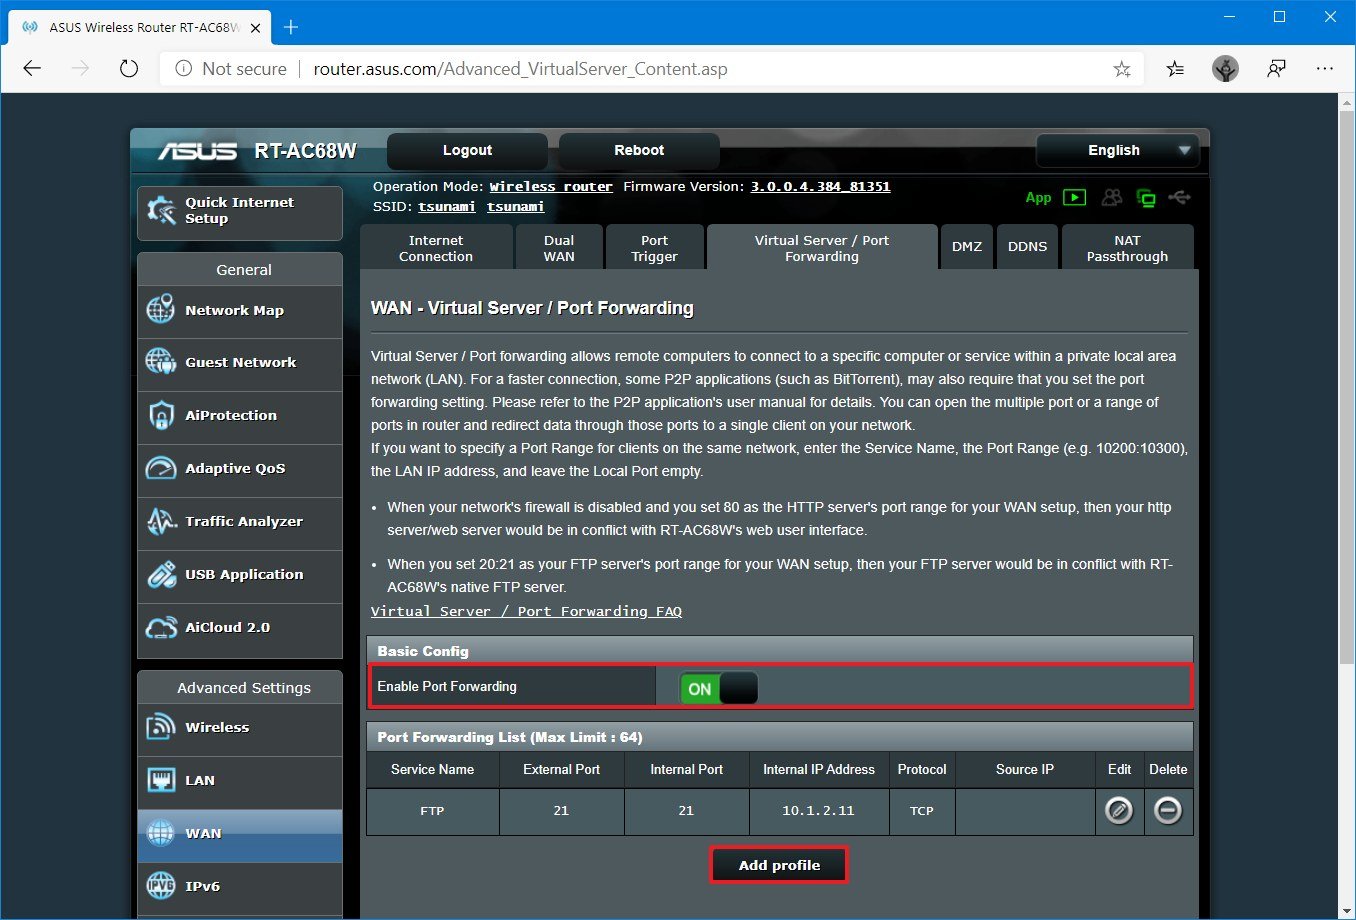
- Create a new port forward with the required information — for example:
- Service name: (optional) Specify the reference name for the service.
- Protocol: TCP.
- External Port: 3389.
- Internal Port: 3389.
- Internal IP Address: Specify the IP address of the computer you’re trying to connect — for instance, 10.1.4.100.
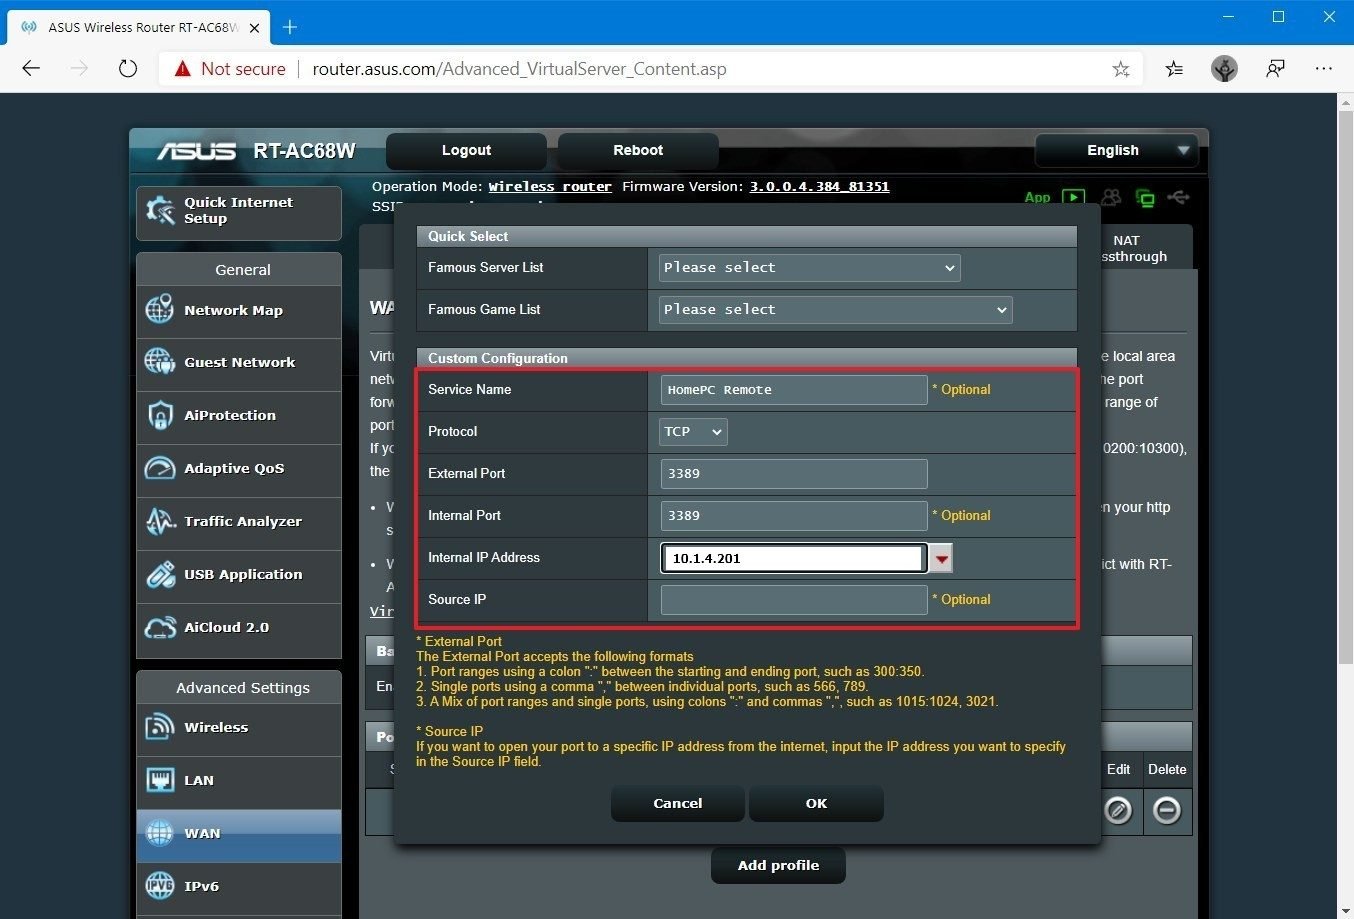
- Click the OK button.
Once you complete the steps, the port will open on the router, allowing remote desktop connections through the internet to that specific device.
How to establish remote desktop connection on Windows 10
After setting up the computer and router, you can initiate a remote connection using the Remote Desktop app on Windows 10.
Install Remote Desktop app
The Remote Desktop app should already be available on Windows 10, but you can always install it from the Microsoft Store.
To install the Remote Desktop app on Windows 10, use these steps:
- Open Microsoft Remote Desktop app page.
- Click the Get (or Install) button.
- Click the Open Microsoft Store button.
- Click the Get (or Install) button.
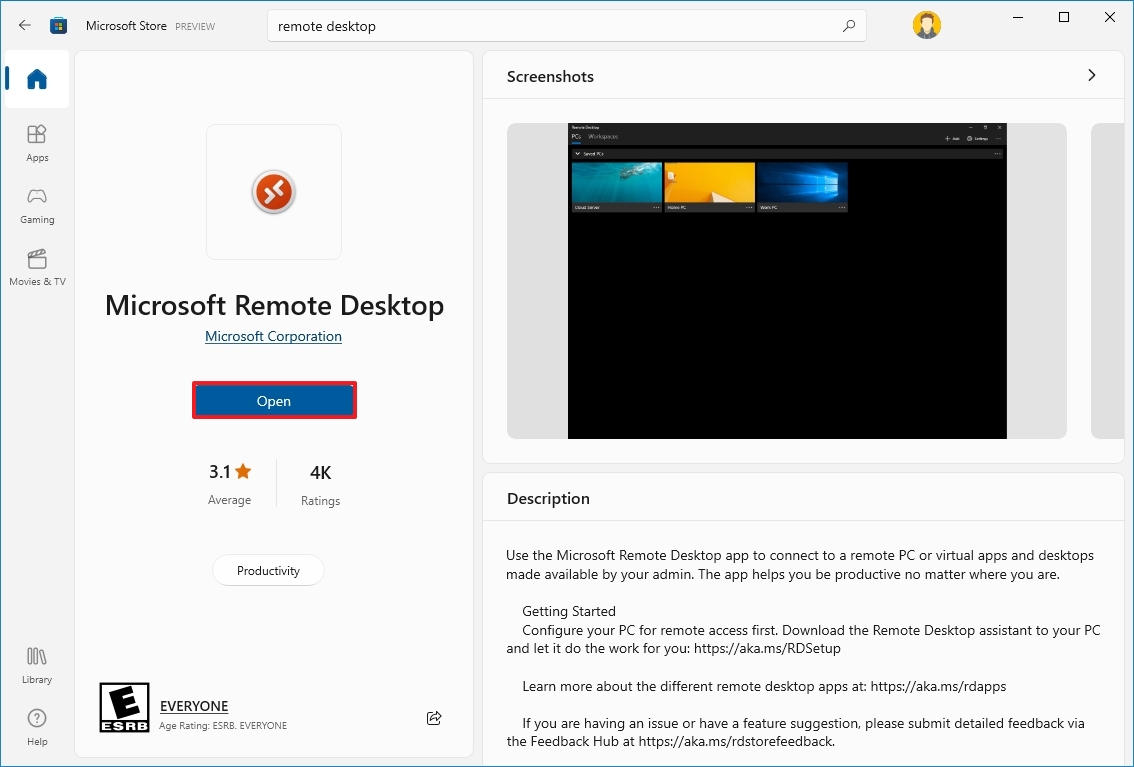
Once you complete the steps, open the app from within the Microsoft Store or Start menu.
Start remote desktop connection
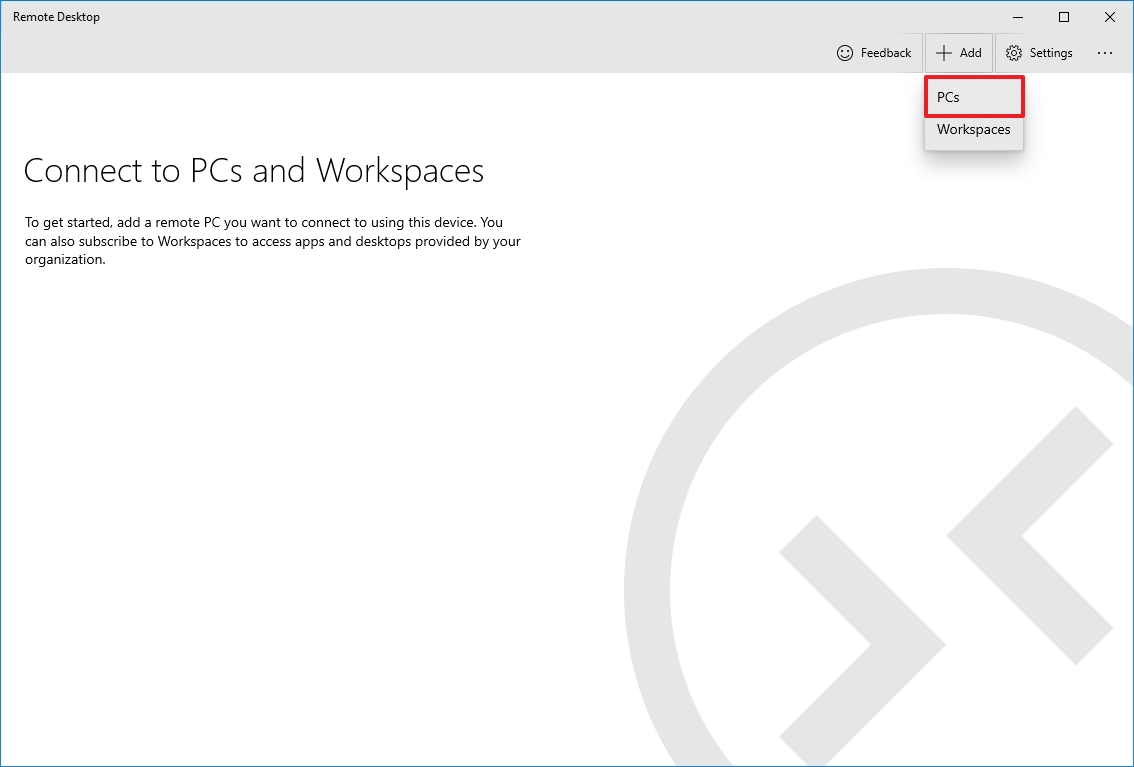
To connect to a computer remotely on Windows 10, use these steps:
- Open the Remote Desktop app.
- Click the + Add button in the top right.
- Click the PCs option.
- Under the «PC name» section, specify the TCP/IP address of the remote computer:
- If the device is inside a private network, enter the local IP address.
- If the device is in a remote network (via the internet), enter the public IP address.
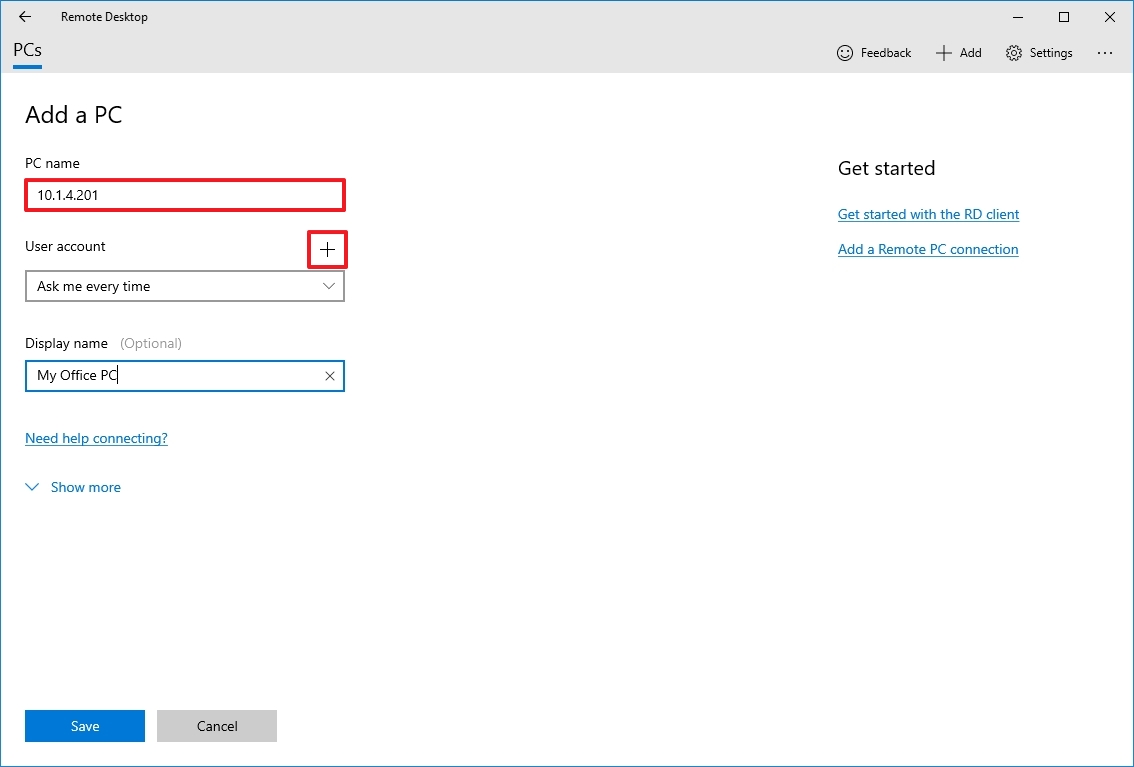
- Under the «User account» section, click the + (plus) button in the top right.
- Confirm the account information to sign in to the remote computer:
- If the remote device is using a Microsoft account, enter that Microsoft account sign-in information.
- If the remote device uses a local account, enter the local username and password to sign in.
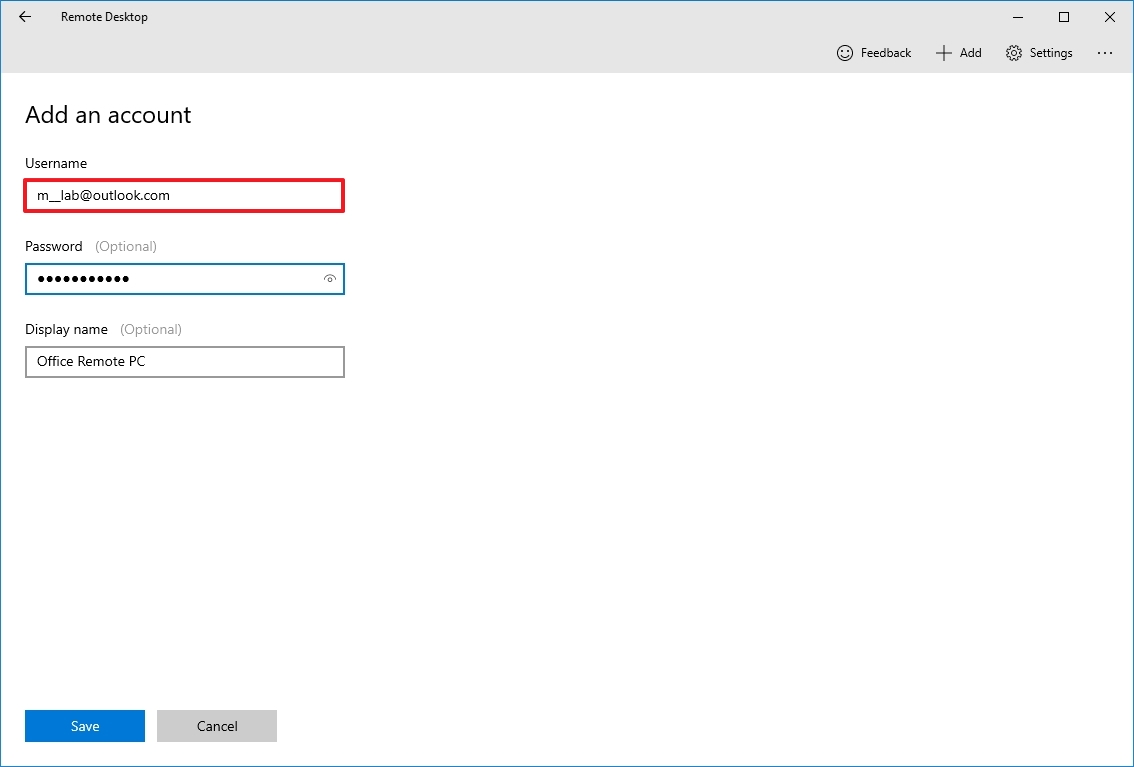
- (Optional) Under the «Display name» section, specify the account settings’ name.
- Click the Save button.
- (Optional) Under the «Display name» section, specify the connection’s name — for example, Office Remote PC.
- Click the Show more option.
- (Optional) Select additional settings as necessary.
- Quick tip: The additional settings include the option to connect using an admin session, set the remote session resolution, and clipboard, among others. Typically, you don’t need to configure these options, and you should only use them depending on the scenario.
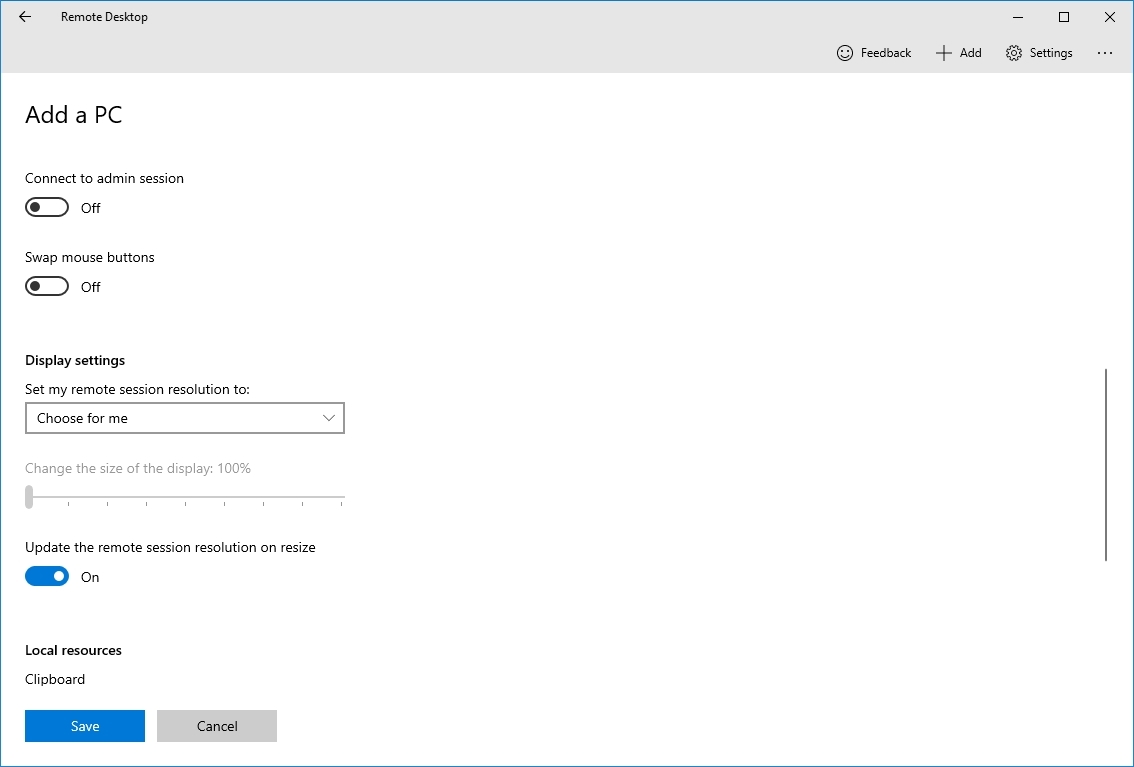
- Click the Save button.
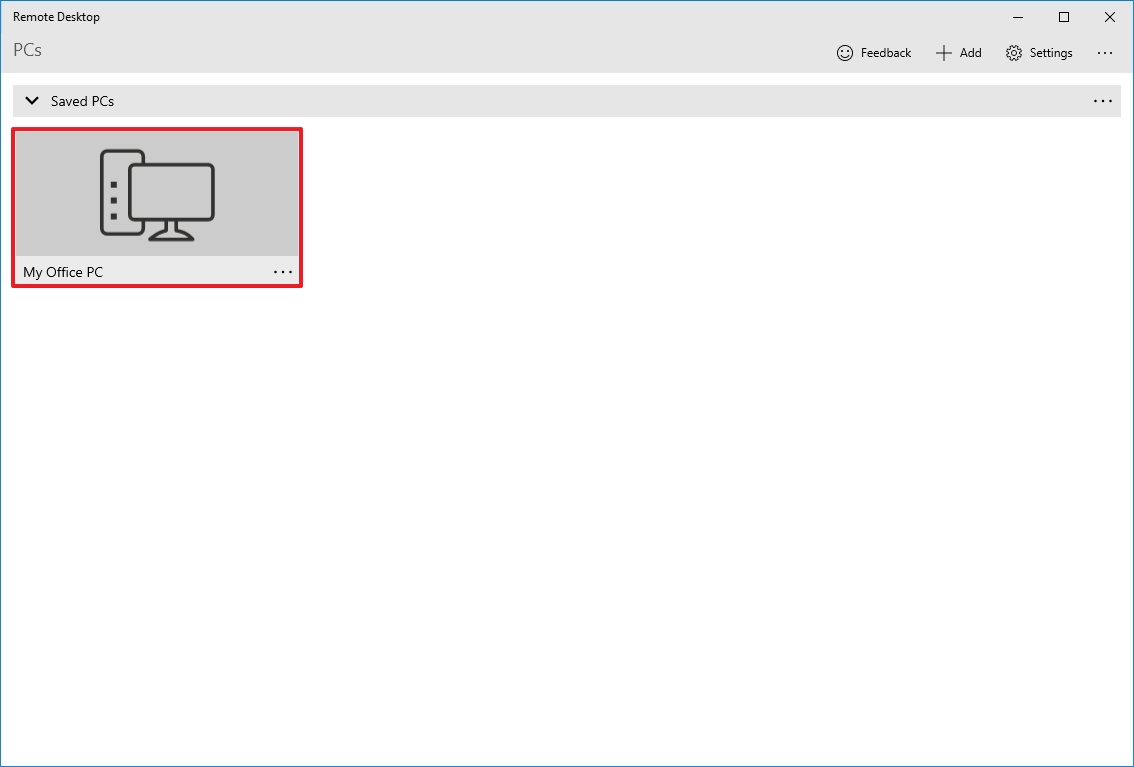
- Under the «Saved Desktops» section, click the connection to start a remote session.
- Check the «Don’t ask about this certificate again» option (if applicable).
- Click the Connect button.
After you complete the steps, the remote connection should establish without problems if everything has been configured correctly.
If you want to terminate the session, you can close the window, click the three-dotted menu button from the top-middle and then click the Disconnect button.
Change app and connection settings
On Windows 10, the Remote Desktop app allows you to customize various settings, including additional configuration options, and modify existing settings.
Change general settings
To change general settings in the Remote Desktop app, use these steps:
- Open the Remote Desktop app.
- Click the Settings button in the top right.
- Select the user account from the list.
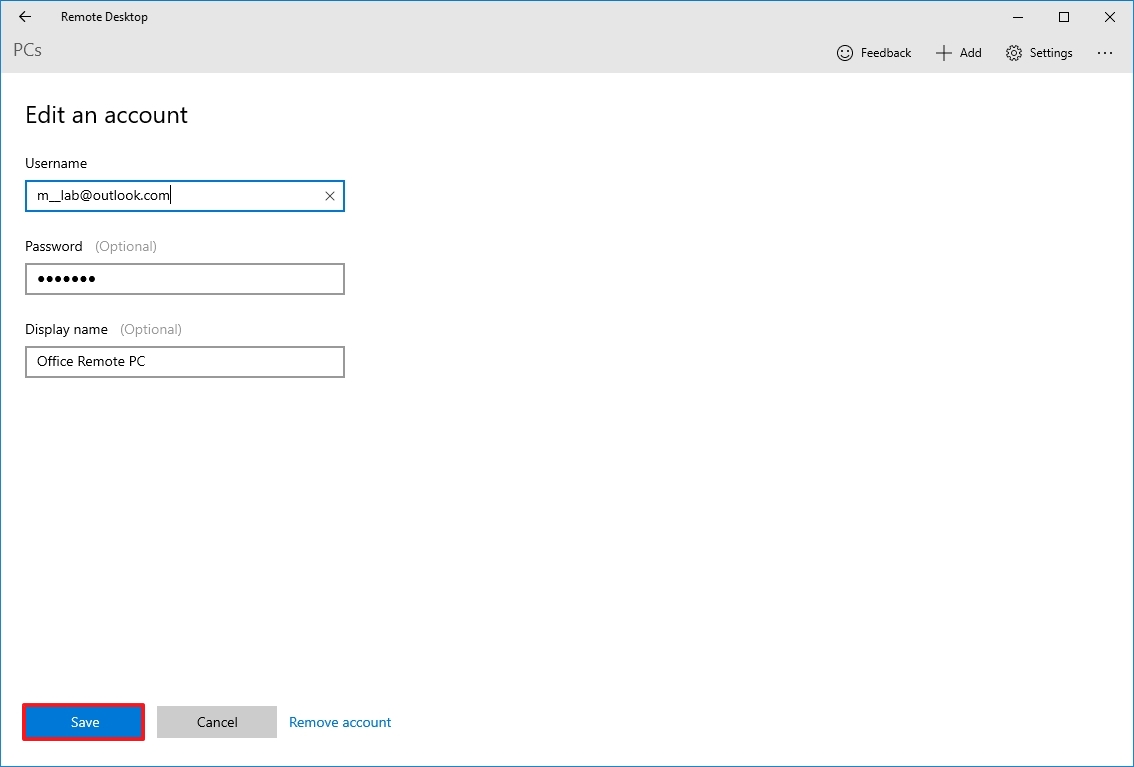
- Click the Edit (pen) button to adjust the settings.
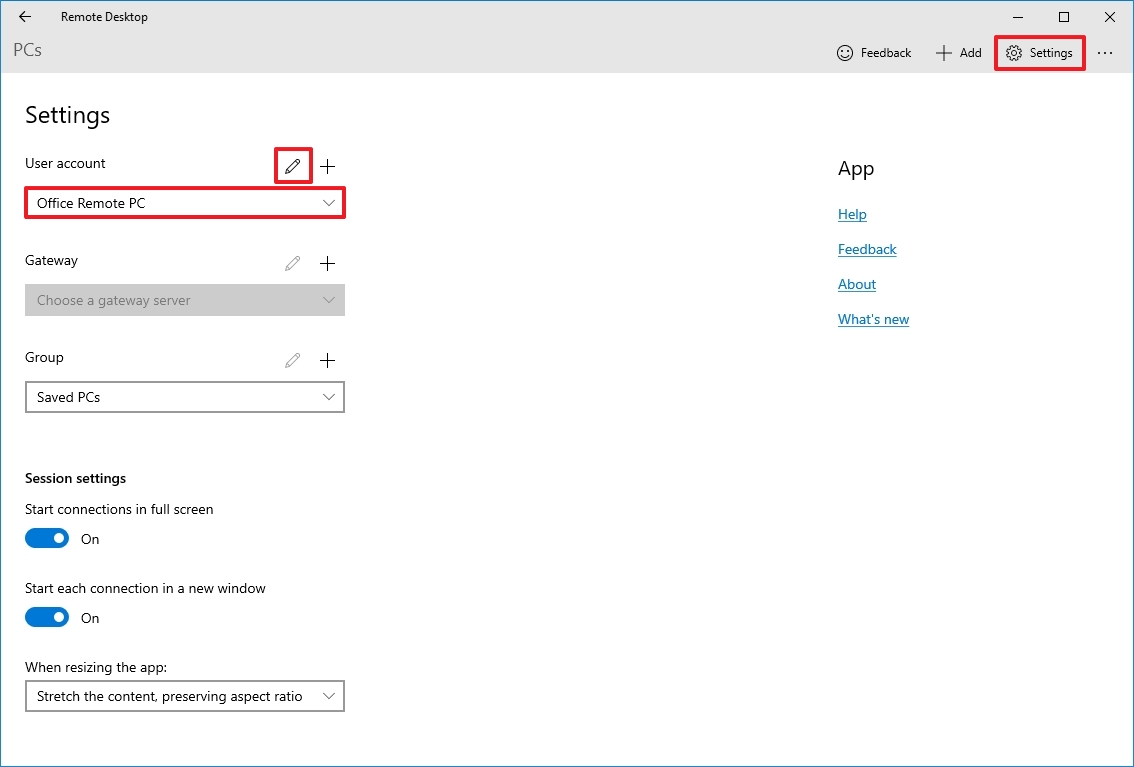
- Click the Save button.
You can also pre-add additional user accounts (with the plus + button) that you can use later to connect to other devices or as a different user.
The Gateway option allows you to set a gateway server, but you’ll rarely need to use this option. Also, the Group option enables you to organize connections into different and more manageable groups.
Change session settings
To change the session settings for Remote Desktop on Windows 10, use these steps:
- Open the Remote Desktop app.
- Click the Settings button in the top right.
- Turn on or off the «Start connections in full screen» toggle switch.
- Turn on or off the «Start each connection in a new window» toggle switch.
- Use the «When resizing the app» drop-down menu to choose how the remote desktop session will look as you resize the app:
- Stretch the content, preserving aspect ratio (recommended).
- Stretch the content.
- Show scroll bars.

- Use the «Use keyboard command with a» drop-down menu to choose whether shortcuts (such as «Ctrl + C» and «Ctrl + V») work only locally or on the remote desktop. Options available include.
- My local PC only.
- My remote session when it’s in full screen (recommended).
- My remote session when it’s in use.
- (Optional) Turn on the «Prevent the screen from timing out» toggle switch.
Alongside editing the account and session settings, you can also enable the option to show a preview of the remote desktop in the connection, which adds a visual queue to make it easier to find the connection in the app.
Change connection settings
To edit the settings of a remote connection, use these steps:
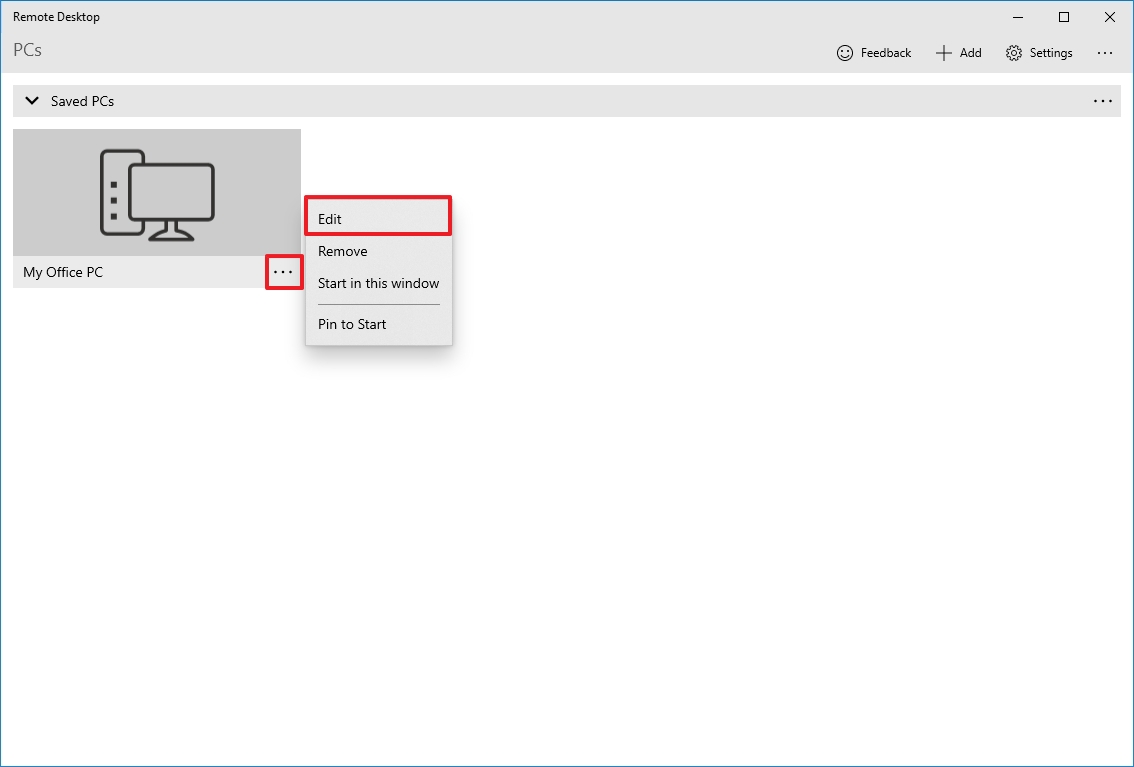
- Open the Remote Desktop app.
- Click the menu (three-dotted) button in the connection and select the Edit option.
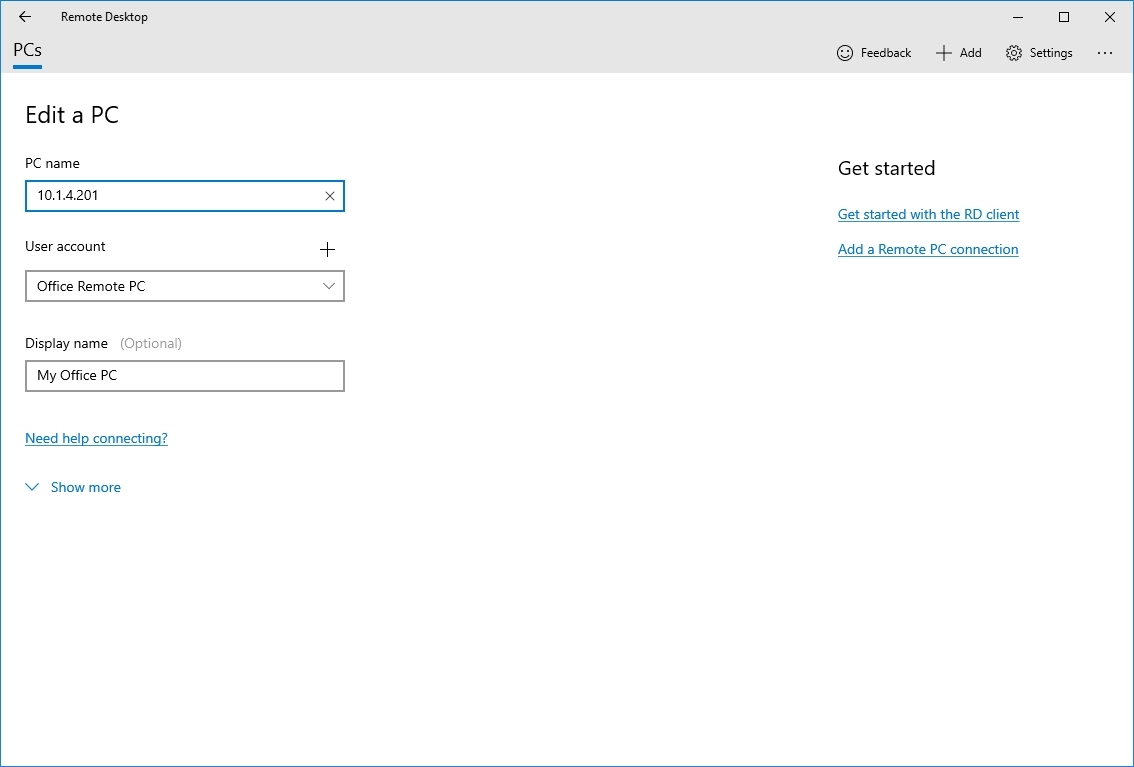
- Change the device name, account, and settings as needed.
- Click the menu (three-dotted) button in the connection and choose the Remove option to delete it.
- Click the menu (three-dotted) button in the connection, and choose the Pin to Start option to quickly access the remote computer from the Start menu.
Once you complete the steps, the settings will save and apply automatically in the connection.
How to troubleshoot remote desktop connection on Windows 10
Typically, you won’t find issues using the Remote Desktop app, but if you cannot connect to a device, you will need to troubleshoot the problem.
Confirm firewall settings
Windows 10 opens the required firewall ports automatically when you configure Remote Desktop, but it might not always be the case. If the connection fails, check the firewall to ensure it’s allowing the Remote Desktop service.
To enable remote connections through the firewall on Windows 10, use these steps:
- Open the Windows Security app.
- Click on Firewall & network protection.
- Click the «Allow an app through firewall» option.
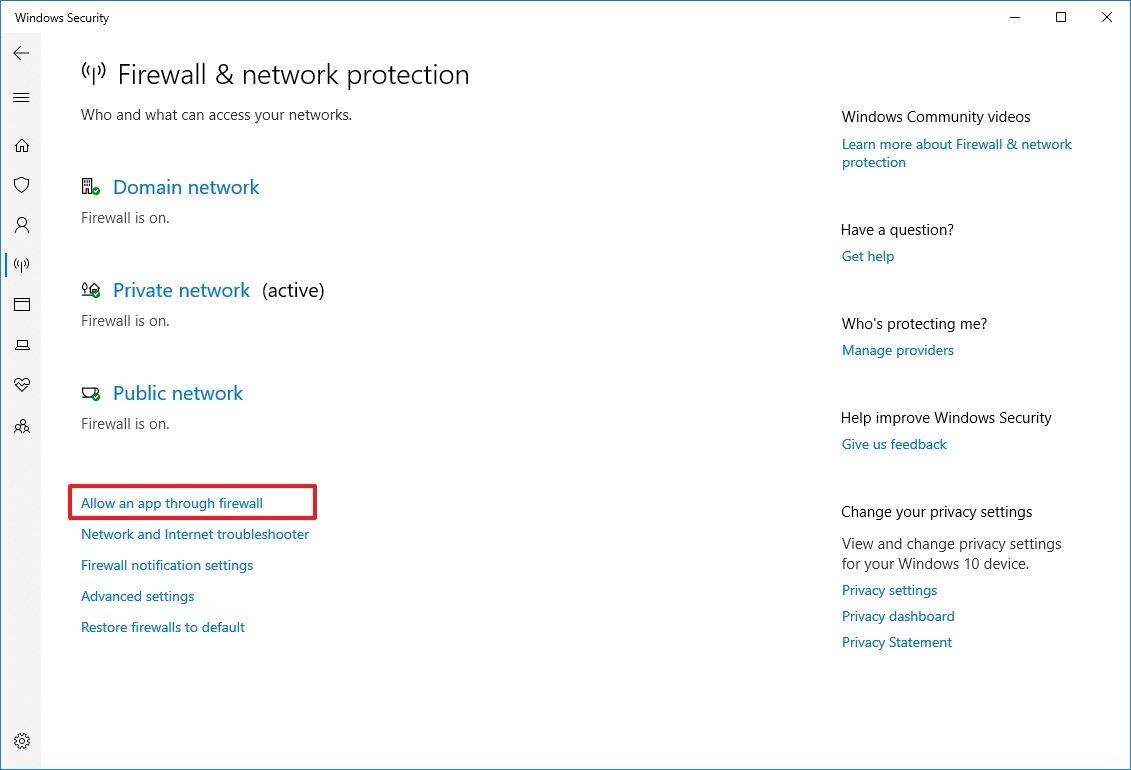
- Click the Change settings button.
- Check the Remote Desktop option and check the options for Private and Public.
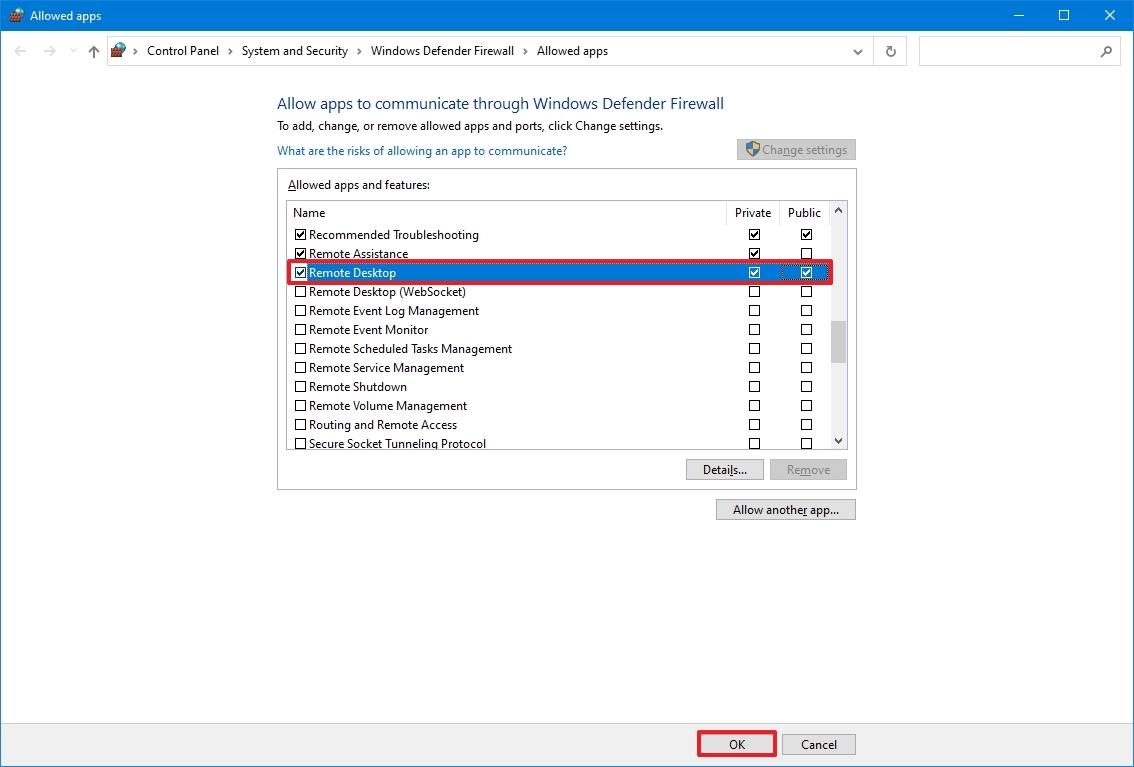
- Click the OK button.
If you have a third-party firewall or antivirus, you may want to disable these security applications to check if you can connect. You may need to check the software support website for more specific details to complete this task.
Unblock the remote connection port
If the settings are correct, and you still can’t connect, there’s a chance the internet provider is blocking the remote desktop port for security reasons. In this case, you may want to contact the ISP directly to resolve the issue.
Use the computer IP address (not the name)
When using the Remote Desktop app, it’s better to use the device’s IP address instead of the computer name. Otherwise, you may stumble upon some resolution issues.
Also, when adding a new computer, remember to enter the appropriate IP address. For example, use the local IP address to connect remotely from within the private network and use the correct public IP address to connect over the internet.
Confirm remote desktop service
You may also be unable to connect because the required remote desktop services are not running on Windows 10.
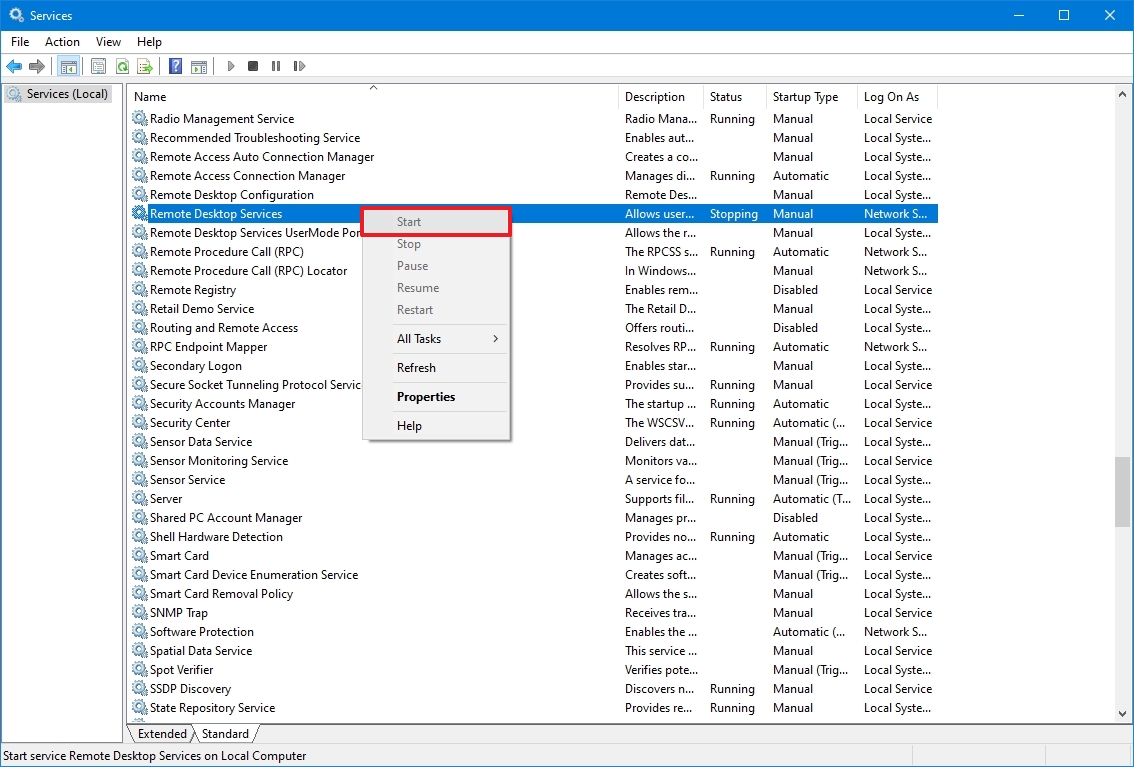
To determine whether the remote desktop service is running on your device, use these steps:
- Open Start.
- Search for Services and click the top result to open the app.
- Select the «Remote Desktop Service» and check that the «Status» column reads Running.
- If it’s not running, right-click the service and select the Start option.
After you complete the steps, you should be able to establish a remote session on Windows 10.
Switch to Internet Protocol Version 4 (TCP/IPv4)
Windows 10 can use both networking stacks, IP version 4 (IPv4) and version 6 (IPv6) — also known as dual-stack — but sometimes, it’ll choose version 6 for the connection, which may cause problems with the remote desktop protocol (RDP).
To set IPv4 as the default networking stack on Windows 10, use these steps:
- Open Control Panel.
- Click on Network and Internet.
- Click on «Network and Sharing Center.»
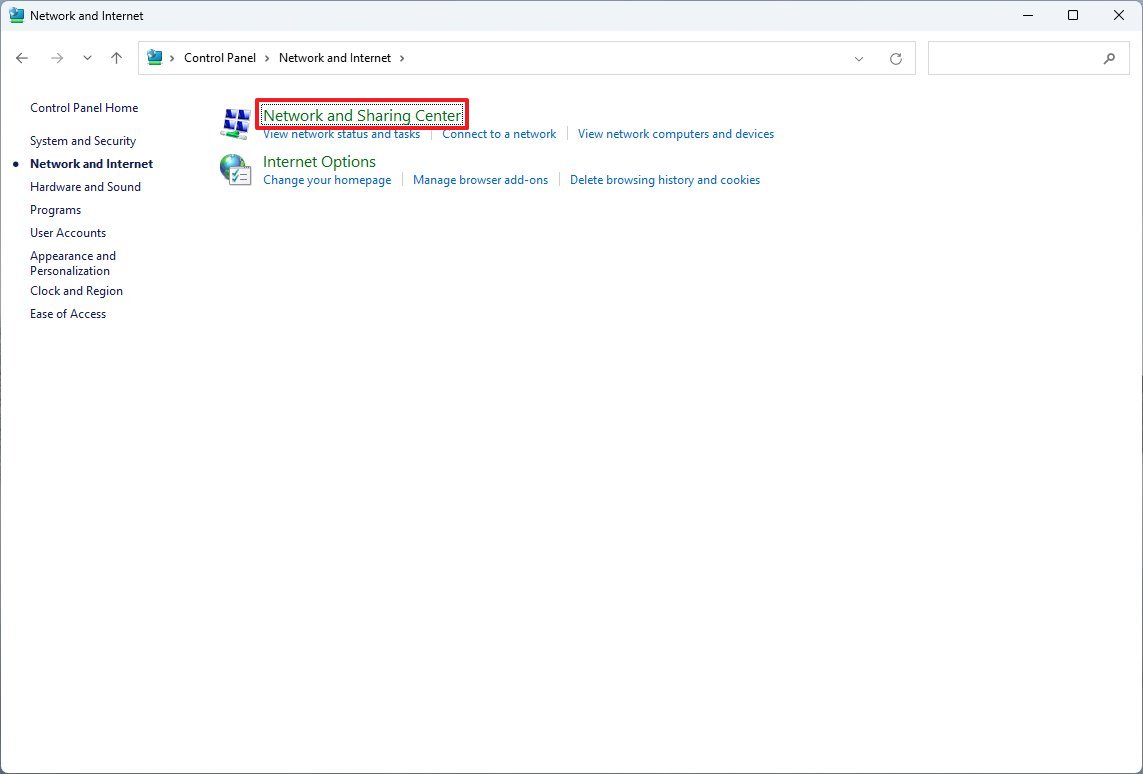
- Click the «Change adapter settings» option from the left navigation pane.
- Right-click the active adapter and select the Properties option.
- Clear the «Internet Protocol Version 6 (TCP/IPv6)» option.

- Click the OK button.
- Restart the computer.
Once you complete the steps, you should now be able to connect using a remote connection.
Use local account instead of Microsoft account
If you try to connect, but the authentication fails, and you are using a Microsoft account, it’s probably a problem with the authentication method. For instance, you may encounter issues if the Microsoft account has the two-step verification or passwordless security feature enabled. You may consider creating and using a local account for remote access if this is the case.
To create a local administrator account on Windows 11, use these steps:
- Open Settings.
- Click on Accounts.
- Click on Family & other users.
- Under the «Other users» section, click the «Add someone else to this PC» option.
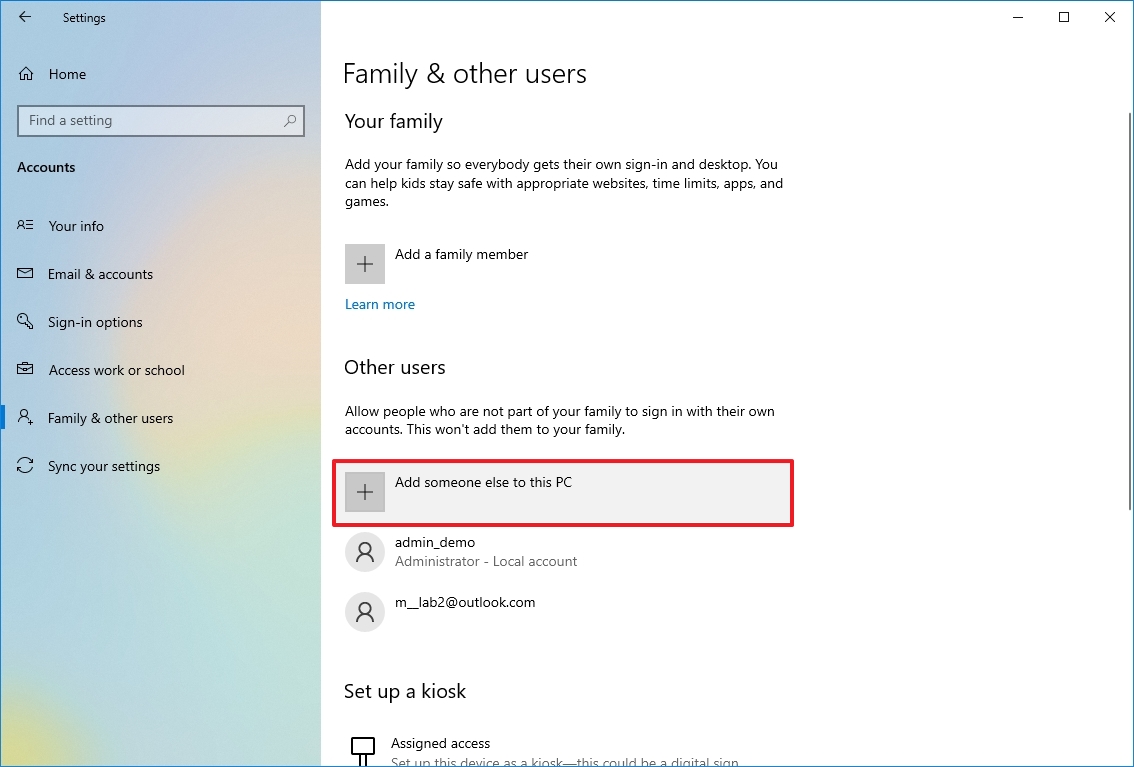
- Click the «I don’t have this person’s sign-in information» option.
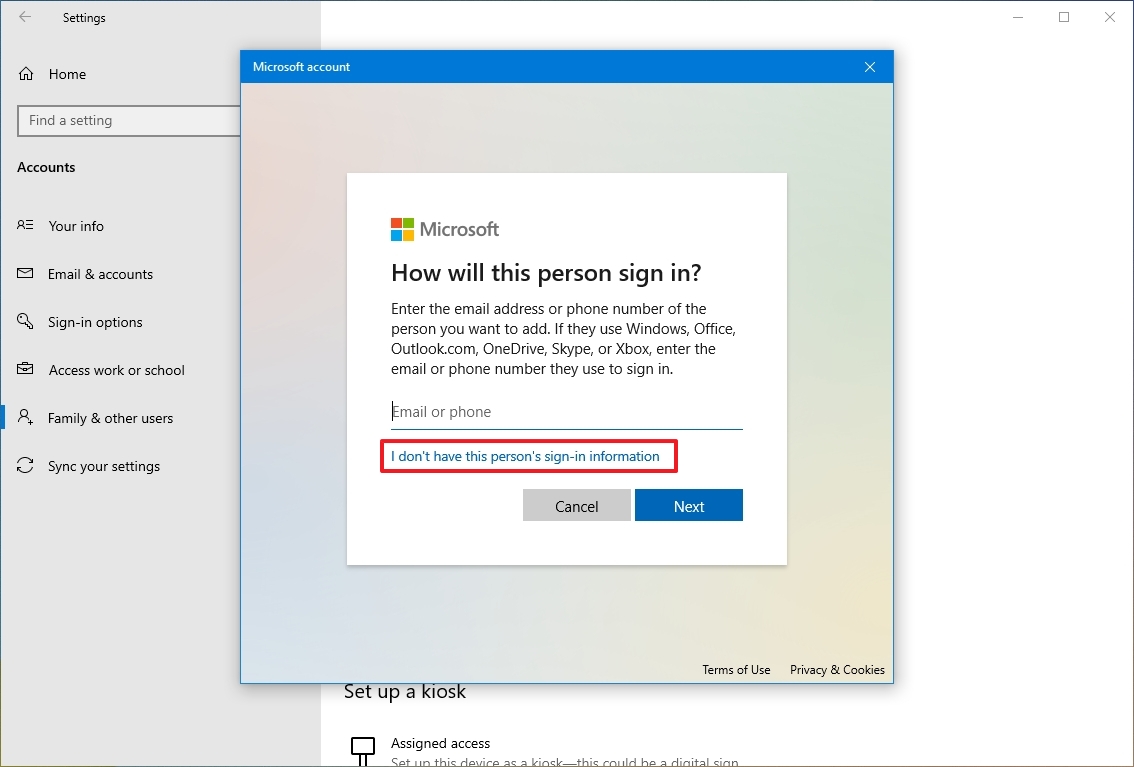
- Click the «Add a user without a Microsoft account» option.
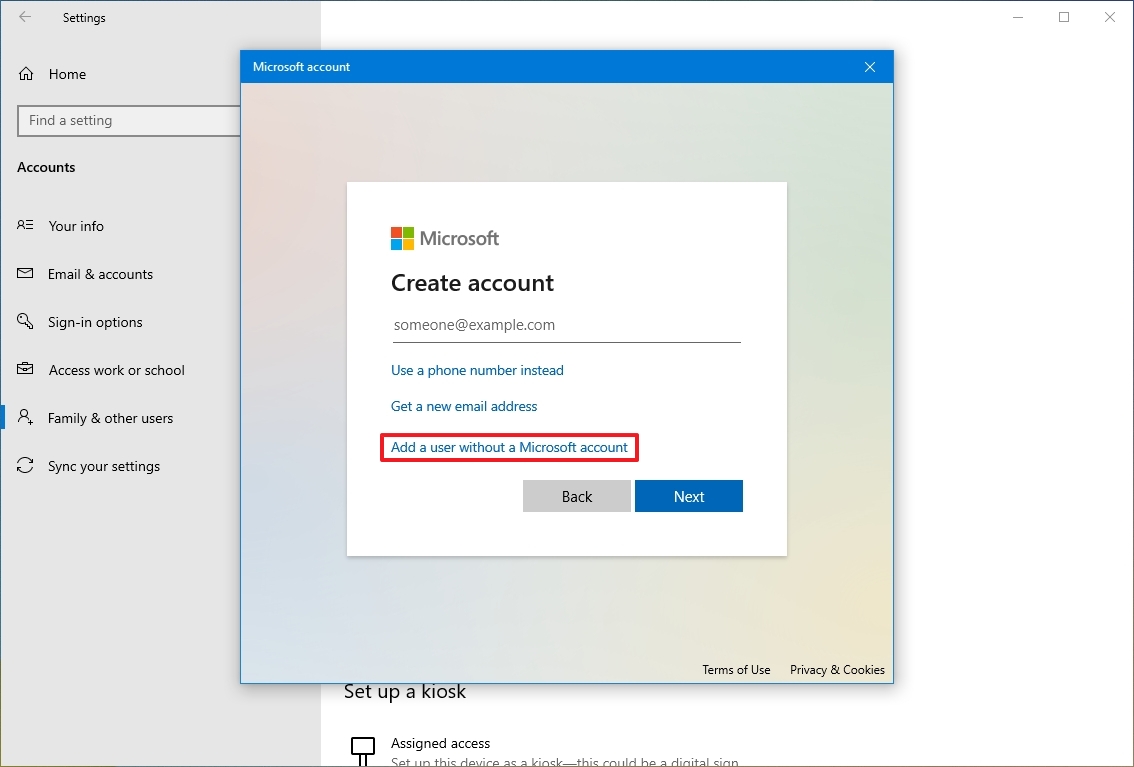
- Confirm the username.
- Create a strong password.
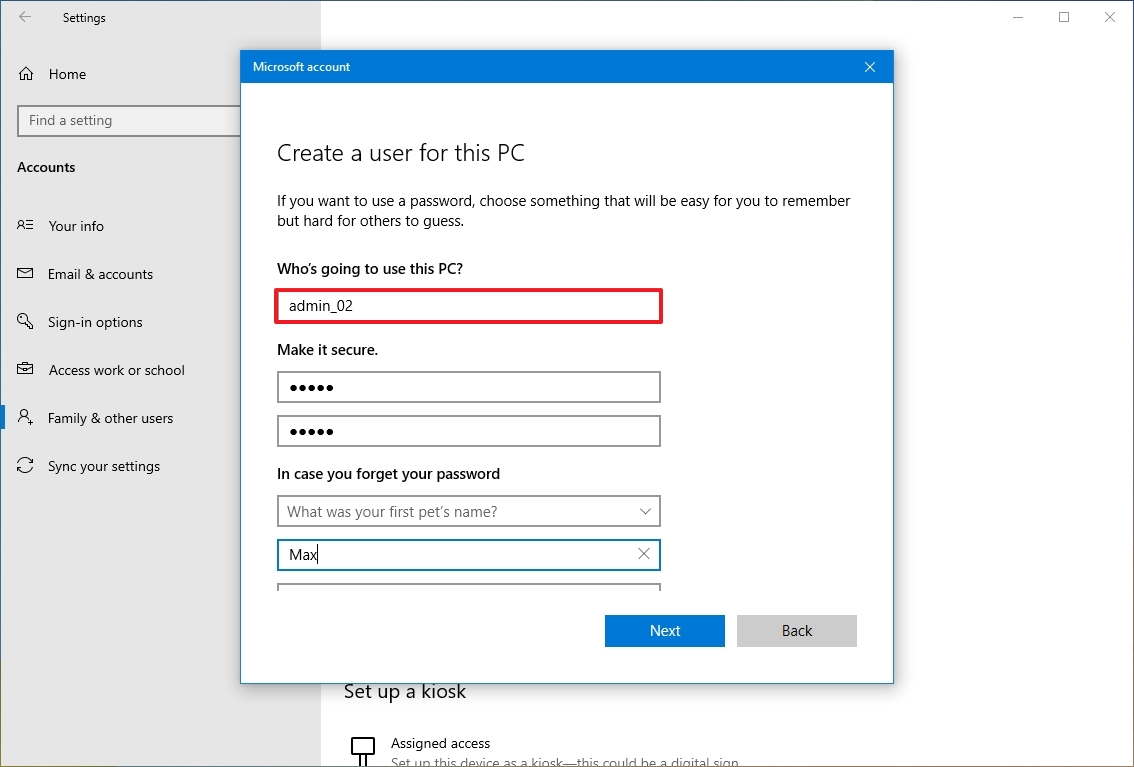
- Complete the security questions to allow password reset from the Sign-in screen.
- Click the Next button.
- Select the newly created account and click the «Change account type» button.
- Choose the Administrator option.
- Click the OK button.
After you complete the steps, you can use the local account information instead of the Microsoft account to connect to a remote desktop session.
We outlined the steps to connect to a device inside a private network and through the internet. However, allowing remote desktop connections (mainly through the internet) could be a security risk.
Remember that having the remote desktop protocol enabled and opening ports could allow malicious individuals to gain unauthorized access to the computer. If you need to use this feature, use a strong password, disable the remote desktop service and remove the port forwarding settings from the router when they are no longer needed.
More resources
For more helpful articles, coverage, and answers to common questions about Windows 10 and Windows 11, visit the following resources:
- Windows 11 on Windows Central — All you need to know
- Windows 10 on Windows Central — All you need to know
All the latest news, reviews, and guides for Windows and Xbox diehards.
Mauro Huculak is technical writer for WindowsCentral.com. His primary focus is to write comprehensive how-tos to help users get the most out of Windows 10 and its many related technologies. He has an IT background with professional certifications from Microsoft, Cisco, and CompTIA, and he’s a recognized member of the Microsoft MVP community.

Remote Desktop Protocol (RDP) has been a feature of Windows since the XP Pro days. Here’s a look at using it in Windows 10 with the Remote Desktop app.
Remote Desktop Protocol (RDP) has been a feature of Windows since the XP Pro days. It makes it easy to connect from one PC or device to another to retrieve files or provide PC support.
There are several free utilities out there that will get you set up with a remote connection. Some that come to mind are services such as join.me, TeamViewer, and Chrome Remote Desktop and are especially handy when connecting between different platforms. But if you’re in a pure Windows environment, here’s a look at how to enable the built-in RDP utility in Windows 10, which will allow you to connect to your Windows box remotely.
The Remote Desktop or RDP feature is disabled by default, so you will need to enable it in the settings. There are several ways to do this; let’s review the easiest.
-
- Open Settings
- Click System > Remote Desktop
-
- Click the toggle Enable Remote Desktop
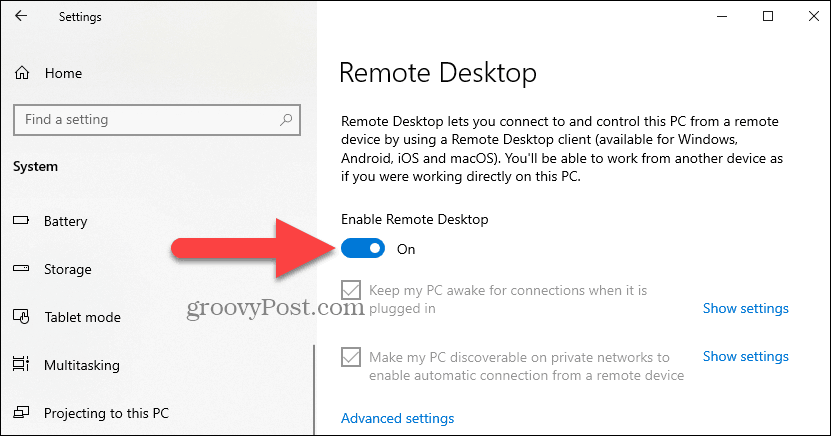
- Click Confirm when prompted.

Expert Note:
You can also enable Remote Desktop using the System Properties. Press the Windows Key and Type: advanced system. Click View advanced system settings.

Click the Remote tab and select Allow remote connections to this computer. Keep the box checked for Network Level Authentication for better security. Also, note that you will need to enable incoming remote connections on the PC you’re connecting.
Remote Into Your PC
You have a couple of choices when it comes to how you remotely connect to the other computer. You can use the traditional desktop app or the Remote Desktop universal app. For this, I’m connecting to my Windows Home Server on my home network. I’m also going to use the app that you can install from the Store. It’s more versatile and can be used on mobile platforms, including iOS and Android.
Tip: If you have many PCs and devices on your home network, a useful free utility to use is Advanced IP Scanner.
Launch the app and type a name for the PC or device, its hostname or IP address, and select Connect.
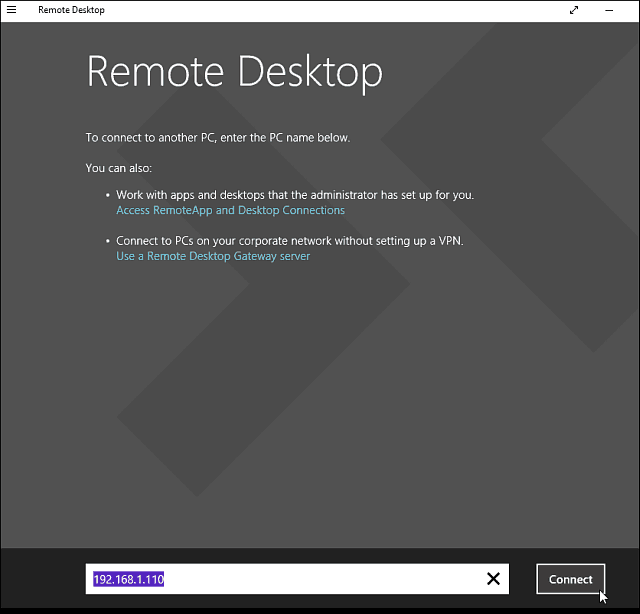
Next, enter the username and password used for the computer you’re connecting into. Also, if you’re going to remote into it often, check the box to remember your credentials.
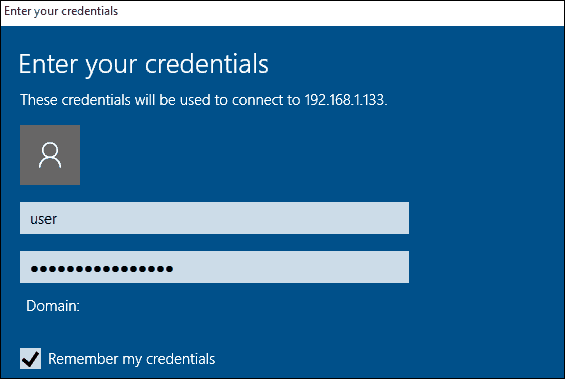
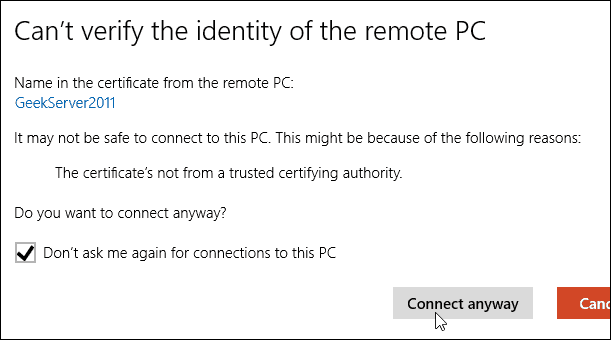
If you get the following security message, click Go ahead and Connect and check the box not to remind you again. You know what you’re doing; no reason for Windows to be constantly nagging you.
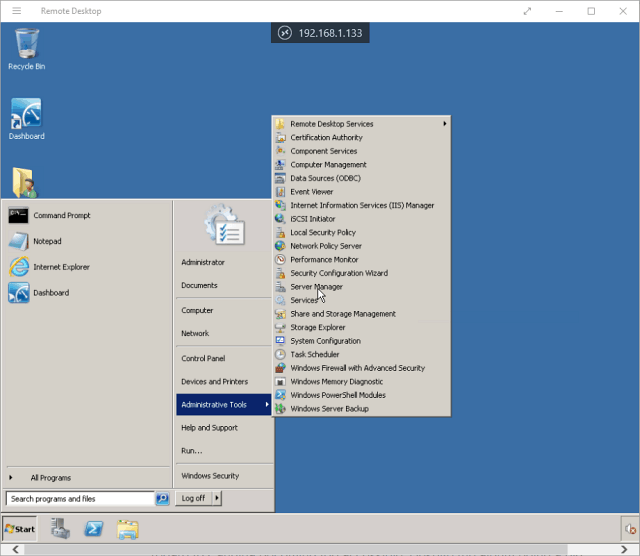
There you have it. You can now start using the remote computer for configuration, remote support, or however you need to use it.
I should also mention that you can go to Settings > connection settings in the app and configure the appearance, devices and make other adjustments that work for you.

More About Remote Desktop Connections
If you’re running a previous version of Windows or looking to remote access your Windows PC from your smartphone or tablets, check out the articles linked below for more.
- How to Enable Remote Desktop in Windows 7
- Make Remote Desktop Connections Work Faster
- Enable Remote Desktop for Windows 8
- Using the Windows Phone Remote Desktop App
- Remote Desktop Into Windows from a Mobile Device
![]()
Описание и рекомендации
Microsoft Remote Desktop – клиентское приложение для удаленного доступа к компьютеру с других устройств, подключенных к сети Интернет. Кроссплатформенная программа поддерживает издания Windows 7 – 10/11, включая некоторые серверные редакции.
Также удаленный рабочий стол функционирует на ПК под управлением Mac OS (не ниже 10.14), мобильных устройствах Android (от 4.1), iOS (15.0 и выше). Клиент распространяется бесплатно, но требует учетной записи Microsoft и корректного выбора инсталлятора, соответственно разрядности системы 32/64-бит.
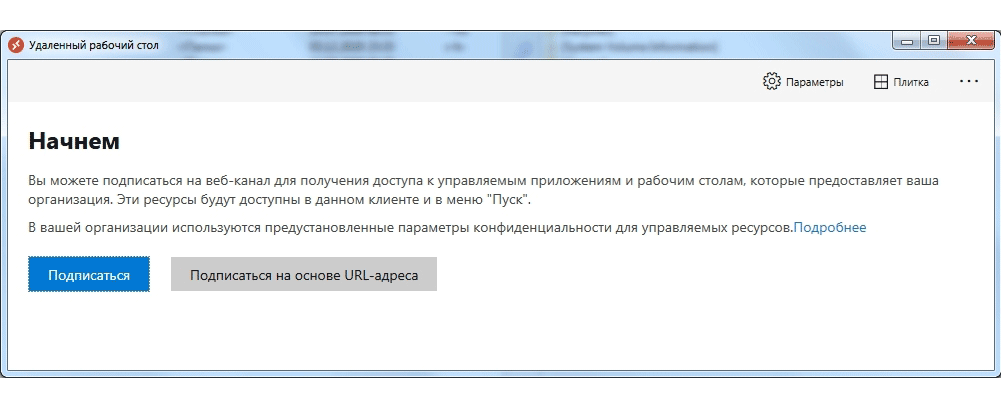
Remote Desktop для Windows 11, 10, 7
Непосредственно клиентское приложение имеет мультиязычный интерфейс. Русская версия активируется автоматически при соответствующих региональных настройках Виндовс. Удаленное подключение устанавливается при помощи протокола RDP (Remote Desktop Protocol).
Возможности клиента для Windows 10/11 включают:
- управление при помощи графического интерфейса на русском языке с использованием клавиатуры, мышки или сенсорного экрана;
- поддержку жестов;
- полноценный доступ к компьютерам и ресурсам;
- использование нескольких сеансов одновременно;
- удаленная печать;
- конфигурирование системных настроек, включая разрешение монитора, прочие параметры;
- скоростная передача аудио и потокового видео с возможностью сжатия данных.
Для Семерки и ранних релизов Windows 10 рекомендуется использовать Microsoft Remote Desktop Assistant. Последнюю версию ассистента можно скачать у нас или с официального сайта разработчика. Приложение произведет автоматическое конфигурирование удаленного подключения.
Программа имеет незначительные ограничения. Удаленный доступ невозможен к любым ПК, включая ноутбуки, управляемым Домашним (Home) релизом Windows.
Версия для Mac OS
Редакция для Мак не отличается от Виндовс клиента. После запуска приложения необходимо добавить удаленный компьютер по его имени или IP.
Мобильные издания
Клиент для телефонов и планшетов открывает быстрый доступ к удаленному ПК с любого места, где имеет сеть Интернет. Принцип подключения остается прежним. Необходимо добавить компьютер, используя имя (IP-адрес) и пароль.
Заключение
Скачать Microsoft Remote Desktop наш сайт предлагает в нескольких вариациях. Доступны установщики клиента под Виндовс 7/10/11, для Mac ОС и мобильных устройств, функционирующих на платформах Android, iOS.
Скриншоты

Скачать Microsoft Remote Desktop 1.2.4583 для Windows (64-bit)
Скачать Microsoft Remote Desktop 1.2.4583 для Windows (32-bit)
Скачать Microsoft Remote Desktop 1.2.4583 для Windows (ARM)
Скачать Microsoft Remote Desktop для Windows из Microsoft Store
Скачать Microsoft Remote Desktop 10 для Android 9.0 и выше (Play Маркет)
Скачать Microsoft Remote Desktop 10.0.16.1239 для Android 9.0 и выше (APK)
Скачать Microsoft Remote Desktop 10.0.16.1238 для Android 9.0 и выше (APK)
Скачать Microsoft Remote Desktop 10.0.16.1236 для Android 9.0 и выше (APK)
Скачать Microsoft Remote Desktop 10.0.15.1208 для Android 9.0 и выше (APK)
Скачать Microsoft Remote Desktop 10.0.15.1207 для Android 9.0 и выше (APK)
Скачать Microsoft Remote Desktop 10.0.12.1148 для Android 8.0 и выше (APK)
Скачать Microsoft Remote Desktop 8.1 для Android 4.1–7.1.1 (Play Маркет)
Скачать Microsoft Remote Desktop 8.1 для Android 4.1–7.1.1 (APK)
Скачать Microsoft Remote Desktop для macOS (App Store)
Скачать Microsoft Remote Desktop Assistant для Windows (ZIP)