Posted:
23 Apr, 19
Updated:
27 Dec, 22
by Ayden I
1 Min
In this tutorial, you will learn how to control Windows update settings through the registry. For controlling Windows Update settings follow the steps below.
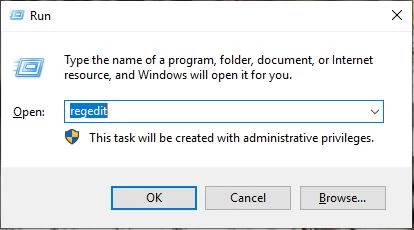
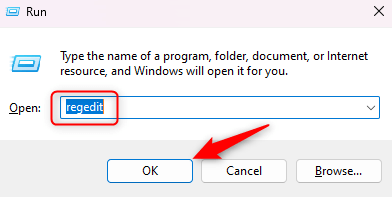
- Press Winkey+R to open Run
- Enter Regedit phrase then press OK
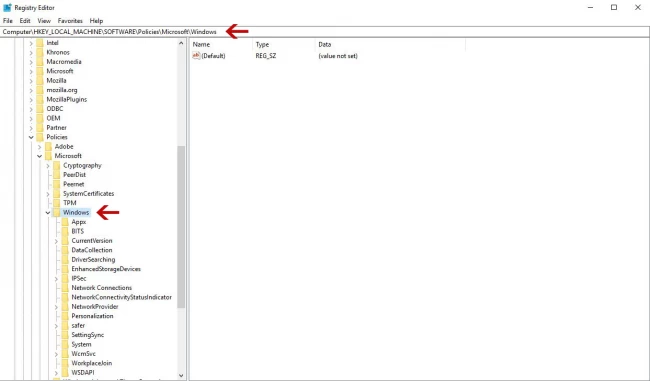
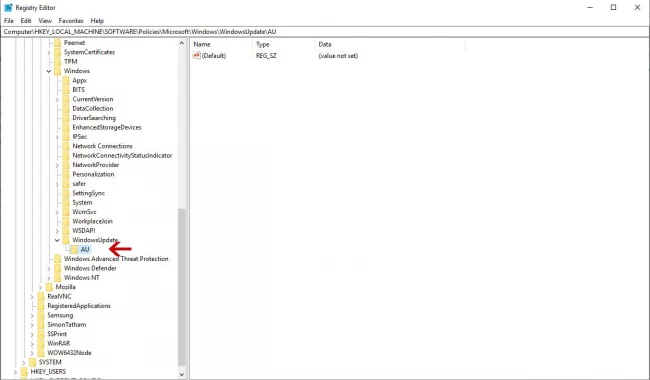
- In the Windows registry page, locate the following address.
HKEY_LOCAL_MACHINE\SOFTWARE\Policies\Microsoft\Windows
- Right click on Windows directory and select Key option in New
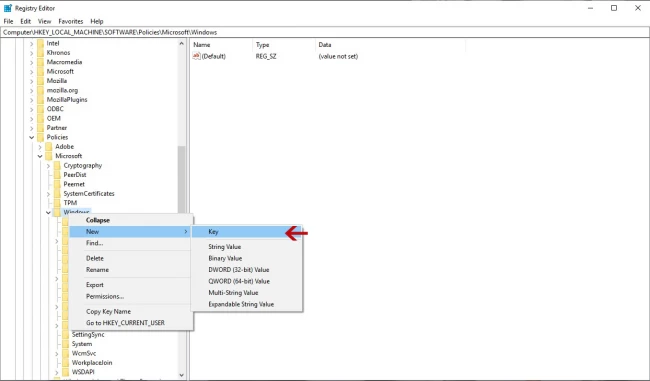
- Enter WindowsUpdate as the new directory’s name.
- Now, right click on WindowsUpdate directory which you created at the previous step and again create a new directory by selecting Key option in New Enter AU as this directory’s name.
- Right click on AU directory and select DWORD option in New
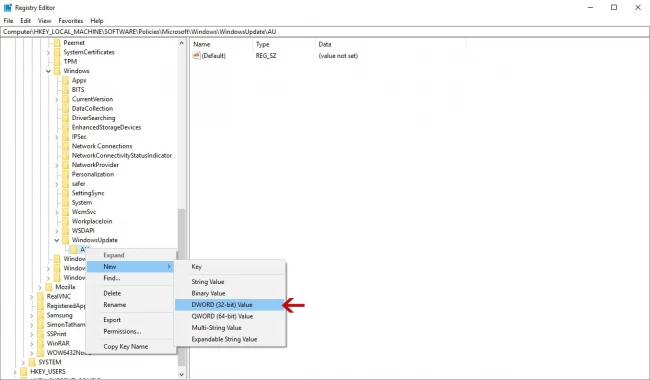
- Enter AUOptions as new DWORD key’s name.
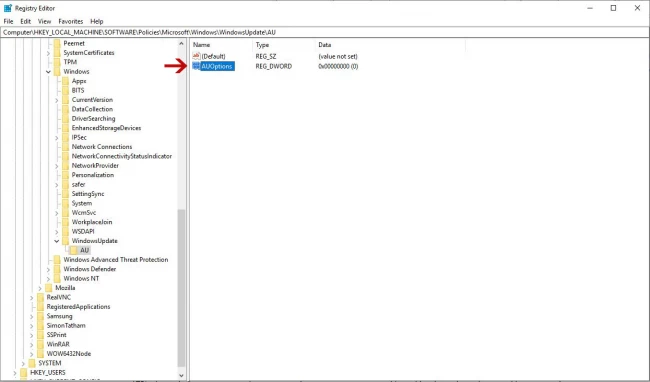
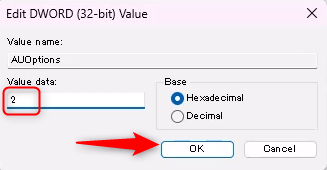
- Double click on AUOptions to open Edit DWORD (32-bit) Value
- At this section you have to enter a number between 2 and 5 as value data. This are the meanings of the values:
2: Before downloading and installing any updates, you will be notified.
3: Updates will automatically be downloaded and will notify you before installation.
4: Automatically download and automatically set the time to install it.
5: Allow and access to the local system admin to select the update status
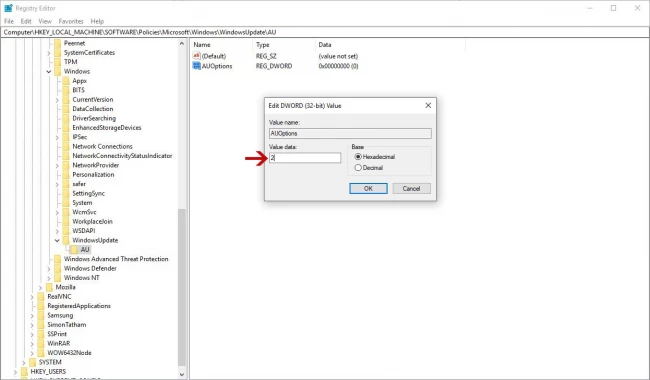
You must enter one number from the above list. We recommend using the using value 2, as the user will be informed before any action.
![]()
Windows VPS
Starting From $16.99/Monthly
to Disable Windows Update From Group Policy follow this article
If you use a Windows 11 PC, you’re probably familiar with Windows Update, a service that automatically downloads and installs software updates from Microsoft. These updates include service packs, patches, and other essential system files to improve performance and security.
However, there are situations where you might want to customize how Windows Update works. This can be achieved through modifications in the Windows Registry, a hierarchical database that stores low-level settings for the operating system and for the applications that opt to use it.
Accessing the Registry
Before you proceed, it’s crucial to understand that the Registry is a powerful tool, and incorrectly modifying it can cause serious problems that may require you to reinstall your Windows 11 operating system. To avoid data loss or irreversible damage, make sure that you back up the Registry and your computer before making changes.
If you’re sure you want to edit the Registry, press Windows + R to open the Run app, type regedit in the text box, and then click Ok.
The Registry Editor will open.
Customizing Windows Update Registry Settings
There are several ways you can customize Windows Update through the Registry. Here are some of the more popular edits.
How to Disable Automatic Updates
Windows Updates are enabled by default to ensure your Windows 11 system stays secure and up-to-date. However, there may be times when you want to control when these updates occur, such as when you’re on a metered or slow internet connection.
Here’s how you can disable automatic updates using the Windows Registry.
- Navigate to this file path in the Registry Editor:
HKEY_LOCAL_MACHINE\SOFTWARE\Microsoft\Windows\CurrentVersion\WindowsUpdate\Auto Update - Right-click the Auto Update file, select New from the context menu, and then select DWORD (32-bit) Value.
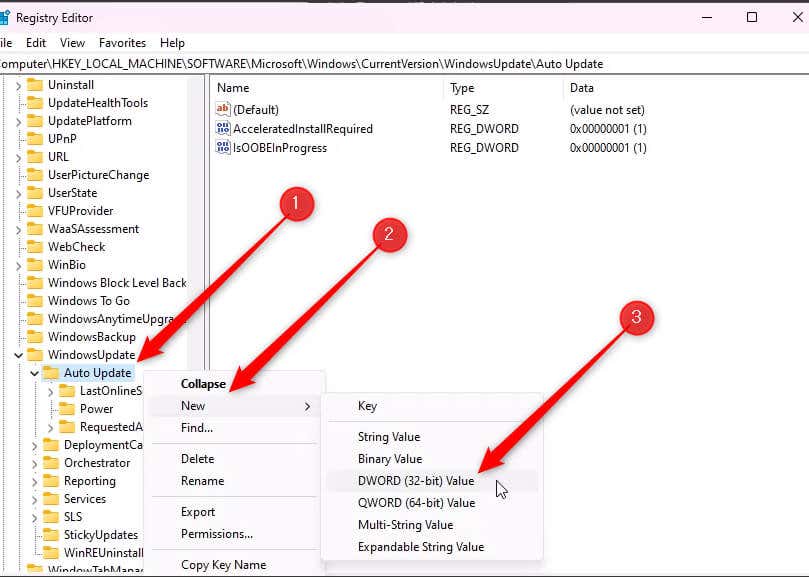
- Name the new key AUOptions and then double-click it to open its properties dialog.
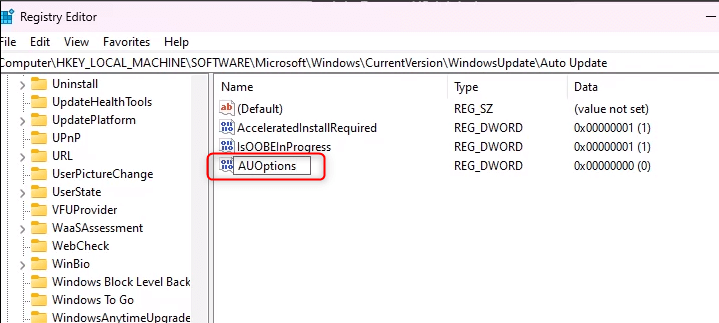
- Enter 2 in the Value data field and click OK.
By setting the value to 2, you’re telling Windows Update to check for updates but not download or install them without your permission.
How to Change the Windows Update Service Startup Type
The Windows Update Service Startup type determines when and how the Windows Update service is initiated. Here’s how to change the Windows Update service startup type using the Windows Registry.
- Navigate to this file path in the Registry Editor:
HKEY_LOCAL_MACHINE\SYSTEM\CurrentControlSet\Services\wuauserv - Double-click Start in the right-hand pane to open its properties dialog.
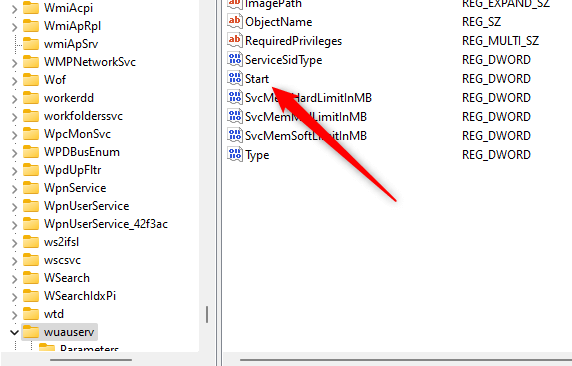
- Change the number in the Value data box to one of the following:
2: Automatic
3: Manual
4: DisabledThe value is 3 by default. If you set the value to 2, the Windows Update service will start automatically when your system boots. If you set it to 4, the service will be disabled and won’t start unless manually triggered.
Click OK after you’ve set the value.
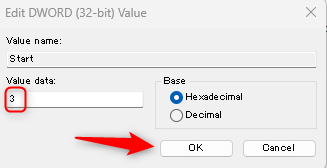
The changes should take effect immediately.
How to Restrict Windows Updates Over Metered Connections
A metered connection is a network connection where you have limited data usage per month. Windows lets you set your network connection as metered to help control data usage. When set to a metered connection, Windows Update will only download priority updates to save data and won’t download most updates automatically.
- Navigate to this file path in the Registry Editor:
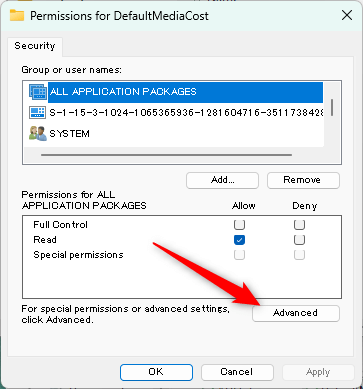
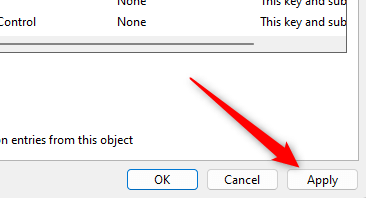
HKEY_LOCAL_MACHINE\SOFTWARE\Microsoft\Windows NT\CurrentVersion\NetworkList\DefaultMediaCost - At this point, if you try to modify the DefaultMediaCost key, you’ll be given a permissions error. You’ll need to adjust a few settings to enable permissions. First, right-click the DefaultMediaCost key and select Permissions from the drop-down menu.
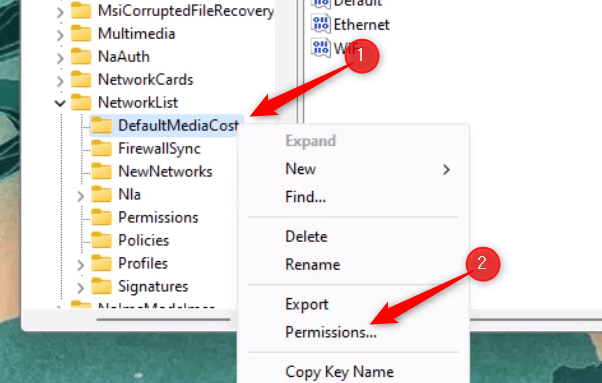
- In the Permissions for DefaultMediaCost window, click Advanced.
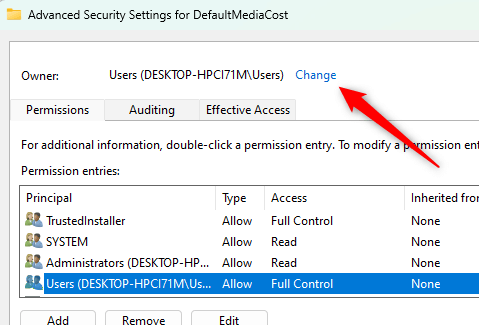
- Now we need to change the Owner. By default, this is TrustedInstaller. We need to change the owner to Users. Click Change.
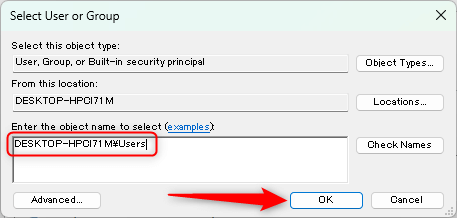
- Enter the user’s path in the text box. In our case, that would be DESKTOP-HPCI71M\Users. You can find this info next to Users in the previous step. After you enter the name, click OK.
- Now that the Users is the owner, select Users from the Permission entries list and then click Edit.
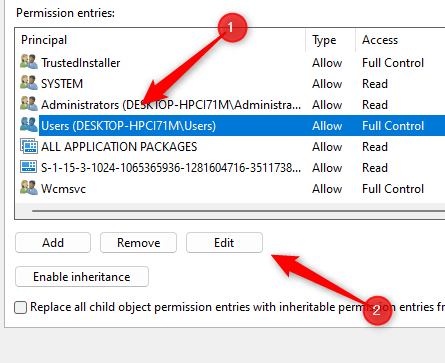
- Check the box next to Full Control and then click OK.

- Finally, click Apply to apply the settings.
- You can now edit the DefaultMediaCost key. Each value, such as Ethernet, WiFi, 4G, etc., represents a different connection. To set a connection as metered, double-click the value to open its DWORD window, and then set the Value data to 2.
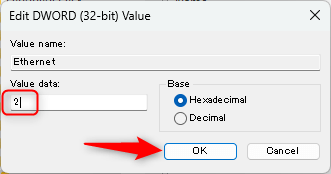
The value is now set as metered. You can switch it back to metered by setting it to 1.
How to Control Reboots After Updates
Windows has an automatic restart feature that can restart your computer after an update is installed. This can be inconvenient if you’re in the middle of something important. Here’s how to control the automatic restarts.
- Navigate to this file path in the Registry Editor:
HKEY_LOCAL_MACHINE\SOFTWARE\Policies\Microsoft\Windows\WindowsUpdate\AU - Double-click the NoAutoRebootWithLoggedOnUsers.
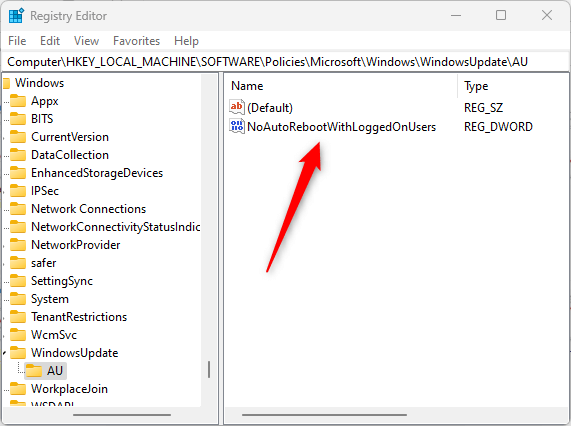
- Change the Value data to 1 and then click OK.
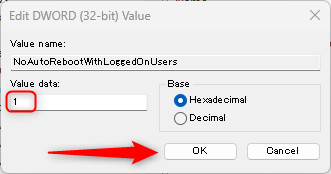
Windows will now no longer restart after an update. Remember that even if you download and install an update, you’ll need to manually restart your system for some of those updates to take place.
How to Disable Automatic Driver Updates
Automatic driver updates can sometimes cause problems, particularly if you have specific drivers that you wish to use. Disabling automatic driver updates gives you more control over what is installed on your system.
- Navigate to this file path in the Registry Editor:
HKEY_LOCAL_MACHINE\SOFTWARE\Microsoft\Windows\CurrentVersion\DriverSearching - Double-click the SearchOrderConfig value and edit its Value data to 0. Click OK.
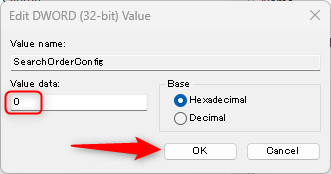
Automatic driver updates are now disabled.
How to Set the Frequency of Automatic Updates Checks
Text
- Navigate to this file path in the Registry Editor:
HKEY_LOCAL_MACHINE\SOFTWARE\Microsoft\Windows\CurrentVersion\WindowsUpdate\Auto Update - Right-click an empty space, select New > DWORD (32-bit) Value, and then create a new value called ScheduledInstallDay. Repeat this process and create a new value called ScheduledInstallTime.
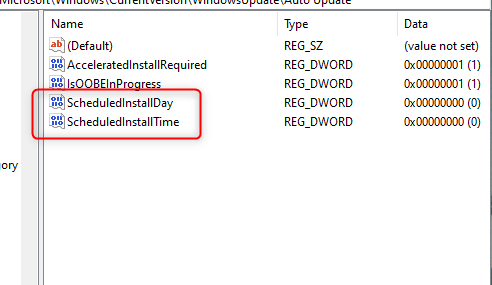
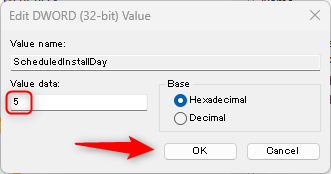
- Double-click ScheduledInstallDay and set the Value data to 1 through 7. 1 represents Sunday, 2 represents Monday, 3 represents Tuesday, and so on. Click OK.
- Double-click ScheduledInstallTime and set the Value data to 1 through 24. The value represents the hour of the day in 24-hour format. Click OK.
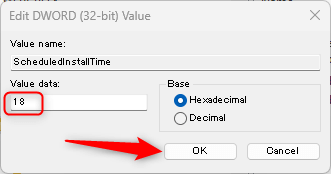
So, in our example, we set the day to 5 and the time to 18. That means the update check will be on Thursday and 6 PM.
Enhancing Control Over Windows Updates With the Registry
Customizing Windows Update Registry settings can give you a greater level of control over your computer’s updates, enabling you to manage your data usage, disable automatic updates, control restarts after updates, and much more.
However, it’s important to approach this process with caution and ensure your computer and the Registry are backed up before making any changes. The Registry is a powerful tool and mishandling it can lead to serious issues requiring a reinstallation of your operating system.
The ability to personalize your Windows Update experience is there, just make sure that you use this tool wisely to avoid potential complications.
Perhaps it’s because Windows is such a robust operating system, or perhaps it’s just because Microsoft keeps layering new features over the old, but there’s usually more than one way to get things done. A case in point is the ability to enable or disable updates in Windows.
Windows updates often include vital security updates, so ensuring the computers in your organization are updated in a timely manner is extremely important. By default, Windows 10 is set to download and install updates automatically when prompted. As of November 2019, users can’t disable updates, but they can pause them for a week at a time.
Windows Update Options
Windows 10 gives users options for its updates. It’s a two-step process, as the update files are first downloaded to the computer before installation.
Downloads: You can have updates downloaded automatically or have the system prompt the user to download them when it’s convenient. Having them download automatically should not be a problem, as these downloads are designed not to interfere with other processes. However, if the user has poor internet service and is trying to stream video or download other files, it could slow down the system.
Installation: Once the update is downloaded, a pop-up prompts the user to update the system, either immediately or at a more convenient time. Most updates take only a few minutes, but it’s often necessary to restart the computer when the update is complete.
Administrators have the option to schedule updates for specific times and dates using Group Policy or a Windows Update registry fix.
Before Changing Registry Settings
If you’re only concerned about your own computer, there should be no need to edit the registry to enable automatic updates. If you don’t think your computer is being updated, click the Windows Start button in the bottom right corner and select Settings, followed by Update & Security and then Windows Update.
If there are updates available, you will see them in the Windows Update window. From there, you can install them immediately or select a time that is most convenient for you. If you want the updates to be installed overnight, remember to leave your computer on or in sleep mode at the end of the day.
Windows Update Group Policy: Windows 10
If your computers are in a network using Active Directory, the network administrator can use a Group Policy to force each computer to update Windows automatically whenever an update is available.
With an administrator’s username and password, navigate to Computer Configuration > Administrative Templates > Windows Components > Windows Update > Configure Automatic Updates.
Select Auto download and notify for Install to have updates downloaded as soon as they are available. After the update is downloaded in the background, the user is prompted to install it. Alternatively, you can select Auto download and schedule the Install and then set the time for the installation to occur.
Windows Update Registry Settings: Windows 10
If you don’t have access to Active Directory, changing the registry setting is the next best option. However, only an experienced network administrator should do this.
1. Click the Start button, type «regedit» in the Search field, and then open the Registry Editor.
2. Navigate to the registry key: HKEY_LOCAL_MACHINE > SOFTWARE > Policies > Microsoft > Windows > WindowsUpdate > AU.
3. In the right pane of the registry editor, select NoAutoUpdate and turn it to 0 to enable automatic updates. The other option, 1, activates this feature, thus disabling automatic updates.
4. Select AUOptions in the right pane and ensure it is not set to 1, which disables automatic updates.
5. Select ScheduledInstallDay to specify installations that happen on a specific day of the week. Select 0 to have downloaded updates installed on the day they are downloaded or select 1 (Sunday) through 7 (Saturday) to choose a specific day.
6. Select ScheduledInstallTime to choose the time updates are installed. Windows uses a 24-hour clock, so 0 is midnight, while 23 is 11:00 p.m.
7. Select RescheduleWaitTime to specify how long Windows should wait if it is unable to install the update at the scheduled time. You can specify a wait time of 1 to 60 minutes.
Для обеспечения безопасности и поддержания актуального состояния операционной системы очень важно регулярно загружать и устанавливать последние обновления. Обновление может выполняться как каждым клиентским компьютером с сайта Microsoft Update, так и централизованно, посредством использования сервера Windows Server Update Services (WSUS).
В корпоративной сети рекомендуется использование сервера WSUS, так как при этом достигается значительное снижение Интернет трафика и обеспечивается возможность централизованного управления процессом развертывания обновлений.
Наилучшим способом настройки автоматического обновления является использование групповых политик, однако это возможно только в случае, если в организации есть служба каталогов Active Directory. Если же AD в организации не развернута и компьютеры находятся в рабочих группах, то доменные групповые политики отпадают и настроить клиента на использование WSUS можно либо посредством локальной групповой политики, либо путем прямого внесения изменений в системный реестр компьютера.
Предварительная настройка
Сначала нам необходимо произвести некоторые настройки на сервере WSUS. Открываем консоль управления WSUS и в разделе «Computers» создаем новую группу, в которую будут входить наши компьютеры. Назовем ее Workgroup.

Создав группу идем на вкладку «Options» и там, в разделе «Computers» указываем серверу WSUS размещать компьютеры в группах согласно групповым политикам или настройкам реестра. В противном случае все новые компьютеры автоматически попадают в группу Unassigned Computers.

Групповая политика
Теперь можно приступать к настройке клиента. Заходим на клиентский компьютер, нажимаем Win+R и набираем команду gpedit.msc. Открывается редактор локальной политики компьютера. За настройку обновлений отвечает раздел Конфигурация компьютера — Административные шаблоны — Компоненты Windows — Центр обновления Windows.

Нам надо настроить следующие политики:
Указать размещение службы обновлений Microsoft в интрасети — задаем адрес или имя сервера обновлений, к которому будет выполняться подключение клиента, а также адрес сервера статистики. Можно указать один и тот же адрес для обеих задач.

Разрешить клиенту присоединение к целевой группе — указываем имя группы на сервере WSUS, к которой должен быть присоединен данный компьютер. В нашем случае это Workgroup.

Настройка автоматического обновления — здесь мы задаем режим загрузки и установки обновлений и расписание, по которому обновления будут устанавливаться. Если расписание не задано, то по умолчанию обновления будут устанавливаться ежедневно в 3 часа ночи.

Частота поиска автоматических обновлений — указываем частоту обращений к серверу для проверки на наличие обновлений. Теперь обращения к серверу WSUS будут происходить через заданный промежуток времени со случайным отклонением для проверки наличия разрешенных для установки обновлений.

Перенос запланированных автоматических установок обновлений — задаем время ожидания перед установкой обновлений в том случае, если плановая установка была пропущена по каким либо причинам.

Не выполнять автоматическую перезагрузку, если в системе работают пользователи — даем пользователю возможность выбора времени перезагрузки после установки обновлений. Если этот параметр не задан или отключен, то пользователю выдается уведомление и компьютер автоматически перезагружается через 5 минут.

Реестр
Теперь те же настройки произведем с помощью правки реестра.
Идем в раздел реестра HKEY_LOCAL_MACHINE\SOFTWARE\Policies\Microsoft\Windows\WindowsUpdate. Если раздела нет — создаем его. В разделе создаем следующие ключи:
″WUServer″=http://192.168.0.1 — адрес сервера обновлений;
″WUStatusServer″=http://192.168.0.1 — адрес сервера статистики;
″TargetGroupEnabled″=dword:00000001 — размещать компьютер в целевой группе;
″TargetGroup″=″Workgroup″ — имя целевой группы для компьютера.

Далее в разделе HKEY_LOCAL_MACHINE\SOFTWARE\Policies\Microsoft\Windows\WindowsUpdate\AU создаем ключи:
″NoAutoUpdate″=dword:00000000 — автоматическое обновление включено;
″AUOptions″=dword:00000004 — загружать и устанавливать обновления по расписанию;
″ScheduledInstallDay″=dword:00000001 — устанавливать обновления в 1-й день недели (воскресенье). Для ежедневного обновления нужно задать нулевое значение;
″ScheduledInstallTime″=dword:00000003 — устанавливать обновления в 03:00 часа;
″UseWUServer″=dword:00000001 — использовать для обновлений сервер WSUS. Если задано нулевое значение, то обновление производится с Microsoft Update;
″DetectionFrequencyEnabled″=dword:00000001 — частота проверки обновлений включена;
″DetectionFrequency″=dword:00000012 — проверять наличие обновлений на сервере каждые 12 часов;
″RescheduleWaitTimeEnabled″=dword:00000001 — переносить пропущенную установку обновлений;
″RescheduleWaitTime″=dword:00000010 — запускать пропущенную установку обновлений через 10 минут после включения компьютера;
″NoAutoRebootWithLoggedOnUsers″=dword:00000001 — не перезагружать компьютер автоматически, если на нем работают пользователи.

Автоматизация настройки
Если настраивать предстоит не один компьютер, то процесс можно автоматизировать. Для этого открываем Блокнот, создаем reg-файл и добавляем в необходимые ключи реестра. В нашем случае получился вот такой файл:
Windows Registry Editor Version 5.00
[HKEY_LOCAL_MACHINE\SOFTWARE\Policies\Microsoft\Windows\WindowsUpdate]
″WUServer″=″http://192.168.0.1″
″WUStatusServer″=″http://192.168.0.1″
″TargetGroupEnabled″=dword:00000001
″TargetGroup″=″Workgroup″
[HKEY_LOCAL_MACHINE\SOFTWARE\Policies\Microsoft\Windows\WindowsUpdate\AU]
″NoAutoUpdate″=dword:00000000
″AUOptions″=dword:00000004
″ScheduledInstallDay″=dword:00000001
″ScheduledInstallTime″=dword:00000003
″UseWUServer″=dword:00000001
″DetectionFrequencyEnabled″=dword:00000001
″DetectionFrequency″=dword:00000012
″RescheduleWaitTimeEnabled″=dword:00000001
″RescheduleWaitTime″=dword:00000010
″NoAutoRebootWithLoggedOnUsers″=dword:00000001
Теперь для настройки автоматического обновления будет достаточно перенести этот файл на целевой компьютер и выполнить его.
Возможные проблемы
Если после настройки компьютеры не появляются в консоли WSUS, это может быть связано с тем, что рабочие станции подготовлены с использованием неправильно подготовленных образов, т.е. без использования утилиты sysprep или аналогичных программ. В этом случае машина может иметь дублирующие значения SusClientID в реестре.
Для решения проблемы необходимо произвести на клиенте следующие действия:
- выполнить в консоли cmd команду net stop wuauserv, чтобы остановить службу автоматического обновления;
- запустить regedit и перейти в ветку реестра HKLM\SOFTWARE\Microsoft\Windows\CurrentVersion\WindowsUpdate;
- удалить ключи PingID, AccountDomainSid, SusClientId, SusClientIDValidation (если есть);
- удалить всё содержимое папки %WinDir%\SoftwareDistribution (неофициальная рекомендация);
- в консоли выполнить команду net start wuauserv, чтобы запустить службу автоматического обновления;
- в консоли выполнить команду wuauclt.exe /resetauthorization /detectnow и подождать, пока завершится регистрация рабочей станции на сервере WSUS (10-15 минут);
- если компьютер в консоли не появился, то выполнить команду wuauclt.exe /detectnow. Обычно одного повтора достаточно, но может потребоваться и больше;
- зайти в консоль управления WSUS и убедиться, что рабочая станция успешно зарегистрировалась.
To do this, follow these steps:
- Select Start, search for “regedit”, and then open Registry Editor.
- Open the following registry key: HKEY_LOCAL_MACHINE\SOFTWARE\Policies\Microsoft\Windows\WindowsUpdate\AU.
- Add one of the following registry values to configure Automatic Update. NoAutoUpdate (REG_DWORD):
How do I edit the registry in Windows 8?
In Windows 8, you can type regedit on the Start screen and select the regedit option in the search results. In Windows 10, type regedit in the Search box on the taskbar and press Enter . If prompted by User Account Control, click Yes to open the Registry Editor.
How do you fix some settings are managed by your organization Windows Update?
How can I fix Some settings are managed by your organization?
- Remove work or school accounts. Go to the Windows Settings.
- Change your Diagnostic and usage data.
- Check your hard drive.
- Change your settings from Group Policy Editor.
- Edit your registry.
- Check your antivirus.
- Enable Telemetry.
- Check the scheduled tasks.
How do I change Windows Update settings when managed or disabled by system administrator?
STEP 1: In the Run window or Start search, enter “gpedit….STEP 5: Now select any of the following options according to your requirements:
- 2 – Notify for download and notify for install.
- 3 – Auto download and notify for install.
- 4 – Auto download and schedule the install.
- 5 – Allow local admin to choose setting.
How do I turn off WindowsUpdate in registry?
You can disable the Windows Update service.
- Click Start, type Services and press Enter on the Services Desktop app.
- Find the Windows Update service, double-click to open it.
- Change Startup type: to Disabled, click OK and restart to take effect.
Where is the WindowsUpdate registry key?
Windows Update uses an update agent that actually installs the updates. There are a number of registry keys located at HKEY_LOCAL_MACHINE\SOFTWARE\Policies\Microsoft\Windows\WindowsUpdate\AU that control the automatic update agent.
How do I get to registry editor?
There are two ways to open Registry Editor in Windows 10:
- In the search box on the taskbar, type regedit, then select Registry Editor (Desktop app) from the results.
- Right-click Start , then select Run. Type regedit in the Open: box, and then select OK.
How do I remove managed by my organization?
Step 1: Launch Google Chrome on your computer. Click on the three-dot icon at the top and go to Settings. Step 2: Scroll down and click on Manage search engines. Step 3: If you see any suspicious website, click on the three-dot icon next to it, and select Remove from the list.
How do I enable Windows updates blocked by administrator?
To enable access to the Windows Update Web site, follow these steps:
- Log on to the computer as a local administrator.
- Click Start, click Run, type gpedit.
- In the left pane, expand User Configuration, and then expand Administrative Templates.
- Expand Windows Components, and then click Windows Update.
How do I remove Windows updates managed by system administrator?
Open gpedit. msc, Navigate to the path: Computer configuration/Administrative Templates/System/Internet Communication Management/Internet Communication settings. Look for the setting to turn off all windows update features.
How do I enable Windows Update from the registry?
Enable and Configure Windows Update From Registry Settings. In this tutorial, you will learn how to control Windows update settings through the registry. For controlling Windows Update settings follow the steps below. Press Winkey+R to open Run. Enter Regedit phrase then press OK. In the Windows registry page, locate the following address.
Where is the Registry Editor in Windows 8?
Let us assume that your mission is to change a setting in Windows 8 by using the registry editor. right-click the regedit app, and ‘Advanced’ should appear in the bottom left of your screen. Click and select: ‘Run as administrator’. Launch your registry editor – Regedit.
What happens if I edit the registry in Windows 10?
Incorrectly editing the registry might severely damage your system. Before making changes to the registry, you should back up any valued data on the computer. Registry entries that you can use to configure Automatic Updates by using Registry Editor are located in the following subkeys:
Can you use Registry Editor for automatic updates?
If you do not want to use Group Policy to manage Automatic Updates (for example, the WSUS deployment is in a non-Active Directory environment), you can configure Automatic Updates by using Registry Editor. Incorrectly editing the registry might severely damage your system.