How to make a screen recording
Clipchamp for personal accounts Clipchamp for work accounts More…Less
In Clipchamp, you can either record your screen or you can record both your screen and webcam together to produce training videos, react videos, presentations, gaming streams, and much more.
When you record screen and camera together, the recordings are captured simultaneously but they can be adjusted in the editing timeline separately. This means each video can be resized and placed however you like.
For the ideal outcome, recordings will align if you place them on top of each other on the timeline. The webcam recording can then be altered using freehand editing to place it over the screen recording to give a picture-in-picture appearance.
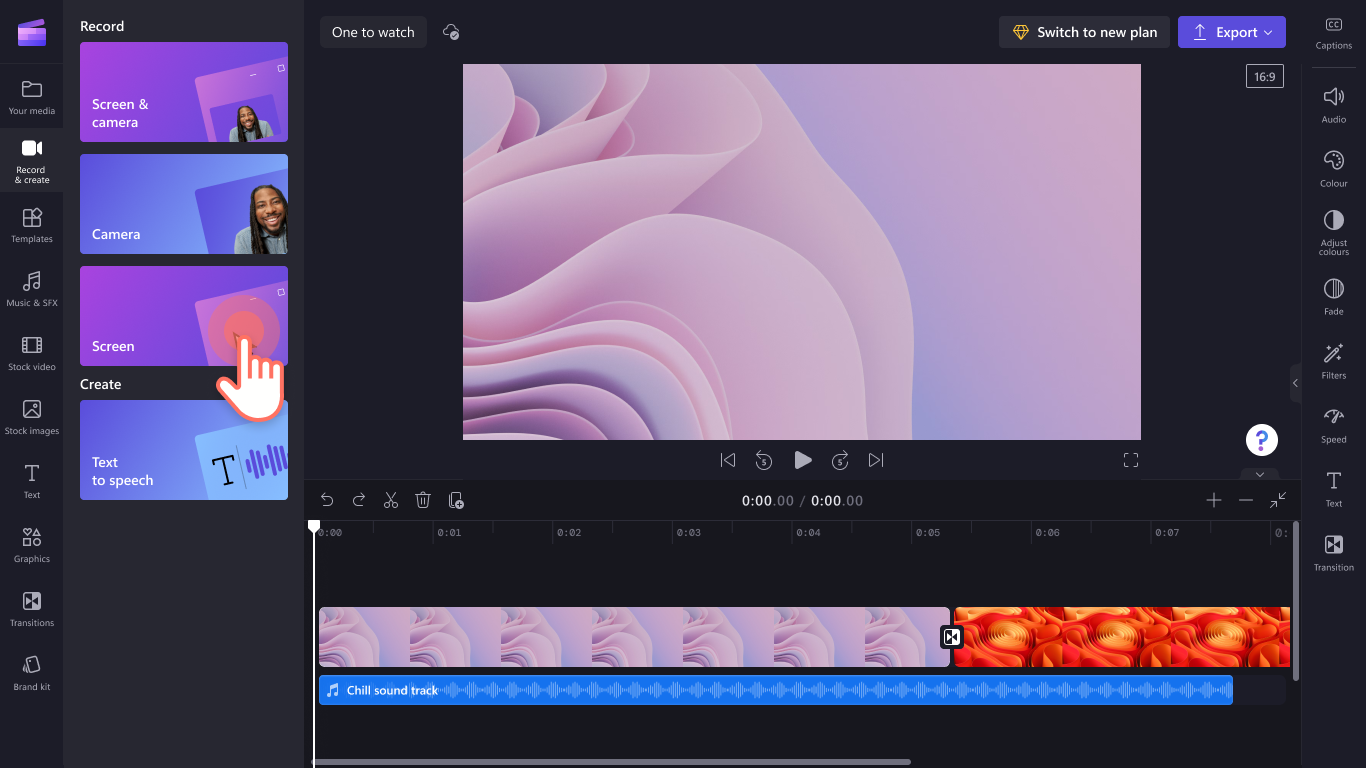
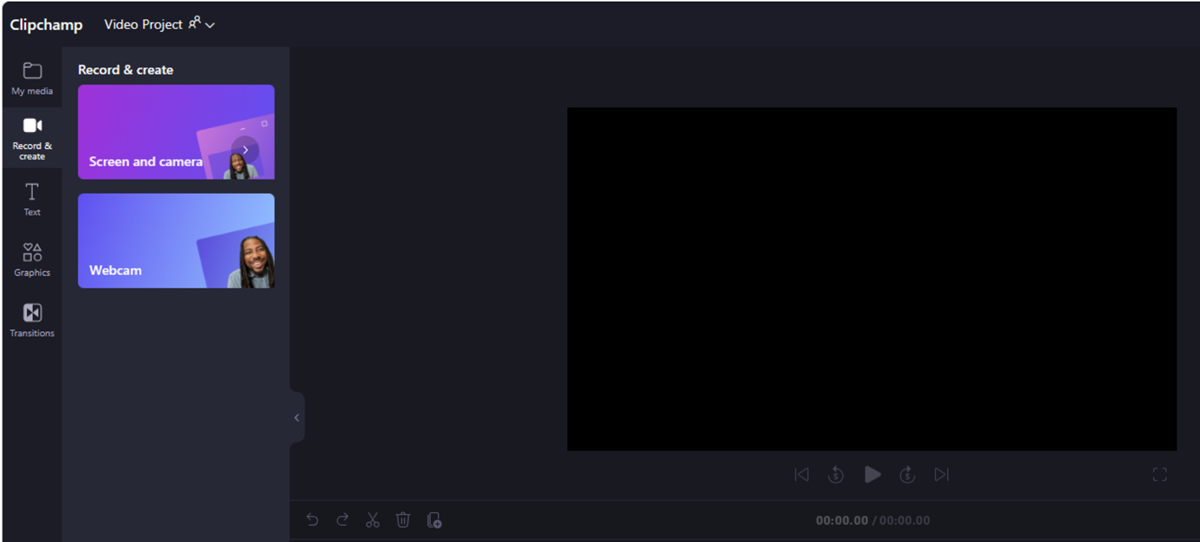
In Clipchamp’s video editor for personal accounts, to take a recording, go to the Record & create tab on the left toolbar.
Next, select either the screen or screen & camera option. Audio will also get recorded through your computer’s microphone, for example, if you want to talk while showing your screen (unless you turn audio recording off).
Note: The screenshots in this article show the screen recorder option. The same steps apply to screen & camera after choosing this option in the initial step.
To begin, open the «Record & create» tab
In this menu, you’ll see the options Screen & camera, Camera, Screen, and Text-to-speech. Select the Screen option.
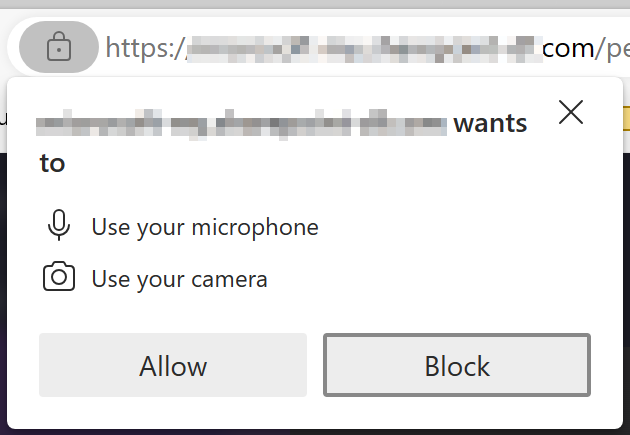
Allow camera & mic access, start the screen recording
A popup will appear at the top of your screen.
Allow Clipchamp access to use your camera & microphone. If you gave permission to access one or both devices before, the message on the popup can look different to our example screenshot.
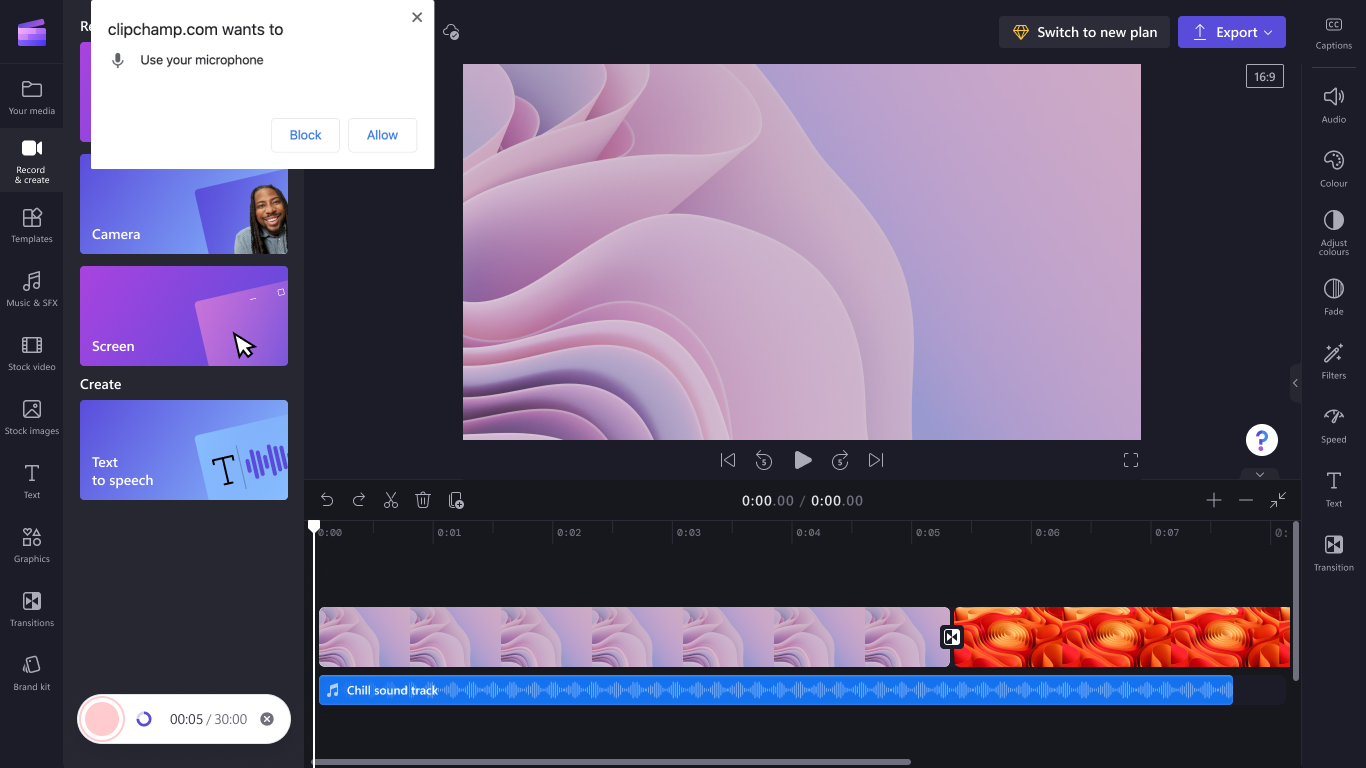
Next, start recording your screen by selecting the big red button at the bottom left.
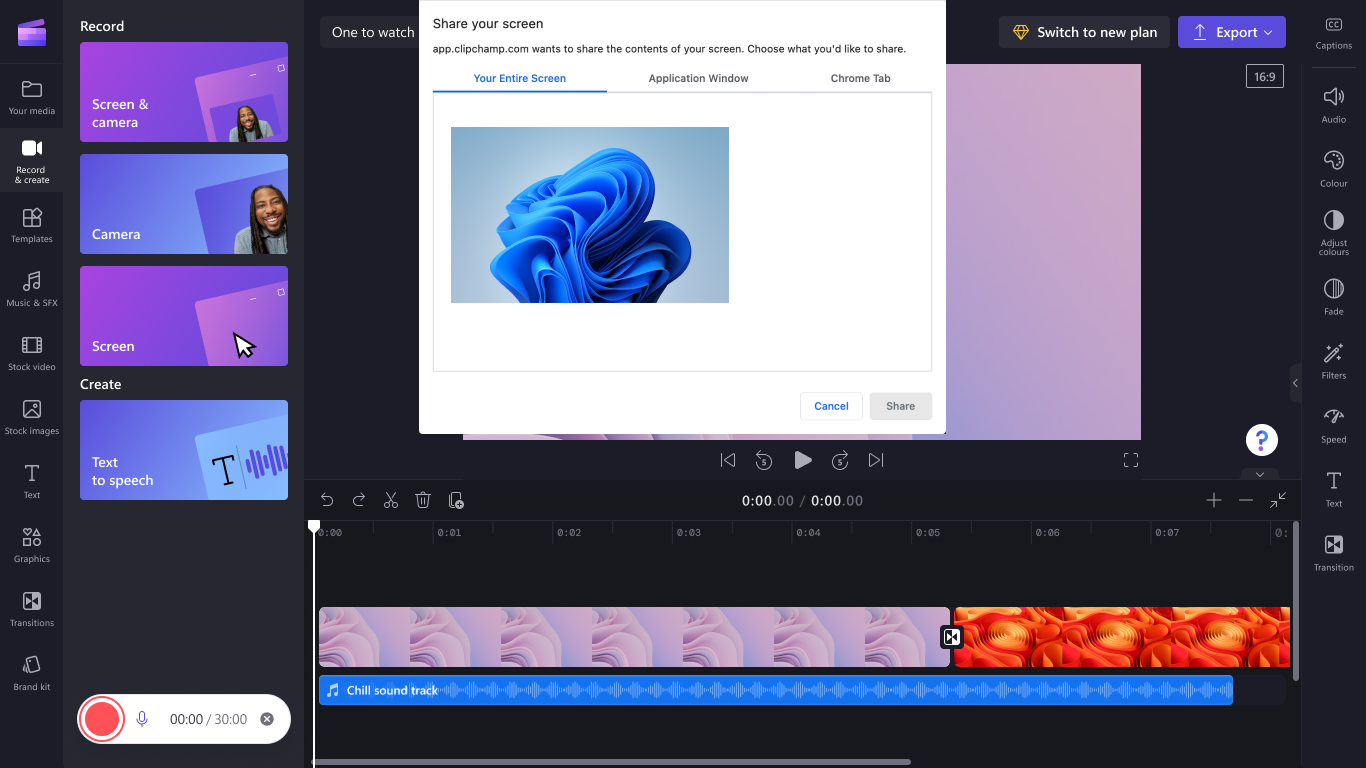
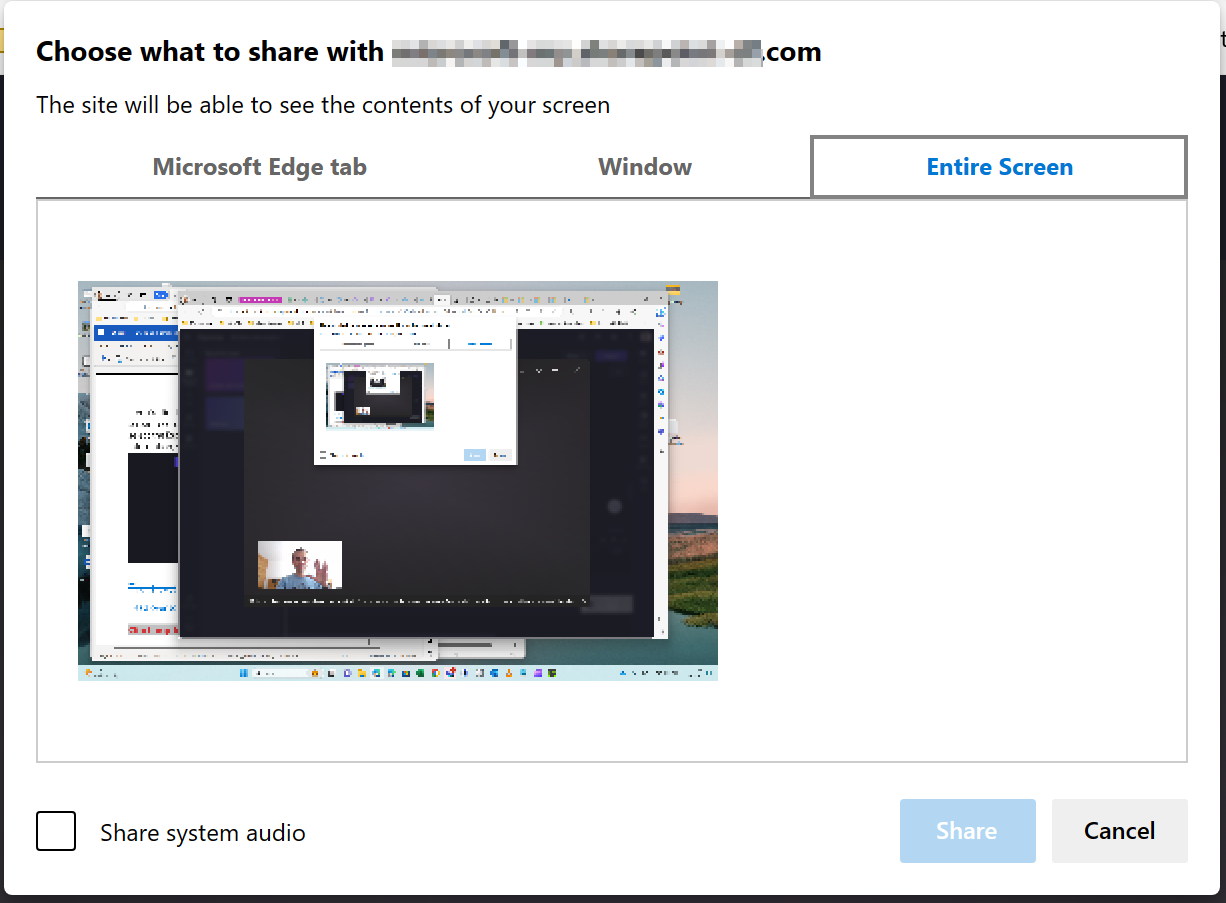
Another popup window will appear with screen recording options. Either record your entire screen, an application window, or a browser tab. We opted to screen record a Chrome tab for this tutorial. Select the tab of your choice, then select Share.
Important: In the Clipchamp Windows app, you will be able to select browser tabs from Microsoft Edge due to the way the Windows app works. To record a Chrome tab, open Clipchamp in Chrome and start a screen recording there.
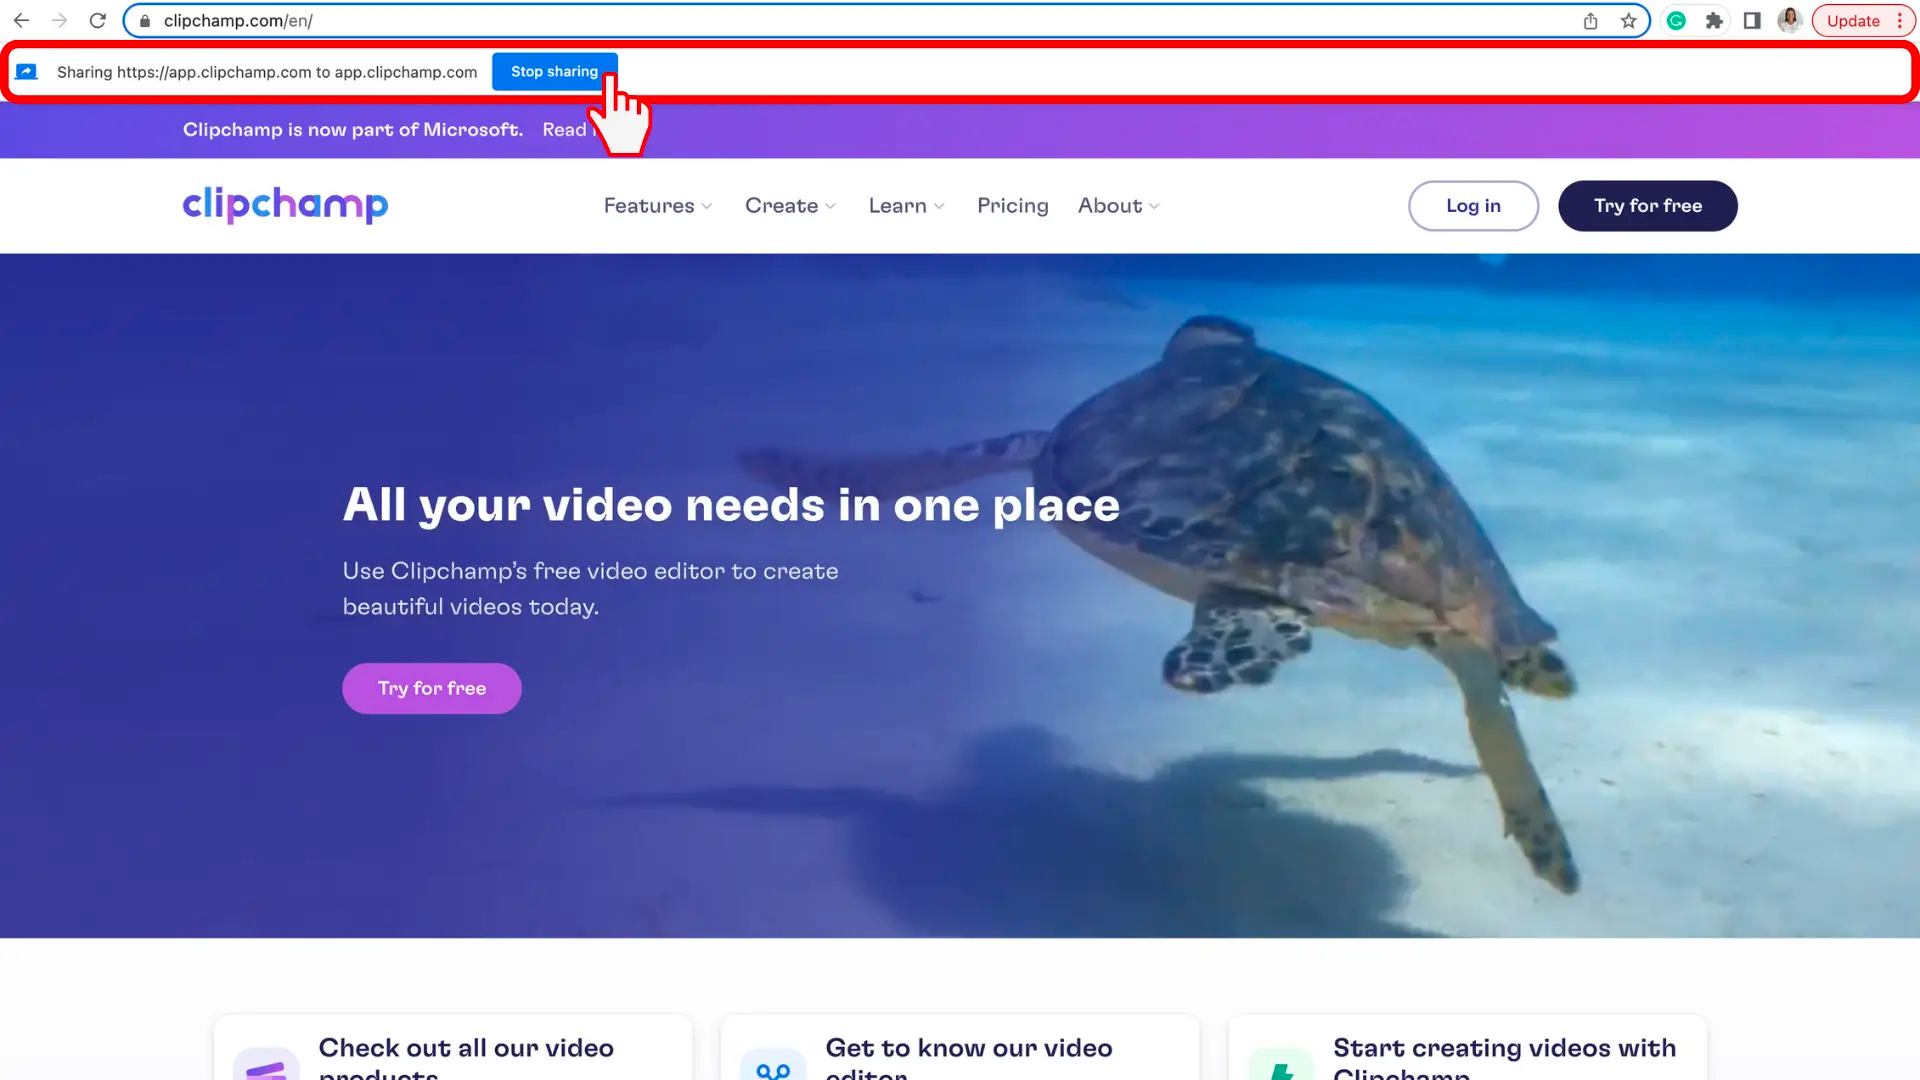
You will be brought to the Chrome tab you have selected to screen record. Your screen is now actively recording. Your audio will automatically start recording when you select Share. Your built-in microphone will pick up on your voice, computer or mouse clicking, and any noise around you. To stop recording your screen, select Stop sharing.
TIP: If you want to record for longer than the maximum time (shown to the right of the elapsed time), try taking several shorter recordings and combining them in the editor later.
Download the raw recording, add it to the editing timeline
After you’ve selected Stop sharing, return to the editor. You can now preview your screen recording with audio. If you’re unhappy with the screen-recorded video, select Retake recording. If you want to use your video, select Save and edit.
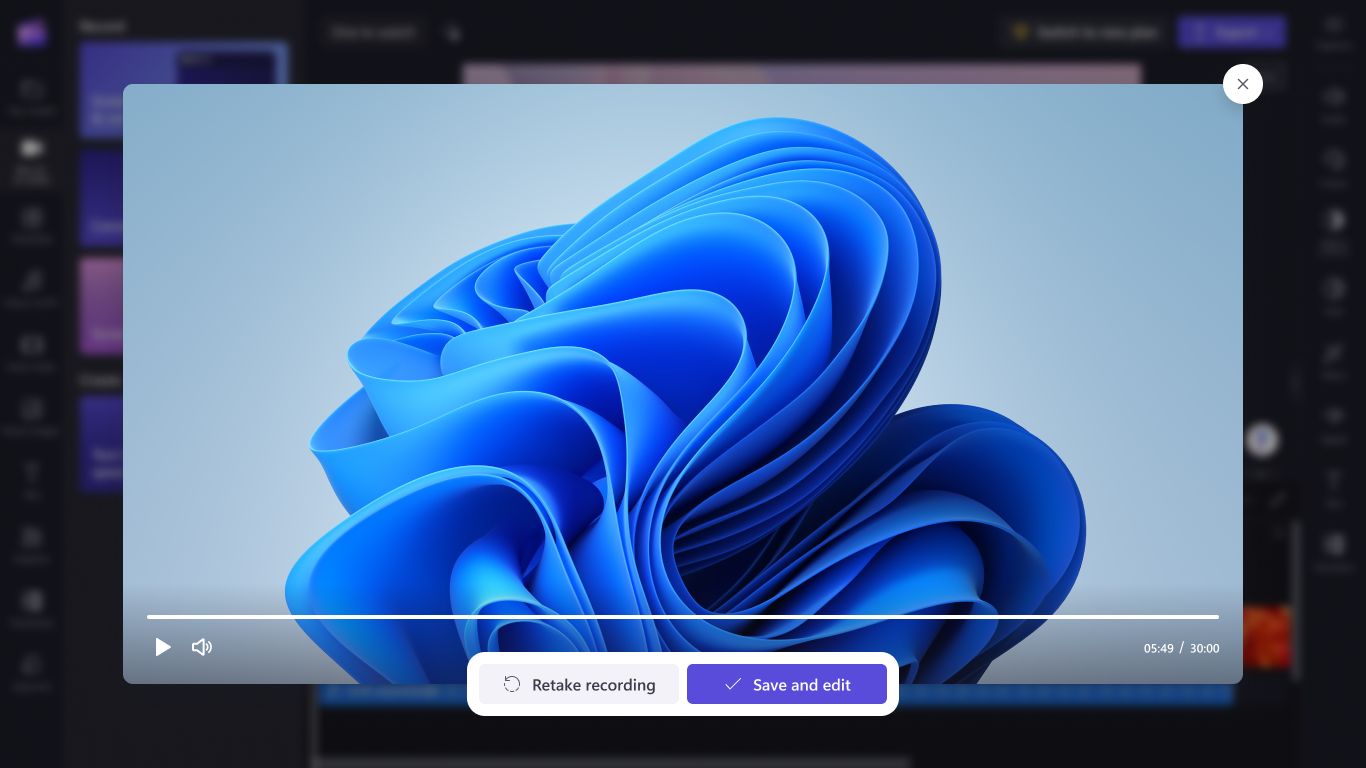
A copy of the recording (in WebM format) will download to your computer, depending on the default settings in place, you can either select a folder to save it in or it will get stored in the Downloads folder automatically.
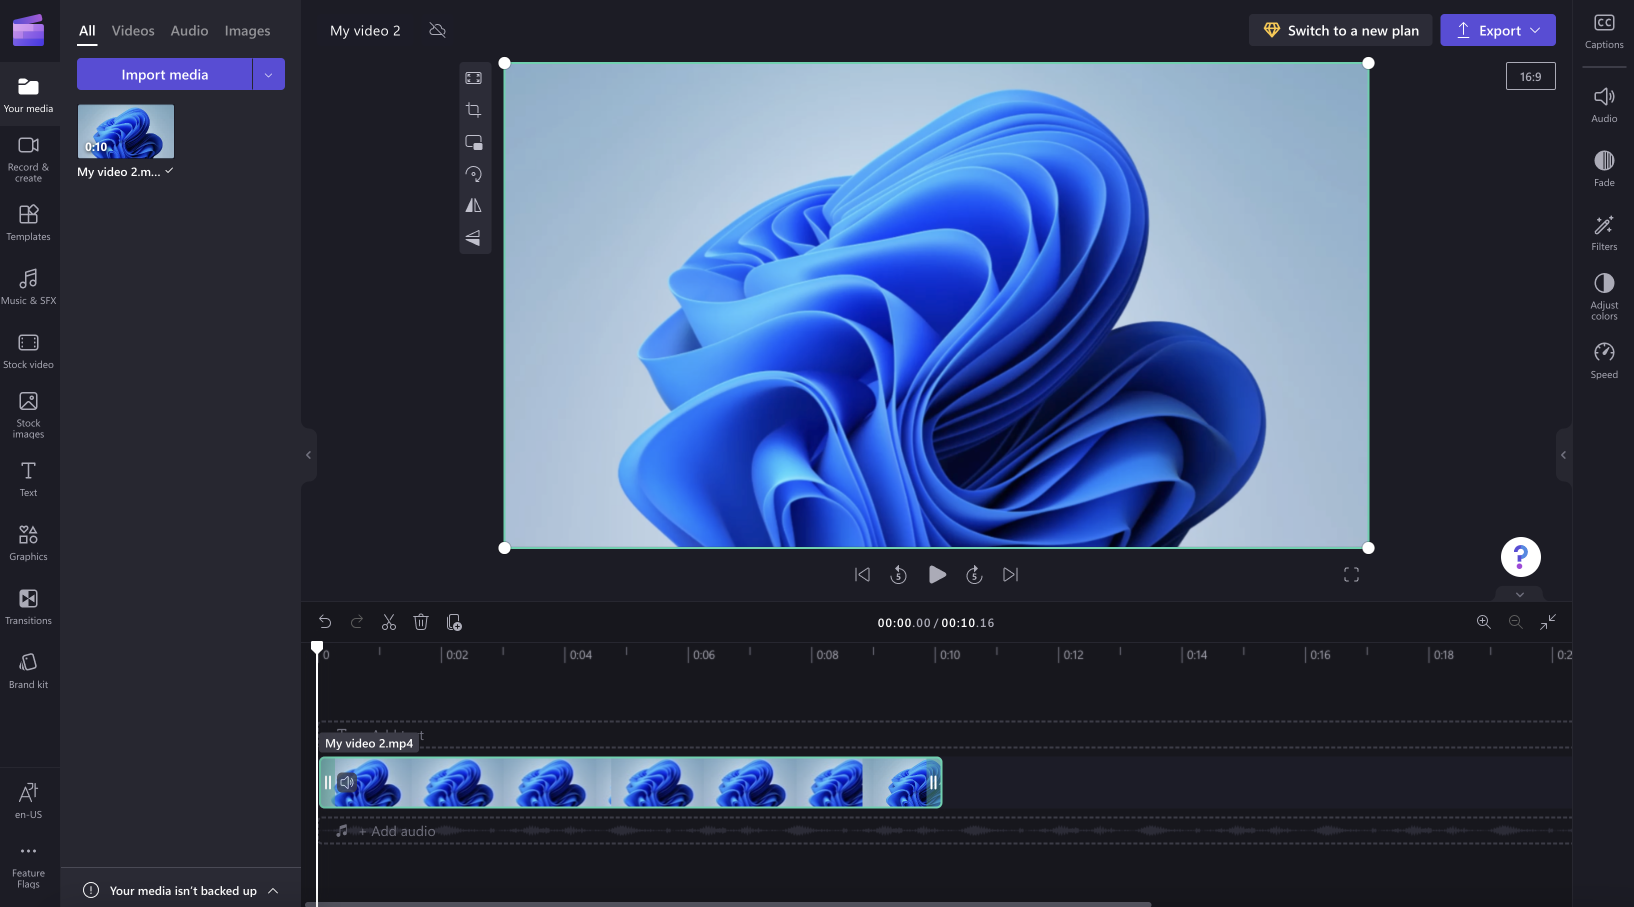
The clip will also get loaded into the editing project and will automatically be added to the timeline. To add more than one copy to the timeline, select the Your media tab to find the screen recording file. Note that the audio track of the recording is part of the video.
Edit your screen recording audio
You can mute your screen recording audio by clicking on the microphone icon on the clip on the timeline. You can also detach the audio track to edit it separately.

In addition, you can edit the video further, for instance by trimming unwanted parts off the start or end or splitting it to cut out segments.
If the recording doesn’t fit the dimensions of your project (e.g. you see black bars on either side of it) you can crop it to fit the project’s aspect ratio.
For more information on Clipchamp’s editing tools, see the How to edit a video article.
Export the video
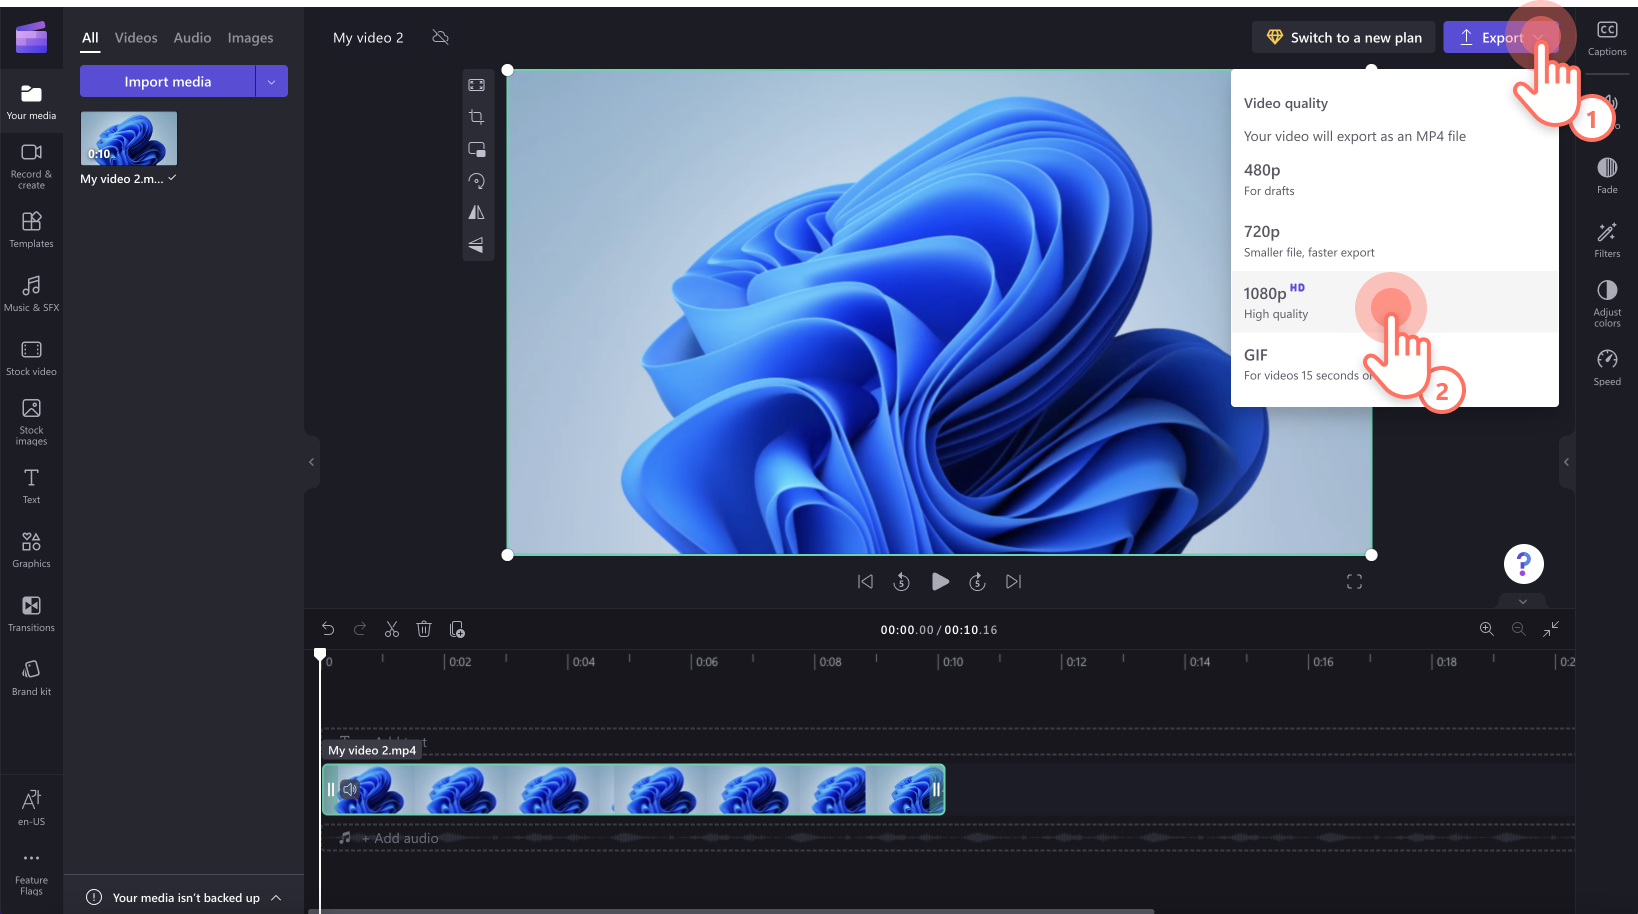
If you’re finished editing and would like to save the screen recording including edits as an MP4 video to your computer, select the Export button in the top right and follow the prompts.
In Clipchamp’s video editor for work accounts, to take a screen recording, go to the Record & create tab in the left toolbar of the editor. Next, select the Screen and camera option.
Audio will also be recorded through your computer’s microphone. For example, you could talk while showing your screen (unless you turn audio recording off).
To begin, open the «Record & create» tab
Select Record & create on the toolbar, then select Screen and camera.
Allow camera & microphone access, start the recording
Important: When you use Clipchamp in Edge, you can select browser tabs from Microsoft Edge to record. To record a Chrome tab, open Clipchamp in Chrome and start a screen recording there.
When you start a recording for the first time, you’ll see a popup next to the browser address bar asking for permission to access your camera and microphone.
Allow access, otherwise the screen and camera recording won’t work.
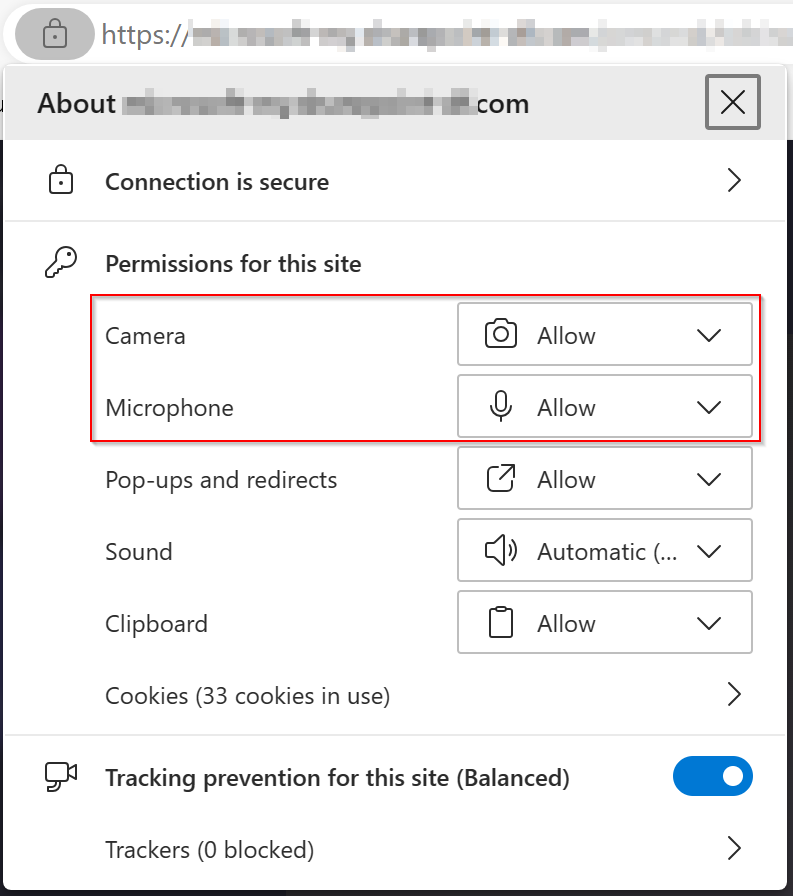
To check the permissions you’ve given Clipchamp, select the Lock icon and make sure you’ve allowed Clipchamp access to use your webcam and microphone.
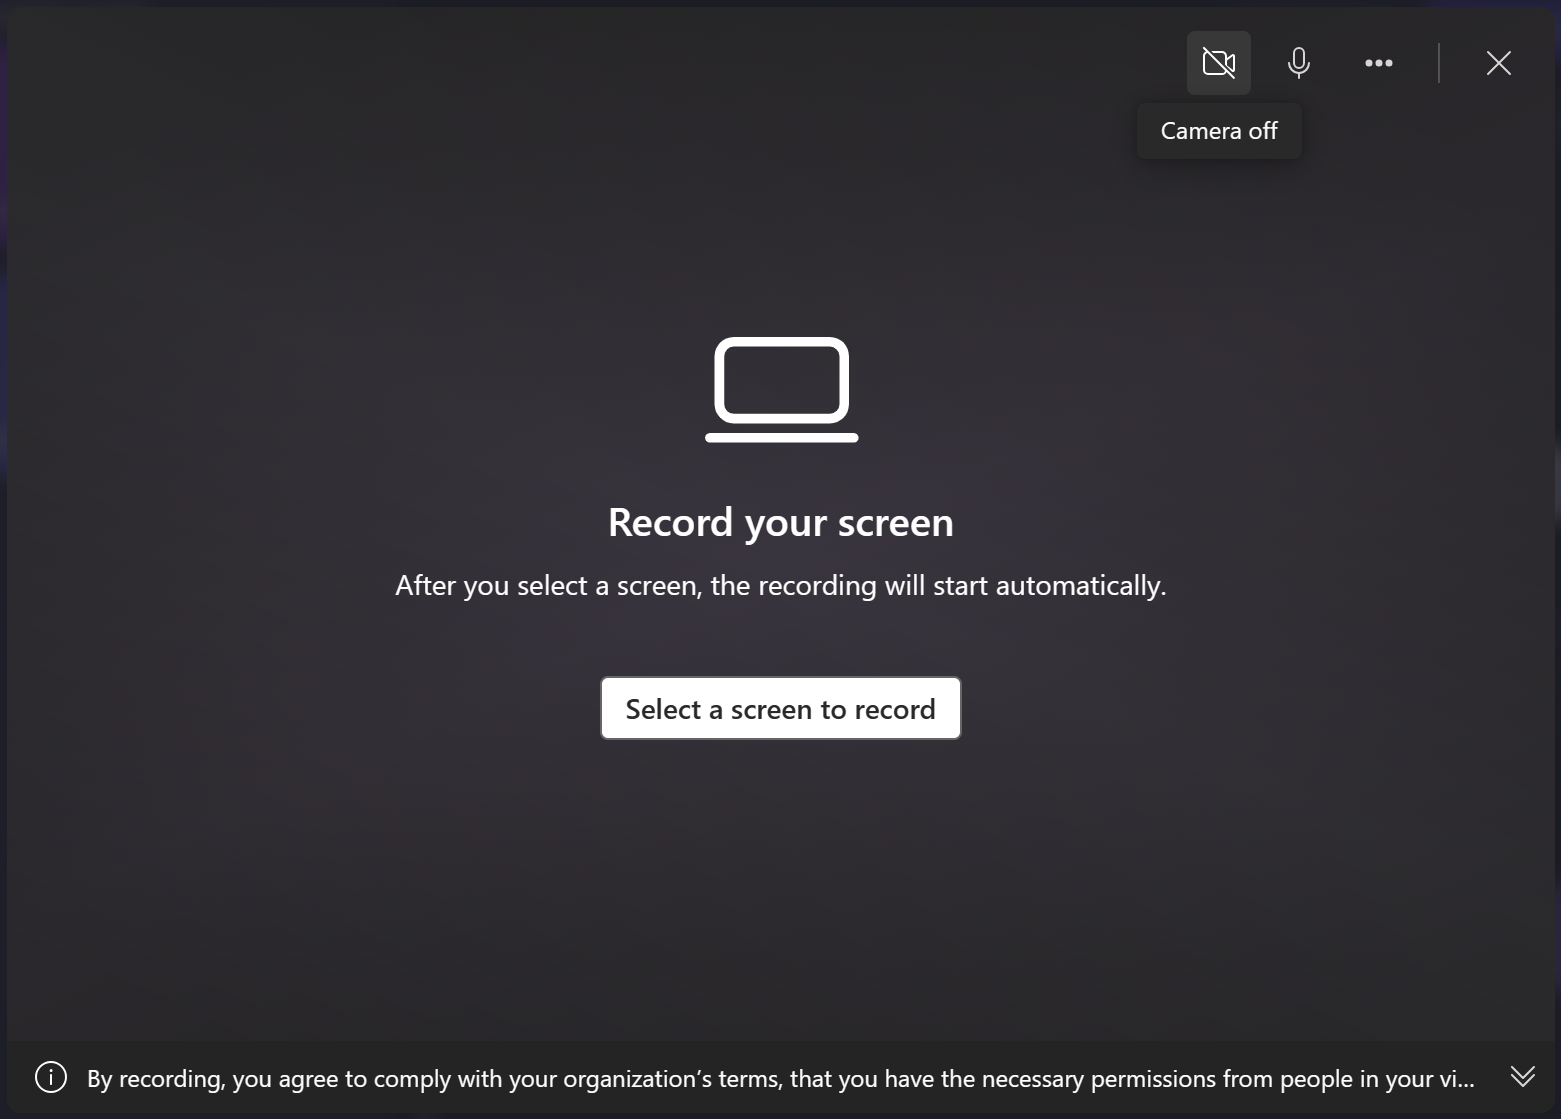
In the popup window, toggle your webcam on or off to either include or exclude the camera from the recording session, then click Select a screen to record.
Select a screen, window or browser tab, also decide if you’d like to include the system audio, then select Share.
You will be brought to the screen, window or browser tab you selected to record. After a countdown of beeps, your screen starts actively recording. The computer’s microphone will pick up on your voice, computer sounds or mouse clicking, and any noise around you.
To stop recording your screen, select Stop sharing in the horizontal toolbar that appeared when the recording started.
TIP: If you want to record for longer than the maximum time, try taking several shorter recordings and combining them in the editor later.
Save your screen recording
After you’ve selected Stop sharing, return to the editor. You can now preview your screen recording with audio. If you’re unhappy with the screen-recorded video, select Retake recording. If you want to use your video, select Save and edit.
Note: If you recorded both screen and camera, there will be 2 files available, one for the screen recording and one for the webcam recording. If you only recorded your screen, there will be one file.
A copy of the recording (in WebM format) will download to your computer, depending on the default settings in place, you can either select a folder to save it in or it will get stored in the Downloads folder automatically.
The clip(s) will also get loaded into the editing project and will automatically be added to the timeline. The audio track of the recording is part of the video.
If there is a screen recording and a camera recording, the 2 files are added to the timeline as a group. You can ungroup them by right clicking on the media on the timeline, then selecting ungroup.
Edit the recording and audio
You can mute your screen recording audio by clicking on the microphone icon on the clip on the timeline. You can also detach the audio track to edit it separately.
In addition, you can edit the video further, for instance by trimming unwanted parts off the start or end or splitting it to cut out segments.
If the recording doesn’t fit the dimensions of your project (e.g. you see black bars on either side of it) you can crop it to fit the project’s aspect ratio. You can also add text and titles.
For more information on Clipchamp’s editing tools, see the How to edit a video article.
Adjust the layout
If your recording includes a webcam clip that appears as a separate item on the timeline, you can edit the layout of the video by freely moving your webcam recording around the screen. To do so, drag and drop the camera clip around the preview window in the editor.
You can also use the editing features on the media’s property panel. These include fit, crop, picture-in-picture, rotate, flip horizontal, and flip vertical.
Export your video
If you’re finished editing and would like to save the edited project to your computer as an MP4 video, select the Export button in the top right and follow the prompts.
Need more help?
Want more options?
Explore subscription benefits, browse training courses, learn how to secure your device, and more.
Communities help you ask and answer questions, give feedback, and hear from experts with rich knowledge.
Do you want to keep game highlights but don’t know how? Did you watch a good video but have no way to download it? Or do you want to save an important online meeting to review later? Screen recording with audio is your best solution.
Today’s blog by AWZware will show you 4 effective apps to record screen and audio. Each one has its advantages and disadvantages. Read to learn more.
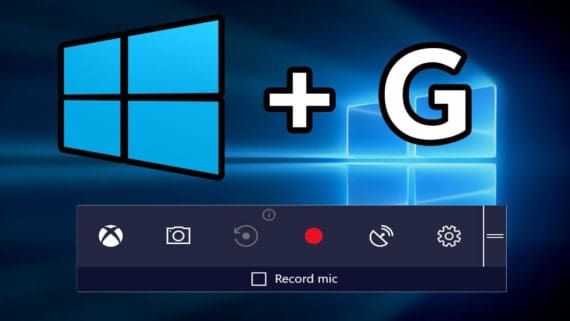
Screen Recording with Audio on Windows through Xbox Game Bar
People search the Internet for how to screen record on Windows 10 with audio. And most people are trying to find a simple way. Well, the Xbox Game Bar is a great tool.
Founded by Microsoft, the Xbox Game Bar is a customizable gaming overlay that is built into every Windows 10 system. It is mainly used for recording gameplay on PC, but it can also be used for screen recording with audio. Check out the next paragraph to learn how to record a screen with audio in just a few clicks.
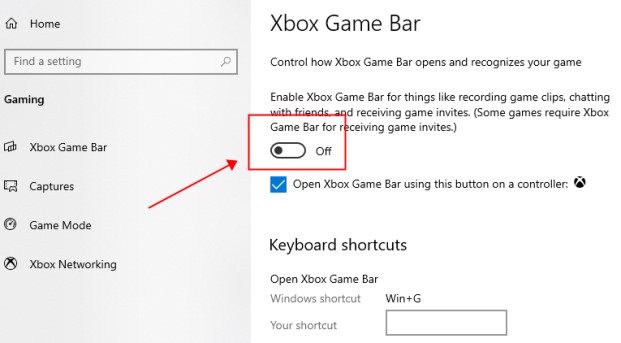
Before checking out the steps, you should turn the switch on in Settings >> Gaming >> Xbox Game Bar. Scroll down to learn keyboard shortcuts, or you can customize your shortcuts.
Step 1. Use shortcuts to open the game bar.
Press “Win+G” to launch the Xbox Game Bar. There will be several widgets with different functions displayed on your screen.
Step 2. Start screen recording with audio.
Navigate to the tab or any window you want to record. Click the button to screen record with audio. Or you can use the keyboard combination “Win+Alt+R” to begin. The recording will start as soon as you press the button.
Tips: Tap anywhere on the screen, and these widgets will disappear. A floating bar will appear, and you can now apply any action on your computer.
Step 3. Stop screen recording with audio.
Click on the blue button, and you can end the recording. The shortcut “Win+Alt+R” can stop it as well. Videos will be saved in the gallery, where you can preview them.
Pros
- There is no need to download Game Bar, you can use it directly.
- You can record screen and audio together in one click.
- It is a free Windows screen and audio recorder.
Cons
- You can only record videos for less than 30 minutes.
- You cannot edit videos.
- Any action to split the screen will pause the recording.
Screen Recording with Audio with AWZ Screen Recorder
Well, Game Bar is a little bit simple, isn’t it? It doesn’t allow you to edit while recording. What if you have something that needs to be pointed out? At this time, you need AWZ Screen Recorder. As a professional but easy-to-use tool, it has been liked by many users. Check out how to Screen record with audio using it.
Step 1.Download it from its official website and launch it.
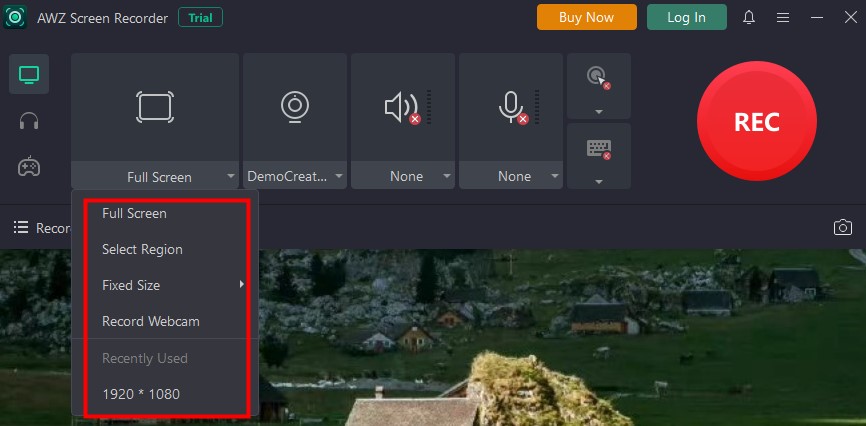
Step 2. Adjust capture options.
Choose to record the full screen and audio, or any part that you like.
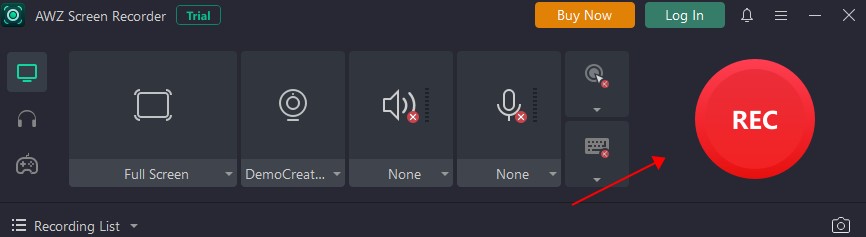
Step 3. Record screen and audio now.
Tap on the “REC” button or press “F12”, and the recording will begin after a 3-second countdown.
Step 4. End the recording by tapping the stop sign, or pressing “F12”.
Pros
- A handy tool. You can capture the screen with sound with just a tap.
- All-in-one. It integrates recording screens and taking screenshots together.
- Instant sharing. You can directly share your work on YouTube, Facebook, Instagram, and so on.
Cons
- It is a feature-rich app, you need time to explore.
- Recordings will be saved on your computer, if you record too much, it may take up a lot of your storage.
Screen Recording with Audio by ScreenRec
If you are trying to find an easy-to-use screen audio recorder, you shouldn’t miss ScreenRec. It is a light but very useful tool with simple steps. You can utilize this app without signing up or paying. Let’s see how to use it.
Step 1. Download and launch ScreenRec on your computer.
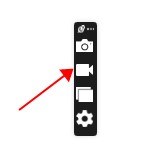
Step 2. Select the recording area. Tapping on the video player icon to start recording.
It will begin to record after a 3-second countdown.
Step 3. Stop recording and save videos.
You can stop it by clicking the stop button below or tapping on the record button again. The videos will be saved in ScreenRec’s gallery. Download them if needed.
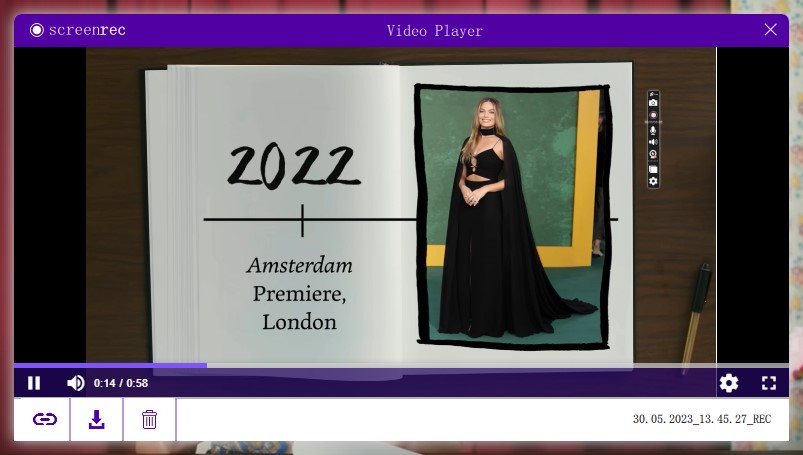
Step 4. Preview and share videos.
You can preview and rename videos. It generates a link that helps you share the video with friends.
Pros
- Free tool.
- Easy to use. You are able to record screen and audio in 3 actions: click, select, and click.
- Record any part of the screen.
- Splitting screens while recording is available.
Cons
- Sign-up is a must. You have to create an account to screen record with audio for more than 5 minutes. Creating a private link also requires that.
- You can only preview but not edit videos in the gallery.
- Saving videos as MP4, other formats are not available.
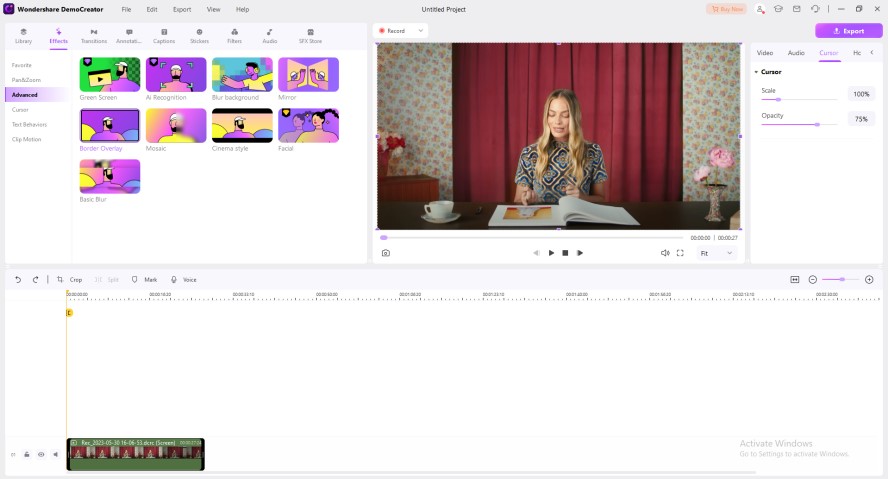
How to Record Screen with Audio Using DemoCreator
If you are looking for how to record screen and audio on Windows, DemoCreator is the last one you want to miss. It is a powerful screen audio recorder and video editor. It can record the screen along with the audio. The following part is going to show you how to use it.
Step 1. Install and open it on the computer.
Step 2. Tap on the “All-in-One Recorder” button and customize the recording settings.
According to different situations, it provides you with different recording sizes, such as full-screen, 3:4/9:16 for portraits, 16:9 for YouTube, and so on.
Step 3. Click the “REC” button or “F9” to start recording.
It will work after a countdown of 3 seconds.
Alt: Windows Screen Audio Recorder
Step 4. Stop recording by clicking the stop icon or pressing “F10”.
Step 5. Edit videos.
After recording, it will guide you to the editor. There are many features for you to explore.
Pros
- Professional editor. You can put effects, transitions, and more on videos.
- Annotate while recording.
- Capture screen, sound, and webcam altogether.
Cons
- Export videos are only available to subscribers.
- In a free trial, you can only record videos for less than 15 minutes.
![How to Screen Record on Mac with Audio in 3 Ways [Simple Steps]](https://img.swifdoo.com/image/how-to-screen-record-on-mac-with-audio.jpg)
How to Screen Record on Mac with Audio in 3 Ways [Simple Steps]
Wonder how to screen record on Mac with audio without a hassle? This article covers three ways and screen recorders to help along with steps to record.
READ MORE >
Final Thoughts
This post recommends you 4 ways to screen record with audio on Windows, along with their pros and cons. If you’re a vlogger, DemoCreator is recommended. If you want to share a video message with friends, you can choose Game Bar and ScreenRec. Try AWZ Screen Recorder, if you need a handy tool to highlight while recording.
Screen recording with audio is a general need that you might sometimes need to make a video tutorial because the video will be more intuitive to show the operations. You might also need to record a clip of the online video so you don’t need to find a way to download the whole of it. There are more needs, such as to record gameplay, record an important online meeting, etc.
This article teaches two significant ways to record computer screen with audio in Windows 10. One is to use the free inbuilt Windows 10 screen recorder. Another is to record screen with a more professional screen recording software for Windows 10.
Contents
- Method 1: Record Screen with the Free Built-in Windows 10 Screen Recorder
- Method 2: Capture Screen with VideoSolo Screen Recorder
Method 1: Record Screen with the Free Built-in Windows 10 Screen Recorder
You might have been using Windows 10 for quite a long time but haven’t known there’s a hidden feature that Windows 10 comes with a screen recording function. You can activate it by pressing Win+G. This function is built into Xbox. It is designed primarily for recording Xbox gameplay but it can also be used to record browser video or capture the activities on the applications.
How to record your screen with the Win10 inbuilt recorder?
Step 1: Press Windows key + G key simultaneously to open the recorder.
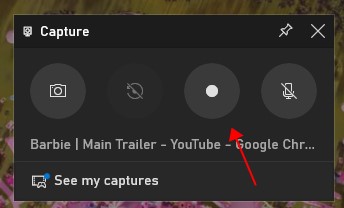
Step 2: In the Xbox game bar panel, you can adjust the volume for the microphone sound and system sound. After that, click on the recording button as highlighted to start recording your work.
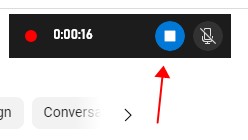
Step 3: The Win10 recorder is recording the screen. You can click the “Stop recording” button when you are going to end the recording process. You’ll find your recorded videos under the “Videos” folder in a subfolder called “Captures“.

The superiority and inferiority of this free inbuilt screen recording software are quite obvious. The biggest advantage is that it can record “after the fact”. Just imagine you have experienced the best hit in your game playing history but you didn’t turn on the recorder beforehand? You can use the inbuilt recorder to record most recent 30 seconds of gameplay on Windows 10.
However, the shortcoming of this free inbuilt screen recorder is deadly. It doesn’t allow you to record the desktop and the file explorer. In addition to this, you can’t switch to record the activities on different applications.
For example, when you are recording the operation on the Chrome browser, and you switch to another software interface, the recording will automatically stop. That means it is almost impossible to record a video tutorial with the inbuilt Windows 10 recorder.
Don’t worry and keep reading. We will show a more professional way to capture all the screen activities on Windows 10 along with Audio.
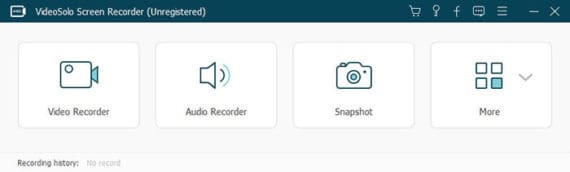
Method 2: Capture Screen with VideoSolo Screen Recorder
To record anything that happens on the screen, it is necessary to find a more extensive screen recording software. VideoSolo Screen Recorder is a professional tool that perfectly works on Windows 10/8/7. It can record all the screen activities with system audio and microphone audio, whether it is the operation on desktop, file explorer, or other applications.
With the free version of VideoSolo Screen Recorder, you can record for 3 minutes. However, to record as long as you wish, you need to either buy the Pro version or restart the recording for every 3 minutes. Later you might need to combine them using any video editors.
There are many output formats for you to choose, such as MP4, WMV, MOV, F4V, AVI, TS, GIF. After recording, VideoSolo Screen Recorder enables you to preview and do a simple clip for the video. You can download the free trial to try.
Download for Windows
Download for Mac
Here is how to record computer screen with VideoSolo Screen Recorder
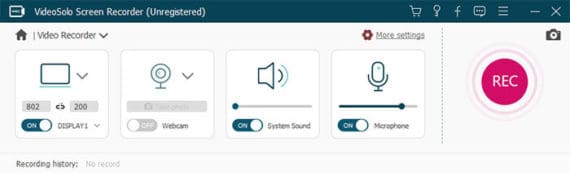
Step 1: Launch the Program and Click on “Video Recorder”
Launch VideoSolo Screen Recorder, the program interface looks like this. To record the computer video with audio, you will need to move your mouse to click on “Video Recorder“.
Step 2: Set the Recording Region and Adjust the Sound
After you click on the “Video Recorder” option, you will be taken to a new set of menu. Here you can customize the recording area: full or part of the screen. And then, you can adjust the system sound and microphone. If you don’t need to record the system sound, you can simply turn it off.
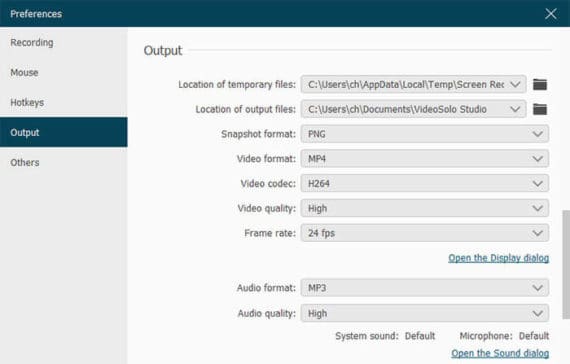
Step 3: Customize the Preferences before Start
VideoSolo Screen Recorder offers rich customizations. Click on the “Settings” icon on the program interface and it will bring you to the “Preferences” window. Here you can set your own hotkeys in the “Hotkeys” column, or customize many output settings in the “Output” column.
Step 4: Click the “REC” Button to Start Recording
Go back to the “Video Recorder” interface, and then click on the “REC” button to start the recording process. While recording, you can use the hotkeys to control the process. For example, end the record, pause/resume the record, take screenshots, hide/show the floating bar, and open/close webcam.

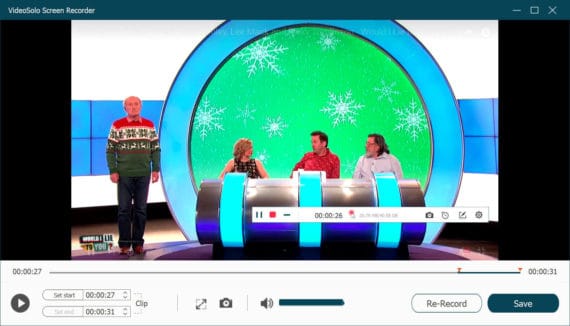
Step 5: Preview and Clip the Video
Click on the “Stop” button the end to the recording process. Before saving, you can preview the video and cut out the unwanted part, and then click on “Save“.
You can know more features about VideoSolo Screen Recorder in this video guide.

Above is how to record your screen with audio in Windows 10. The Windows 10 inbuilt screen recorder is great for recording Xbox gameplay and it is convenient to share the game video to the Xbox online community.
But comes to record anything you want on the computer screen, you can try VideoSolo Screen Recorder. It is a powerful, efficient and intuitive tool. You can get started very quickly.
The benefits of using a Windows 10 screen recorder with audio are numerous. You can record personal video calls, university lectures and business conferences, and play them back with the original audio. In this guide, we cover 4 different ways to record your screen on Windows 10 with audio.
- Movavi Screen Recorder – best for video and audio capture
- Game Bar – best for users who want to record gameplay videos
- Screen Capture – best for recording your slides online
- Vidyard – best for tracking who watches your videos
Special pick: Movavi Screen Recorder
Movavi Screen Recorder is our special pick for screen recording on Windows 10 with audio. It is a great choice for its multipurpose recording system, which can both record your visual display alongside your computer’s audio. It can be especially helpful for long, hard-to-remember online university lectures and complex business conferences. You can schedule your recordings in advance, draw while recording, take screenshots, and much more. There is also a free version which allows you to become aware of the program’s uses and compatibility with your needs before you commit to purchase the full version. So if you’re looking for a way to screen record with audio on your Windows PC, it’s a great option to start.
Features
- Button clicks and cursor movement capture
- HD and 4K recording
- Drawing right on your videos while recording live
- Recording sounds from a microphone or speakers
At Movavi, we’re committed to providing you with verified information only. Here’s what we do to ensure this:
-
When selecting products to include in our reviews, we research both demand and popularity.
-
All products mentioned in this article have been tested by Movavi Content Team.
-
When testing, we aim to highlight the best features of a product and what it’s best suited for.
-
We study user reviews from popular review platforms and make use of this information when writing our product reviews.
-
We collect feedback from our users and analyze their opinions of Movavi software as well as products from other companies.
How to use the Movavi Windows 10 screen recorder with audio
Movavi Screen Recorder allows you to capture the content displayed on your computer screen, be it a program window, a part of the screen, or your whole screen. With this program, you can easily record your screen and sound, including system audio. Additionally, Movavi Screen Recorder allows you to capture sounds from a microphone or computer separately from your screen recording. You can also draw while recording and show your keystrokes, which is perfect for creating tutorials and other instructional videos.
Follow the steps below to learn how to record a screen with audio in Windows 10 using Movavi Screen Recorder.
Step 1. Install the program
Download the installation file and install the screen recorder with audio for Windows 10. Launch the program after the installation is complete.
Step 2. Specify the recording settings
Click Screen recording on the sidebar and set the area of your screen you want to record. Make sure that Microphone and System sound icons are highlighted to record both video and audio.
Step 3. Capture your screen
Hit the REC button to start recording and Stop to finish. If you want to cut out unwanted fragments, use Scissors. Finally, click Export, set the exporting settings, and hit Save.
Bestseller
Screen, system audio, and mic recorder
Online screen and audio recorder
How to screen record on Windows 10 with audio using Game Bar
Game Bar is a built-in screen recorder on Windows 10 with audio. It was created for capturing gameplay, but you can also record any other screen activity you need – just keep in mind that it can capture only one app at a time. The main advantage of this program is that it’s already pre-installed on your computer. You can also customize some recording settings, including video quality, audio bitrate, and frame rate. If you plan to use this app to capture your gameplay, Game Bar offers multiple handy features as well. For example, it allows you to chat with your friends on Xbox Live without having to exit your favorite games. Overall, it’s a good basic screen recorder with audio for a PC that can be useful for short screen recordings.
Here’s how to screen record on Windows 10 with audio using Game Bar:
Step 1. Open Game Bar
To get started, launch the screen and audio recorder on your Windows 10 PC. If it’s not installed, use the link below to download the installation file from Microsoft Store and finish the installation.
Download Game Bar
Step 2. Activate Game Bar
If Game Bar isn’t activated on your PC, you need to do it first. Click the Windows + I keys to open the Settings menu and select Gaming. Click Xbox Game Bar, then toggle the switch to On to activate Game Bar on your computer.
Step 3. Select the recording settings
Open the Captures tab to adjust the settings. You can set the video frame rate and quality, change the maximum recording length, and choose the output folder.
Step 4. Record your screen and audio on Windows 10
To start Windows screen recording with audio, hit Windows + G to bring up the recording panel. Another option is to press the Windows + Alt + R buttons to start recording automatically.
How to record a screen with audio in Windows 10 online
Another option to capture your screen is to use an online Windows screen and audio recorder, like Screen Capture. If you want to save some disk space or simply don’t want to install any software, this can be a great option for you.
To learn how to record a PC screen with audio online, check out the instructions below.
Step 1. Open the website
Step 2. Adjust the settings
Click the Sound icon to capture your screen with audio. If you want to capture your microphone or webcam, make sure to select the corresponding icons as well.
Step 3. Start recording
Finally, hit the Start Recording button and choose the area you want to capture. To finish recording, click Stop Recording.
How to screen record with audio on Windows 10 using an extension
The next option for recording is to use a browser extension. With Vidyard, you can easily capture your browser activity and record sound as well. The extension also has a feedback feature that can show when and who is viewing the livestream. It can be very useful for businesses trying to market their products.
Here’s how to record your screen using Vidyard:
Step 1. Download the extension
Step 2. Set up the recording settings
Log in or create a new account. Click the Vidyard icon to view recording options. Click the corresponding icons to capture your screen, webcam, or both. If you also want to capture your microphone, make sure that the correct device is selected.
Step 3. Capture your screen
Click the Start Recording button. To stop recording, hit the Vidyard icon. Now you can play or share your video.
Bestseller
Screen, system audio, and mic recorder
Online screen and audio recorder
Summary
With the addition of voice and audio recording to screen recording, it has never been easier to share your online presence and engage with viewers, with a wide selection of companies offering this service on different platforms. Hopefully, this guide helped you choose the best screen-recording option for your needs.
The perfect way to record anything from your screen
Disclaimer: Please be aware that Movavi Screen Recorder does not allow capture of copy-protected video and audio streams.
Frequently asked questions
Does the Windows 10 screen recorder record audio?
Yes. With the addition of the inbuilt Game Bar on Windows 10, screen recording with audio is now a simple procedure. However, Game Bar has some limitations since it was created for only recording gameplay. If you’re looking for a recorder with more advanced features, we recommend you try Movavi Screen Recorder.
How do I record my screen on Windows 10 with sound?
To record your screen with sound, use Movavi Screen Recorder:
-
Download and install the program.
Download Movavi Screen Recorder -
Adjust the recording settings.
-
Hit REC to start recording and then Stop recording to finish
-
Click the Export button to adjust the saving settings.
-
Finally, hit Save.
Have questions?
If you can’t find the answer to your question, please feel free to contact our Support Team.
Sign up for news and special offers
Whether you want to make a tutorial video with your narration or capture some video conferences for later checking on your Windows 10 PC, knowing how to screen record on Windows 10 with audio will be very helpful. If you still don’t know how to record screen and voice on Windows, you can get the right direction here.
This post will list some excellent Windows 10 screen recorders with audio, and walk you through detailed steps to get the task done!
| 🛠️Method | 👍User Experience |
| EaseUS RecExperts | It is the most effective way to record screens on Windows 10 with audio. Users can flexibly choose to record screen with system sound or microphone. |
| Game Bar | It is an inbuilt tool on Windows 10 PC to record screen and audio in Windows 10. However, it can only record the microphone sound and a full screen. |
| Online Recorder | Users can adopt this method to record Windows 10 with voice without any software for free. |
| OBS | Users can use OBS to record in Windows 10 with sound for free, but it is only suitable for the pros. |
| VLC | This tool only can help users do simple video and audio recording in Windows 10. |
How to Record Screen with Audio in Windows 10 via EaseUS RecExperts
EaseUS RecExperts is one of the most screen and audio recorder software for Windows users, allowing you to capture almost anything on your screen quickly. It lets you flexibly record an entire screen or partial screen, along with system audio, microphone voice, or both.
More than that, while recording screen with audio on Windows 11/8/7, you can add a webcam overlay, as well. That is always helpful when you need to create a tutorial video, or make an interactive video. Once done, you can choose to save your recording in high video quality.
Brillant features:
- Let you select audio sources flexibly as you want
- The noise reduction feature is available
- Support exporting recordings in various formats, including MP4, MKV, AVI, MOV, etc.
- Allow extracting audio from your recorded video and saving it as a separate audio file
Here’s how to record screen with voice in Windows 10 for free:
Step 1. Launch EaseUS RecExperts. Choose a recording mode from «Full Screen» or «Region». If you choose the second one, you will need to select the recording area manually.

Step 2. After selecting the recording mode, you need to choose which audio to record. To record the system sound, click on the loudspeaker sign; to record the microphone sound, click on the mic sign; to record no sound, select nothing.
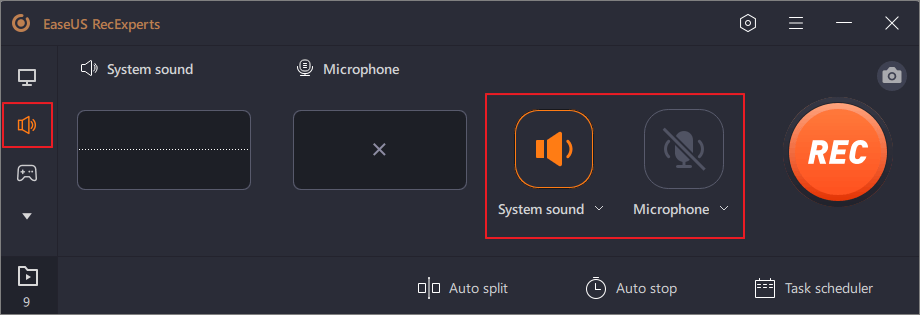
Step 3. Then, you can click the red «REC» button to start recording. If you want to pause the recording, click on the white «Pause» button; to end the recording, click on the red «Stop» button.
![]()
Step 4. After recording, the recording list window will open. Here you can view, split, delete, manage your recordings easily.

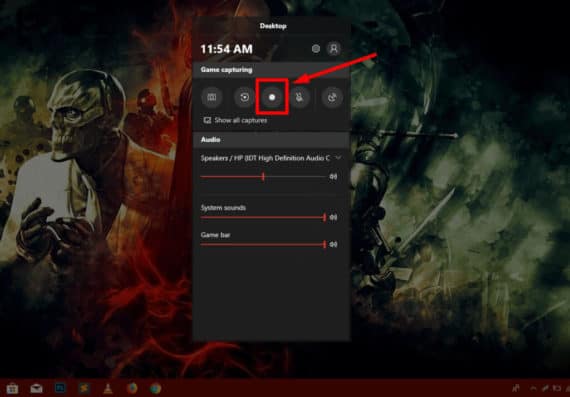
How to Record Desktop Screen and Audio on Windows 10 using Game Bar
If you want to record a Windows 10 screen with voice without any software, the Xbox Game Bar is a nice option. It is completely free and pre-installed on your Windows 10 PC, which allows you to do simple screen and audio recording activities. Now, let’s take a look at how to use it to record desktop on screen with audio in Windows 10 for free:
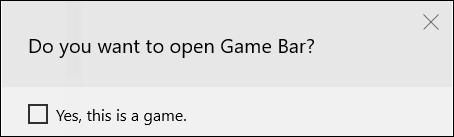
Step 1. Click «Windows +G» on your keyboard to open the inbuilt screen recorder. Next, tick the checkbox «Yes, this is a game» to load the Game Bar.
Step 2. Then, click the white circle button to start your Windows 10 screen and audio recording. After that, click on the microphone icon to add the audio source.
Step 3. When you’re done, hit the Stop button in the Game Bar menu to end your screen and audio recording. Finally, you can find the recorded videos in the Videos Folder.
How to Record Screen with Audio in Windows 10 Online
If you are a one-time user or someone who doesn’t want to install any desktop screen recorders, you can choose an online Windows screen recorder with audio.
EaseUS Online Screen Recorder is one of the most popular online screen recorder programs. This tool can run perfectly on all mainstream browsers, like Chrome, Firefox, and more. To record the screen with a voice in Windows 10, you can follow the below steps:
Step 1. Go to its official website and choose the Start Recording button.
Step 2. Select the audio source based on your needs. Here, you can tick System Sound or Microphone or both with the screen.
Step 3. Then, Click Start Recording again to choose the tab that you want to capture.
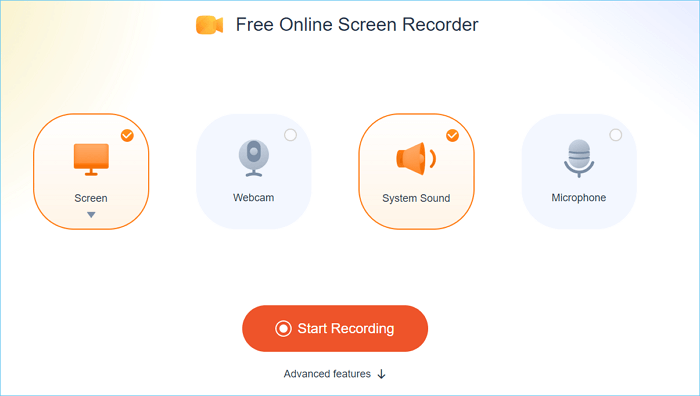
Step 4. When everything is ready, click Share to start your recording.
How to Capture Screen on Windows 10 with Voice using OBS
Another Windows 10 screen recorder with audio is OBS Studio, which is open-source and completely free.
This open source screen recorder allows you to capture your screen and start a live stream, as well. As for its recording features, it lets you capture audio, screen, webcam, or all of them simultaneously or separately. Apart from these basic recording functions, it provides many more advanced features, including recording multiple screens, capturing a virtual camera, applying filters, etc. However, it is a little complex, and you might need to watch the tutorial videos before using it.
Step 1. Install and launch OBS Studio on your Windows 10 computer.
Step 2. Find the Scenes box and click «+» to add a scene. Next, click the plus button in the Sources box next to Scenes and select «Display Capture».
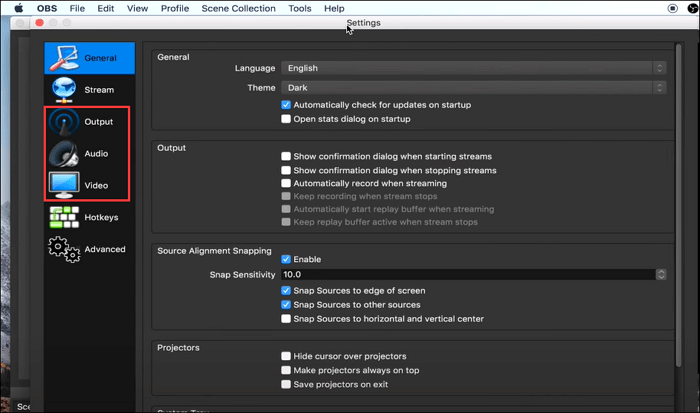
Step 3. Click «Settings» to adjust the parameters of your output recordings, including the saving path, format, frame rate, etc.
Step 4. Once done, go back to the main interface and click «Start Recording» in the lower-right corner of the screen to begin your recording.
How to Screen Record Windows 10 with audio using VLC
Like OBS Studio, VLC Media Player is also an open-source program which functions in media files playing, converting, and recording. With its help, you can capture Windows 10 screen and audio effortlessly, like below:
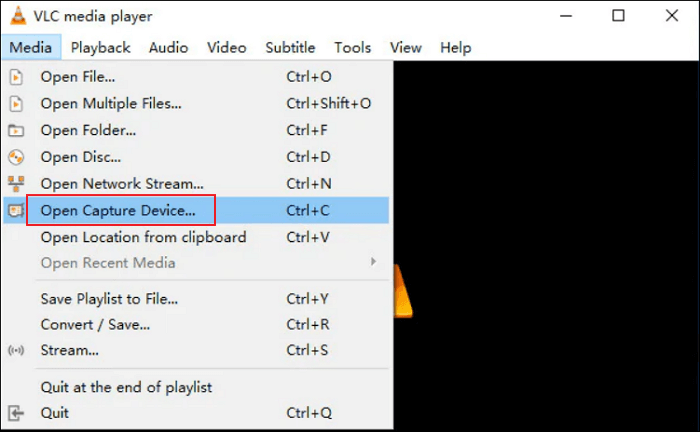
Step 1. Launch VLC, and click «View» > «Advanced Controls», then click «Media» > «Open Capture Device».
Step 2. In the Open Media window, click «Capture Device» and choose «Desktop» from the Capture Mode drop-down menu.
Step 3. Check «Shou more options» to add the audio source. After that, click «Convert/Save» to continue.
Step 4. Select the output file for the screen video recording, and then set the folder for saving your recorded videos. Once done, click «Start» to begin your recording.
Final Words
Here, you can learn the top 5 Windows 10 screen recorder with audio to assist you in making screen recordings, which can meet the needs of different groups:
- For those who don’t want to install any third-party software, EaseUS online screen recorder and Xbox Game Bar are ideal options
- If you’re going to find a completely free yet powerful tool, you can opt for OBS Studio
- People looking for easy yet powerful screen and audio recorder software look no more than EaseUS RecExperts. This software provides users with the best quality and the lowest price.
How to Screen Record on Windows 10 with Audio FAQs
1. Does Windows 10 have a screen recorder with audio?
Yes. Windows 10 has a built-in screen recorder with audio, and it’s called Xbox Game Bar. This freeware lets users record full screen on Windows 10 with microphone sound. But, if you want to capture a Windows screen with system sound, you need to switch to another third-party screen and audio recorder like EaseUS RecExperts.
2. Can I record audio on Windows 10?
Of course, yes. There is a built-in voice recorder on Windows 10 PC. You can type voice recorder in the search box to bring up the Voice Recorder. Then, you can start recording audio with a simple click.
3. Why is there no Sound when I record my computer screen?
Below are some common reasons you can refer to:
- The sound drivers are not updated
- Apps are not granted permission to access the microphone
- The recording software you used is not working