Asked
Viewed
145k times
I downloaded dateutil which comes with a setup.py file but it throws an error when I try to open it. What’s the proper way to install this module?
This is the error:
error: no commands supplied
![]()
Mark Hildreth
42.1k11 gold badges120 silver badges109 bronze badges
asked Sep 7, 2012 at 19:58
![]()
4
setup.py is designed to be run from the command line. You’ll need to open your command prompt (In Windows 7, hold down shift while right-clicking in the directory with the setup.py file. You should be able to select «Open Command Window Here»).
From the command line, you can type
python setup.py --help
…to get a list of commands. What you are looking to do is…
python setup.py install
answered Sep 7, 2012 at 20:04
![]()
Mark HildrethMark Hildreth
42.1k11 gold badges120 silver badges109 bronze badges
1

Learn a simple approach to make your code easily sharable between environments and developers
Jan. 20, 2020
environment
path
setup
install
package
Why having a setup
When you develop software, at some point you will want other people to be able to use what you have built. Sometimes it is handy if you can quickly use the code you developed yourself in the past on a new machine or a different virtual environment. We have already seen that for importing to work properly, it is very important to have well-defined packages, and that Python knows where to find them.
With a proper setup file, Python will quickly understand where to find the package, and thus importing from other places becomes trivial. It will also be possible to quickly distribute the code with other people, diminishing the barrier of adoption. Having a setup.py file is the first step into being able to switch from scripts to a package on which to rely.
Your first setup file
The examples we are going to develop are toy examples, very similar to the ones on the article about importing. But they will prove the point. You should start on an empty directory, the name doesn’t matter, but it is important not to mix it with other things, so you can follow this article without complications.
Let’s start by creating a file called first.py, with the following code inside:
def first_function():
    print('This is the first function')
This file is what we want to be able to use from other packages, etc. What we would like to be able to achieve is to run code like this:
from first import first_function

first_function()
# 'This is the first function'
Next to the file, let’s create a new file called setup.py, with the following code:
from setuptools import setup

setup(
    name='My First Setup File',
    version='1.0',
    scripts=['first.py'],
)
!!! warning
The code we are developing is harmless, nevertheless, it is always wise to create a virtual environment to play around, and eventually discard once you understood and polished the details
To install your script, you can simply do the following from the console:
python setup.py installYou will see some information printed to the screen. More importantly, you can now use your package from anywhere else on your computer. For example, change your directory to anywhere else on your computer, and to the following:
from first import first_function
first_function()
# This is the first function
This is great, now you have a way of using your program from anywhere else, even from other packages.
Laying out the project
In the example above we had only one script available, and thus the structure of the program was straightforward. However, this is rarely the case. As soon as your program starts having multiple files, you will need to structure it in such a way that setup knows what files are needed. Let’s evolve the example above. Let’s create now a package with tho modules, the folder structure will look like this:
.
├── my_package
│   ├── __init__.py
│   ├── mod_a
│   │   ├── file_a.py
│   │   └── __init__.py
│   └── mod_b
│       ├── file_b.py
│       └── __init__.py
└── setup.py
Let’s develop two very simple function inside file_a and file_b, respectively:
def function_a():
    print('This is function_a')
def function_b():
print('This is function_b')We need to update the setup.py file to accommodate that the program is more complex than what it was before. Fortunately, the developers at setuptools made our life very easy, we just need to write the following:
from setuptools import setup, find_packages

setup(
    name='My First Setup File',
    version='1.0',
    packages=find_packages()
)
We have removed the script argument, but have added the packages argument. find_packages will automatically look for packages in a given directory. If we don’t provide any arguments, it will look in the current folder. If you want to see it in action, you can do the following within a python interpreter:
>>> from setuptools import find_packages
>>> find_packages()
['my_package', 'my_package.mod_b', 'my_package.mod_a']
>>> find_packages(where='my_package')
['mod_b', 'mod_a']
So now you see, find packages returns a list with the names of the packages we will include in the setup. If you want to have finer control, you can replace find_packages and type down exactly what you want to include in your install. Also, if your code would be inside of an extra folder, for example src, you would need to specify it: find_packages(where='src'). I, personally, prefer to keep the code directly in a folder next to the setup file, with a name that makes it very clear that it is the entire package inside, just like in the example in this section. Again, if you just install the code,
python setup.py installyou will be able to use it:
>>> from my_package.mod_b.file_b import *
>>> function_b()
This is function_b
With everything you know from importing files in Python, it is now dead easy to use relative, absolute imports, etc. because everything is added to the path by the installation procedure.
Installing in development mode
One of the important things to point out is that the setup process can be very helpful also while developing, not only when you are releasing the code. This can be achieved by installing the code in development mode. The only thing you need to do is to run the setup script with a different argument:
python setup.py developNow, if you change any of your files, it will be reflected, in your code. For example, let’s edit file_b.py*:
def function_b():
    print('This is New function_b')
If you use the module again, you will see the output was modified:
>>> from my_package.mod_b.file_b import *
>>> function_b()
This is New function_b
!!! note
Remember that if you change a module in Python, you will need to restart the interpreter. Once you import a module, Python will skip any new import statements of the same packages.
One of the best things about this approach is that if you add a new module to your package, it will still work fine. For example, let’s create a new module C, which uses what is already available in a and b, using two different import approaches. Create a folder called mod_c, with a file file_c.py, and add the following:
from ..mod_a.file_a import  function_a
from my_package.mod_b.file_b import function_b

def function_c():
    print('This is function c')
    function_a()
    function_b()
And we can simply use it:
>>> from my_package.mod_c.file_c import function_c
>>> function_c()
This is function c
This is function_a
This is New function_b
Now you see that by having a setup.py file, using relative and absolute imports became trivial. No more worries about the system path, the python path, etc. everything is taken care of. Having a setup.py even when you are just starting makes your life much easier. You stop worrying about where the code is, how to import it, etc.
But where is the code?
At some point, you may be wondering what is happening to your code that makes it work. I will assume you are working within a virtual environment (because that is what you should be doing anyway), and that you know where is your virtual environment located (i.e. the folder where everything is stored). Navigate to the site-packages folder, in my case, it is located in:
venv/lib/python3.6/site-packagesvenv is the name of the virtual environment. python3.6 is the version I am using now, but it can be different for you. Before you install anything else, just after a fresh virtual environment is created, the contents of the folder are very limited. You have pip, setuptools, and not much more. Let’s install the package in development mode:
python setup.py developAnd if you look at the contents of the site-packages folder, you will notice a new file created: My-First-Setup-File.egg-link. Pay attention that the name of the file is associated with the name argument we used in the setup.py file. You can open the file with any text editor, what do you see? Indeed, you see the full path to the directory that contains the *my_package folder. That file can tell the Python interpreter what should be added to its path to work with our module. You see that it is not a lot of work, but being able to do it from a single command pays off.
If you, on the other hand, install the package:
python setup.py installYou will see that what gets installed in the site-packages folder is radically different, you will find a file called My_First_Setup_File-1.0-py3.6.egg. Egg files are just zip files that Python can uncompress and use when required. You can easily open the file with the same program you use to open zip files, and you will find a copy of your code. The folders, the files, etc. plus some metadata of your program, such as the author, license, etc. (which we haven’t used yet in your simple setup file). Whenever you change your project files, they won’t become available on your other programs, because now Python has its copy of the source code. Whenever you change a file you will need to run the setup script again:
python setup.py installAnd the code will be refreshed and you can use the new development. You have to be careful, because it is very easy to forget to run again the setup script, and you will be banging your head against the wall trying to find why your bugs are still there if you solved them in your code. If you are developing a solution and trying things out, you should avoid the setup install and keep the setup.py develop approach.
Installing with pip
Just for completeness, it is important to show that once you have your setup.py file in place, you can also use pip to install it by running:
pip install .Note two things: if you used the python setup.py approach, you should first remove the files created on your site-packages folder, or pip will fail with a cryptic message. Also, note the . after the install, this is important to tell pip you want to install this package. The install always takes the name of the package you would like to install. One of the advantages of using pip for installing is that you also get the uninstall for free. However, to uninstall you need to use the name you gave to your package:
pip uninstall My-First-Setup-FileNow you see that the name we gave to our package is independent of how we use it. We had to import my_package, while the actual name is My-First-Setup-File. This, in my opinion, can create a lot of headaches. For example, if you want to communicate with a serial device, you install a package called PySerial, while to use it you have to import serial. It may not seem like a big issue at the beginning until you find two packages with different names which define two different modules with the same name serial. Imagine we change the name of my_packe to serial. And we do the following:
bash

pip install .

pip install pyserial
If you explore the folder serial within your site-packages you will see that both your code and pyserial are mixed up. There is no warning of this clash, and the results can be an absolute disaster, especially if the top-level __init__.py file is used somehow. The example above may seem a bit far-fetched for some. But you would be surprised to know that there are two packages: pyserial and serial which are used for some very different tasks and both specify the same module name.
Installing from Github
One of the advantages of creating setup.py files is that you can directly install packages available on Github (or on any other online repository). For example, if you would like to install the code of this tutorial, which can be found here, you can run:
pip install git+https://github.com/PFTL/website_example_code.git#subdirectory=code/38_creating_setup_pyThere are several things to note on the code above. First, it will not work on Windows as it is written. You will need to enclose the repository address with " so it understands it is the path to a repository. Note that we have used git+https because it is the simplest way of making it work. If you have configured your ssh keys properly, you can also use pip install git+git, which can give you access to private repositories as well. We have used github.com, but you can use any other version control platform you like, including Gitlab and bitbucket. The path up to website_example_code.git is simply the location of the repository, but in our case, the setup file is inside of a subdirectory, that is why we appended the #subdirectory=code/38_creating_setup_py information. But if it is not the case, you can skip that extra information.
!!! note
In most repositories, the setup.py is at the top level, and thus you won’t need to specify a subdirectory to use it.
Now you see that it is very easy to share with others, you just need to put the code in a place that can be accessed by others. However, when you start sharing code, there are other things you need to be aware of. Imagine you update your code. In our case, we changed what function_c does. If we upload the code to Github, and then you run the same command as above, buried within a lot of information, there will be a line saying:
Requirement already satisfied (use --upgrade to upgrade)This means that the code was not changed, because pip found that the package was already installed. You can run the same code with the extra --upgrade argument, and you will see that indeed it updates the code.
Just to close the discussion with pip installations, there is a very nice feature that allows you to install the package in editable mode, meaning that you can make changes and submit them to version control. This is ideal if you are willing to contribute to a package that is part of the requirements of your current project. In that case, you can run pip like this:
pip install -e git+git://github.com/PFTL/website_example_code.git#egg=my_test_package-1.0\&subdirectory=code/38_creating_setup_pyAnd if you explore your virtual environment, you will find a folder called src in which the package is available. Not only that, but the package itself is a git repository you can use as any other repository. You will also find a file within site-packages linking to the directory where the code is, including its subdirectory.
Adding an entry point
So far everything is working great, and probably you have plenty of ideas in your head about what can be done with a setup file. But what we have seen up to now is only the beginning. In the examples above, we have always installed a package that could be imported from other packages. This is great for a lot of applications, but in a lot of situations, you would like to be able to run your program directly, without the need to import from another script. That is when entry points become your best friends.
Let’s creat a new file, called start.py at the top directory, my_package, and let’s add the following:
from .mod_c.file_c import function_c


def main():
    function_c()
    print('This is main')
This file in itself does not do anything, but the function main will generate an output of we run it. If we go back to setup.py, we can add the following:
from setuptools import setup, find_packages

setup(
    name='My First Setup File',
    version='1.1',
    packages=find_packages(),
    entry_points={
        'console_scripts': [
            'my_start=my_package.start:main',
        ]
    }
)
Note that we have added a new argument, called entry_points. We want to have a console script, meaning something we can run as a command from the terminal. We call it my_start, and then we specify the path to it in the form module.file:function. The last argument must be a callable, something we can execute. If you install our package again:
python setup.py developWe will be able to run my_start directly from the terminal:
$ my_start
This is New function_b
This is main
If you want to know where the command is located, you can run (Linux and Mac, not Windows):
which my_start
[]/venv/bin/my_start
Windows users need to run:
where my_start
[]/venv/Scripts/my_start.exe
So, the script is located inside the bin folder of your virtual environment. One of the nicest things of doing this is that if you are on Windows it will also work. You see that it creates an executable .exe file. The function you run as an entry point can be further extended with arguments, etc. but this is for another discussion.
If you are building an application with a user interface, instead of using console_scripts you can use gui_scripts. On Windows, this will allow you to run the program without opening a terminal in the background, and this will look more professional. But is nothing you can’t live without.
Remember that you can add as many entry points as you wish. If your program can perform very different tasks, perhaps you would prefer to have different entry points instead of an endless list of arguments which alter the behavior. It is up to you to choose what you believe is the best approach.
For consistency, there is one extra thing to mention. Right now, with the entry point, we have a script that runs a specific task, but we can’t run our package directly from Python. Thus, let’s create a file at the top-level directory of the package, called main.py, with the following:
from .mod_c.file_c import function_c


def main():
    function_c()
    print('This is main')


if __name__ == '__main__':
    main()
It’s the same as our start file, but with the extra two lines at the end. Now, we can run our package directly:
python -m my_packageIf you look around other packages, you will see that many define a __main__ file and then an entry point using it. We could redefine our entry point, and it will look like:
entry_points={
        'console_scripts': [
            'my_start=my_package.__main__:main',
        ]
    }
Adding dependencies
Right now we have a package that is completely independent of anything else around. Therefore, the next step is to add dependencies to the setup.py file. As an example, let’s assume we want to have numpy (regardless of its version) and Django before version 3.0. We can add the following to the setup.py file:
install_requires=[
        'numpy',
        'django<3.0'
    ]
You will see that if we run the setup script, python will automatically fetch the latest numpy version and Django 2.2 (even though 3.0 is available). Working with dependencies can be a nightmare, and pip is not great at solving conflicts. Imagine you have two packages which require different versions of some libraries, the one you install the latest is the one that prevails. And this is even without considering that those libraries have other requirements, etc. There are other package managers which are more powerful than pip and take into account all the dependencies to find the sweet spot that satisfies all the requirements.
Difference with requirements files
A common issue when people start working with setup files is that they wonder what is the role requirement files have if you can specify everything in the setup file. The general answer is that requirement files are normally used to keep track of an environment, and therefore they normally include the specific version of the libraries used. This ensures that you can reproduce almost the same environment that the person developing the code had. Setup files, on the other hand, should be more accommodating. In the end, what we want is to make it simple for users to get our code running. Therefore, normally they include the minimum version of libraries to run, or the maximum version, in case future changes of a library would break things.
The reality is that there are no hard-written rules. You have to put yourself in the shoes of your users and decide what would make their life easier. Is it pin-pointing the versions of every library in the environment, or is it giving flexibility? If it would be a developer looking into your code, one of the options is to always download the code, install everything from requirements.txt and then run setup.py. If things are well configured, the last step won’t download anything, since all the dependencies will be present in our environment. And then you know both people have the same versions installed while developing.
There is also the option of not adding any requirements in your setup and asking users to install everything in the requirements file to use your library. This approach is very user-unfriendly, but it also works. So, you see, there is a lot of flexibility for you to decide what approach you think is best in your particular situation.
Extra Dependencies
Setup files also give us the option to define extra dependencies, which are not always necessary, but which can enhance the functionality of our program in some cases. We simply define them as an extra argument for the setup function:
from setuptools import setup, find_packages

setup(
    name='My First Setup File',
    version='1.1',
    packages=find_packages(),
    entry_points={
        'console_scripts': [
            'my_start=my_package.__main__:main',
        ]
    },
    install_requires=[
        'numpy>1.18',
        'django<3.0'
    ],
    extras_require={
        'opt1': ['serial'],
        'opt2': ['pyserial'],
    }
)
And to install them, we can run a pip command:
pip install .[opt1]or
pip install .[opt2]Note that this works also with libraries available on PyPI, for example, scikit-learn can be installed with extra dependencies:
pip install scikit-learn[alldeps]Extra dependencies are a great feature when you have dependencies that are hard to install in some systems, or which take a lot of resources, or which are conflicting, just like serial and pyserial above. Note that nothing prevents you from installing both opt1 and opt2, thus the conflict can still arise.
Where to next
This was an introduction to develop your first setup.py file. The topic is far from over, but with what you have up to now, you can go a long way. Something very useful is to pay attention to the libraries you use and how they behave. For example, you can check the setup file of scikit-learn, or of Django. They can be much more complex than what you need, but they can also point you in the right direction if you are looking for inspiration on how to structure your code. If you are curious about more down-to-earth examples, you can see the one I’ve developed for the Python for the Lab workshop, or for the startup in which I’m working. Many of the arguments of setup.py which are available (and almost trivial), such as author, website were skipped in this tutorial, since they don’t bring much to the discussion, and you can quickly add them.
An obvious step once you have your setup file in order is to release your code through PyPI. This topic will be covered soon. Something we didn’t discuss, and which I hope grabbed your attention is that when you run python setup.py install some folders are created, such as build and dist. Go ahead and explore them, see what is inside and try to understand what is happening when you install the package as we have just done.
Finally, another very interesting topic is what happens if you want to release your package to be installed through conda instead of pip. Conda is a great package manager, that allows you to install also non-python libraries and manage dependencies much more efficiently than what pip does. However, developing a package which is conda-installable requires some extra steps, which will also be covered later.
Article written by Aquiles Carattino
Header Illustration by Tsvetelina Stoynova
#Руководства
-

0
Знания расширяют сознание, а библиотеки — возможности языков программирования. Расскажем, как подключить их в Python.
vlada_maestro / shutterstock

Автор в сфере IT, digital, экономики и финансов. Ведёт некоммерческий проект для начинающих писателей «ЛитЦех».
Мы уже рассказывали, как установить Python на различные операционные системы. Если хотите расширить возможности языка, используйте менеджер пакетов — именно с ним подключают библиотеки и модули. А если стоит вопрос, как научиться программировать на Python и получить работу, записывайтесь на курс «Python-разработчик».
В этом способе не нужен традиционный установщик пакетов pip — модуль подключается прямо из источника. Это удобно, когда у вас несколько версий Python и нужно импортировать модуль в разные. Рекомендуем научиться делать это сразу.
Для этого скачайте файл с PyPI и извлеките его в системе.
Поменяйте каталог на папку с файлом setup.
Если Python расположен вне пути вашей системы, она выдаст ошибку, что команда не найдена. Тогда укажите путь вручную. Для Windows это выглядит так:
c:\python34\python.exe setup.py install
Название говорит само за себя — способ легкий, буквально в два клика. Если устанавливали вручную, то на компьютере уже стоит setuptools, и вы сможете использовать easy install, что лежит в папке со скриптами Python.

Если добавить папку со скриптами в путь операционной системы, вы сможете вызвать easy install через командную строку без указания полного адреса.
Теперь выполните следующее:
easy_install package_name
И автоматически установите любой необходимый пакет. Однако есть ограничения:
- Он может попробовать запустить пакет, который еще не загрузился до конца.
- С помощью easy install нельзя провести деинсталляцию.
Из-за этих и других причин в сообществе языка Python придумали и реализовали программу pip.
Она появилась в Python 3.4 и скачивается вместе с самим языком, но если у вас более ранняя версия, то установите pip вручную:
- Зайдите в PyPI и скачайте скрипт get-pip.py.
- Затем выполните команду:
Установятся setuptools, если ранее его не было на компьютере, и сам pip. С его помощью подключают любые библиотеки и файлы — всё, что только может установить easy install. Но теперь для этого будет использоваться иная команда:
А для обновления пакета применяйте:
pip install -U PackageName

Жизнь можно сделать лучше!
Освойте востребованную профессию, зарабатывайте больше и получайте от работы удовольствие. А мы поможем с трудоустройством и важными для работодателей навыками.
Посмотреть курсы
With deep roots in open source, and as a founding member of the Python Foundation, ActiveState actively contributes to the Python community. We offer the convenience, security and support that your enterprise needs while being compatible with the open source distribution of Python.
Download ActiveState Python to get started or contact us to learn more about using ActiveState Python in your organization.
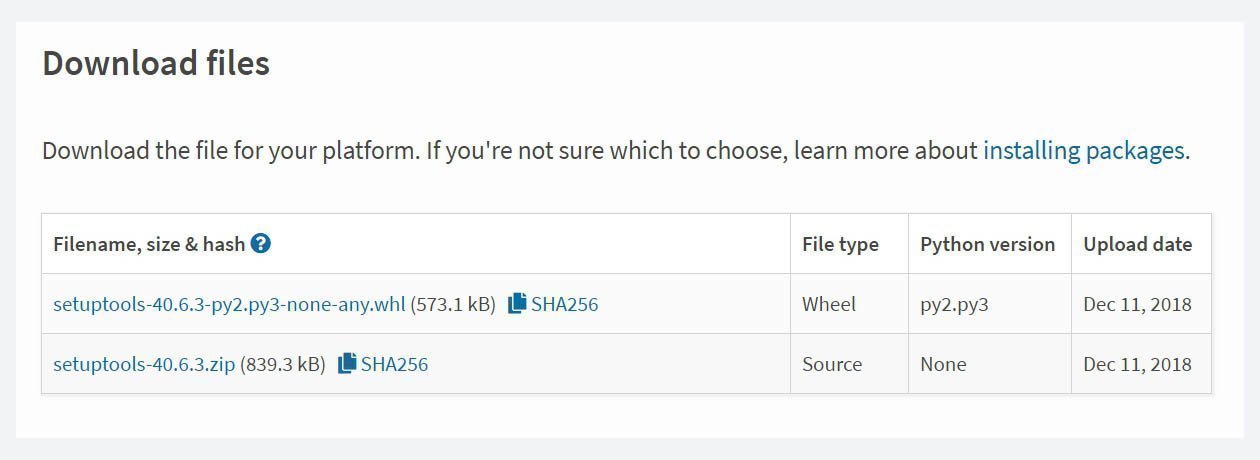
Most Python packages are now designed to be compatible with Python’s pip package manager. But if you have a package that is not compatible with pip, you’ll need manually install Python packages. Here’s how.
Python Installation Checklist
Before installing any package, you should always ensure that a Python installation containing the necessary files needed for installing packages is in place by following the Installation Requirements.
Packages That Cannot be Installed with Pip
Preliminary Steps to take:
- Download the package and extract it into a local directory.
- If the package includes its own set of installation instructions, they should be followed. Otherwise, the most common method for manually installing a package is to implement
setup.py.
Installing Python Packages with Setup.py
To install a package that includes a setup.py file, open a command or terminal window and:
- cd into the root directory where
setup.pyis located - Enter:
python setup.py install
Setup.py Build Environment
Packages installed with setup.py have build requirements that developers must adhere to. However, some requirements are optional.
Examples
- Ensure that an up-to-date version of setuptools is installed:
python -m pip install --upgrade setuptools
- Include
install_requireskeyword arguments in setup.py. install_requires is a setuptools setup.py keyword used to specify minimum package requirements. For example:
install_requires=['<packagename>'], # Optional keyword
Complete package build requirements for a setup.py based installation are outlined by PyPA (Python Packaging Authority) in ‘Sample Project’.
Sample Project
Sample Project is a template package with a setup.py file for manual installation of a package. The file is annotated with comments for customizing the script, and for the overall package build environment. [https://github.com/pypa/sampleproject ]
Sample Project is based on the setuptools package: “A setuptools based setup module.” https://github.com/pypa/sampleproject/blob/master/setup.py ]
setup.py is the build script for packages built with setuptools.
Setup.py Example (Non-Annotated)
import setuptools
with open("README.md", "r") as fh:
    long_description = fh.read()
setuptools.setup(
	    name="<template-package-username>", # Replace with your username
    version="1.0.0",
    author="<authorname>",
    author_email="<authorname@templatepackage.com>",
    description="<Template Setup.py package>",
    long_description=long_description,
    long_description_content_type="text/markdown",
    url="<https://github.com/authorname/templatepackage>",
    packages=setuptools.find_packages(),
    classifiers=[
        "Programming Language :: Python :: 3",
        "License :: OSI Approved :: MIT License",
        "Operating System :: OS Independent",
    ],
    python_requires='>=3.6',
)
How ActiveState Can Help
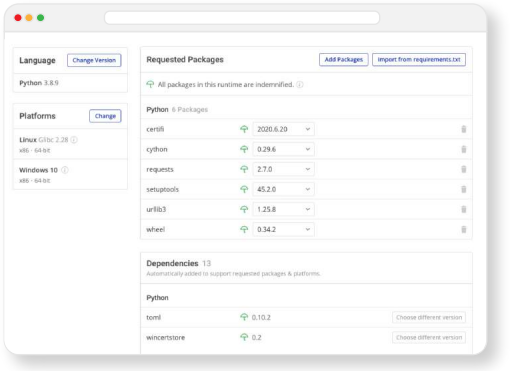
ActiveState provides a unified cross-platform toolchain for modern Python package management. It can replace the complex and hard-to-maintain in-house solutions built from multiple package managers, environment management tools and other solutions.
By adopting the ActiveState Platform, developers can:
- Automated building of packages from source, including link C libraries without the need for a local build environment.
- Automated resolution of dependencies (or suggestions on how to manually resolve conflicts), ensuring that your environment always contains a set of known good dependencies that work together.
- Central management of a single source of truth for your environment that can be deployed with a single command to all development and CI/CD environments, ensuring consistent reproducibility.
- Automated installation of virtual Python environments on Windows or Linux without requiring prior setup.
- The ability to find, fix and automatically rebuild vulnerable environments, thereby enhancing security and dramatically reducing time and effort involved in resolving CVEs.
- Visually seeing which versions of which packages are approved for use, thereby taking the guesswork out of development.
Those that prefer to work from the command line can leverage the ActiveState Platform’s CLI, the State Tool, which acts as a universal package manager for Python, and provides access to most of the features offered by the Platform.
Modern Python Package Management
ActiveState provides a unified cross-platform toolchain for modern Python package management. It can replace the complex and hard-to-maintain in-house solutions built from multiple package managers, environment management tools and other solutions.
By adopting the ActiveState Platform, developers can:
- Increase the security of Python environments
- Improve the transparency of your open source supply chain
- Dramatically reduce package and environment management overhead
- Eliminate dependency hell
- Reduce “works on my machine” issues
Ultimately, developers that are willing to adopt the ActiveState Platform will spend less time wrestling with tooling and more time focused on doing what they do best: coding.
To try the ActiveState Platform for yourself, sign-up for a free account.
Related Quick Reads:
How to Install Python Packages using a Script
How to Update All Python Packages
One of the reasons that Python is so valuable is that there are several packages that we can install that extend the capabilities of Python. For example, if we want MATLAB-like functionality matrices numerical analysis, you can use numpy, optimizers, and differential equation solvers. Further, several other packages like matplotlib help us plotting, while Pygame helps develop a graphical user interface and build diverse games. xlwings, on the other hand, allows us to interface with excel. In addition, we have others like open CV, computer vision, etc.
Python modules allow you to incorporate other people’s code into your own. As a result, you won’t have to reinvent the wheel every time, saving you a lot of time during development. Python has thousands of modules that can help you save time when programming. In addition, Python modules can be installed in two ways: system-wide and in a virtual environment.
A module aids in the logical organization of Python code. When code is separated into modules, it is easier to comprehend and use. In addition, a module, which is a Python object with freely named characteristics, can be bound and referenced.
A module is nothing more than a Python code file. In a module, you can describe functions, groups, and variables. A module can also include executable code.
Multiple programs can import a module for use in their application; therefore, a single code can be utilized by various applications to complete their tasks faster and more reliably.
Introduction to modules
There are numerous code packages or code modules available in Python. You don’t have to reimplement existing code when using a module, and you can use code written by others.
It simplifies development by allowing you to save time on simple operations like scraping a webpage or reading a CSV file.
When you look for a solution to an issue, you’ll frequently encounter modules that you’ve never seen before or that aren’t installed on your computer. You can use these modules after installing them on your machine.
Importing modules at the start of your code allows you to load them. As an example,
import csv
import requests
Wheels vs. Source Distributions
pip can install from Source Distributions (sdist) or Wheels, and however, if both are available on PyPI, pip will choose the most compatible wheel. You can modify pip’s default behavior using the –no-binary option, for example.
Wheels are a pre-built distribution type that allows for speedier installation compared to Source Distributions (sdist), especially when a project incorporates compiled extensions.
Instead of rewriting the source distribution in the future, if pip cannot locate a wheel to install, it will construct one locally and cache it for future installs.
With pip, you can install modules and packages. Open a terminal and type pip to install a module system-wide.
The module will be installed if you type the code below.
sudo pip install module-name
In addition, you can choose to install to a specific user account -mostly the active user. Achieving these isolated packages for the given user will require you to run the following command.
python3 -m pip install --user module-name
It will automatically install a Python module. In most cases, you’ll use a virtual environment, or venv, rather than installing modules system-wide. On the other hand, you can run the following command on windows.
py -m pip install --user module-name
You must have a pip installed for this to work. The installation procedure is dependent on the platform you’re using.
Installing pip
On Windows, you can install Python modules. First, check whether pip is installed: To see if pip is installed, use the command prompt in Windows to perform the following command:
Note: If the pip isn’t already installed, then you need to install it first. To install the pip package, run the following command: pip install.
If the output version is not equal to or greater than 19, execute the following command to update pip:
pip install --upgrade pip wheel
Use the following command to install packages from other resources:
pip install -e git+<a href="https://github.com/myrepo.git#egg=packagename">https://github.com/myrepo.git#egg=packagename</a>
Use the following command to upgrade the packages that are already installed:
Use the following command to uninstall a package that has already been installed:
Installing Python modules on Unix/macOS
Make sure you’ve got pip installed. In your terminal, use the following command to see if pip is installed.
While pip alone is adequate for installing from pre-built binary files, you should also have up-to-date versions of the setuptools and wheel projects to ensure that you can install from source archives.
Use the following command to update the installed pip and setup tools copies:
python -m pip install --upgrade pip setuptools wheel
Or run the following command if you are on Windows.
py -m pip install --upgrade pip setuptools wheel
To install the module with pip, use the command below.
python3 -m pip install "model-name"
Use the following command to install the module’s specific version:
python3 -m pip install "model-name==2.2"
To install a module’s version between any two numbers, run the following:
python3 -m pip install "model-name>=2,<3"
To install a specific full-length version that is compatible with your computer, run the following command:
python3 -m pip install "model-name ~=2.2.3"
Use the following command to upgrade the project version:
python3 -m pip install --upgrade model-name
To install a required module that is in the text document:
python3 -m pip install -r requirements.txt
To install the directories that are present in the local system using the following command:
python3 -m pip install --no-index --find-links=file:///local/dir/ ProjectName
python3 -m pip install --no-index --find-links=/local/dir/ ProjectName
python3 -m pip install --no-index --find-links=relative/dir/ProjectName
Installation of Python packages manually
The vast majority of Python packages now supports pip. If your kit isn’t compatible, you’ll have to install it manually.
Before installing any package, make sure you have a Python installation that includes all of the essential files for installing packages by reading the Installation Requirements.
Download the kit and extract it to a local directory to install it. If the kit comes with its own set of installation instructions, follow them; if the package isn’t there, run the following command to install the package manually:
Using Setup.Py to Install Python Packages
Open a command or terminal window and type: setup.py to install a package that includes a setup.py file. First, cd to the setup.py directory in the root directory.
Setup.Py Build Environment
Packages installed with setup.py have build requirements that developers must follow. Some prerequisites, however, are optional.
Make sure you have the most recent version of setuptools installed:
python -m pip install --upgrade setuptools
Setup should include the install requires keyword arguments.
install_requires=[''], # Optional keyword
The setuptools setup.py keyword install_requires is used to define minimal package needs. Consider the following example:
install_requires=[''], # Optional keyword
For a setup, complete the package build prerequisites. PyPA (Python Packaging Authority) outlines py-based installation in their ‘Sample Project.’
Sample Project is a template package that includes a setup.py file for manual package installation. For tweaking the script and the whole package build environment, the file is annotated using comments. The sample project can be found at [https://github.com/pypa/sampleproject ].
The setuptools package is used in the Sample Project: “A setuptools based setup module.” Setup.py [ https://github.com/pypa/sampleproject/blob/master/setup.py
setup.py is the build script for setuptools-based packages.
This tutorial will walk you through the process of downloading and installing Python modules. There are various ways to install external modules, but for the sake of this course, we’ll use pip, which is available for both Mac/Linux and Windows. Pip is installed by default in Python 3.8 and newer. However, anyone using an older version of Python will equally benefit from this tutorial because the processes are still quite common.
Modules Introduction
One of the best things about Python is the abundance of excellent code libraries that are publicly and freely available. These libraries can save you a lot of time coding or make a task (such as creating a CSV file or scraping a webpage) much more manageable.
When searching for solutions to problems, you’ll frequently come across sample code that employs code libraries you’ve never heard of. Don’t be scared off by these! You can use these libraries after they’ve been installed on your computer by importing them at the start of your code; you can import as many libraries as you like, for example,
import csv
import requests
import kmlwriter
import pprint
It can be intimidating for new Python users to download and install external modules for the first time. There are a variety of methods for installing Python modules, which adds to the complication. This article covers one of the simplest and most used methods.
The idea is to get the software on your computer that automatically downloads and installs Python modules.
We’ll use a tool called pip for this.
Note that starting with Python 3.9, pip will be included in the standard installation. There are many reasons why you may not yet have this version, and if you don’t, following instructions should assist you.
Instructions for Mac and Linux mac-and-Linux-instructions
We can obtain a python script to install pip for us, according to the pip documentation. Furthermore, we can install pip via the command line on a Mac or Linux using the curl command, which downloads the pip installation Perl script.
curl -O https://bootstrap.pypa.io/get-pip.py
You must run the get-pip.py file with the Python interpreter after downloading it. However, if you use Python to run the script, it will fail.
The script will very certainly fail because it lacks the necessary rights to update specific folders on your filesystem, which are specified by default to prevent random programs from changing vital files and infecting you with viruses. You can use the sudo command in front of the python command in this case—and in all circumstances where you need to allow a script that you trust to write to your system folders—like this.
Instructions for Windows
Like with the other platforms, the quickest approach to installing pip is using the get-pip.py python application, which you can obtain here. You might be afraid of the vast mess of code that awaits you when you open this link. Please don’t be that way. Save this page with the default name of get-pip.py in your browser.
It’s a good idea to save this file in your python directory so you know where to look for it later.
After you’ve saved the file, you’ll need to run it in one of two methods. If you prefer to use your own Python interpreter, right-click on the file get-pip.py and select “open with,” then choose your own Python interpreter.
If you prefer to install pip via the command line on Windows, go to the directory where you saved Python and get-pip.py. We’ll suppose this directory is called python27 in this example, so we’ll type C:>cd python27. To install pip, navigate to this directory and run the command.
Installing-python modules in Python
It’s simple to install python modules now that you have pip because it handles all the work for you. When you identify a module you wish to use, the documentation or installation instructions will usually contain the pip command you’ll need, such as
pip install requests
pip install beautifulsoup4
pip install simplekml
Remember that you may need to execute pip with sudo for the same reasons as above (on Mac or Linux systems, but not Windows).
sudo pip install requests
You may find it helpful to use the -m flag to assist Python in finding the pip module, especially on Windows.
python -m pip install XXX
Installing Python modules in a virtual environment
We can create a different virtual environment from the operating system. It enables you to use the same Python modules as your other engineers in the team.
Use the following command to create a virtual environment:
virtualenv codevirtualenv
After opening codevirtualenv, you will find three directories now: bin, include, and lib.
To turn on the virtual environment, run the following command.
source codevirtualenv/bin/activate
Then we can install any module, in any version, without having to worry about the operating system. We’ll be able to use the same version of modules as other developers this way.
pip will only install for this environment.
Or you can choose to install a specific version of the given Python module by running the following command.
python -m pip install model-name==2.0.5
Alternatively, upgrade the module by running the following command,
python -m pip install --upgrade model-name
When you are finally ready to exit the virtual environment write, run the following command:
When you use the —user option with Python -m pip install, a package will be installed only for the current user, not for all users on the system.
Install Python packages for scientific purposes
A lot of scientific Python packages have complicated binary dependencies and are currently challenging to install through pip. It will often be more accessible for users to install these packages using other means than attempting to do so with pip at this time.
Working with many Python versions installed at the same time
Use the versioned Python commands with the -m flag to run the appropriate copy of pip on Linux, Mac OS X, and other POSIX systems. Below are examples of how you can go about this.
python2 -m pip install SomePackage # default Python 2
python2.7 -m pip install SomePackage # specifically Python 2.7
python3 -m pip install SomePackage # default Python 3
python3.9 -m pip install SomePackage # specifically Python 3.9
Use the py Python launcher on Windows in conjunction with the -m switch as follows.
py -2 -m pip install SomePackage # default Python 2
py -2.7 -m pip install SomePackage # specifically Python 2.7
py -3 -m pip install SomePackage # default Python 3
py -3.9 -m pip install SomePackage # specifically Python 3.9
Pip commands with the appropriate version numbers may also be available.
Additional approaches for Installing modules in Python
Using the requirements files
When you have a list of modules in a requirements file, for instance, requirements.txt, Python has a way of installing such a list of requirements. Run the following command to achieve this,
in Linux or macOS
python3 -m pip install -r requirements.txt
in Windows
py -m pip install -r requirements.txt
VCS Installation
It is possible to do a module installation from VCS. Mostly, the latter is in an editable form. Below are the variations for installations on Unix and windows
in Unix/ macOS
python3 -m pip install -e git+https://git.repo/some_pkg.git#egg=SomeProject # from git
python3 -m pip install -e hg+https://hg.repo/some_pkg#egg=SomeProject # from mercurial
python3 -m pip install -e svn+svn://svn.repo/some_pkg/trunk/#egg=SomeProject # from svn
python3 -m pip install -e git+https://git.repo/some_pkg.git@feature#egg=SomeProject # from a branch
in Windows
py -m pip install -e git+https://git.repo/some_pkg.git#egg=SomeProject # from git
py -m pip install -e hg+https://hg.repo/some_pkg#egg=SomeProject # from mercurial
py -m pip install -e svn+svn://svn.repo/some_pkg/trunk/#egg=SomeProject # from svn
py -m pip install -e git+https://git.repo/some_pkg.git@feature#egg=SomeProject # from a branch
Using other indexes for installation
An alternate index can come in handy when installing modules. You are in a position to search for an additional index while installing besides using PyPI. An example of index installation is as follows.
In Unix/macOS
python3 -m pip install --index-url http://my.package.repo/simple/ model-name
In Windows
py -m pip install --index-url http://my.package.repo/simple/ model-name
Using a local src tree for installation
Installing from local src in development mode, i.e., the project seems to be installed but may still be edited from the src tree.
In Unix/macOS
python3 -m pip install -e
In Windows
Additionally, you can install from the src as follows
Installing from src in Unix/macOS
Installing from src in Windows
Local archives Installation
You can additionally install a given source archive file as follows in Unix and Windows Operating Systems.
In Unix/ macOS
python3 -m pip install ./downloads/model-name-1.0.4.tar.gz
In Windows
py -m pip install ./downloads/model-name-1.0.4.tar.gz
Further, it is possible to do a local directory installation with archives without necessarily checking the PyPI.
In Unix/macOS
python3 -m pip install --no-index --find-links=file:///local/dir/ model-name
python3 -m pip install --no-index --find-links=/local/dir/ model-name
python3 -m pip install --no-index --find-links=relative/dir/ model-name
In Windows
py -m pip install --no-index --find-links=file:///local/dir/ model-name
py -m pip install --no-index --find-links=/local/dir/ model-name
py -m pip install --no-index --find-links=relative/dir/ model-name
Installing from a different location
Create a helper application that delivers the data in a PEP 503 compliant index format. Use the –extra-index-url flag to direct pip to use that index when installing other data sources (for example, Amazon S3 storage).
./s3helper --port=4488
python -m pip install --extra-index-url http://localhost:4488 model-name
Prereleases Installation
Along with stable versions, you’ll find pre-release and development versions. Pip searches for stable versions by default.
In Unix/macOS
python3 -m pip install --pre model-name
In Windows
py -m pip install --pre model-name
Setuptools “Extras” Installation
At this point, the Setuptools extras can be installed.
In Unix /macOS
python3 -m pip install SomePackage[PDF]
python3 -m pip install SomePackage[PDF]==3.0
python3 -m pip install -e .[PDF] # editable project in current directory
In Windows
py -m pip install SomePackage[PDF]
py -m pip install SomePackage[PDF]==3.0
py -m pip install -e .[PDF] # editable project in the current directory
Example: Installing matloplib using pip
First, open the terminal if you are on Unix or macOS and run the following command.
Then try to import maplotlib. If the process is successful, then it is already installed. However, if errors are importing, then it is probably not there and requires re-installation.

Installing matplotlib
To uninstall matplotlib, run the following command on the terminal as shown below.
Finally, if you choose to uninstall matplotlib, you can efficiently run the following command on the terminal or the command-line interface.
Conclusion
Python is a major open-source development project with a vibrant community of contributors and users that make their products available to other Python developers under open source license terms.
It enables Python users to efficiently exchange and interact, taking advantage of the solutions that others have already generated for common (and sometimes even uncommon!) problems and maybe introducing their solutions to the pool of answers.