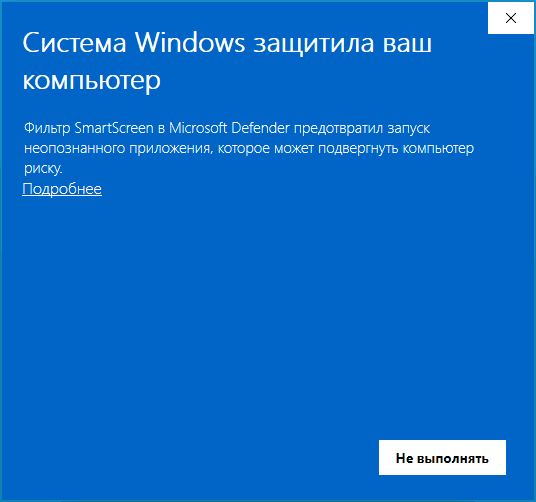
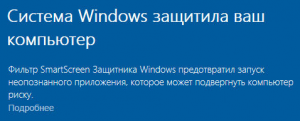
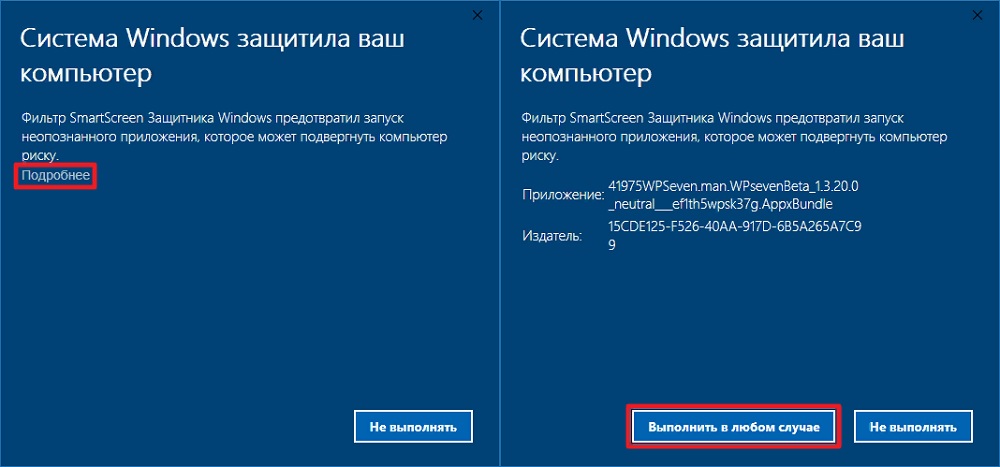
 При запуске некоторых программ, игр и их установщиков, скачанных из Интернета, в Windows 11 и Windows 10 вы можете увидеть сообщение «Система Windows защитила ваш компьютер» с пояснением о том, что фильтр SmartScreen предотвратил запуск неопознанного приложения, которое может подвергнуть компьютер риску. Иногда, нажав по ссылке «Подробнее» в окне вы можете всё равно запустить приложение, иногда такой возможности нет.
В этой инструкции подробно о том, как запустить программу, если при её запуске сообщается о том, что Windows защитила ваш компьютер или полностью отключить такого рода предупреждения и блокировки запуска.
Быстрый запуск программы в ситуации «Windows защитила ваш компьютер»
Если вы не планируете полностью отключать функции защиты системы Windows 11 и Windows 10, фильтр SmartScreen и Microsoft Defender, при этом запуск программы нужно выполнить (а при нажатии на «Подробнее» нет пунктов для запуска в любом случае), обычно достаточно выполнить следующие шаги:
- Нажмите правой кнопкой мыши по файлу, запуск которого блокируется и выберите пункт «Свойства».
- В свойствах файла, на вкладке «Общие» отметьте пункт «Разблокировать» и нажмите «Ок».

- Запустите программу повторно.

С большой вероятностью в этот раз запуск пройдёт успешно, каких-либо сообщений о предотвращении запуска появиться не должно.
Это решение подходит лишь в случае, когда файл был скачан из Интернета и в его свойствах есть сообщение о том, что «Этот файл получен с другого компьютера и, возможно, был заблокирован с целью защиты компьютера» и лишь тогда, когда нет необходимости полностью отключать предотвращение запуска малоизвестных приложений.
Отключение защиты от вредоносных и потенциально нежелательных приложений
Запуск малоизвестных, подозрительных и потенциально нежелательных приложений в Windows 10 и Windows 11 может блокироваться антивирусом Microsoft Defender, а точнее — его модулем SmartScreen. При желании эти функции можно отключить:
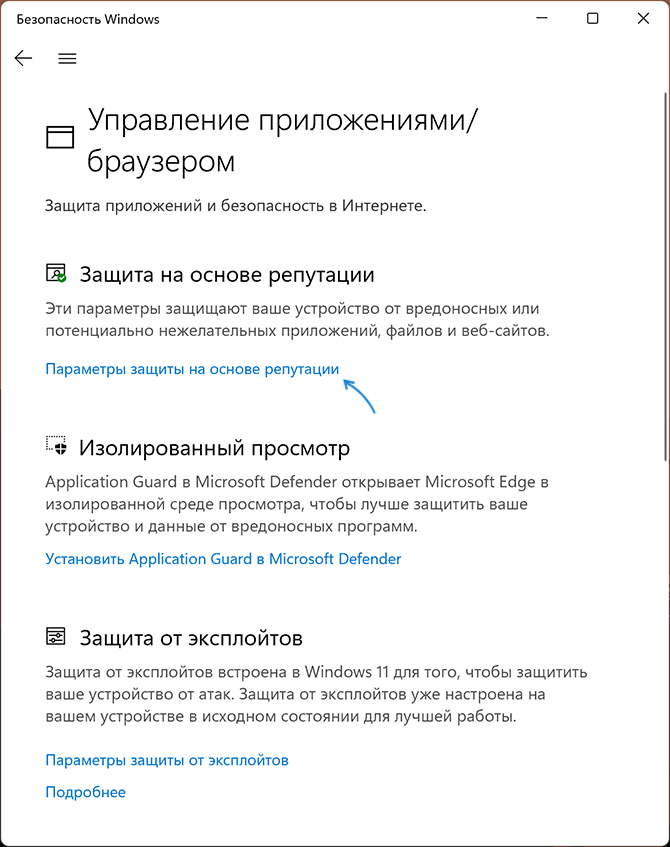
- Зайдите в окно «Безопасность Windows», используя значок в области уведомлений или поиск в панели задач.
- Откройте раздел «Управление приложениями/браузером».

- Нажмите «Параметры защиты на основе репутации».
- Отключите опцию «Блокировка потенциально нежелательного приложения». Также может иметь смысл отключить верхнюю опцию — «Проверка приложений и файлов».


В дальнейшем блокировка запуска программ из Интернета выполняться не должна, а сообщение «Система Windows защитила ваш компьютер» перестанет появляться.
Дополнительные нюансы:
- Я не рекомендую отключение встроенных функций защиты системы в Windows: они, в целом, работают вполне исправно и помогают обратить внимание на потенциальную небезопасность выполняемых действий.
- Рассмотренным во втором разделе инструкции способом мы отключим только опции SmartScreen. Встроенный антивирус Microsoft Defender продолжит работать и, обнаружив явно вредоносные программы с известными сигнатурами угроз (а не просто малоизвестное приложение без цифровой подписи), заблокирует его. Подробнее на тему: Как отключить Microsoft Defender в Windows 11, Как отключить Защитник Windows 10.
If you run a program, Windows 10 may give you a pop-up window saying “Windows protected your PC”. This message may appear when you are in a browser. The former is the warning given by Microsoft and the latter is a tech support scam. In this post, you can know how to disable the SmartScreen protection and remove the scam, as well as data protection offered by MiniTool Software.
Now, let’s see two cases on the “Windows protected your PC” pop-up window.
In Windows 10, there are some built-in security features designed to protect your PC from a number of malicious apps and criminal websites. Among these features, the Windows Defender SmartScreen feature is representative.
It is enabled by default and runs in the background to prevent you from running certain apps that are unrecognized by the Windows software database or known to be malicious. This could be a good protective measure for your PC.
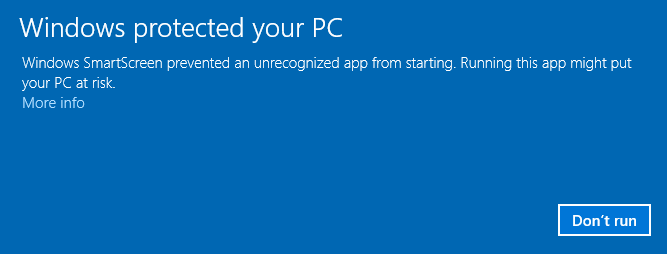
Usually, you will receive a popup if you attempt to run or install an application that Windows doesn’t recognize. The warning is “Windows protected your PC. Windows SmartScreen prevented an unrecognized app from starting…”
However, this warning sometimes is annoying. For example, you know this app is secure, obtained from a trustworthy source and won’t damage your system. Besides, it seems to show an only option – Don’t run. What should you do? Now, let’s go to the following part.
Things to Do When “Windows Protected Your PC” Appears in Windows 10
Allow App to Bypass the Windows Defender SmartScreen Message
When receiving the above warning screen, please make sure the app is absolutely safe. To know some new information and options, you can click the More info link that is displayed beneath the warning message.
In the pop-up window, you can know the app name and publisher. You may note that the publisher is unknown. Don’t panic since not every developer registers with Microsoft and the absence of this field information doesn’t imply the application is risky.
Of course, you can check again carefully and make sure the app comes from the correct source. Then, click the Run anyway button to bypass the Windows Defender SmartScreen warning and continue using the app.
Disable Windows SmartScreen
Some of you may don’t like the protection features offered by Windows SmartScreen since they are not as excellent as expected. According to reports, it could slow down your system greatly and cannot offer any additional security possibly if you run a professional antivirus program. Additionally, Windows SmartScreen can collect your private data.
Of course, disabling the SmartScreen feature can avoid the “Windows protected your PC” warning in Windows 10.
Method 1: Disable Windows Defender SmartScreen Security Software
- Go to Start > Settings > Update & Security.
- Navigate to Windows Defender and click Open Windows Defender Security Center.
- Click the App & browser control section, scroll down, find Check apps and files and turn it off.
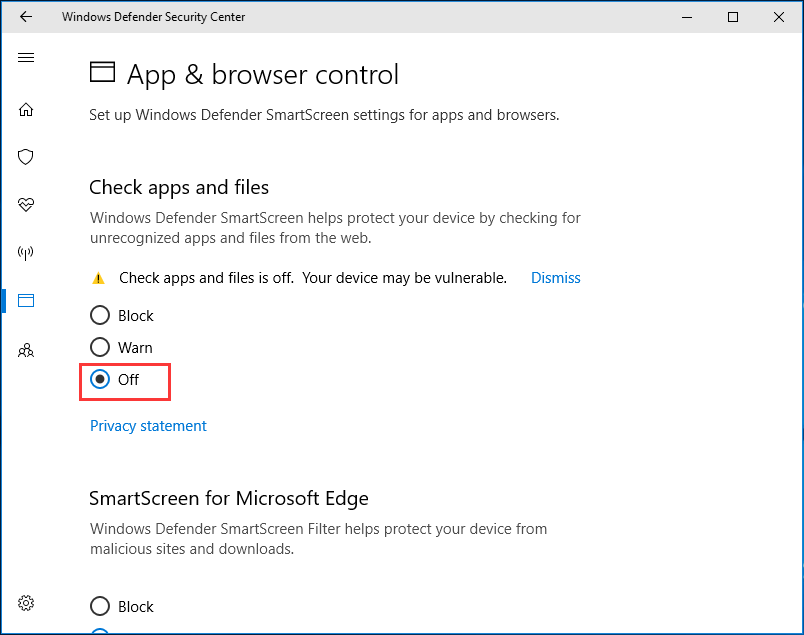
Now, you won’t receive the “Windows protected your PC” message when running an unrecognized app in Windows 10.
Method 2: Use Registry Editor to Disable Windows SmartScreen
If you are a home computer user, you can turn off SmartScreen via Registry Editor in Windows 10 to remove the message – Windows SmartScreen prevented an unrecognized app from starting.
Tip: Modifying registry keys is a dangerous operation since the incorrect operation could cause the system to be not bootable. So, back up your registry keys before you do.
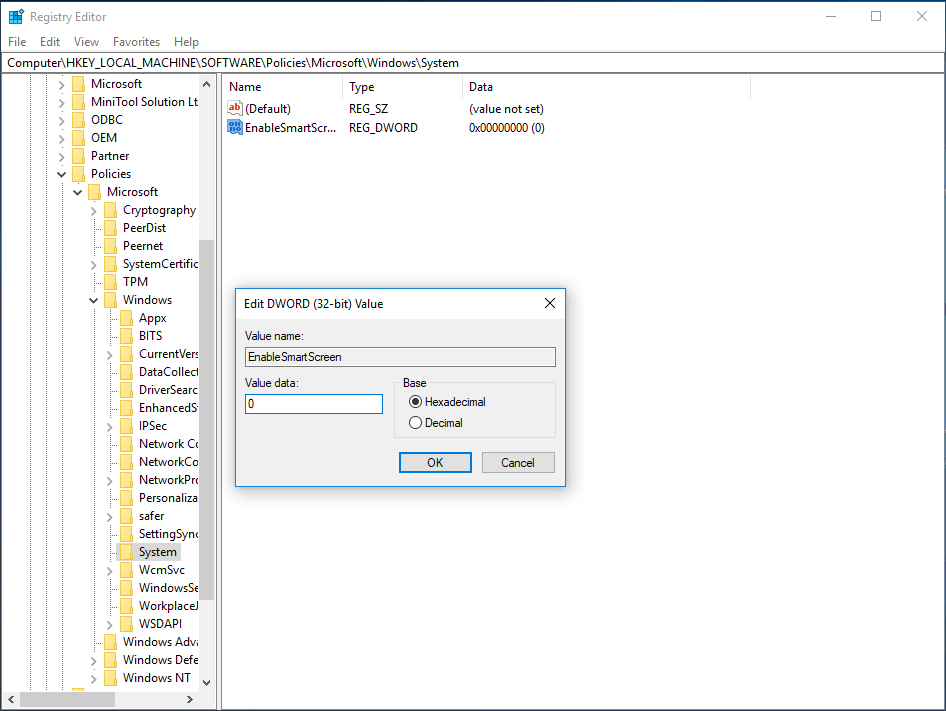
- Input regedit.exe in the Windows 10’s search box and click the exact result to launch Registry Editor.
- Head to the path: HKEY_LOCAL_MACHINE\SOFTWARE\Policies\Microsoft\Windows\System.
- Double-click on EnableSmartScreen and set its value to 0 (disabled).
- Exit the tool and restart your computer.
Method 3: Use Group Policy to Disable SmartScreen
If you are a Pro user, you can turn off the feature to remove the “Windows protected your PC” message. Here is how to do it:
- Search for gpedit.msc in the search bar and click Edit group policy.
- Head to Computer Configuration > Administrative Templates > Windows Components > File Explorer.
- Double-click Configure Windows Defender SmartScreen and set it to Disabled.
- Click OK to save the change.

Disable SmartScreen Filter in IE and Edge
Sometimes, the warning may appear in Internet Explorer (IE) or Microsoft Edge. To remove it, you should open IE, go to Settings > Safety and turn Windows Defender SmartScreen off. In Edge, go to Settings > View advanced settings > Privacy and services to turn off the toggle – Help protect me from malicious sites and downloads with Windows Defender SmartScreen.
Warning: Disabling Windows SmartScreen could let your computer be vulnerable, so it is best to not turn it off. Or you only do so if you encounter the SmartScreen protection while running an unknown app. To avoid data loss caused by a virus and ensure your data safe, we suggest backing up your important files with MiniTool ShadowMaker. This will be described in detail subsequently.
Case 2: Windows Protected Your PC Virus Scam
The above paragraphs show you the actual SmartScreen protection on the desktop screen in Windows 10. Actually, you may also receive the “Windows protected your PC” warning when using a browser. The warning is not real but only a tech support scam.
Usually, the warning message gives you a phone number and tricks you into a call for help. Then, scammers ask for payment to get a purported support service. As it is just a scam, the website doesn’t really know what is running on your computer. So, don’t call any listed phone number.
In fact, Microsoft never sends unsolicited email message giving phone calls to request personal information. Besides, errors from Microsoft also never include a phone number.
Tip: In addition to this scam, you may encounter another scam – Windows Defender Zeus Virus. For more information, refer to our previous article – Remove “Windows Defender Alert Zeus Virus” from Your PC Now!
When encountering this fake error message, you should try to remove it. Now, let’s go to see the following operations.
Steps to Remove “Windows Protected Your PC” Scam
Step 1: Close the Browser Tab
Firstly, you can try closing the browser tab based tech support scam. Usually, you couldn’t close it directly but you can do this via Task Manager.
- Right-click the taskbar and choose Task Manager.
- Find your browser from the Processes tab and click End task after selecting it.

Tip: When opening your browser next time, do not open the latest opened page.
Step 2: Uninstall Malicious Programs from Windows 10
In your computer, some apps are installed without your consent; some are added to the add-ons of your browser or hidden in other installers. Perhaps malicious viruses are included, so you should remove these apps.
1. Search for control panel in the search bar and then click the result.
2. In the Control Panel interface, view items by category and then choose Uninstall a program.
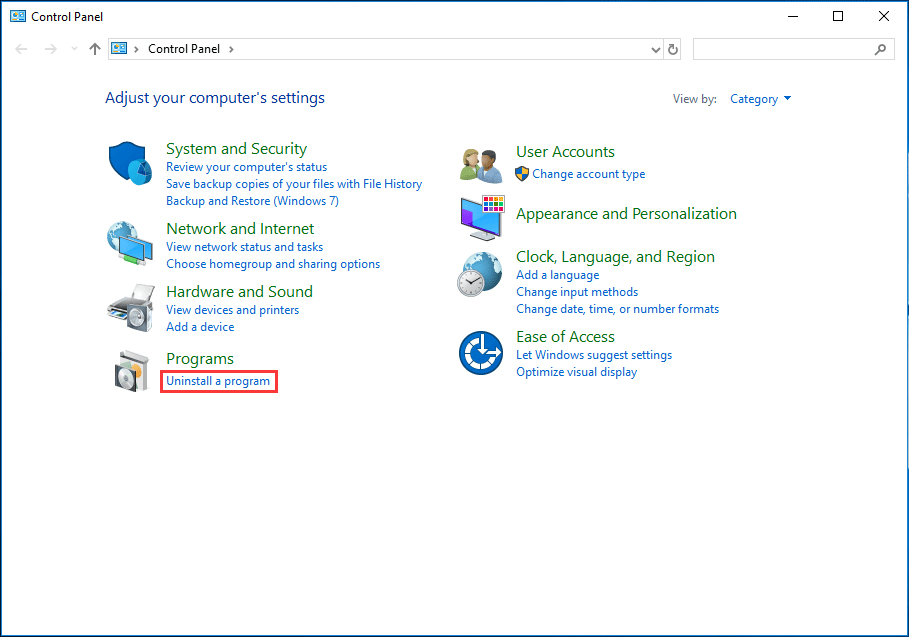
3. Scroll down the app list, find and right-click the malicious program and click Uninstall.
Step 3: Use Anti-Malware to Remove “Windows Protected Your PC” Adware
It is important to use an anti-malware or antivirus program to scan your system and remove malicious programs and viruses. On the market, Malwarebytes can be worthy of being recommended since it is able to destroy many types of malware that other software tends to miss.
Of course, you can try other programs, for example, HitmanPro, AdwCleaner, etc. to scan your computer for badware or remove adware from a computer.
Step 4: Reset Browser Settings to Default
If you have tried the above operations, now you can consider resetting the browser settings to their default configuration to remove the “Windows protected your PC” tech support scam from your Windows 10 computer.
Tip: This method will remove all extensions, add-ons, toolbars, and other customizations but will keep your bookmarks.
Google Chrome
1. Open Chrome, click on the main menu, represented by three horizontal lines and click Settings.
2. Go to the Advanced link.
3. In the Reset and clean up section and click Restore settings to their original defaults.

4. To complete the reset process, click on the Reset Settings button.
Mozilla Firefox
- Click the menu and choose Help > Troubleshooting Information.
- In the pop-up window, click Refresh Firefox to remove add-ons, customizations and restore the browser settings to defaults to remove “Windows protected your PC” fake error message.

Internet Explorer
1. Click the gear icon and choose Internet options.
2. Under the Advanced tab, click Reset.

3. In the pop-up window, check the Delete personal settings option and click Reset.
4. Click Close finally.
Now, after doing the above operations, your computer should be free of the “Windows protected your PC” fake error message.
“Here is all the information on the Windows protected your PC warning on a computer. You can share these two cases on Twitter to let more people know.”Click to Tweet
Back up Your PC to Avoid Data Loss
Viruses, malware, malicious adware, spyware, etc are always ubiquitous. To keep your computer protected really, you should do some things, for example, run a powerful antivirus program or anti-malware, do not install an unrecognized program, don’t open unknown attachment or emails, back up your computer, etc.
Computers are easily attacked by malicious software or viruses, causing data loss. So, the important thing you should do is to make a backup for your important files.
MiniTool ShadowMaker, a third-party free backup software, can be your good assistant since it is designed to back up your operating system, disks, partitions and files & folders within simple clicks. To back up your computer well, you can make an automatic backup. Besides, you can use it to perform a fast disaster recovery.
For file backup, you can also try file sync. Furthermore, this backup program allows you clone disk to another disk. Now, download MiniTool ShadowMaker Free Edition for free and install in on your computer to start file backup.
MiniTool ShadowMaker TrialClick to Download100%Clean & Safe
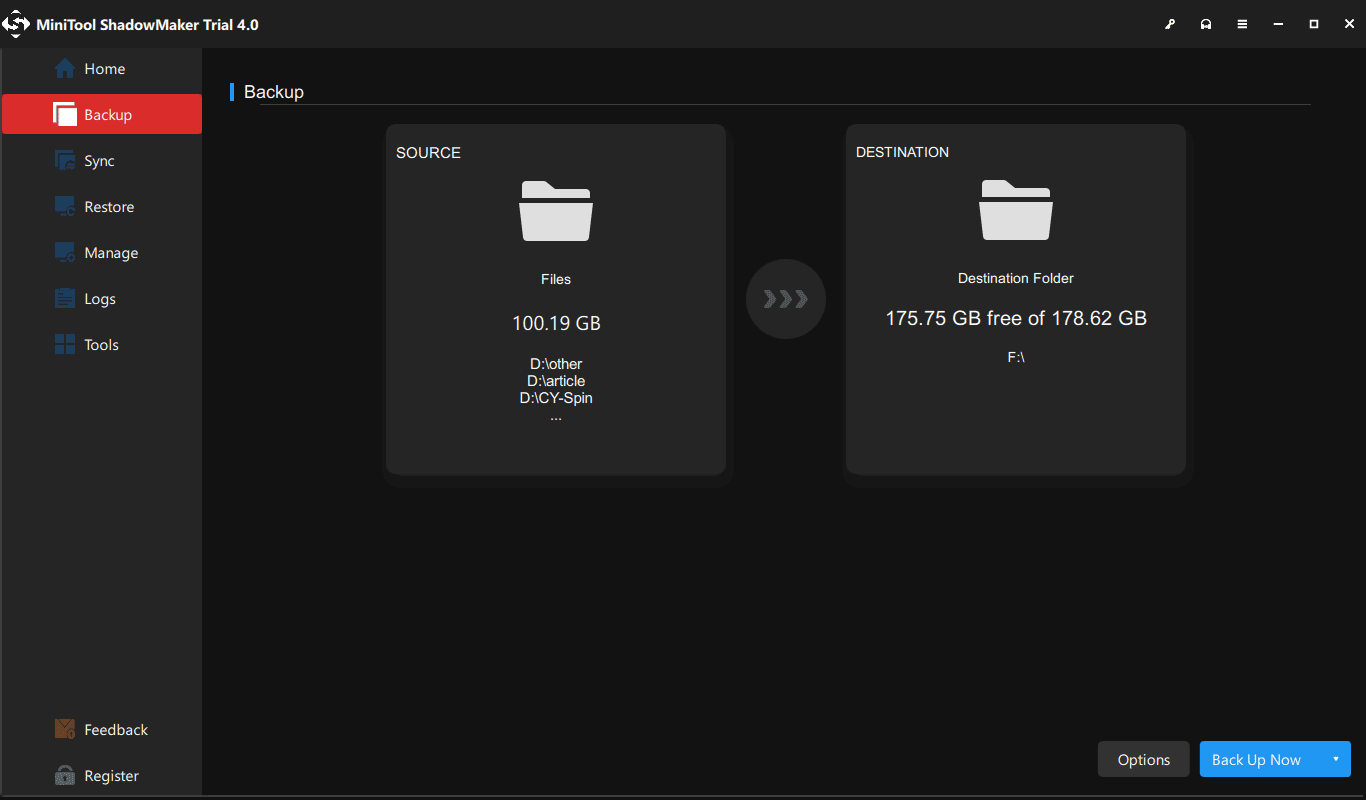
1. Run MiniTool ShadowMaker.
2. Go to the Backup tab, choose the files to back up.

3. Decide which place you want to store the backup to.
4. Finally, click Back Up Now to start the file backup at once.
Tip: If you want to sync files for backup, you can read our previous post – 2 Best File Synchronization Software in Windows 10/8/7.
Bottom Line
Have you got the warning “Windows protected your PC” in Windows 10? If yes, don’t panic and this post gives you two cases. Just do what you should do based on your actual situation by following the steps mentioned above. What’s more, we suggest backing up your files to avoid data loss since viruses and malicious programs are rampant.
As for other suggestions or questions to this post or our software, you can let us know by leaving a comment below or sending an email to our support team: [email protected].
Windows Protected Your PC FAQ
How do I remove protected Windows from my computer?
To turn off “Windows protected your PC” on Windows 10, you can choose to disable SmartScreen via Windows Settings, Registry Editor and Local Group Policy Editor. If you encounter a scam with the same error message, close your web browser, uninstall a malicious program, use antivirus software, and reset your browser to default settings.
What is Windows SmartScreen?
SmartScreen, also called Windows SmartScreen and Windows Defender SmartScreen, is an important component that helps protects systems from malicious programs downloaded from the Internet. It is included in many Microsoft products, including Windows operating systems (Windows 8 and later), Microsoft Edge, Internet Explorer, and Outlook.com.
How do I disable SmartScreen on Windows 10?
Three methods are offered for you:
- Change the setting of Windows Defender
- Use Registry Editor to disable Windows SmartScreen
- Edit Group Policy to Disable SmartScreen
How do I get past Windows Defender SmartScreen?
- Go to Settings > Update & Security > Windows Defender.
- After opening Windows Defender Security Center, click the App & browser control button.
- Click Off in these three sections – Check apps and files, SmartScreen for Microsoft Edge and SmartScreen for Windows Store apps.

Что значит и как убрать «Система windows защитила ваш компьютер»?
Практически каждый пользователь Windows 10 при запуске некоторых файлов сталкивался с сообщением о защите операционной системы. Запускаемый вами файл был признан как небезопасный и система заблокировала его открытие.
Все это конечно хорошо, но вот зачастую данная защита ошибочно признает файл небезопасным и тем самым препятствует запуску и установке требуемых пользователю приложений.
В данной статье мы расскажем как отключить механизм защиты от запуска небезопасных файлов в Windows 10 и тем самым избавится от сообщения “Система windows защитила ваш компьютер”.
Почему появляется данное сообщение?
В Windows 10 присутствует встроенный защитник системы. Называется фильтр SmartScreen. Работает он в режиме реального времени и по каким – то своим скрытым алгоритмам самостоятельно принимает решение безопасен запускаемый в данный момент файл или нет.
Текст сообщения
Именно в случае, когда по его мнению запускаемый вами файл не безопасен и может принести вред компьютеру, отображается сообщение “Система windows защитила ваш компьютер”.
Как отключить SmartScreen в Windows 10?
Чтобы открыть файл, который блокирует система SmartScreen, последнюю нужно отключить. Для этого через центр уведомлений в правом нижнем углу рабочего стола возле часов нужно зайти в настройки.
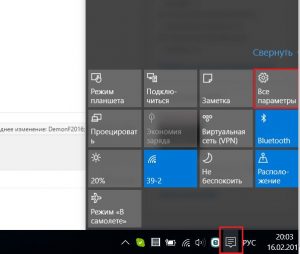
Раскрытие области уведомлений для входа в настройки windows 10
В открывшемся окне “Параметры Windows” заходим в “Обновление и безопасность”.
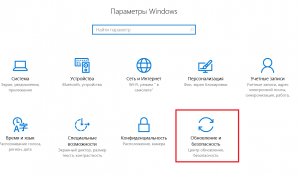
Выбираем обновление и безопасность
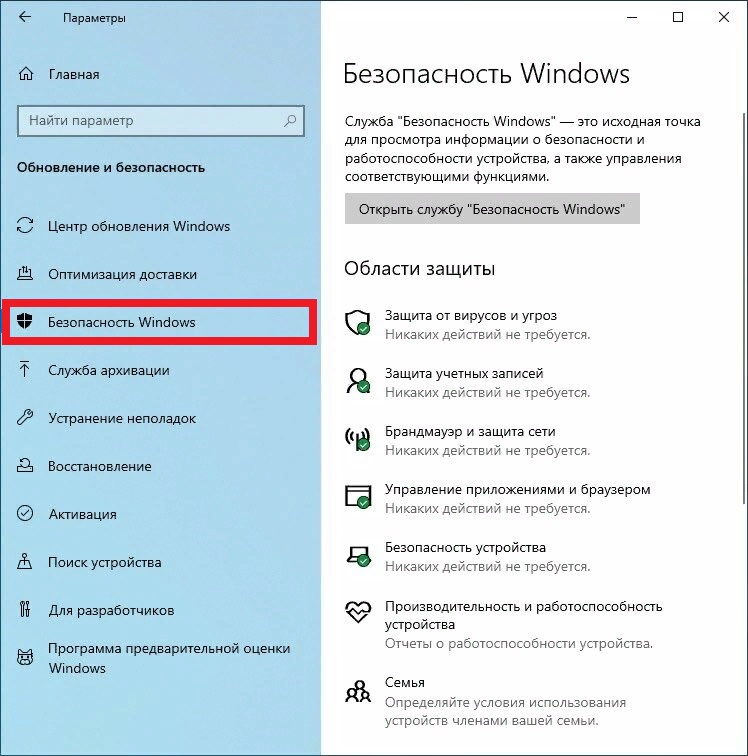
Далее слева выбираем “Безопасность Windows”, а в окне справа “Управление приложениями/браузером”.
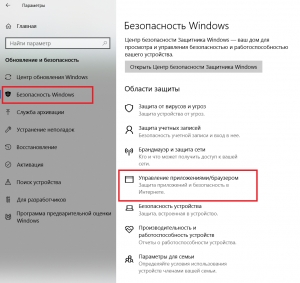
Открываем управление фильтром SmartScreen
Здесь нужно в первом пункте “Проверка приложений и файлов” установить переключатель в положение “Выключить”.
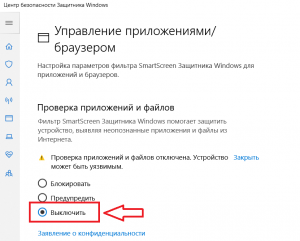
Отключение smartscreen в windows 10
На этом отключение SmartScreen в Windows 10 окончено. Теперь при открытии файлов их запуск не будет блокироваться и сообщение “Система windows защитила ваш компьютер” не будет появляться.
Время на прочтение
3 мин
Количество просмотров 952K
В Windows 10 имеется встроенный антивирус Windows Defender («Защитник Windows»), защищающий компьютер и данные от нежелательных программ: вирусов, шпионских программ, программ-вымогателей и многих других типов вредоносных программ и действий хакеров.
И хотя встроенного решения для защиты достаточно для большинства пользователей, бывают ситуации, в которых вы можете не захотеть пользоваться этой программой. К примеру, если вы настраиваете устройство, которое не будет выходить в сеть; если вам необходимо выполнить задачу, блокируемую этой программой; если вам нужно уложиться в требования политики безопасности вашей организации.
Единственная проблема связана с тем, что полностью удалить или отключить Windows Defender у вас не выйдет – эта система глубоко интегрирована в Windows 10. Однако есть несколько обходных путей, при помощи которых вы можете отключить антивирус – это использование локальной групповой политики, реестра или настроек Windows в разделе «Безопасность» (временно).
Как отключить Защитник Windows через настройки безопасности Windows
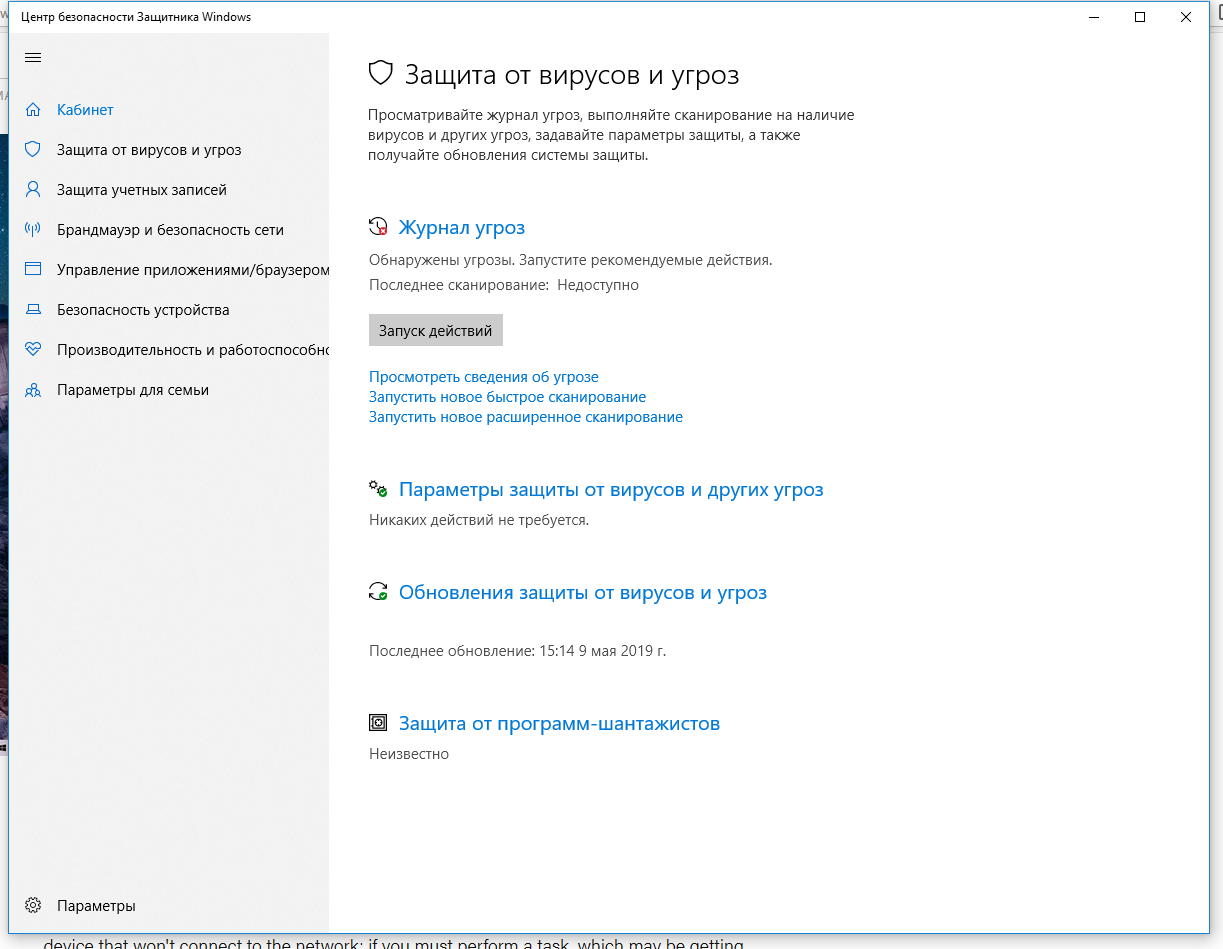
Если вам нужно выполнить определённую задачу, и не нужно отключать Защитника полностью, вы можете сделать это временно. Для этого при помощи поиска в кнопке «Пуск» найдите раздел «Центр безопасности Защитника Windows», и выберите в нём пункт «Защита от вирусов и угроз».
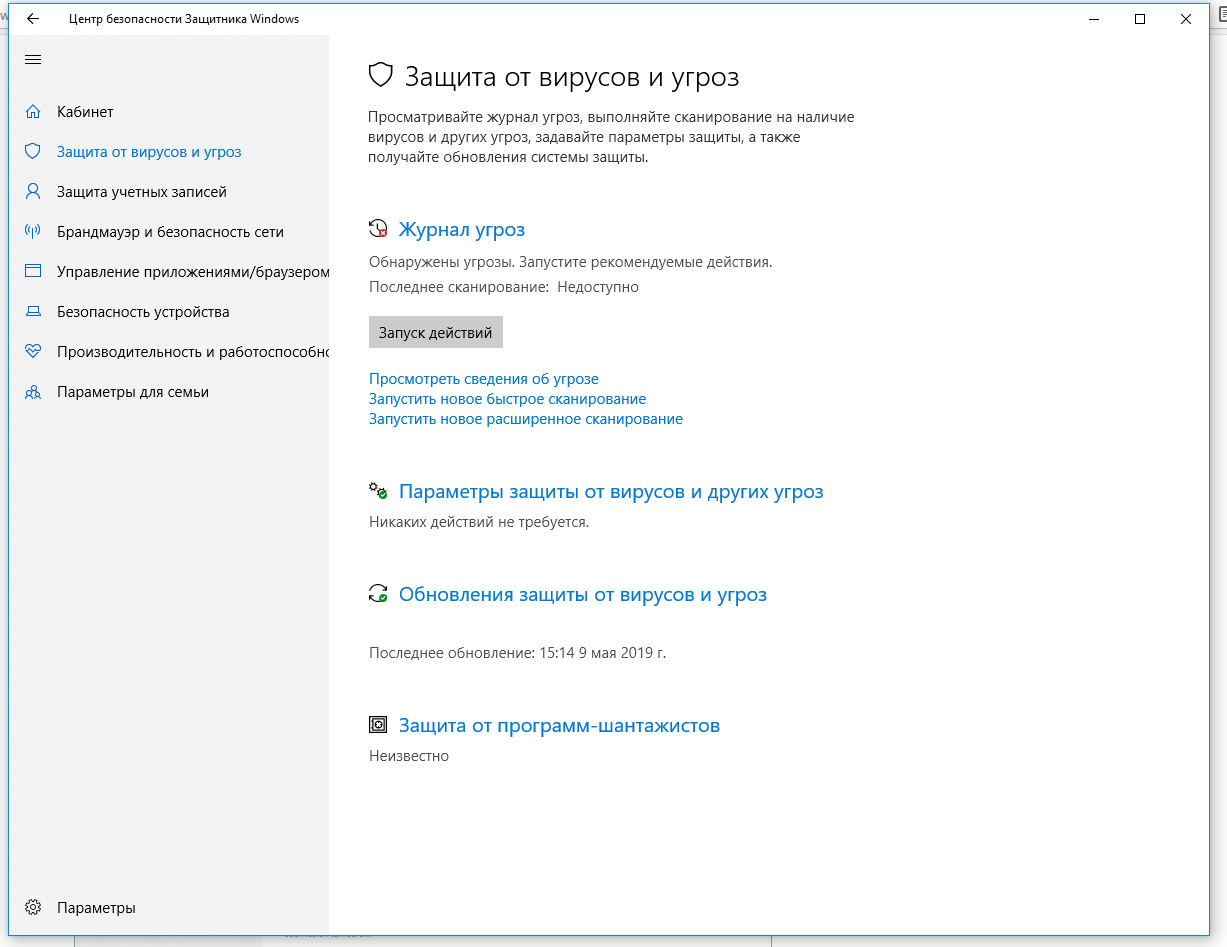
Там перейдите в раздел «Параметры защиты от вирусов и других угроз» и кликните по переключателю «Защита в режиме реального времени».
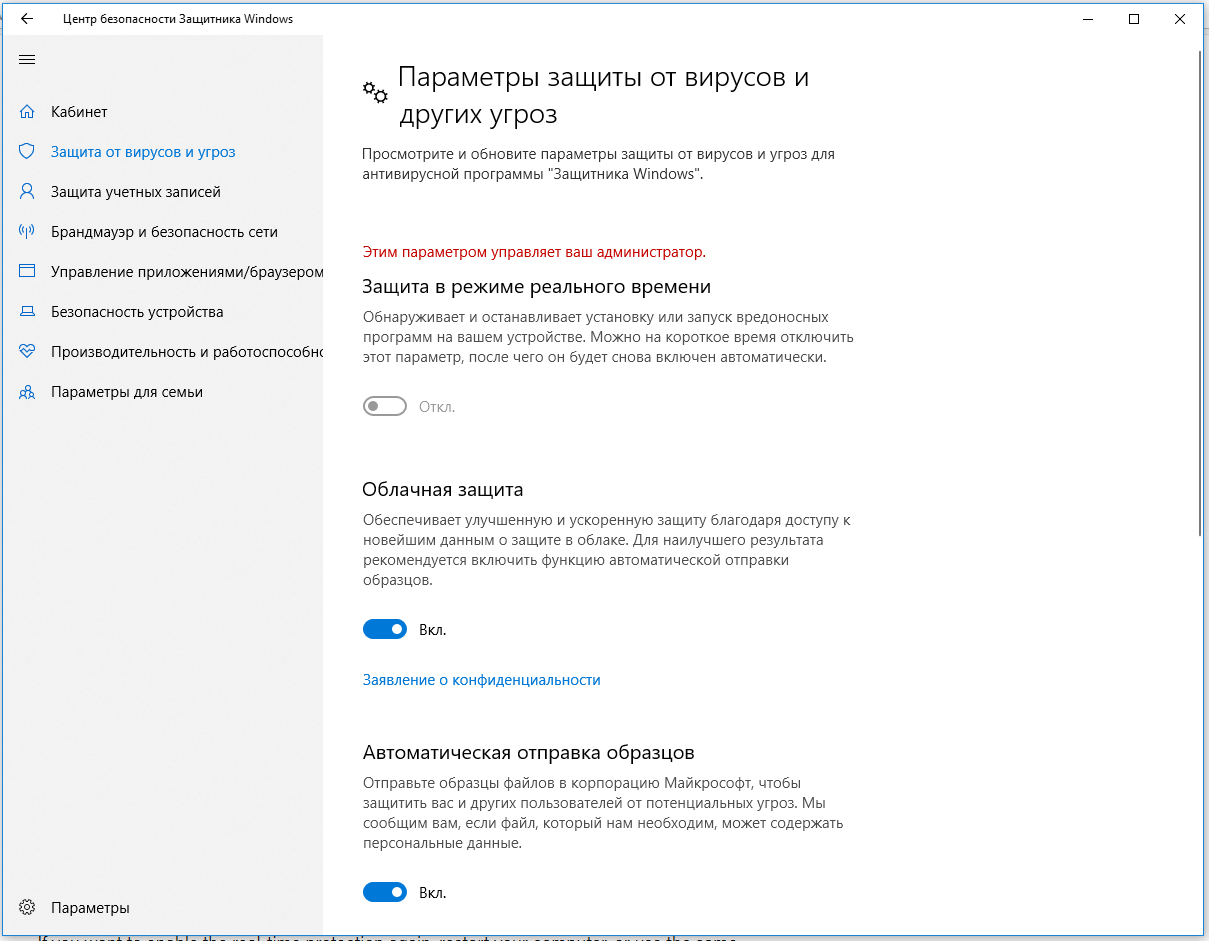
После этого антивирус отключит защиту компьютера в реальном времени, что позволит вам устанавливать приложения или выполнять определённую задачу, которая была недоступна вам из-за того, что антивирус блокировал необходимое действие.
Чтобы снова включить защиту в реальном времени, перезапустите компьютер или заново пройдите все этапы настроек, но на последнем шаге включите переключатель.
Это решение не является постоянным, но лучше всего подходит для отключения антивируса Windows 10 для выполнения определённой задачи.
Как отключить Защитник Windows через групповые политики
В версиях Windows 10 Pro и Enterprise вам доступен редактор локальных групповых политик, где можно навсегда отключить Защитника следующим образом:
Через кнопку «Пуск» запустите исполняемый скрипт gpedit.msc. Откроется редактор политик. Перейдите по следующему пути: Конфигурация компьютера > Административные шаблоны > Компоненты Windows > Антивирусная программа «Защитник Windows».

Двойным нажатием откройте пункт «Выключить антивирусную программу „Защитник Windows“». Выберите настройку «Включено» для включения этой опции, и, соответственно, отключения Защитника.
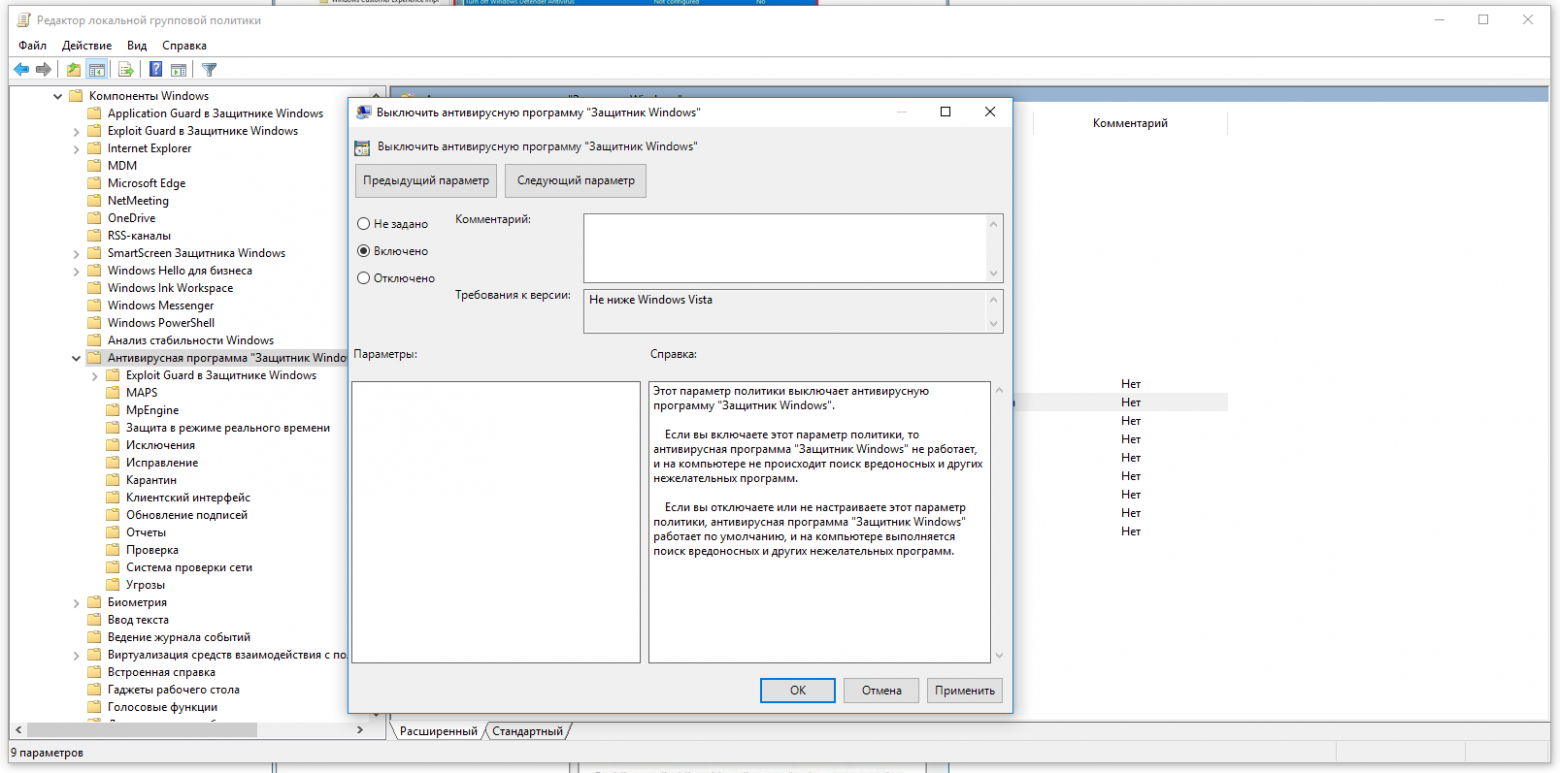
Нажмите «ОК» и перезапустите компьютер.
После этого антивирус будет навсегда отключён на вашем устройстве. Но вы заметите, что иконка со щитом останется в панели задач – так и должно быть, поскольку эта иконка принадлежит к приложению «Безопасность Windows», а не самому антивирусу.
Если вы передумаете, вы всегда можете заново включить Защитника, повторив эти шаги, и на последнем шаге выбрав вариант «Не задано», после чего снова нужно будет перезагрузить компьютер.
Как отключить Защитник Windows через реестр
Если у вас нет доступа к редактору политик, или у вас установлена Windows 10 Home, вы можете отредактировать реестр Windows, отключив тем самым Защитника.
Напоминаю, что редактировать реестр рискованно, и ошибки в этом деле могут нанести непоправимый ущерб текущей установленной копии Windows. Лучше сделать резервную копию системы перед тем, как начинать редактирование.
Чтобы полностью отключить Защитиника через реестр, запустите через кнопку «Пуск» программу regedit, и перейдите в ней по следующему пути:
HKEY_LOCAL_MACHINE\SOFTWARE\Policies\Microsoft\Windows Defender
Совет: этот путь можно скопировать и вставить в адресную строку редактора реестра.
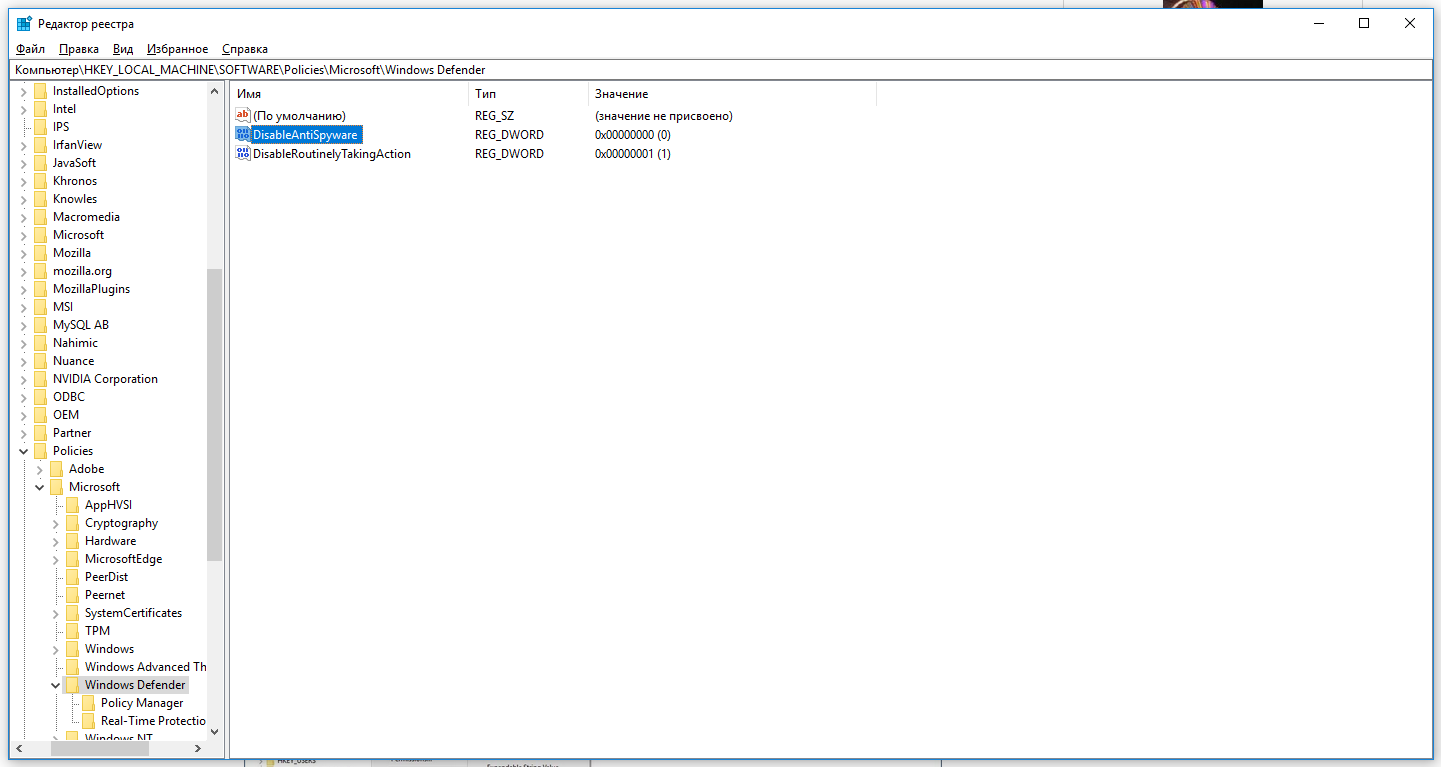
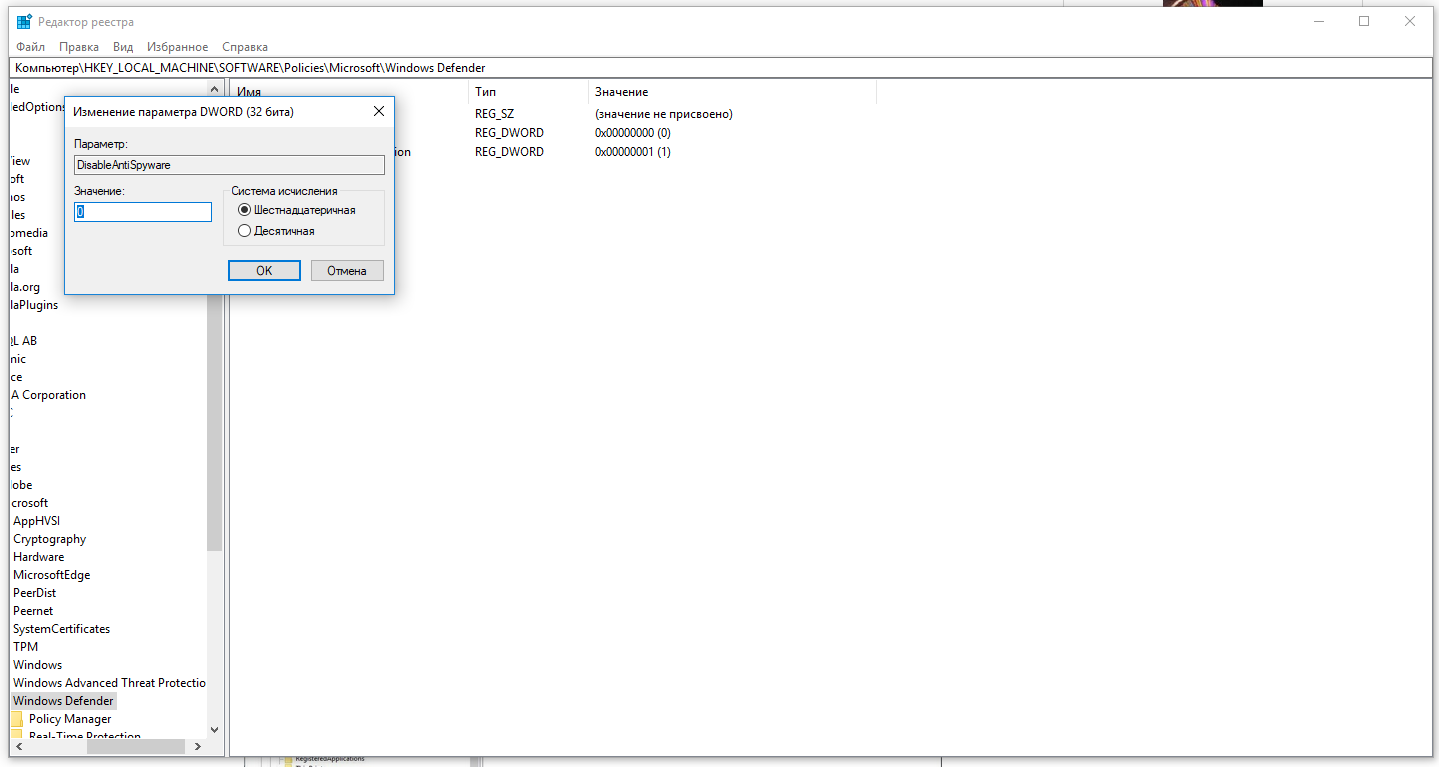
Затем правой клавишей нажмите на ключ (каталог) Windows Defender, выберите «Новый» и DWORD (32-bit) Value. Назовите новый ключ DisableAntiSpyware и нажмите «Ввод». Затем двойным щелчком откройте редактор ключа и задайте ему значение 1.
Нажмите ОК, и перезапустите компьютер.
После этого Защитник Windows уже не будет защищать вашу систему. Если вы захотите отменить эти изменения, повторите все шаги, но в конце удалите этот ключ или назначьте ему значение 0.
Рекомендации
Несмотря на наличие нескольких методов отключения Защитника Windows, мы не рекомендуем использовать компьютер вообще без антивирусных программ. Однако вы можете столкнуться с ситуациями, в которых отключение этой функции будет лучшим вариантом. А если вы устанавливаете стороннюю программу-антивирус, вам не нужно отключать Защитника вручную, поскольку во время установки он отключится автоматически.
Windows 7, 8.1 и 10 включают ряд встроенных функций безопасности, предназначенных для защиты вашего ПК от опасностей, связанных с мошенническими сайтами и вредоносными программами. Одна из этих систем, называемая SmartScreen Защитник Windows, предотвращает запуск определённых приложений, которые заведомо являются вредоносными (например, вирусы и нелегальное ПО) или не распознаются базой данных Microsoft.
Как все равно запустить программу?
Однако программы, попадающие под вторую категорию, не всегда являются вирусами или незаконными приложениями. Они просто отсутствуют в базе, и SmartScreen на всякий случай блокирует и их. Проблема в том, что, когда пользователь сталкивается с сообщением, создается впечатление, что есть только один выбор — согласиться, и нажать кнопку «Не выполнять».
Но, если вы полностью уверены, что приложение, которое вы пытаетесь запустить, безопасно и было получено из надёжного источника, есть простое решение, хотя и не очевидное. Под текстом сообщения расположена кнопка «Подробнее», при нажатии на которую появляется дополнительная информация и возможность запустить приложение принудительно.
Как отключить SmartScreen Защитника Windows?
В некоторых случаях, при повторном запуске программы, Защитник Windows всё равно заблокирует приложение или некоторые его файлы, удаляя их или помещая в карантин. Обычно это происходит с нелицензионным ПО, включающим в себя программы обхода проверки лицензии, и именно их блокирует система. Чтобы продолжить работать с такой программой, потребуется временно отключить Защитник Windows.
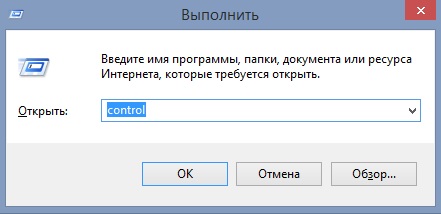
- Для этого перейдите в панель управления с помощью встроенного поиска или через функцию Win + R, введя команду control.
- В открывшейся «Панели управления» выберите раздел «Центр обновления Windows». Далее, в меню слева «Безопасность Windows», и в списке справа «управление приложениями / браузером». В
- разделе «Проверять приложения и файлы» справа выберите «отключить». Для отключения SmartScreen Windows вам потребуется пройти аутентификацию с правами администратора.
После этого система предупредит вас, что ваш компьютер теперь может быть уязвим для вредоносных приложений (что является правдой). Однако, если вы будете осторожны и запускаете приложения только из известных надёжных источников, ничего страшного не произойдёт. В любом случае, вышеописанным способом всегда можно повторно активировать SmartScreen.