Starting with Windows 10 build 15002, you can capture a screen region to the clipboard. Windows 10 Creators Update comes with a new feature which allows you to take a screenshot of a selected part of the screen. This can be done with just a hotkey.
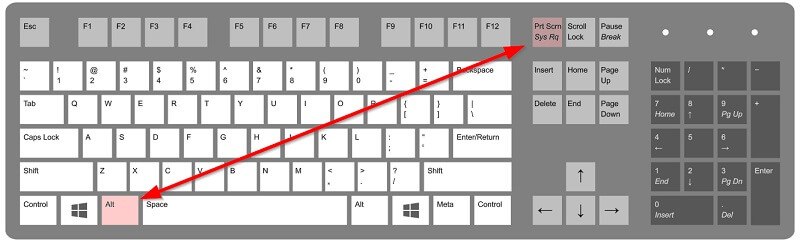
To take a screenshot of a screen region in Windows 10, press Win + Shift + S keys together on the keyboard. The mouse cursor will turn into a cross sign.
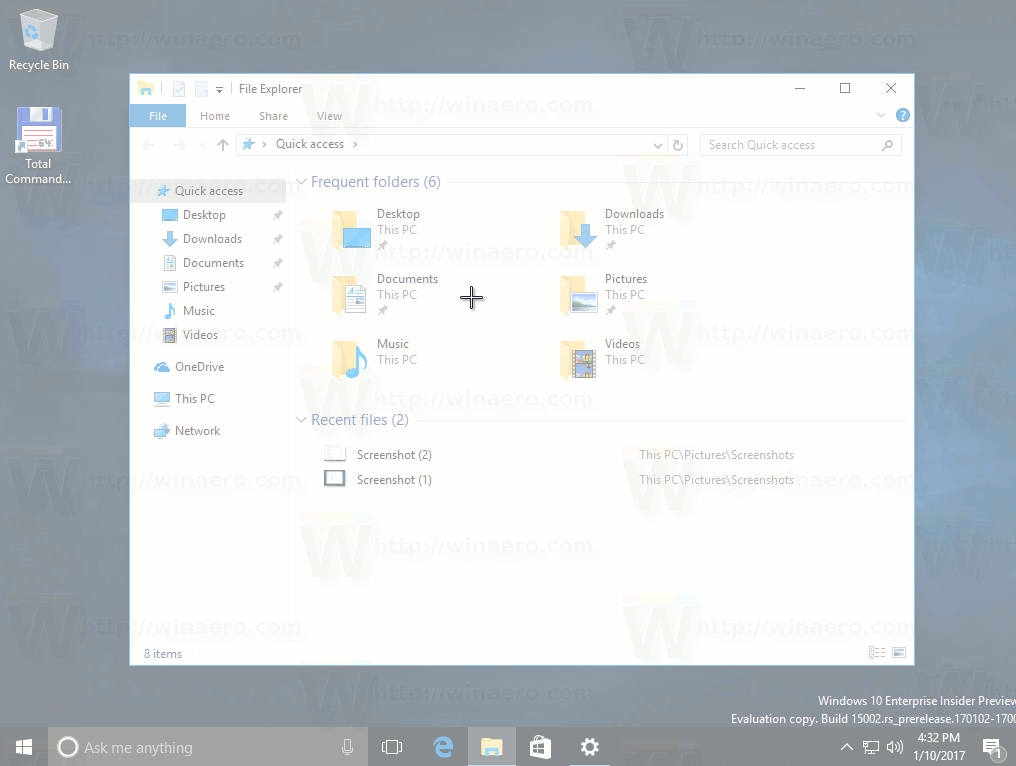
Select the area you want to capture and its screenshot will be taken and stored in the clipboard.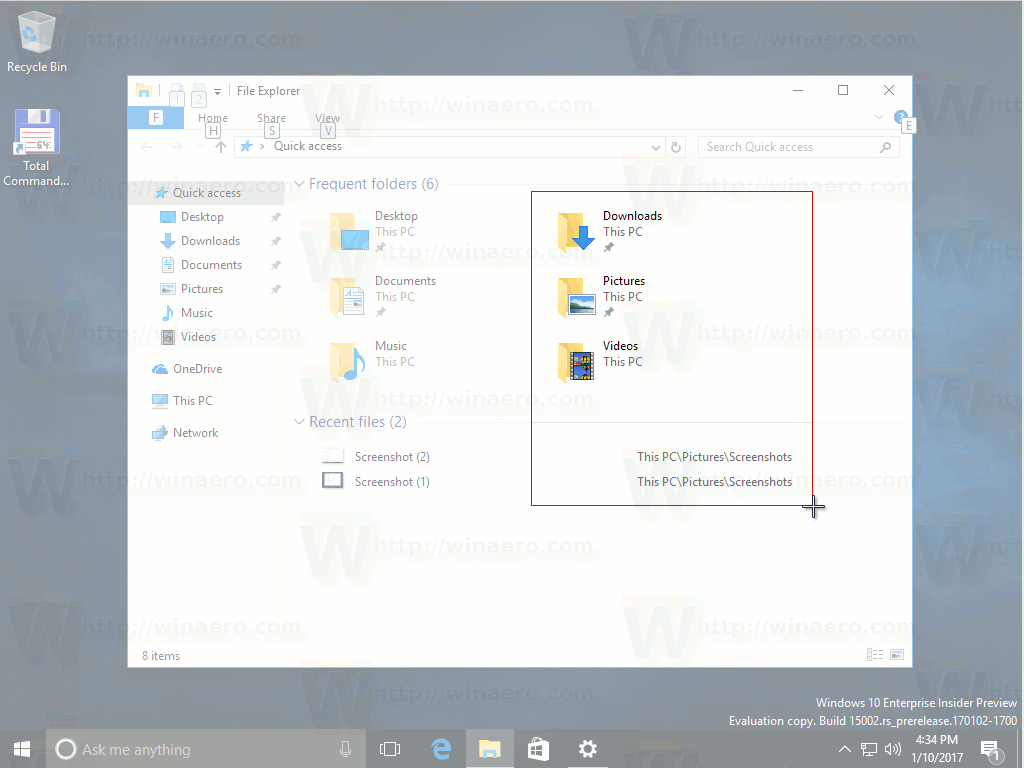
After you capture the screen region using the built-in feature of Windows 10, its contents will be stored in the clipboard. The operating system will not prompt you to save it to a file or open it in a program. Instead, you can open any app which supports image editing and paste your screenshot there.
For example, I can paste my screenshot of the selected region in Paint: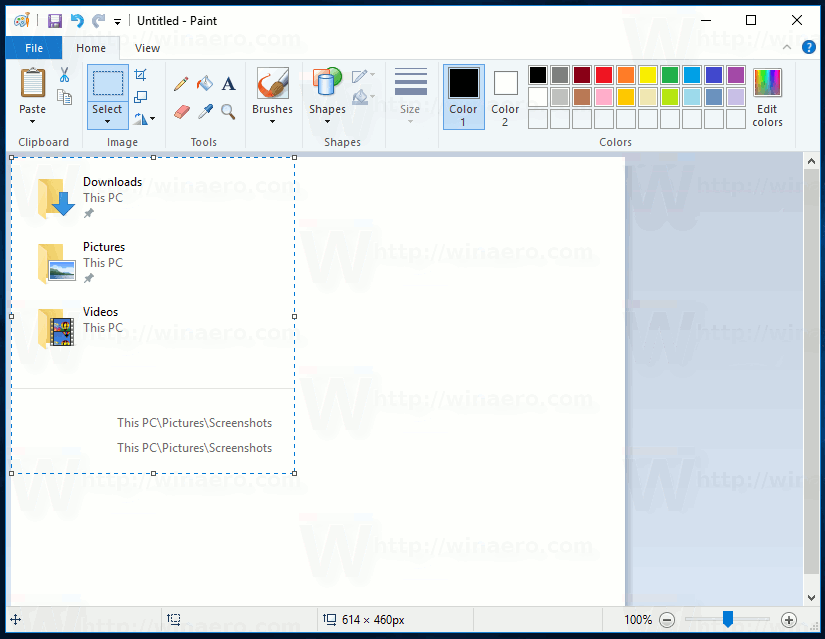
Or you can paste it into a WordPad document, Microsoft Word or any other modern word processor.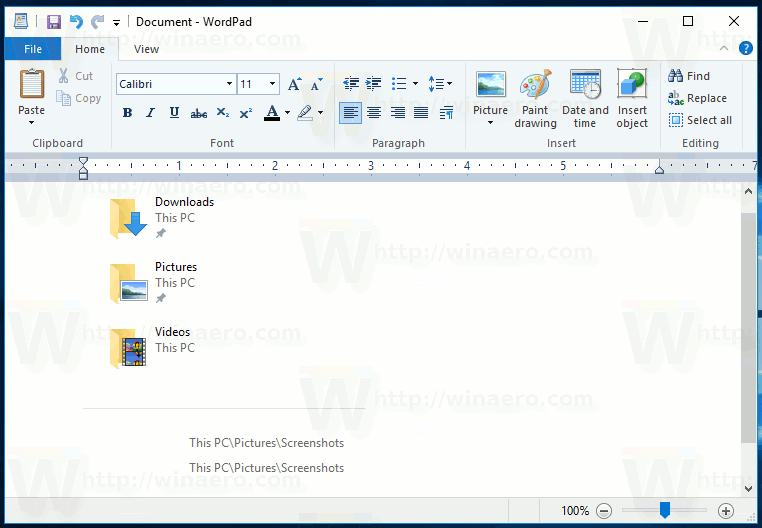
The original screenshot feature was implemented in Windows 95. In Windows 8, an enhanced screenshot feature was implemented which automatically saved it to a file by pressing Win + Print Screen. The entire screen’s contents will be captured in a file stored at %userprofile%\Pictures\Screenshots. During this operation, the screen will be dimmed for half a second to give visual feedback of the screenshot being taken. Every screenshot will saved as a *.PNG file and named ‘Screenshot (#).png’ where # indicates the screenshot index.
Tip: See How to reset screenshot index number in Windows 10.
So, Windows 10 offers you several ways to take a screenshot without using third party tools.
- The classic PrintScreen feature since Windows 95. If you press PrintScreen on your keyboard, the entire screen’s contents will be copied to the clipboard, but not saved to a file.
- Alt + PrintScreen shortcut key will capture a screenshot of only the active window to the clipboard.
- Pressing Win + Print Screen will capture the entire screen and save it to a file in the %userprofile%\Pictures\Screenshots folder.
- Pressing Win + Shift + S will allow you to capture a selected region of the screen to the clipboard.
- Using the Snipping Tool which was also updated in Windows 10.
I wish Windows 10 would get the ability to save the captured screen region directly to a file, like Win + Print Screen does. Considering that Windows 10 build 15002 is a preview build, future releases might allow users to do that. The behavior of this feature can be improved in the final version of Windows 10 Creators Update. Now we just have to wait till April 2017 when it will be finalized.
Support us
Winaero greatly relies on your support. You can help the site keep bringing you interesting and useful content and software by using these options:
If you like this article, please share it using the buttons below. It won’t take a lot from you, but it will help us grow. Thanks for your support!
How to Screenshot a Specific Area on PC in High Quality Picture
A screenshot is an image captured of whatever is on your screen. It is well-known that you can take a screenshot for entire screen with the Print Screen button; however, what about screenshot specific area on PC?
In fact, there are both built-in utilities and third-part tools able to capture custom region and send the screenshot to clipboard or save as an image. This guide identifies three easiest methods and shares their steps.


- Part 1: Screenshot a Part of Screen with Button Combination
- Part 2: How to Screenshot Specific Area on PC with Snipping Tool
- Part 3: Best Free Way to Screenshot a Part of Screen
- Part 4: FAQs of Screenshot Part of Screen
Part 1: Screenshot a Part of Screen with Button Combination
In addition to the single Print Screen key, you can use some shortcuts on PCs to take screenshots based on your need. To screenshot a specific area, like a window, for example, Alt + Print Screen buttons are available.
Step 1: Put whatever you want to screenshot on your desktop, such as a program window or a video playback.
Step 2: Press Alt + Print Screen buttons together if you wish to screenshot an active window. To screenshot a part of screen, press Win + Shift + S at the same time.
Step 3: Search for MS Paint in Start menu at the bottom left corner of your desktop. Then open it and click Paste menu on the top ribbon to paste the screenshot. Then you can crop the screenshot on Windows as you like.

Step 4: Edit it as a normal picture. Then go to File menu, select Save as and choose a proper format. On the popup dialog, navigate to a location, enter a filename and click the Save button
Part 2: How to Screenshot Specific Area on PC with Snipping Tool
The Snipping Tool is a built-in utility to take screenshot for specific area on PC. Moreover, you can use the basic picture editing tool to redesign the screenshot.
Step 1: Go to your Start menu at the bottom left corner, search for Snipping Tool and open it.
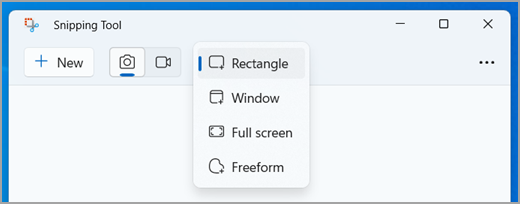
Step 2: Click the Mode menu on the too menu bar and choose a proper mode. To screenshot a specific area on PC, you can select Rectangular Snip, Windows Snip or Free-form Snip.
Tip: To change destination folder and more, click Options menu.

Step 3: Next, hit the New menu and your screen will turn to gray. Click the window if you select Window Snip. Or use your cursor to cover the desired area.
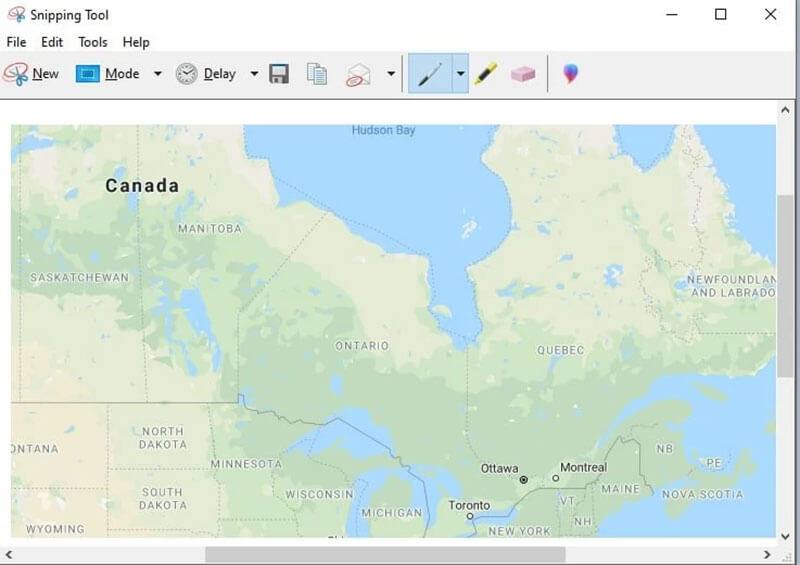
Step 4: Release your mouse and the screenshot will be put in the editing panel. Then simply edit it and click the Save icon to save screenshot to your hard drive. Alternative, press the Clipboard icon to send it to your clipboard.
More screenshots tools on Windows like Snipping Tool are here.
Part 3: Best Free Way to Screenshot a Part of Screen
Many people do not like pre-installed utilities and shortcuts, partly because they are too simple sometimes. The screenshot shortcut, for example, does not offer any picture editing. Vidmore Screen Recorder is a more flexible option to screenshot part of your screen.
Briefly speaking, it is the best way to take a screenshot for specific area on PCs.
How to Screenshot Specific Area on PC
Step 1: Install screenshot utility
When you want to screenshot a specific area on PC, install the best screenshot utility. There is another version for Mac. Click the Menu icon at the upper right side and choose Preferences. Go to the Output tab, and change Screenshot format and Location of screenshot files. Otherwise, the utility will save screenshots as PNG files and store it in picture library.
Tip: Though the screenshot function is just a part of the software, you can use it for free without ads or registration.

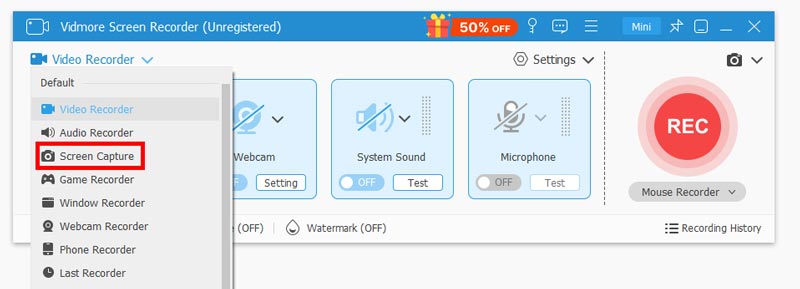
Step 2: Screenshot specific area
Enter the screen you wish to capture, such as a window. Turn to the screenshot utility and click Screen Capture. Then your cursor will turn to a cross. If take a screenshot on a window, click on it. For custom region, click and drag your left mouse to get it.
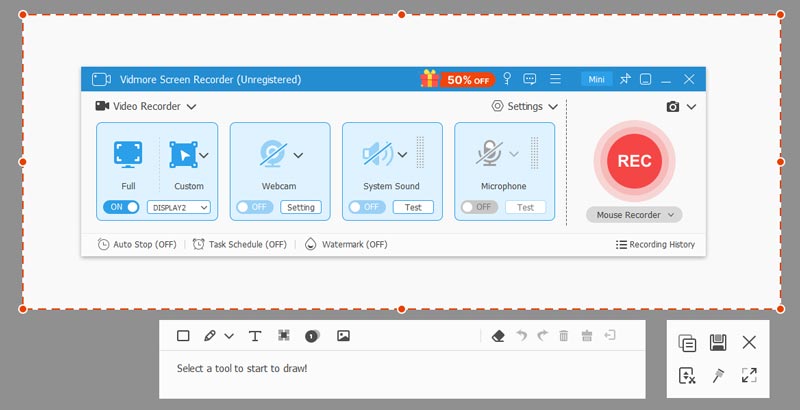
Step 3: Edit and save screenshot
When screenshotting specific part on PC is done, let left mouse go and the menu bar will pop up. Now, you can add shape, text or painting to the screenshot. Pick the right tool, select other and other options, and add it to your screenshot directly. If you are not satisfied with the painting, the Eraser icon can remove it. Finally, click on the Save button to export the screenshot to your hard drive. If you intend to use the screenshot in other programs, select the Clipboard button instead.
Part 4: FAQs of Screenshot Part of Screen
How do I screenshot a specific area on iPad?
When you see the screen you want to screenshot, hold down both Home and Power buttons together until your screen flashes. For iPad Pro 2020, replace Home button with Volume Up. Then go to Photos app, find the screenshot and crop unwanted part. Otherwise, you can use a third-party screenshot app to get it.
Where is the Print Screen key?
The Print Screen key is usually on the top line of your keyboard next to function keys. Sometimes, it is abbreviated as Prscr, PRTSC, PrtScrn, Ps, etc.
Where are print screens saved?
By default, screenshots are saved in your clipboard if you use the Print Screen key. Then you can go to a proper program, like Office Word, and paste the screenshot directly. The location folder is different depending on what way you use. In most cases, the default location is C:\ UsersYour Namepictures on PC.
Why can’t you take a screenshot?
Sometimes you may fail when you screenshot some pages. This happens because there is sensitive information on the pages, and they are prohibited from being screenshots to protect your privacy and security. For example, payment QR codes, banking software pages, etc.
Does screenshotting a photo lower its quality?
The screenshot does not change the quality of your original image. However, since the quality displayed on your screen may be lower than the original quality of the image, if you take a screenshot, the resolution of the resulting image may be lower than the true image.
Conclusion
This guide has talked about how to screenshot a specific area on PC. It is a useful screen to take pictures for everything on your desktop. The shortcut is the easiest way to do it, though you cannot edit the screenshots directly. If you prefer to Snipping Tool, it can meet your need too. Vidmore Screen Recorder is worth to try as well. More importantly, it offers pro-level functions in the way that everyone can master quickly. More questions related to screenshot a part on PC, leave a message below.
-
Home
-
News
- How to Take a Full and Partial Screenshot in Windows 10?
By Stella | Follow |
Last Updated
For some reason, you may need to take a full or partial screenshot on your Windows 10 computer. You can just use the Windows built-in tools or keyboard shortcuts to do this work and it is very simple. In this post, MiniTool Software will show you some methods that are suitable for you.
Taking a screenshot of your Windows screen is a common operation when using your computer. For example, you may want to take a full or partial screenshot in Windows 10 and then share it with your friend you are chatting with. Of course, there are some other situations in which you want to capture screenshots in Windows 10.
Some of you may don’t know how to do this work. Don’t worry, we will tell you how to do it using different methods.
How to Take a Partial Screenshot in Windows?
In this part, we will show you how to perform a Windows 10 partial screenshot using four methods. You can just select your preferred one to do this job.
How to Screenshot a Specific Area in Windows 10?
- Use the Print Screen Key
- Press Win+Shift+S
- Use Windows Snipping Tool
- Use Windows Snip & Sketch
Method 1: Use the Print Screen Key
There is a Print Screen key on your keyboard. Just like the name of the key, it is used to print the current screen of your computer. If you are using a wired keyboard, it is usually on the top-right side of the keyboard. If you are using a laptop, you can find it on the top line or the bottom line of the keyboard. The Print Screen can be shown as Print Screen or PrtSc.
How to screenshot a specific area in Windows 10? It is very easy:
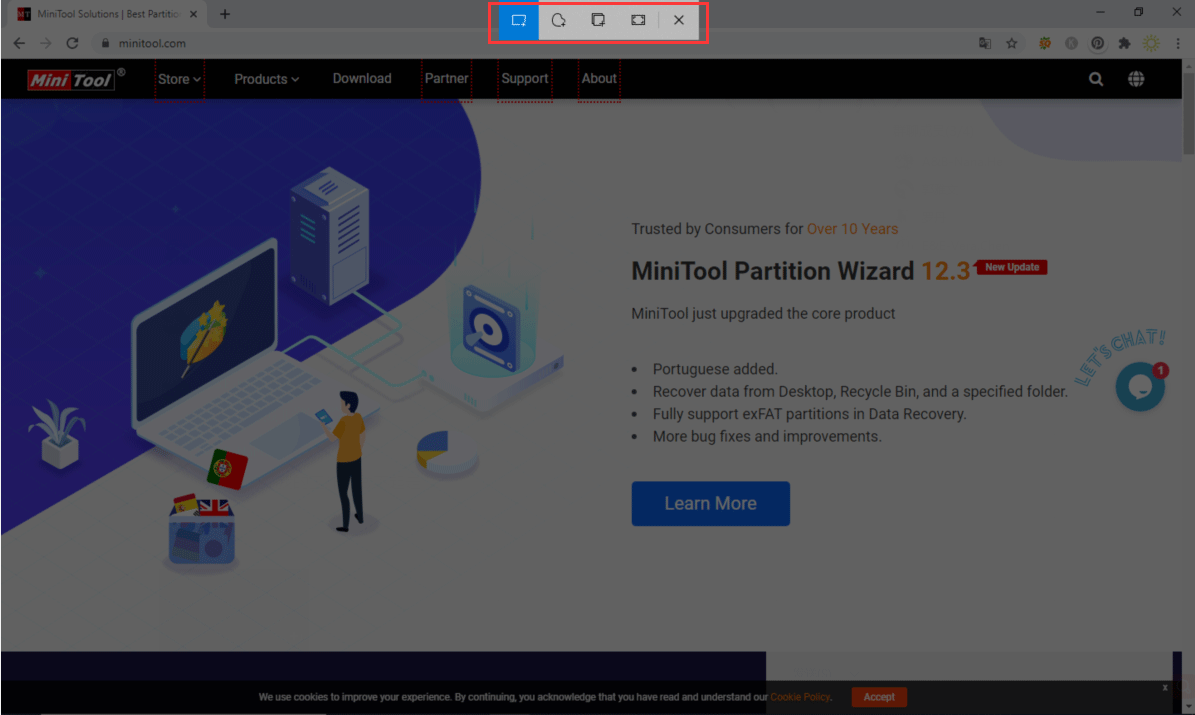
- Press the Print Screen Key and you will see a small menu on the top middle side of your computer screen.
- Select the area you want to capture. The screenshot will be saved to the clipboard. Of course, you can click one of the icons in the menu according to your need to take a screenshot.
- Open an application like Paint or Word and paste the screenshot to it.
- Edit the screenshot or save it to a suitable location.
Method 2: Press Win+Shift+S
Pressing Win+Shift+S is equal to pressing the Print Screen key. It also calls out the small menu and you can then select the section you want to take on your computer screen. We will not repeat the steps here.
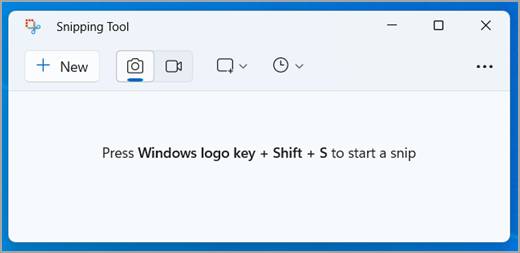
Method 3: Use Windows Snipping Tool
Windows Snipping Tool is a Windows snap-in tool. It has more features than the Print Screen key.
- Use Windows search to search for snipping tool and select the first result to open it.
- Click New.
- Choose the area you want to screenshot.
- The screenshot will show in the tool. You can use this tool to annotate the screenshot. You can also use the features in this tool to make up the screenshot.
- Go to File > Save As to choose a suitable location to save it.

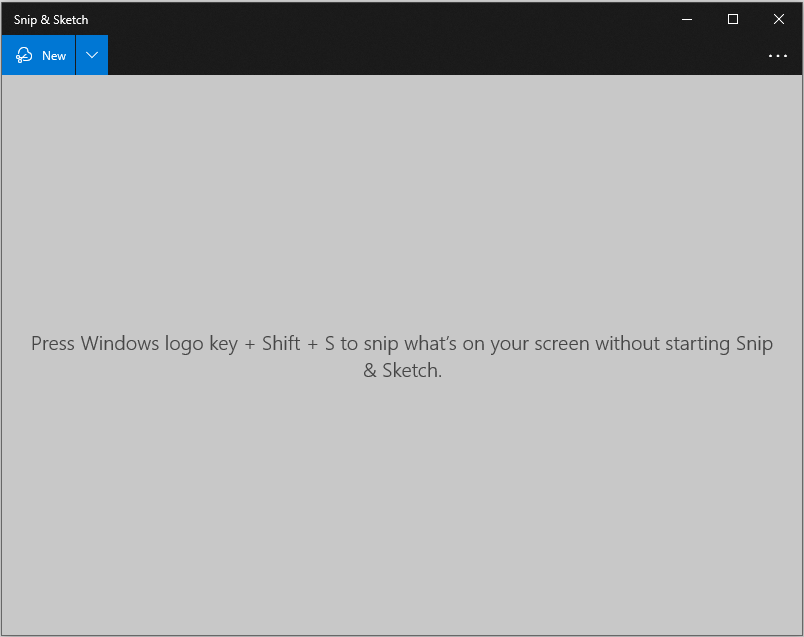
Method 4: Use Windows Snip & Sketch
Windows Snip & Sketch is another choice for you to take a partial screenshot in Windows 10. It is also a Windows snap-in tool.
- Use Windows Search to search for snip & sketch and select the first result to open it.
- Click New and then select the area you want to capture.
- The screenshot will be opened in the Snipping Tool.
- Click the Save As button to save the screenshot on your computer.
How to Take a Full Screenshot in Windows 10?
Take a full screen in Windows 10 is also very simple. We will show you four methods in this part.
How to Screenshot a Full Screen in Windows 10?
- Press Win+Print Screen
- Press Win+Shift+Print Screen
- Use Windows Snipping Tool
- Use Windows Snip & Sketch
Method 1: Press Win+Print Screen
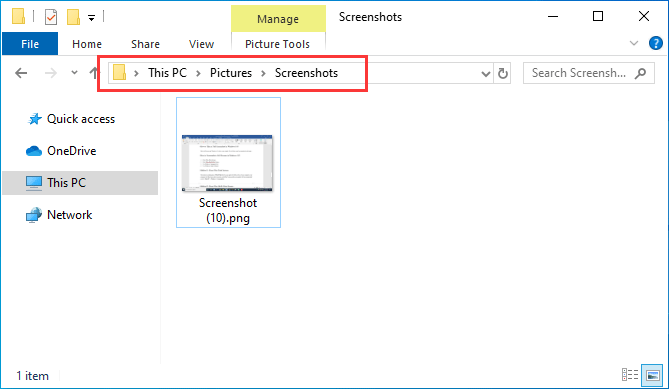
The shortcut combination of Win+Print Screen can capture the full screen of your computer. your computer will flash once after your press Alt+Print Screen and the screenshot will be automatically saved to This PC > Pictures > Screenshots.
Method 2: Press Win+Shift+Print Screen
You can also press Win+Shift+Print to take a full screen. But this time, you need to paste the screenshot to Paint or Word and then save it.
Method 3: Use Windows Snipping Tool
Windows Snipping Tool can also be used to take full screenshots in Windows 10. You can call it out and then select the whole screen to capture. After that, you can also use this tool to edit the image according to your requirements.
Method 4: Use Windows Snip & Sketch
Likewise, you can use Windows Snip & Sketch to capture the full screen in Windows 10. You need to use your mouse to select the full screen to capture after you open the tool. If needed, you can use this tool to edit the image.
Bottom Line
Now, you should know how to take a full or partial screenshot in Windows 10. If you delete your important screenshots by mistake, you can use a free file recovery tool, MiniTool Power Data Recovery, to restore them.
MiniTool Power Data Recovery FreeClick to Download100%Clean & Safe
If you encounter issues when capturing your computer screen, you can let us know in the comments. We will reply to you as soon as possible.
About The Author

Position: Columnist
Stella has been working in MiniTool Software as an English Editor for more than 7 years. Her articles mainly cover the fields of data recovery including storage media data recovery and phone data recovery, YouTube videos download, partition management, and video conversions.
С помощью снимков можно копировать слова или изображения со всего экрана ПК или его части. Используйте приложение «Ножницы», чтобы вносить изменения, добавлять заметки, а также сохранять и отправлять снимки.
Поддерживаются следующие типы фрагментов:
|
Фрагмент фрагмента свободной формы |
Нарисуйте любую фигуру вокруг объекта пальцем, мышью или пером планшета. |
|
Прямоугольный фрагмент |
Обведите указатель вокруг объекта, чтобы образовать прямоугольник. |
|
Фрагмент окна |
Выберите окно, которое требуется захватить, например диалоговое окно. |
|
Полноэкранный фрагмент |
Захват всего экрана. |
|
Фрагмент видео |
Запишите видеоклип прямоугольного фрагмента любой части экрана, который вам нравится. |
После того как снимок экрана сделан, он автоматически копируется в окно приложения «Ножницы», где его можно изменить, сохранить и отправить.
Открытие приложения «Ножницы»
Существует четыре способа открыть ножницы:
-
Нажмите кнопку Пуск , введите ножницы, а затем выберите Инструмент ножницы в результатах.
-
Нажмите клавишу с логотипом Windows +SHIFT+S для статического фрагмента изображения.
-
Нажмите кнопку Print Screen (PrtSc) для статического фрагмента изображения.
-
Нажмите клавишу с логотипом Windows + SHIFT + R для фрагмента видео.
Работа со снимками экранов
Открыв ножницы, выберите один из следующих вариантов, чтобы создать снимки экрана и работать с ним.
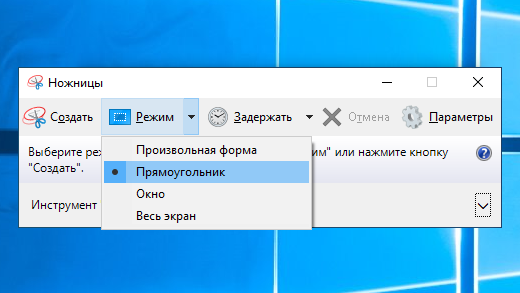
В средстве ножницы выберите Режим. В более ранних версиях Windows щелкните стрелку рядом с кнопкой Создать. Затем, когда вы выберете нужный тип фрагмента, вы увидите, что весь экран немного изменится на серый. После выбора любого элемента на экране выберите область экрана, которую требуется захватить.
-
После запуска приложения «Ножницы» откройте меню, снимок которого вам нужен.
-
Нажмите клавиши CTRL +PrtSc. После этого весь экран становится серым.
-
Выберите Режим или в более ранних версиях Windows щелкните стрелку рядом с кнопкой Создать. Выберите нужный тип фрагмента, а затем выберите область снимка экрана, которую вы хотите записать.
После захвата фрагмента изображения можно написать или нарисовать на нем или вокруг него, нажав кнопки Перо или Маркер. Выберите Ластик, чтобы удалить нарисованные линии.
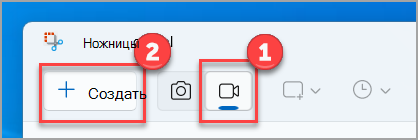
Чтобы записать фрагмент видео, откройте ножницы, нажмите кнопку Записать , а затем выберите Создать запись или нажмите клавишу с логотипом Windows +SHIFT+ R. Выберите область экрана, которую вы хотите записать, а затем нажмите кнопку Пуск. По завершении нажмите кнопку Остановить. На этом этапе вы можете сохранить запись как есть или выбрать Изменить в Clipchamp , чтобы работать с ней в видеоредакторе Clipchamp.
-
После захвата фрагмента нажмите кнопку Сохранить фрагмент.
-
В поле Сохранить как введите имя файла, расположение и введите, а затем нажмите кнопку Сохранить.
При захвате фрагмента из окна браузера и сохранении его в виде HTML-файла под фрагментом появляется URL-адрес. Чтобы предотвратить появление URL-адреса:
-
В приложении «Ножницы» нажмите кнопку Параметры.
-
Вокне «Параметры Ножниц» снимите флажок Включать URL-адрес под фрагментами (только HTML) и нажмите кнопку ОК.
После захвата фрагмента нажмите стрелку рядом с кнопкой Отправить фрагмент, а затем выберите вариант из списка.
|
Сочетание клавиш |
Действие |
|---|---|
|
ALT + M |
Выбор режима ножниц. |
|
ALT + N |
Создание нового фрагмента в том же режиме, что и последний. |
|
SHIFT +клавиши со стрелками |
Перемещение курсора для выбора различных типов фрагментов. |
|
ALT + D |
Задержка захвата на 1-5 секунд |
|
CTRL + C |
Копирование фрагмента в буфер обмена |
|
CTRL + S |
Сохранение фрагмента |
Открыв запись в инструменте ножницы, выберите Изменить > Изменить с помощью paint, чтобы использовать функции для изменения размера, цвета, текста и многих других улучшений.
В папке, в которую вы сохранили фрагмент, щелкните правой кнопкой нужный фрагмент. Выберите Печать из параметров и выберите способ печати изображения.
В поле поиска на панели задач введите ножницы. Вы увидите приложение «Ножницы» и список действий, которые можно выполнить. Выберите Закрепить на панели задач.
Сначала определите меню или другие компоненты, которые требуется записать. В инструменте ножницы выберите Задержка , а затем выберите, например, 5 секунд. Выберите Режим, чтобы начать 5-секундный обратный отсчет. В течение 5 секунд откройте меню или составьте изображение иным образом. Через 5 секунд, когда вы увидите, что экран становится серым, используйте мышь для рисования вокруг нужной области.
С помощью снимков можно копировать слова или изображения со всего экрана ПК или его части. Используйте приложение «Ножницы», чтобы вносить изменения, добавлять заметки, а также сохранять и отправлять снимки.
Поддерживаются следующие типы фрагментов:
|
Фрагмент фрагмента свободной формы |
Нарисуйте любую фигуру вокруг объекта пальцем, мышью или пером планшета. |
|
Прямоугольный фрагмент |
Обведите указатель вокруг объекта, чтобы образовать прямоугольник. |
|
Фрагмент окна |
Выберите окно, которое требуется захватить, например диалоговое окно. |
|
Полноэкранный фрагмент |
Захват всего экрана. |
После того как снимок экрана сделан, он автоматически копируется в окно приложения «Ножницы», где его можно изменить, сохранить и отправить.
Открытие приложения «Ножницы»
Открыть ножницы можно тремя способами:
-
Нажмите кнопку Пуск , введите ножницы, а затем выберите Инструмент ножницы в результатах.
-
Нажмите клавишу с логотипом Windows +SHIFT+S.
-
Нажмите кнопку Print Screen (PrtSc).
Работа со снимками экранов
Открыв ножницы, выберите один из следующих вариантов, чтобы создать снимки экрана и работать с ним.
В средстве ножницы выберите Режим. В более ранних версиях Windows щелкните стрелку рядом с кнопкой Создать. Затем, когда вы выберете нужный тип фрагмента, вы увидите, что весь экран немного изменится на серый. После выбора любого элемента на экране выберите область экрана, которую требуется захватить.
-
После запуска приложения «Ножницы» откройте меню, снимок которого вам нужен.
-
Нажмите клавиши CTRL + PrtSc. После этого весь экран становится серым.
-
Выберите Режим или в более ранних версиях Windows щелкните стрелку рядом с кнопкой Создать. Выберите нужный тип фрагмента, а затем выберите область снимка экрана, которую вы хотите записать.
После захвата фрагмента можно делать подписи или рисовать на нем или вокруг него, нажав на кнопку Перо или Маркер. Выберите Ластик, чтобы удалить нарисованные линии.
-
После захвата фрагмента нажмите кнопку Сохранить фрагмент.
-
В поле Сохранить как введите имя файла, расположение и введите, а затем нажмите кнопку Сохранить.
При захвате фрагмента из окна браузера и сохранении его в виде HTML-файла под фрагментом появляется URL-адрес. Чтобы предотвратить появление URL-адреса:
-
В приложении «Ножницы» нажмите кнопку Параметры.
-
Вокне «Параметры Ножниц» снимите флажок Включать URL-адрес под фрагментами (только HTML) и нажмите кнопку ОК.
После захвата фрагмента нажмите стрелку рядом с кнопкой Отправить фрагмент, а затем выберите вариант из списка.
|
Сочетание клавиш |
Действие |
|---|---|
|
ALT + M |
Выбор режима ножниц. |
|
ALT + N |
Создание нового фрагмента в том же режиме, что и последний. |
|
SHIFT +клавиши со стрелками |
Перемещение курсора для выбора различных типов фрагментов. |
|
ALT + D |
Задержка захвата на 1-5 секунд |
|
CTRL + C |
Копирование фрагмента в буфер обмена |
|
CTRL + S |
Сохранение фрагмента |
Открыв запись в инструменте ножницы, выберите Изменить > Изменить с помощью Paint 3D, чтобы использовать функции для изменения размера, цвета, текста и многих других улучшений.
В папке, в которую вы сохранили фрагмент, щелкните правой кнопкой нужный фрагмент. Выберите Печать из параметров и выберите способ печати изображения.
В поле поиска на панели задач введите ножницы. Вы увидите приложение «Ножницы» и список действий, которые можно выполнить. Выберите Закрепить на панели задач.
Сначала определите меню или другие компоненты, которые требуется записать. В инструменте ножницы выберите Задержка , а затем выберите, например, 5 секунд. Выберите Режим, чтобы начать 5-секундный обратный отсчет. В течение 5 секунд откройте меню или составьте изображение иным образом. Через 5 секунд, когда вы увидите, что экран становится серым, используйте мышь для рисования вокруг нужной области.
Нужна дополнительная помощь?
Нужны дополнительные параметры?
Изучите преимущества подписки, просмотрите учебные курсы, узнайте, как защитить свое устройство и т. д.
В сообществах можно задавать вопросы и отвечать на них, отправлять отзывы и консультироваться с экспертами разных профилей.
Найдите решения распространенных проблем или получите помощь от агента поддержки.
I have Windows 10 Pro. I’m a science teacher and a frequent user of the in-built snipping tool in Windows 10 Pro. I often create screen-shots of small parts of my screen to make «how-to» documents for my students. The «current-window-screen-shot» feature includes too much information. I’m only interested in the tiny portions of GeoGebra-calculations.
Currently I do as follows:
-
Windows button + S
-
Type
snipping toolthen press Enter. The application opens (or use your own custom hotkey-combination to open this app) -
Choose New then select portion of the screen
-
Press Ctrl+C
-
Open a Word document
-
Press Ctrl+V
Since everything is done from the keyboard this procedure is pretty fast. But in OS-X it’s only a 3-step procedure:
-
Cmd+Ctrl+Shift+4 then select portion of the screen
-
Open Word document
-
Cmd+V
Without buying a Mac (we only have PCs at work), what is the fastest possible way to take a screen shot of select a portion of the screen?
![]()
asked Sep 5, 2016 at 13:13
![]()
0
This process is as quick as your OSX example on Windows 10 since build 17661:
- Press Win—shift—S to open up the snipping tool and select the area of your screen that you want to capture
- Open word doc
- Press Win—ctrl
Additionally you can also select the notification that pops up after step 1, which opens your capture in the snipping tool window, allowing you to save the screenshot to a file and/or make adjustments.
answered Apr 20, 2020 at 12:09
![]()
MMMMMM
2,6626 gold badges25 silver badges43 bronze badges
answered Sep 5, 2016 at 13:20
![]()
LukasTLukasT
3261 silver badge12 bronze badges
1
Use gyazo!
https://gyazo.com/
I love it, and use it alot!
Set it up and you’re ready to go:
- Download the program (big button on homepage, can’t be missed).
- Install it
- Put it somewhere where you can click it fast, like the bar at the bottom of your screen (forgot the name)
- Click it for an image (drag an area on the screen to capture, and collect it from the url that will popup), click the also downloaded program (search for gyazo gif) to capture gifs
It also allows you to capture gifs
answered Sep 5, 2016 at 14:22
![]()
1
A snip can be taken with a single click.
-
On the desktop, right click and select New…Shortcut.
-
Paste this in the location: snippingtool /clip
-
Click next, and give the shortcut a name, maybe QuickSnip
-
Click Finish. Drag your shortcut to the taskbar.
Now you just need to click on this and select the area to copy.
I much prefer this to the other answers. Enjoy!
answered Apr 20, 2020 at 11:02
![]()
The fastest way I do this is by using a small tool named Fastone Screen Capture. It’s a freeware and very easy to use. I used two or three such programs and it seems the fastest to me.
- The download page.
- A simple tutorial of how to use it.
answered Sep 5, 2016 at 13:56
![]()
1
You must log in to answer this question.
Not the answer you’re looking for? Browse other questions tagged
.
Not the answer you’re looking for? Browse other questions tagged
.