Задача запустить из PowerShell какой либо исполняемый файл (программу или утилиту командной строки) встречается достаточно часто. PowerShell предлагает для этого несколько различных способов, которые мы и рассмотрим далее в этой статье. Начнем с самого простого…
Прямой запуск
Самый простой способ запустить исполняемый файл в PowerShell — это перейти в директорию с файлом и стартовать его напрямую. Для примера возьмем простенькую программку, выводящую приветствие, и выполним ее командой:
Set-Location ″C:\Program Files″
.\Hello.exe

Обратите внимание, что даже находясь в нужном каталоге, требуется указывать относительный путь к исполняемому файлу. Исключение составляют файлы из директорий, перечисленных в переменной окружения (path). Например различные встроенные программы и утилиты (notepad, calc, ping и т.п.), находящиеся в директории Windows\System32, можно запускать без указания пути.

Оператор &
Если необходимо указать полный путь к исполняемому файлу, то можно воспользоваться оператором & (оператор вызова). Он позволяет выполнить строку текста, указанную в кавычках, как единую команду. Например:
& ′C:\Program Files\Hello.exe′
![]()
Поскольку оператор & не анализирует передаваемую команду, то он не может интерпретировать ее параметры. Поэтому дополнительные параметры\аргументы передаются также в виде текста, в кавычках. Для примера возьмем предыдущую программу и немного изменим ее, так что она принимает нужный текст в виде аргумента:
& ′C:\Program Files\Hello.exe′ ′Hello, world′
При желании можно указать нескольких аргументов через запятую:
& ′C:\Program Files\Hello.exe′ ′Hello,′, ′ world′
Для удобства команду и аргументы можно поместить в переменные:
$exe = ′C:\Program Files\Hello.exe′
$arg1 = ′Hello′
$arg2 = ′world′
& $exe $arg1 $arg2

Ну и если аргументов много, то их можно объединить, воспользовавшись такой конструкцией:
$exe = ′C:\Program Files\Hello.exe′
$allargs = @(′Hello,′,′world′)
& $exe $allargs

Invoke-Expression
Командлет Invoke-Expression работает примерно так-же, как и оператор & — берет текстовую строку и выполняет ее в виде команды. Например:
Invoke-Expression -Command ′C:\Windows\Hello.exe′
Однако у него есть один большой недостаток, а именно — неумение работать с пробелами. К примеру, следующая команда вызовет ошибку:
Invoke-Expression -Command ′C:\Program Files\Hello.exe′
Эта особенность делает применение командлета крайне неудобным. Хотя при необходимости подобных ошибок можно избежать с помощью дополнительных кавычек, например так:
Invoke-Expression -Command ″C:\′Program Files′\Hello.exe″

Start-Process
Командлет Start-Process запускает указанный файл в виде процесса, используя метод Start .NET класса Process. Например:
Start-Process -FilePath ′C:\Program Files\Hello.exe′
По умолчанию процесс выполняется в отдельном окне, которое закрывается по окончании процесса. Изменить такое поведение можно с помощью параметров, так следующая команда запустится в текущем окне:
Start-Process -FilePath ′C:\Program Files\Hello.exe′ -NoNewWindow -Wait
Также Start-Process позволяет передать в процесс дополнительные аргументы:
Start-Process -FilePath ′C:\Program Files\Hello.exe′ -ArgumentList ′Hello, world′ -NoNewWindow -Wait

По умолчанию командлет ничего не возвращает, но с помощью параметра -PassThru можно заставить его вернуть объект процесса. Этот объект очень удобно поместить в переменную:
$process = Start-Process -FilePath ′C:\Program Files\Hello.exe′ -Wait -PassThru
из которой можно затем можно узнать многие полезные вещи, такие как статус:
$process.HasExited
время:
$process.ExitTime
или код выполнения:
$process.ExitCode

.NET
В принципе .NET классом Process можно воспользоваться напрямую, без командлета Start-Process. К примеру, запустить процесс можно командой:
[System.Diagnostics.Process]::Start(′C:\Program Files\Hello.exe′)

Такой способ достаточно неудобен и громоздок (на мой взгляд), но чуть более гибок в использовании. Для примера запустим нашу программу в текущем окне, передадим в нее аргументы и заберем результат выполнения:
$process = New-Object -TypeName System.Diagnostics.Process
$process.StartInfo.FileName = ″C:\Program Files\Hello.exe″
$process.StartInfo.Arguments = ″Hello,world″
$process.StartInfo.RedirectStandardOutput = $true
$process.StartInfo.UseShellExecute = $false
$process.Start()
$process.WaitForExit()
$process.StandatdOutput.ReadToEnd()

WMI
С помощью WMI можно сделать практически все, в том числе и запустить программу. Для этого вполне подойдет метод Create WMI-класса Win32_Process. Этот метод запускает процесс на локальном или удаленном компьютере через RPC. Например, для выполнения программы на локальном компьютере можно воспользоваться такой командой:
([wmiclass])″Win32_Process″).Create(′C:\Program Files\Hello.exe′)
А для выполнения на удаленном компьютере команда будет выглядеть так:
([wmiclass])″\\remotecomputer\root\cimv2:Win32_Process″).Create(′C:\Program Files\Hello.exe′)

Как вариант, можно воспользоваться командлетом Invoke-WmiMethod:
Invoke-WmiMethod -Class Win32_Process -Name Create -ArgumentList ″C:\Program Files\Hello.exe″

Либо командлетом Invoke-CimMethod:
Invoke-CimMethod -ClassName Win32_Process -MethodName Create -Arguments @{CommandLine=″C:\Program Files\Hello.exe″}

WMI запускает процесс в отдельном окне и возвращает объект, содержащий идентификатор процесса (ProcessID) и результат выполнения (ReturnValue). ReturnValue может принимать следующие значения:
0 — Sucsessful Completiom
2 — Access Denied
3 — Insufficient Privilege
8 — Uncnown Failure
9 — Path Not Found
21 — Invalid Parameter
Invoke-Command
Командлет Invoke-Command умеет выполнять команды на локальном или удаленном компьютере, используя WinRM. Например, для запуска нашей программы на локальном компьютере используем команду:
Invoke-Command -ScriptBlock {″C:\′Program Files′\Hello.exe″}
При необходимости в программу можно передать аргументы:
Invoke-Command -ScriptBlock {C:\′Program Files′\Hello.exe ″Hello,world″}
Обратите внимание, что Invoke-Command не очень дружит с пробелами, поэтому во избежании ошибок приходится исхитряться с кавычками. Впрочем, подобных проблем можно избежать, например комбинируя использования командлета с оператором &:
Invoke-Command -ScriptBlock {& ′C:\Program Files\Hello.exe′}

В основном Invoke-Command применяется для удаленного управления, его главное достоинство — это возможность одновременного выполнения на нескольких компьютерах. Например:
Invoke-Command -ScriptBlock {″C:\′Program Files′\Hello.exe″} -ComputerName SRV1,SRV2,SRV3
Или так:
$scriptblock = {″C:\′Program Files′\Hello.exe″}
$Computers = @(′SRV1′,′SRV2′,′SRV3′)
Invoke-Command -ScriptBlock $scriptblock -ComputerName $Computers
По умолчанию командлет возвращает результат выполнения программы, а если запустить его в фоновом режиме (параметр -AsJob), то возвращает объект Job:
Invoke-Command -ScriptBlock {C:\′Program Files′\Hello.exe} -ComputerName localhost -AsJob -JobName Hello

Invoke-Item
Командлет Invoke-Item предназначен для применения к файлу действия по умолчанию. Так запустить исполняемый файл можно командой:
Invoke-Item -Path ″C:\Program Files\Hello.exe″
Однако наиболее удобно использовать Invoke-Item для открытия определенного типа файлов. Например так мы откроем текстовый файл:
Invoke-Item -Path ″C:\Files\test.txt″
А так все текстовые файлы в папке:
Invoke-Item -Path ″C:\Files\*.txt″

CMD
Ну и в завершение еще один способ запуска программы из PowerShell — с помощью оболочки cmd. Способ достаточно ″непрямой″, но тем не менее работающий. Следующая команда запускает новый экземпляр cmd, выполняет в нем указанную программу, завершает работу cmd и возвращает результат:
cmd /c ″C:\Program Files\Hello.exe″
![]()
Такое вот изобилие способов запустить программу предоставляет PoSh. И каждый из них хорош для определенных ситуаций.
Кстати, статья написана по мотивам PowerShell: Deep Dive and Best Practice. Рекомендую почитать, там еще много интересного.
.EXE files, or “executable files” are something we see often. Most downloaded files, especially setups, are executable files that are ready to be run and installed on your system. At other times, files may still be executable but have a different file extension, like “.msi”, “.bat”, or “.inf”.
Even though you can run such files by double-clicking them using File Explorer, the method may not be ideal for every situation. You can also run executable (.exe) files directly from Windows PowerShell. Some people may prefer the command-line method as you can run an executable without having to navigate here and there.
In this article, we show you 4 methods to run .exe files directly inside PowerShell. The commands discussed in the methods below can also be applied to PowerShell scripts. Moreover, some of them even allow you to send parameters/values to the executable file.
Table of contents
- How to Run EXE Files in PowerShell
- Run EXE File Directly from PowerShell
- Run EXE File in PowerShell Using Invoke-Expression Command
- Run EXE File in PowerShell Using Start-Process Command
- Run EXE File in PowerShell Using «&» Call Operator
- Closing Thoughts
How to Run EXE Files in PowerShell
In all of the methods discussed below, you must know the complete directory path to the file that you want to run in PowerShell. While one of the methods requires you to navigate to the .exe file directory and then execute the file, the other methods need complete file paths in the command.
In the example below, we will be running “Rufus.exe” located at “C:\Users\Subhan\Downloads.” Of course, this will change for you according to the file’s path and its name.
Run EXE File Directly from PowerShell
When we say “directly,” we mean that this method to run an executable file does not need any special PowerShell commands. All it needs is a path and the name of the file to run.
-
Launch an elevated PowerShell instance.
-
Use the “CD” command to change the directory to the executable file’s location:
CD "[PathToExecutableFile]" Files Using PowerShell 1")
Change directory using CD command Alternatively, you can also jump one folder at a time using the following pattern:
# Change directory to the root of the current volume CD\ # Change direcoty to root of the C drive CD C: CD Users CD Subhan CD Downloads -
Now that you’re inside the directory of the file, use “.\” followed by the complete name of the executable file.
Note: Apart from the [FileName], you can also change the file type/extension depending on the actual file type.
.\[FileName].exe Files Using PowerShell 2")
Run the executable file from PowerShell directly The executable file will now run.
You can also run the executable file whilst sending a parameter to the file, as in the example below:
.\Rufus.exe 10In this example, the parameter “10” will be sent to Rufus.exe.
 Files Using PowerShell 1")
 Files Using PowerShell 2")
Note that it is crucial that you use “.\” while running an executable file directly. Otherwise, it will be considered a PowerShell command and you may see an error.
Additionally, if you find yourself lost while navigating/changing the directories, or are unsure of the file name, you can use the following cmdlet to get a list of the items inside the current directory:
Get-ChildItem Files Using PowerShell 3")
Run EXE File in PowerShell Using Invoke-Expression Command
Another way to run an executable file using PowerShell is by using the “Invoke-Expression” cmdlet. You can use this cmdlet directly in PowerShell, or insert the full command inside a PowerShell script (.ps1) to run an executable. This way, you can open a document file directly inside the app/program you are writing the script for.
To run an executable file in PowerShell or PowerShell script, use the following command syntax:
Invoke-Expression -Command “[PathToExecutableFile].exe”Alternatively, the following syntax also works just as well:
“[PathToExecutableFile].exe” | Invoke-Expression Files Using PowerShell 4")
Run EXE File in PowerShell Using Start-Process Command
Like the Invoke-Expression cmdlet, you can also use the “Start-Process” command to run an executable file or a PowerShell script. Here’s how:
-
Launch an elevated PowerShell instance.
-
Use the following cmdlet to run an executable file:
Start-Process -FilePath ‘[PathToExecutableFile].exe’ Files Using PowerShell 5")
Run executable file from PowerShell using Start-Process command That’s it! The executable file should now run.
 Files Using PowerShell 5")
Alternatively, you can also change your strategy to a directory-first approach and use a different syntax of the “Start-Process” command to run an executable file. For that, you must first use the “CD” cmdlet to change your directory to the location where the executable file is located, then use the following command to run it:
Start-Process [ExecutableFileName].exeHere is an example:
 Files Using PowerShell 6")
Run EXE File in PowerShell Using “&” Call Operator
A Call Operator in Windows PowerShell allows you to run a command, function, or script. Anything followed by the “&” call operator is considered a command by PowerShell. You can use this logic of PowerShell to run an executable file simply by entering the file’s path prefixed with the call operator.
This is the syntax to be used to run an executable file in PowerShell:
& "[PathToExecutableFile].exe" Files Using PowerShell 7")
It is that simple.
Closing Thoughts
The easiest way to run an executable file, may it be a .exe, .ps1, or .msi file, is perhaps using the “&” call operator followed by the complete file path and extension. However, there are other ways to get the job done as well:
- Run the executable in PowerShell directly by using “.\” followed by the file name.
- Run the executable in PowerShell using the
Invoke-Expressioncommand. - Run the executable in PowerShell using the
Start-Processcommand.
All of the 4 aforementioned methods will execute the file directly from PowerShell. This way, you do not have to browse through File Explorer to run a file each time you need to.
To run an application, process, or script from within PowerShell you could simply enter the path to file. But this will start the process in the same environment and within the same context as your PowerShell session.
When you want to run the process as a different user, start it in a new window, or even start multiple processes simultaneously then you will need to use the Start-Process cmdlet.
In this article
In this article, we are going to take a look at the start-process cmdlet. How we can run a process with elevated permissions, run it in a new window, or even completely hidden. I will also give you a couple of useful examples to get started.
The Start-Process cmdlet allows you to run one or multiple processes on your computer from within PowerShell. It’s designed to run a process asynchronously or to run an application/script elevated (with administrative privileges).
You don’t need to use the Start-Process cmdlet if you need to run a script or other console program synchronously in PowerShell. The reason for this is that you can redirect the output of it to PowerShell.
This is one of the downsides of the cmdlet, you can’t redirect the output or error streams to PowerShell. The only option that you have is to redirect the output to text files.
So let’s take a look at how to use the cmdlet. We can use the following parameters to start a process:
| Parameter | Description |
|---|---|
| -FilePath | Specify the file, application, or process to run |
| -ArgumentList | Specifies parameters to use with the process to start |
| -Credential | User account to run the process with |
| -WorkingDirectory | The location where the process should start in |
| -NoNewWindow | Don’t open a new window for the process |
| -RedirectStandardError | Specify text file to redirect error output to |
| -RedirectStandardInput | Text file with input for the process |
| -RedirectStandardOutput | Specify text file to redirect output to |
| -WindowStyle | Normal, Hidden, Minimized, or Maximized |
| -Wait | Wait for the process to finish before continuing with the script |
| -UseNewEnvironment | The process will use its own environment variables instead of those of the PowerShell session |
So to simply open an application with PowerShell we could use the following command:
Start-Process Notepad.exe

# Simply typing notepad.exe in PowerShell will have the same result:
Notepad.exe
This will open Notepad in a new window with the same privileges as the PowerShell session. The process is run asynchronously, which means that PowerShell will continue the script, even if the process isn’t finished yet.
Waiting for a process to finish
The most common wait to start a process in PowerShell is to wait for it to finish. We can use the -wait parameter for this, which will make sure that PowerShell will wait until the process and all child-process are finished.
Let’s say we have a bat file that we want to start from PowerShell and wait for the process to finish:
# Start the process example.bat and wait for it to finish
Start-Process -FilePath "c:\temp\example.bat" -Wait
This will run the bat file and wait for it to finish before continuing the script or resuming input. Keep in mind that any output of the process isn’t captured by default. So you won’t know if the bat file failed or successfully completed.
Window size and Hidden processes
If we run the bat file with the example above, it will run the bat file in a new window. The window will have a normal size and close when the process completes. In the start-process cmdlet, we can specify the window size or even hide it completely.
We can choose between using the parameters -WindowStyle and -NoNewWindow. Obviously, we can’t use both parameters together 😉
To run the bat file without any windows we can use the following command in PowerShell:
# Start the process example.bat, without any window and wait for it to finish
Start-Process -FilePath "c:\temp\example.bat" -Wait -WindowStyle Hidden
You won’t get any feedback, except that your script will continue when the process is finished. However we can redirect the result of the process to a text file, more about that later.
To run a process in a maximized, normal, or minimized window you can use the following options:
# Default behavior:
Start-Process -FilePath "c:\temp\example.bat" -Wait -WindowStyle Normal

# Maximized
Start-Process -FilePath "c:\temp\example.bat" -Wait -WindowStyle Maximized

# Minimized
Start-Process -FilePath "c:\temp\example.bat" -Wait -WindowStyle Minimized
Another parameter that we can use is -NoNewWindow. This will run the process in the same window as the PowerShell script. This option only works with command-line-based processes. You can’t for example, open Notepad in the same window as PowerShell.
Start-Process -FilePath "c:\temp\example.bat" -Wait -NoNewWindow
Using Arguments with Start-Process
Some processes or scripts that you want to start require parameters (arguments). Probably your first thought is to add the arguments between the quotes in the filepath, but as you might have noticed, that won’t work.
To pass arguments to the process that you want to start, you will need to use the -arguments parameter.
Let’s run an MSI from PowerShell as an example. To run the MSI silently we will need to supply the arguments /quiet or /qn and we probably don’t want to restart as well, so we add /norestart to it.
Start-Process -FilePath "C:\temp\example.msi" -Wait -ArgumentList "/quiet /norestart"

# Or arguments as string array:
Start-Process -FilePath "C:\temp\example.msi" -Wait -ArgumentList "/quiet","/norestart"
PowerShell Start-Process Elevated
When you start a process with Start-Process it will run in the same user context as the PowerShell session. But some processes may need elevated permissions to run. To do this we can use the -Verb parameter.
Keep in mind that you can’t combine -Verb and -NoNewWindow because the process that you want to start must be opened in a new window.
To run the example.bat with elevated permissions we can use the following command:
Start-Process -FilePath "c:\temp\example.bat" -Wait -Verb RunAs
Depending on the file extension other options are also possible. We could for example print a text file with -Verb Print.
Start Process as a different user
It’s also possible to run a process as a different user. By default, the process will be executed with the credentials of the currently logged-on user.
First, you will need t to create a PSCredential object and store it as a secure string. Then you can pass the credentials to the cmdlet with the parameter -Credential.
Keep in mind that secure strings are not super secure to use, so make sure that you keep the secure string as safe as possible.
# Create credential object
# You can store these also in a text file
$username = Read-Host "Enter your username"
$secureStringPwd = Read-Host -assecurestring "Please enter your password"

# Create credential object
$credObject = New-Object System.Management.Automation.PSCredential -ArgumentList $username, $secureStringPwd

Start-Process -FilePath "c:\temp\example.bat" -Wait -Credentials $credObject
Redirecting the Output
The output of the Start-Process cmdlet can’t be passed through to PowerShell. The only option that we have is to redirect the output to a text file. Variables won’t work.
So what you can do to capture the output is:
# Redirect the output to example-output.txt
Start-Process -FilePath "c:\temp\example.bat" -Wait -RedirectStandardOutput c:\temp\example-output.txt

# Read the contents of example-output.txt
$output = Get-Content c:\temp\example-output.txt
What won’t work is :
# Storing the output into a variable will throw an error
Start-Process -FilePath "c:\temp\example.bat" -Wait -RedirectStandardOutput $output

# $result will be empty
$result = Start-Process -FilePath "c:\temp\example.bat" -Wait
If you want to capture only the error of the process then you can use:
Start-Process -FilePath "c:\temp\example.bat" -Wait -RedirectStandardError c:\temp\example-output.txt
Getting the Process ID
The last option that I want to explain is the -Passtru parameter. It will return the process object of the process that we have started. This can be useful when you want to automatically stop a process when it’s running for too long.
$process = Start-Process "C:\temp\example.bat" -PassThru

# Get the process ud
$process.ID

# Wait 1 second
Start-Sleep 1

# Kill the process
Stop-Process -id $process.Id
Wrapping Up
The Start-Process cmdlet is great to run one or multiple applications or scripts from within PowerShell. Unfortunately, we can’t easily capture the output of the process, but with a small workaround, we are still able to inspect the results in PowerShell.
I hope you found this article useful, if you have any questions, just drop a comment below.
-
Home
-
Partition Manager
- PowerShell Run Exe: How to Run Exe in PowerShell Windows 10/11
By Ariel | Follow |
Last Updated
A great many people are confused about the PowerShell run exe operation. If you are also searching for the answer, this post of MiniTool is worth reading. It illustrates 3 ways to execute exe from PowerShell Windows 10/11.
PowerShell is a powerful Windows built-in command-line shell and scripting environment tool. It’s widely used by people to deal with various works such as PowerShell copy files, PowerShell gets folder size, installing SSH PowerShell, PowerShell unzip/zip files, etc.
However, a lot of users and even professionals don’t know how to perform these operations in PowerShell. This post mainly focuses on PowerShell run exe. Let’s keep reading to know more details.
What Command Can Be Used to Run Exe from PowerShell
What command can be used to run exe in PowerShell Windows 10/11? After investigating extensive references, we found there are 2 main cmdlets – PowerShell Start-Process and Invoke-Expression to execute/run a .exe file.
With the PowerShell Start-Process cmdlet, you can enter a .exe file or script file that can be opened using a program on the local computer. The PowerShell Invoke-Expression cmdlet can run a .exe file or open a document file in the program associated with the document file type.
How to Run Exe from PowerShell Windows 10/11
How to let PowerShell execute exe on Windows 10/11? There are 3 simple ways that you can choose one according to your preference.
To execute exe from PowerShell smoothly, here we assume that the .exe file is located in the C:UsersAdministratorDownloads directory and the file name is partitionwizard.exe.
Note:
Make sure you replace the file directory/path and .exe file name according to your actual situation.
# 1. PowerShell Run Exe Directly
If you want to install exe with PowerShell directly, you can use the “.” parameter before the .exe file name. Here’s how to do that:
Step 1. Press the Win + R keys to open the Run box, and then type powershell in it and press Ctrl + Shift + Enter keys to open the elevated PowerShell window.
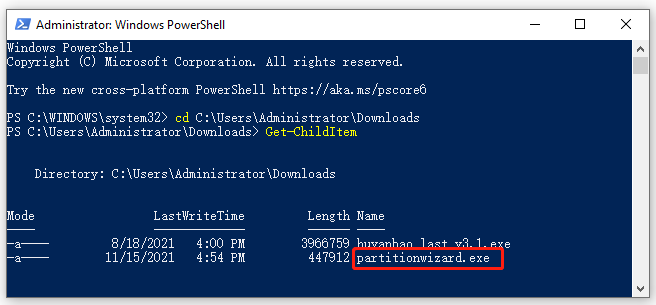
Step 2. In the pop-up window, type the following command and hit Enter to locate the directory where the partitionwizard.exe file is located.
cd C:UsersAdministratorDownloads
Step 3. Now, you should locate the Downloads folder. Run the following command and check if partitionwizard.exe exists in the directory.
Get-ChildItem
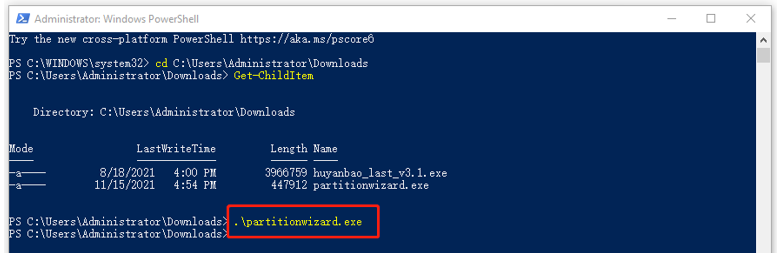
Step 4. Type “.” before the partitionwizard.exe file to run exe from PowerShell script. Once done, the installer of partitionwizard.exe should start installing on the computer.
.partitionwizard.exe
# 2. PowerShell Run Exe via the Start-Process Cmdlet
Another command method for the PowerShell execute exe operation is to use the Start-Process cmdlet. To do this work, follow the detailed steps below:
Step 1. Open the elevated PowerShell window again as we explain above.
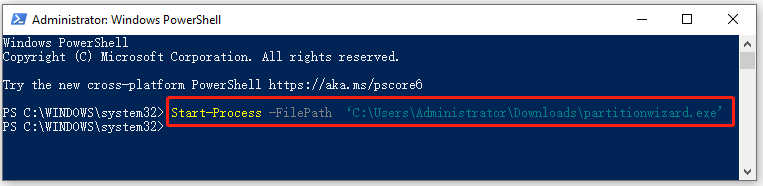
Step 2. Type the following command and hit Enter to locate the directory where the partitionwizard.exe file is stored. Then it should open the exe file and execute.
Start-Process -FilePath ‘C:UsersAdministratorDownloadspartitionwizard.exe’
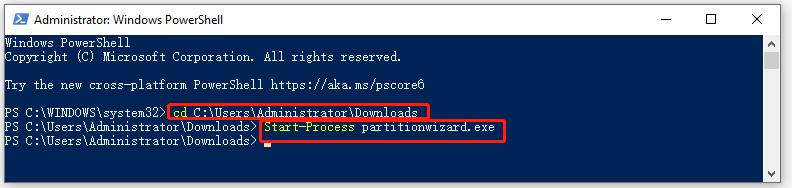
Step 3. Alternatively, you can run the following commands one by one to execute the partitionwizard.exe file.
- cd C:UsersAdministratorDownloads
- Start-Process partitionwizard.exe
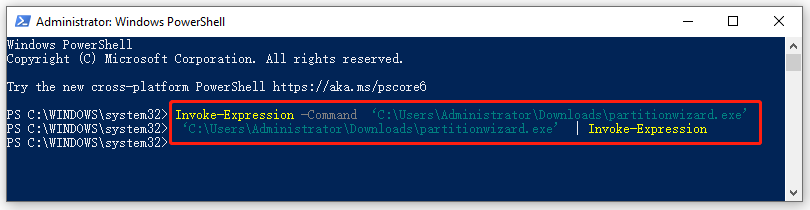
# 3. PowerShell Run Exe via the Invoke-Expression Cmdlet
In addition to the above 2 methods, you can install exe with PowerShell Invoke-Expression cmdlet on Windows 10/11. It’s very simple to operate. To do so, open the elevated PowerShell window, type the following command, and hit Enter to execute the partitionwizard.exe file.
Invoke-Expression -Command ‘C:UsersAdministratorDownloadspartitionwizard.exe’
Or
‘C:UsersAdministratorDownloadspartitionwizard.exe’ | Invoke-Expression
Further reading: If you enter some issues like file system corruption and low disk space on Windows 10/11, don’t worry. MiniTool Partition Wizard can help you fix them easily by checking file system errors, extending/resizing partitions, analyzing disk space, upgrading to a larger hard disk, etc.
About The Author

Position: Columnist
Ariel has been working as a highly professional computer-relevant technology editor at MiniTool for many years. She has a strong passion for researching all knowledge related to the computer’s disk, partition, and Windows OS. Up till now, she has finished thousands of articles covering a broad range of topics and helped lots of users fix various problems. She focuses on the fields of disk management, OS backup, and PDF editing and provides her readers with insightful and informative content.
Как избежать распространенных ошибок при запуске исполняемых файлов в оболочке PowerShell
Оболочка Windows PowerShell построена с использованием интерактивного интерфейса командной строки (CLI). Одна из основных задач интерфейса CLI – предоставить пользователям возможность запускать программы. Однако я не раз сталкивался с такими вопросами как: «Необходимо запустить такую-то утилиту командной строки в оболочке PowerShell. Я безуспешно пытался различными способами заключить параметры в кавычки. Как заставить программу корректно работать в оболочке PowerShell?»
Выполнение исполняемого файла с корректной расстановкой кавычек в оболочке Cmd.exe не представляет трудности, ведь процесс Cmd.exe не проводит дополнительный синтаксический анализ командной строки с исполняемым файлом. Если вы пишете сценарий для оболочки Cmd.exe (то есть пакетный файл), запускаемый как исполняемый файл, то можете увидеть, как будет выглядеть командная строка исполняемого файла, просто добавив к этой командной строке префикс Echo, который дает оболочке Cmd.exe команду не выполнять полученную строку, а вывести ее на экран. Это простая и эффективная техника отладки.
Однако в оболочке PowerShell задача немного усложняется, поскольку синтаксический анализатор командной строки здесь сложнее, чем в оболочке Cmd.exe. Команда Echo в оболочке PowerShell на самом деле является псевдонимом команды Write-Host, поэтому вы не можете задействовать ее в оболочке PowerShell для просмотра полной командной строки, как в оболочке Cmd.exe. В оболочке PowerShell отсутствует встроенный механизм просмотра полной командной строки для исполняемого файла.
Чтобы обойти данное ограничение, я написал короткую программу для командной строки, ShowArgs.exe. Цель этой программы — вывести на экран переданные ей параметры командной строки без анализа или интерпретации. Заменив ShowArgs.exe программу, которую вы пытаетесь запустить (но сохраняя параметры вашей программы), вы сможете увидеть именно те параметры командной строки, которые будет использовать оболочка PowerShell.
Используя приложение ShowArgs.exe (доступно для загрузки на нашем сайте), я покажу, как справляться с наиболее распространенными проблемами типа «как правильно заключить выражение в кавычки» при запуске исполняемых файлов в оболочке PowerShell. Для примеров, приведенных в этой статье, я создал каталог с именем C:\Sample Tools и скопировал файл ShowArgs.exe в него.
Запуск исполняемых файлов в оболочке PowerShell
Для запуска исполняемого файла в оболочке PowerShell достаточно просто указать его имя. Точно так же запускаются исполняемые файлы в оболочке Cmd.exe. На экране 1 приведены два примера запуска приложения ShowArgs.exe напрямую в оболочке PowerShell. На экране 1 для запуска приложения ShowArgs.exe требуется префикс «.\», так как оболочка PowerShell по умолчанию не запускает исполняемые файлы из текущего каталога.
 |
| Экран 1. Запуск исполняемого файла в PowerShell |
Если имя исполняемого файла, путь к нему или его полное имя не содержат пробелы, использовать оператор вызова (&) необязательно (см. экран 2). В остальных случаях он необходим.
|
|
| Экран 2. Использование оператора вызова в некоторых случаях не является обязательным |
Однако вы не можете использовать оператор & для вызова командной строки целиком. На экране 3 показана эта распространенная ошибка. Первая команда на экране 3 завершается с ошибкой, потому что строка, заключенная в кавычки, после оператора вызова не является именем файла (о чем и сообщает система). Вторая команда на экране 3 исправляет эту ошибку. В этой команде в кавычки помещается только имя исполняемого файла, а параметры выносятся в конец команды.
|
|
| Экран 3. Общие ошибки при использовании оператора вызова |
Как показано на экране 4, вы можете сохранить результаты выполнения исполняемого файла в переменную. Первая команда на экране запускает файл Find.exe с параметром «/?» и сохраняет результат в переменную $findHelp. Вторая команда показывает, что переменная содержит массив, а последняя выводит на экран содержимое массива. Если программа возвращает только одну строку, переменная будет содержать отдельную строку, а не массив.
|
|
| Экран 4. Сохранение результатов выполнения исполняемого файла в переменную |
Командная строка исполняемого файла: заключение параметров в кавычки
Если параметр содержит пробелы, необходимо заключать его в кавычки. Сами по себе кавычки не являются частью параметра, а, следовательно, вы можете заключать в кавычки параметры, которые не содержат пробелы, но в таких случаях использование кавычек не обязательно.
Следующие инструкции могут помочь избежать проблем при указании параметров для исполняемых файлов в оболочке PowerShell. Все примеры в данном разделе используют приложение ShowArgs.exe с предполагаемыми параметрами. Я рекомендую запустить эти примеры, чтобы увидеть, какие именно параметры командной строки будет использовать оболочка PowerShell.
Инструкция 1. В случаях, когда вы указываете параметр непосредственно в командной строке и этот параметр содержит пробелы, необходимо только добавить кавычки. Например:
. \ShowArgs «Gil Bates»
Эта команда работает именно так, как ожидается. Оболочка PowerShell видит, что строка, заключенная в кавычки, содержит пробел, и заключает ее в кавычки при передаче параметра исполняемому файлу. Добавлять дополнительные кавычки к строке не требуется. Другими словами, не нужно использовать один из приведенных ниже вариантов:
. \ShowArgs «`"Gil Bates`»«
. \ShowArgs '»Gil Bates«'
. \ShowArgs»«"Gil Bates»«"
Оболочка PowerShell удалит лишние кавычки таким образом, чтобы у параметра был только один набор кавычек. А значит, дополнительные кавычки не выполняют никакой функции, а лишь затрудняют прочтение команды. Если параметр не содержит пробелов, использование кавычек не обязательно.
Инструкция 2. Если в качестве параметра исполняемого файла вы хотите передать переменную, то можете просто поместить переменную в командную строку с исполняемым файлом. Ниже приведен пример:
$name =»Gil Bates«
. \ShowArgs $name
Если содержимое переменной включает пробелы, оболочка PowerShell автоматически добавит кавычки. Как и в случае с предыдущим примером, нет необходимости добавлять дополнительные кавычки.
Инструкция 3. Если параметр использует аргумент, связанный с параметром (то есть параметр и его аргумент должны писаться слитно, без разделения пробелом), вы можете заключить в кавычки параметр целиком, вместе с его аргументом. Для тех, кто не понимает разницы между параметром и аргументом, поясню, что параметр – это выражение, которое указывается после команды и управляет ее поведением, в то время как аргумент предоставляет дополнительную информацию о параметре. Вы также можете заключить в кавычки лишь аргумент параметра. Например, следующие команды эквивалентны друг другу:
. \ShowArgs /name»Gil Bates«
. \ShowArgs»/nameGil Bates«
Аналогичная ситуация возникает, если между параметром и аргументом находится разделительный символ, например двоеточие (:) или знак равенства (=). Другими словами, следующие две команды эквивалентны:
. \ShowArgs /name:»Gil Bates«
. \ShowArgs»/name:Gil Bates«
Следующие две команды также эквивалентны:
. \ShowArgs /name=»Gil Bates«
. \ShowArgs»/name=Gil Bates«
Как и в предыдущих примерах, добавление дополнительных кавычек не обязательно.
Инструкция 4. Если вы используете переменную в качестве аргумента параметра, не требуется добавлять дополнительные кавычки, даже если содержимое переменной включает пробелы. Например, все перечисленные ниже команды будут работать корректно:
. \ShowArgs /name $name
. \ShowArgs /name$name
. \ShowArgs /name=$name
. \ShowArgs /name:$name
Инструкция 5. Если параметр начинается с дефиса (-), аргумент параметра связан с параметром (не отделен пробелом) и аргумент параметра хранится в переменной, необходимо либо поставить перед дефисом в начале параметра знак обратной кавычки (`) либо взять в кавычки параметр целиком или только его связанный аргумент. Например, следующая команда не будет работать корректно:
. \ShowArgs -name:$name
Вместо нее необходимо использовать одну из команд:
. \ShowArgs `-name:$name
. \ShowArgs»-name:$name«
Это правило применяется, когда параметр и аргумент либо связаны напрямую (например, -name$name) или через символ (такой как: или =), стоящий между ними. Однако оно неприменимо, если аргумент параметра не хранится в переменной. Например, следующие две команды эквивалентны:
. \ShowArgs -name:»Gil Bates«
. \ShowArgs»-name:Gil Bates«
Если вы не знаете наверняка, командную строку какого вида оболочка PowerShell будет использовать, замените имя исполняемого файла приложением ShowArgs.exe, и вы увидите именно те параметры командной строки, которые оболочка PowerShell будет использовать для запуска исполняемого файла.
Получение кода завершения исполняемого файла
Оболочка Cmd.exe использует динамическую переменную окружения ERRORLEVEL для хранения кода завершения последнего запущенного исполняемого файла. Оболочка PowerShell для этих целей использует переменную $LASTEXITCODE. Обычно можно проверить, возникли ли ошибки при выполнении исполняемого файла, выяснив, равна ли переменная $LASTEXITCODE нулю.
Формирование командной строки исполняемого файла, использующей логические операторы
Если требуется сформировать командную строку, зависящую от логических операторов, вам может потребоваться дополнительная гибкость. Например, рассмотрим сценарий Test.ps1 в листинге 1.
Если вы запустите сценарий Test1.ps1 с параметром -Test, оболочка PowerShell выполнит команду:
. \ShowArgs»/a:A B C /Test«
Однако на самом деле необходимо, чтобы оболочка PowerShell выполнила команду:
. \ShowArgs»/a:A B C«/Test
Другими словами, мы хотим, чтобы оболочка PowerShell интерпретировала параметр $params как командную строку целиком, а не как отдельный строковый параметр исполняемого файла.
Одно решение заключается в использовании команды Start-Process (см. листинг 2). У команды Start-Process есть параметр -ArgumentList, который представляет собой массив параметров командной строки. Оболочка PowerShell автоматически не расставляет кавычки для этих параметров, так что вам придется вставить кавычки там, где нужно.
У использования команды Start-Process есть ряд недостатков:
- Если вы хотите перехватить выходные данные исполняемого файла, необходимо задействовать параметр -RedirectStandardOutput. Сценарий Test3.ps1 в листинге 3 иллюстрирует этот подход. Данный сценарий создает временный файл, запускает исполняемый файл (перенаправляя выходные данные во временный файл) и возвращает выходные данные с помощью команды Get-Content.
- Команда Start-Process не обновляет переменную $LASTEXITCODE.
Чтобы добавить еще немного гибкости, вы можете задействовать функцию Start-Executable, описанную в листинге 4. Функция Start-Executable не использует временный файл и обновляет переменную $LASTEXITCODE. Параметр -ArgumentList данной функции работает аналогично параметру -ArgumentList команды Start-Process.
Составляйте команды корректно
Корректное составление командных строк в оболочке PowerShell может сопровождаться множеством сомнений, но так не должно быть. Инструкции из этой статьи помогут вам избежать наиболее распространенных «подводных камней» при запуске исполняемых файлов в оболочке PowerShell. Кроме того, я рекомендую добавить приложение ShowArgs.exe в «аварийный» набор инструментов, чтобы вы могли увидеть, какие именно параметры оболочка PowerShell передает исполняемому файлу.
Листинг 1. Test1.ps1
param(
[Switch] $Test
)
$arg =»A B C«
$params =»/a:$arg«
if ( $Test ) {
$params +=» /Test«
}
# Won't work as expected if using –Test
ShowArgs $params
Листинг 2. Test2.ps1
param(
[Switch] $Test
)
$arg =»A B C«
# You have to insert your own quotes
$params = @(»/a:`«$arg`»«)
if ( $Test ) {
$params +=»/Test«
}
Start-Process ShowArgs.exe -ArgumentList $params `
-NoNewWindow -Wait
Листинг 3. Test3.ps1
param(
[Switch] $Test
)
$arg =»A B C«
$params = @(»/a:`«$arg`»«)
if ( $Test ) {
$params +=»/Test«
}
$tempName = [IO.Path]::GetTempFileName()
$output =»«
$spArgs = @{
»FilePath«= "ShowArgs.exe»
«ArgumentList» = $params
«NoNewWindow» = $true
«Wait» = $true
«RedirectStandardOutput» = $tempName
}
Start-Process @spArgs
if ( test-path $tempName ) {
$output = get-content $tempName
remove-item $tempName
}
Листинг 4. Функция Start-Executable
function Start-Executable {
param(
[String] $FilePath,
[String[]] $ArgumentList
)
$OFS = «"
$process = New-Object System.Diagnostics.Process
$process.StartInfo.FileName = $FilePath
$process.StartInfo.Arguments = $ArgumentList
$process.StartInfo.UseShellExecute = $false
$process.StartInfo.RedirectStandardOutput = $true
if ( $process.Start() ) {
$output = $process.StandardOutput.ReadToEnd() `
-replace»\r\n$«,"»
if ( $output ) {
if ( $output.Contains(«`r`n») ) {
$output -split «`r`n»
}
elseif ( $output.Contains(«`n") ) {
$output -split»`n«
}
else {
$output
}
}
$process.WaitForExit()
&»$Env:SystemRoot\system32\cmd.exe" `
/c exit $process.ExitCode
}
}