How to Install or Uninstall Windows PowerShell ISE in Windows 10
Starting with Windows 10 build 19037, the PowerShell ISE app is now an options feature installed by default (Feature on Demand). This means that it is now listed in the Optional Features, you will be able to install or uninstall it easily.
PowerShell is an advanced form of command prompt. It is extended with a huge set of ready-to-use cmdlets and comes with the ability to use .NET framework/C# in various scenarios.
PowerShell was initially released in November 2006 for Windows XP SP2, Windows Server 2003 SP1 and Windows Vista. This days, it is a different, open source product. PowerShell 5.1 introduced editions to the app. Microsoft first announced PowerShell Core edition on 18 August 2016, along with their decision to make the product cross-platform, independent of Windows, free and open source. It was released on 10 January 2018 to Windows, macOS and Linux users. Now it has its own support lifecycle.
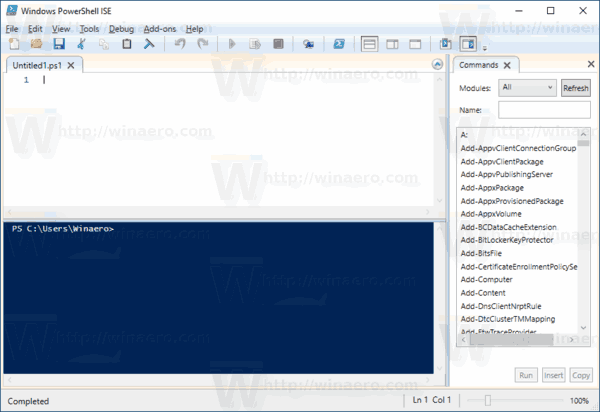
Windows includes a GUI tool, PowerShell ISE, which allows editing and debugging scripts in a useful way. In Windows PowerShell ISE, you can run commands and write, test, and debug scripts in a single Windows-based graphic user interface with multiline editing, tab completion, syntax coloring, selective execution, context-sensitive help, and support for right-to-left languages. You can use menu items and keyboard shortcuts to perform many of the same tasks that you would perform in the Windows PowerShell console. For example, when you debug a script in the Windows PowerShell ISE, to set a line breakpoint in a script, right-click the line of code, and then click Toggle Breakpoint.
In recent Windows 10 versions, PowerShell ISE is an optional feature. To install or uninstall PowerShell ISE, you can use either Settings, or the command prompt.
To Install or Uninstall Windows PowerShell ISE in Windows 10,
- Open Settings.
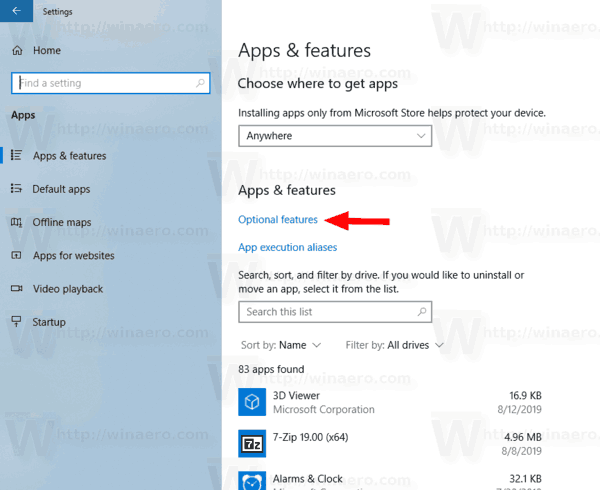
- Navigate to Apps > Apps & features.
- Click on the Optional features link on the right.
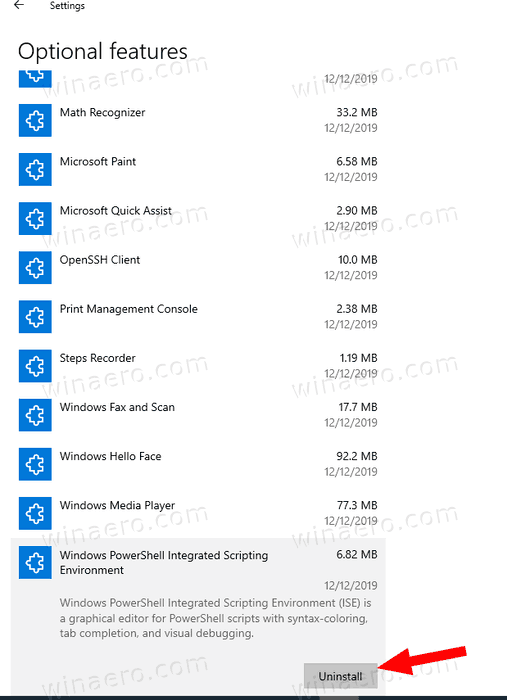
- To uninstall Windows PowerShell ISE, click on the Windows PowerShell Integrated Scripting Environment under Installed features, and click on Uninstall.
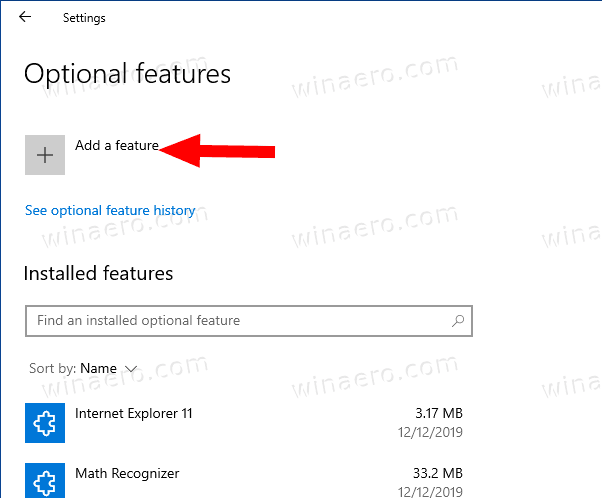
- To install the uninstalled Windows PowerShell ISE, click on Add a feature.
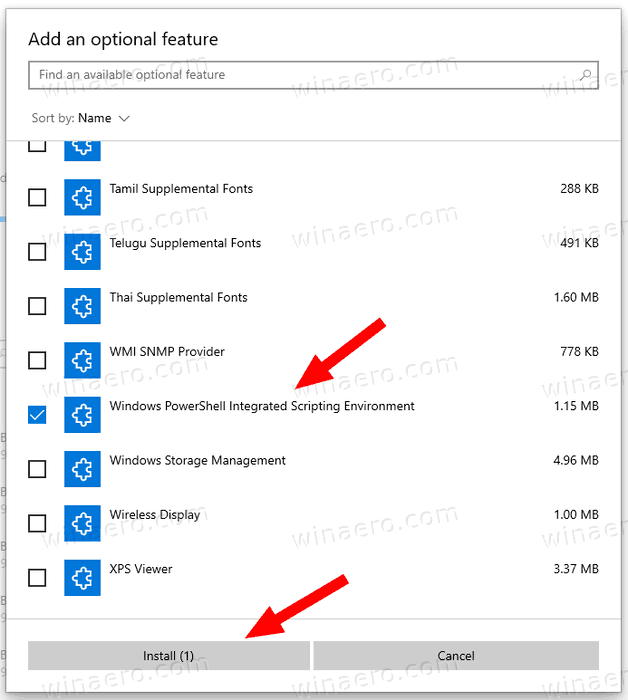
- Check Windows PowerShell Integrated Scripting Environment, and click on Install.
You are done. Alternatively, you can use the command prompt console to manage optional features.
Install or Uninstall PowerShell ISE in Command Prompt
- Open an elevated command prompt.
- To uninstall PowerShell ISE, use the command:
DISM /Online /Remove-Capability /CapabilityName:Microsoft.Windows.PowerShell.ISE~~~~0.0.1.0. - To install the uninstalled PowerShell ISE, type or copy-paste the following command:
DISM /Online /Add-Capability /CapabilityName:Microsoft.Windows.PowerShell.ISE~~~~0.0.1.0.
That’s it.
Articles of interest:
- Uninstall WordPad in Windows 10
- Manage Optional Features in Windows 10
- Uninstall Microsoft Paint in Windows 10 (mspaint)
Support us
Winaero greatly relies on your support. You can help the site keep bringing you interesting and useful content and software by using these options:
If you like this article, please share it using the buttons below. It won’t take a lot from you, but it will help us grow. Thanks for your support!
In this PowerShell tutorial, we will discuss Windows PowerShell ISE. We will discuss below things:
- What is Windows PowerShell ISE?
- How to start ISE?
- How to find the Current Version of PowerShell using it?
- How to create a script in Windows PowerShell ISE?
- How to debug PowerShell script?
- Advantages of using it?
Subscribe to EnjoySharePoint YouTube Channel for more free videos.
What is Windows PowerShell ISE
Now, we will discuss what it is and what are the advantages of PowerShell ISE.
What is PowerShell?
Windows PowerShell is a shell (the shell is a user interface that gives you access to various services of an operating system) developed by Microsoft for purposes of task automation and configuration management. This powerful shell is based on the .NET framework and it includes a command-line shell and a scripting language.
What is Windows PowerShell ISE?
It is a scripting environment where you can run commands and write, test, and debug scripts in a single Windows-based graphic user interface with multiline editing, tab completion, syntax coloring, selective execution, context-sensitive help, and support for right-to-left languages.
It stands for PowerShell Integrated Scripting Environment.
Windows PowerShell ISE download
You can download Module Browser for Windows PowerShell ISE from this URL.
How to start with It?
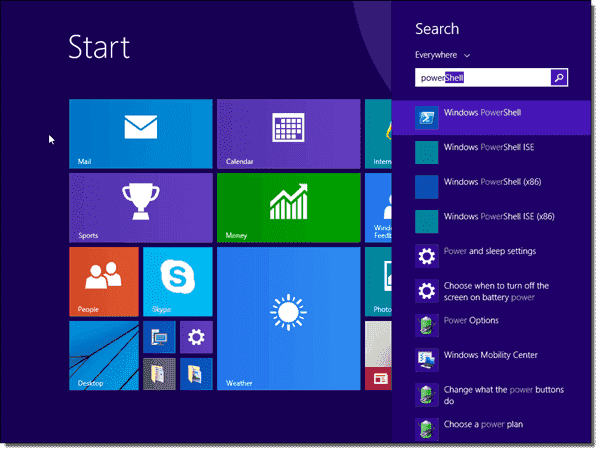
In any of the operating systems (Windows7,8 or 10 or any server operating system like windows server 2012 or windows server 2012 r2) search for “Windows PowerShell ISE”, then it will display like below:

Apart from the above method, you can also run it from Run box. Click on Windows+R to open the Run box and then type powershell_ise.exe and click on Enter. This will also open the PowerShell ISE.
How to find Current Version of PowerShell?
We can easily get the current version of PowerShell installed in the machine by executing the below command in the command window.
$PSVersionTableOnce you run the above command it will display various details like PSVersion, BuildVersion, PSCompatiableVersion, CLRVersion etc. like below:

How to create a script using ISE?
We can easily create a script by clicking on the new button below toolbar and then you can write the PowerShell script. Similarly, you can easily Save Open existing PowerShell script by clicking on Open Folder and Save button.

How to debug in PowerShell ISE?
One of the biggest advantages of using it is that we can easily debug PowerShell script.
Note: Before start debugging, we need to first Save the script.
Once you save the script, Right-click on the line where you want to put the debugger and click on “Toggle Brealpoint” like below:

Or you can also put the cursor on the line where you want to attach the debugger and then press F9. The debugger will appear like below:

Then you can click on “run script” icon in the toolbar or you can also press F5 which will start the debugging

Once it reaches the debugger point it will stay in that line. Then you can use F10 to debug line by line and also you can use F11 for step over. You can press “Shift + F5” to stop debugging. The debugging shortcuts same like any other Microsoft IDE.
It will also show a message in the console once it Hit breakpoint like below:

Advantages of PowerShell ISE
Now, we will see few advantages of using it.
IntelliSense
PowerShell ISE supports IntelliSense. When you type cmdlets it will display possible values for the cmdlets. For example, if I am writing Write- it is showing me the values in IntelliSense Debug, error, Host etc like below:

Similarly, if I will write “-” after cmdlets, it will display the parameters. This will be very much helpful if you are not sure about the parameters for the cmdlets. Here I have written one Get-Date and then

Run Selection
If you are working with a large script like “Upload large files to SharePoint online document library using PowerShell csom”, you may need to run and see a portion of the script. It provides “Run Selection” option by which you can run a portion from the script.
Select the portion which you want to run and then click on “Run Selection” button from the toolbar. Alternatively, you can click on F8, only the selected portion will run.

Easily Copy, Paste and Clear
It is really difficult to copy or paste in a PowerShell command prompt but it is very easy in PowerShell ISE. You can do copy & paste by using Ctrl + C and Ctrl + V.
Also, you can clear the console by clicking on “Clear Console Pane” button from toolbar like below:

Debug Script using PowerShell ISE
As discussed in the above steps, you can easily debug a script using PowerShell ISE.
One-Click Open PowerShell Command Prompt
From Windows PowerShell ISE, you can open the command prompt by clicking on the “Start PowerShell.exe” button from toolbar like below:

Command Add-on
By using Command Add-on, you can search PowerShell cmdlets. Once you click on “Show Command Add-on” button it will open the Commands on the right side. You can search for cmdlets there.

Open Multiple Scripts in Tabs
In PowerShell ISE, you can open multiple scripts in multiple tabs. You can also debug script in each tab separately.

PowerShell cannot be loaded because running scripts is disabled on this system windows 10
Let us see, how to solve PowerShell cannot be loaded because the execution of scripts is disabled issue, which comes while running PowerShell cmdlets in Windows 10 machine.
Recently I was trying to run a PowerShell command using PowerShell ISE, but it gave an error:
cannot be loaded because running scripts is disabled on this system like below:

PowerShell cannot be loaded because the execution of scripts is disabled
The error was coming because the PowerShell execution policy doesn’t allow to run scripts by default in the Windows 10 laptop.
By default, the PowerShell policy was set to Restricted which means No scripts can be executed.
To allow script execution, we need to use the Set-ExecutionPolicy PowerShell cmdlets. Run the cmdlet like below:
Set-ExecutionPolicy UnrestrictedIt will show you a confirmation box, select Yes to All, and then when you run any cmdlets in PowerShell, it will run successfully like below:

To run outside script set Set-ExecutionPolicy to RemoteSigned like:
Set-ExecutionPolicy RemoteSigned Below are the different types of policies we can set for PowerShell.
- Restricted: You can run any script, no script is allowed to run.
- Unrestricted: All Windows PowerShell scripts can be run.
- AllSigned: Only trusted publisher scripts are allowed to run.
- RemoteSigned: Downloaded scripts must be signed by a trusted publisher.
If you want to know what is current policy set, then you can run the below PowerShell cmdlets.
get-executionpolicyYou can bypass this policy by adding -ExecutionPolicy ByPass when running PowerShell
powershell -ExecutionPolicy ByPass -File myscript.ps1If you wanted to change the policy to RemoteSigned/Unrestricted for just the CurrentUser, you can run the below PowerShell cmdlets.
Set-ExecutionPolicy -ExecutionPolicy RemoteSigned -Scope CurrentUser
or
Set-ExecutionPolicy -Scope "CurrentUser" -ExecutionPolicy "Unrestricted"
or
Set-ExecutionPolicy -Scope "CurrentUser" -ExecutionPolicy "RemoteSigned"
This is how to solve cannot be loaded because running scripts is disabled on this system error which comes in windows 10 while running PowerShell cmdlets.
Read some PowerShell tutorials:
- Missing argument in parameter list PowerShell
- Get SharePoint document library size using PowerShell
- PowerShell SharePoint Online: The remote server returned an error: (403) Forbidden
- PowerShell reference variable
- Working with PowerShell Date Command (Get-Date)
- Retrieve all list names and list guids from SharePoint online site using PowerShell
- What is a PowerShell variable
- SharePoint 2016 PowerShell Script to list all Users in Site Collection
- SharePoint 2013 backup and restore using PowerShell
I hope this tutorial, we learned Windows PowerShell ISE, advantages of PowerShell ISE and how to debug script using it.
I am Bijay a Microsoft MVP (8 times – My MVP Profile) in SharePoint and have more than 15 years of expertise in SharePoint Online Office 365, SharePoint subscription edition, and SharePoint 2019/2016/2013. Currently working in my own venture TSInfo Technologies a SharePoint development, consulting, and training company. I also run the popular SharePoint website EnjoySharePoint.com
Windows PowerShell 7.3.4 and PowerShell 7.2.11 LTS are now available for you to download. These releases include minor build and packaging improvements. You can download the latest versions of PowerShell from the direct download links shared below.
PowerShell can also be used to run scripts and automate and perform administrative tasks.
Continue down below to learn what is new in this release and then download it from the direct download links.
Table of contents
- Changes and Improvements
- PowerShell 7.3.4
- PowerShell 7.2.11 LTS
- Download PowerShell 7.3.4
- For Windows 11, 10, 8.1, and 7
- For MacOS
- For Linux
- Download PowerShell 7.2.11 LTS
- For Windows 11, 10, 8.1, and 7
- For MacOS
- For Linux
- How to Install PowerShell 7.3.4 or 7.2.11 LTS
- How to Uninstall PowerShell
- Final Analysis
Changes and Improvements
PowerShell 7.3.4
- [Engine Updates and Fixes]
- Added instrumentation to
AmsiUtiland make theinitvariable read-only. - Fixed support for
NanoServerdue to the lack of AMSI. - Adding missing guard for telemetry optout to avoid
NullReferenceExceptionwhen importing modules. - Fixed
VtSubstringhelper method to correctly check chars copied. - Fixed
ConciseViewto handle customParserErrorerror records.
- Added instrumentation to
- [Build and Packaging Improvements]
- Updated ThirdPartyNotices.txt.
- Updated cgmanifest.json.
- Fixed the template that creates Nuget packages.
- Updated the wix file.
- Update to .NET SDK 7.0.203.
- Skiped VT100 tests on Windows Server 2012 R2 as the console does not support it.
- Improved package management acceptance tests by not going to the gallery.
- Fixed stage dependencies and typos in the release build.
- Fixed issues in the release build and release pipeline.
- Restructured the package build to simplify the signing and packaging stages.
- Test fixes for stabilizing tests.
- Added stage for symbols job in Release build.
- Use reference assemblies generated by dotnet.
- Added URLs for all distributions.
PowerShell 7.2.11 LTS
- [Build and Packaging Improvements]
- Updated ThirdPartyNotices.txt.
- Updated cgmanifest.json.
- Fixed the template that creates Nuget packages.
- Updated the wix file.
- Updated .NET SDK to 6.0.408.
- Fixed the build script and signing template.
- Fixed stage dependencies and typos in the release build.
- Fixed issues in the release build and release pipeline.
- Restructured the package build to simplify the signing and packaging stages.
- Skipped VT100 tests on Windows Server 2012 R2 as the console does not support it.
- Improved package management acceptance tests by not going to the gallery.
- Tested fixes for stabilizing tests.
- Added stage for symbols job in Release build.
- Use reference assemblies generated by dotnet.
- Added URLs for all distributions.
- Updated the release pipeline to use Approvals and automate some manual tasks.
Let us continue to see how to download and install PowerShell 7.3.4 or 7.2.11 LTS.
Download PowerShell 7.3.4
You can download PowerShell 7.3.4 from the direct download links below.
For Windows 11, 10, 8.1, and 7
PowerShell-7.3.4 for Windows 64-bit.msi [101 MB]
PowerShell-7.3.4 for Windows 32-bit.msi [93.5 MB]
For MacOS
PowerShell-7.3.4 for MacOS 64-bit.pkg [65.3 MB]
PowerShell-7.3.4 for MacOS ARM64.pkg [62.4 MB]
For Linux
PowerShell-7.3.4 for RedHat Linux.rpm [67.9 MB]
PowerShell-7.3.4 for Debian.deb [68.4 MB]
For more download options, please check out this download page.
Download PowerShell 7.2.11 LTS
You can download PowerShell 7.2.11 from the direct download links below.
For Windows 11, 10, 8.1, and 7
PowerShell-7.2.11 for Windows 64-bit.msi [102 MB]
PowerShell-7.2.11 for Windows 32-bit.msi [92.9 MB]
For MacOS
PowerShell-7.2.11 LTS for MacOS 64-bit.pkg [63.7 MB]
PowerShell-7.2.11 LTS for MacOS ARM64.pkg [60.2 MB]
For Linux
PowerShell-7.2.11 LTS for RedHat Linux.rpm [66.6 MB]
PowerShell-7.2.11 LTS for Debian.deb [67.2 MB]
For more download options, please check out this download page.
How to Install PowerShell 7.3.4 or 7.2.11 LTS
Here is how you can install Windows PowerShell on Windows 11, 10, 8.1, and Windows 7:
-
Download and execute the respective MSI file from the links above.
The installation wizard will now run.
-
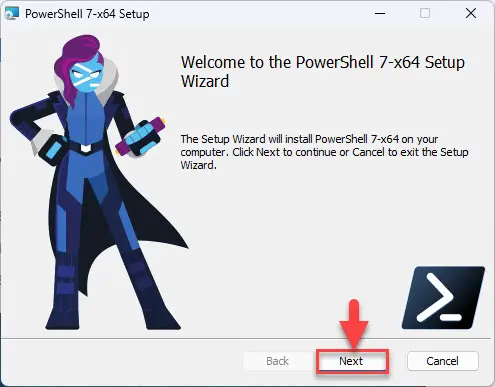
Click Next.
Proceed -
Select the destination folder for the installation and click Next.
Select installation directory -
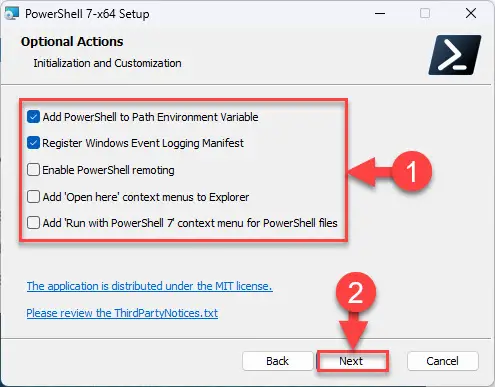
Select the optional features you want to install and click Next.
Select optional features to install Select the optional features to install, such as adding PowerShell to environment variables, enabling PowerShell remoting, adding PowerShell to the context menu, etc.
-
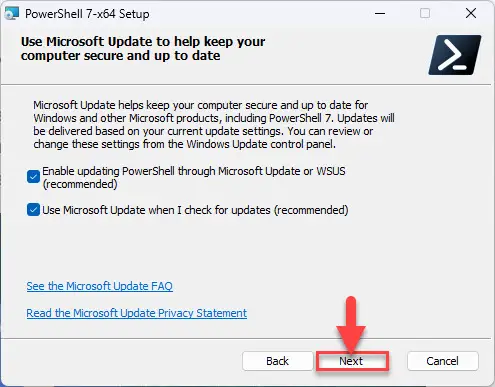
Click Next.
Leave default settings Leave default settings and proceed with the installation
-
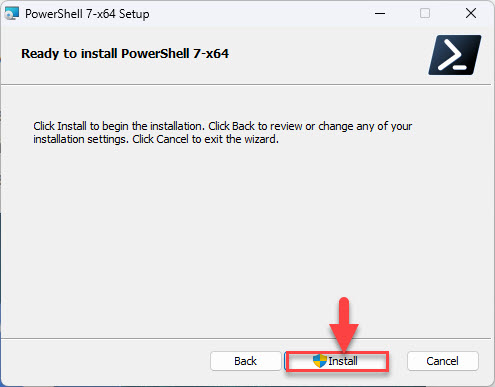
Click Install to begin the installation.
Begin installation -
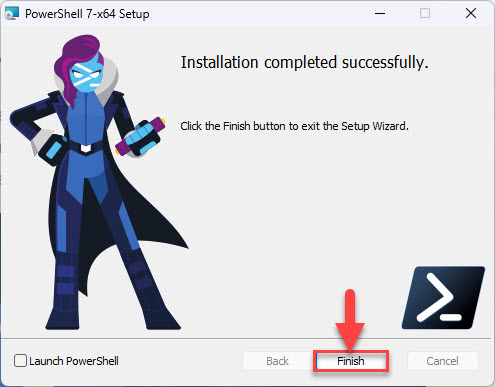
Once installed, click Finish.
PS 7.3.2 installed -
Now type in “pwsh” in the Run Command box to confirm the installation.
Confirm PowerShell has been updated
Learn more about PowerShell and PowerShell Core. You can also download and install PowerShell over the network.
How to Uninstall PowerShell
If you do not require PowerShell in the future then you may remove it from your computer. Here is how:
-
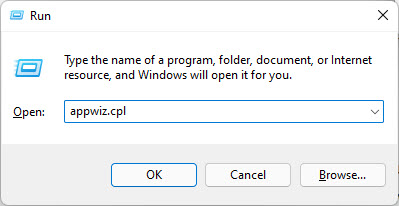
Open the Programs & Features applet by typing in appwiz.cpl in the Run Command box.
Open Programs & Features -
Right-click on the PowerShell version that you want to remove and then click Uninstall.
Uninstall PowerShell If asked for confirmation, click Yes.
The selected version of PowerShell will now be removed from your computer.
Final Analysis
The stable release of PowerShell 7.3.4 does not have any significant improvements over its previous versions. However, it is a significant upgrade if you are using PowerShell 6 or any older versions. Either way, there would be no harm in upgrading right now.
Additionally, since it is a stable release, most of the glitches and kinks would have already been addressed.
If you are a coder, we would suggest that you always test out the recent PowerShell releases to keep up with the latest features and improvements.
PowerShell 7 Release History
| Complete Version | Release Date | Significant Improvements | Changelog and Downloads |
| 7.3.6 | 13-Jul-23 | – General build and packaging improvements | PowerShell 7.3.6 complete changelog |
| 7.3.5 | 17-Jun-23 | – Includes general build and packaging improvements | PowerShell 7.3.5 complete changelog |
| 7.3.4 | 13-Apr-23 | – Includes engine updates and general build and packaging improvements | PowerShell 7.3.4 complete changelog |
| 7.3.3 | 23-Feb-23 | – General build and packaging improvements | PowerShell 7.3.3 complete changelog |
| 7.3.2 | 24-Jan-23 | -Includes engine, build, and general cmdlet updates | PowerShell 7.3.2 complete changelog |
| 7.3.1 | 13-Dec-22 | -Several packages updated along with versions -Some issues were fixed |
PowerShell 7.3.1 complete changelog |
| 7.3.0 | 8-Nov-22 | -Added test for the framework-dependent package in the pipeline -Fixes for building test artifacts -AzCopy has been removed |
PowerShell 7.3 complete changelog |
Ха. Я уже во всю тестирую Windows 10 .
А как у Вас с этим?
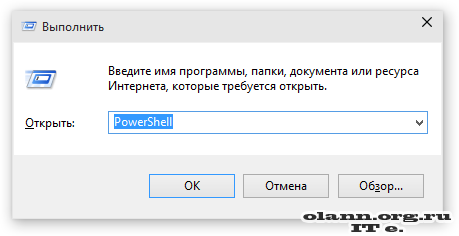
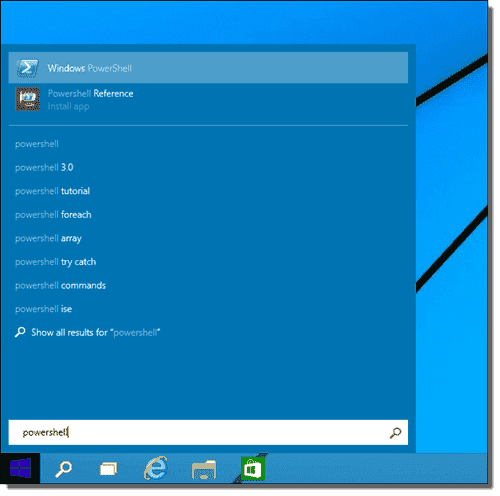
Итак во время работы я обнаружил что PowerShell запускается также по обычному — в окне выполнить «PowerShell»
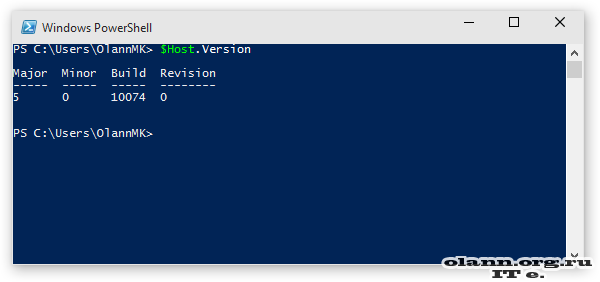
Стоит еще отметить, что в Windows 10 уже как и положено 5-я версия PowerShell
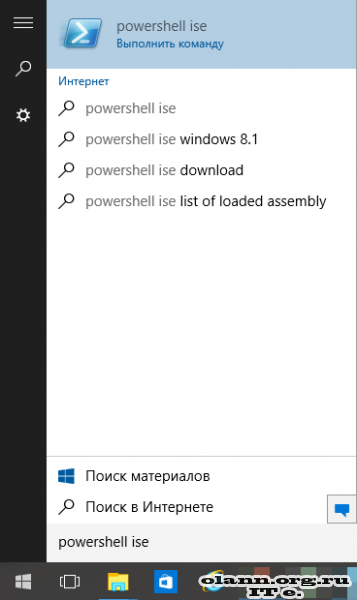
Но для разработки скриптов очень удобно использовать Виндовую утилиту ISE. Стоит отметить что по поиску в меню «Пуск» ярлыка ISE я так и не увидел
Но если в меню поиск правильно ввести команду «PowerShell ise«, то сначала запустится PowerShell, и в нем выполнится команда ise, которая запустит среду разработки
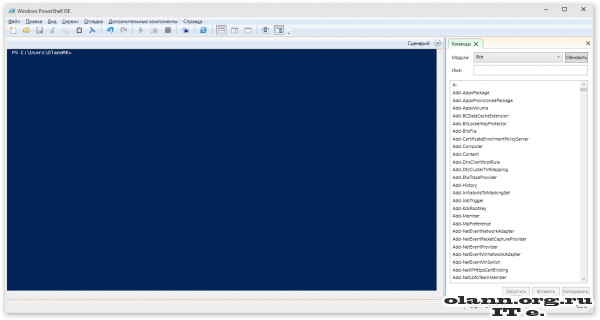
И Вот так выглядит эта среда:
Еще хочу отметить, что ярлык есть в панели управления по пути «Панель управления\Система и безопасность\Администрирование»
Собственно все что хотел сегодня Вам рассказать.
С уважением Ваш ИТ Инженер.
Are you wondering how you can start PowerShell ISE in Windows 10? This post is for you.
- Author
- Recent Posts
Michael Pietroforte is the founder and editor in chief of 4sysops. He has more than 35 years of experience in IT management and system administration.
Even though Microsoft significantly improved the shell interface of PowerShell in Windows 10, I still prefer PowerShell ISE for most command-line tasks. For some reason, Microsoft hid this nifty Integrated Development Environment (IDE) even better in Windows 10. If you type “PowerShell” in the Start menu search box, PowerShell ISE is missing. In this post, I will explain how you can change this behavior in Windows 10.
PowerShell ISE missing in Start search
However, if you just want to place the icon on your desktop, you don’t need this procedure. You can just right-click the Start button, launch the Control Panel from the WINX menu, and start typing “Administrative Tools.” In the Administrative Tools folders, you should be able to locate PowerShell ISE.
PowerShell ISE in Administrative Tools
If you prefer to start PowerShell ISE through the Start menu or Start screen, you have to enable the Show Administrative Tools feature.
If you enabled the Start screen, you have to change the tile settings. In Windows 8 and Windows 8.1, you had to open the Charms menu for this purpose. In Windows 10, you can just right-click the Start screen and then select Settings.
Settings on Start screen
In the Settings menu that pops up in the right sidebar, click Tiles.
Tiles settings
Now, you have to enable Show administrative tools.
Showing Administrative Tools
From now on, PowerShell ISE should pop up when you start typing “PowerShell” on the Start screen.
PowerShell ISE in Search
To be honest, I didn’t figure out by myself how to enable the Administrative Tools in Windows 10 in Start menu mode. Fortunately, Martin Goyer told me how. You have to right-click the Taskbar or an empty space in the Start menu and then select Properties. Then, you have to click the Customize button on the Start Menu tab.
Customize the Start menu
Scroll down to the end of the list and select System administrative tools.
Showing system administrative tools in Windows 10 Start menu
I have to admit, I don’t understand why Microsoft has hidden PowerShell ISE. If end users are not supposed to be bothered with administrative tools, why not also hide the PowerShell console?
The fact that you have to enable this feature in two completely different ways depending on whether you have enabled the Start menu or the Start screen is another good example of how incoherent the Windows 10 user interface is. Microsoft really has to make up its mind what kind of UI is best for Windows. Taking one step forward and two steps back with regard to the new UI will further hurt the Windows brand.

