Содержание
- Вариант 1: Закрепление любого окна
- Способ 1: PinWin
- Способ 2: DeskPins
- Способ 3: AutoHotKey
- Вариант 2: Закрепление отдельных программ
- Закрепление «Диспетчера задач»
- Закрепление проигрывателя Windows Media Player
- Закрепление плеера браузера
- Вопросы и ответы
Вариант 1: Закрепление любого окна
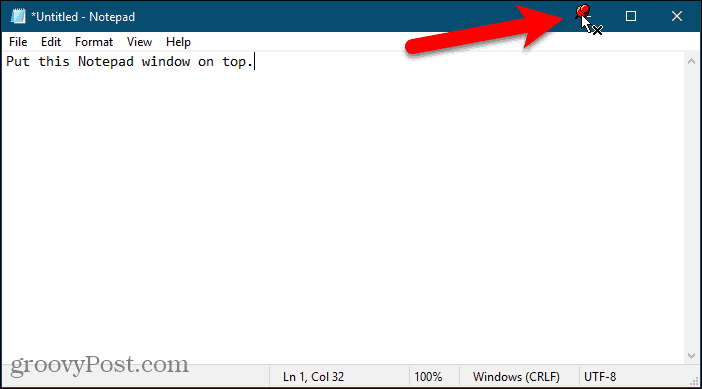
Чтобы закрепить окно Windows поверх остальных, потребуется воспользоваться сторонними утилитами, поскольку штатных средств для этого не предусмотрено. Разберем несколько бесплатных вариантов, которые позволят сделать так, чтобы любое окно системы и софта располагалось всегда поверх. Алгоритм зависит от выбранного средства: у некоторых утилит реализована функция горячих клавиш, у других – через меню в области уведомлений.
Способ 1: PinWin
PinWin – бесплатное приложение, с помощью которого можно закрепить любое окно поверх других, даже если оно неактивно. Работает через область уведомлений, где после инсталляции появится его иконка:
Скачать PinWin с официального сайта
- Скачайте установочный файл и запустите его, чтобы инсталлировать приложение на компьютер, следуя инструкциям пошагового мастера.
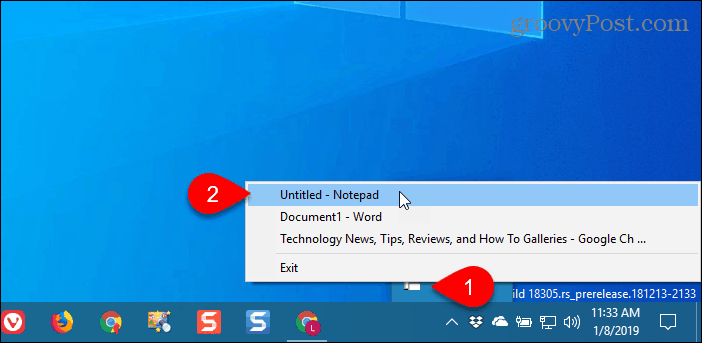
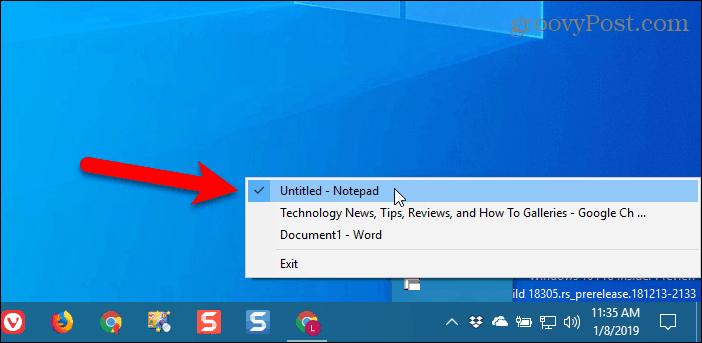
- В трее появится значок, стилизованный под канцелярскую кнопку, нажмите на него. Отобразится меню, где доступен список всех окон, которые запущены. Выберите из перечня нужное или воспользуйтесь пунктом «Select Window From Screen».
- То окно, которое нужно закрепить, будет подсвечиваться красным цветом. Щелкните левой кнопкой мыши, чтобы указать, что именно отобразится поверх остальных окон.

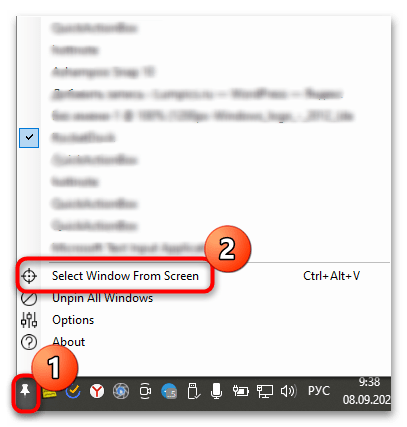
В утилите реализована горячая клавиша при выборе окна с рабочего стола: достаточно одновременно зажать «Ctrl + Alt + V».
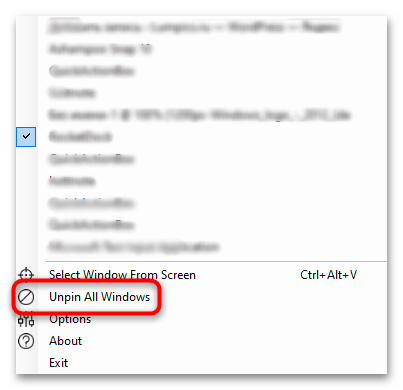
Несмотря на то, что интерфейс на английском языке, он интуитивно прост. При необходимости можно открепить сразу все окна, выбрав пункт «Unpin All Windows».
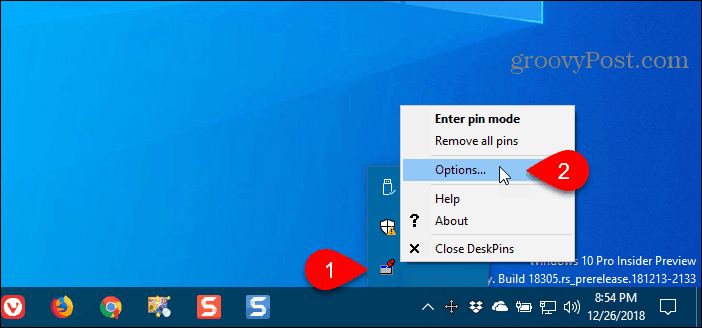
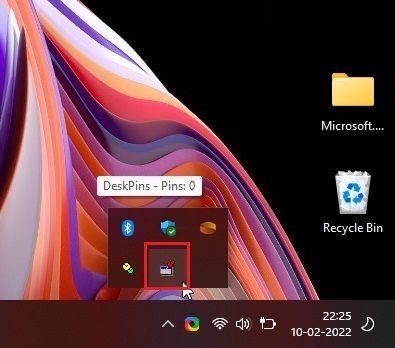
Способ 2: DeskPins
Еще одно решение, упрощающее работу с окнами в Windows 10, – это DeskPin. С помощью него можно без особых усилий закрепить любое окно поверх остальных:
Скачать DeskPins с официального сайта
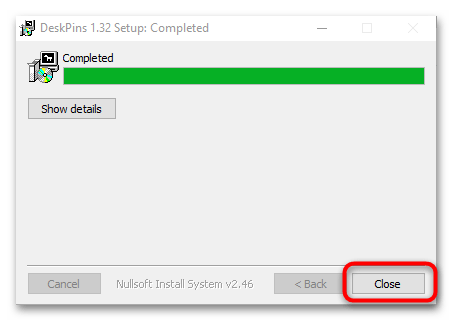
- Загрузите и установите DeskPins. После инсталляции нажмите на «Close» в окне пошагового мастера.
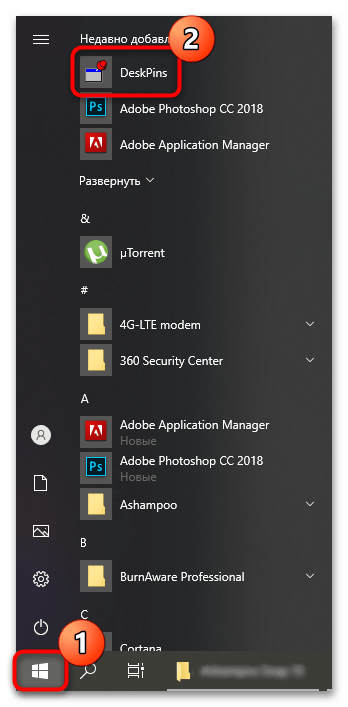
- Чтобы иконка приложения появилась на панели уведомлений, запустите его, отыскав в списке установленного софта.
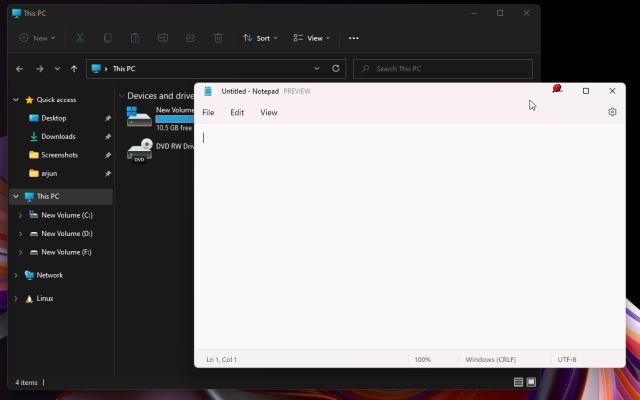
- Щелкните ЛКМ по значку на трее, и тогда курсор мыши преобразуется в значок канцелярской кнопки. Кликните по тому окну, которое надо закрепить. Вверху появится картинка в виде кнопки, указывающая, что окно располагается поверх остальных.

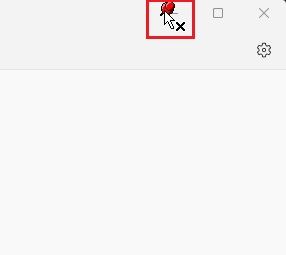
Чтобы открепить окно, наведите курсор на красный значок канцелярской кнопки. Появится иконка в виде крестика, после чего щелкните по нему ЛКМ.
Способ 3: AutoHotKey
AutoHotKey – удобная программа, с помощью которой пользователь может самостоятельно создавать различные скрипты для своих горячих клавиш. При этом они применяются не только в определенных приложениях, но и в операционной системе в общем. Создать скрипт, отвечающий за функцию «Всегда сверху» у активного окна, достаточно просто:
Скачать AutoHotKey с официального сайта
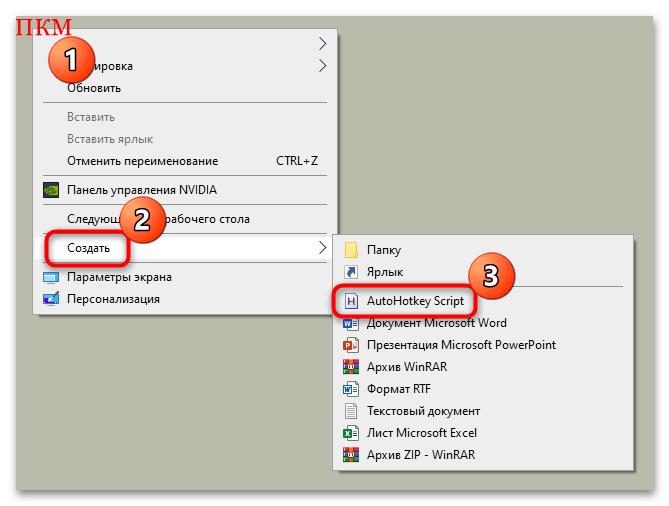
- После скачивания установочного файла запустите его. Его функции автоматически интегрируются в контекстное меню Windows 10. Щелкните правой кнопкой мыши по свободной области рабочего стола и в списке наведите курсор на пункт «Создать». В развернувшемся дополнительном меню нажмите на пункт «AutoHotkey Script».
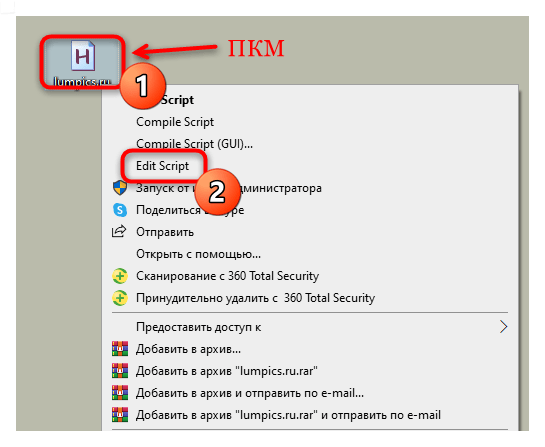
- Задайте имя скрипту, затем кликните по нему правой кнопкой мыши и выберите функцию «Edit Script».
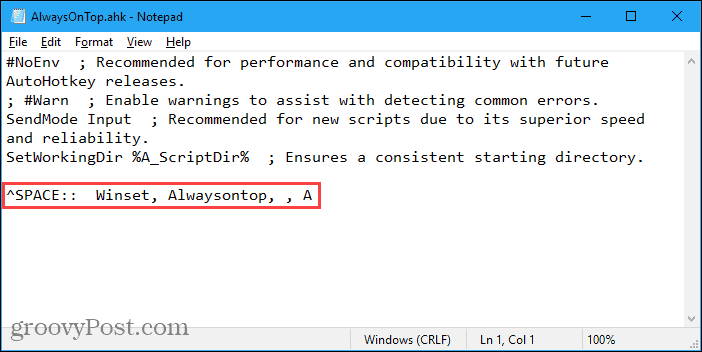
- По умолчанию запустится встроенный редактор «Блокнот». Не удаляйте уже введенные символы, а ниже пропишите команду
^+SPACE:: Winset, Alwaysontop, , A. - Нажмите на вкладку «Файл» и выберите пункт сохранения.

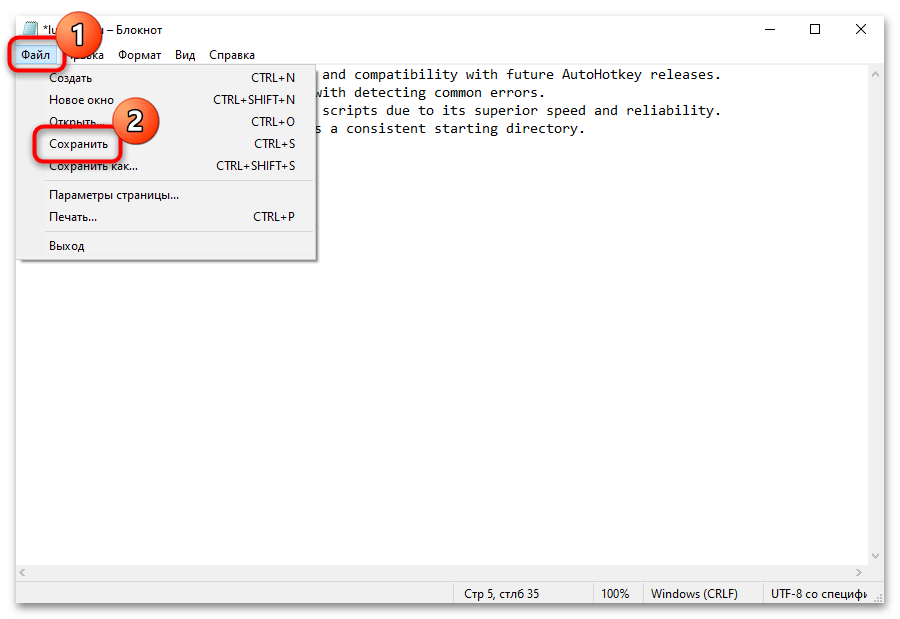
Затем потребуется запустить файл скрипта двойным нажатием ЛКМ. Теперь, когда открыто окно, которое нужно закрепить, достаточно использовать комбинацию клавиш «Ctrl + Shift + Space».
Вместо «Space» можно задать любую клавишу, вписав ее в файле скрипта, открытом в «Блокноте».
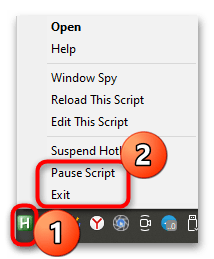
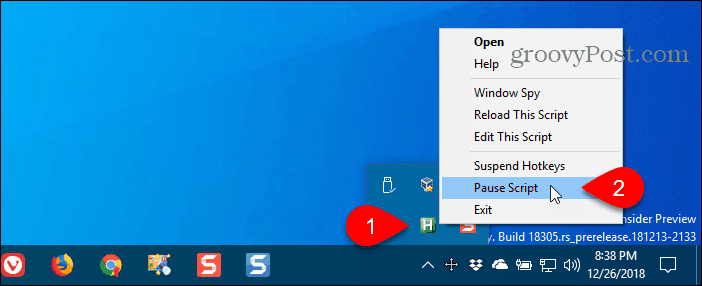
Чтобы остановить работу скрипта, достаточно в трее щелкнуть по его иконке правой кнопкой мыши и выбрать пункт «Exit». Также можно поставить его на паузу, воспользовавшись параметром «Pause Script».
Вариант 2: Закрепление отдельных программ
Встроенных в Windows средств закрепления окон, как вы уже понимаете, нет — лишь только пара системных приложений умеет выносить себя на первый план. Кроме того, если говорить о функциях самой программы, браузеры сейчас позволяют выносить окно плеера отдельно, и оно по умолчанию закрепляется поверх всех окон.
Закрепление «Диспетчера задач»
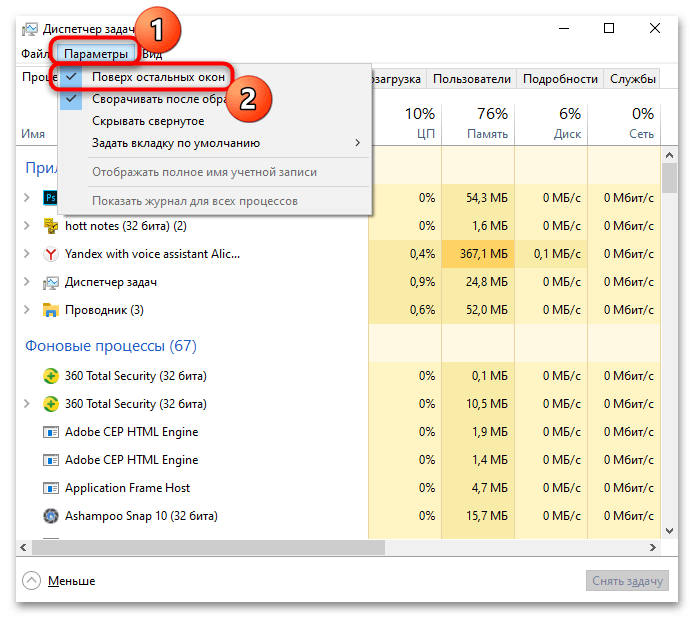
Штатное средство «Диспетчер задач» позволяет отслеживать работу активных процессов и производительность системы в целом, поэтому иногда важно, чтобы окно приложения было на виду. Разработчики предусмотрели такую возможность: для этого достаточно в запущенном «Диспетчере задач» кликнуть по вкладке «Параметры», затем отметить пункт «Поверх остальных окон».
Читайте также: Методы запуска «Диспетчера задач» в Windows 10
После этого «Диспетчер задач» будет всегда находиться сверху. Его размер можно уменьшить, если навести курсор на границу интерфейса, чтобы он преобразился в стрелку с двумя концами. Удерживая левую кнопку мыши, перетащите границу окна, пока оно не примет нужный размер.
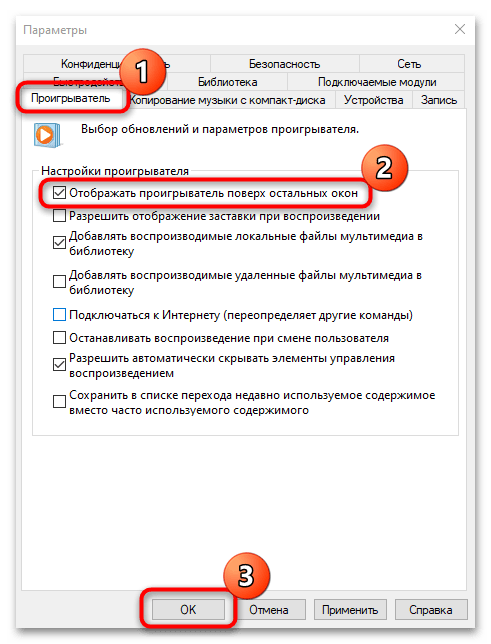
Закрепление проигрывателя Windows Media Player
Встроенный мультимедийный проигрыватель Windows Media Player также предусматривает функцию «Окно в окне», то есть при которой он будет закреплен на экране:
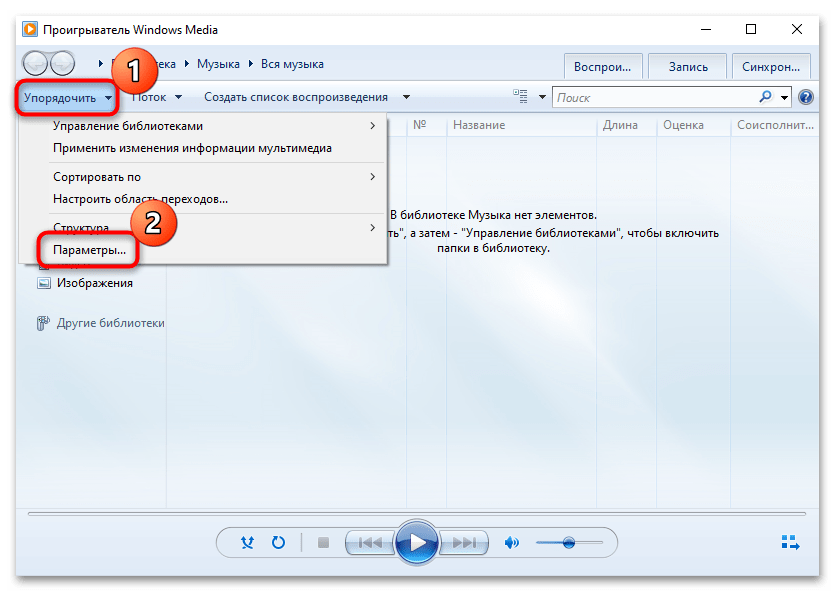
- В запущенном приложении нажмите на кнопку «Упорядочить» и из меню выберите пункт «Параметры».
- В новом системном окне перейдите на вкладку «Проигрыватель» и поставьте галочку около опции «Отображать проигрыватель поверх остальных окон». Кликните по «ОК», чтобы применить изменения.
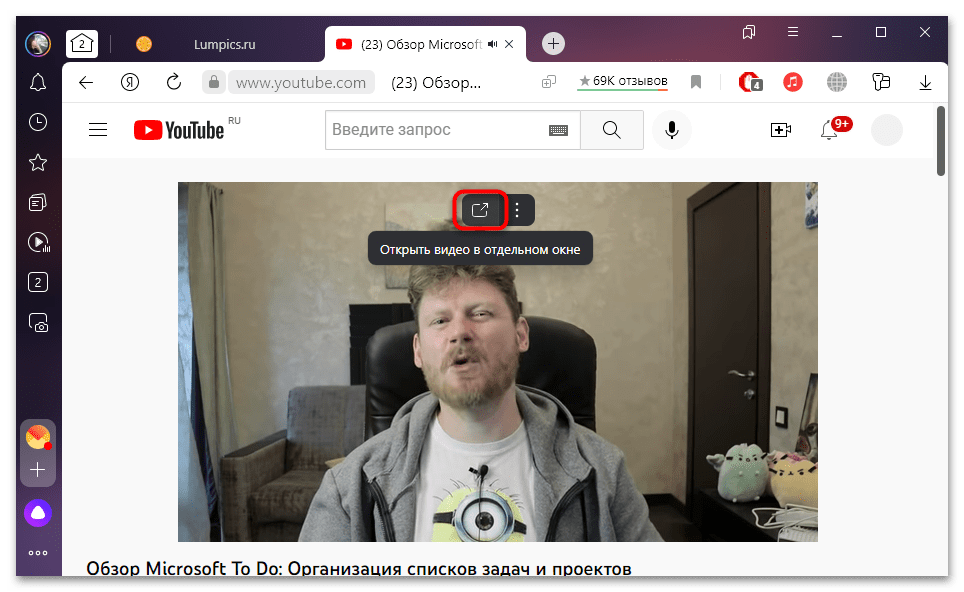
Закрепление плеера браузера
Некоторые браузеры имеют встроенную функцию «Окно в окне», что удобно при просмотре видеоконтента с сайтов или специальных сервисов. Во время воспроизведения через встроенный проигрыватель на ресурсе в этом случае нужно нажать на специальную иконку, запускающую плеер в отдельном окне, которое по умолчанию поверх остальных. Это доступно в таких обозревателях, как Яндекс.Браузер, Opera, встроенном Microsoft Edge.
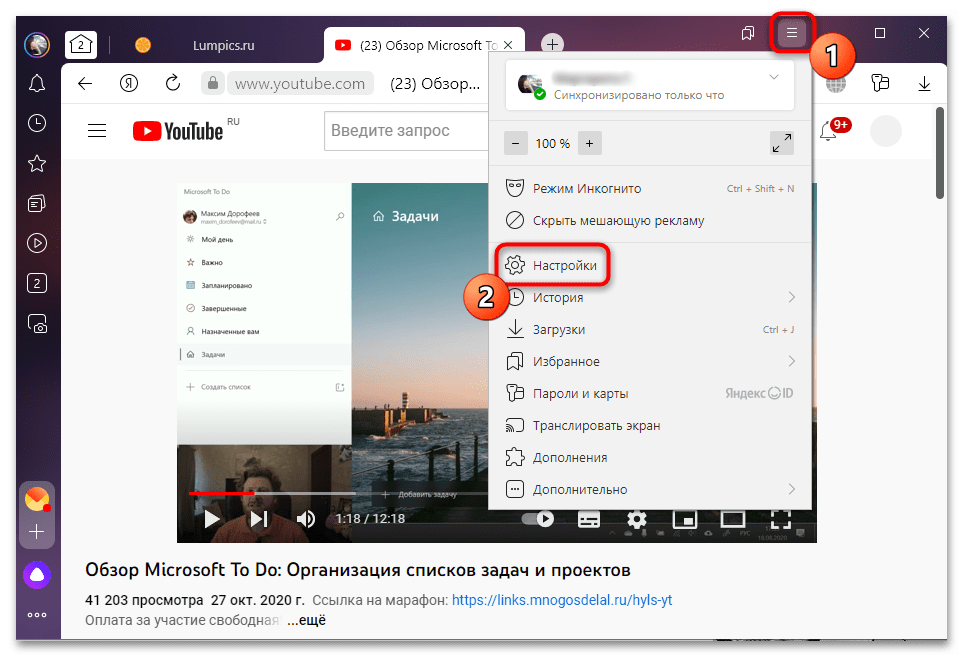
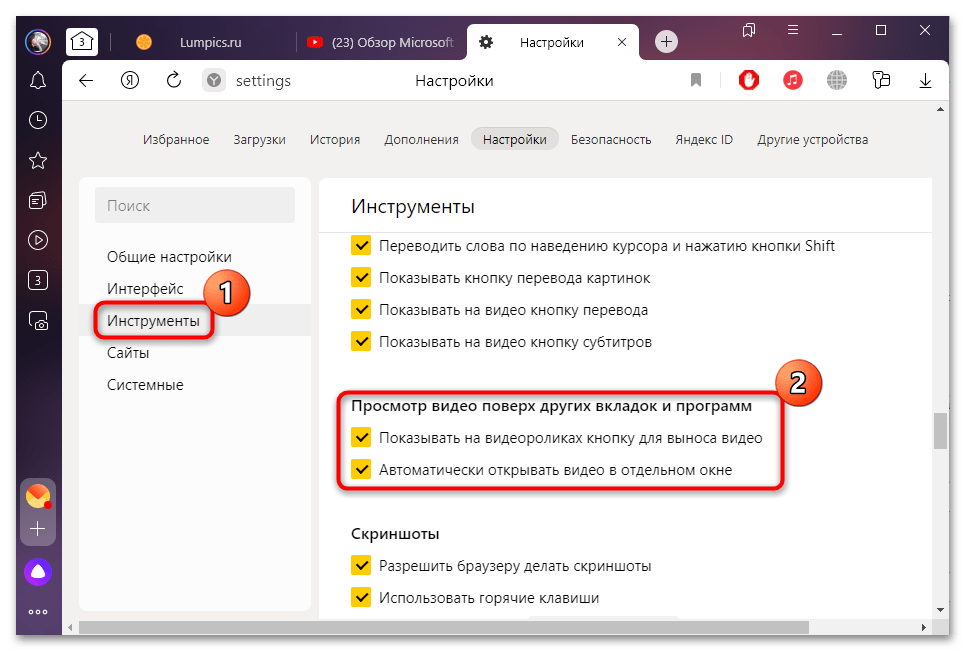
Если в «Яндекс.Браузере» нет значка для выноса видео в отдельном окне поверх остальных, то эту функцию потребуется активировать вручную:
- Откройте раздел «Настройки», нажав на три вертикальные полоски на верхней панели.
- На вкладке «Инструменты» найдите блок «Просмотр видео поверх других вкладок и программ». Отметьте опцию «Показывать на видеороликах кнопку для выноса видео».
Are you finding yourself constantly frustrated while multitasking on your Windows 10 computer? Do you often need to keep an important window from getting lost behind other windows, but you don’t know how? If so, then you’re in the right place! In this article, you will learn exactly how to pin a window on top in Windows 10. With just a few simple steps, you can make sure that your window will stay on top of other windows and never get lost again. Let’s get started!
To Pin a Window on Top Windows 10, follow these steps:
- Right-click on the window title bar.
- Choose the “Always on Top” option from the context menu.
- The window will stay pinned on top of other windows.
This feature is available in all Windows versions after Windows 7.

Pinning a Window on Top of Windows 10
Pinning a window on top of Windows 10 is a great way to keep a particular window open and accessible as you work with other windows. It’s especially useful when you’re working with multiple programs and need to keep an eye on one program while working in another. Here’s how to get started.
Step 1: Locate the Target Window
The first step is to locate the window you want to pin to the top of your Windows 10 desktop. You can find the window by using the taskbar or by using the Task Manager. The Task Manager is a powerful tool that allows you to view and manage running programs and processes. To open the Task Manager, press the Windows key + X and select Task Manager.
Once the Task Manager is open, you can select the window you want to pin to the top of your desktop. To do this, click the “Processes” tab and locate the window you want to pin. Once you’ve located the window, right-click it and select “Pin to top” from the menu.
Step 2: Pin the Window to the Top
Now that you’ve located the window you want to pin to the top of your Windows 10 desktop, you can pin it. To do this, right-click the window and select “Pin to top” from the menu. This will make the window stay on top of other windows, even when you switch to another window.
Step 3: Keep the Window on Top
Once you’ve pinned the window to the top of your desktop, you can keep it there by selecting the “Always on top” option in the window’s menu. This will keep the window on top of other windows even when you switch to another window.
Step 4: Unpin the Window
If you want to unpin the window from the top of your desktop, you can do so by right-clicking the window and selecting “Unpin from top” from the menu. This will remove the window from the top of your desktop and allow you to switch to another window.
Step 5: Pin the Window Again
If you want to pin the window back to the top of your desktop, you can do so by right-clicking the window and selecting “Pin to top” from the menu. This will make the window stay on top of other windows, even when you switch to another window.
Related FAQ
1. What is Pin on Top?
Pin on Top is a Windows 10 feature that allows you to keep a window in the foreground of your computer screen. It will stay in the same position, regardless of what other windows or programs you may have open. This feature is especially useful when you need to keep a certain window visible, such as a chat window or a document that you are working on.
2. How do I Pin a Window on Top of Windows 10?
To pin a window on top of Windows 10, you will need to right-click on the title bar of the window that you would like to pin. From the menu that appears, select the option “Pin on Top.” The window will now remain in the foreground, regardless of what other windows or programs you may have open.
3. What are the Benefits of Pinning a Window on Top?
The primary benefit of pinning a window on top is that it allows you to keep a certain window visible, regardless of what other windows or programs you may have open. This can be especially useful for keeping track of certain documents or conversations that you need to have visible at all times. It can also help to keep your workflow organized, as you can keep the window you need on top, while still having access to other windows or programs.
4. Is There a Limit to How Many Windows I Can Pin on Top?
No, there is no limit to how many windows you can pin on top. You can pin as many windows as you like and they will all remain in the foreground. However, it is important to note that if you have too many windows pinned on top, your computer may start to run slowly and become unresponsive.
5. Can I Unpin a Window Once I Have Pinned It on Top?
Yes, you can unpin a window once you have pinned it on top. To do this, simply right-click on the title bar of the window that you would like to unpin and select the option “Unpin from Top.” This will remove the window from the foreground, allowing you to open and view other windows or programs.
6. Is Pinning a Window on Top Available on All Versions of Windows?
Yes, pinning a window on top is available on all versions of Windows 10. This feature was first introduced in Windows 8 and has been included in all subsequent versions of Windows 10. It is a useful feature that can help to keep your workflow organized and keep certain windows visible at all times.
How To Pin A Window On Top In Windows 10 (2023)
There you have it! Now you know how to pin a window on top of Windows 10. It’s an incredibly simple process that will save you time and effort. So don’t wait any longer, start pinning your most-used windows to the top of your desktop today!

When working with multiple windows in Windows 10, you might want to keep a window always on top for easy reference. Learn three different ways of accomplishing this.
When you are working in Windows with limited screen space, it’s useful to have certain windows stay on top of others. Some programs in Windows automatically incorporate this “always on top” feature, but most programs don’t, and Windows doesn’t include this feature either.
Today we’ll cover three ways to easily add the “always on top” feature to every single program in Windows.
1. Use a Keyboard Shortcut with an Always on Top AutoHotkey Script
AutoHotkey is a free program that allows you to create scripts to perform multiple actions with a single keyboard shortcut. It runs in the background and sits in the system tray.
We’re going to use AutoHotkey to create a script that will keep a selected window on top of all others when you press Ctrl + Spacebar when that window is active. We’ll show you the script and explain how it works. But we’ll also provide a downloadable AutoHotkey script file you can use.
Download and install AutoHotkey and then run it.
Download the AlwaysOnTop.ahk script file, extract the .zip file, and put the script in a folder on your hard drive that won’t be moved or deleted.
The script contains some comments and then the following command:
^SPACE:: Winset, Alwaysontop, , A
This command sets the currently active window to always be on top when you press Ctrl + Spacebar. If you’d rather use a different key combination, you can change the first part of the command, “^SPACE“. The “^” character represents the Ctrl key. You’ll find the symbols to use for other hotkeys in the Hotkey Modifier Symbols section on this AutoHotkey help page.
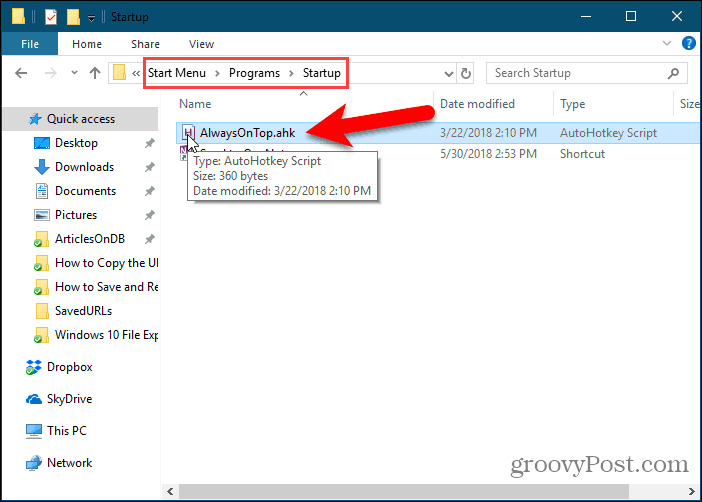
You can put the script in the Windows startup folder (%AppData%\Microsoft\Windows\Start Menu\Programs\Startup), so it starts automatically when Windows starts.
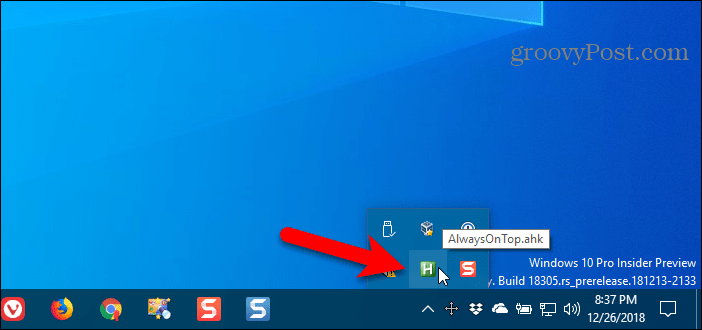
The AutoHotkey script stays in the system tray.
To make the active window always on top, press Ctrl + Spacebar (or the keyboard shortcut you assigned). Press the keyboard shortcut again to disable “always on top” for the active window.
For script options, right-click on the AutoHotkey icon in the system tray.
2. Use Your Mouse with DeskPins
DeskPins provides pins you can grab and use to keep any window on top of all other windows. The program sits in the system tray and uses minimal resources.
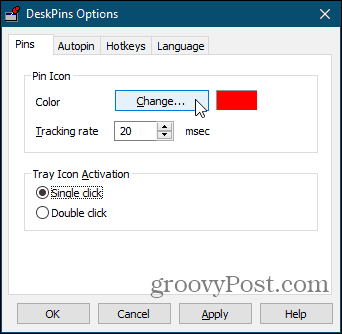
Download and install DeskPins. Run the program, right-click the icon in the system tray, and select Options to change the Pins, Autopin, and Hotkeys settings.
On the Pins tab, you can change the color of the pins. The Tracking rate controls how often each pin checks the pinned window’s position and state. Lower values make the pins more responsive. You can enter any number from 10 to 1000 msec (milliseconds).
If you have an older computer, you may want to increase the Tracking rate number to avoid slowing down your computer.
You can also choose Single click or Double click under Tray Icon Activation to indicate how you get pins from the DeskPins system tray icon. The default is Single click.
You can have DeskPins automatically pin certain types of windows using rules on the Autopin tab.
Check the Enable box and then click Add to add a new rule. Use the checkboxes next to the rules to enable and disable individual rules.
Click Help to access the DeskPins help file for more information about automatically pinning windows.

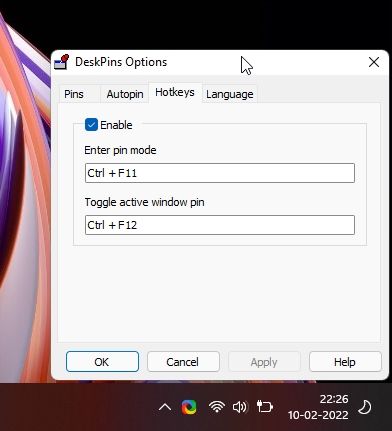
DeskPins provides default shortcuts for entering pin mode and toggling the active window pin. You can change these shortcuts on the Hotkeys tab.

To pin a window on top, click (or double-click, depending on the setting) the DeskPins icon in the system tray.
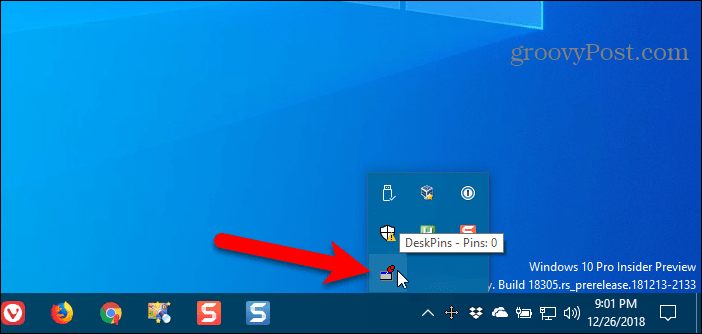
Then, click the title bar on the window you want to keep always on top.
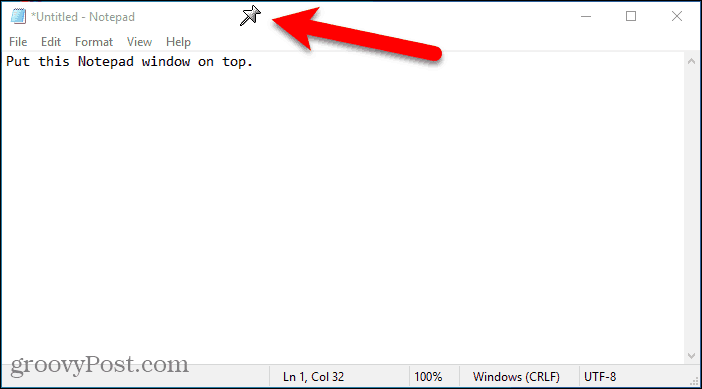
A pin displays on the title bar of the chosen window in the color you specified, or in the default color red.
Click the pin again to disable always on top for the window.
3. Use a System Tray Menu with TurboTop
TurboTop also sits in your system tray like DeskPins. But it operates differently.
Download and install TurboTop. Then, run the program.
To keep a window always on top, click the TurboTop icon in the system tray. A list of all open windows displays. Select the title of the window you want.
Any windows you choose to be always on top are indicated with a checkmark on the TurboTop menu.
To stop keeping a window always on top, click the TurboTop icon in the system tray and select that window again, so there’s no checkmark next to the window name on the menu.
Bring the Always-on-Top Feature to All Windows
Whether you like using keyboard shortcuts or prefer using the mouse, there’s an easy solution for keeping windows always on top. If you’ve found other options for keeping windows always on top, let us know in the comments.
![]()
If you are like me and have a ton of windows open on your desktop, you might be looking for an app that lets you pin a window that stays on top of everything. I usually keep my text editor on top of all the windows while doing research work. It helps make my workflow much more productive. We have been waiting for a built-in always-on-top feature in Windows for the longest time, but even Microsoft’s latest desktop OS, Windows 11, does not come with it. Nevertheless, we have found two easy ways to keep a window always-on-top in Windows 11. And well, one of the solutions comes directly from Microsoft. So without any wait, let’s go through the tutorial.
As mentioned above, we have added two nifty methods to keep a window always-on-top on Windows 11. Both the programs are free and work great on Windows 11. You can expand the table below and move to the program you wish to check out.
Method 1: Keep a Window Always-on-Top with Microsoft PowerToys
Microsoft has released an update for PowerToys that brings the much-needed Always-on-top feature to Windows 11. The best part is that instead of manually pinning a window, PowerToys lets you pin a window on top with a keyboard shortcut. So yeah, you can enable always-on-top for a particular window in a jiffy and turn it off with ease. Here is how to set it up.
1. First, go ahead and download PowerToys from its GitHub page. You should download the latest EXE file. Apart from that, you can also install PowerToys from Microsoft Store (Free).
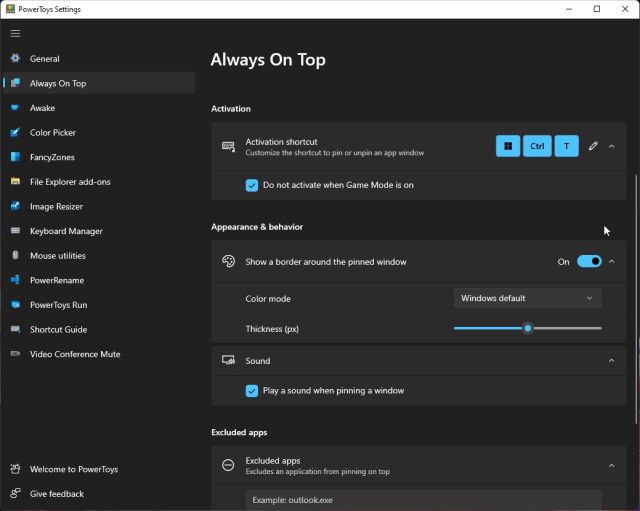
2. After the installation, open PowerToys from the Start menu. Then, move to the “Always On Top” section from the left sidebar and turn on the toggle. That’s it.
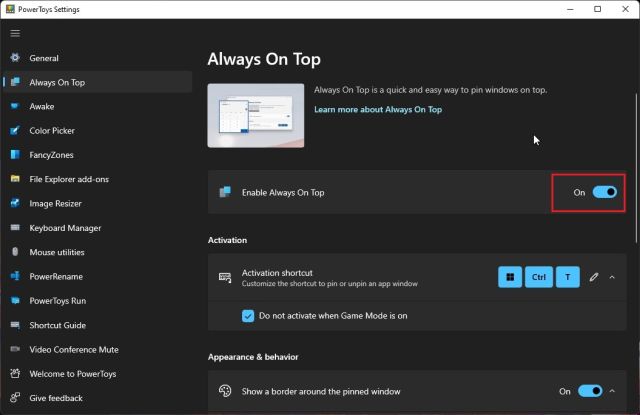
3. To test the feature, select a window and press “Windows + Shift + T” simultaneously, and that window will be pinned on top right away. That’s amazing, right? To turn it off, press the same shortcut, and you are done. By the way, you can also pin multiple windows on top.
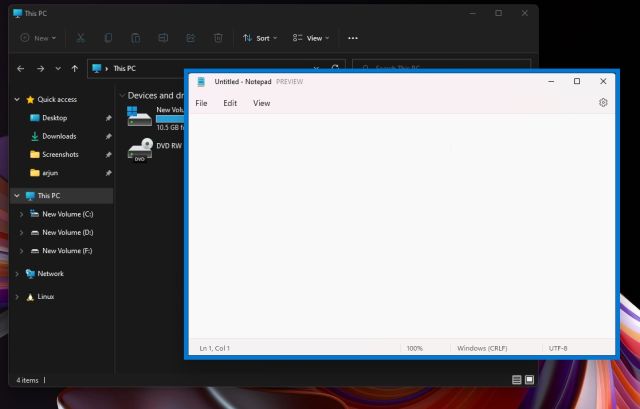
4. In case you don’t like the big bold borders around the window, you can disable it from PowerToys. Toggle off the “Show a border around the pinned window” feature. There is also an option to change the hotkey, disable the sound, and add apps to be excluded from pinning on top. As a side note, if you love PowerToys, you can also use it to get a universal mute switch on Windows 11.
Method 2: Keep a Window Always-on-Top with DeskPins
Apart from PowerToys, there is the DeskPins app that does the job of pinning windows on top quite well. It’s a free and open-source app that is lightweight (just 104KB in size) with support for multiple window pinning and a keyboard shortcut. Simply follow the below instructions to set it up.
1. Head over to this link and download DeskPins on your Windows 11 PC. After that, install the program.
2. Next, open the program from the Start menu. You will find the app running under the System tray.
3. Click on it, and the mouse cursor will turn into a pin. Click on the window you wish to pin on top, and there you have it. You have now successfully pinned a window always-on-top using this app.
4. To remove the pinned window, hover your mouse on the pin and click the cross button that appears.
5. There are also keyboard shortcuts available here. Press “Ctrl +F11” to pin a window on top and press “Ctrl + F12” to disable it. You can customize the shortcuts by right-clicking on the app and navigating to “Options -> Hotkeys”.
Pin a Window on Top in Windows 11 with Ease
So these are the two best ways to pin any window always-on-top in Windows 11. Earlier, I was using the third-party program, but with the latest release of PowerToys, things have changed significantly. Microsoft’s implementation is frictionless, and in my brief testing, it worked seamlessly on my Windows 11 laptop. Anyway, that is all from us. If you are looking for the best live wallpaper apps for Windows 11, check our linked list. And in case you want to diagnose your PC to fix programs or remove malware, learn how to start Windows 11 in safe mode. Lastly, if you have any questions, comment them down below, and we will help you out.
24.07.2023
К большому сожалению, Windows почему-то не предлагает штатные средства для того, чтобы можно было закрепить любое окно поверх остальных. Да, некоторые программы (например, AIMP или VLC) имеют опцию «всегда сверху», доступную через настройки, но таких программ очень мало. Остается решать данную проблему своими силами.
- Недостатки софта для закрепления окон
- «Always on top» при помощи AutoHotkey
- Создание скрипта
- Проверка работы скрипта
- Ставим скрипт в автозагрузку
- Краткий FAQ по AutoHotkey
Недостатки софта для закрепления окон
Существует целый ряд софта, как платного, так и бесплатного для того, чтобы закрепить любое окно поверх всех остальных окон в Windows. Наиболее популярными являются:
- DeskPins
- TurboTop
- Microsoft PowerToys
- OnTopper
- PinWin
Однако эти решения имеют недостатки, из-за которых лично я, исходя из своего опыта, не рекомендую ими пользоваться. Например, DeskPins последний раз обновлялась в феврале 2015 года, TurboTop – в 2016. Я пользовался утилитой DeskPins на десятке много лет, пока не столкнулся с тем, что она начала глючить и некорректно себя вести с окнами самых разных программ.
Тогда я перешел на Microsoft PowerToys, которая имеет функцию закрепления любого окна поверх других. Однако это решение я считаю неоптимальным, потому что это все равно как устанавливать Photoshop всего лишь для того, чтобы просто изменить размер одной картинки. Программа PowerToys весит более двухсот мегабайт и помимо «always on top» имеет еще два десятка других возможностей (о них я подробно рассказывал), большинством из которых вы скорее всего никогда не будете пользоваться. Зачем захламлять жесткий диск и замедлять систему лишними трудоемкими процессами, постоянно висящими в памяти?
Оптимальным решением лично я считаю использование утилиты AutoHotkey, про которую я тоже уже рассказывал ранее. Она весит чуть более 3 Мб и позволяет запускать выполнение любых действий в Windows путем нажатия шоткатов. Например, изменить язык раскладки клавиатуры нажатием всего одной клавиши. И всё это доступно бесплатно любому пользователю.
«Always on top» при помощи AutoHotkey
Прямо сейчас я расскажу, как при помощи AutoHotkey можно написать небольшой скрипт, чтобы одним нажатием определенных сочетаний клавиш на клавиатуре закрепить любое открытое окно поверх других.
Итак, для начала надо скачать утилиту AutoHotkey на свой компьютер и установить её (выбирайте для скачивания версию 1.1.).

Создание скрипта
Для создания нового скрипта надо сделать следующие:
- Кликните правой клавишей мыши в любом месте рабочего стола
- Выберите «Создать – AutoHotkey Script»
- Можно присвоить скрипту любое имя либо оставить по умолчанию

Откройте созданный скрипт в любом текстовом редакторе, например Блокноте. Скопируйте и вставьте в него следующую запись:
^SPACE:: Winset, Alwaysontop, , A
Должно получиться вот так:

Сохраните скрипт (CTRL + S) и запустите его двойным кликом мыши. Вы будете знать, что скрипт работает, по соответствующему значку на панели задач.
![]()
Проверка работы скрипта
- Запустите любую программу
- Сделайте её окно активным (оно должно быть на переднем плане, поверх всех остальных)
- Нажмите на клавиатуре сочетание клавиш CTRL + Пробел
- Окно будет закреплено поверх всех других окон
- Чтобы открепить окно, снова нажмите CTRL + Пробел
Отныне при помощи указанного сочетания клавиш вы можете нажать настроить любое активное в данный момент окно любой программы таким образом, чтобы оно всегда было сверху.
Ставим скрипт в автозагрузку
Последнее, что нужно сделать – поместить файл созданного нами скрипта в автозагрузку, чтобы он запускался автоматически при каждом старте Windows. Для этого переносим файл в папку C:\Пользователи\ИмяПользователя\AppData\Roaming\Microsoft\Windows\Start Menu\Programs\Startup
Не забудьте включить в проводнике отображение скрытых элементов, чтобы найти указанные выше системные папки.
Краткий FAQ
Сколько памяти потребляет скрипт для закрепления окон?
AutoHotkey очень нетребовательна к ресурсам компьютера и потребляет в фоне очень мало оперативной памяти – чуть более 1 Мб. Данный процесс никак не замедляет работу ПК, поэтому программу можно спокойно использовать даже на самых слабых машинах.
Можно ли дополнить уже имеющийся скрипт AutoHotkey?
Что делать, если вы уже знакомы с программой AutoHotkey и давно пользуетесь каким-либо скриптом? Создавать новый файл скрипта для функции «всегда сверху»? Нет, в этом нет необходимости. Просто дополните уже имеющийся у вас скрипт приведенной выше записью для закрепления окон.
Вот пример того, как выглядит мой файл:

Иными словами, в одном файле вы можете прописать столько разных скриптов сколько нужно — их выполнение не будет конфликтовать друг с другом.
Можно ли изменить сочетание клавиш для расположения поверх других окон?
Если вам не нравится сочетание Ctrl+Space, вы можете задать любые другие клавиши. Для этого рекомендую изучить документацию AutoHotkey по этому вопросу. https://www.autohotkey.com/docs/v1/KeyList.htm
Похожие публикации:
- Как отобразить секунды в часах на панели задач Windows 10
- Решение проблемы с ошибкой 80240020 при обновлении Windows 10
- 3 способа изменить шрифт в Telegram
- Как самому сделать дизайн квартиры онлайн: от рисования плана до расстановки мебели
- Хостинг Timeweb: оно Вам надо?
Понравилось? Поделитесь с друзьями!

Сергей Сандаков, 43 года.
С 2011 г. пишу обзоры полезных онлайн сервисов и сайтов, программ для ПК.
Интересуюсь всем, что происходит в Интернет, и с удовольствием рассказываю об этом своим читателям.