В Windows Server 2008/2012 для установки различных «пользовательских» элементов системы, таких как темы оформления, проигрыватель Media Player, Disk Cleanup, стандартная утилита просмотр изоражений (Photo Viewer) было необходимо устанавливать отдельный компонент Desktop Experience. В Windows Server 2016 отдельного компонента Desktop Experience нет, и подразумевается, что при установке ОС в режиме Server with GUI, этот компонент уже включен в состав системы. Однако в ОС кроме Paint (с ним ассоциированы все графические файлы) отсутствует другие просмотрщики изображений.
Все бы ничего, но что делать в случае использования сервера в качестве хоста RDSH (Remote Desktop Services Host), ведь в силу своей профессиональной деятельности некоторым пользователям просто необходим простой и удобный просмотрщик графических файлов. Конечно, можно установить стороннее приложение, типа IrfanView или аналогов, но неужели нельзя реализовать это штатными средствами системы ?!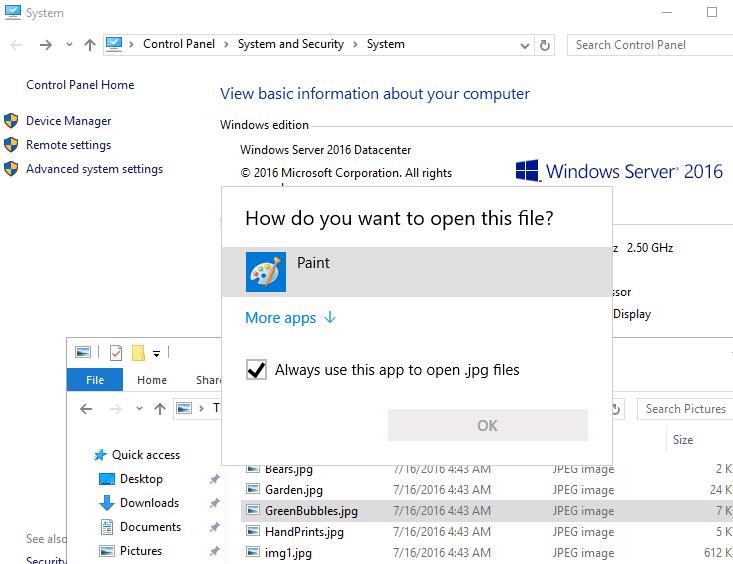
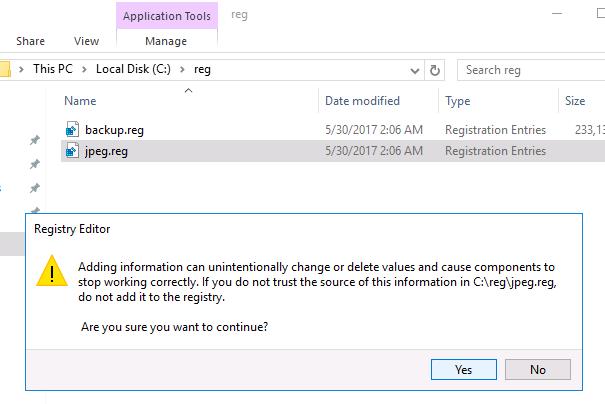
На самом деле в Windows Server 2016, как и в Windows 10 имеются необходимые библиотеки Windows Photo Viewer, но отсутствуют нужные файловые ассоциации. Чтобы исправить это недочет, можно воспользоваться небольшими reg файлами, которые ассоциируют jpeg и png файлы с библиотекой Windows Photo Viewer,
Скачать ZIP архив с reg файлами для ассоциации четырех типов расширений (*.jpg,*.jpeg,*.jpe и *.png) можно по ссылке: PhotoViewer2016.zip
После этого достаточно распаковать архив, дважды щелкнуть по каждому файлу и импортировать содержимое reg файлов в реестр системы.
 Сразу после этого (не нужно перезагружать сервер), при попытке открыть графический файл в сессии Windows Server 2016 будет автоматически открываться знакомое окно стандартного Windows Photo Viewer.
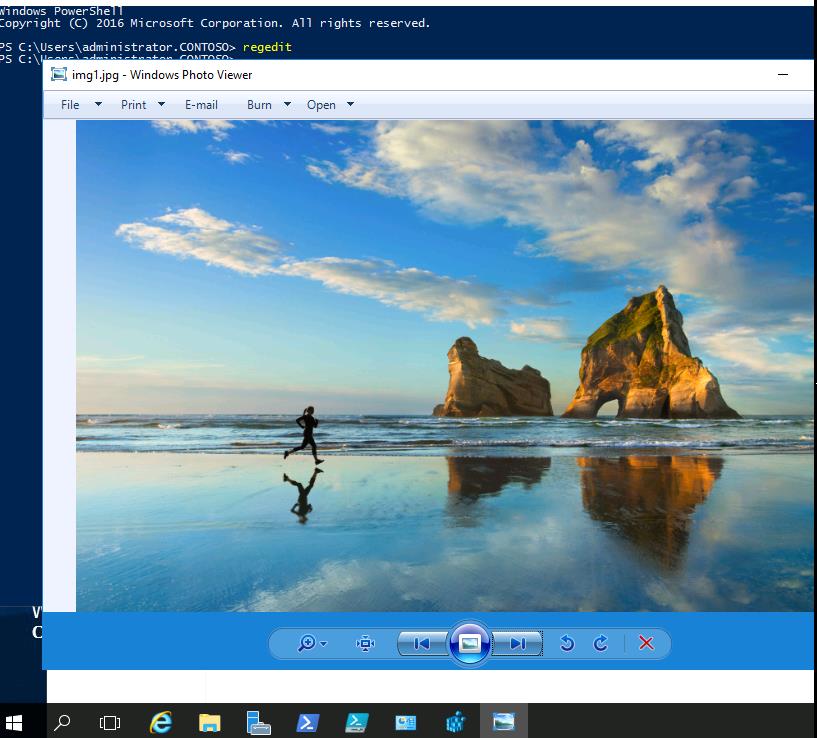
Примечание. На основе данных файлов можно настроить ассоциации Photo Viewer и для других расширений файлов с графикой (tif, bmp и т.д.). Достаточно открыть любой из reg файлов в текстовом редакторе, заменить к примеру jpeg на bmp и импортирвать новый reg файл в реестр.
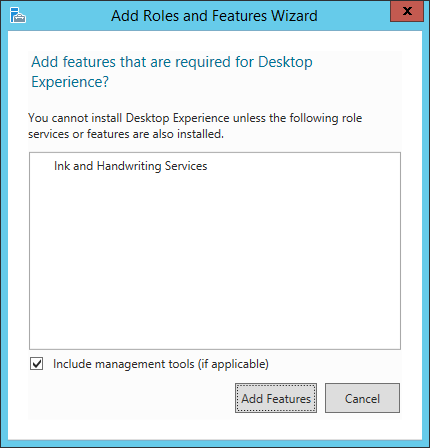
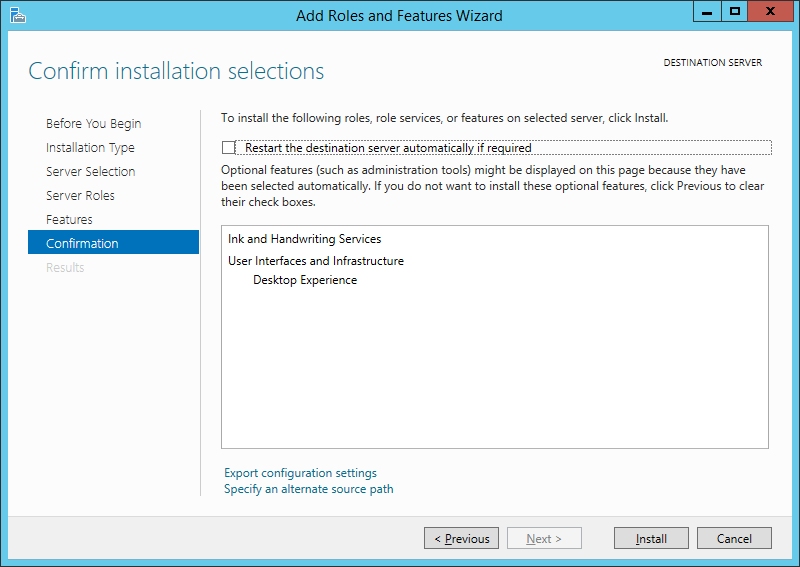
Расскажу как включить старый добрый Photo Viewer в Windows Server 2012 R2. Инструкция также работает на Windows Server 2012. А приведённый reg-файл и в Windows 10, как это ни странно. Первым делом нужно установить дополнение Desktop Experience.
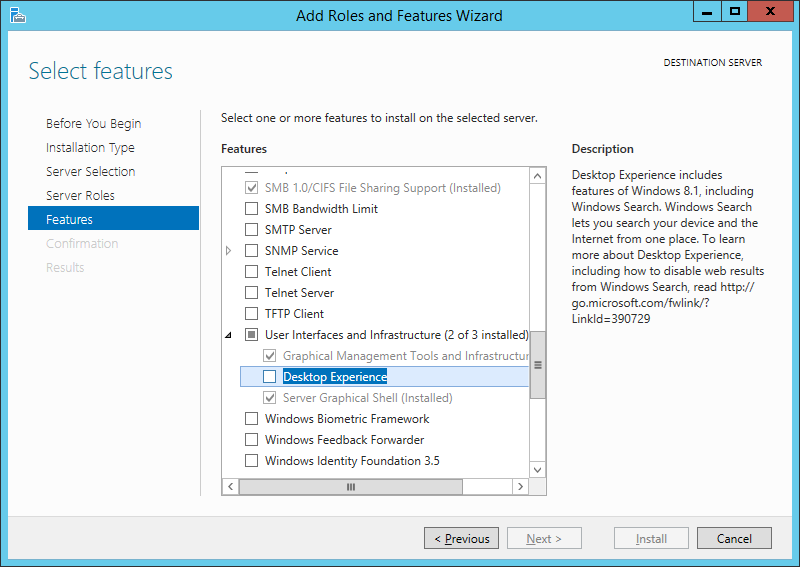
Устанавливаем галку и Add Features.
Потом Next и Install.
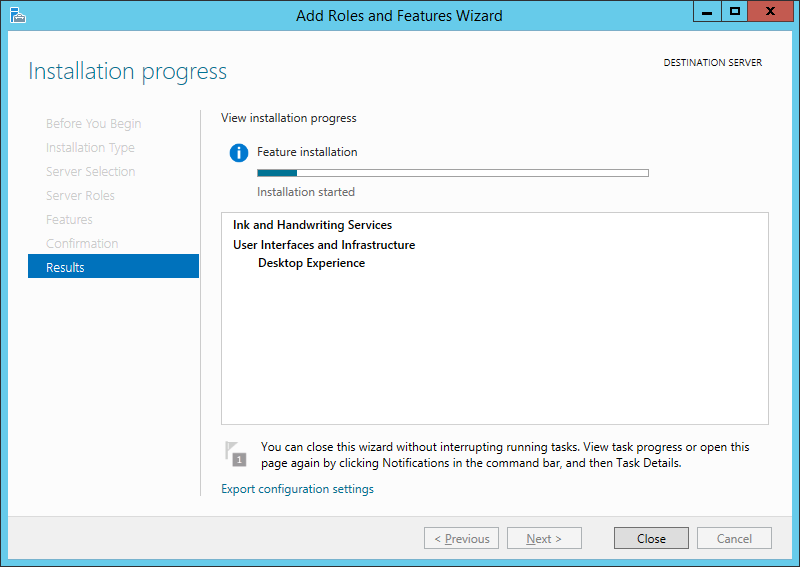
Идёт инсталляция.
После установки сервер захочет перезагрузку:
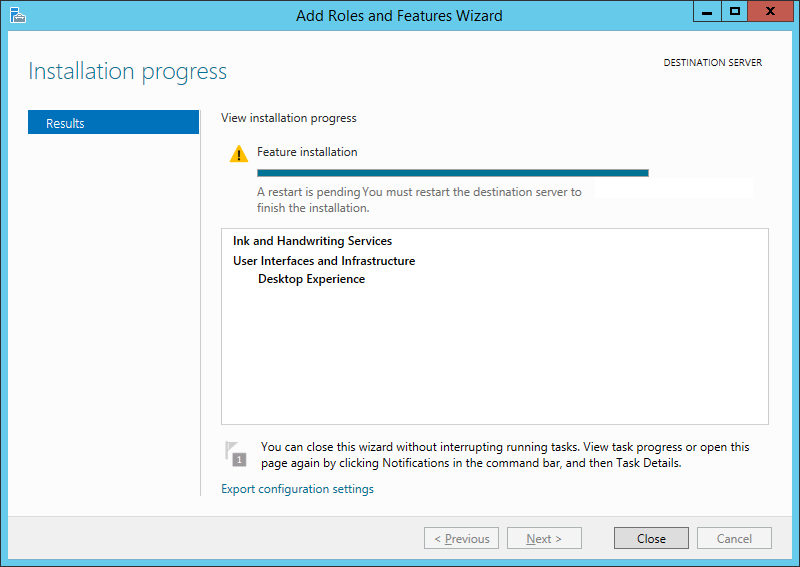
Перезагружаемся. Photo Viewer установлен. Но по умолчанию некоторые файлы не хотят через него открываться. Создаём файл с расширением REG и содержимым:
Windows Registry Editor Version 5.00
[HKEY_CLASSES_ROOT\Applications\photoviewer.dll]
[HKEY_CLASSES_ROOT\Applications\photoviewer.dll\shell]

[HKEY_CLASSES_ROOT\Applications\photoviewer.dll\shell\open]
"MuiVerb"="@photoviewer.dll,-3043"

[HKEY_CLASSES_ROOT\Applications\photoviewer.dll\shell\open\command]
@=hex(2):25,00,53,00,79,00,73,00,74,00,65,00,6d,00,52,00,6f,00,6f,00,74,00,25,\
00,5c,00,53,00,79,00,73,00,74,00,65,00,6d,00,33,00,32,00,5c,00,72,00,75,00,\
6e,00,64,00,6c,00,6c,00,33,00,32,00,2e,00,65,00,78,00,65,00,20,00,22,00,25,\
00,50,00,72,00,6f,00,67,00,72,00,61,00,6d,00,46,00,69,00,6c,00,65,00,73,00,\
25,00,5c,00,57,00,69,00,6e,00,64,00,6f,00,77,00,73,00,20,00,50,00,68,00,6f,\
00,74,00,6f,00,20,00,56,00,69,00,65,00,77,00,65,00,72,00,5c,00,50,00,68,00,\
6f,00,74,00,6f,00,56,00,69,00,65,00,77,00,65,00,72,00,2e,00,64,00,6c,00,6c,\
00,22,00,2c,00,20,00,49,00,6d,00,61,00,67,00,65,00,56,00,69,00,65,00,77,00,\
5f,00,46,00,75,00,6c,00,6c,00,73,00,63,00,72,00,65,00,65,00,6e,00,20,00,25,\
00,31,00,00,00

[HKEY_CLASSES_ROOT\Applications\photoviewer.dll\shell\open\DropTarget]
"Clsid"="{FFE2A43C-56B9-4bf5-9A79-CC6D4285608A}"

[HKEY_CLASSES_ROOT\Applications\photoviewer.dll\shell\print]

[HKEY_CLASSES_ROOT\Applications\photoviewer.dll\shell\print\command]
@=hex(2):25,00,53,00,79,00,73,00,74,00,65,00,6d,00,52,00,6f,00,6f,00,74,00,25,\
00,5c,00,53,00,79,00,73,00,74,00,65,00,6d,00,33,00,32,00,5c,00,72,00,75,00,\
6e,00,64,00,6c,00,6c,00,33,00,32,00,2e,00,65,00,78,00,65,00,20,00,22,00,25,\
00,50,00,72,00,6f,00,67,00,72,00,61,00,6d,00,46,00,69,00,6c,00,65,00,73,00,\
25,00,5c,00,57,00,69,00,6e,00,64,00,6f,00,77,00,73,00,20,00,50,00,68,00,6f,\
00,74,00,6f,00,20,00,56,00,69,00,65,00,77,00,65,00,72,00,5c,00,50,00,68,00,\
6f,00,74,00,6f,00,56,00,69,00,65,00,77,00,65,00,72,00,2e,00,64,00,6c,00,6c,\
00,22,00,2c,00,20,00,49,00,6d,00,61,00,67,00,65,00,56,00,69,00,65,00,77,00,\
5f,00,46,00,75,00,6c,00,6c,00,73,00,63,00,72,00,65,00,65,00,6e,00,20,00,25,\
00,31,00,00,00

[HKEY_CLASSES_ROOT\Applications\photoviewer.dll\shell\print\DropTarget]
"Clsid"="{60fd46de-f830-4894-a628-6fa81bc0190d}"
Выполняем этот файл, значения добавятся в реестр.
Теперь можно взять любой нужный файл с картинкой, например, JPG. Правой кнопкой выбрать программу для просмотра.
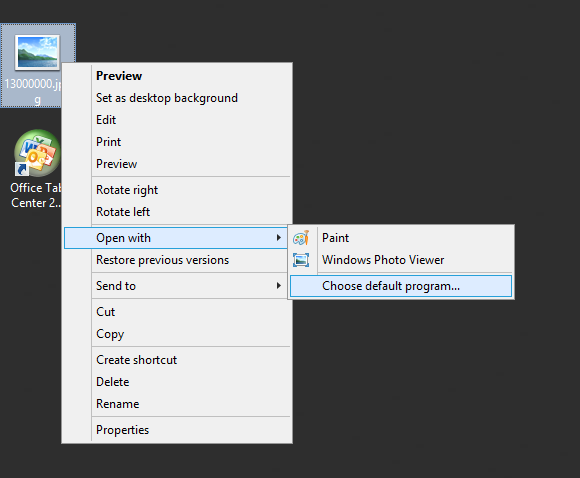
Теперь в списке есть Photo Viewer.
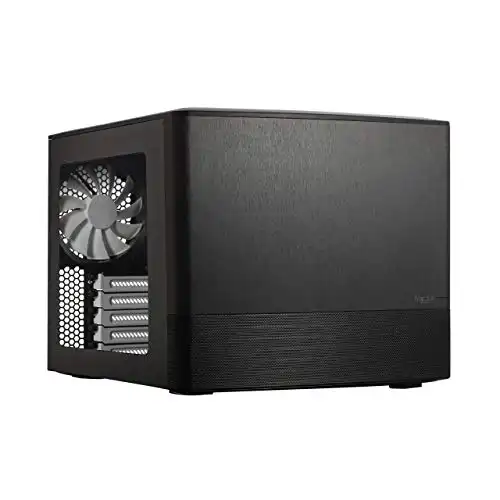
I’m in the middle of migrating my Plex media server from my daily driver Windows 10 PC to Server 2019 Standard. I ran out of space (and hard drive bays) inside my desktop, so the time has come to migrate to a different OS. I purchased all the components with the intention of turning my server into a TrueNAS nas server, but after running TrueNAS for a week, I decided the time invested in learning/migrating to an unfamiliar operating system was more than I wanted to tackle at this point in time. I ultimately ended up purchasing a Fractal Design Node 804 case because of how many storage bays it has.
We earn a commission if you make a purchase, at no additional cost to you.
As a sysadmin, I’ve become really proficient with Windows operating systems, Powershell, Hyper-V, PFsense, etc, so I figured moving to a known OS would simplify things for me in the long run. However, I soon learned that there are a few things I wasn’t aware of on Server 2019. In particular, one of the things I learned was that the default “photo viewer” is set to Paint.
Fortunately, this was a quick fix. Follow the steps below if you’ve ran into the same issue.
If you’re curious about my server build, I am using
- (Case) Fractal Design Node 804
- (Harddrives x4) 8TB Seagate Barracuda
- Cooler Master Hyper 212 CPU Fan
- Gigabyte B450M DS3H AM4 motherboard
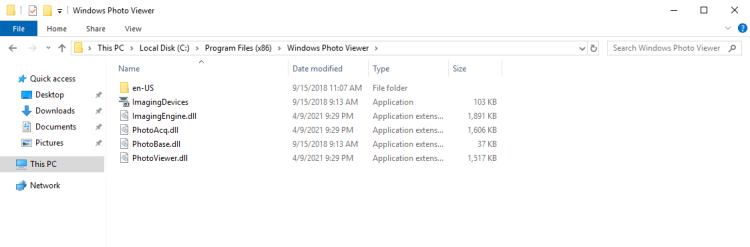
By default, Photo Viewer isn’t installed or active. The first thing we need to do is check whether or not the DLL’s exist on the server.
Step 1: Check if Photo Viewer DLL’s Exist
Browse to C:\Program Files (x86)\Windows Photo Viewer on the server. If you see .dll files there, that means the files exist but aren’t registered. It should look like this:

If you don’t see those files, simply browse to the path above from a Windows 10 PC & copy the folder contents to the same path on your server.
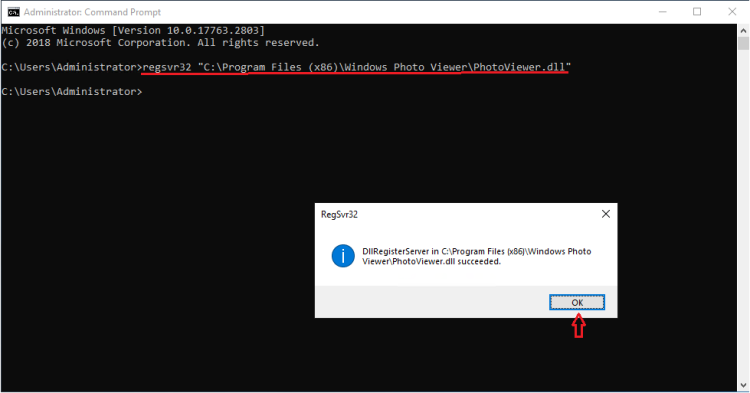
Step 2: Register the DLL’s
Now that we know the necessary files are present, we need to register them.
Open Command Prompt (type CMD into Start) and right-click to Run as Administrator. Then copy and paste the following code:
regsvr32 “C:\Program Files (x86)\Windows Photo Viewer\PhotoViewer.dll”Step 3: Download PhotoViewer Registry Keys
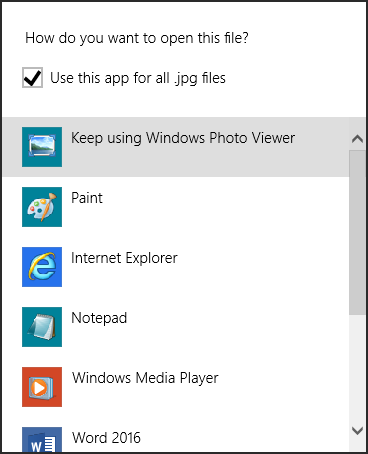
Now that the .dll’s are registered, we need to import the registry keys. This allows us to “Open With…” from File Explorer and choose Windows Photo Viewer, as well as set default file associations for various file types, such as .jpg, .jpe, or .jpeg.
Download registry files from here: MS Photoviewer Registry Files.zip
Once downloaded, right-click the .zip file and extract it to a temporary location.
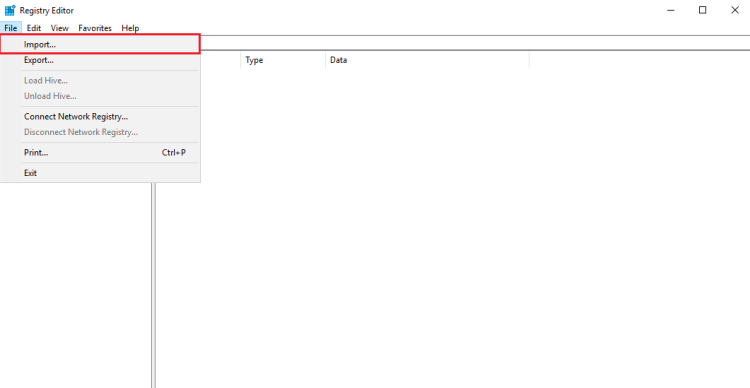
Step 4: Import Registry Keys
From Start, open Regedit.
File > Import > browse to the location you extracted the 4 registry files. You will need to import all 4 of them.
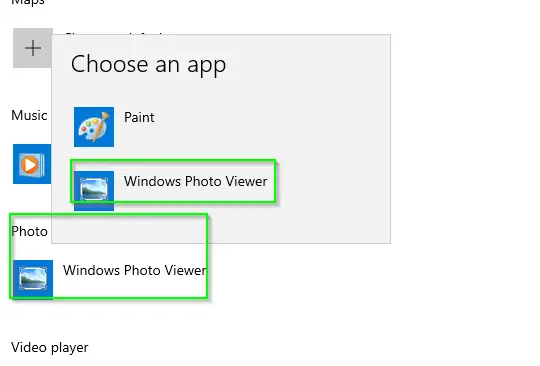
You should now be able to right-click an image file and Open With Windows Photo Viewer!
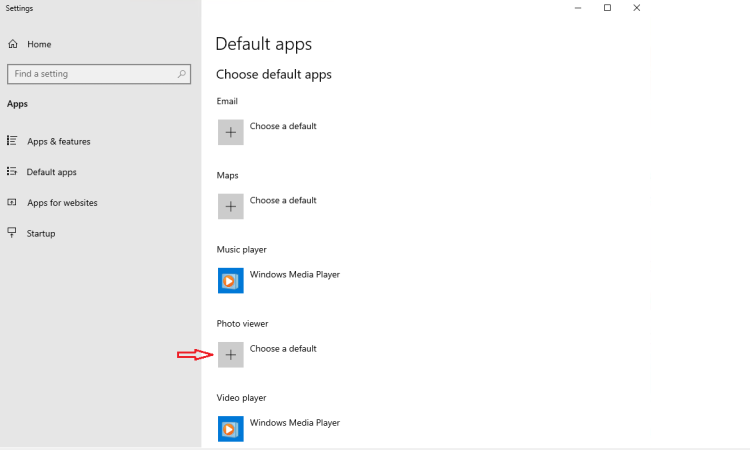
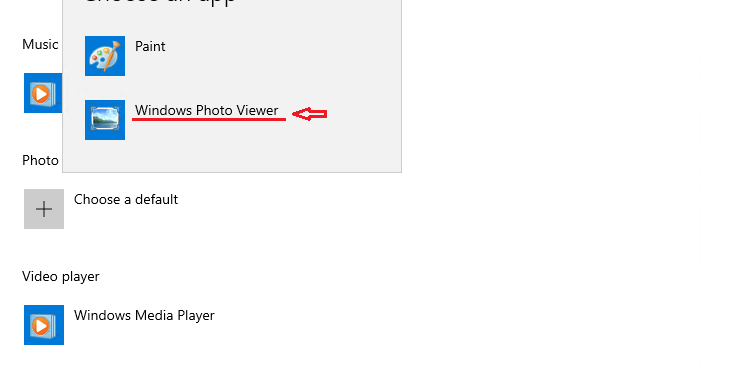
Step 5: Set Photo Viewer as Default App
If you’d like to make Photo Viewer your default photo viewing application, search Windows for “Default Apps” and then change Photos to Windows Photo Viewer.

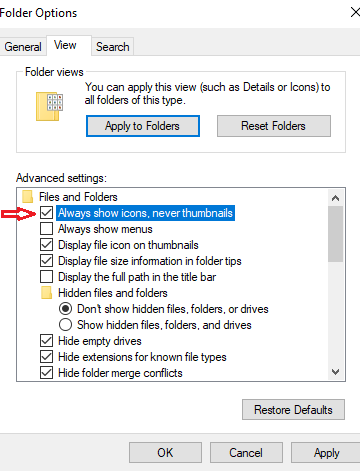
Step 6: Allow Images in Thumbnails
This step is optional, but if you’d like to see a preview of the images from File Explorer (instead of just icons), you can do that by changing the File Explorer options.
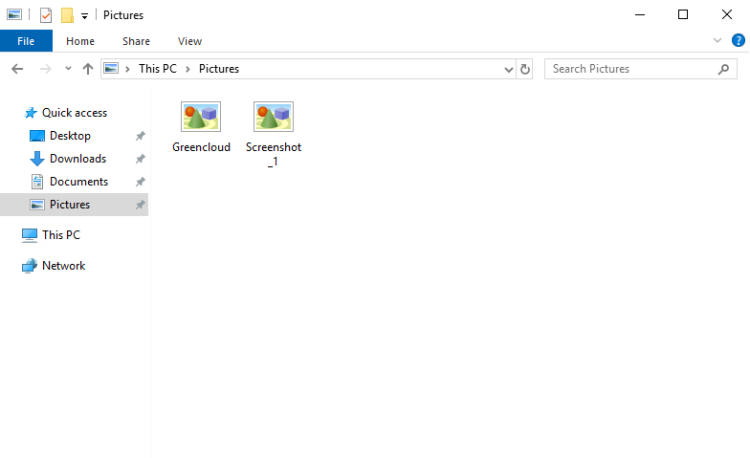
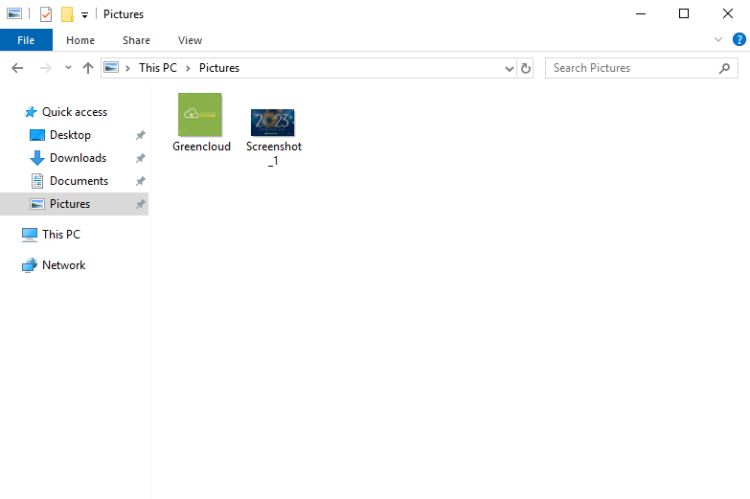
Search Windows for Folder Options. Change to the View tab and uncheck “Always show icons, never thumbnails”.
That will change it from looking like this:
to looking like this:
That’s all there is to it! Hopefully this guide helped you out.
My Homelab Equipment
Here is some of the gear I use in my Homelab. I highly recommend each of them.
- Server 2019 w/ Hyper-V
- Case: Fractal Design Node 804
- Graphics Card: NVIDEA Quadro K600
- CPU: AMD Ryzen 7 2700
The full list of server components I use can be found on my Equipment List page.

Hey there! I’m Danny, owner and writer of Smart Home Pursuits. I’ve worked as an IT Manager for 8 years and enjoy using my knowledge to make my smart home «smarter».
Иногда в Windows 10 / Server 2016 приходится возвращать привычный для предыдущих версий Windows просмотр изображений через приложение «Просмотр фотографий Windows». По умолчанию в новых версиях Windows оно ассоциировано только с TIFF-файлами
Идем в реестр:
HKEY_LOCAL_MACHINE\SOFTWARE\Microsoft\ Windows Photo Viewer\Capabilities\FileAssociations
Создаем строковый параметр (REG_SZ), по аналогии с уже имеющимися .tif и .tiff, называем .jpeg, .jpg, .png и т.п.
Значение везде одинаковое:
PhotoViewer.FileAssoc.Tiff

Либо, для более быстрого добавления можно использовать следующие команды cmd:
reg add "HKLM\SOFTWARE\Microsoft\Windows Photo Viewer\Capabilities\FileAssociations" /v .jpg /t REG_SZ /d PhotoViewer.FileAssoc.Tiff
reg add "HKLM\SOFTWARE\Microsoft\Windows Photo Viewer\Capabilities\FileAssociations" /v .jpeg /t REG_SZ /d PhotoViewer.FileAssoc.Tiff
reg add "HKLM\SOFTWARE\Microsoft\Windows Photo Viewer\Capabilities\FileAssociations" /v .png /t REG_SZ /d PhotoViewer.FileAssoc.Tiff
Estimated reading: 3 minutes
0 views
As a sysadmin, I’ve become really proficient with Windows operating systems, Powershell, Hyper-V, PFsense, etc, so I figured moving to a known OS would simplify things for me in the long run. However, I soon learned that there are a few things I wasn’t aware of on Server 2019. In particular, one of the things I learned was that the default “photo viewer” is set to Paint.
Fortunately, this was a quick fix. Follow the steps below if you’ve ran into the same issue.
How to Enable Photo Viewer in Windows Server 2019
By default, Photo Viewer isn’t installed or active. The first thing we need to do is check whether or not the DLL’s exist on the server.
Step 1: Check if Photo Viewer DLL’s Exist
Browse to C:Program Files (x86)Windows Photo Viewer on the server. If you see .dll files there, that means the files exist but aren’t registered. It should look like this:
If you don’t see those files, simply browse to the path above from a Windows PC & copy the folder contents to the same path on your server.
Step 2: Register the DLL’s
Now that we know the necessary files are present, we need to register them.
Open Command Prompt (type CMD into Start) and right-click to Run as Administrator. Then copy and paste the following code:
regsvr32 “C:Program Files (x86)Windows Photo ViewerPhotoViewer.dll”
Step 3: Download PhotoViewer Registry Keys
Now that the .dll’s are registered, we need to import the registry keys. This allows us to “Open With…” from File Explorer and choose Windows Photo Viewer, as well as set default file associations for various file types, such as .jpg, .jpe, or .jpeg.
Download registry files from here: MS Photoviewer Registry Files.zip
Once downloaded, right-click the .zip file and extract it to a temporary location.
Step 4: Import Registry Keys
From Start, open Regedit.
File > Import > browse to the location you extracted the 4 registry files. You will need to import all 4 of them.
Step 5: Set Photo Viewer as Default App
If you’d like to make Photo Viewer your default photo viewing application, search Windows for “Default Apps” and then change Photos to Windows Photo Viewer.
Step 6: Allow Images in Thumbnails
This step is optional, but if you’d like to see a preview of the images from File Explorer (instead of just icons), you can do that by changing the File Explorer options.
Search Windows for Folder Options. Change to the View tab and uncheck “Always show icons, never thumbnails”.
That will change it from looking like this:
to looking like this:
That’s all there is to it! Hopefully this guide helped you out.
Good Luck!
