I am having issues with committing changes to my gear. I have tried to run rhc setup, I also deleted my .ssh folder and executed rhc setup again but that also didnt work.
Not sure what changed but it worked couple of hours ago.
>git push -u <GEAR_NAME> master
Permission denied (publickey,gssapi-keyex,gssapi-with-mic).
fatal: Could not read from remote repository.

Please make sure you have the correct access rights and the repository exists.

>git remote add devstage3 -f ssh://<GEAR_ID>@<GEAR_NAME>-<GEAR-DOMAIN>.rhcloud.com/~/git/<GEAR_DOMAIN>.git/
Also I have tried to start a different gear and commit to it but I am getting the same error:
Updating <GEAR_NAME>
The authenticity of host '<GEAR_NAME>-<GEAR-DOMAIN>.rhcloud.com (<GEAR_IP>)' can't be established.
RSA key fingerprint is <KEY_FINGERPRINT>.
Are you sure you want to continue connecting (yes/no)? yes
Warning: Permanently added '<GEAR_NAME>-<GEAR-DOMAIN>.rhcloud.com,<GEAR_IP>' (RSA) to the list of known hosts.
Permission denied (publickey,gssapi-keyex,gssapi-with-mic).
fatal: Could not read from remote repository.

Please make sure you have the correct access rights
and the repository exists.
error: Could not fetch <GEAR_NAME>
Introduction
The SSH Permission denied error appears after permission-related settings are modified on the SSH server. Usual scenarios include a new package installation or the creation of new users.
In this tutorial, you will learn how to troubleshoot the SSH Permission denied error and reconnect to your SSH server.
Prerequisites
- SSH client on the local machine and SSH server on the remote system
- A user account to access the remote server (for password-based login)
- A user account with sudo or root privileges
The SSH Permission denied error appears when trying to SSH into a server:
Permission denied (publickey,gssapi-keyex,gssapi-with-mic)
Following the Permission denied statement, the bracket contains the attempted authentication methods that failed at the initiation of the connection. The error suggests that the public key is the issue, which is misleading.
One reason for the error may be sshd_config, the file that contains SSH server configuration. The other possibility is that the authorized_keys file has insufficient permissions. This file contains the list of public keys for the clients allowed to SSH into the server. Consequently, the system’s inability to read from the file results in the Permission denied error.
How to fix SSH Permission denied
Both solutions contain steps you need to perform on the server-side. Start by opening the terminal on your server and proceed with one of the solutions below.
Solution 1: Enable Password Authentication
If you want to use a password to access the SSH server, a solution for fixing the Permission denied error is to enable password login in the sshd_config file.
To do this, open the file in a text editor. This example uses the nano editor:
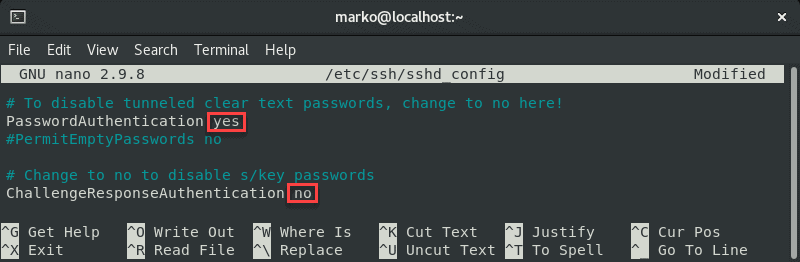
sudo nano /etc/ssh/sshd_configIn the file, find the PasswordAuthentication line and make sure it ends with yes.
Find the ChallengeResponseAuthentication option and disable it by adding no.
If lines are commented out, remove the hash sign # to uncomment them.
Save the file and exit.
Restart the SSH service by typing the following command:
sudo systemctl restart sshdSolution 2: Change File System Permissions
Using the password-based login as the SSH authentication method is not recommended due to security concerns. Therefore, the following solution may be preferable since it troubleshoots the public key authentication method.
First, open the sshd_config file using a text editor:
sudo nano /etc/ssh/sshd_configIn the file, make sure the following options are set as follows:
PermitRootLogin no
PubkeyAuthentication yes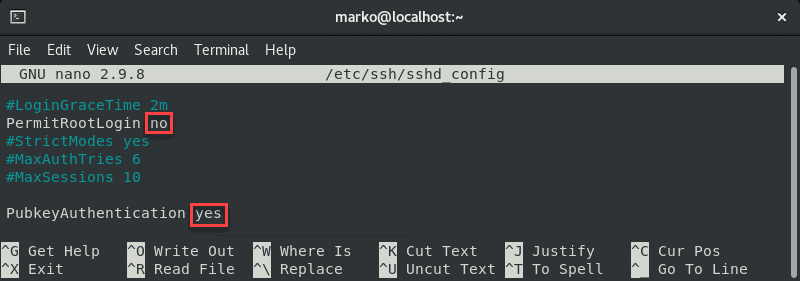
Note: The steps above are considered best security practices. If you need to use root login, set the relevant line to yes.
Comment out the GSSAPI-related options by adding the hash sign at the beginning of the line:
#GSSAPIAuthentication yes
#GSSAPICleanupCredentials no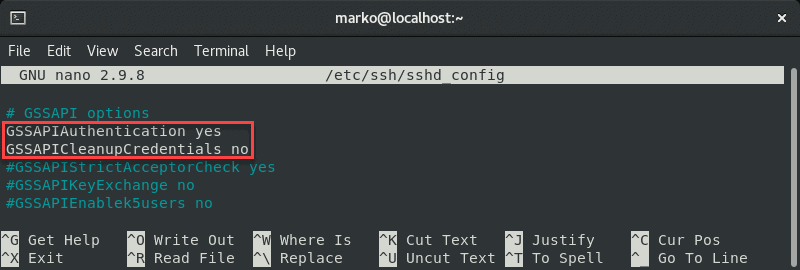
Also, make sure the UsePAM line is set to yes:
UsePAM yes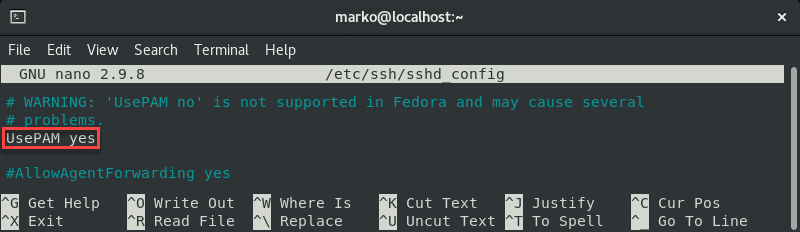
Save the file and restart the sshd service:
systemctl restart sshdNow navigate to your home folder and check the permissions:
ls -ld
If your owner permissions are not set to read, write, and execute (drwx------), use the chmod command to change them:
chmod 0700 /home/[your-username]Now go to the .ssh folder and recheck the permissions:
ls -ld
This directory should also have read, write, and execute permissions for the file owner. To enforce them, use chmod again:
chmod 0700 /home/your_home/.sshThe .ssh folder contains the authorized_keys file. Check its permissions with:
ls -ld authorized_keys
The file owner should have read and write permissions. To set them, use:
chmod 0600 /home/[username]/.ssh/authorized_keysNow try logging in with the key pair again. The output below shows a successful login attempt.

Conclusion
This tutorial covered the steps necessary to troubleshoot the SSH Permission denied (publickey,gssapi-keyex,gssapi-with-mic) error. By completing the steps in the guide, you should fix the error and successfully SSH into your server.
I am having issues with committing changes to my gear. I have tried to run rhc setup, I also deleted my .ssh folder and executed rhc setup again but that also didnt work.
Not sure what changed but it worked couple of hours ago.
>git push -u <GEAR_NAME> master
Permission denied (publickey,gssapi-keyex,gssapi-with-mic).
fatal: Could not read from remote repository.

Please make sure you have the correct access rights and the repository exists.

>git remote add devstage3 -f ssh://<GEAR_ID>@<GEAR_NAME>-<GEAR-DOMAIN>.rhcloud.com/~/git/<GEAR_DOMAIN>.git/
Also I have tried to start a different gear and commit to it but I am getting the same error:
Updating <GEAR_NAME>
The authenticity of host '<GEAR_NAME>-<GEAR-DOMAIN>.rhcloud.com (<GEAR_IP>)' can't be established.
RSA key fingerprint is <KEY_FINGERPRINT>.
Are you sure you want to continue connecting (yes/no)? yes
Warning: Permanently added '<GEAR_NAME>-<GEAR-DOMAIN>.rhcloud.com,<GEAR_IP>' (RSA) to the list of known hosts.
Permission denied (publickey,gssapi-keyex,gssapi-with-mic).
fatal: Could not read from remote repository.

Please make sure you have the correct access rights
and the repository exists.
error: Could not fetch <GEAR_NAME>
Table of Contents
Hide
- What is Permission Denied (publickey, gssapi-keyex, gssapi-with-mic)?
-
Solution
- Step1: Permission for home and .ssh needs to be 0700 or drwx——
- Step 2: Permission of authorized_keys file needs to be 0600
- Step 3: Prevent insecure password authentication
- Step 4 – Restart SSH service
-
Conclusion
- Related Posts
While trying to ssh a host you might encounter an error – Permission Denied (publickey, gssapi-keyex, gssapi-with-mic). This says that you are not allowed to access the host via ssh.
But why you got this error?
Maybe because your public key is wrong. Or maybe there is another issue in the server and it is returning the wrong message.
Before solving any error, we should know the root causes. Permission denied means you can’t access the server. This could be due to wrong key or ssh server could not access the public keys file, authorized_keys.
Let’s understand the error first. It indicates these 3 things – publickey, gssapi-keyex and gssapi-with-mic.
gssapi stands for Generic Security Services Application Program Interface. According to Oracle docs – “gssapi provides a way for applications to protect data that is sent to peer applications; typically, this might be from a client on one machine to a server on another“.
gssapi is used by Kerberos. If you are not using Kerberos and only authenticating with password or ssh public key then you don’t need gssapi. Hence you can disable them. We will discuss about disabling gssapi in the next section.
Solution
To solve this issue you need to disable gssapi authentication as well as set appropriate permissions to the .ssh directory and .ssh/authorized_keys file.
First of all let’s set the permissions.
Step1: Permission for home and .ssh needs to be 0700 or drwx——
Owner permission for home and .ssh directory needs to be read, write, execute. That is, 0700 or drwx——. Follow these steps –
1. Move to your user folder in home directory using this command –
cd ~

2. Check directory permission using ls -ld command –
ls -ld
After running this command you will get output like this –
drwxr-xr-x 4 akamit akamit 4096 Sep 17 02:16
The owner permission needs to be read, write and execute (rwx). Group and others permission could be none for maximum security. In my case they are set to read and execute (r-x).
What are owner permissions? The first 3 characters after d represents owner permissions, next 3 group permissions and last 3 others permissions. Shown in the below code block –
# Owner    Others
#   |       |
 d rwx r-x r-x
#       |
#     Group
If your owner permission is different than this then set it using chmod command. You will need the absolute path to your user directory. If you don’t know that then use ~ to enter into your user directory and then run pwd for getting path –
chmod 0700 ~

# OR

cd ~
pwd
chmod 0700 /home/{YOUR_USERNAME}

3. Check permission for ~/.ssh directory
First move into .ssh directory using the below command –
cd ~/.ssh
Next, check the permission using ls -ld command –
ls -ld
The output should be read, write and execute permission for owner on this directory. For me the output looks like this –

You can see from the terminal image that the permission assigned to my .ssh directory is drwx------.
If it is not the same for you, then change the permission using chmod command –
chmod 0700 ~/.ssh
authorized_keys is the file inside .ssh directory which holds the list of all the public keys that are allowed to login using ssh. So, in order to allow an ssh request, the server needs to open this file and match the provided key with the keys in this file. If there is a match then authentication is successful. Otherwise permission denied.
What if public key is correct but server is not able to access authorized_keys file? In that case server will return permission denied. Although you have passed the correct key. That’s why it is required to have a proper permission on this file for owner account.
Check the permission using the below command –
ls -ld ~/.ssh/authorized_keys
It should return the permission as -rw-------. That is, the owner can read and write but not accessible to anybody else. For me the output looks like this –
[email protected]:~$ ls -la ~/.ssh/authorized_keys
-rw------- 1 akamit akamit 553 Apr 17 10:33 /home/akamit/.ssh/authorized_keys
[email protected]:~$

If the permission of this file is not the same as shown above then use chmod to change it –
chmod 0600 ~/.ssh/authorized_keys
Step 3: Prevent insecure password authentication
Password authentication should not be used for better security. We need to use public_key based ssh authentication. In this step we will turn off password authentication and enable public key authentication.
Open /etc/ssh/sshd_config file –
sudo vim /etc/ssh/sshd_config
This file will look like this –
# $OpenBSD: sshd_config,v 1.103 2022/04/09 20:41:22 tj Exp $

# This is the sshd server system-wide configuration file.  See
# sshd_config(5) for more information.

# This sshd was compiled with PATH=/usr/bin:/bin:/usr/sbin:/sbin

# The strategy used for options in the default sshd_config shipped with
# OpenSSH is to specify options with their default value where
# possible, but leave them commented.  Uncommented options override the
# default value.

Include /etc/ssh/sshd_config.d/*.conf

#Port 22
#AddressFamily any
#ListenAddress 0.0.0.0
#ListenAddress ::

#HostKey /etc/ssh/ssh_host_rsa_key
#HostKey /etc/ssh/ssh_host_ecdsa_key
#HostKey /etc/ssh/ssh_host_ed25519_key

# Ciphers and keying
#RekeyLimit default none

# Logging
#SyslogFacility AUTH
#LogLevel INFO

# Authentication:

#LoginGraceTime 2m
#PermitRootLogin prohibit-password
#StrictModes yes
#MaxAuthTries 6
#MaxSessions 10

#PubkeyAuthentication yes

# Expect .ssh/authorized_keys2 to be disregarded by default in future.
#AuthorizedKeysFile	.ssh/authorized_keys .ssh/authorized_keys2

#AuthorizedPrincipalsFile none

#AuthorizedKeysCommand none
#AuthorizedKeysCommandUser nobody

# For this to work you will also need host keys in /etc/ssh/ssh_known_hosts
#HostbasedAuthentication no
# Change to yes if you don't trust ~/.ssh/known_hosts for
# HostbasedAuthentication
#IgnoreUserKnownHosts no
# Don't read the user's ~/.rhosts and ~/.shosts files
#IgnoreRhosts yes

# To disable tunneled clear text passwords, change to no here!
PasswordAuthentication no
#PermitEmptyPasswords no

# Change to yes to enable challenge-response passwords (beware issues with
# some PAM modules and threads)
ChallengeResponseAuthentication no

# Kerberos options
#KerberosAuthentication no
#KerberosOrLocalPasswd yes
#KerberosTicketCleanup yes
#KerberosGetAFSToken no

# GSSAPI options
#GSSAPIAuthentication no
#GSSAPICleanupCredentials yes
#GSSAPIStrictAcceptorCheck yes
#GSSAPIKeyExchange no

# Set this to 'yes' to enable PAM authentication, account processing,
# and session processing. If this is enabled, PAM authentication will
# be allowed through the ChallengeResponseAuthentication and
# PasswordAuthentication.  Depending on your PAM configuration,
# PAM authentication via ChallengeResponseAuthentication may bypass
# the setting of "PermitRootLogin without-password".
# If you just want the PAM account and session checks to run without
# PAM authentication, then enable this but set PasswordAuthentication
# and ChallengeResponseAuthentication to 'no'.
UsePAM yes

#AllowAgentForwarding yes
#AllowTcpForwarding yes
#GatewayPorts no
X11Forwarding yes
#X11DisplayOffset 10
#X11UseLocalhost yes
#PermitTTY yes
PrintMotd no
#PrintLastLog yes
#TCPKeepAlive yes
#PermitUserEnvironment no
#Compression delayed
#ClientAliveInterval 0
#ClientAliveCountMax 3
#UseDNS no
#PidFile /var/run/sshd.pid
#MaxStartups 10:30:100
#PermitTunnel no
#ChrootDirectory none
#VersionAddendum none

# no default banner path
#Banner none

# Allow client to pass locale environment variables
AcceptEnv LANG LC_*

# override default of no subsystems
Subsystem	sftp	/usr/lib/openssh/sftp-server

# Example of overriding settings on a per-user basis
#Match User anoncvs
#	X11Forwarding no
#	AllowTcpForwarding no
#	PermitTTY no
#	ForceCommand cvs server
We are interested in highlighted lines only. The values of these properties should be –
- PermitRootLogin – no
- PubkeyAuthentication – yes
- GSSAPIAuthentication – no (Or keep it commented out)
- GSSAPICleanupCredentials – yes (Or keep it commented out)
- UsePAM – yes
Step 4 – Restart SSH service
After making these changes, you need to restart SSH service. Use this command –
systemctl restart sshd
Conclusion
SSH throws permission denied error when either the public key is invalid or there is some problem with sshd configuration. It could be missing permissions on .ssh directory or authorized_keys file. In this article we saw the solution to all these issues. Follow the steps and you will be able to successfully log into the system through ssh.
The permission denied (publickey,gssapi-keyex,gssapi-with-mic)” AWS error log happens when changing permission settings on the SSH server. For example, usual scenarios include creating new users and password authentication when the packages fail to provide the necessary permissions and properties.
In addition, you will encounter permission denied (publickey gssapi-keyex gssapi-with-mic). Windows 10 code exception when using PuTTy on your SSH server with broken values and configurations. As a result, we wrote this profound debugging guide that overcomes the Jenkins SSH permission denied (publickey gssapi-keyex gssapi-with-mic password) warning with full-proof debugging techniques that apply to all operating systems and applications.
Contents
- When Does the Permission Denied (Publickey,Gssapi-Keyex) Bug Happen?
- – Malfunctioning GitLab on a Simple SSH Server
- – Using Putty on the SSH Server With Invalid Values
- How to Repair the Permission Denied (Publickey,Gssapi-Keyex) Error?
- – Creating Another PEM File on the Public Machine
- Conclusion
When Does the Permission Denied (Publickey,Gssapi-Keyex) Bug Happen?
The permission denied (publickey,gssapi-keyex,gssapi-with-mic windows) bug happens when the permission settings and properties on the SSH server are changed. In addition, similar permission denied messages could compromise your programming experience when using PuTTy on the SSH server with invalid values and configurations, especially with complex programs.
For example, the permission denied (publickey,gssapi-keyex,gssapi-with-mic mac) code exception indicates your application changed several settings the system cannot render. Although the syntax and script appear correct and raise no bugs, the program denies users access and prevents them from executing the intended commands.
Nevertheless, by scanning the traceback calls, you can troubleshoot the program and locate the cause for the permission denied (publickey,gssapi-keyex,gssapi-with-mic oracle cloud) mistake. Although warnings differ and are unique for each system, they carry information you can use to improve your programming experience and resolve the exception.
On the contrary, the permission denied (publickey gssapi-keyex gssapi-with-mic) Amazon Linux error log indicates flaws when using PuTTy on the SSH server with invalid configurations. This issue forces your application to display messages that block the normal workflow and affect other functions and commands.
In addition, although the permission denied (publickey gssapi-keyex gssapi-with-mic) PowerShell bug is standard with Windows, it affects all operating systems and applications, especially programs rendering complex SSH operations and procedures. Considering this, let us remake the error log and demonstrate the invalid permission before listing the possible solutions and overcoming the error message.
– Malfunctioning GitLab on a Simple SSH Server
We will exemplify the debug log the application throws after confirming the GitLab inputs malfunction on a simple SSH server. Although the SSH server functions before changing the configurations, it fails to complete and render the GitLab elements and commands. You can compare the inputs to your document to locate the similarities and differences.
You can learn more about the debug log in the following code snippet:
debug1: Rendering configuration data /etc/ ssh/ ssh_config
debug1: /etc/ ssh/ ssh_config line 22: Applying options for *
debug2: ssh_connect: needpriv 0
debug1: Connecting to 192.158.87.23 [192.158.87.23] port 22.
debug1: Connection established.
debug1: permanently_set_uid: 0/1
debug1: key_load_public: No such file or directory
debug1: identity file /root/ .ssh/ id_rsa type -2
debug1: key_load_public: No such file or directory
debug1: identity file /root/ .ssh/ id_rsa-cert type -2
debug1: key_load_public: No such file or directory
debug1: identity file /root/ .ssh/ id_dsa type -2
debug1: key_load_public: No such file or directory
debug1: identity file /root/ .ssh/ id_dsa-cert type -2
debug1: key_load_public: No such file or directory
debug1: identity file /root/ .ssh/ id_ecdsa type -2
debug1: key_load_public: No such file or directory
debug1: identity file /root/ .ssh/ id_ecdsa-cert type -2
debug1: key_load_public: No such file or directory
debug1: identity file /root/ .ssh/ id_ed25519 type -2
debug1: key_load_public: No such file or directory
debug1: identity file /root/ .ssh/ id_ed25519-cert type -2
debug1: Enabling compatibility mode for protocol 2.2
The application throws other traceback calls that are irrelevant when pinpointing the flawed inputs. Nevertheless, other confusing instances and obstacles exist.
– Using Putty on the SSH Server With Invalid Values
This article’s second incorrect chapter demonstrates how using PuTTy on an SSH server with broken values and configurations ruins your programming experience. As a result, we will provide the SSH configurations and debug log to help you understand the project’s purpose and relevant indicators.
The following code snippet provides the main SSH configurations:
# ForwardAgent no
# ForwardX11 no
# ForwardX11Trusted yes
# RhostsRSAAuthentication no
# RSAAuthentication yes
# HostbasedAuthentication no
BatchMode no
# CheckHostIP yes
# AddressFamily any
# ConnectTimeout 0
# StrictHostKeyChecking ask
# IdentityFile ~/.ssh/identity
# IdentityFile ~/.ssh/id_rsa
# IdentityFile ~/.ssh/id_dsa
# Port 22
# Protocol 2,1
# AuthorizedKeysFile .ssh/authorized_keys
# Cipher 3des
# EscapeChar ~
# Tunnel no
# TunnelDevice any:any
# PermitLocalCommand no
SendEnv LANG LC_*
HashKnownHosts yes
GSSAPIAuthentication yes
GSSAPIDelegateCredentials no
We will complete this bugged instance by listing the complete error log and its warnings.
You can learn more about this information in the following example:
OpenSSH_5.1p1 Debian-5, OpenSSL 0.9.8g 19 Oct 2007
debug1: Rendering configuration data /home/ff/.ssh/config
debug1: Applying options for *
debug1: Reading configuration data /etc/ssh/ssh_config
debug1: Applying options for *
debug1: Connecting to host2 [192.*.*.*] port 22.
debug1: Connection established.
debug1: identity file /home/ff/.ssh/identity type -1
debug1: identity file /home/ff/.ssh/id_rsa type -1
debug1: identity file /home/ff/.ssh/id_dsa type -1
debug1: match: OpenSSH_4.3 pat OpenSSH_4*
debug1: SSH2_MSG_KEXINIT sent
debug1: SSH2_MSG_KEXINIT received
debug1: kex: server->client aes128-cbc hmac-md5 none
debug1: kex: client->server aes128-cbc hmac-md5 none
debug1: expecting SSH2_MSG_DH_GROUP
debug1: SSH2_MSG_DH_INIT sent
debug1: expecting SSH2_MSG_DH_REPLY
debug1: Found key in /home/ff/.ssh/known_hosts:1
debug1: ssh_rsa_verify: signature correct
debug1: SSH2_MSG_NEWKEYS sent
debug1: expecting SSH2_MSG_NEWKEYS
debug1: SSH2_MSG_NEWKEYS received
debug1: SSH2_MSG_SERVICE_REQUEST sent
debug1: SSH2_MSG_SERVICE_ACCEPT received
We complete this chapter by confirming this article’s debugging methods apply to all operating systems and applications, as you will soon learn.
How to Repair the Permission Denied (Publickey,Gssapi-Keyex) Error?
You can repair the permission denied (publickey, gssapi-keyex) error log by changing the file system permissions to clarify the authentication method. In addition, this guide suggests creating another PEM file on the public machine and running the SSH command. Both approaches require a few code alterations.
As you can tell, our primary solution requires altering the file system permissions that confuse your program or application. In addition, this technique troubleshoots the public key method and prevents further code complications.
We provided the necessary steps in the following list:
- Open the SSH configuration using this command line: sudo nano /etc/ssh/sshd_config.
- Ensure you set the following options: PermitRootLogin no and PubkeyAuthentication yes.
- Add a hash sign at the following options: PermitRootLogin no and PubkeyAuthentication yes.
- Change the UsePAM command to this: UsePAM yes.
- Save the code alterations. Restart the SSHD device using the following command line: systemctl restart sshd.
- Navigate to your current folder and check the following permissions: ls -ld.
- Use the CHMOD command to change and execute the owner permissions: systemctl restart sshd.
- Repeat the sixth step to ensure no error logs appear.
- Use the CHMOD function to write and run the permissions for the file owner: chmod 0700 /home/your_home/.ssh.
- Ensure the changes function using the next code snippet: chmod 0700 /home/your_home/.ssh.
- Complete the debugging procedure by inputting this command: chmod 0700 /home/your_home/.ssh.
After replicating these steps, your program should no longer experience similar warnings and error logs. However, if the error persists, you can implement this guide’s alternative debugging method.
– Creating Another PEM File on the Public Machine
The error log sometimes indicates your application lacks the private key when logging in to the EC2 system. As a result, you can create another PEM file on the public machine and render the relevant commands. In addition, you will reenable the failed sudo elements that terminate your project and affect the parent functions.
You can learn more about this debugging technique in the following code snippet:
15 package(s) needed for security, out of 30 available
Run “sudo yum update” to apply all updates.
[ec2-user @ip-10-182-10-25 ~]$ ssh ec2-user@10.182.11.93
The authenticity of host ‘10.182.11.93 (10.182.11.93)’ can’t be established.
ECDSA key fingerprint is SHA266: hfxxxxxxxxxxxxxxxxxSHGe5mL0.
ECDSA key fingerprint is MD4: xxxxxxxxxxxxxxxxxxxxxxxx3: c2.
Are you confident you want to continue connecting (yes/no)? yes
Warning: Permanently added ‘10.182.11.93’ (ECDSA) to the list of known hosts.
Permission denied (publickey).
[ec2-user @ip-10-182-10-25 ~]$ ls
[ec2-user @ip-10-182-10-25 ~]$ vi MyEC2KP.pem
[ec2-user @ip-10-182-10-25 ~]$ sudo chmod 400 MyEC2KP.pem
[ec2-user @ip-10-182-10-25 ~]$ ssh -i MyEC2KP.pem ec2-user@10.192.11.93
__| __|_ )
_| ( / Amazon Linux AMI
___|\___|___|
https://aws.amazon.com/amazon-linux-ami/2022.06-release-notes/
[ec2-user @ip-10-182-11-93 ~]$
This demonstration exemplifies the system experiences no issues or obstacles after running the new PEM file. In addition, you will prevent further complications.
Conclusion
The permission denied error log happens when altering the permission settings and properties on the SSH server. Your debugging journey is close to an end, so let us remember this guide’s critical points:
- Similar errors appear when using PuTTy on your SSH server with broken values and configurations
- We recreated the error log with GitLab inputs that malfunctioned on a simple SSH server
- You can repair the public key error log by changing the file system permissions to clarify the authentication method
- Creating another PEM file on the public machine and rendering the relevant commands is another excellent debugging method
Reading this guide takes little time because the solutions and reproductions implement simple functions and code alterations. In addition, we hope we inspired you to overcome the error log without worrying for the outcome.
- Author
- Recent Posts

Your Go-To Resource for Learn & Build: CSS,JavaScript,HTML,PHP,C++ and MYSQL. Meet The Team