The best way is to set Notepad++ to run as administrator. The problem with that is it breaks the Right Click option. So I made a replacement to the right click option that removes the old one. The nice part of my fix is I added it to the Directory setting in the Registry. So now you can right click on a folder and pick Edit with Notepad++ and it will open all the files in Notepad++ :). I do a lot of VBScript programming. That makes it easy for me to edit all my files making global changes when I come up with a new method of doing something or change an object.
My VBScript backs up the registry keys before it changes them. It does not set Notepad++ as administrator so you have to do that by right clicking on the Notepad++ executable and changing it to run as administrator. I’m starting to research on how to make this a Run as Administrator. When I come up with that I’ll edit my post so it gives you the option to edit as Admin or edit normally.
'==========================================================================================
' NAME:   New-OpenWithNotepad++(WinVista7).vbs
' EDITED:  Kevin Dondrea , Gordos-Dondrea Enterprises and Foundation
' DATE  : 8/12/2012
' COMMENT: This script Exports Registry keys and replaced Notepad++ Right Click options.
'   Works with Windows Vista and 7.  Also works for restricted Win XP accounts.
' WEB LINK:
'==========================================================================================

Option Explicit

' =============== START ADD ADMIN RIGHTS ===============
' This adds the Admin Run Function for Windows Vista and 7
' You must put this at the top below computer and End If at the
' very end of the script
If WScript.Arguments.length = 0 Then
Set objShell = CreateObject("Shell.Application")
objShell.ShellExecute "WScript.exe", """" & _
WScript.ScriptFullName & """" &_
" RunAsAdministrator", , "runas", 1
Else
' Do not forget to add End If at the end of the script
' =============== END ADD ADMIN RIGHTS ===============

On Error Resume Next

' =============== START CONSTANT VARIABLES ===============
Const HKEY_CLASSES_ROOT   = &H80000000
Const HKEY_CURRENT_USER   = &H80000001
Const HKEY_LOCAL_MACHINE  = &H80000002
Const HKEY_USERS          = &H80000003
' =============== END CONSTANT VARIABLES ===============

' =============== START DIM VARIABLES ===============
Dim objFSO, objWrite2File, objShell, objReg, objRegistry, objWshShell
Dim strDate, strTime, strTime2, strFileName, strOpenFile
Dim strComputer, strCommand, strHostName, strUserName
Dim intRC, strKeyPath, strValueName, strValue
' =============== END DIM VARIABLES ===============

' --------------------------------------------------------------------------

' =============== START COMPUTER NAME, TIME and DATE ===============
strComputer = "."

' Reads registry for Computer Name
Set objShell = CreateObject("WScript.Shell")
' Edit or Add with Registrry Object
Set objReg=GetObject("winmgmts:{impersonationLevel=impersonate}!\\" & _
strComputer & "\root\default:StdRegProv")

' Same as above but used only to delete registry key
Set objRegistry=GetObject("winmgmts:\\" & _
strComputer & "\root\default:StdRegProv")

strHostName = objShell.RegRead ("HKLM\SYSTEM\CurrentControlSet\Services\" & _
        "Tcpip\Parameters\Hostname")
strUserName = objShell.RegRead ("HKLM\SOFTWARE\Microsoft\Windows NT\" & _
        "CurrentVersion\Winlogon\DefaultUserName")

' Retreives Date and Time
strTime = Right("0" & Hour(now()), 2) & Right("00" & _
    Minute(Now()), 2) & Second(Now())
strTime2 = Right("0" & Hour(now()), 2) & ":" & Right("00" & ":" & _
    Minute(Now()), 2) & ":" & Second(Now())
strDate = Right("0" & Month(now()), 2) & "-" & Right("00" & _
    Day(Now()), 2) & "-" & Year(Now())
' -----------------------------------------------------------

' =============== START BACKUP OF REGISTRY KEYS USED FOR ===============

' Original Command
' strCommand = "regedit /e <FilePath> <RegKey>"

' Local Machine ......
strCommand = "regedit /e " & strHostName & "-" & strDate & "-" & _
strTime & "-BackupLM-Notepad++.reg " & _
"""HKEY_LOCAL_MACHINE\SOFTWARE\Classes" & _
"\CLSID\{00F3C2EC-A6EE-11DE-A03A-EF8F55D89593}"""

Set objWshShell = WScript.CreateObject("WScript.Shell")
intRC = objWshShell.Run(strCommand, 0, TRUE)
If intRC <> 0 then
 WScript.Echo "Error returned from exporting Registry: " & intRC
Else
 WScript.Echo "No errors returned from exporting the Registry file"
End If
' =============== END BACKUP OF REGISTRY KEYS USED FOR ===============

' -----------------------------------------------------------

' =============== START NEW OPEN * SHELL COMMAND ===============
' Name of Registry Entry Key\Path
strKeyPath = "*\shell\Edit With Notepad++\command"
objReg.CreateKey HKEY_CLASSES_ROOT,strKeyPath

' Name of Registry Entry String
strValueName = ""
strValue = "C:\progra~1\notepad++\notepad++.exe %1"
objReg.SetStringValue HKEY_CLASSES_ROOT,strKeyPath,NULL,strValue

' =============== START NEW OPEN DIRECTORY SHELL COMMAND ===============
' Name of Registry Entry Key\Path
strKeyPath = "Directory\shell\Edit With Notepad++\command"
objReg.CreateKey HKEY_CLASSES_ROOT,strKeyPath

' Name of Registry Entry String
strValueName = ""
strValue = "C:\progra~1\notepad++\notepad++.exe %1"
objReg.SetStringValue HKEY_CLASSES_ROOT,strKeyPath,NULL,strValue

' -----------------------------------------------------------

strKeyPath = "*\shellex\ContextMenuHandlers\ANotepad++"
objRegistry.DeleteKey HKEY_CLASSES_ROOT,strKeyPath

strKeyPath = "SOFTWARE\Classes\CLSID\{00F3C2EC-A6EE-11DE-A03A-EF8F55D89593}\Settings"
objRegistry.DeleteKey HKEY_LOCAL_MACHINE,strKeyPath

' Ending Message
MsgBox"Notepad++ Right-Click Settings" & VbCrLf & _
"Have Been Created", ,"Click OK To Close Window"

' Cleans up Variables From Memory
Set objFSO = Nothing
Set objWrite2File = Nothing
Set objShell = Nothing
Set objReg = Nothing
Set objRegistry = Nothing
Set objWshShell = Nothing
Set strDate = Nothing
Set strTime = Nothing
Set strTime2 = Nothing
Set strFileName = Nothing
Set strOpenFile = Nothing
Set strComputer = Nothing
Set strCommand = Nothing
Set strHostName = Nothing
Set strUserName = Nothing
Set intRC = Nothing
Set strKeyPath = Nothing
Set strValueName = Nothing
Set strValue = Nothing

End If
A lot of programs require admin privileges to function properly. Running a file as an admin can also be an easy solution to many application errors.
The most common approach is to right-click the .exe file and select the Run as administrator option. But there are numerous other ways to accomplish the same thing such as keyboard shortcuts, task manager, command prompt, and more.
So, without further ado, here are all the possible ways to run files as an administrator.
Table of Contents
Using Contextual (Right-Click) Menu
The usual way most users run a file as an administrator is by right-clicking its executable (.exe) file and selecting Run as Administrator.
Additionally, if you hold Shift and then right-click, you can select the Run as different user option. With this, you can enter the credentials for another admin account to run the file as an administrator.
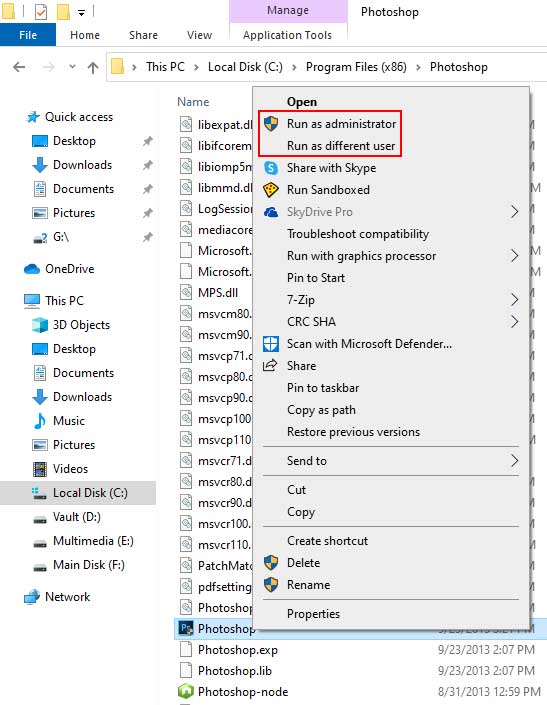
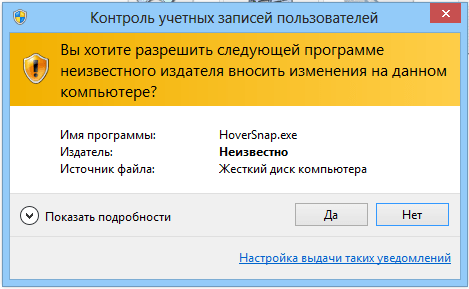
You will need to confirm that you want to run the file with administrator privileges before it opens. This also applies to most other methods in this guide.
It’s possible to bypass this prompt if you want. Check the FAQ section for more on that.
Using File Explorer Ribbon
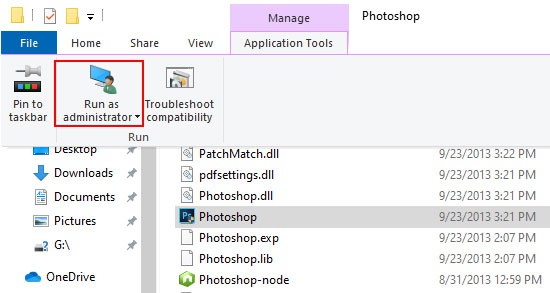
In the file explorer, select your file and open the Application tools tab. You can Run as Administrator or troubleshoot compatibility directly from here.
Search
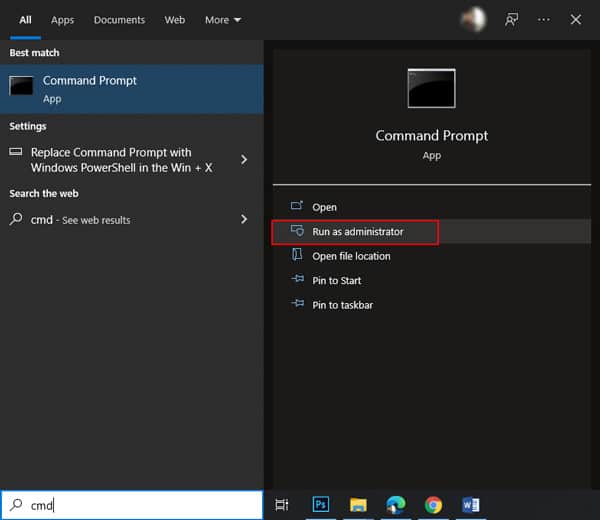
In the search Window, you can press the option on the right or use the keyboard shortcut CTRL + Shift + Enter to run a file as an administrator.
Through Run
If you type a run command (cmd for instance) and press CTRL + Shift + Enter, you can directly launch it in Administrator Mode.
Using Start Menu
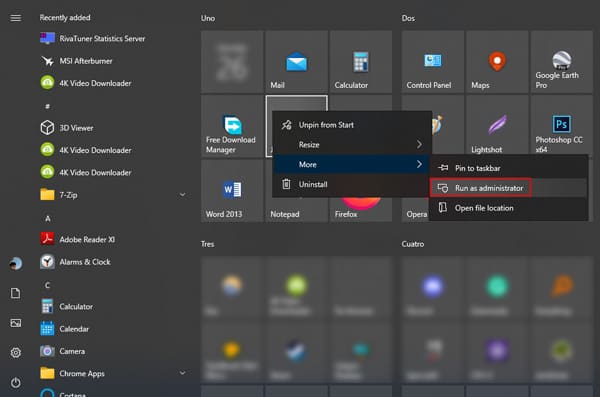
In the Start Menu, you can right-click any program and press More > Run as administrator.
Alternatively, you can also hold CTRL + Shift and left-click a program to run it as an administrator.
From Task Bar
You can hold CTRL + Shift and left-click any program to run it as an administrator directly from the taskbar.
Using Task Manager
Very few users know about this but it is actually possible to run a file as an administrator using the Task Manager. This can come in handy in certain situations, such as when the file explorer is not responding for instance.
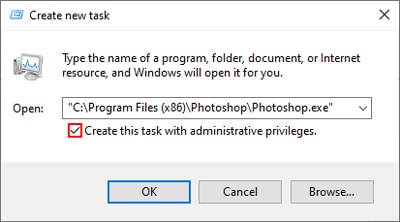
- Press CTRL + Shift + Esc to launch the Task Manager.
- Press the More Details button to change to advanced view.
- Click on File and select Run new task.
- Use the Browse option to locate and select your file.
- Enable the Create this task with Administrative privileges option.
- Press OK to run the file as an administrator.
With Task Scheduler
If you want to set a program to launch at a specified time, Task Scheduler is the perfect Windows tool for this. To run the program as an administrator in such cases, follow the steps below:
- Press Windows + S to bring up the search window.
- Type task scheduler and press Enter.
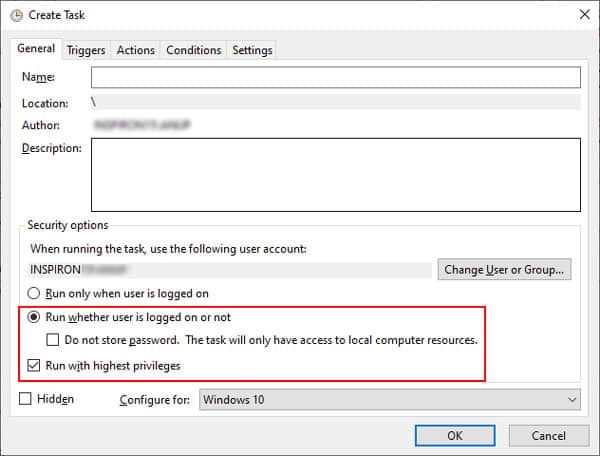
- From the top-left, select Action > Create Task.
- Once you create your task, select Run whether user is logged in or not.
- Enable Run with highest privileges and press OK to apply the changes.
Using Command Prompt
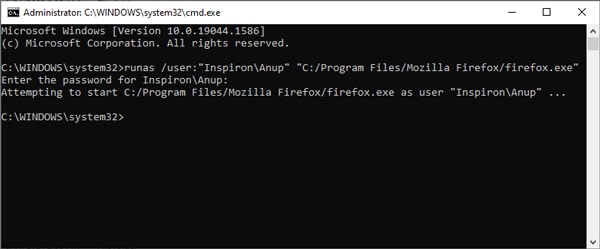
For users who prefer the command-line approach, the runas command can be used to run a file as an administrator. To do so:
- Press Windows + R to launch Run.
- Type cmd and press CTRL + Shift + Enter to launch Elevated Command Prompt.
- Type the following command, replace ComputerName, AdminName, and FilePath with the appropriate values as shown in the picture below, and press Enter:
runas /user:“ComputerName\AdminName” “FilePath”
Things To Note
If you get a system cannot find the file specified error, the file path is incorrect. Make sure you got the spaces correct as well.
When prompted to enter the admin password, type it and press Enter. The password won’t be shown on the screen, so you needn’t worry.
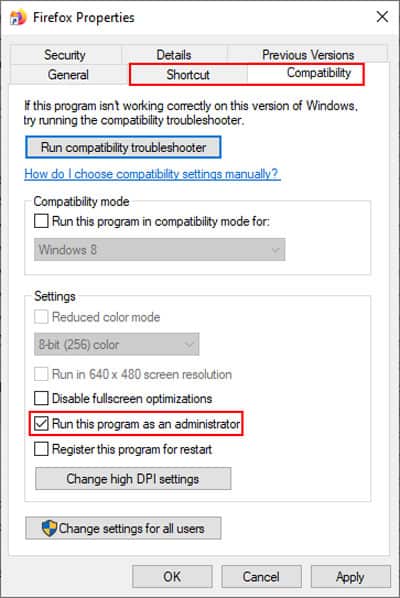
If you want to open any file or app as an administrator every time, you can do so from Properties.
- Select the file and press CTRL + Alt + Enter to open properties. Alternatively, simply right-click and select properties.
- In the compatibility tab, enable Run this program as an administrator.
- In the case of shortcuts, enable it from Shortcut > Advanced > Run as administrator instead.
Работая за компьютером, пользователь, так или иначе, открывает приложения. С запуском некоторых из них могут возникнуть проблемы. Бывает, что стандартные рекомендации не помогают устранить неполадки, и тогда на помощь приходят расширенные параметры доступа. По сути, для решения проблемы владельцу ПК нужно лишь разобраться, как запустить программу от имени Администратора в Windows 10. А еще подобный запуск дает много других преимуществ, о которых важно знать.
Что дают права Администратора в Windows 10
Для ответа на вопрос, обозначенный в подзаголовке, необходимо сделать уточнение касательно учетных записей в операционной системе Windows 10. Для входа в ОС пользователь должен создать хотя бы один аккаунт, которому присваивается статус стандартной учетки или УЗ с правами Администратора.
Как следует из названия, первый тип профиля используется обычными юзерами, а второй – продвинутыми. Впрочем, для владения правами Администратора не нужно обладать серьезными навыками. Получить их может обладатель стандартной учетной записи, но только после ввода пароля.
Отдельные программы, чей принцип работы завязан на взаимодействии с системными файлами, запускаются исключительно с правами Администратора. Сделано это для того, чтобы рядовой пользователь не мог навредить компьютеру, ведь нередко новички устанавливают пиратский софт, зараженный вирусами. А запуск такого приложения может привести к краже пользовательских данных.
Как запустить программу в таком режиме
Несмотря на все «страшилки», которыми пугают разработчики, даже рядовые пользователи вынуждены запускать отдельные программы с правами Администратора, так как иначе софт просто не будет функционировать. Осуществить задуманное можно несколькими способами, приведенными ниже.
На заметку. Чтобы каждый раз не активировать расширенные права, вы можете войти в профиль Администратора и запускать приложения в таком режиме без дополнительного подтверждения.
Контекстное меню
Как правило, для запуска приложений используются исполняемые файлы или их ярлыки. Скорее всего, вы открываете программу, дважды кликнув по ее иконке левой кнопкой мыши. Это приводит к стандартному запуску. Для получения расширенных прав при работе с софтом необходимо обратиться к контекстному меню исполняемого файла:
- Найдите иконку приложения, которое нужно открыть.
- Щелкните по ней ПКМ.
- В контекстном меню выберите опцию «Запустить с правами администратора».
После выполнения указанных действий программа запустится с административными правами. При этом помните, что для получения расширенных возможностей требуется ввод пароля.
Функция Проводника
Еще один похожий вариант, позволяющий открыть приложение от имени Администратора. На этот раз предлагается найти исполняемый файл программы через Проводник (воспользуйтесь поиском внутри файлового менеджера или перейдите в корневую папку утилиты).
Когда вы найдете ярлык запуска, единожды кликните по нему ЛКМ, чтобы выделить файл. Далее откройте вкладку «Управление», расположенную в верхней части интерфейса Проводника. Здесь находится опция «Запустить от имени администратора». Нажав по ее иконке, вы запустите приложение с расширенными правами.
Поисковая строка
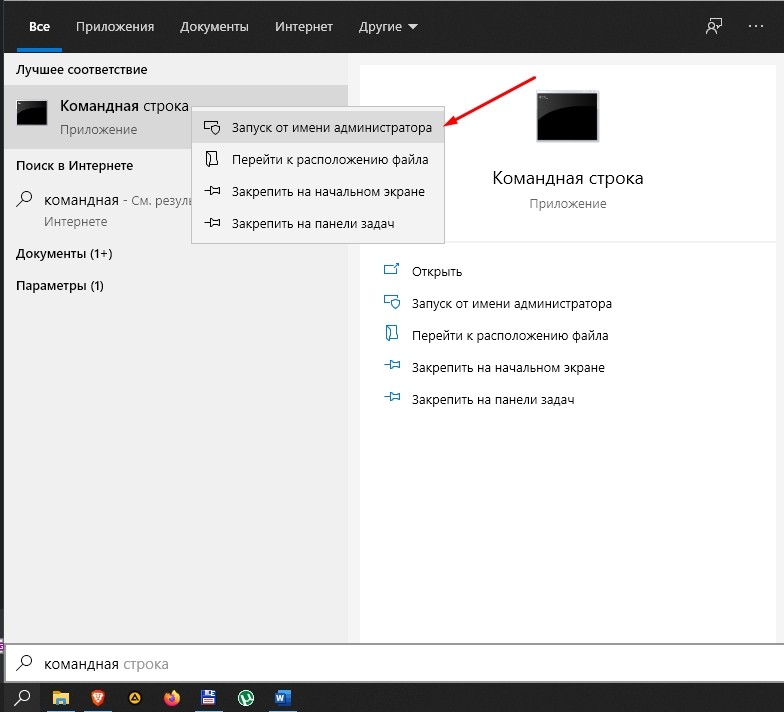
Следующий способ тоже завязан на том, как вы привыкли открывать приложения. Многие пользователи, которые не позаботились о создании ярлыка на Рабочем столе, и не знают, где находится корневая папка программы, ищут софт через поисковую строку Windows. Вопреки расхожему мнению, через этот интерфейс все-таки доступен расширенный вариант запуска:
- Введите поисковый запрос, соответствующий названию приложения.
- Обнаружив программу в выдаче, щелкните по ее названию ПКМ.
- Нажмите на кнопку «Запуск от имени администратора».
Таким образом, взаимодействие с поисковой строкой практически не отличается от контекстного меню ярлыка или специальной опции Проводника. Запускать приложение можно любым способом, и каждый из них предложит получение административных прав.
Меню «Пуск»
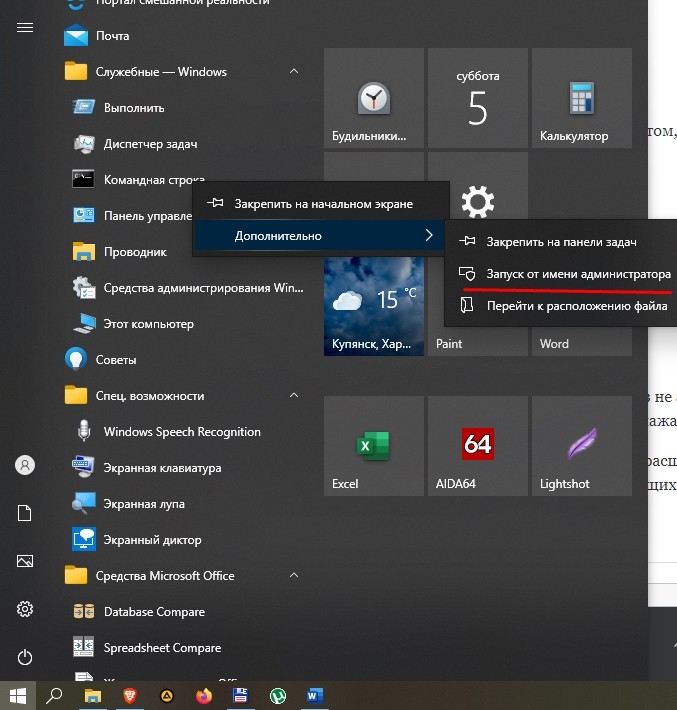
Двигаемся дальше и в очередной раз обращаемся к способу, завязанному на том, как именно вы открываете программы. Если запуск осуществляется через меню «Пуск», то можно не обращаться к помощи Проводника или контекстного меню ярлыка:
- Найдите приложение в меню «Пуск».
- Щелкните по нему ПКМ.
- Во вкладке «Дополнительно» выберите «Запуск от имени администратора».
Больше никаких действий предпринимать не нужно. Программа сразу же откроется с правами расширенного доступа и будет так работать до следующего запуска, когда свои намерения потребуется вновь подтвердить.
Панель быстрого доступа
Чтобы не искать исполняемый файл на просторах Проводника и лишний раз не заходить в меню «Пуск», многие люди добавляют приложения в Панель задач. Здесь образуется пространство быстрого запуска с ярлыками приложений, которые можно открыть одним нажатием левой кнопки мыши.
Разумеется, в таком случае происходит стандартный запуск. Для получения расширенных прав требуется сначала щелкнуть ПКМ по иконке, а затем выбрать пункт «Запуск с правами администратора». Словом, действовать нужно точно так же, как и в предыдущих вариантах.
Диспетчер задач
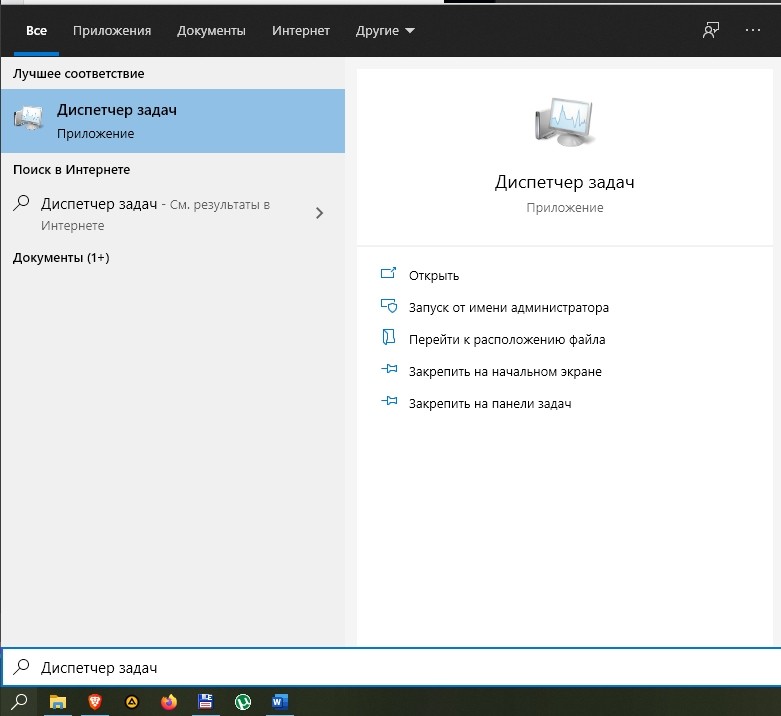
Теперь рассмотрим альтернативные варианты, которые сложно назвать удобными. Первый из них – обращение к функционалу Диспетчера задач:
- Щелкните ПКМ по иконке «Пуск».
- Вызовите «Диспетчер задач» из контекстного меню.
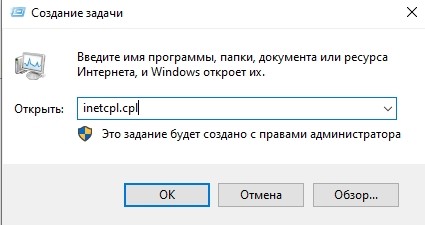
- Кликните ЛКМ по вкладке «Файл» и выберите пункт «Запустить новую задачу».
- В появившемся окне введите название исполняемого файла.
- Отметьте галочку, которая отвечает за получение дополнительных прав.
- Нажмите на кнопку «ОК».
Учтите, что без запроса на получение прав Администратора в окне «Создание задачи» у вас не получится осуществить задуманное. Обязательно проверьте наличие галочки и не ошибитесь с вводом имени EXE-файла приложения.
Через «Свойства»
Так или иначе, все варианты, рассмотренные ранее, можно назвать неудобными. Проблема заключается в том, что пользователь при каждом запуске программы должен подтверждать получение административных прав. Чтобы избавиться от лишних движений, сделайте следующее:
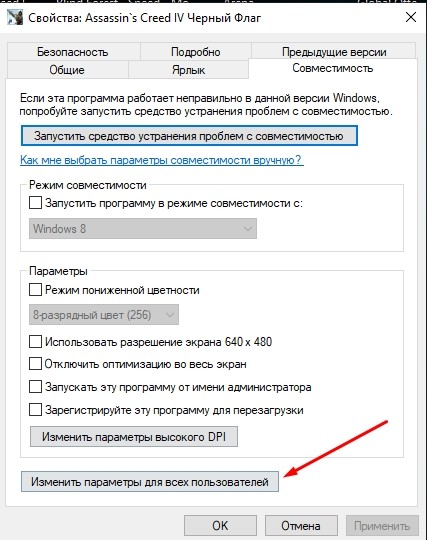
- Щелкните ПКМ по исполняемому файлу.
- Перейдите в «Свойства».
- Откройте вкладку «Совместимость».
- Нажмите на кнопку «Изменить параметры для всех пользователей».
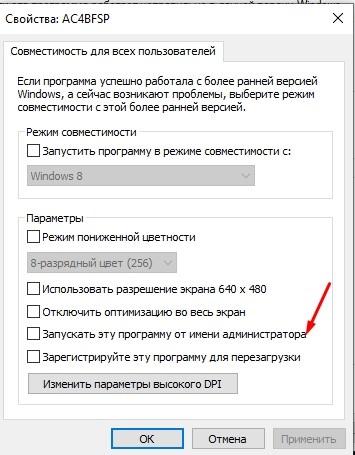
- Отметьте галочкой пункт «Запускать эту программу от имени администратора».
- Сохраните новые настройки нажатием кнопки «Применить».
Теперь для административного запуска компьютер не будет требовать вызов контекстного меню или выполнения лишних действий. Просто открывайте приложение любым удобным способом, и оно всегда будет запускаться от имени Админа.
Реестр
Заключительный вариант, который повторяет предыдущий способ. То есть мы вновь пытаемся присвоить программе административный запуск на постоянной основе. Но теперь через Редактор реестра:
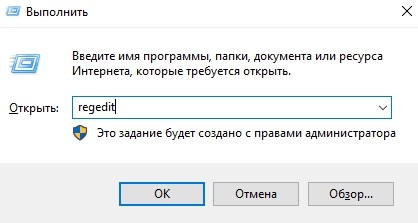
- Вызовите окно «Выполнить» («Win» + «R»).
- Введите запрос «regedit».
- Нажмите на кнопку «ОК» или клавишу «Enter».
- Перейдите в раздел «HKEY_CURRENT_USER\ Software\ Microsoft\ Windows NT\ CurrentVersion\ AppCompatFlags\ Layers».
- Щелкните ПКМ по свободной области экрана и создайте строковый параметр.
- Присвойте ему имя, в котором будет указано расположение исполняемого файла.
- Назначьте параметру значение «RUNASADMIN».
По аналогии с предыдущим способом, для запуска от имени Админа вам не потребуется вызывать контекстное меню. Просто кликните ЛКМ по исполняемому файлу – и «дело в шляпе».
We often use File Explorer to browse and view our files. When we open it, File Explorer in Windows 11 by default operates with standard-level privileges, which are sufficient for regular tasks. However, to modify or access hidden file settings, we need to open File Explorer with administrative rights.
Running File Explorer as an administrator can provide you with the necessary permissions to do so. This article will guide you through the straightforward steps to open File Explorer with administrator rights, enabling you to manage files and settings that regular user accounts might not have access to. Let’s delve deeper and learn how to run File Explorer as an administrator in Windows 11.
When you use File Explorer (a tool to look at your computer’s files), being an administrator gives you special powers. It lets you do things that require important rights. Here are some situations where it’s good to be an administrator in File Explorer:
Accessing System Files: Some files on your computer are kept safe and can only be changed by people with administrator powers. If you use File Explorer as an administrator, you can look at and change these special files. This might be needed when fixing problems, setting things up, or making things look how you want.
Installing or Modifying Software: When you add new programs or change ones that affect how the whole computer works, you might need special powers. Being an administrator in File Explorer helps you find where programs are put, take care of their files, and make the right changes.
Managing Files in Protected Locations: Certain folders in the computer, like “Program Files” or “Windows” folders, are locked so that you don’t accidentally mess them up. If you use File Explorer as an administrator, you can change files in these folders and make things work better.
Editing Permissions and Ownership: Sometimes, you might want to say who’s allowed to change files or own them. To do that, you need to be an administrator. File Explorer with administrator powers helps you set things up to keep things safe and the way you like them.
Dealing with File Operations: When you move or copy files to special places, your computer might ask for special powers. If you’re already using File Explorer with administrator rights, you won’t get extra questions. It makes things faster and easier.
Resolving Access Denied Errors: If you ever see a message saying you can’t do something with files, it could be because you need special powers. If you use File Explorer as an administrator, you can go around those limits and finish your work.
Remember, having administrator powers is like having a super tool – it’s helpful, but it’s important to be careful not to change things by mistake.
How to Run File Explorer as an Administrator in Windows 11
Running File Explorer with administrator privileges enables you to perform special tasks on your computer. There are various methods to achieve this.
Here’s how you can open File Explorer as an admin in Windows 11:
1. Using the Start Menu
The foremost method of running File Explorer as an Administrator in Windows 11 involves using the Start Menu. This approach offers a convenient means of elevating your privileges and accessing the administrative features of File Explorer.
If you frequently encounter tasks that demand file modifications, settings management, or troubleshooting issues necessitating administrator-level permissions, this method can be a vital asset to your workflow.
Here are the steps you can follow to run File Explorer as an Administrator using the Start Menu:
1. Click on the Start Menu button located in the bottom-left corner of your screen.
2. Now, in the search bar, type explorer.exe and look for the Explorer command. Here, click on the Run as Administrator option.
3. Alternatively, right-click on it. This action will prompt a context menu to appear.
4. From this context menu, select Run as administrator to execute File Explorer with administrative privileges.
These are the straightforward steps you can follow. You are now ready to run your File Explorer as an administrator using the Start Menu.
2. Using Task Manager
Another way to launch File Explorer with administrator rights is by using the Task Manager. To open File Explorer as an admin using the Task Manager, follow these steps:
1. Right-click on the taskbar, which is the bar at the bottom of your screen, and then select Task Manager from the menu that appears. Alternatively, you can open Task Manager using the Ctrl + Shift + Esc keys.
2. The Task Manager window will appear. Here, click on the Run new task option.
3. In the Create New Task window that appears, type explorer in the box and tick the box that says Create this task with administrative privileges option.
4. Then click on the OK button to run File Explore as an Admin.
3. Using the Run Dialog Box
You can also use something called the Run dialog box to open File Explorer as an administrator. For that, follow these steps:
1. Press the keys Win + R at the same time. This will open the Run dialog box.
2. Type Explorer into the box, and instead of just pressing Enter, press Ctrl + Shift + Enter on your keyboard to launch File Explorer as an administrator.
3. You will receive a User Account Control prompt. Here, click on Yes to proceed.
This will open File Explorer with administrator privileges, a feat that cannot be achieved using the Run Dialog alone. You can also explore other methods to accomplish this.
4. Using PowerShell
Windows PowerShell is another tool you can utilize to run File Explorer as an administrator. It serves as a command-line interface; to use it, you need to execute specific commands.
Here is how you can run File Explorer with administrator privileges using PowerShell or the command prompt:
1. Right-click on the Start button, usually found at the bottom-left corner.
2. From the menu that appears, select the Terminal (Admin) option. Alternatively, you can also choose Command Prompt (Admin), which is also effective.
3. Once the PowerShell window opens, type the following command and press Enter.
C:\windows\explorer.exe /nouaccheck5. Run as an Admin from File Explorer
You can also run File Explorer as an administrator from the Windows location. This folder contains all the regular applications and important system-related files. Therefore, it is a crucial directory for your system to function properly.
To run File Explorer as an admin, simply follow the steps mentioned below.
1. Open File Explorer using Win + E a keyboard shortcut.
2. Then, navigate to the following location on your C drive. Or, paste it in the File Explorer address bar.
C:\Windows
3. Now, locate Explorer in the list, right-click on it, and choose the Run as administrator option from the menu that appears.
Keep in mind that when you’re using administrator privileges, it’s similar to having a powerful tool at your disposal. However, exercise caution to avoid making unintended changes, particularly within crucial folders.
Conclusion
Whether you’re troubleshooting an issue or making advanced adjustments, understanding how to run File Explorer as an administrator in Windows 11 is a valuable skill. By following the methods mentioned above, you’ll be able to elevate your privileges and perform tasks that require higher system access, ensuring you can effectively manage your computer without unnecessary restrictions.
So, now you know the magical way to use File Explorer in Windows 11! Whether you’re clicking the Start button, going through the Task Manager, using the Run box, or even staying within File Explorer, remember to be extremely careful with your actions. We hope this guide helps you learn the steps to run File Explorer as an administrator on Windows 11.
