
На чтение 4 мин Просмотров 13.8к. Опубликовано
Содержание
- Нам потребуется:
- Установка Game Porting Tool
- Установка Diablo IV
После анонса новой операционной системы macOS Sonoma, компания выпустила специальную утилиту Game Porting Tool. Он позволяет перенести Windows-игры на Mac, не редактируя код.

На форуме Reddit уже можно найти много примеров работы популярных игр на Mac. Теперь вы сможете поиграть в такие хиты, как Cyberpunk 2077, Diablo IV, Hogwarts Legacy, Spider-Man (2018), Sonic Omens, Elden Ring и SpongeBob SquarePants: The Cosmic Shake. Например, Cyberpunk 2077 работает на MacBook Pro с M1 и 16 ГБ ОЗУ на ультра-настройках со скоростью около 15 FPS, а на чипе M2 Max, выдает уже 40 FPS. Интересно, что если понизить настройки графики, то Cyberpunk 2077 все равно будет работать максимум на 40 FPS.
Популярные телефоны Айфон
Популярный Ведьмак 3 с DirectX 12 тоже выдает максимум 40 FPS на процессоре M1 Pro. Но с DirectX 11 и средними настройками графики игра идет на 48-50 FPS. При этом MacBook Pro нагревается в среднем до 65 градусов и не включает вентиляторы.
Пользователи предполагают, что ограничение FPS связано не с железом (его запаса достаточно), а с рендерингом. Все игры были портированы без какой-либо дополнительной оптимизации. Кроме того, во время их работы не задействован игровой режим macOS Sonoma, который повышает частоту процессора в играх.
Как же вам запустить любимую игра на Mac? Легко…
Нам потребуется:
- Процессор Apple Silicon
- Минимум 16 ГБ оперативной памяти
- Минимум 50 ГБ свободного места на диске (зависит от размера игры)
- Бета-версия macOS Sonoma
- Скачайте и установите Game Porting Tool с сайта Apple для разработчиков.
- После установки приложения, откроется окно с различными файлами. Надо открыть файл Read Me.rtf и установить весь софт из пунктов 1-3.
- Скачайте и установите Command Line Tools for Xcode 15 beta с официального сайта Apple для разработчиков.
- Откройте Терминал и установите весь софт, который выделен красным на скриншоте. Для этого поочередно вставьте в Терминал код, который выделен синим.

- Создайте новый префикс Wine для Game Porting Toolkit. В данном случае нужен виртуальный диск C:, на который будет установлена игра.
- Для этого в Терминале надо запустить команду
WINEPREFIX=~/my-game-prefix `brew --prefix game-porting-toolkit`/bin/wine64 winecfg - Затем на экране должно появиться окно Wine configuration
- Измените версию Windows на Windows 10
- Нажмите Применить и закройте winecfg
- Установите набор инструментов для Wine, запустив в Терминале команду
ditto /Volumes/Game\ Porting\ Toolkit-1.0/lib/ `brew --prefix game-porting-toolkit`/lib/
Установка Diablo IV
- Скачайте установщик Battle.net для Windows
- Переместите его в Wine, выполнив команду в Терминале
cp ~/Downloads/Battle.net-Setup.exe ~/my-game-prefix/drive_c/users/crossover/Downloads/ - Перед запуском Battle.net обновите номер сборки Windows, иначе Diablo IV не запустится. Это можно сделать с помощью команд
WINEPREFIX=~/my-game-prefix `brew --prefix game-porting-toolkit`/bin/wine64 reg add 'HKEY_LOCAL_MACHINE\Software\Microsoft\Windows NT\CurrentVersion' /v CurrentBuild /t REG_SZ /d 19042 /f
WINEPREFIX=~/my-game-prefix `brew --prefix game-porting-toolkit`/bin/wine64 reg add 'HKEY_LOCAL_MACHINE\Software\Microsoft\Windows NT\CurrentVersion' /v CurrentBuildNumber /t REG_SZ /d 19042 /f
WINEPREFIX=~/my-game-prefix `brew --prefix game-porting-toolkit`/bin/wineserver -k
- Запустите Battle.net, с помощью команды в Терминале:
/Volumes/Game\ Porting\ Toolkit-1.0/gameportingtoolkit ~/my-game-prefix "C:\users\crossover\Downloads\Battle.net-Setup.exe" - Откроется окно установки Battlenet, после чего можно установить и запустить Diablo IV
Пока что все инструменты работают в бета-версии, поэтому возможны различные ошибки. В файле Read Me.rtf есть информация по их решению.
Также стоит учитывать, что сейчас не все игры можно перенести на Mac, а те, что можно, не всегда работают стабильно, даже на этапе установки. Например, Battle.net может не запуститься с первого раза. В таком случае нужно повторить команду из четвертого пункта.
Свежие новости, промо-коды магазина, инструкции и обзоры уже в Telegram
Идея совместить несовместимое кажется бредовой только до того момента, пока вам не понадобится какое-нибудь специфичное приложение, которого нет на Mac, или пока не захочется зарубиться в свежий игровой хит.
Даже самым ярым поклонникам OS X иногда бывает нужно воспользоваться «вражеской» Windows. Ситуации бывают разные: от необходимости пользоваться банковскими клиентами и корпоративным ПО до запуска игр. Есть масса способов запустить приложения, написанные под Windows, при помощи как сторонних инструментов, так и фирменных решений Apple.
Условно их можно разделить на три категории: полноценная установка Windows, использование виртуальных машин и эмуляторов программной среды Windows. У каждого варианта есть свои преимущества и недостатки, поэтому мы рассмотрим их все, чтобы вы могли выбрать самый удобный именно для вас.
Установка Windows с помощью Boot Camp
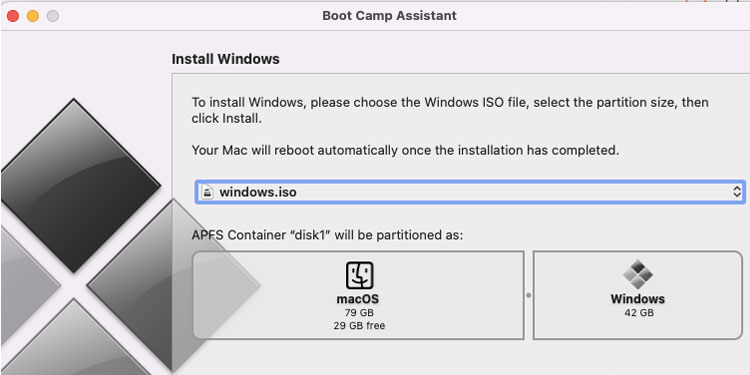
Специально для горемык, не способных порвать все связи с Windows, Apple создала утилиту «Ассистент Boot Camp», с помощью которой можно подготовить свой Mac к установке Windows и, собственно, установить её. При этом на диске создаётся отдельный раздел, позволяющий обеим ОС работать независимо друг от друга.
Вам потребуются 50 ГБ свободного места и загрузочный диск Windows. Сам процесс установки очень прост, нужно лишь следовать подсказкам мастера и дождаться завершения. После перезагрузки вы получите в своё распоряжение полноценную версию Windows, как на обычном ПК. Останется установить необходимые приложения или игры — и можно пользоваться. Подробнее о требованиях и поддерживаемых версиях можно узнать здесь.
Преимущества Boot Camp
- Производительность. Поскольку все ресурсы Mac использует только одна ОС, мы получаем максимальное быстродействие.
- Совместимость. Благодаря полноценной Windows обеспечивается полная совместимость с любыми приложениями и играми.
Недостатки Boot Camp
- Необходимость перезагрузки. Для запуска Windows всякий раз придётся перезагружать Mac.
- Отсутствие интеграции. Windows не поддерживает файловую систему HFS+, а значит, получить из неё доступ к файлам OS X будет нельзя, равно как и наоборот.
Использование виртуальных машин
Этот способ имеет много общего с предыдущим, но немного отличается в реализации. С ним мы также получаем полноценную ОС, но устанавливается она не на реальное «железо», а на виртуальное. Специальное ПО (виртуальная машина) эмулирует аппаратную платформу для запуска Windows, отбирая часть ресурсов Mac, и получается, что одна ОС работает внутри другой.
Существует несколько виртуальных машин, как платных, так и бесплатных. По принципу работы они аналогичны, а отличия незначительны и больше заключаются в функциональных возможностях. Windows устанавливается из образа загрузочного диска или физического носителя. Выбираем количество ресурсов, которыми вы готовы поделиться с гостевой ОС (процессор, память, дисковое пространство), а дальше как обычно устанавливаем Windows и нужные приложения и используем в оконном или полноэкранном режиме, в любой момент переключаясь между OS X и Windows.
Parallels Desktop
Пожалуй, самая популярная среди «маководов» виртуальная машина. Parallels регулярно обновляется, всегда работает с актуальными версиями OS X и Windows и обладает дополнительными функциями вроде гибридного режима, когда на экране одновременно отображаются интерфейсы OS X и Windows, а приложения запускаются независимо от их принадлежности. Кроме того, программа умеет запускать Windows из разделов Boot Camp, что удобно, если нужно получить доступ к каким-либо приложениям или данным без перезагрузки.
Недостаток программы заключается в том, что Parallels не бесплатна. Младшая версия обойдётся вам в 79,99 доллара.
VMware Fusion
Ещё одно коммерческое решение для виртуализации ОС. Ключевой фишкой VMware Fusion является мастер обмена, позволяющий перенести всю среду с вашего Windows-ПК в виртуальную машину и продолжить использование приложений уже на Mac. Установленная Windows имеет общий с OS X буфер обмена, а также доступ к файлам и сетевым ресурсам. Её приложения полностью интегрируются с функциями OS X (Spotlight, Mission Control, Exposé). Кроме того, поддерживается запуск Windows из раздела Boot Camp.
VMware Fusion стоит 6 300 рублей, но перед покупкой вы можете изучить её возможности в бесплатной пробной версии.
VirtualBox
Если в ваши планы не входят дополнительные траты на запуск Windows-приложений, то ваш выбор — VirtualBox от Oracle. По сравнению с платными аналогами она обладает гораздо меньшими возможностями, но для простых задач вполне годится. На интеграцию с системными функциями OS X рассчитывать не стоит, но базовые вещи вроде общего буфера обмена и доступа к сетевым ресурсам здесь доступны. Бесплатность VirtualBox полностью оправдывает все её ограничения.
Преимущества виртуальных машин
- Одновременная работа двух ОС. Для запуска Windows-приложений не нужно перезагружать Mac.
- Общий доступ к файлам. Поскольку Windows работает внутри OS X, проблема с поддержкой файловых систем отсутствует.
Недостатки виртуальных машин
- Низкая производительность. Из-за того, что ресурсы Mac делятся между двумя ОС, быстродействие приложений значительно ниже, особенно на не самых новых компьютерах.
- Проблемы совместимости. Некоторые приложения (чаще всего игры), требующие прямого доступа к «железу», могут работать некорректно или не работать вовсе.
Использование эмуляторов
С эмуляторами всё совсем иначе, нежели с виртуальными машинами и Boot Camp. Вернее, у них есть что-то общее с виртуальными машинами, только эмулируют они не Windows целиком, а лишь те её программные компоненты, которые необходимы для работы нужного приложения. Полноценной ОС и доступа к её функциям у нас не будет: мы получаем некий слой совместимости, позволяющий запустить Windows-приложение прямо в среде OS X.
Все эмуляторы работают по одному и тому же принципу. Инициализируется установка приложения через setup.exe, а далее в её процессе настраиваются необходимые параметры запуска и автоматически загружаются нужные библиотеки. После этого на Launchpad появляется иконка приложения, которое будет работать так же, как и все нативные программы OS X.
WineBottler
Этот эмулятор может превратить .EXE-файл в совместимое с OS X приложение. Также WineBottler позволяет автоматически загружать некоторые уже настроенные Windows-приложения. Он полностью бесплатен и совместим с OS X El Capitan.
Wineskin
Ещё один эмулятор, который, как и предыдущий, использует библиотеки Wine для создания портов. По сравнению с предыдущим решением, Wineskin имеет больше настроек и позволяет более тонко задать параметры. Подробно о его настройке и использовании мы рассказывали в отдельной статье.
CrossOver
Коммерческий эмулятор, команда разработчиков которого уже адаптировала и настроила для вас множество популярных Windows-приложений и игр. CrossOver обладает дружелюбным интерфейсом, а также избавляет от необходимости копаться в настройках и разбираться с возможными ошибками. Единственный минус — он платный. Лицензия стоит 20,95 доллара, но есть 14-дневный пробный период.
Преимущества эмуляторов
- Не нужна лицензия Windows. Эмуляторы запускают приложения через слой совместимости, поэтому лицензионная копия ОС не нужна.
- Производительность. Опять же, из-за экономии ресурсов, которые в виртуальных машинах расходуются на запуск полноценной Windows, мы получаем более высокую производительность по сравнению с ними.
Недостатки эмуляторов
- Сложность настройки. Для использования Windows-приложений их сначала нужно настроить, а это далеко не всегда бывает просто, особенно с играми.
- Проблемы совместимости. В некоторых случаях приложения (чаще ресурсоёмкие) могут работать неправильно или не работать совсем.
Что выбрать
Что же в итоге выбрать из такого многообразия? Однозначного ответа на этот вопрос нет. В каждом конкретном случае нужно отталкиваться от ваших нужд, но в целом рекомендации следующие.
- Boot Camp подойдёт в первую очередь геймерам, а также тем пользователям, которым нужна максимальная производительность и совместимость с софтом. Перезагружаем Mac — и получаем полноценный компьютер с Windows.
- Виртуальные машины выручат в случаях, когда нужны обе ОС одновременно. Жертвуем производительностью, но избегаем перезагрузок и получаем хорошую интеграцию.
- Эмуляторы можно порекомендовать только для несложных задач и нечастого использования. Например, когда пару раз в месяц вам нужно воспользоваться банк-клиентом или изредка поностальгировать в любимой игре.
Выбирайте для себя самый подходящий вариант, а в комментариях рассказывайте, для каких нужд вы используете Windows-приложения на своём Mac и как их запускаете.
Mac is mostly associated with productivity, eco-system, security, and good performance but not gaming. While Macs have capable hardware to run games smoothly, developers are not convinced, and many popular games have not been ported to Mac.
If you own Mac and want to play any game, then there are different reliable and secure ways to play Windows games on Mac.
Very few developers have opted to make the Mac version of Windows games. The developers mainly focus on the Windows platform because of its gaming performance and dedicated and powerful external graphics.
So, if you want to play a game that is not supported on your Mac device, you need to take an unconventional approach. But don’t worry, it is very easy and we are here to guide you.
In 2020, Tim cook officially claimed Mac devices are now steering away from Intel silicon chips and integrating their own technology named Apple Silicons. Nowadays, the M-series Mac book is available.
The process to install windows differs depending upon the chip used. So, you must first know which silicon chip is installed on your device. Here are few ways you can install windows on your Mac devices,
Table of Contents
Virtual Machines
Mac chips are so powerful that they can run Windows operating system on top of Mac OS and still run demanding games on Windows. So, there is no performance problem on Mac while using Virtual machines.
There are various virtual machine applications available that let users install Windows on Mac devices. So, it is up to you to choose which one you prefer but we recommend you use Parallels and Boot Camp Assist.
Boot Camp Assistant
Before their revolutionary Silicon chip, Mac used an Intel processor based on the x86-64 architecture. So, Mac had an inbuilt boot utility software that lets users enjoy Windows operating system easily.
Because of Boot Camp Assistant, you don’t need any external applications to enjoy Windows games. Using this is only possible in Mac with older Intel Chipsets as new mac devices do not have Boot camp assistant. Follow the steps to install windows on a Mac device,
Step 1: Download the Official Windows Installation File
On Windows’s official website, the Windows installation file is available for free. You can download the ISO file and move that file to USB devices.
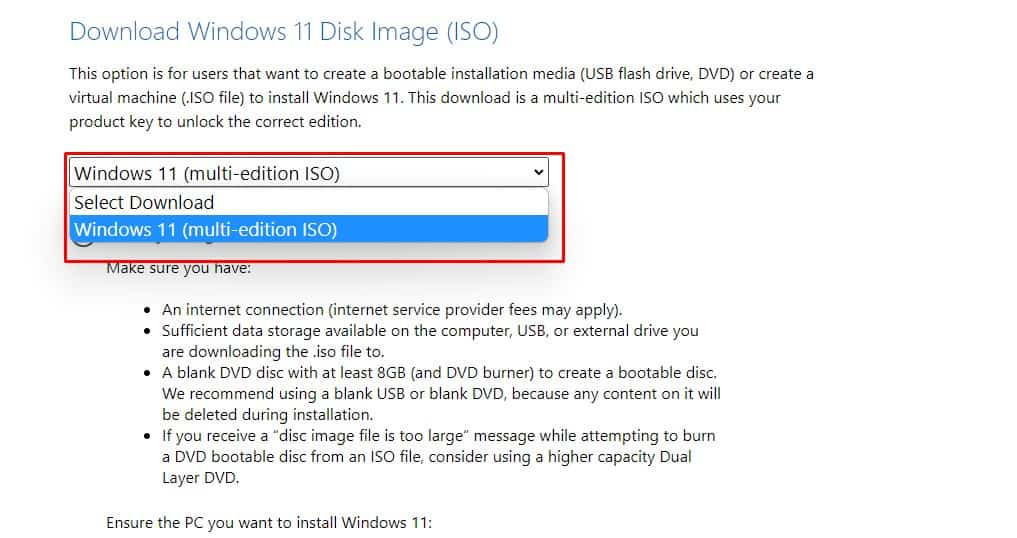
- Go to Windows Official’s Website
- Locate Download Windows 11
- Select version

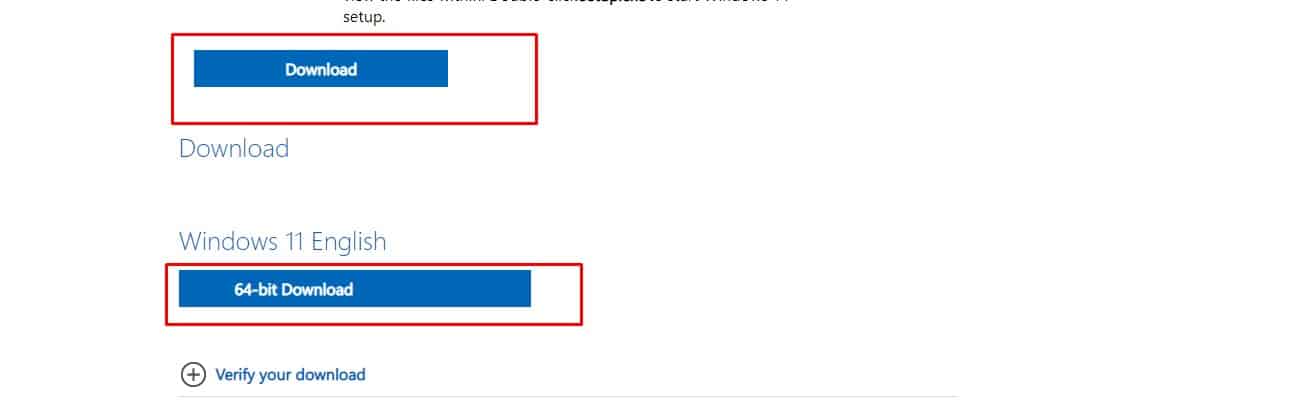
- Click on Download.
- Click on 64-bit Download

- Move the Windows files to a USB drive.
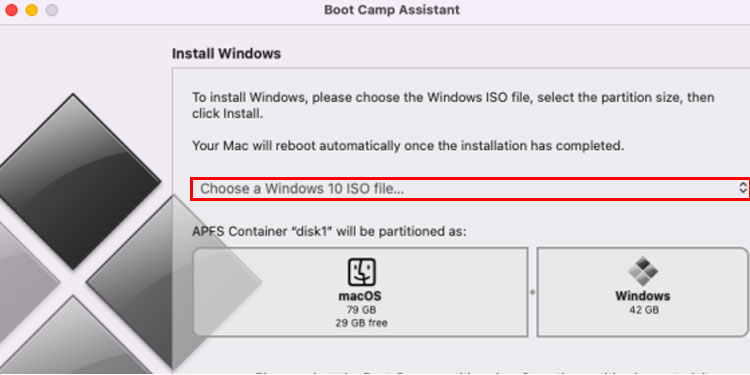
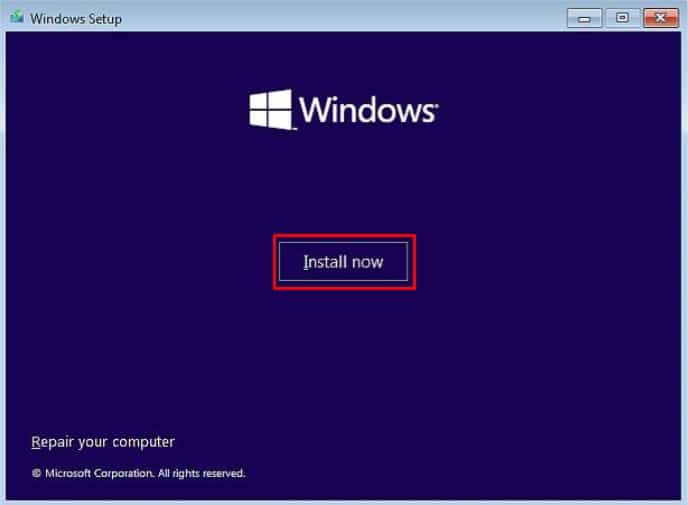
Step 2: Install Windows
You need to create a partition to install Windows on Mac. So, you must specify the partition where you want to install Windows.
- Open Boot camp assistant.
- Tap on Choose.

- Select Windows ISO file.
- Click Install now.

Parallels
Parallels are reliable and fast boot utility software that lets users install Windows operating systems on their Mac devices. Parallel is common tool used for Mac with M1 Chips. It is free to use for a certain time but you need to subscribe to their plan for the long time use. Here’s how you can install windows using paralles,
Step 1: Download Parallels
Parallel’s official executable file is available on its official website.
- Download Parallel’s installation file.
- Double-click on the downloaded file and then, click on Install.
- Read the terms and conditions and click on Accept.
- Enter your device’s password to complete the installation process.
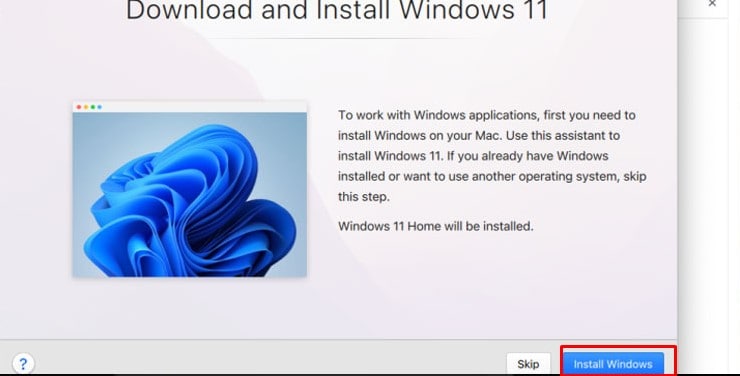
Step 2: Install Windows
For Parallels to work properly on your Mac devices, you must first download the .iso file of the Windows operating system from Microsoft’s official website.
- Open the Parallels.
- Click on Install Windows.

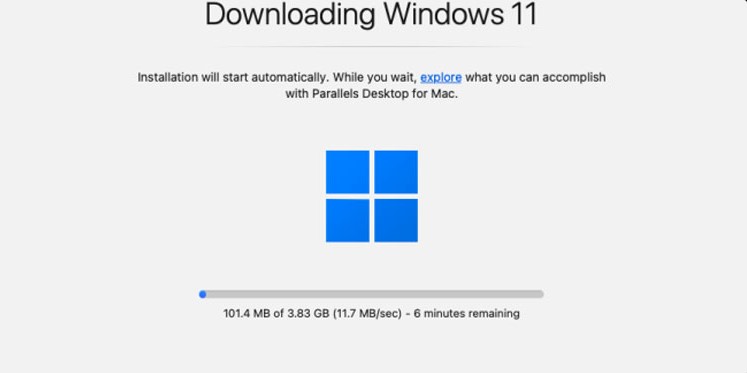
- The downloading starts.

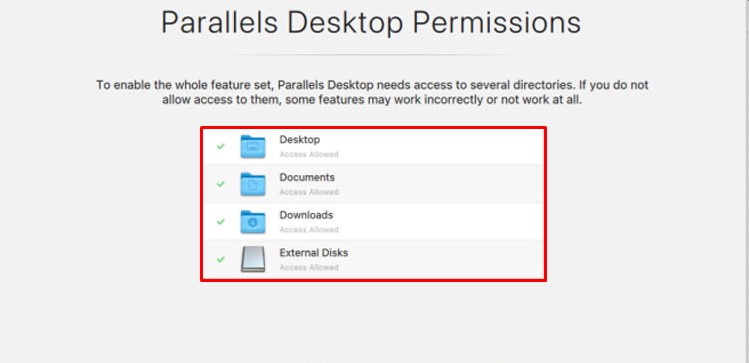
- Give access to the drive you want to install Windows.

- Click on Ok.
Cloud Gaming
Various cloud gaming services are claiming cloud gaming to be the future of gaming. It is partially true because it is very tough to play competitive first-person shooters on cloud gaming but for regular gaming, this is a very good option. While cloud gaming, there is no hassle for downloading games, and no powerful GPUs and CPUs. You just need stable and high-speed internet connection.
Cloud gaming is a great option to use for gaming on Mac devices. You can just subscribe to cloud gaming services like Geforce, and airgpu and play the game. There are various cloud gaming services available now. So, you can subscribe to any of the services according to your need.
Are you a Mac user? Then, you can do your office work pretty effectively on your device, but when it comes to playing games to relax, unfortunately, luck isn’t on your side. It’s common knowledge that Macs aren’t designed to play video games. Heck, many popular games aren’t even compatible on macOS, like Grand Theft Auto, Call of Duty, etc.
In contrast, the Windows operating system has all the right features to play powerful games. In fact, the latest Windows 11 is embedded with many new gaming features, such as:
- Auto-HDR offers a more realistic and bold color to your games and display sceneries even better.
- Microsoft DirectStorage API allows the GPU to load games faster from the SSD by avoiding CPU processing.
- Built-in Xbox app and Game Pass to quickly access the vast video game gallery.
So, Windows is great for gaming, but you have a Mac, so what to do now?
First of all, stop getting annoyed at your Mac every time you fail to play your favorite game on it. And just learn how to run Windows on Mac for games. Yes, folks, Macs might not be good for playing games, but it is perfect for running Windows. So, all you have to do is run Windows on your Mac and play all your favorite Windows games on Mac. Let’s check out how to do that.
3 Ways to Run Windows on Mac to Play Games
Today, you can easily install Windows on your Mac to run Windows-specific programs and games. It also will be cheaper to run Windows on Mac rather than getting two devices.
Additionally, you don’t need much technical knowledge to run Windows on Mac for gaming or other purposes. There you have many options to run Windows on Mac, but the three best options are:
- Install Wine on Mac
- Create a portable Windows USB drive
- Install the virtual machine on Mac
Let’s discuss all three methods in detail.
1. Install Wine on Mac
Wine, aka Wine Is Not an Emulator, is a free method to run Windows on your Mac machine. It is a very technical way to wrap Windows OS in macOS. Wine allows Mac to interpret Windows API calls, and it is notoriously difficult to set it up.
Thus, if you don’t have adequate technical knowledge, using Wine to run Windows on Mac is not recommended.
| Pros | Cons |
|---|---|
|
Free solution. No Windows ISO file is required. |
Doesn’t support macOS Catalina. Complicated to use. Doesn’t support all Windows OS. Doesn’t work with Apple Silicone M1 Macs. |
2. Create a portable Windows USB drive
This is the easiest method than using Wine to install Windows on Mac. In fact, in this method, you aren’t installing Windows on your Mac. All you have to do is create a portable copy of Windows on a USB drive and boot it on your Mac device.
That means without any installation hassle; you can run Windows on your computer. Additionally, it is less complicated to add Windows OS on a portable device and run on Mac. You can use software like EaseUS OS2Go to easily install Windows on portable drives.
| Pros | Cons |
|---|---|
|
Easy to set up. No hard disk space consumption. Simple to use. |
Authentic Windows copy is required. |
3. Install the virtual machine on Mac
A virtual machine allows you to smoothly install and run Windows programs on Mac. In this, Windows thinks that it’s working on a real computer. But in reality, it is working inside software attached to your Mac.
Indeed, it is easy to use virtual machines to run Windows on Mac but not for gaming purposes. That’s because many games like Valorant don’t even support virtual machines. Importantly, 3D graphics performance isn’t up to the bar with VMs.
| Pros | Cons |
|---|---|
|
Easy to install Windows. Fast processing. Supports Windows on M1 Macs. |
Updates aren’t free. Doesn’t allow boosting graphics cards for gaming. VMs are expensive. |
Based on the brief description of three prominent methods to run Windows on Mac, it is clear that installing Windows on a USB drive method is the best. That’s because to use Wine intensive knowledge is required, and virtual machines are expensive to use. All in all, putting Windows OS on the portable drive will save your hard disk space, your time, and it is easy to set up. So, let’s check out how to create a portable Windows drive.
How to Create A Portable Windows USB Drive for Mac
To create a portable Windows USB for Mac, you have multiple options, such as Microsoft’s Windows To Go feature. But this method is only for Windows Enterprise and currently has been terminated by Microsoft. Therefore, if you wish to run Windows 10/11 on Mac, we highly recommend using EaseUS OS2Go. This program allows you to easily create Windows USB for Mac with simple clicks.
The software supports all the leading Windows systems, including Windows 11/10/8/7. Also, it is compatible with MacBook, Mac mini, and iMac. EaseUS OS2Go brings many other features onboard, such as:
- Allow you to access all Windows apps and games on Mac
- Easy to set up and run Windows on Mac
- Supports all the leading USB drives
- Seamless integration with almost all Windows and Mac devices
Download this tool from the button below, and here’s how you can create portable Windows drive using EaseUS OS2Go:
Step 1. Install EaseUS OS2Go on your Windows computer, it will display your system drive’s used space. Plug in a USB drive that is larger than the system drive used space. Choose the target USB drive and click Next to continue.

Step 2. EaseUS OS2Go will notify you that the following operation would delete all data on your drive. Make sure that you have backed up all the important data. Click the Continue button to proceed.

Step 3. Adjust disk layout. The default disk layout on the target drive will be exactly the same as the resource drive. You could also edit the layout according to your needs. Tick the option there if you’re using a Solid State Drive as the Windows bootable drive. Next, click Proceed.

Step 4. Then EaseUS OS2Go will start to create the portable USB drive. It usually takes a while depending on your OS and Network condition. When the progress reaches 100%, the USB drive should be bootable now.

Step 5. Insert the portable Windows USB and start your computer. Press the required key (F2, DEL, F10…) to access BIOS. Choose to boot from the USB disk.
Note: Please make sure that the boot mode (UEFI or Legacy) of the portable USB and your target computer are the same, otherwise you may not be able to boot.
How to Install Wine on Mac to Run Windows
If you are brave enough to use Wine to run Windows on Mac to play, here are steps to do that:
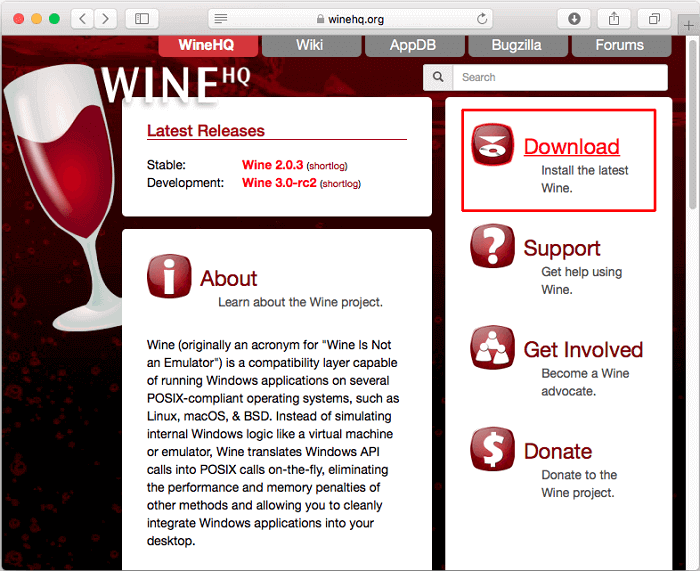
Step 1. Open the Wine website on your web browser and click on the download button.
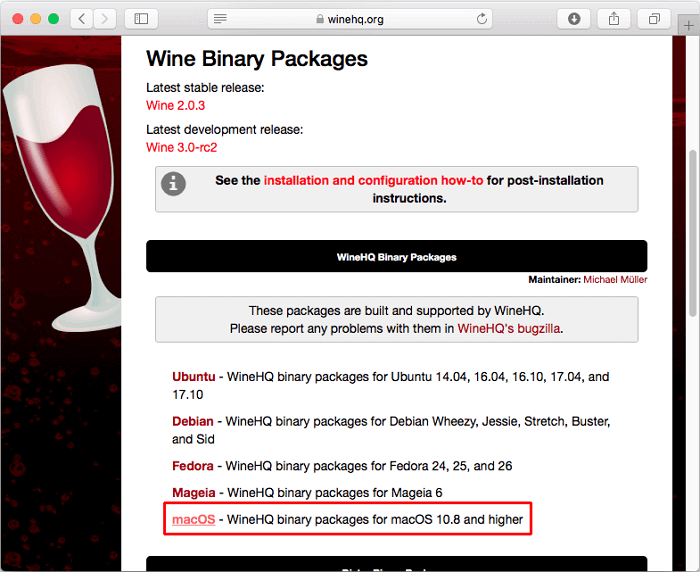
Step 2. Choose the macOS to download the Wine package for Mac.
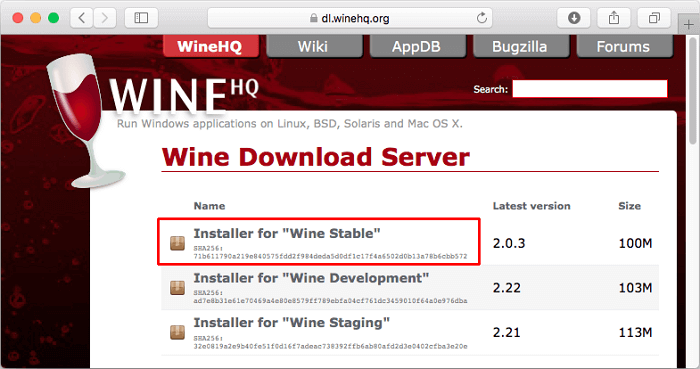
Step 3. Tap on the link to .pkg files and download the Wine Stable installer on your Mac.
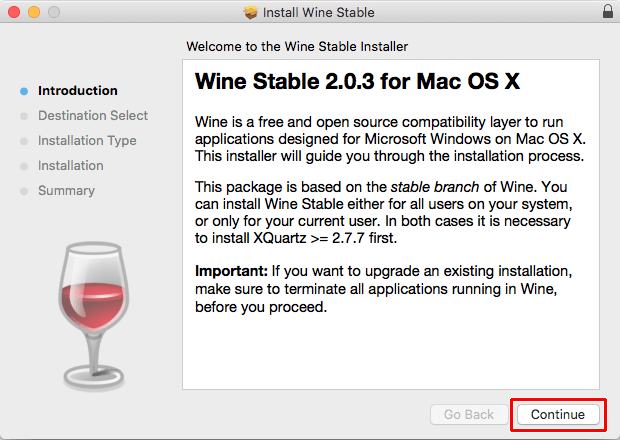
Step 4. Run «Downloads > winehq-stable-2.0.3.pkg», check out instructions and click on the Continue button.
Step 5. Turn on the 64-bit support option and then click on the Continue.
Step 6. Now, click on the Install button to start the Wine installation process and then enter your password to Installer.
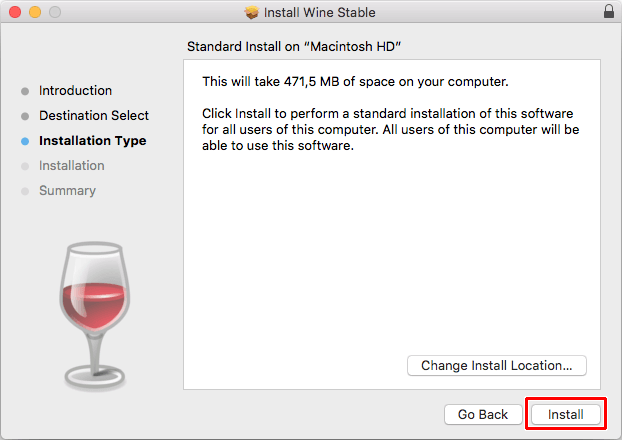
Step 7. Wait for a few minutes for the installation to complete.
Sum Up
There you go, gamers. Mac might not be designed to play robust games, but you can run Windows on Mac to play your favorite PC games. You simply have to select the right method to run Windows on your Mac, and you can effortlessly play games on your Mac devices.
We have already discussed the top three options to operate Windows on Mac. And out of all the options using a Windows USB drive is the best solution because:
- It is cheaper than running virtual machines
- It is less complicated than using Wine Software
- Importantly, you can use a simple tool like EaseUS OS2Go to create Windows USB
In short, install Windows OS on a portable drive today to play games on your Mac without consuming hard disk space.
Using a Mac operating system can be uncomfortable for a gamer. Only some games create with the Mac operating system in mind. Playing Windows games on a Mac can initially seem intimidating once you know the required techniques and workarounds.
On a Mac computer, you may play games in various ways. While some games are fan-made ports and emulator files, several create for this OS. Whatever the situation, I have covered every method about how to play windows games on mac.
Can I Play a Windows Game on My Mac?
Most Windows games can play on a Mac but doing so requires more work than simply installing and running your favorite game. Is there any way to play windows games on mac? Yes! There is. The excellent way to play Windows games on a Mac, is to install Windows via Bootcamp if your Mac supports it.
You’ll be able to switch between macOS and Windows each time you turn on your Mac and get the greatest possible performance when playing any Windows game.
How Can I Play Just PC Games on My Mac?
Installing Windows on a Mac and thus converting it to a Windows PC is the best way to play Windows games. You can use the official macOS Boot Camp capability by dual booting between a mac OS and a Windows installation.
Windows applications and games will function just as on a Windows PC if Boot Camp correctly configure, and the necessary drivers must install. Consequently, you can play Windows Steam titles and other games that need OpenGL, which Apple no longer supports.
How To Play Windows Games on Mac Without Bootcamp?
Although some games don’t have Mac versions, many may still play. How to play windows games on Mac M1? The ideal method is to utilize Bootcamp because it ensures that there will be no performance or compatibility problems.

If Bootcamp is not an option, you can install the desired game’s Windows version via Wine. To play Windows-only games, you own through a site like Steam. You can alternatively install it using Wine, Geforce, etc. There are several ways how to play windows games on mac epic games without Bootcamp:
Method 1: How to Play Windows Games on Mac with Cloud Streaming
You can use your Mac to play Windows games without really having a Windows computer! How? Cloud gaming is the solution. The game’s main computer is hidden away in a data center, while your PC receives streaming audio and video and receives commands from the game.
It can be a great experience if you have a reliable internet connection and reside close enough to the data center for low latency. However, I urge you to use Ethernet rather than Wi-Fi.
The best thing about cloud streaming is that it frees you from being forced to play games exclusively on a Mac. On a mobile device or even some set-top boxes like a Google Chromecast or Android TV, you can pick up where you left off in your game and continue playing.
Google Stadia, Nvidia GeForce Now, Xbox’s Xcloud, and PlayStation Now are notable game streaming services. Even better, many of these services are compatible with iOS devices, allowing you to play games on Apple products other than Macs.
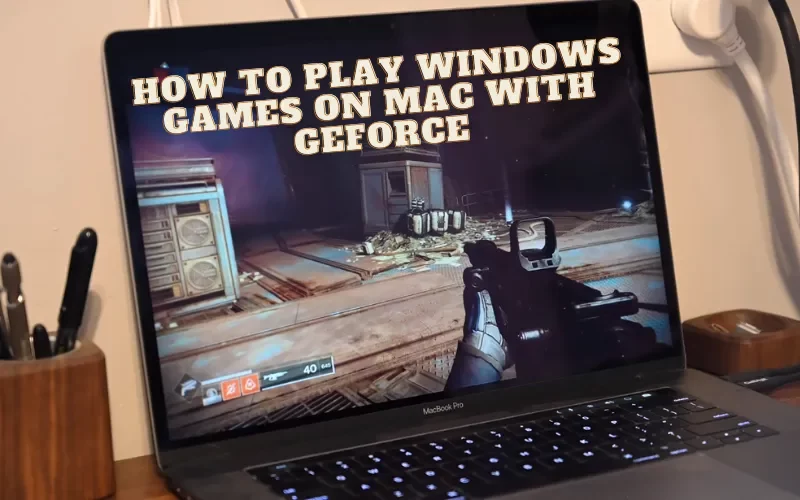
Method 2: How to Play Windows Games on Mac with GeForce
If your hardware is ancient, but you still want to play the most recent PC games on a Mac, use GeForce Now. It is a streaming service that utilizes Nvidia servers. Since every game plays remotely, you only need a strong internet connection.
After a protracted beta period, most of its bugs ironed out, and you can now use it to easily play even fast-paced multiplayer games like Fortnite now has a sizable selection of games from Steam, Battle.net, and Uplay. You can start playing your favorite game immediately because most are already stored.
How to play windows games on mac for free? GeForce Now is free, but there is a line to get in, and you can only use it for an hour. You must purchase a Priority Membership if you want to continue playing.
- GeForce Now may configure very quickly.
- Visit the Nvidia website. Before downloading GeForce Now, you must either create a free account or log in using Google or Facebook.
- Download and install GeForce for Mac OS right away.
- Register with Your Account. Clicking login will launch a browser page.
- To complete this process, click on the Nvidia logo in the center.
- Search for games. On GeForce Now, there are many games to choose from. Before playing a purchased game, you must sign into Steam or another service provider.
- Start the music.
How To Play Windows Games on Mac Crossover?
Another application that uses Wine is CrossOver. Because of its elegant user interface, it is more valuable than a WineBottler, although it must purchase. CrossOver costs $40, even though a trial edition is accessible for 4 days. The only application that lets Windows games run on modern Macs with M1 processors is Parallels.
Running PC games on a Mac only takes 3 steps with CrossOver.
- Install and download CrossOver.
- Take Steam. After the application launch, click Install a Windows Application. Use the search bar to look up any software you want to download, including Steam and Origin. Just click install and adhere to the directions.
- Look for the Games You Want to Play. When you start Steam, all of the Windows games should be available. Start the ones you prefer from the Library and download the others.
How To Play Windows Games on Mac WineBottle?
Running Windows Steam games using Wine is an excellent alternative. This compatibility layer is not an emulator but can run many Microsoft applications. You may download the well-known Windows programs from its primary hub, WineBottler.
- Go to WineBottler and get the app. Invest in a stable version rather than the most recent.
- Set it up. Simply drag Wine and WineBottler to the Applications after opening the download directory.
- Go to the wine bottle. By selecting the Games tab, find Steam, and then select Install.
- Join Steam now. It only takes a minute to create an account quickly.
- Obtain Games in the Store. Now is the moment to look through the store and immediately download the games you wish to play. Because many top independent games give away on Steam, no investment is required.
- Play. Go to your library when you’re ready. Click Play after selecting your game.
How To Play Windows Games on PlayOnMac?
Players can play Microsoft Windows games on their Macs without registering, thanks to the free tool PlayOnMac. Users won’t need a license key to use the software, and installation is easy and uncomplicated. Additionally, easy to use, the app lets you play uninterrupted video games.
After swiftly installing the software, users may look for games they previously couldn’t play on their Mac devices. Several Microsoft Windows games are now accessible to Mac users thanks to PlayOnMac.
Once the app has launched, enter the game’s name into the search field to begin playing. You may easily find the book you want by choosing it from a tidy list of all the results that fit your search criteria. The only thing left is waiting for the game to load before you can start playing at your leisure.
The fact that PlayOnMac maintains the quality of the games is one of its best qualities. The games play with Mac OS in mind! You won’t be able to distinguish between the two, and you’ll be able to enjoy smooth gaming with excellent graphics and fluent motion.
How To Play Windows Games on Mac with Parallels Desktop?
Like CrossOver, Parallels Desktop runs Windows ARM on Apple Silicon machines via virtualization technology. The people that create Parallels have optimized their software extensively.
Parallels include a unique Games only mode that guarantees the best performance when using OpenGL or DirectX if all you want to do is play games. It’s as simple as using Parallels to install Steam for Windows and start your games. I advise purchasing an Apple Silicon Mac with 16GB of RAM because some games play much worse with less RAM.
How To Play Windows Games on Mac M2?
You can use a Mac computer to run Windows OS by setting up a virtual machine. While it may resemble Boot Camp at first glance, the fundamental idea behind it is different. In contrast to Boot Camp, installing a virtual machine does not produce a dual-boot environment.
A virtual machine also operates on top of the primary OS. To access Windows OS, you must use a macOS program. A VM does not directly access your processor and memory, in contrast to Boot Camp. Installing a Windows virtual environment allows you to play games on a Mac.
Do Macs Work Well for Gaming?
Macs are terrific for productivity and making superb business computers, but they do not make to be gaming PCs.
Why is Mac Superior to Windows?
MacBooks’ high-quality audio, video, and typing experiences are another factor that sets them apart from their competitors and makes them more immersive gadgets overall. Everything appears sharper on the Retina Display because it has a higher pixel density than most Windows laptop screens.
Which MacOS is the Best for Gaming?
Gaming on Mac is even better with macOS 13 Ventura, especially on powerful MacBooks like the 14- and 16-inch versions. MacOS 13 Ventura will feature improved aesthetics, enhanced speed, and faster load times in addition to a redesigned Game Center experience.