Уровень сложности
Средний
Время на прочтение
2 мин
Количество просмотров 19K
Кому и для чего это нужно?
С момента появления Apple MacBook с процессорами M1 и M2 задача виртуализации становится очень актуальной. Я для разработки всегда использую несколько виртуалок. Ubuntu, CentOS, Windows, работающие под Oracle Virtual Box, например, в качестве тестовых полигонов значительно облегчают жизнь и экономят время. Но Virtual Box на MacBook с процессором M2 чувствует себя очень плохо (но это отдельная история). Основная задача в том, что на новых маках в качестве гостевых операционных систем лучше всего использовать собранные под ARM. Это особенность архитектуры и челендж на ближайшее время. Итак, где взять Windows 11 под ARM?
Microsoft Windows Insider Program
Для того, чтобы получить нужный ISO образ от Microsoft, нужно присоединиться к Windows Insider Program. Затем на странице Windows Insider Preview Downloads нужно выбирать сборку и нажать на кнопку Confirm. Затем нужно выбрать язык сборки и снова нажать на кнопку Confirm.
После этих телодвижений в случае, если компьютер находится не на территории России, начнётся загрузка нужного ISO образа. В противном случае появится следующее сообщение.
We are unable to complete your request at this time. Some users, entities and locations are banned from using this service. For this reason, leveraging anonymous or location hiding technologies when connecting to this service is not generally allowed. If you believe that you encountered this problem in error, please try again. И т.д.
К счастью, есть альтернативный способ.
Альтернативный способ получить Windows 11 под ARM
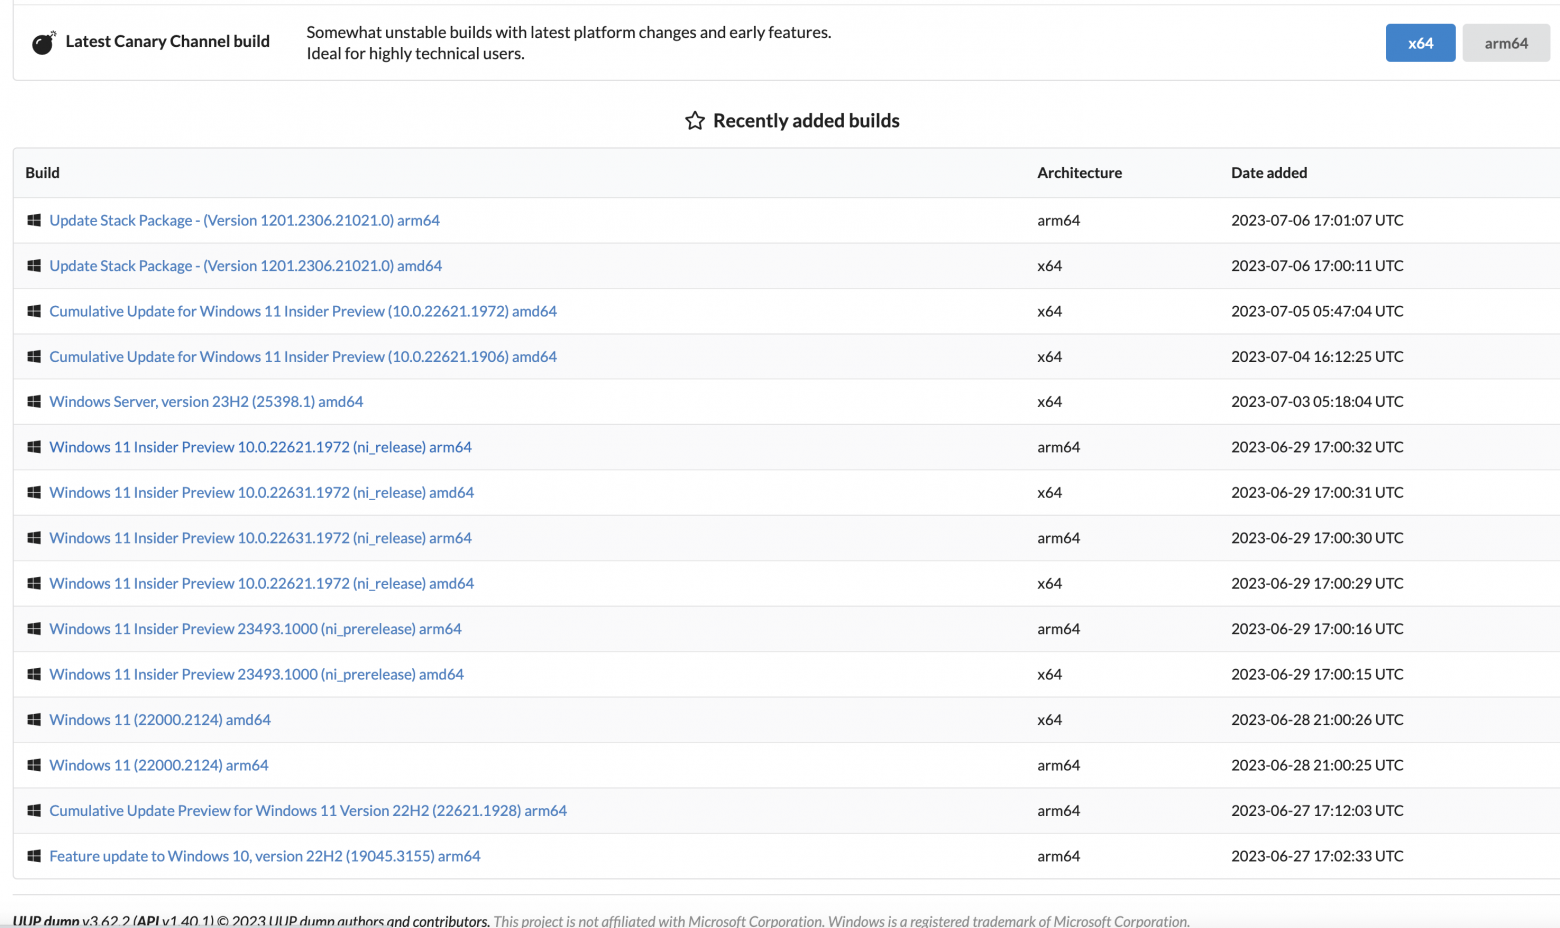
Можно воспользоваться услугами сервиса UUP Dump. Делается это в несколько шагов, но может потребовать большое количество времени (напрямую зависит от качества и скорости интернет подключения) и, возможно, админских скилов ( как минимум нужно понимать, как запускать скрипты для командной строки).
На открывшейся странице выбираем нужный релиз
Затем выбираем язык сборки и жмём на кнопку Next

Затем выбираем редакцию WIndows (по умолчанию Home и Pro) и жмём на кнопку Next

Затем, если нажать на кнопку Create Download Package, скачивается небольшой архив с файлами для командной строки Linux, macOS и Windows.

И тут начинается самое интересное. Каждая из версий скрипта скачивает исходники Windows 11 для ARM архитектуры и собирает их в загрузочный ISO образ, пригодный для установки. Вначале попробовал собрать образ на macOS с использованием uup_download_macos.sh, но сразу у меня не получилось добиться результата. Нужно разбираться вот с этим мануалом.
Вариант с Windows uup_download_windows.cmd отработал нормально. Я оставил процесс работать на ночь и на утро получил нужный результат. Собранный мной образ можно скачать c Яндекс Диска.
Полученный ISO образ я перенёс на macOS и установил с использованием UTM.

Всем желаю удачи, и… надеюсь, что мой опыт будет полезным кому-то ещё.
Item Preview
There Is No Preview Available For This Item
This item does not appear to have any files that can be experienced on Archive.org.
Please download files in this item to interact with them on your computer.
Show all files
184
Views
1
Favorite
DOWNLOAD OPTIONS
Uploaded by
WindowsRT2012
on
SIMILAR ITEMS (based on metadata)
This describes how to setup a Windows 10 on Arm laptop to build llvm. Windows 10 on Arm supports emulation of 32-bit x86 programs. This allows us to use those 32-bit x86 version on Windows 10 on Arm but support for x64 versions of same executables is not available in Windows 10.
We have moved regular LLVM development to Windows 11 while some information on this page is still valid overall, please follow https://linaro.atlassian.net/l/cp/6SWAH1pt page in order to setup your Windows 11 machines for LLVM development.
Adding to the PATH
For all the steps below you’ll need to put things on the PATH, if an installer doesn’t do it for you. To do that open the start menu, type “environment” and open the link to “System Properties”. There click “Environment Variables” to see a GUI for editing them.
Note that we configure RunAsRob (the service that runs buildbot) to run as “tcwg”, not “System” user, so environment changes will also apply to the buildbot.
Note: Just like in Unix, adding to the path doesn’t refresh active terminals, and there is no way to refresh an active terminal. So you need to open a fresh terminal after changing environment variables.
After following this guide your PATH should have these extra entries:
-
C:\Users\tcwg\AppData\Local\Programs\Python\Python39-32\Scripts\
-
C:\Users\tcwg\AppData\Local\Programs\Python\Python39-32\
-
C:\Program Files (x86)\Git\usr\bin
-
This is for mingw utilities. Git adds itself to System PATH
-
-
C:\Users\tcwg\source\ninja
-
C:\Program Files\LLVM\bin
-
C:\Program Files (x86)\CMake\bin
For building release packages we also install 7-Zip https://www.7-zip.org/download.html and NSIS https://nsis.sourceforge.io/Download
-
C:\Program Files (x86)\7-Zip
-
C:\Program Files (x86)\NSIS
Note: Microsoft Visual Studio 2022 has been released but the installer is a 64-bit application requiring ARM64 emulation support. Arm64 emulation is generally available for Windows 11 but only a preview build is available for windows 10.
Build tools is the command line portion of visual studio, download it from https://visualstudio.microsoft.com/downloads/ . (“Tools for Visual Studio 2019” → “Build Tools for Visual Studio 2019”)
The Visual Studio installer has many options but generally, you want various things to do with C++ desktop development for ARM64. (we do not need ARM components, ARM means Arm 32 bit in this context)
If you have build issues later, come back to the installer and add anything that seems relevant. Here’s the list of what is minimally needed, check this against “Individual Components” in your “Installation Details” panel:
-
MSVC v142 — VS 2019 C++ x64/x86 build tools (latest)
-
This is needed to make vsdevcmd.bat correctly setup LIB/LIBPATH/INCLUDE variables for x86->arm64 cross-compilation. All the lib/header files are actually present, but vsdevcmd.bat doesn’t add them without x86-hosted tools.
-
Installing this may become optional in the future.
-
-
MSVC v142 — VS 2019 C++ ARM64 build tools (latest)
-
Without these vsdevcmd.bat doesn’t setup x86->arm64 cross-compilation.
-
-
C++ ATL for latest v142 build tools (ARM64)
-
LLVM needs ATL libraries for processing debug info.
-
-
Windows 10 SDK
-
Versions 18362 and 19041 are known to work.
-
Version 20348 is known to cause LLVM build failure.
-
error: use of undeclared identifier ‘__umulh’
-
-
This is required for correct cross-compilation setup. (not sure if SDK libraries are actually used)
-
Note: there’s probably a choice in the installer for where to install to. If you do that modify any instructions as needed. The default that I got was “C:\Program Files (x86)\Microsoft Visual Studio\2019\BuildTools\Common7\Tools\”.
(worst case, you can always search C:\ for a file, it isn’t as slow as you’d expect)
Install MSVC Redist libraries
Search filesystem for vc_redist.arm64.exe, and you’ll most likely find it in C:\Program Files (x86)\Microsoft Visual Studio\2019\BuildTools\VC\Redist\MSVC\v142\ .
Install these libraries to get msvcp140.dll, vcruntime140.dll, concrt140.dll and other libraries. Without these DLLs MSVC-built application will not run; in LLVM build this manifests itself as llvm-tblgen.exe failing.
For reasons unknown, these libraries are not installed by default as part of Windows or Visual Studio.
Install latest llvm for Windows on Arm
Go to https://github.com/llvm/llvm-project/releases/tag/llvmorg-14.0.6 and download the Windows on Arm (“woa64”) installer. Run it and if it asks to add llvm to the path say yes. If it doesn’t or you forget that you can always add the install directory to PATH yourself.
Install CMake
Recent versions of VS ship cmake as x86_64 binary (in VS circa-2020.08 cmake was x86_32 binary). Instead install the i386 build from https://cmake.org/files/ and add that to the PATH.
LLVM 12 or 13, with CMake 3.17 is known to work.
LLVM 13 with CMake 3.21 or 3.22 is known not to work.
Install Python
If you run “python” it takes you to the Windows Store which allegedly will give you a (native?) copy of Python3. As per usual with the Windows Store, it didn’t do anything when I clicked install.
So instead, you can go to Python.org and get a 32 bit x86 build of the latest Python3. Remember to:
-
Tell the installer to add python variables to environment (so that cmake can find python3).
Note: lldb’s Python integration requires a native Python install, see the section below about lldb dependencies.
Install Git
Go to https://git-scm.com/download/win and get the latest 32 bit x86 installer. There is likely a copy of git the VS Build Tools install, but we reccomend installing a separate copy so that you also get the tools git for Windows is packaged with. These tools are used for testing llvm.
llvm-lit.py: <...>\llvm-project\llvm\utils\lit\lit\llvm\config.py:46: note: using lit tools: C:\Program Files (x86)\Git\usr\bin
(you can get these tools by installing MSYS2 instead, but git for Windows is based on that so the result is the same)
Build Ninja
VS Build Tools does come with a ninja but the default one doesn’t run on WoA. You should build from source (https://github.com/ninja-build/ninja ) using the cmake build method.
(https://github.com/ninja-build/ninja/releases does provide prebuilt releases but at this time the Windows variant is x86_64 only)
Check out LLVM
The git for Windows install will default to converting line endings to windows style. This applies to any file git thinks is ASCII, which includes some archive files used for llvm tests. As stated in https://llvm.org/docs/GettingStarted.html#checkout-llvm-from-git , use the following to override this behaviour:
git clone --config core.autocrlf=false https://github.com/llvm/llvm-project.git
Testing the Install
First, open a plain terminal “Command Prompt” (ignore the cross prompts shortcuts you might find in the start menu).
Then run VsDevCmd.bat to setup the environment.
"C:\Program Files (x86)\Microsoft Visual Studio\2019\BuildTools\Common7\Tools\VsDevCmd.bat" -host_arch=x86 -arch=arm64

<...>

"C:\Program Files (x86)\Microsoft Visual Studio\2019\BuildTools\Common7\Tools\VsDevCmd.bat" -test

<...>

set PATH=C:\Program Files (x86)\Microsoft Visual Studio\2019\BuildTools\DIA SDK\bin\arm64;%PATH%
If the second test command fails, your build probably won’t work. If figuring out why it failed is difficult, go ahead and do a build anyway. The compiler’s errors will probably be more informative.
Note: We setup the Visual Studio env first because it adds some copies of cmake and ninja that we don’t want. By doing it first, then checking cmake and ninja, we know if our preferred versions are being used.
Note: We have to add the arm64 DIA (debug information access) DLL onto the path otherwise it will find the x86_32 version in BuildTools\Common7\IDE.
Now check that cmake and ninja can run at all.
ninja --version

cmake --version
Doing a Build
In the same command prompt as the previous step, set your compiler(s) to be the clang-cl.exe we installed earlier.
set "CC=clang-cl.exe"

set "CXX=clang-cl.exe"
Then make a folder next to your llvm checkout and from that folder:
cmake ..\llvm-project\llvm -DCMAKE_BUILD_TYPE=Release -DLLVM_ENABLE_PROJECTS="clang;lldb;lld;llvm" -DLLVM_ENABLE_ASSERTIONS=ON -DCMAKE_C_FLAGS="-fms-compatibility-version=19.27" -DCMAKE_CXX_FLAGS="-fms-compatibility-version=19.27" -DCMAKE_TRY_COMPILE_CONFIGURATION=Release -DLLVM_DEFAULT_TARGET_TRIPLE="arm64-pc-windows-msvc" -G Ninja
Some specifics:
-
We need the “
-fms-compatibility-version» flag to have clang-cl pretend to be a newer MSVC, especially if that clang-cl is a prior release to the clang you’re compiling. If this value is too low than cmake will tell you what it should be, just set it to that. -
Known issue with cmake 3.21.1, it builds all try_compile/try_run as debug even if you select release mode. This is why we set “-DCMAKE_TRY_COMPILE_CONFIGURATION=Release”. Not doing so causes a try_run to fail to get error message strings, so lit defaults to Linux strings and many tests will fail.
-
We set LLVM_DEFAULT_TARGET_TRIPLE manually because the prompt we use is an x86 32 bit host prompt. There is no arm64 to arm64 prompt, so cmake detects the host/default target triple “correctly” but it’s not what we really want.
Then build as usual with ninja.
Here is where you might get errors about includes and linker directories and so on. Best way to solve this is to go back to the Visual Studio Installer and add anything that looks related.
You will find things online about adding certain dirs to your path but be careful because you could just be adding x86 libs. Installing ARM64 specific variants is almost always what you want.
If you’re doing a debug build and you see linker errors about missing libs, see if the file names end with “d”. E.g. “foo.lib” would be “food.lib” for a debug build. To solve this search for those files and add their location to PATH. They don’t appear to be automatically added by the installers.
Excluding the test folder from Windows Defender
Windows Defender likes to scan new files, including those that tests create. This changes their last accessed times and there’s one test known to fail because of this, “LLVM :: ThinLTO/X86/cache.ll”. To exclude the folder follow https://support.microsoft.com/en-us/windows/add-an-exclusion-to-windows-security-811816c0-4dfd-af4a-47e4-c301afe13b26 and add “<llvm-build-dir>/test”. (you shouldn’t need to restart defender or the machine, it takes effect automatically)
Install LLDB API and testsuite dependencies
-
Install GNUWin32 for make and coreutils. LLDB tests depend on make and some of the coreutils for running API tests. Install it using standard install as 32bit x86 emulated executable and add install location to PATH.
-
Install native Python. LLDB API requires native python library. Here is a link to a unofficial build of native python installer for WoA.
-
Install SWIG 3 or later. LLDB requires swig to generate Python bindings. Install SWIG via x86 emulated installer and add to PATH.
Windows 10 for ARMv7 Installer 3.0

Disclaimer
* I'm not responsible for bricked devices, dead SD cards,
  thermonuclear war, or you getting fired because the alarm app failed (like it did for me...).
* YOU are choosing to make these modifications,
  and if you point the finger at me for messing up your device, I will laugh at you.
* Your warranty will be void if you tamper with any part of your device / software.

* This is not a software, this is a set of programs that combined to make the installation easier.
* Editing the files or folders may cause damage to the intaller.
Supported Devices
- Nokia Lumia 930
- Nokia Lumia Icon
- Nokia Lumia 1520 (Global, AT&T)
- Nokia Lumia 830 Global
- Nokia Lumia 735 Global
- Microsoft Lumia 650
- Microsoft Lumia 640 XL LTE (Global, AT&T)
- Nokia Lumia 1020 (Global, AT&T)
- Nokia Lumia 920
- Nokia Lumia 520
- Windows 10 Mobile: Builds newer than
14393.xare not supported.
Prerequisite (on your PC)
- Official Windows 8.1 or newer
- Windows Powershell enabled
- WPinternals 2.9 or newer — Download
- Win32 Disk Imager — Download
- Microsoft Visual C++ Redistributable 2022 (x86) installed — Download
- Windows 10 ARM build 15035 — Download
Download
For latest stable version, go to Releases section.
For latest development version, use the green Code button, Download ZIP.
Instruction
- From the Windows 10 ARM 7z file:
Extractsources\install.wimto the same folder as Installer.cmd.
Note: Just extract the file, not it’s content. - Download drivers for your device with Driver Downloader.
- Unlock bootloader and boot into Mass Storage Mode with WPinternals.
- Backup the phone with Win32 Disk Imager (Only if not already did).
- Run Installer and follow the instruction in the Installer.
- Visit the Wiki for usage tips.
Notes
- On Spec A devices, using Reset My Phone will remove Windows 10 ARM.
- Updating Windows Phone with unlocked bootloader will break your installation.
- Join the Telegram group for more support.
Reporting issues
Go to Issues page, check if your issue is already reported.
If not, open an issue ticket providing detailed information and logs.
License notice
Some script files are licensed under the Microsoft Reciprocal License (MS-RL).
If you wish to redistribute such files without LICENSE-SCRIPTS.txt, you should add the license’s content into it.
Credits
fadilfadz01 (Fadil Fadz)     : Helping me write the script
Gus33000 (Gustave Monce)     : Making drivers & lot more
Heathcliff74 (Rene Lergner)  : WPinternals
Windows ARM32 Telegram group : Testing my script
Microsoft                    : Windows and other tools
TortoiseSVN                  : SVN
Aria2 project                : aria2
Adoxa                        : ansicon
Wimlib                       : wimlib-imagex
Dariusz Stanislawek          : dsfo
Systola                      : VhdxTool
RedGreenBlue123 (Me)         : Author of this script
Screenshots


If you are using an Arm-based computer, you may want to install Windows 11 on your device. You can download Windows 11 Arm ISO and then use it to install Windows 11 on Arm. Now, MiniTool solution shows you how to install Windows 11 on Arm-based PCs in this article.
What Is Windows on ARM?
Traditionally, Windows is running on devices that are powered by x86/x64 processors. This is well-known by users. But there is another situation: Windows can also run on machines that are powered by Arm processors.
Due to the power-frugal nature of the Arm architecture, the Arm-based PCs can have a longer battery life while delivering great performance. Arm Systems on Chip (SoC) often include other key features like a powerful CPU, GPU, Wi-Fi & mobile data networks, as well as Neural Processor Units (NPUs) for accelerating AI workloads.
Can Windows 11 Run on ARM?
Many users are currently using Arm-based computers. They want to know if Windows 11 can run on an Arm-based computer. As a new version of Windows, Windows 11 has new hardware and system requirements.
The requirements for the processor are 1 gigahertz (GHz) or faster with 2 or more cores on a compatible 64-bit processor or System on a Chip (SoC). In detail, Windows 11 supported processors include the following categories:
- Windows 11 supported Intel processors
- Windows 11 supported Qualcomm processors
- Windows 11 supported AMD processors
You see the Arm processor is not included. So if Windows 11 can run on Arm is a common issue. Here we will show a simple explanation.
Microsoft has released Windows Arm64 builds. This means that it has changed the limitations as per users’ requirements. This also means that you are allowed to install Windows 11 on an Arm64-based computer.
However, you may don’t know how to download and install Windows 11 on Arm with ISO. This is the thing we are also concerned about. In the following part, we will show you a detailed guide.
Tips:
You can also run Windows 10 on Arm-based PCs. Here is how to download Windows 10 Arm ISO: How to Download Windows 10 ARM ISO for ARM Processors?
How to Download and Install Windows on Arm with ISO?
If you want to install Windows 11 on an Arm-based computer, you need to first download Windows 11 Arm ISO, then create a Windows 11 installation USB drive, and then install Windows 11 on a virtual machine.
Step 1: Download Windows 11 Arm64 ISO
As to download a Winodws 11 Arm42 ISO, you can search for such a download source from the interner. However, which one is the reliable download link? Usually, you can try the search resullt in the first search result page.
After you get a Windows 11 Arm64 ISO file for installation. Next, you need to create a Windows 11 installation USB drive for installing Windows 11 on Arm with ISO file you have just got.
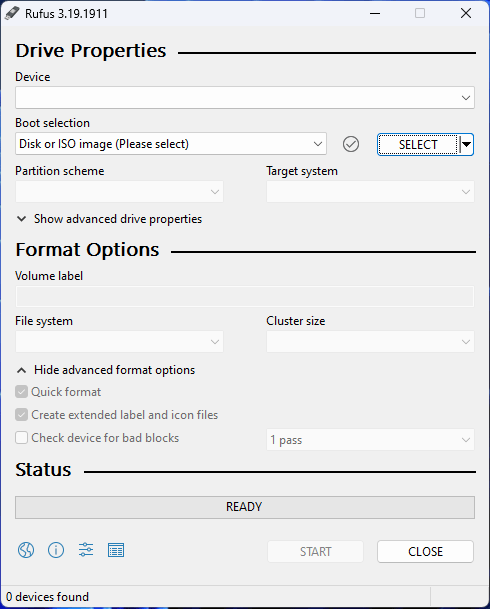
Step 2: Create a Windows 11 Installation USB Drive for Arm64 PCs
The universal method to create a Windows 11 installation USB drive using an ISO file is to use Rufus. This is also the way recommended by Microsoft. See how to download Rufus. Rufus version 3.19 enables you to install Windows 11 without a Microsoft account. This feature is worth trying.
After downloading Rufus on your device, you can directly open the downloaded files to open this tool to create a Windows 11 installation USB drive for Arm64-based computers.
Step 3: Install Windows 11 on a Virtual Machine
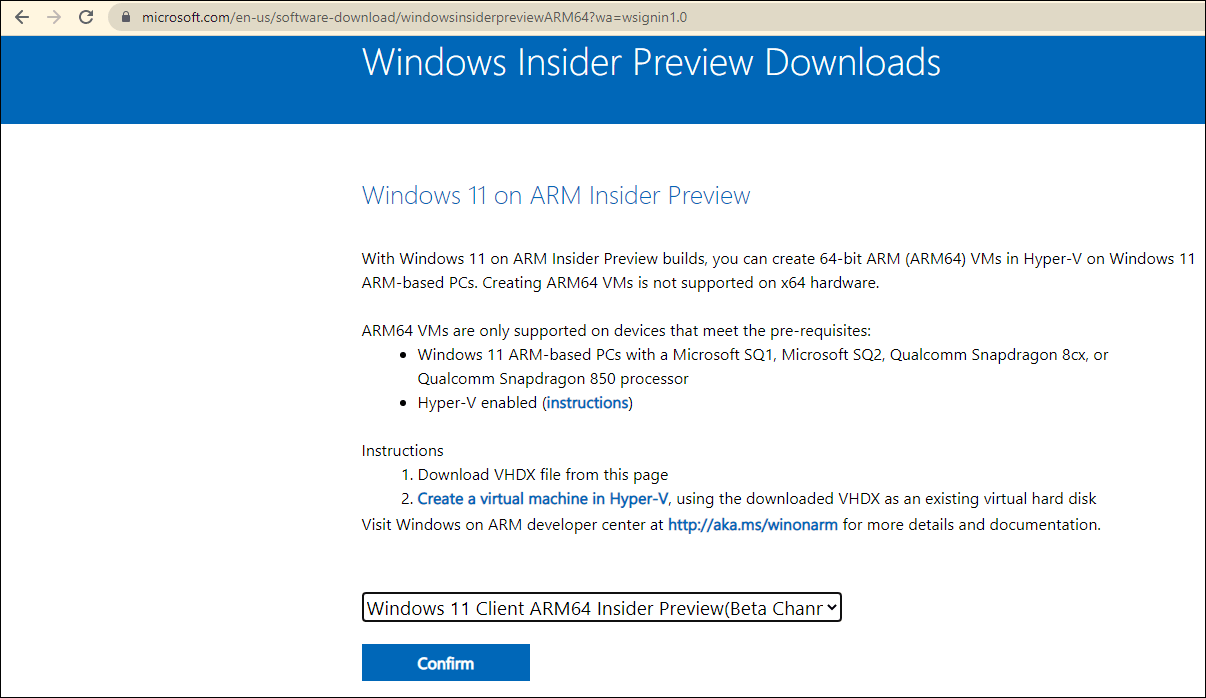
You can install Windows 11 on a virtual machine on an Arm-based PC. However, Creating ARM64 VMs is not supported on x64 hardware. ARM64 VMs are only supported on devices that meet the following requirements:
- Windows 11 ARM-based PCs with a Microsoft SQ1, Microsoft SQ2, Qualcomm Snapdragon 8cx, or Qualcomm Snapdragon 850 processor
- Hyper-V enabled
These are the steps to install Windows 11 on a virtual machine:
Step 1: Create a virtual machine in Hyper-V.
Step 2: Install Windows 11 using the Windows 11 installation USB drive you have created.
Download a Windows Insider Preview Arm Build
If you are a Windows Insider in the Windows Insider Program, you can also download a Windows 11 Insider Preview Arm build, then use it to install Windows 11 on an Arm64-based computer.
Microsoft offers an official download link for Windows 11 on ARM Insider Preview builds. The file you can download is a VHDX file. But like installing Windows 11 Arm ISO file, you can install Windows 11 on an ARM (ARM64) VM in Hyper-V.
If you are not a Windows Insider, you need to first join the Windows Insider Program. Then, you can go to Windows 11 on ARM Insider Preview page to download a build for installation. You can find more useful information on that page.
Windows Arm-based PCs FAQ
Main Benefits of Windows Arm-Based PC
- It can always be connected to the internet.
- Its battery life can go beyond all-day.
- You can turn it on instantly.
Limitations in a Windows Arm-Based PC
- Only drivers for hardware, games, and apps that are designed for Windows 11 Arm-based PCs can work on the device.
- Some certain games will not work on a Windows Arm-based PC.
- Apps that customize the Windows experience might have problems.
- Some third-party antivirus software will not be installed.
- Windows Fax and Scan isn’t available on a Windows 11 Arm-based PC.
Can I Run Programs That Are Not in Microsoft Store on My Windows Arm-Based PC?
Yes, you can install and run Windows apps that aren’t available in the Microsoft Store. But you should know that peripherals and devices only work if their drivers are built into Windows 11, or if the Arm64 drivers for the device have been released. You’d better make a confirmation in advance.
How to Get a Cellular Data Connection?
You can go to Settings > Network & internet > Cellular to enable the Cellular connection. However, if you can’t find Cellular under Network & internet, it usually means that your computer doesn’t have a physical SIM card slot or eSIM. In a situation like this, you will be unable to get a Cellular connection.
MiniTool ShadowMaker: Back up Your Files on Windows
In theory, updating/upgrading the Windows system to the latest version will not delete files on your device. However, your files may get lost or the system may get crashed due to some accidental situation. To safeguard your computer, you’d better back up your files and system before you perform a Windows update. You can use MiniTool ShadowMaker, a free Windows backup software to do this job.
This software has a trial edition. You can try it for free within 30 days.
MiniTool ShadowMaker TrialClick to Download100%Clean & Safe
In this case, you should back up your computer to an external hard drive. So, you need to prepare an external hard drive that has enough free space to save your computer data and connect it to your PC.
After downloading and installing this software on your Windows computer, you can open it, then select the source disk and the destination disk (the external hard drive), and click the Back up Now button to start backing up your PC.

MiniTool Power Data Recovery: Rescue Your Lost and Deleted Files
You may find some of your files are lost after updating/upgrading the Windows system. As long as these files are not overwritten, you can use a professional data recovery software like MiniTool Power Data Recovery to get them back.
This MiniTool free file recovery tool is specially designed to recover data from all kinds of data storage devices like computer internal hard drives, external hard drives, SSDs, SD cards, memory cards, USB flash drives, pen drives, and more.
This software also has a trial edition. You can first try it to scan the drive you want to recover data from, then check if your needed files are listed in the scan results.
MiniTool Power Data Recovery TrialClick to Download100%Clean & Safe
Here is how to use this software to find and recover your deleted or lost files.
Step 1: Download and install this MiniTool software on your computer.
Step 2: Open the software to enter its main interface.
Step 3: This software displays all logical drives it can detect under Logical Drives. You need to hover over the target drive and click the Scan button to start scanning that drive. If you forget which one is the drive that has previously saved the lost files, you can switch to the Devices section and select the whole drive to scan.
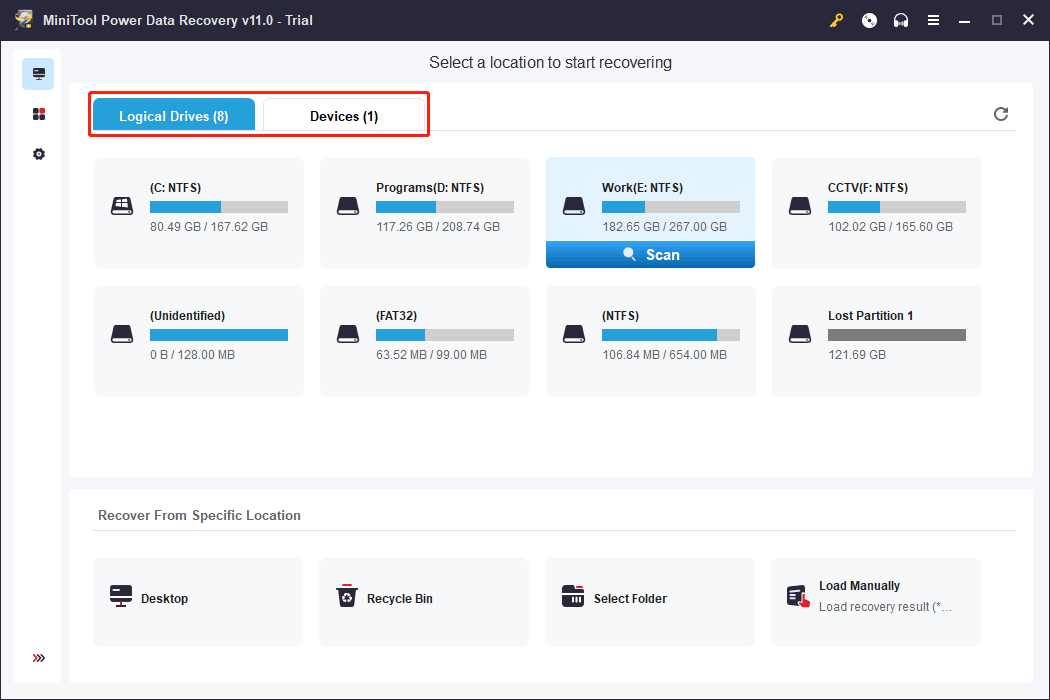
Step 4: After scanning, you can open each path to try to find your needed files. You can also switch to the Type section to find files by type.

Step 5: If you want to use this software to recover your files, you need to upgrade it to a full edition. If you directly click the Register key on the scan result interface and enter the license key you get to get a full edition. After that, you need to select all your needed files at once, click the Save button, and select a suitable folder to save the selected files. The destination folder should not be the original location of the recovered files, otherwise, they might be overwritten and become unrecoverable.
Wrapping Things up
Want to install Windows 11 on an Arm-based computer? You need to first download Windows 11 Arm ISO file and then use it to create a Windows 11 installation USB drive. After that, you can install Windows 11 on a virtual machine on your Arm-based PC. You can find a full guide in this article.
If you have other issues that need to be solved or suggestions, you can let us know in the comment. You can also contact us via [email protected].