
![]()
ВСЁ НА СВОЙ СТРАХ И РИСК!
Замечу что FOV может работать проблематично, связанно это из-за новых версий дбд, фиксят, что удивительно для данной игры.
- Скачали, распаковали архив.
- После этого копируем файл pakchunk1-WindowsNoEditor.pak в директорию игры по адресу: (Ваше имя диска):\SteamLibrary\steamapps\common\Dead by Daylight\DeadByDaylight\Content\Paks. Заменяем файл.
- После этого копируем Engine.ini и вставляем по адресу: C:\Users\Ваше Имя пользователя\AppData\Local\DeadByDaylight\Saved\Config\WindowsNoEditor. И заменяем.
- После этого заходим в игру и радуемся тому что данный конфиг работает.
Скриншоты для наглядности:


Being a one of a kind horror journey, there is a lot to do and experience in Dead By Daylight. The higher quality you can play this multiplayer title in, the more gratifying your overall experience. However, there are some set restrictions implemented by Behaviour Interactive Inc. that can be a pain to deal with.
That does not mean that there is nothing to be done since you can take a few steps to unlock and possibly improve your graphics and frame rate cap. This method does not include any third-party software and is completely free to implement. With that said, let’s see what the method actually is.
In order to unlock your FPS in Dead By Daylight, you will need to go to AppData/Local/DeadByDaylight/Saved/Config/WindowsNoEditor. Open the file Gameusersettings.ini and edit the value of “FrameRateLimit” to 144 and change “bUseVSync” to False. Doing so will enable your game to unlock its default FPS cap.
Playing horror games on maxed-out settings is a different experience altogether. If you are blessed with a capable gaming rig, it can be really annoying to be limited by in-game caps. Therefore, this guide will be showing you an in detail method of manually changing Dead By Daylight’s graphics limits.
All Graphics Settings for Dead By Daylight
Before getting started, it would be a good idea to familiarize yourself with the graphical settings available in Dead By Daylight. This will help you in understanding the exact changes you need to make the game run in the best settings possible. With that said, here are all the graphical settings available:
Quality
This metric can ramp up the overall quality of your game. Every option will add more styling and features to the game. Unfortunately, Dead By Daylight doesn’t give you much options when it comes to adjusting your graphics. You can only choose from Low to Ultra. Generally, settling for High is your best bet if you aim to get consistently high frame rates.
Auto-Adjust
The Auto-Adjust features uses your system’s current specifications, your monitor’s refresh rate and adjusts the game’s graphics accordingly. However, these aren’t always accurate and there’s a high chance that you might end up with sub-par settings. Therefore, we generally recommend setting them on your own.
Resolution
Using the game’s automatic resolution feature, you’ll be able to get down to your monitor’s resolution with relative ease. However, you might need to adjust your resolution depending on whether you have a less capable GPU or just want to experience some higher frame rates on a lower resolution.
Related: Ultimate Beginner’s Guide to Dead by Daylight
Full Screen
Dead By Daylight also features a fullscreen option. However, you won’t be able to find borderless fullscreen or other handy options. So, players who play the game on extended monitors or on ultra wides might run into some trouble.
Here are the steps you can take in order to boost your FPS cap in Dead By Daylight. Make sure to restart your game in order for the changes to take effect.
Follow the Instructions below:
- Close the game and search for %appdata% in your taskbar. Upon hitting the enter button, your file explorer will open up showing some files.
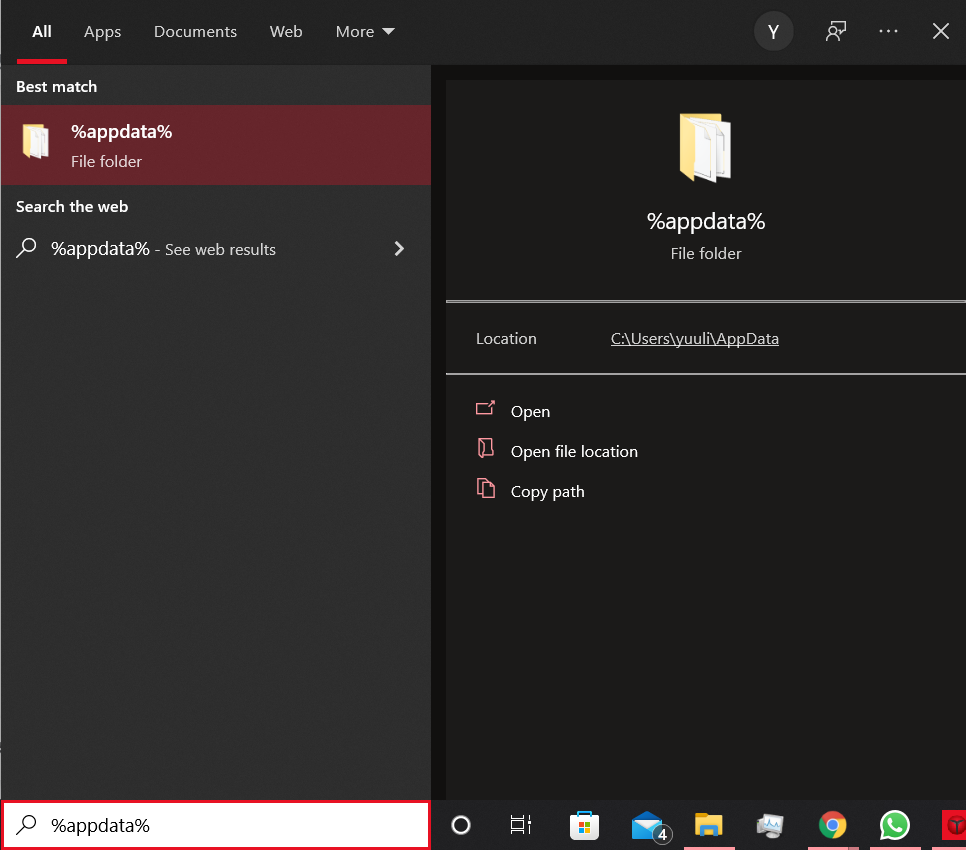
- Navigate to Local and look for DeadByDaylight. Once found, open it and head to Saved => Config => Windows No Editor.

- Right Click the “GameUserSettings” file and open it with notepad. A bunch of values will show up.
AppData/Local/De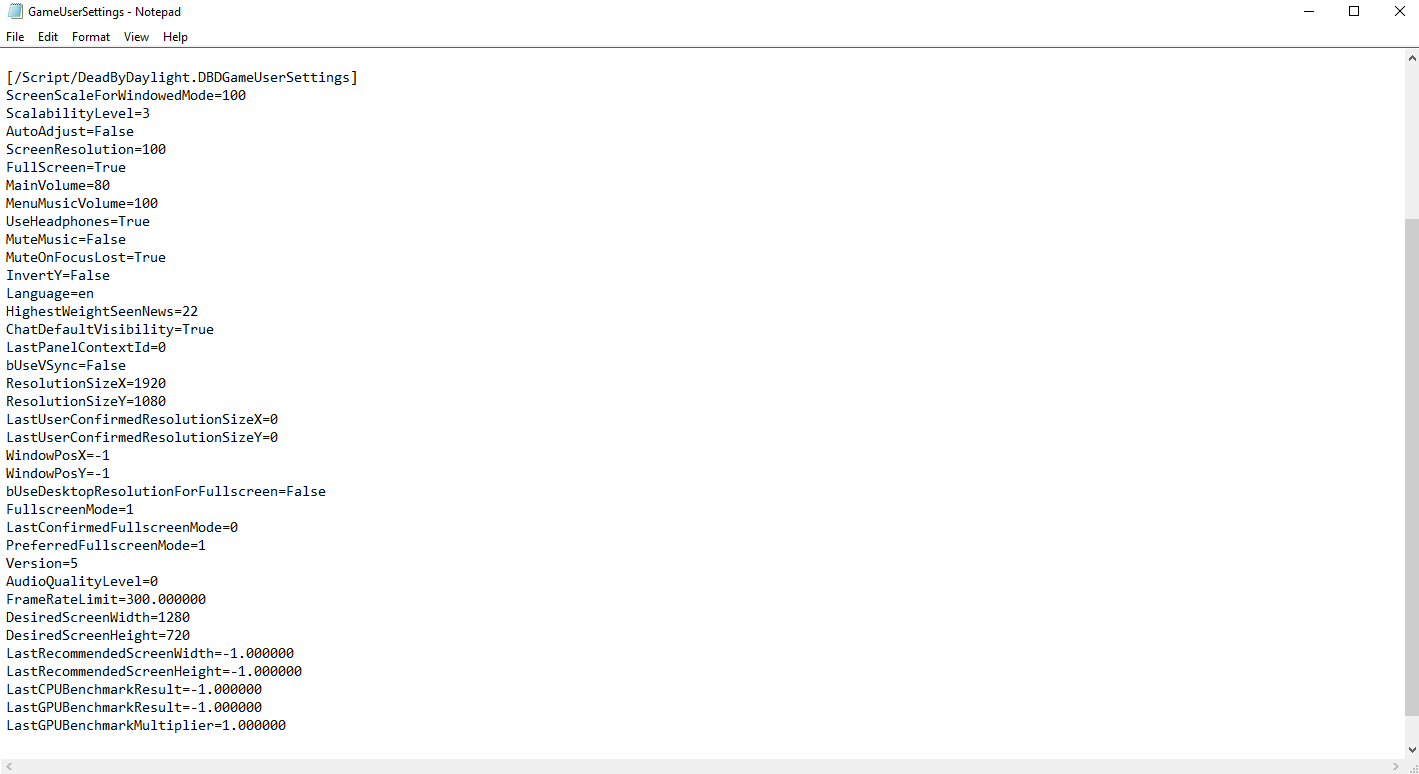
- Change your “FrameRateLimit” Value to your needs. For this tutorial, we will be using 300.000000 as the base value.
- Change the “bUseVSync” value to False and press save from the file menu or simple press CTRL + S
- Right click the GameUsersettings file and click on properties. After that, click on Read-only and hit apply.
Now you will be able to get up to 300 FPS in Dead By Daylight. There is also another optional step you can perform to check if anything has changed or not. While such a big FPS jump is noticeable at first glance, you can use a counter to confirm your suspicions regardless.
To do this, simply:
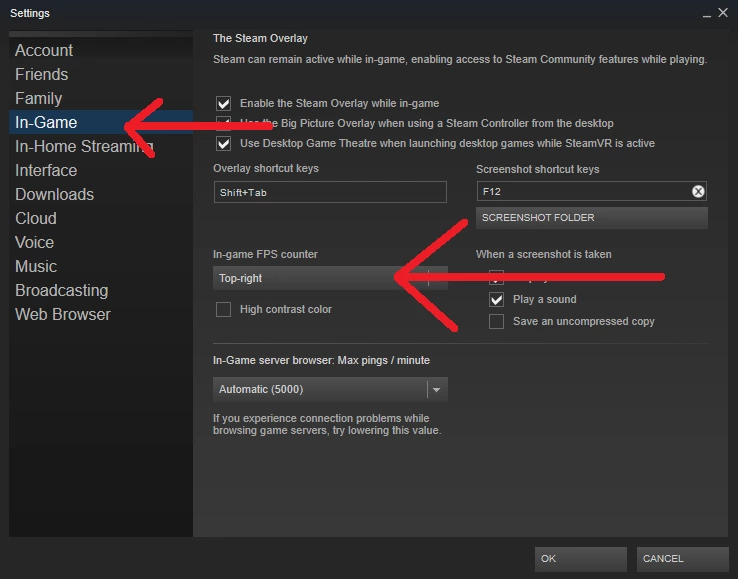
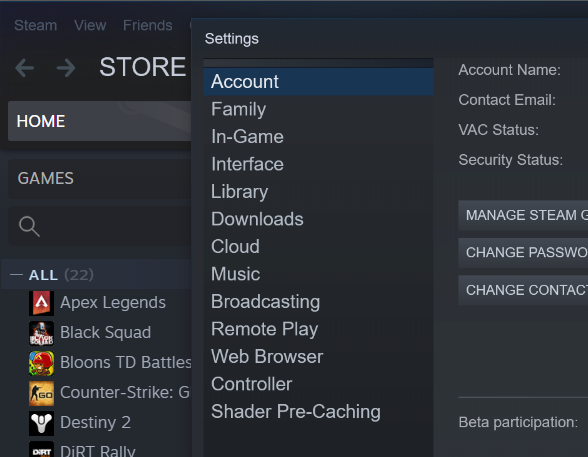
- Open Steam and head to the settings tab. You can do this by clicking on the steam tab in the top right.
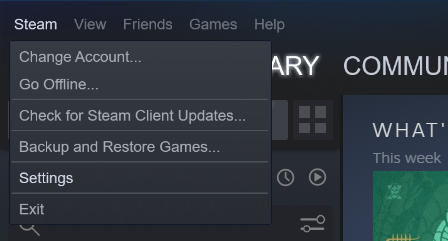
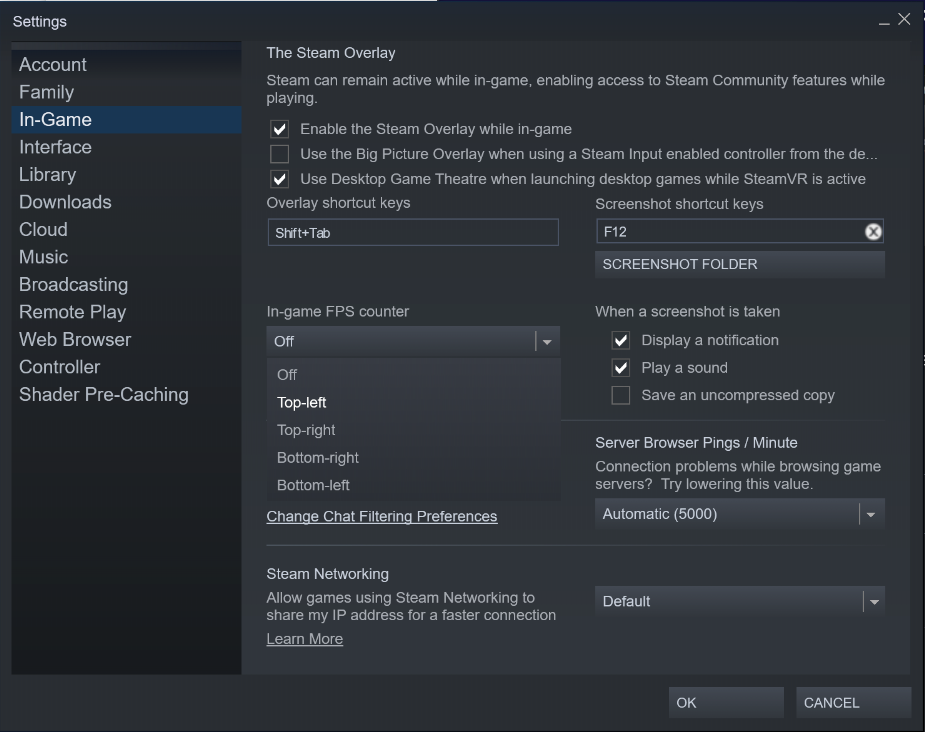
- From there, find and click on the “In game” tab.
- Turn the in-game FPS Counter by choosing one of the available options. These include the four corners of the screen. Choose location of this counter and press OK.
Now reopen Dead By Daylight to see your new in-game FPS. You can also use this method to change settings like your in-game resolution, music settings, and more!
Are More Settings Coming to Dead By Daylight?
For now, the answer to this question is an unfortunate no. However, we might be expecting some more customizable options to show up as more and more updates start to pile up. While you wait for the official settings to be added to the game, you can use the above method to directly edit the game files.
With regular updates coming nonstop it only seems like a matter of time before we get to see Behaviour Interactive Inc to add this feature in DBD officially.
All in all, you can use the steps mentioned above to change your in-game settings. Many players have voiced their concerns about a lack of advanced graphics options in the official forums. However, there has been no official statement by BHVR as of yet.
Another key point to note is that by using the method above, you are essentially tinkering with the core game files. There is a certain chance that you might get banned for it. However, no such incident has been reported as of yet but it is still advisable to do it at your own discretion.
Dead by Daylight | ADVANCED SETTINGS CHANGER
Advanced Config Editor for Dead by Daylight
Tutorial

More information
Dead by Daylight ADVANCED SETTINGS CHANGER is an advanced Config Editor for Dead by Daylight. With this program, you can change all the graphics or audio settings, change the resolution to stretched, or remove the FPS Cap. This application allows you to use ready-made graphics settings prepared for both high-end and low-end PCs. To run this application you will need to install the .NET framework. When the program detects that you do not have it installed, it will launch the installer to help you download it.
It is highly recommended that you change your settings after quitting the game as some changes may not be saved.
How to use
The application saves changes automatically as soon as you make any. The program has a backup system for configuration files and creates a file backup when the application is started for the first time. To restore the current files to files that were saved earlier, just click the arrow button in the upper right corner. To create a new restore point, you need to click on the trash can button in the upper right corner.
Contact
Join Discord server or dm me: @tenshi64bit
New Features
Want to see some new feature in the program? Write on Discord server!
Reporting bugs
Submit a bug report on issues or on a Discord server on the «bug-reports» channel
Versions
What platforms does the program support? Steam, Windows Store and Epic Games Store.
Operating systems
What operating systems was it created for? Windows only.
Download
Download the latest version from website or from releases.
Disclaimer
This program is used to change settings in a configuration file as you do manually. Setting everything to the highest setting may damage your computer, for which I am not responsible. Please use the program with caution and consider hardware limitations when changing settings.
Screenshots:


First, go to the ‘Windows no editor’ folder
Right click on ‘GameUserSettings’ —> ‘Properties’ 

.
.
Remove the mark
Now you can open it
Find these things and change them

BUT! The resolution of 1280:1024 does not work for everyone. You can try 1440:1080 or 1440:1050
When you’re done, press CTRL + S to save
Put the mark back
Now go to your library


.
Type -FULLSCREEN
Congrats, now you can see way more

Here we come to an end for Dead by Daylight Resolution 4:3 hope you enjoy it. If you think we forget something to include or we should make an update to the post let us know via comment, and we will fix it asap! Thanks and have a great day!
- Dead by Daylight
In this guide, we will talk about how you can boost and increase your FPS and the overall performance of Dead by Daylight on your PC. By having the maximum frame rate that you can have in Dead by Daylight, you are making sure you are not missing the benefits that come with it.
You know that feeling when you play Dead by Daylight, and it feels like something doesn’t quite match up? Well, forget that. After following all the steps in this guide, you will finally be able to enjoy super smooth and responsive gameplay with the highest frames per second.
Your gaming experience depends a lot on your hardware(gaming PC), but that’s just one part.
I see this daily with numerous clients. They have the latest and best hardware on the market, but their games run on very low fps and have issues like stuttering, fps drops, freezes, high latency, etc.
After tuning up things like power settings, graphics/video settings, and everything else you will see below, the performance improvements are huge and they end up with smoother gameplay and a huge increase in fps.

Step 1 – Optimize Startup apps and processes.
You may have many apps and background windows services running that you don’t use at all, consuming valuable resources such as Ram, CPU, and sometimes even GPU. This can cause you to have fewer resources to run Dead by Daylight and decrease the overall performance and frame rate. Let’s stop every app you don’t use from running in the background.
The process is identical on Windows 10 and Windows 11.
Now you should see a list of all background apps. To disable all background Windows apps, toggle off “Let Apps Run in the Background”.

Next, navigate to “Startup apps”. You’ll find a list of your apps that automatically start when your computer boots up. You’ll want to get rid of most, if not all, to free up more resources for Dead by Daylight.

Step 2 – Graphics Optimizations to increase fps
This section of the guide will focus entirely on your graphics card. From optimizing the graphics card settings for NVIDIA and AMD graphics cards, uninstalling and then reinstalling the graphics driver, making sure everything works as it should, and ensuring that the graphics card is on MSI Mode to ensure the best performance and frame rate in Dead by Daylight.
What I want you to do is go ahead and download Display Driver Uninstaller on your PC.

Next, go to the search bar, type System Configuration, and click on it.
The System Configuration tab should pop up; navigate to the Boot tab, and tick the option Safe boot.

After the restart, you should be in a Safe Mode environment.
Go ahead and look for the Display Driver Uninstaller folder you previously downloaded, extract it, and run the “Display Driver Uninstaller.exe” file as administrator.

Once DDU is up and running, go to the top left corner and click on Options, scroll down, and tick the option “Prevent downloads of drivers from “Windows Update”……..”, click OK and Close.

On the right side, click on the option “Select Device Type” and choose GPU, and under that, select the GPU manufacturer (NVIDIA, AMD, INTEL).
Press “Clean and do not Restart”.

Once the process is done, do the following:
Go to the search bar, type System Configuration, and click on it.
Navigate to the Boot tab, and untick the option Safe boot.

Click Apply, OK, and then Restart.
Now you should be back in a normal Windows environment. Go ahead and download the latest driver for your GPU and install it.
AMD Drivers / NVIDIA Drivers
Once the driver installation is completed, go ahead and put your graphics card on MSI Mode by following the instructions below.
MSI mode for Graphics Card
The next step is to go ahead and run the MSI mode for GPU tool As Administrator. It’s a simple tool to put your graphics card driver into MSI mode. This is done by default on the latest graphics cards, and it can give you a little bit of gaming performance on Dead by Daylight, so it’s worth checking it.
Look for your graphics card, and once you find it ticks the MSI box, click Apply and Exit. That’s all you have to do, don’t edit any of the priorities if you don’t know what you are doing.

Best AMD Radeon Software settings for Dead by Daylight
Now let’s go ahead and optimize the Radeon Software graphics settings to achieve the best FPS possible in Dead by Daylight. You can copy the settings from the photo below, but if you want a more in-depth guide, you can go ahead and read my guide on how to optimize AMD driver settings.
Here is a quick sum-up of what matters:
- Turn animations and effects off.
- Turn overlays off.
- Almost all settings are turned off and set to performance where applicable.
- Do some tests with the Anti-Lag option. I’ve found out that you shouldn’t be using it on a high-end graphics card, but on older ones, it helps. So take like few minutes and do some tests with it.
- On resolution settings menu, make sure to choose your screen resolution.
- Set the refresh rate to the highest possible to match your gaming monitor’s refresh rate.


Best NVidia Control Panel settings for Dead by Daylight
Now, let’s go ahead and optimize the NVidia Control Panel settings to achieve the best FPS possible in Dead by Daylight. You can either copy the graphics settings from the photo below, or if you want a more in-depth guide, you can go ahead and read my guide on how to optimize NVidia driver settings.
Here is a quick sum-up of what matters:
- Almost all settings are turned off and set to performance where applicable.
- Set the refresh rate to the highest possible to match your gaming monitor’s refresh rate.
- On the Advanced Display Settings option set your resolution to your monitor’s native resolution.
- Choose No Scaling unless you play on stretched resolutions.
- On the Resolution Settings menu, make sure to choose your screen resolution.


![]()


Step 4 – Enable Hardware-Accelerated GPU scheduling.
If you are streaming Dead by Daylight on OBS or Streamlabs, don’t enable this setting because it can cause lags and micro stutters in your stream and recording. You will get slightly lower FPS while playing Dead by Daylight if you don’t enable HAGS, but everything will be smooth and stable.
On the other hand, if you are not streaming, turn it on because it will give you a small fps boost and help you achieve optimum fps in Dead by Daylight.
We are pretty much done with the video settings part of this guide.
Let’s move on to Windows settings!

Step 5 – Optimize Windows Settings
Xbox Game Bar
Go to your search bar and type Xbox game bar, click on it, and turn both options OFF.

Enable Game Mode
While you are on the Xbox game bar tab, on your left side, you should see Enable Game Mode, click on it, and make sure to enable it. The Game Mode option was not working as intended on previous Windows builds and versions, but that seems to be fixed on the latest versions, it’s running smoothly, and it will give you a slight FPS increase in Dead by Daylight.

Advanced Scaling Options
Go to Advanced Scaling Options, look for Fix scaling for apps, and toggle it to Disabled. This option doesn’t work, so keep it off.

Step 6 – Best Power Plan for Dead by Daylight
I’ve tested every single power plan available, and I can say that the one working the best, especially for Dead by Daylight, is the Bitsum Highest Performance Power Plan.
The Bitsum Highest Performance Power Plan is a custom power plan for Windows that is designed to maximize performance and increase fps. The plan applies various tweaks to the operating system, including disabling certain power-saving features and setting processor and graphics performance levels to their highest setting.
As a result, the Bitsum Highest Performance Power Plan can help to improve system performance, particularly for PC gamers. However, it is important to note that the plan can also lead to increased energy consumption and reduced battery life even on new gaming laptops.
Therefore, it is only recommended for use on any desktop gaming pc.
You can download it here.
Step 7 – ISLC(Intelligent Standby List Cleaner)
ISLC is a PC program that can clean and optimize your RAM standby list, which is a compiled list of all the apps and services that are currently running on your machine. The idea behind ISLC is that by trimming this list down to only the essentials, you can improve your PC’s performance and stability.
So, how does it work? ISLC will first identify all of the apps and services that are currently running on your machine. It will then look through your standby list and determine which of these apps and services are no longer needed. Finally, it will remove them from the standby list, freeing up valuable resources for other applications.
The internet is filled with different theories about this app, but one thing’s for sure- if you have a low-end system or want to make things just a little bit quicker then give it try!
You can download ISLC here: ISLC Download Page
- Set Wanted Timer Resolution to 0.5
- Tick Enable Custom Resolution
- Tick Start ISLC minimized and auto-Start monitoring.
- Tick Launch ISLC on user logon
- Change the “Free memory is lower than” option from 1024 to any of the values below(depending on your RAM)
- Take half of your RAM and multiply by 1024. Put the number you got on the “Free memory is lower than” option.
- For example, if you have 16 GB of RAM installed on your computer, the number should be 8192. ( 16/2*1024). You can check the table below with all the values.
- Once you’ve done that, click on Start, and that’s it.
- ISLC will start running automatically every time your PC boots up, so you don’t have to worry again.
YOUR RAMVALUE TO ADD2GB10244 GB.20488GB409616GB819232GB1638464GB32768
ISLC: Free memory is lower than values

If, after restarting your PC, you notice that “Current timer resolution” is not 0.5ms exactly, and it’s a number like 0.4988, do the following:
Run CMD as Administrator and type the following commands one by one:

- bcdedit /set useplatformtick yes
- bcdedit /set disabledynamictick yes
- bcdedit /deletevalue useplatformclock
If the last one gives back an error that the value doesn’t exist, that’s fine. If the value doesn’t exist, it’s already off.
Step 8 – Optimize BIOS to Boost FPS in Dead by Daylight
BIOS settings are really crucial when it comes to boosting and increasing your FPS in Dead by Daylight.
One of the first things to check is the BIOS version; if it’s out of date, it’s worth updating to the latest version since manufacturers provide updates regularly either to address specific issues or to enhance the overall performance.
The thing that will make the biggest difference in performance and fps is to make sure that all your ram modules are working and running at maximum speed.
Next, take a look at the CPU settings; if they’re set too low, the CPU will be underutilized, leading to reduced performance and lower fps. CPU power-saving features could also hinder the performance so that’s worth checking as well.
By taking the time to optimize the BIOS, you can help to ensure that your computer system is running at its best.
Below you can find the best BIOS settings to improve your FPS in Dead by Daylight.
Optimize AMD system BIOS Settings
- Make sure XMP or DOCP is set to Profile 1 / Enabled.
- Precision Boost Overdrive: Enabled
- Re-size BAR support: Enabled
- Find the options for FAN controls, and if you have a water cooler, make sure to set it to 100% at all times and optimize the rest of the coolers to work at higher speeds to keep temperatures as low as possible.


Optimize Intel system BIOS settings
The Intel settings below can be found under your BIOS’s CPU features/CPU configuration/Overclocking/Ai Tweaker tabs. If it’s your first time entering BIOS, it may take you some time, but I am pretty sure you will find them easily.
- Make sure that all your RAM modules are the same exact model.
- Core Ratio: Set a stable clock ratio for your CPU. (If you don’t know what to do here, do some research on Reddit or forums)
- Ring Ratio: Set a stable ring ratio for your CPU. (If you don’t know what to do here, do some research on Reddit or forums)
- Make sure XMP or DOCP is set to Profile 1 / Enabled.
- Intel SpeedStep: Disabled
- Intel Speed Shift Technology: Disabled
- Intel C-state: disabled
- Turbo Mode: Enabled
- CPU Ratio Offset when running AVX: 0
- Re-Size BAR support: Enabled
- Find the options for FAN controls, and if you have a water cooler, make sure to set it to 100% at all times and optimize the rest of the coolers to work at higher speeds to keep temperatures as low as possible.

Once you are done with all the settings, you can go ahead and save these settings as a profile and then find the option to Save & Exit BIOS.
Step 9 – Best Dead by Daylight Graphics Settings for Maximum FPS
If you’re looking for the best graphics settings for Dead by Daylight, it’s your lucky day. In this last part of the guide, we’ll show you the settings that will give you the best possible experience in the game.
Go to Appdata\Local\DeadByDaylight\Saved\Config\EGS and open the GameUserSettings file using Notepad and change the following values.
- sg.ResolutionQuality=100.000000
- sg.ViewDistanceQuality=3
- sg.AntiAliasingQuality=0
- sg.ShadowQuality=1
- sg.PostProcessQuality=1
- sg.TextureQuality=3
- sg.EffectsQuality=1
- sg.FoliageQuality=2
- sg.Shading Quality=0
- sg.AnimationQuality=0
Once you apply all the Dead by Daylight graphics settings, make sure to enable the in-game fps counter or download an external fps counter and check your current fps. Let me know in the comments if this guide helped you increase fps in Dead by Daylight.