In this post I will explain how you can configure an NFS Server on a Windows 2016 Server and connect/mount the NFS exports on Linux clients, in my case I wanted to run a Linux virtual machine whist ensuring that the actual data resides on physical disks on my host machine ensuring that the data is automatically part of my nightly backup routine and did not need to run separate backup scripts on the VM(s).
A bit of background first…
In my home network I have a single (in an attempt to be eco-friendly) Intel i7 server running Windows Server 2016 Standard edition, I use this server for hosting my family media, files and various database engines and ActiveDirectory for local development (I’m a software engineer by trade!) in addition to several Hyper-V virtual machines that do various tasks, all of the virtual machines are running a derivative of Linux.
I currently have the following virtual machines setup and running on it (under Hyper-V):
- A Web Server and reverse proxy running Ubuntu Server 16.04 LTS – Hosting Gogs, Minio and various Nginx reverse proxy configurations for sites, services and API’s that sit on other VM’s in my network.
- An OpenVPN server running CentOS 7 – Providing secure VPN tunnel access for me when away from home.
- A Jenkins server running Ubuntu Server 16.04 LTS– Used for automated code testing and continuous integration.
- A MineCraft server running Ubuntu Server 16.04 LTS – Used by my daughter and friend to play online together.
In the past I used to run VMWare ESXi and hosted everything in their own virtual machine for better isolation and performance although since then, I had tested and was extremely happy with the performance of running virtual machines on top of Hyper-V and Windows Server so when I re-built my home server several months ago I decided to go down that route instead.
Anyway, enough of all that, let me explain why I have such a need for this kind of set-up…
My home server has 1x SDD (500GB for the host operating system and local applications) in addition to 2x WD Red 4TB hard drives in a hardware RAID1 configuration, I periodically backup this array over my LAN to a Buffalo NAS device.
My plan is to install a new VM running Ubuntu Server 16.04 that will host an instance of NextCloud, this will provide me, my family and friends with a free alternative to DropBox with masses of space in addition to all the other cool things that NextCloud offer such as encrypted video calls and the like.
By setting up an NFS server on the host operating system, instead of provisioning this Linux VM with a massive virtual hard disk (and taking drive space away from the host OS) I have instead provisioned it with a single 20GB virtual hard drive and will then use NFS shares on my Windows Server to host the files on the physical disk and thus be automatically part of my backup routine and alleviate the need for using rsync or rsnapshot etc. on the VM and transferring it at regular intervals.
Installing NFS Server on Windows Server 2016
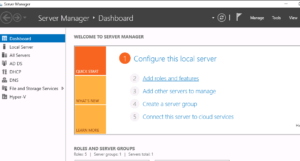
First up, we need to login to our Windows Server and open up the Server Management tool, once open, click on the large text link labelled “Add Roles and Features” as shown here:
Once you have clicked on the “Add Roles and Features” link you should then be presented with this wizard:
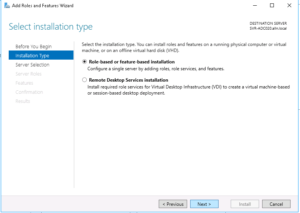
Accept the default “Role-based or feature based installation” and then click Next…
On the next screen you’ll be asked to choose the server that you want to add the role or feature to, select your server from the list that appears (you’ll probably only have one in the list anyway!) and then click Next…
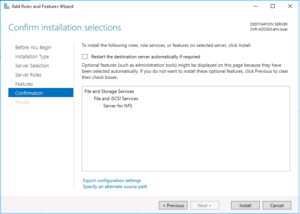
You will now be presented with a screen titled “Select server roles“, expand the following sections, then check the “Server for NFS” option as shown in the screenshot below:
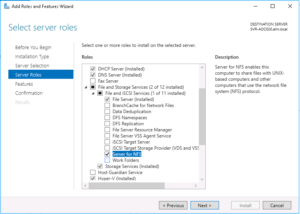
Once checked, click on the “Next” button…
The next screen will just ask you to “Select features“, you can simply click “Next“!
Finally, you’ll be shown a screen asking you to confirm the installation items, we now choose “Install“, this screen and the selection of features and roles to add should look as follows:
Great! We now have an NFS server running on our Windows 2016 Server!
Creating an NFS share (export)
Now that we have the NFS server installed we can now go and share (or “export” as NFS likes to call it) a directory, as per my intro notes to this blog post, I plan to add this to my data RAID array.
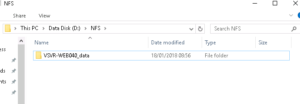
So first up, lets go and create a new directory on our data disk (in my case this is my D: drive), I’ve decided to call the directory “NFS” and then, inside that folder we’ll create another directory called “VSVR-WEB040_data” – This folder will be explicitly shared with my VM (that is named ‘VSVR-WEB040‘, the “_data” portion I’ve just named as that is what I will mount the share locally on the VM as eg. /data).
Now that you have an NFS server installed you can share/export numerous directories to individual or multiple VM’s or even other physical servers in your network.
The result of setting up this directory structure is as follows:-
Next up, we’ll right-click on the newly created folder and choose “Properties” – This will enable us to “Share” it as well as lock down the access to only a specific IP address (that being my NextCloud VM)…
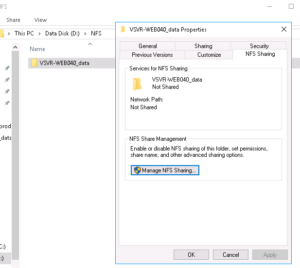
From the Properties window, select the “NFS Sharing” tab and then click on the button named “Manage NFS Sharing” this should then display the following window:
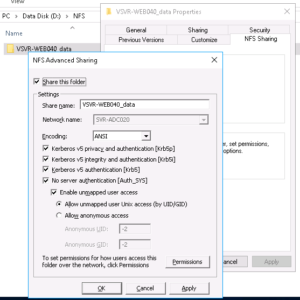
Ensure that the above screenshot matches your folder (eg. select all the checkboxes as per the above)
Next we’ll configure the permissions for the share, clicking on the “Permissions” button in the above screenshot will then display the following window:
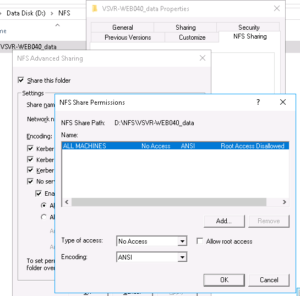
As you can see from the above screenshot, the permissions for this share are very restrictive by default, this is basically saying that for ALL MACHINES trying to access this share they WILL NOT be granted any access.
We should leave the defaults as is as we will instead create another permission only granting our specific VM access, to do this click on the “Add” button, the following screen should then appear:
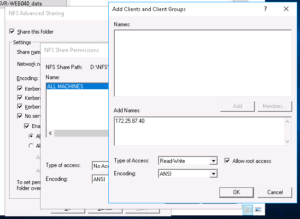
I’ve entered my virtual server IP address in to the “Add names” field already (172.25.87.40), you’ll then need to change the “Type of access” drop-down box to “Read/Write” and check the “Allow root access” checkbox.
Once completed, click the “OK” button!
That’s great, our Permissions form should now look as follows:-

Perfect! – We’re all done on the NFS server side configuration now!
Mounting the NFS share on the client-side
We can now mount the NFS share on our Ubuntu Server (the virtual machine), first we need to install the NFS tools, so we’ll login to our server (I’m using root but you should really use a user with sudo rights!)…
sudo apt-get install -y nfs-common
So before we configure fstab to automatically mount our NFS share at system boot, we’ll first test using the command line to make sure everything works as expected…
Before we can mount the NFS share we must first create a mount point, we will do this like so:
sudo mkdir /data
Now that we have created the mount point, we can mount the remote file-system as follows:
sudo mount -t nfs 172.25.87.20:/VSVR-WEB040_data /data
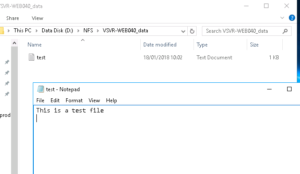
Once mounted you should be able to run the following commands, these commands will essentially create a file on our server and a text file with some content…
echo "This is a test file" > /data/test.txt
We can now jump back over to our Windows server and check our NFS server directory, we should see a file named test.txt and when we open it in Notepad, the contents should appear as follows:-
All going well, that has hopefully worked a charm for you and we can now move on to ensuring that our VM automatically mounts the NFS share at boot.
If for whatever reason wish to un-mount the share you can do it like so:
umount /data
Configuring fstab to mount our NFS share on system boot
Using a text editor on the Linux VM we will open up the /etc/fstab file and add the following line to the bottom of the file:
172.25.87.20:/VSVR-WEB040_data /data nfs auto,nofail,noatime,nolock,intr,tcp,actimeo=1800 0 0
You’ll obviously need to replace your server’s IP address with your own 😉
The result should look something like the below:
Once completed, save the file and you can now either attempt to automatically mount the share using this command:
sudo mount -a
…or you can reboot your server!
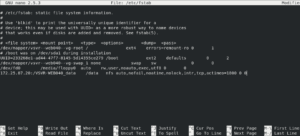
Once rebooted, login and you can then check and confirm that you have re-mounted your /data directory to the remote server by checking the output of:
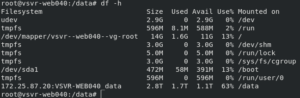
df -h
You should be able to see and confirm the remote disk usage as demonstrated here:
OK, well that’s it, I hope this has been useful for you 🙂
First published on TECHNET on Oct 08, 2012
In this tutorial, we will provision NFS server provided by “Server for NFS” role in Windows Server 2012 for use with Linux based client with Kerberos security with RPCSEC_GSS.
Background
Traditionally NFS clients and servers use AUTH_SYS security. This essentially allows the clients to send authentication information by specifying the UID/GID of the UNIX user to an NFS Server. Each NFS request has the UID/GID of the UNIX user specified in the incoming request. This method of authentication provides minimal security as the client can spoof the request by specifying the UID/GID of a different user. This method of authentication is also vulnerable to tampering of the NFS request by some third party between the client and server on the network.
RPCSEC_GSS provides a generic mechanism to use multiple security mechanisms with ONCRPC on which NFS requests are built (GSS mechanism is described in
RFC 2203
). It introduces three levels of security service: None (authentication at the RPC level), Integrity (protects the NFS payload from tampering), and Privacy (encrypts the entire NFS payload which protects the whole content from eavesdropping).
Server for NFS server role (can be found within server role “File And Storage Services” under path “File And Storage Services /File and iSCSI Services/Server for NFS”) provides NFS server functionality that ships with Windows Server 2012. Server for NFS supports RPCSEC_GSS with Kerberos authentication, including all three levels of RPCSEC_GSS security service: krb5 (for RPCSEC_GSS None), krb5i (for RPCSEC_GSS Integrity), and krb5p (for RPCSEC_GSS Privacy) respectively.
Explaining how to set up Kerberos security between a Linux client and a Windows server running Server for NFS can best be accomplished by way of a simple example. In this tutorial we’ll consider the following infrastructure scenario:
- Windows domain called CONTOSO.COM running Active Directory on a domain controller (DC) named contoso-dc.contoso.com.
- Windows server running Server for NFS with host name: windowsnfsserver. contoso.com
- Linux client machine running Fedora 16 with host name: linuxclient. contoso.com
- Linux user on Fedora 16 client machine: linuxuser
- Windows user that mapped Linux user on Fedora 16 client machine: CONTOSO\linuxclientuser-nfs
- Kerberos encryption: AES256-CTS-HMAC-SHA1-96
For the purpose of configuration, we assume that the Linux client is running Fedora 16 with kernel version 3.3.1. Windows server is running Windows Server 2012 with server for NFS role installed. DC is running Windows Server 2012 with DNS Manager, Active Directory Administrative Center and “setspn” command line tool installed.
Configuration Steps
In this section, we will go through 3 steps for the purpose of enable NFS with Kerberos authentication:
- Basics
- Set up Linux machine with Kerberos authentication.
- Provision NFS share on Windows Server 2012 with Kerberos authentication.
In step 1, we are going to check DNS and make sure that both NFS and RPCGSS are installed on Linux machine. In step 2, we are going to set up the Linux machine to join Windows domain. After that, we will configure service principal name (SPN) for Kerberos and distribute SPN generated key to Linux machine for authentication.
Step 1: Basics
First, make sure that DNS name resolution is working properly using between the DC, the Windows NFS Server, and the Linux client. One caveat for the Linux client is that the hostname should be set to its fully qualified domain name (FQDN) in the Windows domain. Running “hostname” on Linux machine and check whether host name is correct. (In command boxes, bold text is the command we type in and its result shows in normal style without bold.):
[root@linuclient]#
hostname
linuxclient.contoso.com
Details of setting hostname for Fedora 16 machine can be found in
Fedora 16 Doc
with URL:
http://docs.fedoraproject.org/en-US/Fedora/16/html/System_Administrators_Guide/ch-The_sysconfig…
.
Also make sure that NFS and RPCGSS module are successfully installed and started up in this Linux machine. Following example shows how to use “yum” patching tool to install NFS on Fedora 16 client machine:
[root@linuxclient]#
yum install nfs-utils
and load Kerberos 5 by run:
[root@linuxclient]#
modprobe rpcsec_gss_krb5
and start rpcgss service by run:
[root@linuxclient]#
rpc.gssd start
Step 2: Set up Linux machine with Kerberos authentication
Step 2.1: Add Linux machine to DNS in DC
In this step, we need to log into the DC and add an entry to the DNS Manager as follows:
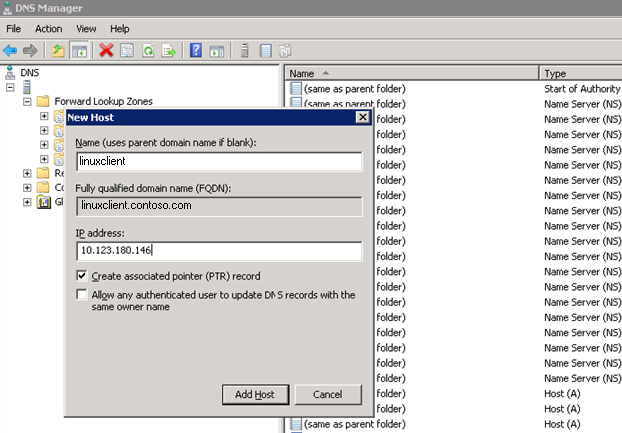
Figure 1
The IP address of Linux client can be found by running “ifconfig” command in Linux terminal. In our case, we stick to Ipv4 address, the IP address of our Linux client machine is “10.123.180.146”.
Reverse DNS mapping can be verified by command “dig –x 10.123.180.146” from Linux side, where “10.123.180.146” should be replaced with the actual IP address of your Linux machine. DNS settings may need time to propagating among DNS servers. Please wait a while until dig command returns the right answer.
Step 2.2: Join Linux machine to the domain
Now we’re going to configure Linux client to get Kerberos tickets from the Windows domain it is going to join (in our case “CONTOSO.COM”). This is done by editing the “/etc/krb5.conf” file. There should be an existing file with some placeholders which can be edited. We’re going to add two lines under “[libdefaults]” for “default_realm” and “default_tkt_enctypes”. We’re also going to add a realm in “[realms]” filling in the following fields: “kdc”, “admin_server”. Moreover, we are going to add two lines in the “[domain_realm]” section.
The end result should look something like (text we added is marked in
Italic
):
…
[libdefaults]
default_realm =
CONTOSO.COM
dns_lookup_realm = false
dns_lookup_kdc = false
ticket_lifetime = 24h
renew_lifetime = 7d
forwardable = true
default_tkt_enctypes = aes256-cts-hmac-sha1-96
[realms]
CONTOSO.COM = {
kdc =
contoso-dc.contoso.com
admin_server = contoso-dc.contoso.com
}
[domain_realm]
.contoso.com = CONTOSO.COM
contoso.com = CONTOSO.COM
Step 2.3: Configure Kerberos service principal name
I’ll explain a bit how authentication works from the NFS standpoint. When a Linux client wants to authenticate with Windows NFS server by Kerberos, it needs some other «user» (called a «service principal name» or SPN in Kerberos) to authenticate with. In other words, when a NFS share is mounted, the Linux client tries to authenticate itself with a particular SPN structured as “nfs/FQDN@domain_realm”, where “FQDN” is the fully qualified domain name of the NFS server and “domain_realm” is the domain where both Linux client and Windows NFS have already joined.
In our case, Linux client is going to look for “nfs/windowsnfsserver. contoso.com@CONTOSO.COM”. For this SPN, we’re just going to create it and link it to the existing “machine” account of our NFS as an alias for that machine account. We run the “setspn” command from command prompt on DC to create SPN:
setspn –A nfs/windowsnfsserver windowsnfsserver
setspn –A nfs/windowsnfsserver.contoso.com windowsnfsserver
You can refer following articles to know more about SPN and “setspn” command.
http://msdn.microsoft.com/en-us/library/aa480609.aspx
User on Linux client will use the same style (i.e. nfs/FQDN@domain_realm where “FQDN” is the FQDN of the Linux client itself) as its own principal to authenticate with DC. In our case, principal for Linux client user is “nfs/linuxclient.contoso.com@CONTOSO.COM”. We’re going to create some user in AD representing this principal, but “/” is not a valid character for AD account names and we cannot directly create an account which looks like “nfs/FQDN”. What we are going to do is to pick a different name as account and link it to that principal. On DC, we create a new user account in Active Directory Administrative Center (Figure 2) and set up a link between this account and Kerberos SPN through “setspn” tool as we did for NFS server SPN.
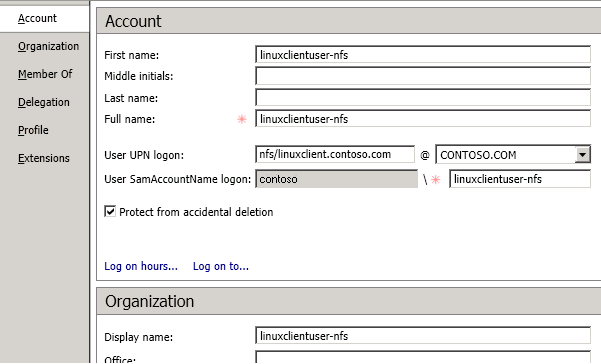
Figure 2
In our case, both first name and full name are set to “linuxclientuser-nfs”. User UPN logon is “nfs/linuxclient.contoso.com@CONTOSO.COM”. User SamAccountName is set to contoso\linuxclientuser-nfs. Be sure to choose the correct encryption options, namely “Kerberos AES 256 bit encryption” and “Do not require Kerberos pre-authentication”, to make sure AES encryption works for GSS Kerberos. (Figure 3)

Figure 3
Now, we’re going to set the SPNs on this account by running the following command in DC’s command prompt:
setspn –A nfs/linuxclient linuxclient-nfs
setspn –A nfs/linuxclient.contoso.com linuxclient-nfs
Fedora 16 Linux client needs to use the SPN without actually typing in a password for that account when doing mount operation. This is accomplished with a «keytab» file.
We’re going to export keytab files for these accounts. On DC run following command from command prompt:
ktpass –princ
nfs/linuxclient.contoso.com@CONTOSO.COM
–mapuser linuxclientuser -nfs –pass [ITSPASSWORD] –crypto All –out nfs.keytab
“[ITSPASSWORD]” needs to be replaced by a real password chosen by us. Then copy nfs.keytab to Linux client machine. On Linux client machine we’re going to merge these files in the keytab file. From the directory where the files were copied, we run «ktutil» to merge keytabs. In this interactive tool run the following commands:
[root@linuxclient]#
ktutil
rkt nfs.keytab
wkt /etc/krb5.keytab
q
Great, now Linux client should be able to get tickets for this account without typing any passwords. Test this out:
kinit –k nfs/linuxclient.contoso.com
Note that Linux client will try three different SPNs (namely host/linuxclient, root/linuxclient, and nfs/linuxclinet) to connect to NFS server. Fedora 16 will go through keytab file we generated from DC and find those SPNs one by one until the first valid SPN is found, so it is enough for us to just configure “nfs/linuxclient” principal. As a backup plan, you may try to configure other SPNs if “nfs/linuxclient” does not work.
Step 3: Provision NFS share on Windows Server 2012 with Kerberos authentication and Test NFS Kerberos v5 from Linux
Now we can create windows share with Kerberos v5 authentication and mount that share from Linux client. We can approach this by run PowerShell command:
New-NfsShare –Name share –Path C:\share –Authentication krb5,krb5i,krb5p -EnableAnonymousAccess 0 –EnableUnmappedAccess 0 –Permission readwrite
More details about how to setup NFS share could be found in blog post “Server for Network File System First Share End-to-End” at
http://blogs.technet.com/b/filecab/archive/2012/10/08/server-for-network-file-system-first-shar…
.
Now we are going to mount that share from Linux machine through NFS V4.1 protocol. On Linux client run:
[root@linuxclient]#
mount –o sec=krb5,vers=4,minorversion=1 windowsnfsserver:/share /mnt/share
In “sec” option, we can choose different quality of service (QOP) from “krb5”, “krb5i”, and “krb5p”. In “vers” option, we can choose to mount the share through NFS V2/3 protocol by replacing “vers=4,minorversion=1” to “vers=3” for NFSv3 or “vers=2” for NFSv2. In our case, “/mnt/share” is the mount point we choose for NFS share. You may modify it to meet your need.
After that, we can get access to mounted position from a normal linux client user by requiring the Kerberos ticket for that user. In our case, we run kinit from linuxuser user on Linux machine:
[linuxuser@linuxclient]#
kinit nfs/linuxclient.contoso.com
Note that we do not need keytab to visit mounted directory, so we do not need to specify “-k” option for kinit. That linux user we run “kinit” should have privilege to read key tab file “krb5.keytab” under path “/etc”. All actions performed by linuxuser will then be treated as the domain user linuxclientuser-nfs on Windows NFS server.
Notes
RPCGSS Kerberos with privacy
RPCGSS Kerberos with privacy does not work with current release of Fedora 16 because of a bug reported here:
https://bugzilla.redhat.com/show_bug.cgi?id=796992
You can refer it to find the patch in Fedora patch database to make it work after they fix it.
NFS Kerberos with DES Encryption
Windows domain uses AES by default. If you choose to use DES encryption, you need to configure the whole domain with DES enabled. Here are two articles telling you how to do that:
http://support.microsoft.com/kb/977321
http://support.microsoft.com/kb/961302/en-us
The Windows machine must also set the local security policy to allow all supported Kerberos security mechanisms. Here is an article talking about how to configure Windows for Kerberos Supported Encryption as well as what encryption types we have for Kerberos:
http://blogs.msdn.com/b/openspecification/archive/2011/05/31/windows-configurations-for-kerbero…
After enabling DES on domain/machines/accounts passwords on accounts must be reset to generate DES keys. After that, we can follow the same configuration steps in previous section to mount NFS share with Kerberos. There is one exception that we need to add one additional line to “[libdefaults]” section of “/etc/krb5.conf” to enable “weak crypto” just like DES:
Troubleshooting
DNS look up failure
DNS server need time to propagate Linux client host names, especially for complicate subnet with multi-layers of domains. We can do some trick by specifying DNS lookup server priority on Linux client by modifying /etc/resolv.conf:
# Generated by NetworkManager
domain contoso.com
search contoso.com
nameserver:
your preferred DNS server IP
Kerberos does not work properly
The Linux kernel’s implementation of rpcsec_gss depends on the user space daemon rpc.gssd to establish security contexts. If Linux fails to establish GSS context, this daemon is the first place for troubleshooting.
First, make sure that rpcsec_gss is running. Run “rpc.gssd –f –vvv”
[root@linuxclient]#
rpc.gssd –f –vvv
beginning poll
Ideally, the terminal will be blocked and polling GSS requests. If it stops right after running that command, you’d better reboot Linux. rpc.gssd itself is also a source of debugging Kerberos context switch. It will print out result of each Kerberos authentication steps and their results.
NFS Access Denial
The most error message from mounting NFS share from Linux is access denial. Unfortunately, Linux terminal does not provide additional clue of what causes failure. Wireshark is a nice tool to decode NFS packets. We can use it to find out error code from server replay message of compounds.
Feedback
Please send feedback you might have to
nfsfeed@microsoft.com
In this short guide I will talk about how to mount a shared drive that is in an Ubuntu or Debian installation that will be the server with the NFS (Network File System) drive, on a network drive accessible from Windows 10 who will play the role of client.

Table of Contents
-
Installation and configuration in Ubuntu or Debian as a server
- Drive options
-
Client installation and configuration in Windows 10
- Mounting the network drive
- Write permissions for the anonymous user
⇧
1. Installation and configuration in Ubuntu or Debian as a server
In the case of Debian, remove sudo from each command (it can even be executed the same).
Install the package «nfs-kernel-server»:
sudo apt install nfs-kernel-server1. Drive options
Then we edit the file /etc/exports with nano or with the editor of our preference:
sudo nano /etc/exportsThe file contains comments such as the following:
# /etc/exports: the access control list for filesystems which may be exported
#               to NFS clients.  See exports(5).
We add a line at the end with the following:
/home/user/folder 192.168.0.10(rw,sync,all_squash,anonuid=1000,anongid=1000)In the example above:
/home/user/folder it is the folder that will be shared by the network.
192.168.0.10 it is the IP of the client or clients that access the network resource. Only a static IP is shown, but we can use 192.168.0.1/24 to match between 192.168.0.1 and 192.168.0.254.
Mount options are in parentheses.
- rw: allow reading and writing.
- sync: is optional in case we want a little more file integrity and avoid data loss, sacrificing a bit of performance.
- all_squash: downgrades the permissions of the files created from the client to the nobody user. For example, if in Windows 10 I am logged in as Administrator and created a new file, it will belong to user nobody.
- anonuid: is the ID of the nobody user, or whatever user we want.
- anongid: is The group ID of the user nobody.
In this case, I set anonuid and anongid to 1000, which is the user who owns the folder, /home/user/folder to preserve execute and write permissions.
With the changes made, we save the file CTRL + O, then Enter, and then we close with CTRL + X, this only if we use the nano editor from the terminal.
We restart the NFS server:
sudo service nfs-kernel-server restartWith this, the configuration on the server will be ready, any error that appears when restarting is necessary to check the configuration and obviously the description of the error.
⇧
2. Client installation and configuration in Windows 10
Windows comes with a default client, but it needs to be installed. The only detail is that I don’t remember if it is available in the Windows 10 Home version.
The easiest way to install it is to use the search bar and type Control Panel, because Windows 10 has several modern panels that hide the older options. Open Programs › Programs and Features and in the left panel we open Turn Windows features on or off.

Mark the box Service for NFS with his two descendants Client for NFS and Administrative Tools. We click on OK and after some time the client will be installed.
1. Mounting the network drive
To mount the unit, we open the cmd (do not use PowerShell). We use the command:
mount -o anon \\192.168.0.20\home\user\folder k:The IP 192.168.0.20 is the server, followed by the shared folder and one drive letter that will be used. It is important to use the real full path of the resource as if we were personally on the server with the folder /home/user/folder, otherwise it won’t work. I have tried hiding the part of the path when mounting the drive, but it is a complicated process and not worth the extra effort.
The message, The command completed successfully. will indicate that everything is working properly.
2. Write permissions for the anonymous user
Normally and by default, Windows does not allow writing on this type of drive with the anonymous user. To enable writing, we have to open the Windows registry Regedit, and we headed towards: HKEY_LOCAL_MACHINE\SOFTWARE\Microsoft\ClientForNFS\CurrentVersion\Default.
There we will create a DWORD (32-bit) Value with the name AnonymousUid with the value of 0 with Base Decimal. Then create a DWORD (32-bit) Value with the name AnonymousGid with the value 0 with Base Decimal.
We have to restart the computer or the service Client for NFS, we can find it in the task manager in the Services tab.

If we follow all the previous steps, and we already have the unit mounted, we open the CMD and execute the command mount, the mount will appear and in properties it will show UID=0 y GID=0. If any other number appears, check the entire procedure above.

Note: The procedure is practically the same in both Ubuntu and Debian, or any other variation like Kubuntu. No need to use Ubuntu Server. The NFS version to be used is 3 with Ubuntu 18.04 — 64-bits and Windows 10.
⇧
 Сетевая файловая система NFS является родным для мира Linux способом организации общего доступа к файлам по сети и ее взаимоотношения с Windows долгое время оставались напряженными. Однако последнее время ситуация начала меняться и Windows перешел от конфронтации к сотрудничеству с открытым ПО. Начиная с Windows 10 1607 (14393) в системе появился штатный NFS-клиент, который позволяет прозрачно подключать и использовать NFS-ресурсы. В данной статье мы расскажем, как его установить и использовать, а также разберем некоторые особенности эксплуатации.
Научиться настраивать MikroTik с нуля или систематизировать уже имеющиеся знания можно на углубленном курсе по администрированию MikroTik. Автор курса, сертифицированный тренер MikroTik Дмитрий Скоромнов, лично проверяет лабораторные работы и контролирует прогресс каждого своего студента. В три раза больше информации, чем в вендорской программе MTCNA, более 20 часов практики и доступ навсегда.
Для установки NFS-клиента откройте оснастку Программы и компоненты и перейдите по ссылке Включение или отключение компонентов Windows, найдите там раздел Службы для NFS и включите его содержимое.

Также можно быстро выполнить установку при помощи PowerShell, для выполнения команды нужно запустить терминал с повышенными правами:
Enable-WindowsOptionalFeature -FeatureName ServicesForNFS-ClientOnly, ClientForNFS-Infrastructure -Online -NoRestartГрафических инструментов для подключения NFS-ресурсов нет, поэтому снова воспользуемся терминалом, только теперь запустим его без повышения прав:
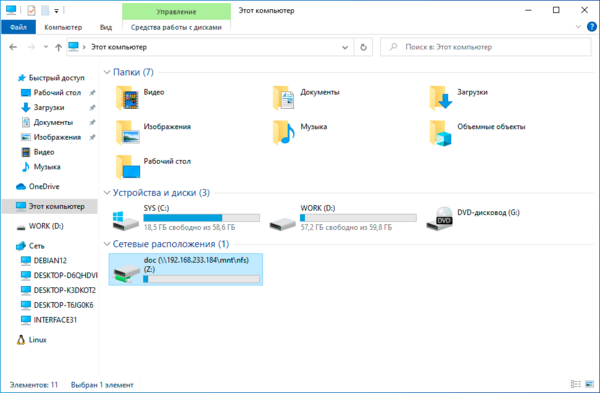
mount -o anon \\192.168.233.184\mnt\nfs\doc Z:Команда mount поддерживает ряд опций, которые указываются после ключа -o, в данном случае опция одна — anon, что означает подключение анонимным пользователем. Затем указываем сетевой путь к экспортируемому ресурсу, обратите внимание, что NFS-клиент для Windows поддерживает только NFS v3 и поэтому путь нужно указывать не от корня NFS, а от корня файловой системы. И наконец буква диска куда будет примонтирован ресурс. Адрес NFS-сервера в нашем случае 192.168.233.184.
Если нигде не было допущено ошибок, то в проводнике появится новый сетевой диск с указанной буквой.
 Для отключение используйте команду:
umount Z:У команды mount есть один существенный недостаток, сетевые диски, подключенные таким образом, не восстанавливаются при загрузке системы. Можно, конечно, пойти наиболее простым путем и добавить в автозагрузку пакетный файл с нужными командами, но лучше снова позвать на помощь PowerShell. Данную команду также нужно выполнять без повышения прав:
New-PSdrive -PSProvider FileSystem -Name Z -Root \\192.168.233.184\mnt\nfs\doc -PersistОбратите внимание, что букву диска для монтирования указываем без двоеточия, а опция -Persist предписывает подключить ресурс на постоянной основе.
Для отключения ресурса воспользуйтесь командой:
Remove-PSdrive -Name ZДля просмотра всех смонтированных NFS-ресурсов, неважно как они были подключены, используйте команду:
mount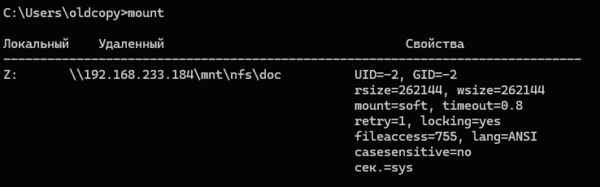 Как можем увидеть, при анонимном подключении Windows использует UID/GID = -2, если мы используем all_squash со стороны NFS-сервера, то это не имеет особого значения, в иных случаях нам может потребоваться указать иные идентификаторы. Это можно сделать через системный реестр, откройте ветвь:
HKEY_LOCAL_MACHINE\SOFTWARE\Microsoft\ClientForNFS\CurrentVersion\DefaultИ добавьте туда два параметра DWORD (32бит) с именами AnonymousUid и AnonymousGid и укажите в них нужные идентификаторы в десятичном виде. После чего перезагрузите компьютер.
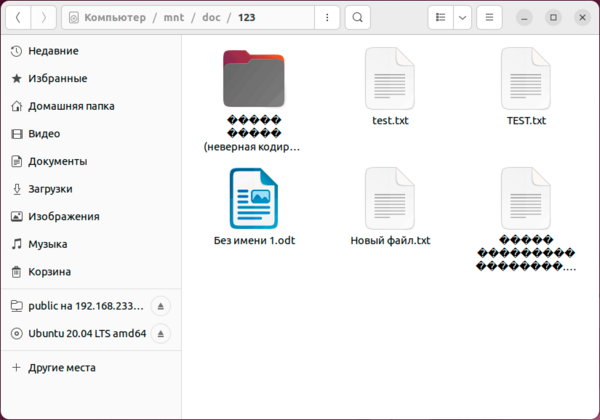
А теперь о проблемах. Для их понимания достаточно посмотреть на следующий скриншот:
 Начнем с самого безобидного, регистра в именах файлов. Как мы помним — Linux система чувствительная к регистру, поэтому там TEST.txt и test.txt разные файлы. И если вы будете работать с ними в пределах NFS-ресурса, то проблем не возникнет, вы можете даже открыть оба файла одновременно, внести изменения и сохранить. Все это возможно потому, что NFS — это не протокол удаленного доступа, а именно сетевая файловая система.
Проблемы начнутся, если вы захотите скопировать их в свою систему. Неопытный пользователь вполне может допустить ошибку и перезаписать важный локальный файл.
А вот следующая проблема куда серьезней и не имеет приемлемого решения на сегодняшний день. Современные Linux системы давно работают с UTF-8, в то время как Windows продолжает использовать региональные кодовые страницы, например, CP-1251 для русского языка. Это приводит к тому, что имена файлов, набранные кириллицей (или любыми иными национальными символами) отображаются «крякозябликами». Сами файлы при этом доступны и могут быть отредактированы.
Если же мы со стороны Windows поместим на NFS-ресурс файл с кириллицей в имени, то со стороны Linux мы увидим веселые ромбики.
В качестве решения можно найти совет включить поддержку UTF-8 в Windows, которая пока находится в состоянии бета. Эта возможность доступа в языковых настройках панели управления.
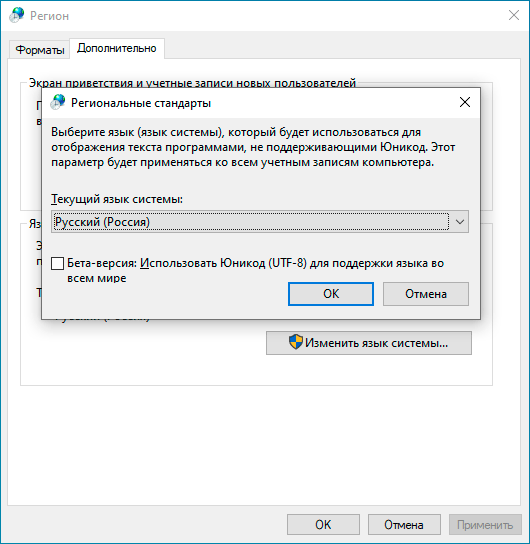 Но это решение из разряда «одно лечим — другое калечим» и покалечено будет гораздо больше, чем вылечено. Дело в том, что достаточно большое количество вполне современных программ ничего не знают об UTF-8 и не умеют с ним работать, в итоге веселые ромбики начнут попадаться вам в самых неожиданных местах вашей системы.
Поэтому, используя NFS-клиент для Windows следует четко понимать все плюсы, минусы и имеющиеся недостатки. Но в целом появление поддержки NFS в Windows — хорошо, так как делает поддержку гетерогенных сред проще.
Научиться настраивать MikroTik с нуля или систематизировать уже имеющиеся знания можно на углубленном курсе по администрированию MikroTik. Автор курса, сертифицированный тренер MikroTik Дмитрий Скоромнов, лично проверяет лабораторные работы и контролирует прогресс каждого своего студента. В три раза больше информации, чем в вендорской программе MTCNA, более 20 часов практики и доступ навсегда.
Network File System (NFS) is an open standard for distributing a file system across a network for multi-client access. Designed in 1984, NFS has grown to include many authentication methods at both the share (export) and file system levels, including client IP/hostname, auth_sys (Unix auth), Kerberos and NFSv4.x ACLs.
This blog post explains how to mount an NFS share on a Windows client.
How NSF works with Windows operating systems
While you’re likely to be familiar with accessing network file shares via Server Message Block (SMB) or the Windows implementation of SMB (CIFS), NFS is still prevalent in production environments with Unix servers.
Unfortunately, NFS traditionally did not play well with environments that mix Windows with Unix: To enable Windows client access to NFS exports, each NFS export needed a Samba share equivalent (an SMB implementation for Unix).
However, this changed when Microsoft implemented NFS client and server tools. Microsoft’s NFS documentation lists the following operating system support:
| Operating Systems | NFS Server Versions | NFS Client Versions |
| Windows 7, Windows 8.1 Windows 10 | N/A | NFSv2, NFSv3 |
| Windows Server 2008, Windows Server 2008 R2 | NFSv2, NFSv3 | NFSv2, NFSv3 |
| Windows Server 2012, Windows Server 2012 R2, Windows Server 2016, Windows Server 2019 |
NFSv2, NFSv3, NFSv4.1 | NFSv2, NFSv3 |
How to Configure Windows as an NFS Client
Prerequisite: Enable the necessary Windows features.
Before we mount an NFS share on a Windows client, we need to enable certain features within Windows to perform NFS client operations. The PowerShell command to use depends on your client environment:
For Windows 10:
Enable-WindowsOptionalFeature -FeatureName ServicesForNFS-ClientOnly, ClientForNFS-Infrastructure -Online -NoRestart
For Windows Server:
Install-WindowsFeature NFS-Client
Now we need to mount NFS exports from a Unix server. However, Unix and Windows use different mechanisms for identifying users and groups: In Unix-like operating systems such as Linux, users and groups are identified by user identifiers (UIDs) and group identifiers (GIDs), respectively. In Windows, users and groups are identified using security identifiers (SIDs).
Therefore, in order to authenticate to a Unix server providing NFS exports, we need to map Windows users to Unix UIDs and GIDs. With this UID/GID mapping, the Unix server will be able to determine which user created the request for the NFS export.
Here are three methods you can use to perform the identity mapping and mount the NFS export.
Method 1 (preferred). Perform identity mapping in Active Directory (AD).
If both the Unix NFS server and Windows NFS client are joined to the same Active Directory domain, then we can handle identity mapping in Active Directory. This is the preferred method for security purposes when possible.
NOTE: This method is not available if method 2 (below) is in use, since the presence of a local etcpasswd file will take precedence for identity mapping.
By default, our NFS client won’t look up identity mapping in Active Directory. However, we can change that by running the following command in an elevated PowerShell session on the NFS client:
» Set-NfsMappingStore -EnableADLookup $True -ADDomainName "<your_domain>"
Now we can run the Get-NfsMappingStore command to check the current Windows user’s UID/GID mapping. As you can see, ADLookupEnabled is set to True, and a domain is specified for ADDomain.
» Get-NfsMappingStore
UNMServer               :

UNMLookupEnabled        : False

ADDomain                : <your_domain>

ADLookupEnabled         : True

LdapServer              :

LdapNamingContext       :

LdapLookupEnabled       : False

PasswdFileLookupEnabled : False
Next, we need to configure our identity mapping in Active Directory Users and Computers. To view the uidNumber and gidNumber attributes for each user, make sure you have Advanced Features enabled under the View dropdown:
You’ll then be able to view and edit those fields in a user or group’s Properties menu, on the Attribute Editor tab:
It can be cumbersome to manually map UIDs and GIDs for many Active Directory users. To automate the process, you can use the following PowerShell command to set the appropriate attribute values for each desired user, using a CSV file with UID/GID data:
Set-ADUser -identity <UserPrincipalName> -add @{uidNumber="<user_unix_uid>";

gidNumber="<user_unix_gid>"}
.
NOTE: In the Set-ADUser command, “add” should be changed to “replace” if a user already has a value for either uidNumber or gidNumber.
Using this approach, we can now map an NFS share in Windows to an available drive letter via command prompt, and the UID/GID will be mapped per the current Active Directory user’s uidNumber and gidNumber attribute values.
» mount \<nfs_server_ip_address>pathtonfsexport Z:
The path after the NFS server’s IP is the local path to the NFS export on the NFS server, and the drive letter is any available drive letter on the Windows NFS client.
Of course, the Unix rights given to the user we’ve mapped to ultimately decide what kind of access we have to the export, such as read/write or read-only.
Method 2. Perform identity mapping using the Local etcpasswd file.
Since using Active Directory is the preferred method for identity mapping, we won’t go into detail for the other two options. However, it’s worth briefly stating that Windows can perform local identity mapping using Unix-style passwd and group files, located in %SYSTEMROOT%system32driversetc.
If the passwd file is present and has identity mapping information for the current Windows user, then the mappings specified in the passwd and group files will be used for the client’s NFS mount requests rather than UID/GID mappings in Active Directory or the AnonymousUid/AnonymousGid Windows registry settings outlined below.
When running the Get-NfsMappingStore PowerShell command, you’ll notice PasswdFileLookupEnabled is True whenever this workflow is in effect for the current Windows user.
This approach uses the same mount syntax as the Active Directory identity mapping approach above:
» mount \<nfs_server_ip_address>pathtonfsexport Z:
Method 3. Perform identity mapping using AnonymousUid/AnonymousGid Windows registry settings.
The final method is considered an insecure approach and is not recommended. It potentially allows any local user to mount the target NFS export(s) with read/write access, as opposed to securing write permissions to specific local Windows users via the methods above.
To map the local Windows client to the UID and GID of the Unix user that owns the desired export(s), run the following in an elevated PowerShell:
» New-ItemProperty HKLM:SOFTWAREMicrosoftClientForNFSCurrentVersionDefault -Name AnonymousUID -Value <unix_export_owner_uid> -PropertyType "DWord"
» New-ItemProperty HKLM:SOFTWAREMicrosoftClientForNFSCurrentVersionDefault -Name AnonymousGID -Value <unix_export_owner_gid> -PropertyType "DWord"
After adding these keys to the Windows registry, you need to reboot in order to have them take effect.
Then use the following command to mount the NFS export with read/write access (assuming the client’s IP has permission to mount the export and that the UID/GID mapping is correct for each desired export):
» mount -o anon \<nfs_server_ip_address>pathtonfsexport Z:
FAQ
Does Windows 11 support NFS clients?
Yes.
How can I use NFS in Windows?
- Provide access to the same file share using both the SMB and NFS protocols by using a Windows NFS file server.
- Deploy a non-Windows operating system to provide NFS file shares accessible to non-Windows clients using the NFS protocol.
- To enable applications to be migrated from one operating system to another, store data on file shares accessible using both the SMB and NFS protocols.
What improvements are included in NFS version 4.1?
- The Remote Procedure Call (RPC)/External Data Representation (XDR) transport infrastructure offers better support and provides better scalability
- RPC port multiplexer feature
- Auto-tuned caches and thread pools
- New Kerberos privacy implementation and authentication options
For complete details, visit the Microsoft page that describes all NFS versions.
How do I add the Server for NFS role service?
In Server Manager or Windows Admin Center, use the “Add Roles” and “Features Wizard”.
Which Windows command-line administration tools does Server for NFS contain?
- Mount provides an NFS mount on Windows clients that maps to a local drive
- Nfsadmin manages configuration settings of the Server for NFS and Client for NFS components.
- Nfsshare sets up NFS share settings for folders that are shared via Server for NFS.
- Nfsstat displays or resets statistics on calls received by Server for NFS.
- Showmount lists the file systems that have been exported by Server for NFS.
NFS-mounted drives are unmounted using Umount.

Security Researcher at Netwrix and member of the Netwrix Security Research Team. Joe is an expert in Active Directory, Windows, and a wide variety of enterprise software platforms and technologies, Joe researches new security risks, complex attack techniques, and associated mitigations and detections.