На компьютерах и серверах Windows могут возникать проблемы с исчерпанием свободной памяти, вызванной утечкой некого системного драйвера, хранящего свои данные в невыгружаемом пуле памяти системы. Невыгружаемый пул памяти (Non-paged memory) – это данные в оперативной памяти компьютера, используемые ядром и драйверами операционной системой, которая никогда не выгружается на диск (в своп/ файл подкачки), т.е. всегда находится в физической RAM памяти.
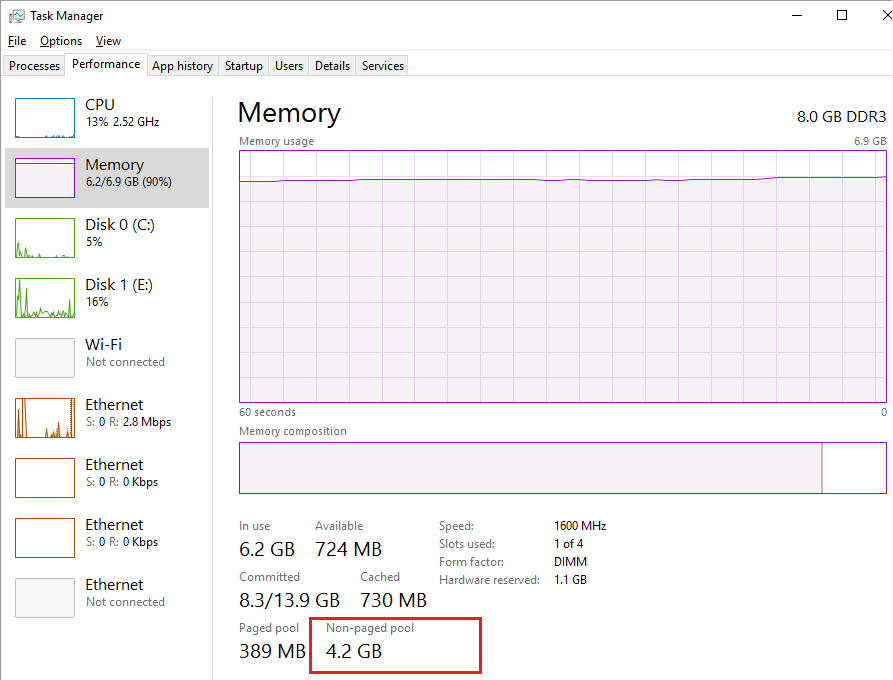
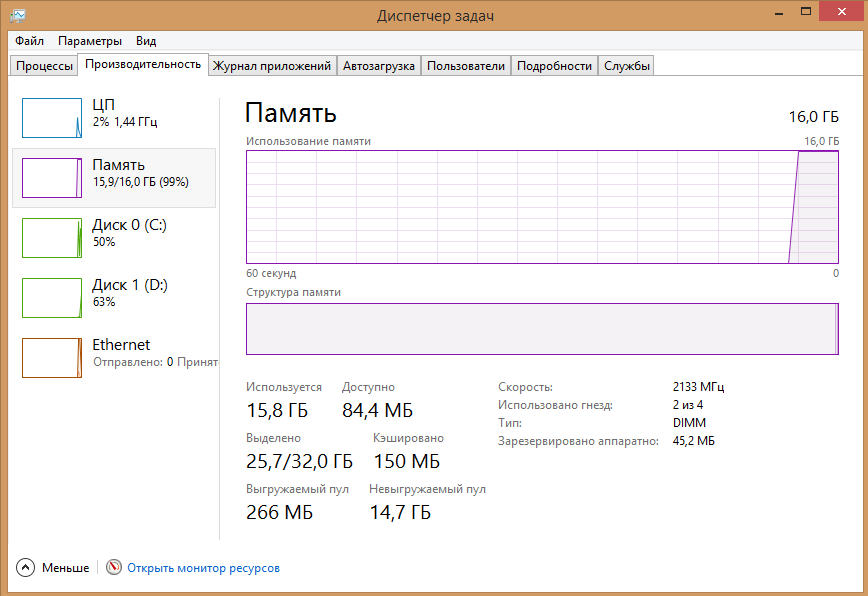
Текущий размер невыгружаемого пула памяти можно увидеть в диспетчере задач Windows на вкладке Perfomance (Производительность) в разделе Memory (Память). На скриншоте ниже видно, что практически вся память на сервере занята, и большая часть ее относится к невыгружаемому пулу 4,2 Гб (Non-paged pool / Невыгружаемый пул). В нормальном состоянии размер невыгружаемого пула редко превышает 200-400 Мб. Большой размер невыгружаемого пула часто указывает на наличии утечки памяти в каком-то системном компоненте или драйвере.
При утечке памяти в невыгружаемом пуле на сервере, в системном журнале событий появится события:
Event ID: 2019
Source: Srv
Description:
The server was unable to allocate from the system nonpaged pool because the pool was empty
В подавляющем большинстве случаев причиной такой утечки памяти является проблема со сторонними драйверами, установленными в Windows. Как правило, это сетевые драйвера. Обратите внимание, как ведет себя пул при скачивании больших файлов (скорее всего он при этом быстро растет).
Максимальный размер невыгружаемого пула в Windows:
- Windows x64 до 128 Гб и не более 75% физической памяти
- Windows x86 до 2 Гб и не более 75% RAM
Для очистки пула помогает только перезагрузка, и, если для домашнего компьютера это еще может быть приемлемо, то на круглосуточно работающем сервере желательно найти нормальное решение.
Содержание:
- Установка последних версий драйверов сетевых адаптеров
- Отключение драйвера мониторинга сетевой активности Windows
- Отключение роли Hyper-V
- Поиск драйвера, вызвавшего утечку памяти с помощью Poolmon
Установка последних версий драйверов сетевых адаптеров
Попробуйте скачать и установить последние версии драйверов ваших сетевых адаптеров с сайта производителя.
Если у вас в Windows включено автоматическое обновление драйверов, убедитесь не начались ли проблемы после установки новых драйверов. Попробуйте откатить версию драйвера на более старую и проверить, воспроизводится ли проблема. Если проблема решилась, отключите авто обновление драйверов.
Отключение драйвера мониторинга сетевой активности Windows
Достаточно часто причиной утечки памяти в невыгружаемый пул является несовместимость драйвера мониторинга сетевой активности (Network Data Usage — NDU, %WinDir%\system32\drivers\Ndu.sys) с драйверами сетевого адаптера компьютера (чаще всего конфликтуют драйвера для сетевых карт Killer Network и MSI). Данный сервис можно отключить без особых потерь функционала Windows.
Службу можно остановить командной:
sc config NDU start= disabled

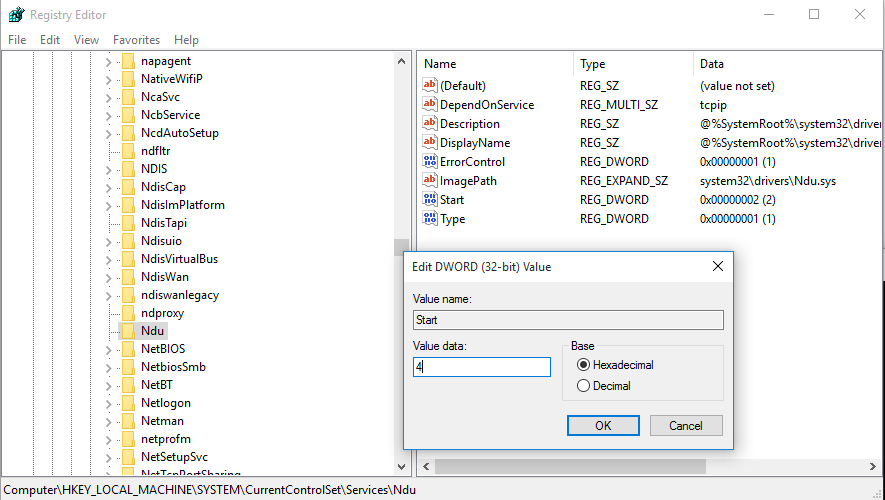
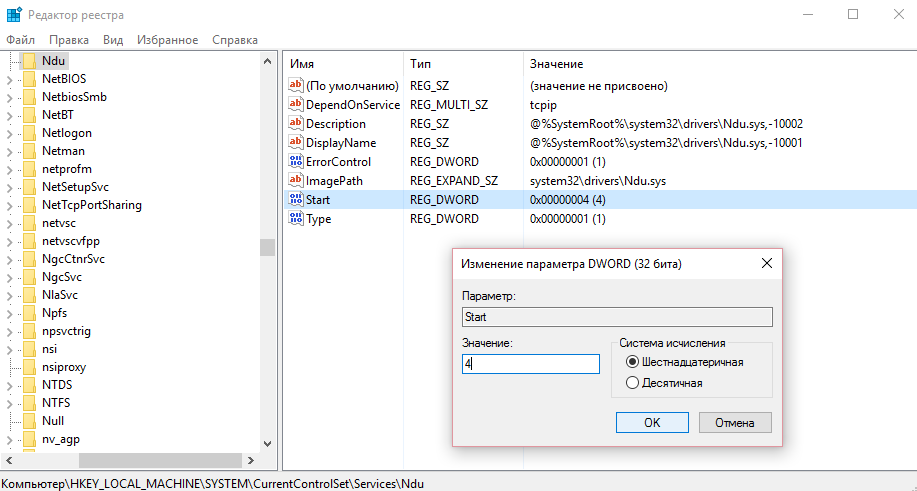
Либо через реестр:
- Откройте редактор реестра regedit.exe
- Перейдите в ветку HKEY_LOCAL_MACHINE\SYSTEM\ControlSet001\Services\Ndu\
- Измените значения параметра Start на 4.
После внесения изменений нужно перезагрузить компьютер
Отключение роли Hyper-V
В некоторых случаях утечку памяти в невыгружаемый пул вызывает установленная роль Hyper-V. Если эта роль не нужна, рекомендуем отключить ее.
В Windows Server Hyper-V роль можно отключить командой:
Remove-WindowsFeature -Name Hyper-V
Команда для Windows 10:
Disable-WindowsOptionalFeature -Online -FeatureName Microsoft-Hyper-V-All
Поиск драйвера, вызвавшего утечку памяти с помощью Poolmon
Если описанные выше способы не помогли, можно попробовать определить драйвер, который вызвал утечку памяти в невыгружаемый пул.
Для этого нам понадобится консольная утилита Poolmoon.exe, входящая в комплект разработки Windows Driver Kit (WDK). Скачайте с сайта Microsoft и установите WDK для вашей версии Windows и запустите утилиту Poolmon.exe (в WDK для Windows 10 утилита находится в каталоге
C:\Program Files (x86)\Windows Kits\10\Tools\
).
После запуска утилиты Poolman.exe нажмите клавиши P. Во втором столбце останутся теги процессов, которые используют невыгружаемую память (атрибут Nonp) Затем нажмите клавишу B, чтобы выполнить сортировку по столбцу Bytes.
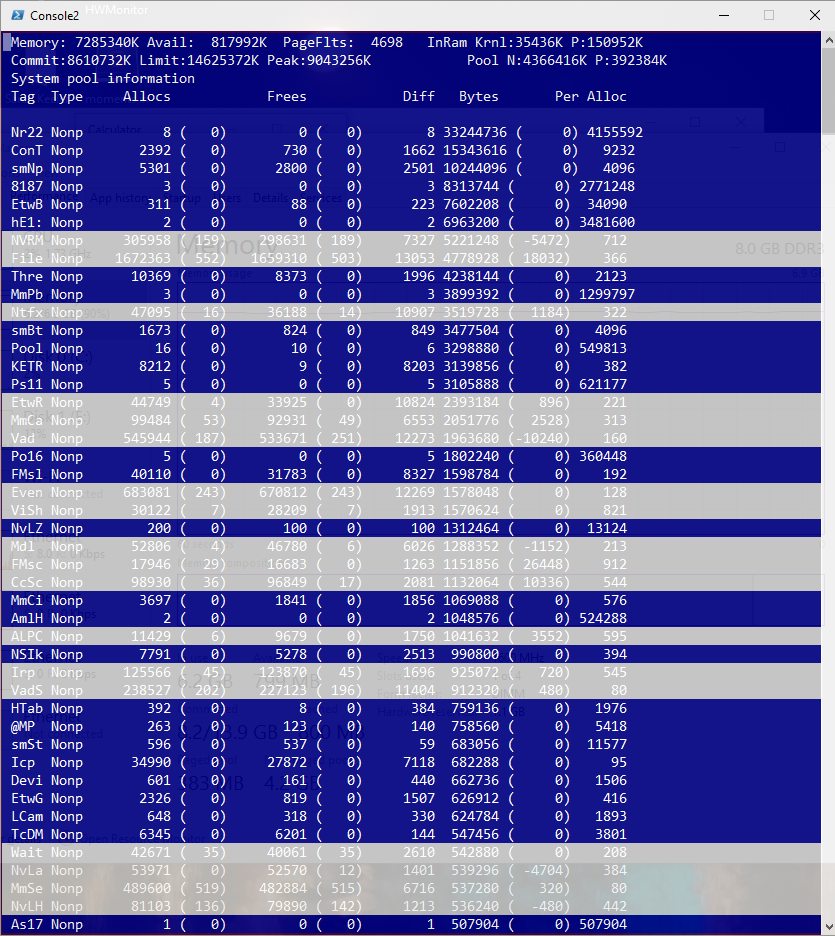
В левом столбце указаны теги драйверов. Ваша задача определить файл драйвера, использующего этот тег. В нашем примере видно, что больше всего RAM в невыгружаемом пуле используют драйвера с тегами Nr22, ConT и smNp.
Вы должны проверить драйвера на наличие найденных тегов с помощью утилиты strings.exe (от Sysinternals), с помощью встроенной команды findstr или с помощью PowerShell.
Следующие команды должны найти файлы драйверов, связанные с найденными вами тегами. данными процессами можно командами:
findstr /m /l /s Nr22 %Systemroot%\System32\drivers\*.sys
findstr /m /l /s ConT %Systemroot%\System32\drivers\*.sys
findstr /m /l /s smNp %Systemroot%\System32\drivers\*.sys
Также можно воспользоваться PowerShell:
Set-Location "C:\Windows\System32\drivers"
Select-String -Path *.sys -Pattern "Nr22" -CaseSensitive | Select-Object FileName -Unique
Select-String -Path *.sys -Pattern "Py28" -CaseSensitive | Select-Object FileName -Unique
Select-String -Path *.sys -Pattern "Ne40" -CaseSensitive | Select-Object FileName –Unique
Вы можете отобразить файлы драйверов непосредственно в poolmon.exe. Для этого убедитесь, что в каталоге утилиты находится файл pooltag.txt. Его можно скопировать из каталога установки WDK или найти в GitHub. Запустите утилиту:
Poolmon /g
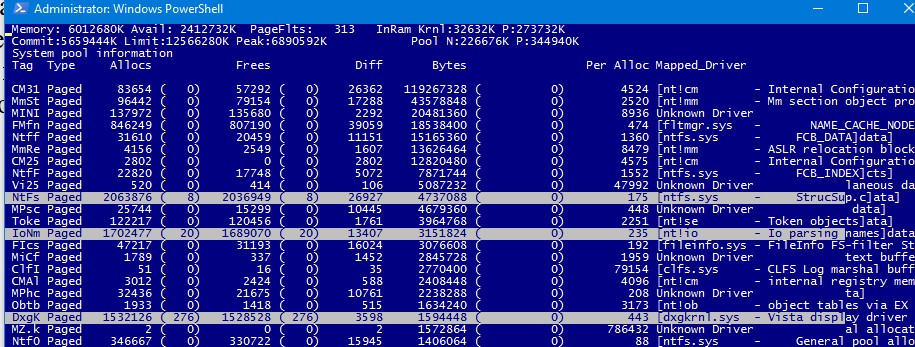
Обратите внимание, что имя драйвера теперь отображается в столбце Mapped_driver.
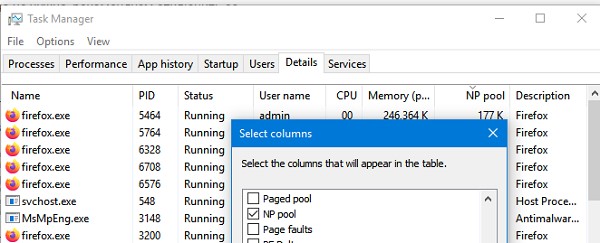
Если поиск не дал результатов, проверьте возможно утечка памяти вызвана не системным процессом. Запустите Task Manager, перейдите на вкладку Details, добавьте колонку NP Pool и найдите процессы с большим размером памяти в невыгружаемом пуле.
Таким образом, мы получили список файлов драйверов, которые могут оказаться причиной проблемы. Теперь по именам файлов нужно определить, к каким драйверам и системным компонентам они относятся. Для этого можно воспользоваться утилитой sigcheck от Sysinternals.
sigcheck C:\Windows\System32\drivers\rdyboost.sys
Утилита возвращает имя драйвера, его свойства и информацию о версии.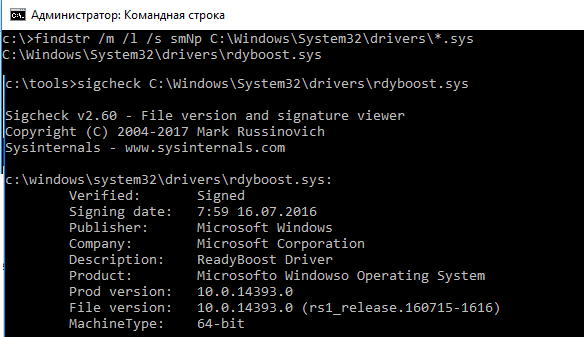
Теперь можно попытаться удалить/обновить/переустановить проблемный драйвер или службу.
Если утечка памяти привела к BSOD, вы можете определить проблемный драйвер по файл дампа памяти.
- Загрузите дамп памяти в отладчик Windbg;
- Выполните команду:
!vm - Если значение NonPagedPool Usage больше чем Max, это говорит о том, что невыгружаемый пул исчерпан;
- Проверьте содержимое пула командой (результаты будут отсортированы по использованию невыгружаемого пула):
!poolused 2 - После получение тега драйвера найдите файл с помощью findstr или strings как описано выше.
Данная инструкция применима как для Windows Server 2019/2016/2012R2, так и для клиентских Windows 10, 8.1.

Вот спустя время решил себе обновить компьютер, собрал, установил новую Windows 10. И горя не знал. Но заметил что он очень тормозит, после того как открыл диспетчер задач, увидел что невыгружаемый пул памяти постоянно увеличивается, и оперативная память не освобождается. Каждый раз чтобы выгрузить память с невыгружаемого пула приходилось выполнять перезагрузку компьютера.
В этой статье я Вам покажу несколько способов как избавится от проблемы с невыгружаемым пулом памяти. Разберемся что такое невыгружаемый пул и по каким причинам пользователи с ней встречаются. Решил написать статью так как сам часто встречаюсь после каждой чистой установки операционной системы Windows 10.
Что такое невыгружаемый пул памяти
На скриншоте видно где можно посмотреть на невыгружаемый пул, и увидеть явную утечку памяти. Не важно сколько в Вас памяти, все с временем уходит в невыгружаемый пул. При этом нормальные значения невыгружаемого пула располагается в районе до двухсот мегабайт. Именно поэтому после обнаружения утечки памяти рекомендуем воспользоваться нашими способами. Обычное добавление планок оперативной памяти немного отдаляет, но все же не решает проблему.
Эта проблема появляется при активном использовании Интернета с включенным управлением полосой пропускания, происходит утечка памяти на материнских платах с сетевой картой от Killer. Не важно интегрированная это или дискретная сетевая карта. Драйвер netio.sys может забрать хоть всю оперативную память в системе. После перезагрузки компьютера по новой все происходило.
Возможно несколько вариантов устранения проблемы. Я же использовал первый или второй способ для отключения утечки памяти. Но не стоит исключать вариант обновления драйверов сетевой карты. Так как сейчас производители уже выпустили обновленные версии драйверов, автоматически исправляющие ошибки с невыгружаемым пулом памяти Windows 10.
Как исправить невыгружаемый пул оперативной памяти
Службы
Первый способ заключается в отключении службы мониторинга сетевой активности (Windows Network Data Usage Monitoring Driver) в Windows 10. Выполнением буквально одной команды проблема с невыгружаемым пулом памяти будет полностью решена.
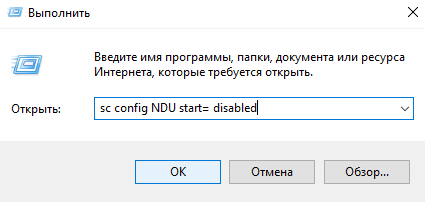
- Откроем окно Выполнить нажатием на клавиши Win+R.
- Вводим команду: sc config NDU start= disabled и нажимаем кнопку ОК.
Реестр
Перед внесением изменений в реестр рекомендуется создать резервную копию реестра Windows 10. Это предоставит возможность в любой момент при необходимости восстановить любые изменения в реестре.
- Нажимаем Win+R и выполняем команду regedit, чтобы открыть редактор реестра.
- Перейдем по пути HKEY_LOCAL_MACHINE\SYSTEM\CurrentControlSet\Services\Ndu.
- Значение параметра Start изменяем на 4.
Для применения изменений выполните перезагрузку компьютера. После включения компьютера память будет освобождаться в автоматическом режиме. Больше утечек оперативной памяти из-за не будет. Смотрите также инструкцию: Как очистить оперативную память на Windows 10.
Драйвера
В некоторых случаях исправить утечки оперативной памяти помогает настройка программного обеспечения к сетевой карте. При этом пользователь теряет весь функционал программы Killer Network Manager.
- Установите Killer Network Manager и отключить Управление пропускной способностью в настройках менеджера.
- Установить драйвера без программы управления возможностями сетевой карты Killer Network Manager.
Сейчас уже с уверенностью можно сказать, что достаточно будет просто обновить драйвера производителя. Сегодня вместо программы Killer Network Manager пользователи получают обновленное средство управления Killer Control Center. В котором разработчики уже решили предыдущие ошибки и проблемы пользователей.
Выводы
Как на меня самый удобный это первый способ, так как невыгружаемый пул памяти исчезает после отключения всего одной службы. Эта проблема актуальна и для пользователей предыдущих операционных систем.
В этой статье мы рассмотрели как исправить невыгружаемый пул Windows 10 и собственно разобрались что такое невыгружаемый пул памяти. Пишите в комментарии встречались ли Вы с этой проблемой, и как с ней боролись. Надеюсь эта статья была для Вас полезной.
(1 оценок, среднее: 5,00 из 5)
Администратор и основатель проекта Windd.pro. Интересуюсь всеми новыми технологиями. Знаю толк в правильной сборке ПК. Участник программы предварительной оценки Windows Insider Preview. Могу с лёгкостью подобрать комплектующие с учётом соотношения цены — качества. Мой Компьютер: AMD Ryzen 5 3600 | MSI B450 Gaming Plus MAX | ASUS STRIX RX580 8GB GAMING | V-COLOR 16GB Skywalker PRISM RGB (2х8GB).
Download Windows Speedup Tool to fix errors and make PC run faster
The original Ndu.sys is an important part of Windows and rarely causes problems. The file Ndu.sys is the Windows Network Data Usage Monitoring Driver file and is located in the C:\Windows\System32\drivers folder and the process is known as Windows Network Data Usage Monitoring Driver. If you’re encountering the Ndu.sys Blue Screen error on your Windows 11/10 device, you can try the solutions provided in this post.

You may encounter this issue after a successful upgrade to the latest version of Windows 11/10.
If you’re faced with this SYSTEM_SERVICE_EXCEPTION error, you can try our recommended solutions below in no particular order and see if that helps to resolve the issue.
- Run the Blue Screen Online Troubleshooter
- Update network card drivers
- Rename and replace Ndu.sys file
- Rollback to previous Windows 11/10 version
- Switch internet connection mode
- Reset Windows 11/10
- Clean install Windows 11/10
Let’s take a look at the description of the process involved concerning each of the listed solutions.
If you can log in normally, good; else you will have to boot into Safe Mode, enter Advanced Startup options screen, or use the Installation Media to boot to be able to carry out these instructions.
1] Run the Blue Screen Online Troubleshooter
In some cases, the Blue Screen Online Troubleshooter from Microsoft will resolve BSOD errors.
2] Update network card drivers
The Ndu.sys is known as Windows Network Data Usage Monitoring Driver. So, you might be encountering this error because of outdated or corrupted network card drivers. In this case, you can either update your drivers manually via the Device Manager, or you can get the driver updates on the Optional Updates section under Windows Update. You may also automatically update your drivers or you can download the latest version of the driver from the network card manufacturer’s website.
3] Rename and replace Ndu.sys file
Do the following:
- Press Windows key + E to open File Explorer.
- Navigate to the folder path below:
C:\Windows\System32\drivers
- At the location, right-click on the Ndu.sys file and then select Rename.
- Name the Ndu.sys file as Ndu.sys1.
Note: If you cannot change the name of the file, make sure you logged in with an administrator account or simply change the permissions you have on this specific file to the administrator.
- Next, open again the C: partition you have Windows 10 installed.
- Search in the C: partition for the Windows.old folder. This folder contains the old Windows 10 version you upgraded from.
- Locate and open the System32 folder you have in the Windows.old folder.
- Now find and double-click to open the driver’s folder.
- Search in the drivers’ folder for the Ndu.sys file.
- Right-click on it and select the Copy option.
- Now paste it in the drivers’ folder of the current upgraded Windows 10 install.
- Exit File Explorer.
- Reboot your Windows 10 computer.
On boot, check to see if the BSOD error persists. If so, try the next solution.
4] Rollback to previous Windows version
This solution requires you to roll back to a previous version of Windows 11/10.
5] Switch internet connection mode
This solution requires you to switch internet connection mode. So, if you are using a wired (ethernet) connection mode to access the internet on your Windows 10 computer, you can switch to wireless connection mode or vice-versa, and see if the error persists.
6] Reset Windows 11/10
This solution requires you to reset Windows and see if that helps.
7] Clean install Windows 11/10
At this point, if none of the above solutions worked to resolve the BSOD error, it’s most likely due to some kind of system corruption that cannot be resolved conventionally. In this case, you can back up your files to an external USB drive; if you can’t boot to the desktop, use a Linux Live USB and then clean install Windows.
Hope this helps!
Obinna has completed B.Tech in Information & Communication Technology. He has worked as a System Support Engineer, primarily on User Endpoint Administration, as well as a Technical Analyst, primarily on Server/System Administration. He also has experience as a Network and Communications Officer. He has been a Windows Insider MVP (2020) and currently owns and runs a Computer Clinic.
This service provides network data usage monitoring functionality.
This service also exists in Windows 8.
Startup Type
| Windows 10 version | Home | Pro | Education | Enterprise |
|---|---|---|---|---|
| 1507 | Automatic | Automatic | Automatic | Automatic |
| 1511 | Automatic | Automatic | Automatic | Automatic |
| 1607 | Automatic | Automatic | Automatic | Automatic |
| 1703 | Automatic | Automatic | Automatic | Automatic |
| 1709 | Automatic | Automatic | Automatic | Automatic |
| 1803 | Automatic | Automatic | Automatic | Automatic |
| 1809 | Automatic | Automatic | Automatic | Automatic |
| 1903 | Automatic | Automatic | Automatic | Automatic |
| 1909 | Automatic | Automatic | Automatic | Automatic |
| 2004 | Automatic | Automatic | Automatic | Automatic |
| 20H2 | Automatic | Automatic | Automatic | Automatic |
| 21H1 | Automatic | Automatic | Automatic | Automatic |
| 21H2 | Automatic | Automatic | Automatic | Automatic |
| 22H2 | Automatic | Automatic | Automatic | Automatic |
Default Properties
| Display name: | Windows Network Data Usage Monitoring Driver |
| Service name: | Ndu |
| Type: | kernel |
| Path: | %WinDir%\system32\drivers\Ndu.sys |
| Error control: | normal |
Default Behavior
The Windows Network Data Usage Monitoring Driver service is a kernel mode driver. If Windows Network Data Usage Monitoring Driver fails to start, the error is logged. Windows 10 startup proceeds, but a message box is displayed informing you that the Ndu service has failed to start.
Dependencies
Windows Network Data Usage Monitoring Driver is unable to start, if the TCP/IP Protocol Driver service is stopped or disabled.
Restore Default Startup Type of Windows Network Data Usage Monitoring Driver
Automated Restore
1. Select your Windows 10 edition and release, and then click on the Download button below.
2. Save the RestoreWindowsNetworkDataUsageMonitoringDriverWindows10.bat file to any folder on your hard drive.
3. Right-click the downloaded batch file and select Run as administrator.
4. Restart the computer to save changes.
Note. Make sure that the Ndu.sys file exists in the %WinDir%\system32\drivers folder. If this file is missing you can try to restore it from your Windows 10 installation media.
Yea, though I walk through the valley of the shadow of death, I will fear no evil: for thou art with me; thy rod and thy staff they comfort me.
Ndu.sys is the Windows Network Data Usage Monitoring Driver. If you check the What Failed section for various bugchecks like SYSTEM THREAD EXCEPTION NOT HANDLED and IRQL NOT LESS EQUAL, you’ll often find ndu.sys listed there.
However, contrary to what users often believe, this doesn’t mean that ndu.sys caused the BSOD. Instead, this driver failed because of something else, and that’s what you’ll need to figure out to fix the ndu.sys BSOD at its root.
Table of Contents
Ways to Fix Ndu.sys BSOD Error
As stated, there are various BSODs related to ndu.sys, with some common ones being:
0x0000000A: IRQL NOT LESS EQUAL (Ndu.sys)
0x0000001E: KMODE EXCEPTION NOT HANDLED (Ndu.sys)
0x0000003B: SYSTEM SERVICE EXCEPTION (Ndu.sys)
0x00000050: PAGE FAULT IN A NONPAGED AREA (Ndu.sys)
0×0000007A: KERNEL DATA INPAGE ERROR (Ndu.sys)
0x0000007E: SYSTEM THREAD EXCEPTION NOT HANDLED (Ndu.sys)
These BSODs can be caused by a number of reasons, but when associated with ndu.sys, certain fixes will be very effective. We’ve listed those first, and if those fixes don’t help, you can analyze the dump file to figure out the exact cause and apply any of the general solutions listed further below.
Remove Antivirus
The most common reason for ndu.sys-related BSODs has been incompatibility with antiviruses. Malwarebytes, in particular, is notorious for this. As such, temporarily removing the antivirus might be your best bet at fixing this BSOD.
You can use Windows Defender for protection in the meantime. With that said, here’s how you can remove the antivirus:
- Press Win + R, type
appwiz.cpl, and press Enter. - Select the antivirus from the list and press Uninstall.

- Follow the on-screen instructions to remove the antivirus and restart afterward.

Update Network Driver
Outdated or corrupt network drivers are another common reason for ndu.sys-related BSODs. You should first try updating the network drivers. Here’s how you can do so:
- Press Win + R, type
devmgmt.msc, and press Enter. - Expand the Network Adapters section.
- Right-click the Network Adapter and select Update Driver.

- First, select Search automatically for updated drivers.
- If you’re unable to find newer drivers that way, look for the drivers on the system manufacturer or network adapter manufacturer’s website.
- Download whichever one is newer.
- Launch the Device Manager and try to update the network driver once again.
- This time, select Browse my computer for drivers.
- Click on Browse and locate the directory where the driver files were downloaded in Step 6.

- Press Ok > Next > Close.
- Restart your computer afterward.


Replace ndu.sys
It’s also possible that the ndu.sys file itself is corrupt, and replacing it with a proper one could resolve the BSOD issues. If you recently upgraded Windows, you’ll have the Windows.old folder on your system. You can use the ndu.sys file from that directory to replace the current one. Here’s how you can do this:
- First, create a restore point as a safety measure.
- On an admin account, press Win + R, type
cmd, and press CTRL + Shift + Enter. - Execute the following commands to take ownership of the current file and rename it:
takeown /f %WinDir%\System32\drivers\ndu.sys
icacls %WinDir%\System32\drivers\ndu.sys /Grant Administrators:f
ren "%WinDir%\System32\drivers\ndu.sys" "ndu.old"
- Now, execute the following commands to replace the file:
copy C:\windows.old\system32\drivers\ndu.sys C:\windows\system32\drivers\


If the Windows.old method isn’t applicable to you, you can instead get the ndu.sys file from an installation media and replace it in the same manner. Here are the steps for this:
- Insert the installation media and reboot your computer.
- Press the Boot Options key shown on the screen (usually F12) and select the media to boot from it.
- In the installation wizard, click on Repair your computer.

- Select Troubleshoot > Advanced Options > Command Prompt.
- Enter the following commands and note the system drive letter:
Diskpart
List vol
- Enter
exit. - Type the following command:
copy X:\windows\system32\drivers\ndu.sys C:\windows\system32\drivers\
- Replace C: with the system drive letter from Step 5 if different, and press Enter to replace the
ndu.sysfile. - On older systems, the previous command may not work. In such cases, try this one instead:
copy X:\sources\windows\system32\drivers\ndu.sys C:\windows\system32\drivers\
- Restart your device and remove the installation media to boot normally.


Analyze Dump File
The previous fixes will resolve the BSOD for most users, but if they persist, you should analyze the dump files generated by the bugcheck to get a better idea of what exactly is causing it. Afterward, you can apply the appropriate solution from the ones listed further below. Here’s how you can analyze the dump files:
- Install the WinDbg Preview App from the Microsoft Store.
- Launch the app and press CTRL + D.
- Navigate to
%windir%or%windir%/minidump/and open the dump file.
- Select View > Command and enter
!analyze -vat the kd prompt.
- After completing the analysis, check the MODULE_NAME and Probably caused by sections for hints on what caused the crash.
- If there are multiple dump files, analyze the rest in the same manner to get more information.


If necessary, you could also use additional methods to gather information, like checking the Event Viewer logs and using Driver Verifier.
Repair System Corruption
We replaced the ndu.sys file earlier, but there could also be other corrupt system files that are causing this driver to fail. As such, we recommend using the native DISM and SFC utilities to repair system corruption. Here’s how you can do this:
- Press Win + R, type
cmd, and press CTRL + Shift + Enter. - Execute the following commands:
dism /online /cleanup-image /restorehealth
sfc /scannow

Use Diagnostic Tools
Memory and disk problems are a common reason for BSODs. As such, using in-built tools to diagnose any potential issues with them is a good idea. First, we recommend using CHKDSK with the steps shown below:
- Press Win + R, type
cmd, and press CTRL + Shift + Enter. - Type
chkdsk c: /f /r, replace c: with your system drive letter if different, and press Enter.
- Accept the prompt to run the disk scan upon restarting, and restart your PC afterward.
- If no disk issues are found, use the
mdschedrun command and use the Windows Memory Diagnostic tool to check the memory instead.


Clean Boot
We’ve already talked about removing antiviruses, but other third-party programs could also be interfering with the ndu.sys driver or other system components and causing this BSOD. As such, performing a clean boot could be helpful. Here’s how you can do this:
- Press Win + R, type
msconfig, and press Enter. - In the Services tab, enable the Hide all Microsoft services option.

- Click on Disable all and press OK.
- In the Startup tab, click on Open Task Manager.
- Disable all the applications and restart your computer.

- If you don’t get the BSOD like this, one of the programs or services may be the culprit. Enable them one by one to figure out which one.
- If you do get the BSOD, the problem is likely something else. Follow the same steps to revert the clean boot configurations.


Update Windows
Windows Updates often include patches to minor issues with system components, including drivers like ndu.sys. As such, we recommend updating your system with the steps listed below:
- Press Win + R, type
control update, and press Enter. - Click on Check for Updates, then download and install any pending ones.

- Restart your PC afterward.

Use System Restore
If you have a system restore point from a time before the BSOD started, it’s very likely that restoring your system to that point could get rid of the BSODs as well. Here’s how you can use system restore in such cases:
- Press Win + R, type
rstrui, and press Enter. - Press Next and select the restore point to use.

- Accept the confirmation prompts and press Finish.
- After 30 – 60 minutes, the system restore should finish, and you’ll receive a completion message.
