Explore our expert’s solutions for this issue
by Milan Stanojevic
Milan has been enthusiastic about technology ever since his childhood days, and this led him to take interest in all PC-related technologies. He’s a PC enthusiast and he… read more
Updated on
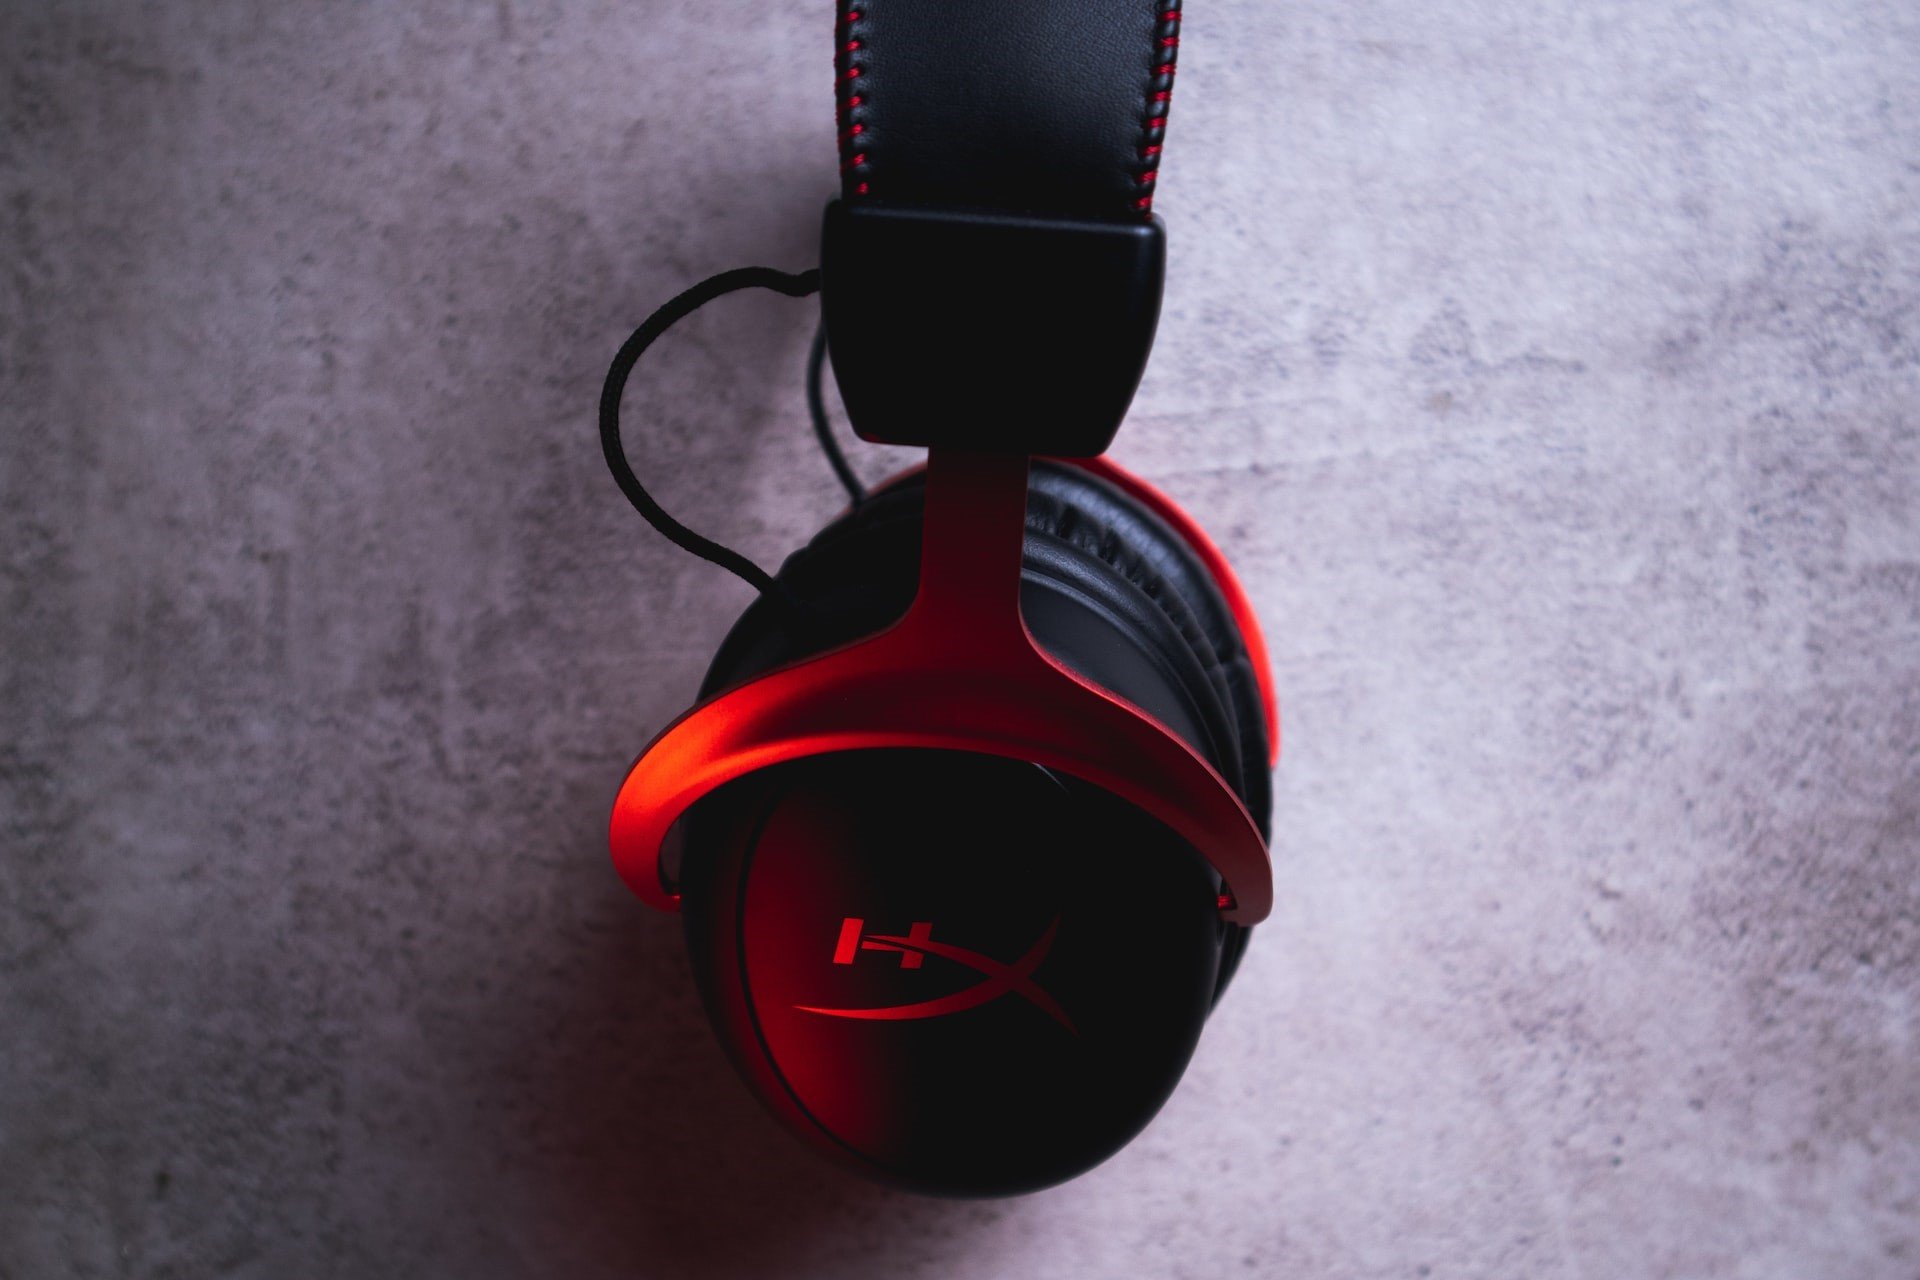
- HyperX Cloudset and HyperX Predator SSD seem to cause some trouble when used on Windows 10.
- If you’ve experienced similar issues, you will need to reinstall the headset driver to start resolving them.
- Make sure to follow the steps described in the guide in an orderly manner to ensure an efficient troubleshooting process.
XINSTALL BY CLICKING THE DOWNLOAD
FILE
HyperX is a famous gaming hardware series that includes memories, SSDs, headsets, and peripherals. But many recently reported encountering problems with HyperX in Windows 10.
Issues with HyperX devices can arise for several reasons, and it’s generally tricky to identify the underlying cause.
So, in the following sections, we will walk you through what’s causing HyperX problems in Windows 10 and the solutions for each.
Why is my HyperX not working?
When the HyperX device is not working on the computer, it’s essential to identify the type of device you are facing issues with.
For instance, if it’s a headphone, misconfigured sound settings, outdated or corrupt drivers, or improper connections are to blame.
Several users also reported that the HyperX mic is not working, in which case, you would have to check the connections, be it a wired or wireless microphone.
Besides, certain services and processes are supposed to run on the computer to function the connected devices effectively. And in their absence, you are bound to encounter issues.
What to do if HyperX Cloud 2 mic is not working?
Many users reported that HyperX Cloud 2 mic is not working on Windows 11 and 10, but this issue can be quickly resolved. First, set the microphone as the primary device and verify if that resolves the problem.
You may update the audio driver or the ones specific to the HyperX Cloud 2 mic if it doesn’t. Besides, if you have third-party apps running that could modify the sound settings, disable or uninstall them to fix the HyperX problems in Windows 10.
If the microphone keeps resetting to 0 volume, you may run the audio troubleshooter or disable apps from taking control of the HyperX Cloud 2 mic.
Does HyperX need drivers?
Yes, HyperX needs drivers, as is the case with any device. But things are a lot more effortless and streamlined with HyperX.
Users don’t need to add the drivers manually; instead, they are automatically fetched and installed as soon as the HyperX device is connected. This is why you wouldn’t be able to find HyperX driver updates online.
How we test, review and rate?
We have worked for the past 6 months on building a new review system on how we produce content. Using it, we have subsequently redone most of our articles to provide actual hands-on expertise on the guides we made.
For more details you can read how we test, review, and rate at WindowsReport.
Also, it’s best that you download HyperX NGENUITY software to customize compatible devices. In addition to that, it will also ensure that the devices work fine.
How do I fix HyperX issues on Windows 10?
1. Reinstall the headset driver
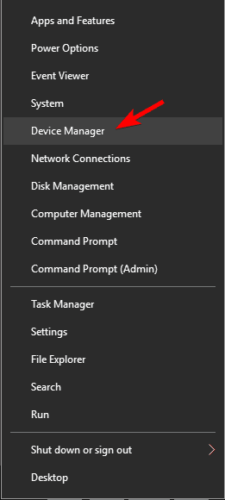
- Press Windows + X to open the Power User menu, and choose Device Manager from the list.

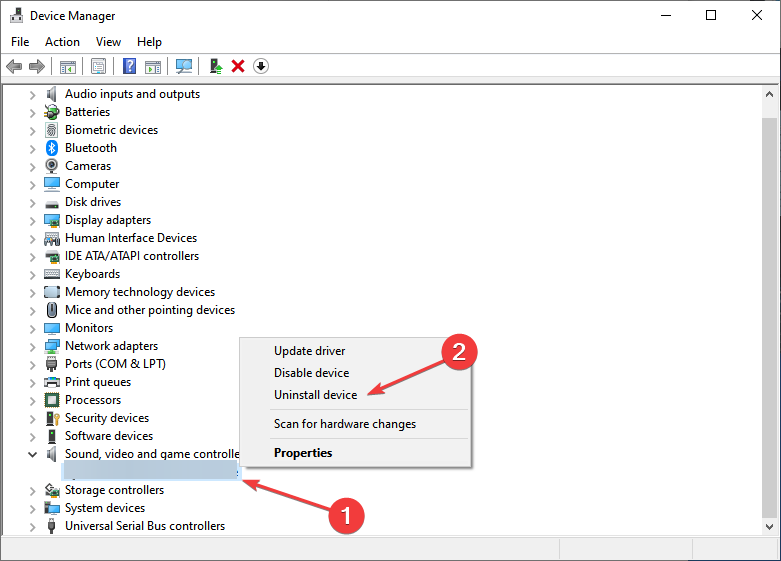
- Locate your HyperX audio device, right-click on it, and choose Uninstall device.

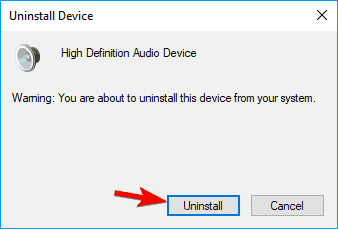
- A warning dialog will appear. Click on Uninstall to remove the device.

- Once done, unplug your headset and then restart your PC.
- After your PC restarts, reconnect the headset, and the driver for it should be installed automatically.
You might have to repeat this process several times before your headset starts working.
Drivers allow your PC to work with the hardware. Therefore, any driver-related issue will cause problems. That is why reinstalling the drivers will most likely solve the problem immediately.
Update drivers automatically
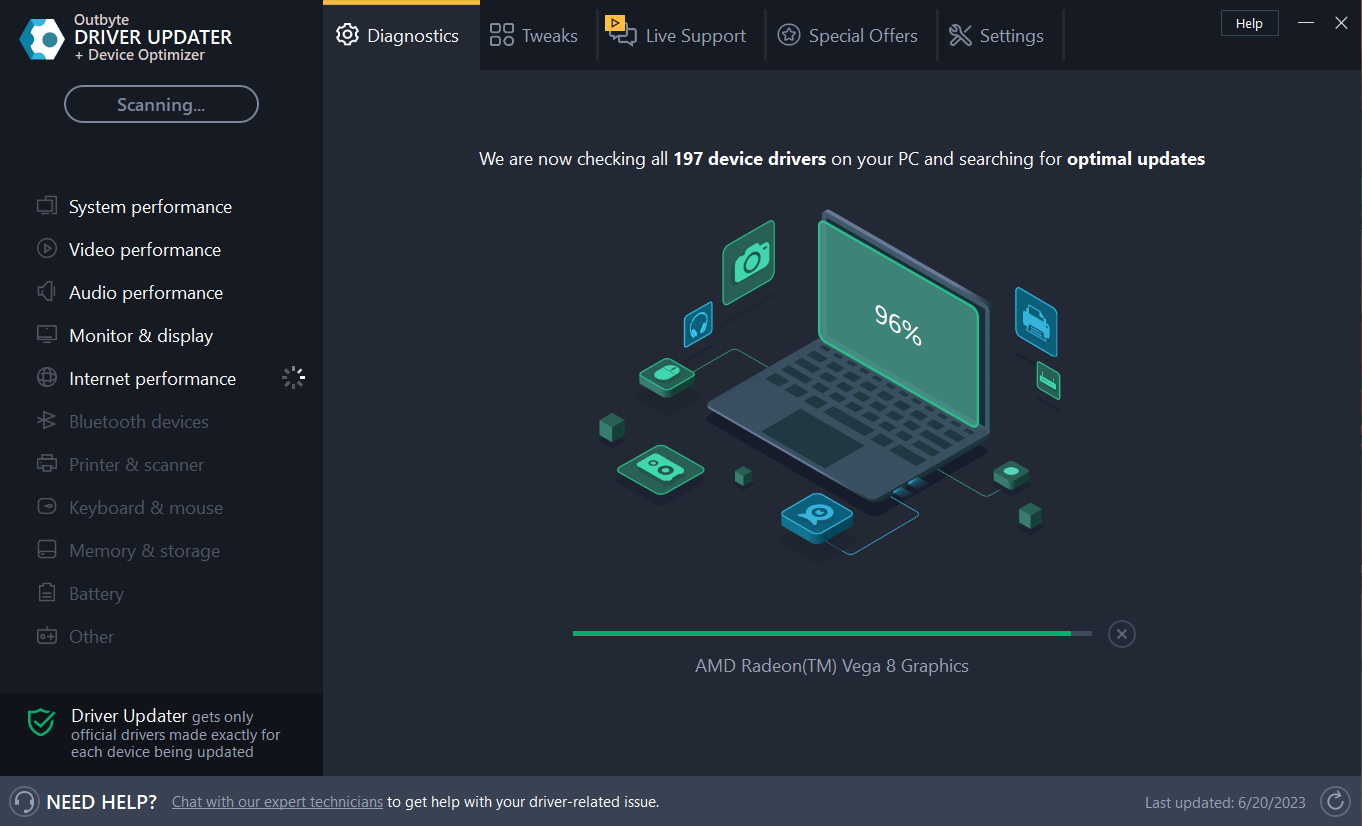
If the previous method doesn’t fix the issue, we recommend you use a dedicated tool. Downloading and installing drivers manually is a process that carries the risk of getting the wrong driver installed, which may lead to severe malfunctions in your system.
So the safest and easiest way to update drivers on a Windows computer is by using a third-party tool. We strongly recommend Outbyte Driver Updater.
It scans your system, automatically identifies each device on your computer, and matches it with the latest driver versions from an extensive online database.
Drivers can then be updated in batches or one at a time without you having to make any complex decisions in the process.

Outbyte Driver Updater
Update all your audio outdated drivers with just a few clicks..
2. Make sure that your microphone is unmuted
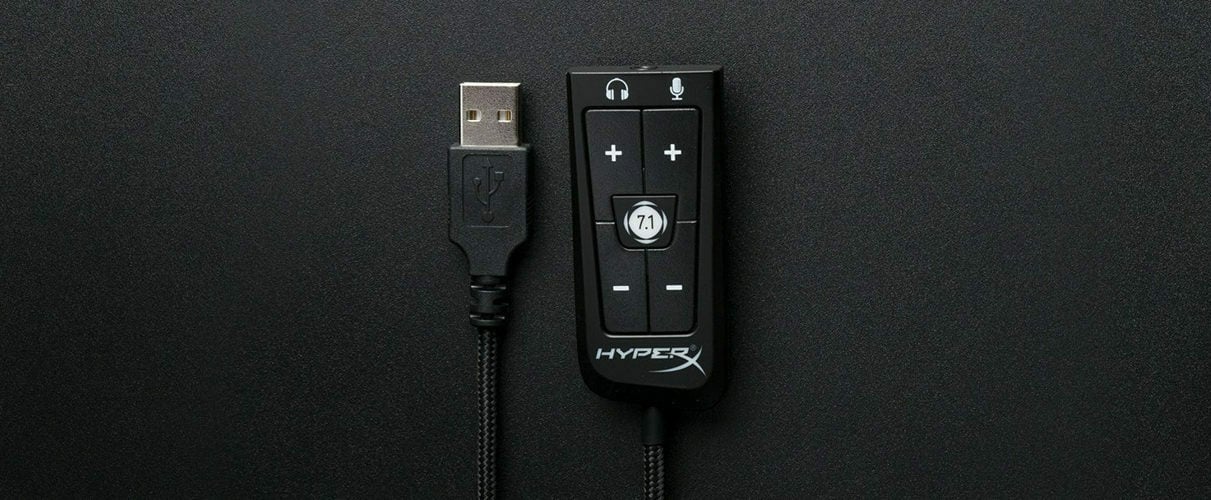
Some users mentioned that they were unable to adjust the microphone volume. The solution to this problem is relatively simple: you have to check the USB dongle that comes with the gaming headset.
There’s a small Mute switch on it, so make sure to press it to unmute the microphone. After doing that, the problem should disappear. It’s worth mentioning that the USB dongle also has its microphone control keys, so adjust the volume of your microphone from here.
Lastly, double-check if the headset is correctly connected to the USB dongle. To fix this problem, firmly connect your headset to the USB dongle and check if that solves the HyperX headset not working issue on Windows 10.
Also, find out what to do if other headsets are not working in Windows 10.
3. Connect your headset to a different USB port
HyperX Cloud II is a USB headset, meaning many USB-related problems can affect it. For example, although the USB 3.0 standard is gaining popularity, several users reported that this headset isn’t working correctly with this USB version.
So instead of using USB 3.0, try to connect your headset to a USB 2.0 port and check if that solves the issue. In addition, some users suggest you use the ports on the back of your computer instead of the front ones, which are more likely to be faulty.
4. Check your audio device settings
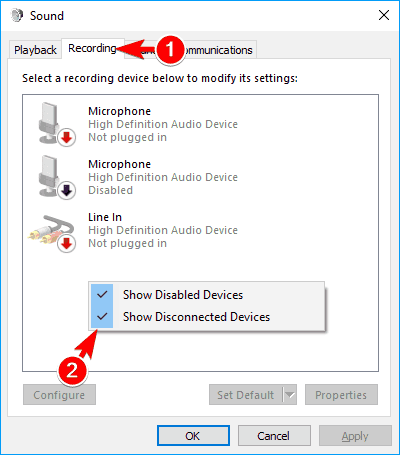
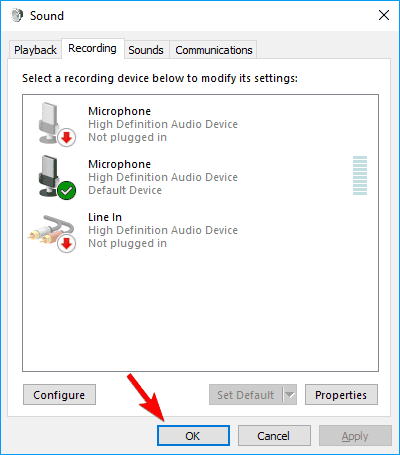
- Press Windows + S, enter Change system sounds in the text field, and choose the relevant search result from the menu.

- Go to the Recording tab, right-click the empty space, and check the Show Disabled Devices and Disconnected Devices options.

- Now locate your microphone, right-click on it, and choose Enable from the menu.
- Click on OK to save changes.


Some users also suggested deactivating and reactivating the microphone to fix this problem. You can easily do it by choosing Disable and Enable from the Sound window.
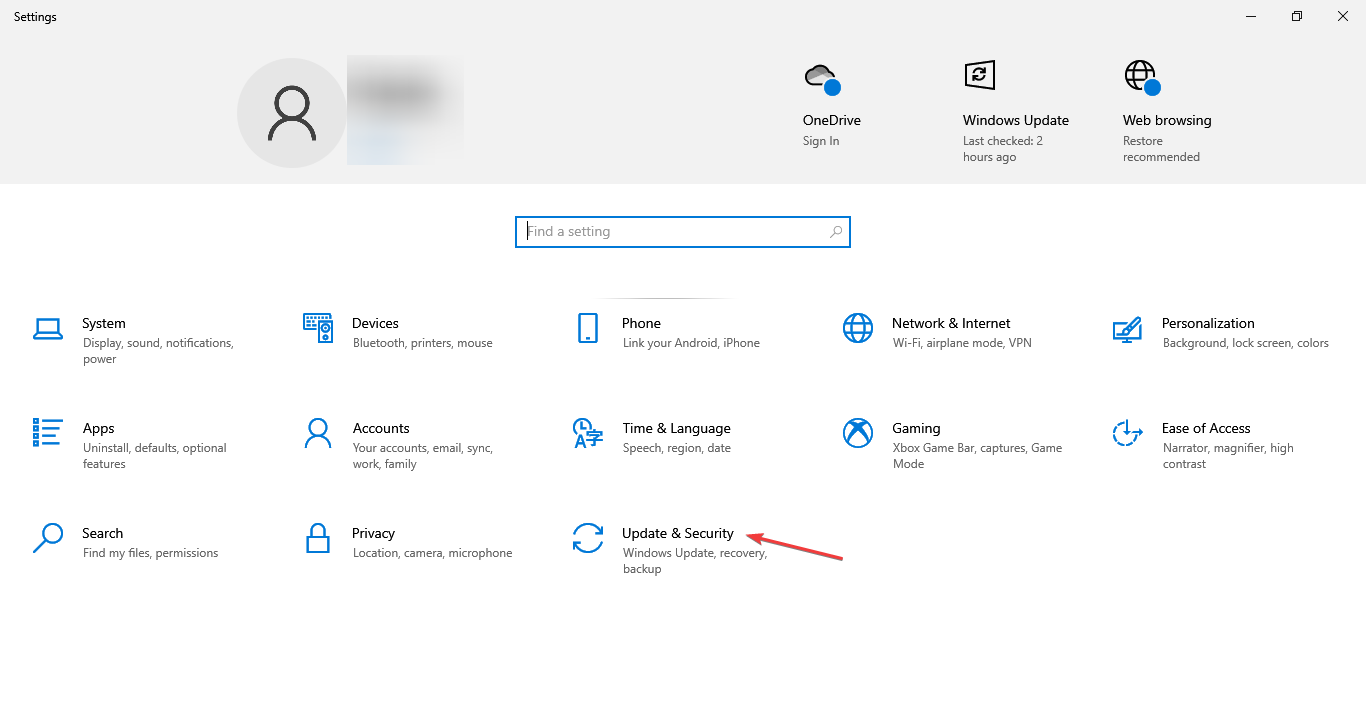
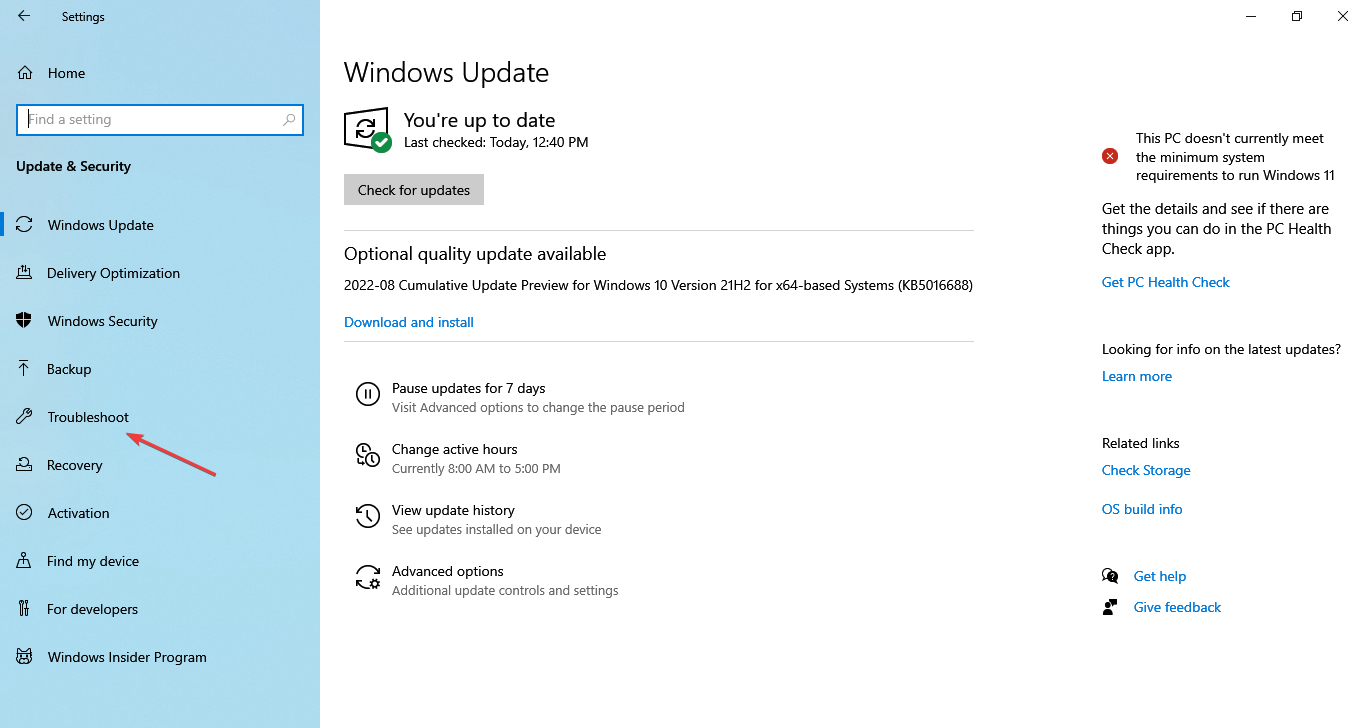
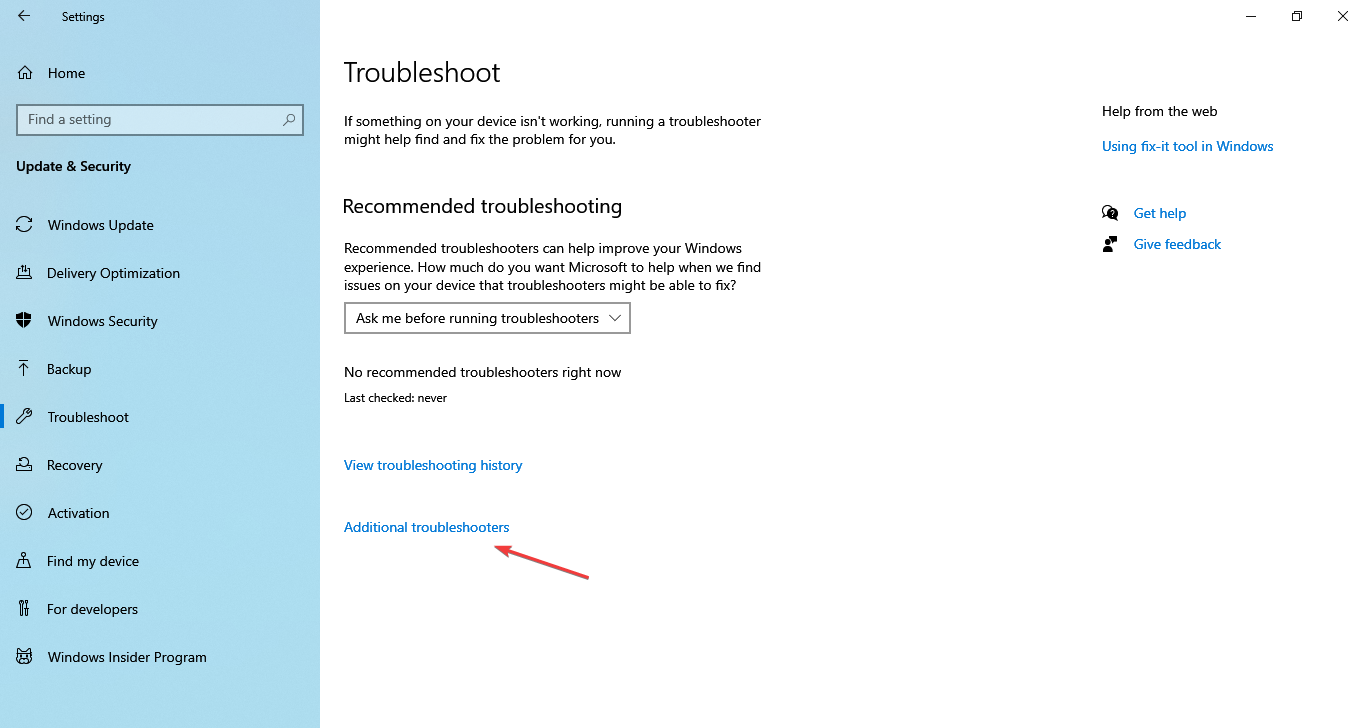
5. Use the sound troubleshooter
- Press Windows + I to open the Settings app, and click on the Update & Security section.

- Choose Troubleshoot from the navigation pane on the left.
- Click on Additional troubleshooters here.
- Now select Recording Audio and click on the Run the troubleshooter button.
- Follow the on-screen instructions and choose the relevant response when prompted to complete the troubleshooting process.
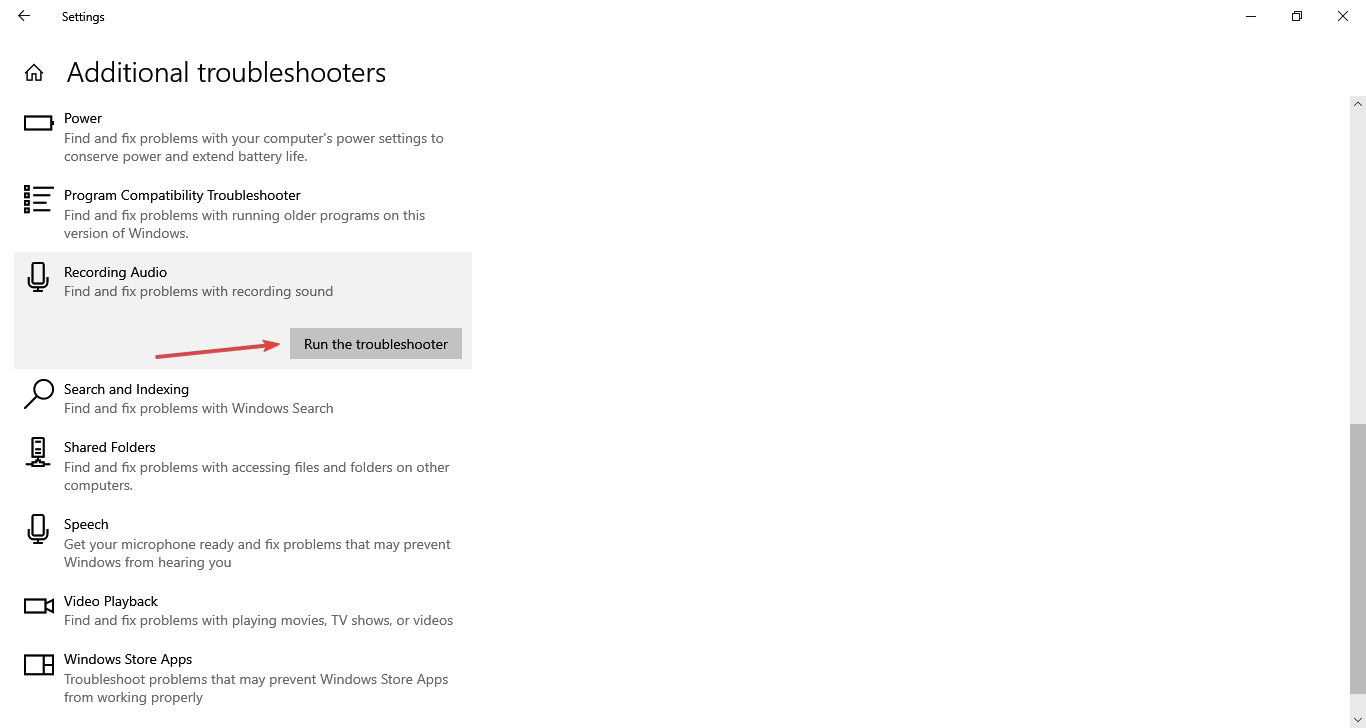
Running the built-in troubleshooter is probably one of the simplest methods to fix HyperX problems in Windows 10. But remember that it would only work if Microsoft has acknowledged the issue and a solution is available.
- Internal microphone not working in Windows 10/11 [HP]
- FIX: Microphone not working in Windows 11
- Fix: This Alias Cannot be Added to Your Account Error on Windows 11
6. Update the firmware
If you’re having microphone problems with your HyperX Cloud II headphones, you might be able to fix them by upgrading the firmware since it’s critical for the effective functioning of the device.
Note that firmware update is an advanced procedure, and it can cause irreversible damage to your headphones if not done right, so exercise caution.
If you intend to update it, download the firmware update for HyperX Cloud II from the official support website. The updates for other devices, too, can be found on the support website.
7. Try using an audio splitter
Users reported that the microphone wasn’t recognized on their HyperX Cloud Stinger headphones. They mentioned one might be able to circumvent this problem by using an audio splitter.
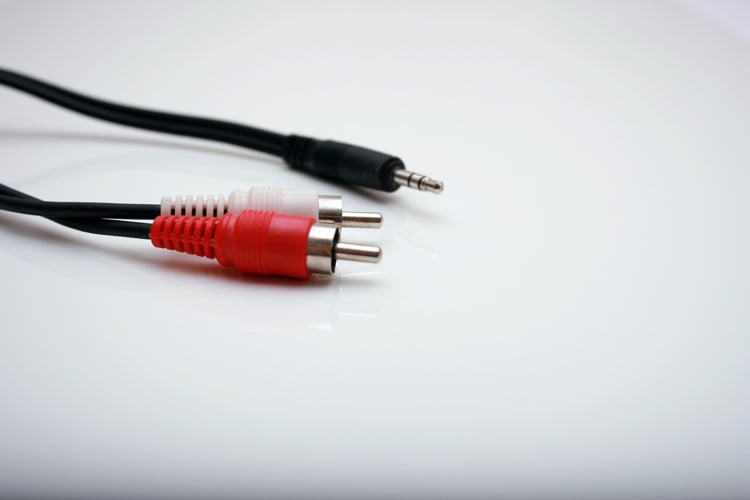
This small device comes with two 3.5mm ports, one for audio and one for the microphone. This isn’t the best solution, but it’s a decent workaround, so you might want to try it if you’re having problems with the HyperX Cloud Stinger headset in Windows 10.
8. Update the drivers
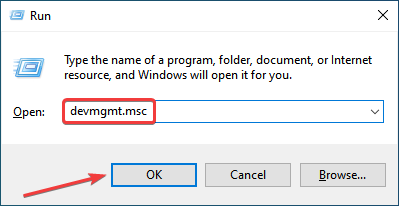
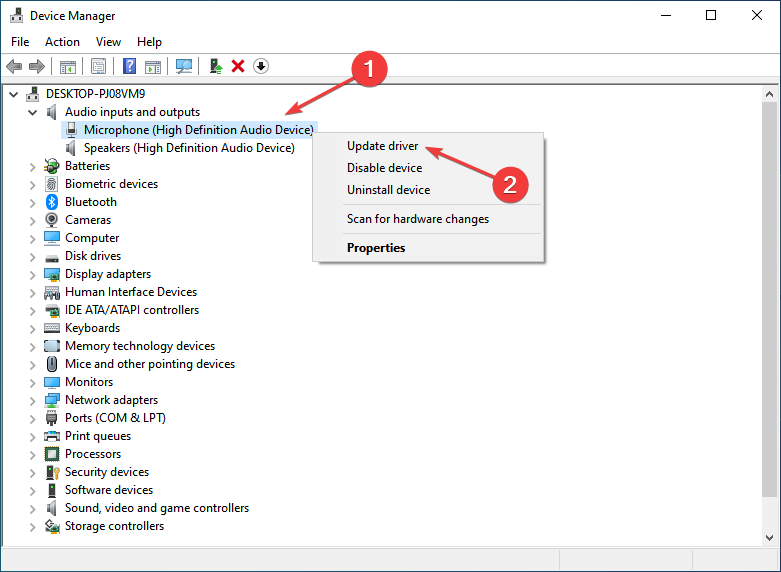
- Press Windows + R to launch the Run command, enter devmgmt.msc in the text field, and click OK to open the Device Manager.

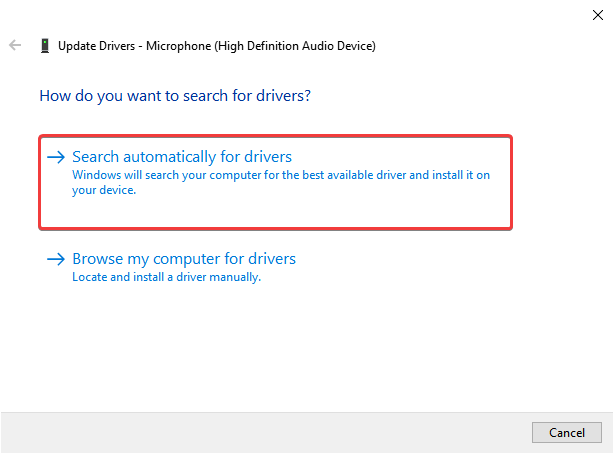
- Locate your audio driver, right-click it and choose Update driver.

- Select Search automatically for drivers.

- Windows will now check for driver updates and install new drivers.
- After the new driver is installed, restart your PC.
We have to mention that Device Manager is the simplest way to update your audio drivers but not necessarily the most efficient one. Usually, Device Manager doesn’t download the latest drivers, which can be a problem. And
To ensure you have the latest drivers, download these from the motherboard or sound card manufacturer’s official website.
Better yet, use the dedicated tool recommended in the first solution, Outbyte Driver Updater, and you’ll surely get the correct components in no time.
9. Use the remote control to adjust the microphone
Some HyperX headsets have a remote control that allows you to control your microphone or adjust your audio.
Using the remote control, you can adjust your headset’s microphone sensitivity, so be sure to do that.
Few users reported that this method solved the problem for them. If the previous ones didn’t help, try this one.
10. Check your headset wires
If you’re having any problems with the HyperX headset in Windows 10, you might be able to fix them by checking the cable. In some cases, your cable is damaged, and you might be able to fix it by taping the affected area.
To verify if the cable is the culprit, you might want to try the headset on a different PC and check if the same appears. If it does, you now know what’s causing the problem and its solution.
How can I fix HyperX problems on Windows 11?
The solutions remain the same with Windows 11 as they were for Windows 10. However, a couple of additional measures you may undertake are as follows:
- Look for applications that might control the Bluetooth functionality or the sound settings and uninstall them.
- If the problem started after updating the OS, revert to the previous version.
- Performing a system restore might do the trick.
- Disable apps from accessing the microphone.
- As a last resort, you may reset Windows 11 to factory settings.
Is there software for HyperX?
There are a series of software that allows you to customize some of HyperX’s features. A good example is the HyperX NGENUITY software that is available for download in Microsoft Store
HyperX series offers a great range of gaming hardware, but as you may have noticed, some of its products have had problems in Windows 10. Though the solutions are simple, you should have them working in no time.
Also, find out how to optimize the PC for gaming and run even the most resource-hungry games seamlessly.
If you have any other suggestions or questions, don’t hesitate to leave them in the comments section below, and we’ll be sure to take a look.
![]()
Эти наушники подключаются через 3.5 mm джеки, поэтому их не поддерживает NGENUITY — она пытается найти поддерживающее устройство, который сами по себе наушники предоставить не в состоянии. Альтернативой такому решению являются следующие варианты:
А. DTS: X for Headphones (у вас в комплекте есть код активации).
B. Steelseries GG
C. Приобрести внешнюю звуковую карту, на ваш выбор.
А. DTS: X for Headphones
Приложение DTS Sound Unbound — в комплекте идет код активации на 2 года. Установите приложение из Microsoft Store, запустите и введите код.
Чтобы активировать сам DTS, нужно:
1. Нажать Пуск, в поиске ввести Звук, Выбрать пункт «Изменение системных звуков», затем выбрать в открывшемся окне вкладку Воспроизведение и устройство, к которому подключены наушники. Чаще всего это Realtek Audio.
2. Во вкладке Дополнительно выбрать Стерео, 16/24 бита и 41100/48000 Гц, другие форматы не поддерживаются.
3. Убрать галочку Включить дополнительные средства звука — при активации совместно с DTS звук получается хуже, чем без этой галочки.
4. В вкладке Пространственный звук выбрать Наушники DTS: X.
5. Снова запустить приложение DTS Sound Unbound, выбрать окно на втором скриншоте и там поменять настройку на любую другую и обратно. Например выбрать иконку внутри-канальных наушников, а затем вернуться к обычным.
Проверять вкладки Дополнительно/Пространственный звук и менять настройку в DTS Sound Unbound, нужно после каждой перезагрузки ПК.
При успешной активации в играх становятся звуке более различимыми как в пространстве, так и на дистанции.
B. Steelseries GG
Приложение Steel Series GG которое кроме эквалайзера и неплохих пресетов, умеет самостоятельно усиливать звук микрофона и даже применять к нему эквализацию. При этом активация DTS смысла уже не имеет — приложение предоставляет собственные виртуальные аудиоустройства, которые позволяют выводить 8 канальный звук и микшировать общение с игрой самостоятельно.
C. Приобрести звуковую карту, на ваш выбор. Мои рекомендации:
1. В одном онлайн магазине из дружественной страны напротив Японии можно приобрести «звуковую карту» абсолютно без внешних изысков и даже корпуса, но зато с чипом Cmedia 108B (фотография из моего заказа, у меня она есть на руках — звучит отлично, так как несмотря на отсутствие корпуса, у неё есть приличная обвязка для чипа). При этом из-за того что чип является не модифицированным, он поддерживается просто неимоверной кучей драйверов от других наушников с этим чипом. Версии драйверов от 2019 предлагают виртуальный пространственный звук.
2. Визуально более приличное оформление, но с другим аппаратным драйвером, хоть и на той же начинке — звуковая карта Edifier GS02.
3. Приобрести звуковую карту от HyperX AMP — она полностью поддерживается приложением NGENUITY и будет корректно с ним работать.


HyperX NGENUITY is a feature-loaded as well as a simplified program for modifying your relevant HyperX software.
Customize button bindings, create and save macros, and fine-tune lighting; HyperX NGENUITY provides you with complete control. Additionally, the program offers a library of presets, so you can just choose one to install and get straight into the action.
You should be able to use your Hyperx Ngenuity program to alter the lighting on all of your compatible Hyperx products.
If it does not allow for tweaking, storing profiles, or addressing other problems, what is the point of having a personalized product in the first place?
When it comes to Hyperx products, you want to get the most out of them and be able to switch between various lighting displays and patterns at any moment.
Regrettably, in certain circumstances, the Hyperx Ngenuity program does not operate as planned or at all, and therefore we’re going to discuss how to resolve this immediately.
This post will discuss how to resolve the HyperX ngenuity headset not detecting problem. Thus, let us begin.
Article Contents
The HyperX Ngenuity is not identifying the headset since the software is not adequately tuned and does not yet support all of the HyperX devices currently available on the market.
If you have any RGB software running on your computer, there may be a problem with the HyperX NGENUITY not detecting the headset.
The problem might also be caused by a variety of other circumstances, such as using an old or incompatible version of the program in conjunction with your existing headset.
Whatever the case, a large number of consumers have grown frustrated as a result of the HyperX Ngenuity software failing to recognize their headsets.
Continue reading until the end of the article to learn more about how to resolve the problem at hand and make full use of your headset once more.
Fix: HyperX Ngenuity not detecting Headset
Method 1: Recheck Compatibility
If you upgraded your Hyperx Ngenuity software or it auto-updated, then possibly you’re operating hardware that is no longer controlled by the newest software. See if your device is covered by this list.
https://hyperx.com/pages/ngenuity
If your device isn’t mentioned, you’ll need to go back to an earlier version of the application and consider changing your equipment in the near term.
Please acquire the previous edition if you can’t find your product; if you are using this edition with the current software, then you may miss out on updated bug fixes or improvements.
From the checklist verify whether your headset is compatible or not. If not, then that is probably the issue as to why the software is not recognizing your headset.
Method 2: Examine the ports
Try using a different USB Port to attach your headset. For a change, we encourage consumers might consider trying the USB 3 port instead of the USB 2 port.
Even after changing ports, if the software does not identify your headset then there might be an issue with the soundcard of the device.
You might try placing another device in the ports to test whether the port is operating correctly or not.
Method 3: Uninstall Hyperx Ngenuity software
Rather than upgrading your Hyperx Ngenuity software to get it running, consumers might definitely execute a thorough uninstall and also get rid of any percent AppData percent that is being left behind.
By applying this procedure rather than updating, you can be confident that no old files or % AppData % are clashing with your fresh installation and that no past setup is generating troubles.
The quickest approach to delete HyperX Ngenuity Software is to right-click on it, pick “uninstall,” and then continue to follow the on-screen instructions.
Head over to your search box, type % AppData %, then locate something to do with Ngenuity or Hyperx and eliminate all the directories including those names.
Any Hyperx Ngenuity registry entries might well be erased by entering regedit into the very same search box, then navigating to the HKLMSoftware directory and removing anything and everything which mentions Hyperx and/or Ngenuity.
When entirely deleted, reboot your computer and then download the latest edition of the Hyperx Ngenuity program that fits your hardware.
Method 4: Verify Microphone settings
The upgrade may have blocked the microphone in the Windows privacy settings. Use the following procedures to re-enable the microphone.
-
Step 1: Press Windows Key + I simultaneously
-
Step 2: Head over to Privacy Settings
-
Step 3: Then navigate to the Microphone Settings
-
Step 4: Set Give access to the Microphone on this device
Allow applications to access your microphone – Make it ON
Select which applications may use your Microphone – If needed put necessary to ON.
Method 5: Modify Windows Update settings
This could be an issue with the Windows 10 upgrade for the Realtek audio drivers. We propose you upgrade the existing drivers from the Realtek site.
-
Step 1: First, navigate to the Control Panel
Then go over to device management and click on Sound, video, and gaming controllers area.
-
Step 2: Discover Realtek High-Definition Audio
Locate Realtek High-Definition Audio, right-click on it, and select uninstall. Download the newest version that is appropriate for your Windows edition and apply it.
You may have to reboot your laptop. When this is accomplished, plug the headset again in and check the microphone.
Conclusion
That is all there is to know the HyperX Ngenuity not recognizing headset difficulties.
Be careful to follow the procedures and techniques indicated above to fix the problem momentarily while the developers strive to make the software better and eliminate any bugs and issues.
Follow us on Twitter & like our Facebook page for more post-updates

Abhigyan identifies himself as a tech geek, gaming cognoscenti, and also a connoisseur of music. Unidentified and mysterious phenomena never fail to gather his undivided attention. When not reading about bizarre and perplexing entities across the Universe, he can often be found cheering for his favorite teams in Football.
HyperX’s NGenuity software provides an easy way to get the most out of your HyperX gaming headset and make audio tweaks on the fly.
However, if you’re having trouble getting the software to detect your headset, you might need to do some troubleshooting in order to get things working properly again.
This guide will help you fix HyperX NGenuity not detecting headset so that you can get back to gaming and chatting with friends.
Hope you will be able to solve the problem by the end of the article. If you don’t, you will probably need to change your headset.
Uninstall and reinstall
This is normally a simple fix, but you may have to uninstall it more than once. If that’s the case, simply delete anything involving HyperX from your computer and device manager, restart your computer and try again.
After uninstalling and reinstalling the software solves the issue, then you do not need to go through the article. This should solve any issues with detecting your headset. If it does not, then you need to follow the steps below.
Disconnect everything and try again
This will also eliminate possible problems with a cluttered system. For example, if you’re using an external hard drive that is connected to your PC, disconnect it and try again. If it still doesn’t work, then you may need to replace that hard drive.
Also, make sure any firewalls or security programs aren’t stopping any of your headsets from working properly on your computer.
You can temporarily disable them to see if they are interfering with other programs on your computer but only do so for troubleshooting purposes.
While you have some things disconnected from your PC, open up Device Manager by going to Control Panel and then Device Manager. Check to see if there are any yellow exclamation points next to any devices.
If there are, right-click on those devices and select Update Driver Software… Next, select Search automatically for updated driver software.
Reboot your computer after installing new drivers. Run HyperX NGenuity again and check if your headset works now.
Update your drivers
This step is not always necessary but can still be done. To find out which drivers you need to update, go to Device Manager. Look for the Sound, Video, and Game Controllers category and expand it.
Right-click on any one of them and select Update Driver Software. Follow on-screen instructions until you are told that the driver is up to date or further action is required.
Go back and right-click again on Audio Device (if available) or Motherboard Integrated Audio Device (in case of no audio device) then select Uninstall.
Once uninstalled reboot your computer, and reinstall the driver downloaded from the official site of the hardware manufacturer.
Reboot your computer
Sometimes, it’s easier to reboot than go through all of your settings. When you turn your computer back on, Windows may automatically detect and install new hardware. If not, press F8 when you see Starting Windows and select Safe Mode with Networking.
Once your system boots into Safe Mode, restart again normally and plug in your headset to ensure that Windows recognizes it as an input device. You can also try uninstalling and reinstalling your audio drivers if nothing else works.
Plug the headset into another port
If you have an external device (flash drive, etc.) plugged into your computer via a USB port, remove it and try plugging in your headset to another USB port.
If it works with a different port, then you know that one of your ports isn’t working correctly. Make sure you update drivers for any devices and switch out suspect ports for new ones if possible.
If the headset still doesn’t work after trying all of these things, Use a dedicated USB port on the computer: This can be a tricky fix but worth a shot if nothing else is working.
Connect the headset to another computer
If you’re still unable to connect your headset with NGenuity, try connecting it to another computer.
If you’re able to use your headset without any problems on another computer, there may be a problem with your software.
You can try updating those or contacting customer support for assistance. If using another computer doesn’t work either, contact customer support and they should be able to help you troubleshoot further.
Also read: PS4 USB Headset No Sound Issue Solved
Conclusion
You may be facing the problem of HyperX NGenuity Not Detecting Headset. You should try these various fixes mentioned above and hopefully trying these, you can make your headset work again.
The most significant one will be restarting your computer and it will solve the issue in most cases. But if it does not and as well as trying the above fixes does not work for you.
Then you probably need to get your headsets changed.
Let me know if you got your issue resolved. If you really did, do let me know in the comments section.
If the HyperX Cloud Stinger mic is not working, detected, or recognized on your Windows 11/10 PC, then tho post will help you. HyperX is a popular brand that creates high-quality gaming products, including headsets, mice, keyboards, etc. One of its headset series is called HyperX Cloud Stinger, which is a lightweight headset with greater sound quality.

How do I connect my HyperX headset to Windows 11?
To connect a HyperX Cloud2 Mic with a headphone jack and a microphone jack to Windows 11/10 PC, you need to connect the 3.5mm plug of your headset to the female jack on your PC extension cable. Also, plug the audio and microphone cables into the respective ports on the extension cable. Once you have connected the headset, set it as a default device in your Sound Control Panel.
Why is my computer not detecting my HyperX Cloud mic?
If your computer cannot detect your HyperX Cloud microphone, the problem is likely to be caused due to a loose connection. Ensure the cable is correctly plugged into your headset and computer’s ports. Besides that, the problem can also occur if your audio drivers are out-of-date. Another reason why your HyperX Cloud Stinger mic might not work properly is due to incorrect sound settings. For example, if you haven’t allowed microphone access or the mic is not set as the default input device, it won’t function properly. Apart from that, in-game settings and background apps can also cause this problem.
If the HyperX Cloud Stinger mic is not working, detected, or recognized on your Windows 11/10 PC, you can use the below methods to get rid of this issue:
- Make sure your HyperX Cloud Stinger mic is connected properly.
- Grant microphone permission to your headset.
- Check your Sound settings.
- Outdated headset drivers? Update them right away.
- Terminate background apps having access to your microphone.
- Check your in-game settings.
- Contact the headset manufacturer.
Before you try these solutions, make sure your headset is not physically damaged and you have installed all pending Windows updates on your system.
1] Make sure your HyperX Cloud Stinger mic is connected properly
The first thing you should do is to ensure that your HyperX Cloud Stinger mic is properly connected to your PC. So, check all physical connections and ensure that there is no loose connection. You can also try unplugging your headset and then plugging it into another port to check if the problem is resolved.
Another thing to make sure of is that your mic is not mute. And, the volume is not set too low that you are unable to hear. Just check the volume knob on the right ear and make sure the volume is set to high.
You can also try connecting your headset to a different computer or device and see if it is working fine. If it is not working properly, the problem might lie with your headset. You can directly contact the device manufacturer and see what can be done.
In case you are using the headset’s controller box, check whether the mute switch is enabled. If so, disable the mute switch and then check if the problem is resolved.
See: Astro Command Center not detecting A50 Headset.
2] Grant microphone permission to your headset
It might be the case that you haven’t allowed microphone access on your PC knowingly or unknowingly. As a result, you are unable to use the HyperX Cloud Stinger microphone. Hence, if the scenario is applicable, change your settings and enable microphone access on your computer.
Here’s how to do that:
- First, open the Settings app using Win+I.
- Now, go to the Privacy & security tab from the left-side pane.
- Next, scroll down to the App permissions section and click on the Microphone option.
- After that, switch on the toggle associated with the Microphone access option.
- Then, make sure the microphone access for the app or game for which you are using the HyperX Cloud Stinger mic is enabled.
- Once done, exit the Settings app and check if the problem is resolved.
Read: Front Audio jack not working in Windows.
3] Check your Sound settings
Your PC’s default sound settings can be the main culprit for this issue. Suppose, if you have other headsets connected to your PC previously, and HyperX Cloud Stinger is not set as the default input device, you will face this issue. Hence, if the scenario applies, change your sound settings and see if the issue is fixed.
Here are the steps to do that:
- First, open Settings using Win+I and go to the System > Sound section.
- Now, click on the More sound settings option.
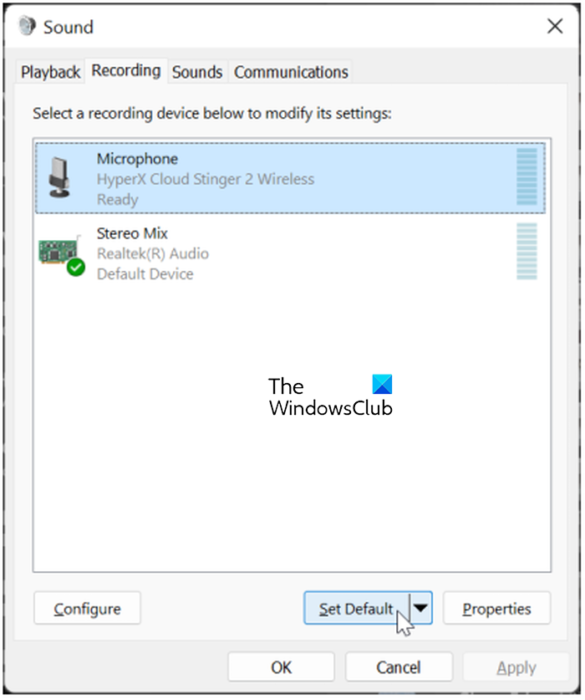
- Next, move to the Recording tab and ensure that the HyperX Cloud Stinger microphone is enabled.
- After that, select the mic and press the Set Default button to set it as a default input device.
- Then, right-click on your microphone and choose the Properties option from the appeared context menu.
- Now, move to the Levels tab and Microphone volume slider to the maximum value.
- Finally, press the Apply > OK button to save changes.
See if this method works for you.
Read: Bluetooth Headset is not working with Microsoft Teams.
4] Outdated headset drivers? Update them right away
Outdated device drivers are known to cause issues in the functioning of your hardware devices. In case your headset or sound drivers are outdated, you are likely to experience this problem. Hence, update your headset driver in Windows 11/10 to fix the issue. Here’s how:
- First, open Settings, navigate to System > Sound, and press the More sound settings option.
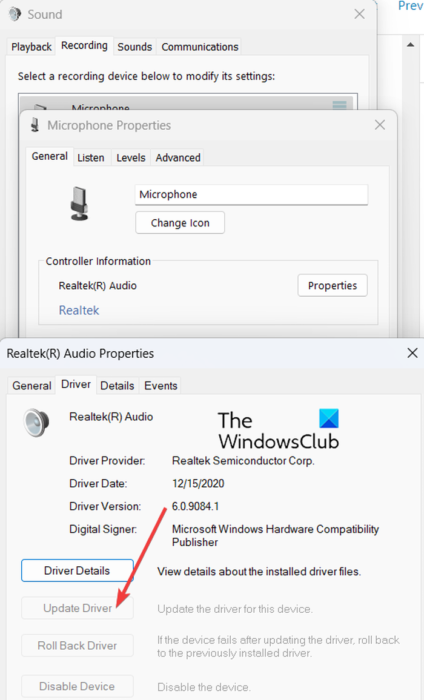
- Now, go to the Recording tab, right-click on your HyperX Cloud Stinger mic, and choose the Properties option.
- Next, under the Controller Information section in the General tab, press the Properties option.
- After that, go to the Driver tab in the opened dialog window and tap on the Update Driver button.
- Then, follow the prompted instructions and complete the update process.
- When done, reboot your computer and check if the problem is resolved.
There are some other methods to update your audio drivers. Hopefully, you won’t face the same problem after updating your audio drivers. But if you do, you can use the next fix.
See: External Microphone being recognized as Headphones in Windows.
5] Terminate background apps having access to your microphone
You can also try closing background apps like Discord, Skype, etc., that are having access to your microphone and ensure that Windows OS has the default control over your headset. In case you have third-party audio software, close it and check if the problem is resolved.
6] Check your in-game settings
Sometimes, the problem might be caused due to your in-game settings. If you are unable to use the HyperX Cloud Stinger mic in specific games, it might be the case that your in-game settings are incorrectly configured. So, open your in-game settings and make sure voice chat, volume level, microphone level, and other audio settings are rightly set up.
7] Contact the headset manufacturer
If none of the above methods worked for you, the last resort is to directly contact the official support team of your headset manufacturer. They should be able to help you troubleshoot this problem.
That’s it.
Now read: Fix SteamVR Headset Not Detected issue.