Ошибка 0x0000052e Windows не удается подключиться к принтеру – почему и что делать?
Очень часто принтер используется целой группой компьютеров, подключаясь к нему по локальной или беспроводной сети. У некоторых с этим возникают проблемы, появляется ошибка 0x0000052e при добавлении принтера или попытке подключить к нему. Проблема всегда затрагивает тех, кто использует сетевой принтер и операционную систему Windows. Что ж, сейчас мы углубленно разберем суть ошибки и способы ее исправления.
На самом деле точно такая же ошибка начала появляться уже с Windows 7 и потом перекочевала в Windows 10, 11. Она появляется каждый раз при подключении принтера: в первый раз или одну из следующих попыток. Код ошибки может быть связан с одним из двух сообщений:
«Ошибка входа в систему: неизвестное имя пользователя или неверный пароль».
Также к коде сообщения часто сказано:
«Не удалось подключиться к принтеру (подробности: в ходе операции произошла ошибка с кодом 0x0000052e)».
Во всех известных случаях ошибка при добавлении принтера вызвана проблемами с учетными данными. Подобную неполадку можно исправить довольно просто.
Как устранить ошибку 0x0000052e в Windows 11, 10, 7?
Нет ничего страшного в том, что не удалось подключиться к принтеру из-за ошибки 0x0000052e. Существует несколько действий, которые позволят восстановить стабильную связь с сетевым принтером.
Заново подключиться к принтеру с правильными данными
Высока вероятность того, что сбились настройки сервера или имени принтера, поэтому компьютер обращается по неправильному адресу. Их нужно только установить заново и все заработает.
Инструкция:
- Нажимаем правой кнопкой мыши по кнопке Пуск.
- Теперь жмем левой кнопкой мыши по «Командная строка (администратор)».
- Вводим команду start \\<servername>\<printername>, только в этой формуле нужно подставить свои значения: вместо <servername> — имя сервера для принтера, а <printername> заменяем на имя принтера.
- В окне аутентификации вводим правильные значения и принтер должен заработать.
В большинстве рабочих организаций доступ к принтеру заблокирован именем пользователя и паролем. Без этих данных получить доступ к устройству невозможно.
Настроить диспетчер учетных данных
В Windows 10 и более новой версии операционной системы есть специальный «Диспетчер учетных данных». В нем сохраняются все пароли, в том числе к веб-сайтам, приложениям и сетям. Если добавить сюда актуальный пароль к принтеру, он будет применяться автоматически и печать будет начинаться практически сразу, после отправки документа.
Как настроить пароль:
- Вводим в поиск «Диспетчер учетных данных» и выбираем его среди списка.
- Выбираем пункт «Учетные данные Windows» и жмем на кнопку «Добавить учетные данные Windows».
- В целевом окне вводим данные: имя сервера печати, ник пользователя и пароль, которые зарегистрированы в сетевом принтере.
- Сохраняем изменения и нажимаем на кнопку Ок.
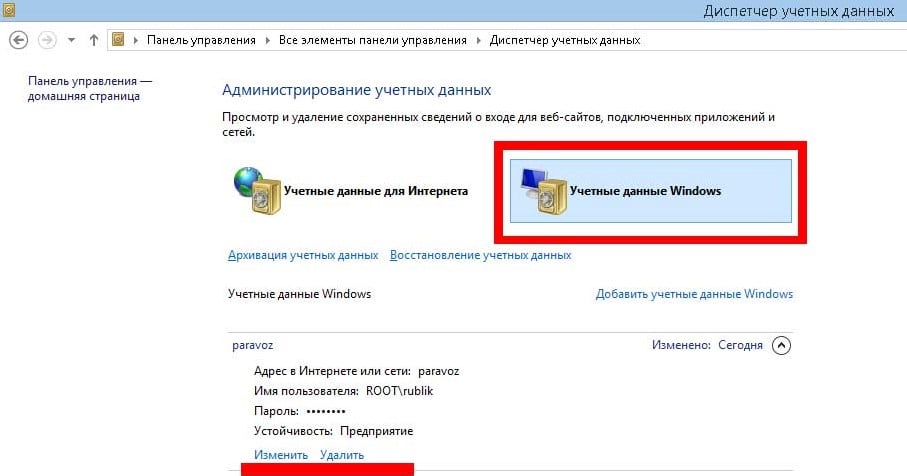
В 99% случаев ошибка 0x0000052e вызвана просто неправильными данными для подключения. Либо компьютер обращается не к тому серверу, либо отсутствует доступ для данного пользователя, либо допущена ошибка в пароле, либо логине. После указания корректных данных доступ к принтеру возобновится.
Run the printer troubleshooter first
by Srishti Sisodia
Srishti Sisodia is an electronics engineer and writer with a passion for technology. She has extensive experience exploring the latest technological advancements and sharing her insights through informative… read more
Updated on
- The printer error occurs if the system files of your computer are corrupted, or device drivers are outdated.
- This guide will discuss all the available fixes to resolve the issue.
![0x0000052e Windows Cannot Connect to Printer [Fix]](https://cdn.windowsreport.com/wp-content/uploads/2023/03/0x0000052e-Windows-Cannot-Connect-to-Printer-Fix.png)
If you are getting 0x0000052e: Windows cannot connect to the printer when trying to connect to your printer, then this guide can help!
We will cover all the expert-tested methods to get rid of the error right after discussing the causes.
What causes the 0x0000052e Windows cannot connect to printer issue?
There are several reasons for this printer error: some of the common ones are mentioned here:
How we test, review and rate?
We have worked for the past 6 months on building a new review system on how we produce content. Using it, we have subsequently redone most of our articles to provide actual hands-on expertise on the guides we made.
For more details you can read how we test, review, and rate at WindowsReport.
- Incorrect printer configuration -If your printer is misconfigured, then your computer might not be able to connect to the printer. You need to check the printer settings to make sure that’s not the case.
- Damaged printer driver – Drivers are important for the smooth functioning of your computer. If the device drivers are outdated or incompatible, then you might not be able to connect your computer to a printer. To fix this, you need to update device drivers to the latest compatible version.
- Firewall or security settings – The security tool or firewall settings of your device could prevent your computer from connecting to the printer. You need to check if Firewall is blocking the printer port or if the security software is blocking the printer driver.
- Network connectivity issues – If the printer is connected to the network and there are connectivity issues, then the computer might not able to establish a connection with the printer.
- System files are corrupted – If your Windows files that handle printer dependencies are missing or damaged, then you might face this issue. You need to perform a clean installation to fix it.
What can I do to fix the 0x0000052e Windows cannot connect to printer issue?
Before we go to the advanced fixes, here are a few preliminary checks you should do:
- Check your internet connection.
- Restart your computer and try to connect to the printer.
- Install Windows updates if available.
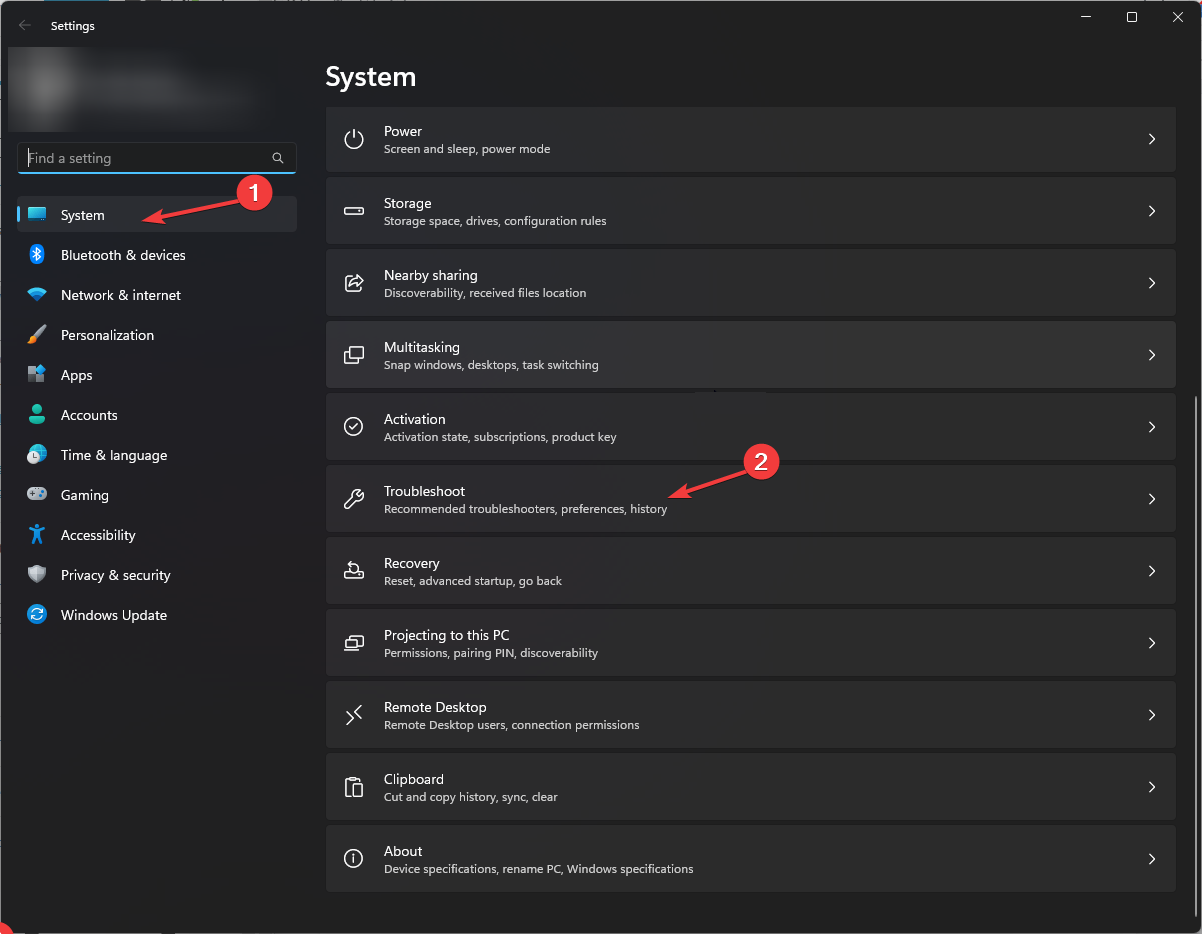
1. Run the troubleshooter
- Press Windows + I to open the Settings app.
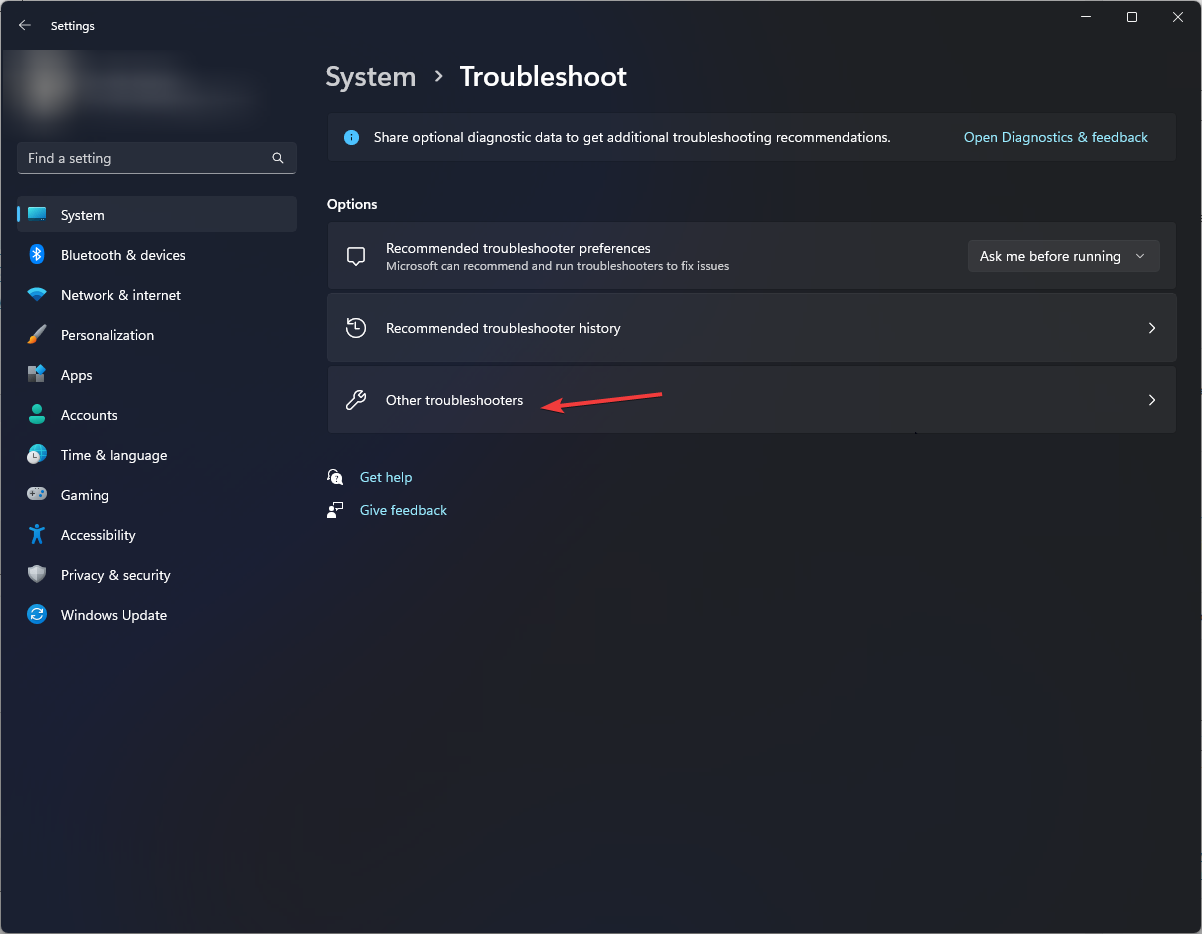
- Go to System, and click Troubleshoot.

- Select Other troubleshooters.
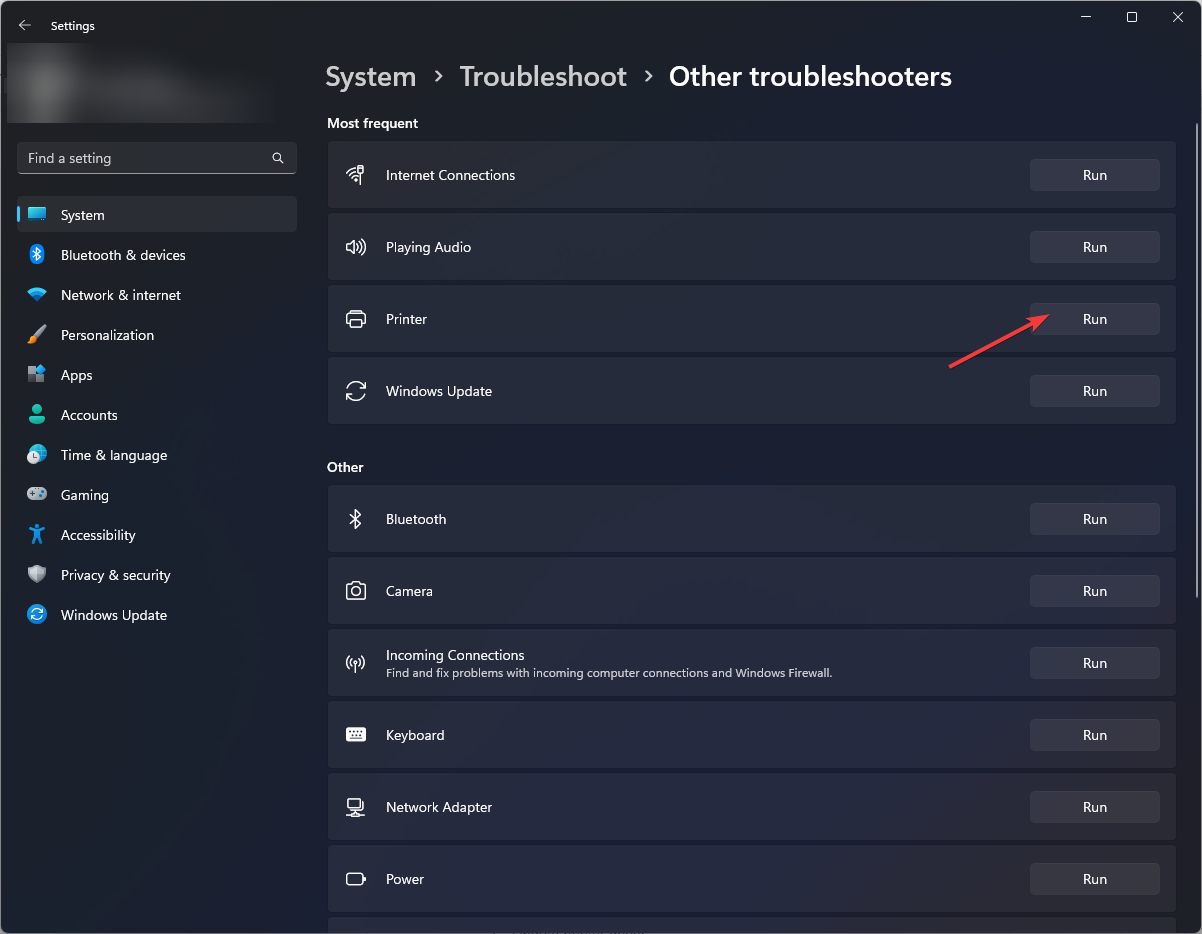
- Locate the Printer option and click Run.
- Select Apply this fix.
Besides the steps mentioned above, we also think you should take care of other critical issues, such as corrupted system files, which can also be the problem of the occurred error.
Thus, to help you simplify this situation, we suggest you try a tool specialized in this area that will help you take care of all corrupted, broken, or even missing files by finding healthy components as replacements.
⇒ Get Fortect
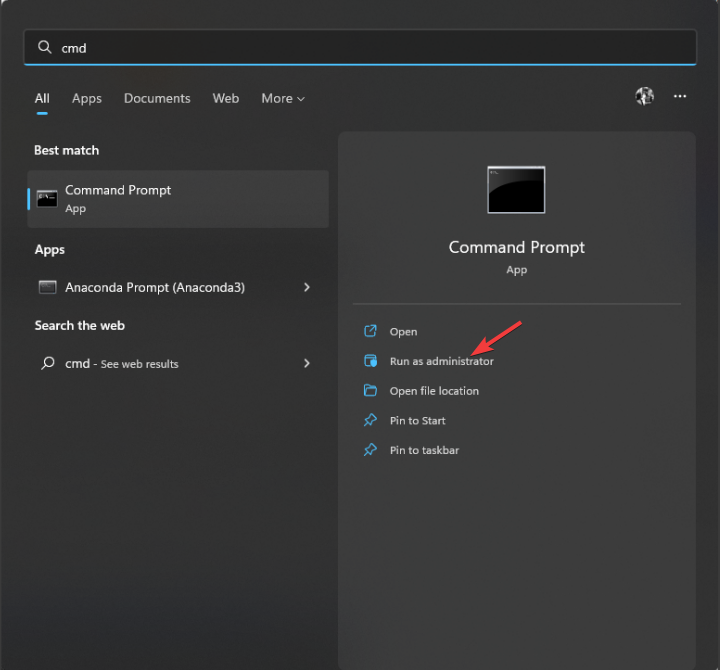
2. Use the Command Prompt
- Press the Windows key, type CMD, and click Run as administrator.

- Type the following command, replace <servername> with the printer server name & <printername> with the name of your printer, and press Enter:
start \\<servername>\<printername> - On the authentication window, enter your username and password.
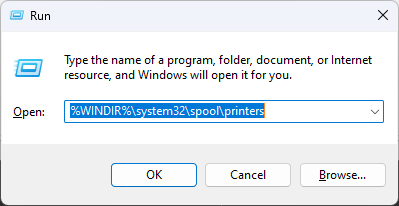
3. Reset printer spooler
- Press Windows + R to open the Run dialog box.
- Type %WINDIR%\system32\spool\printers and click OK to open the Printers folder.

- Select all the content and click the Delete icon.
- Restart your computer to let the changes take effect.
- High GPU Usage but Low FPS: 8 Ways to Fix This Issue
- Microsoft Paint Cocreator: A complete guide on the new AI tool
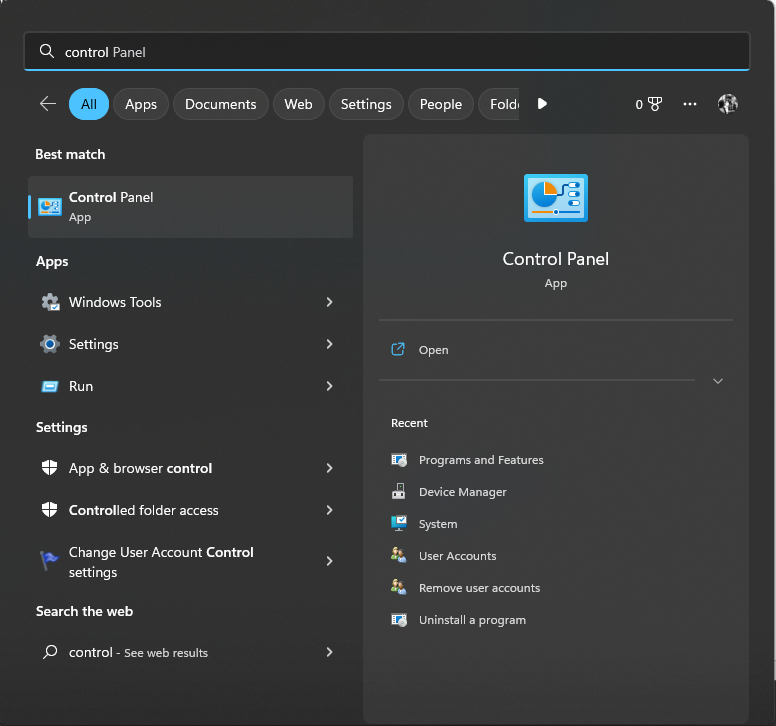
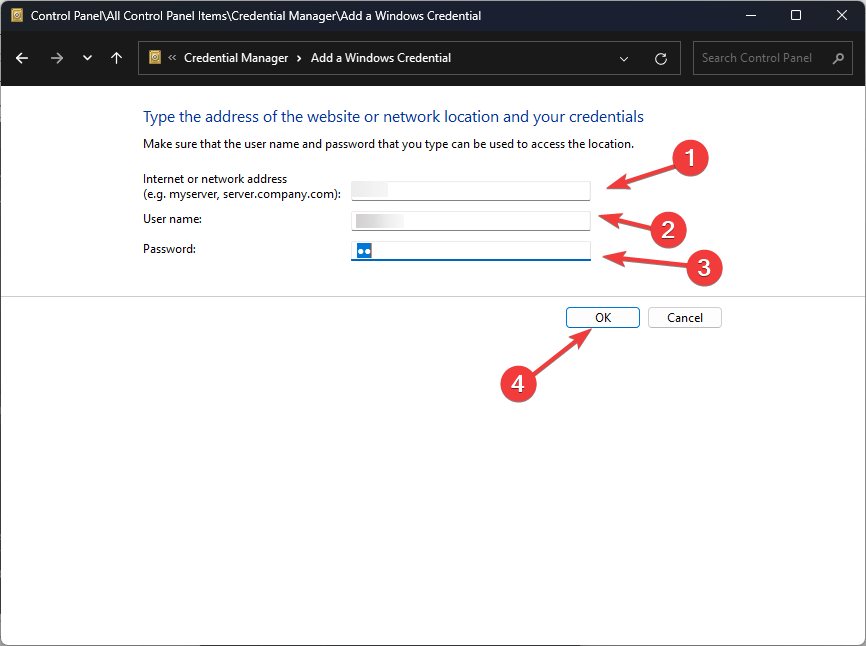
4. Use the Credential Manager
- Press the Windows key, type Control Panel, and click Open.

- Select View by as Large icons or Small icons, and select Credential Manager.

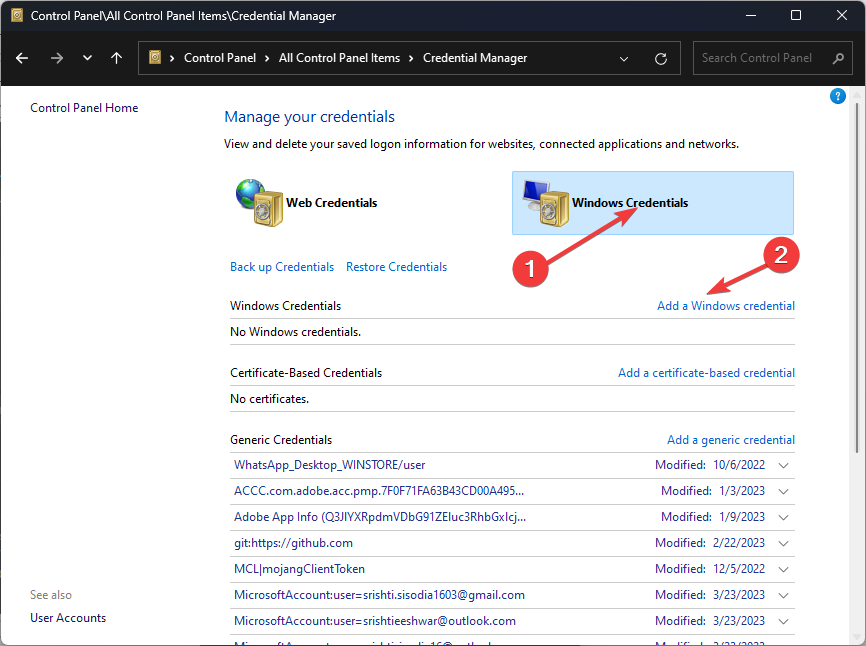
- Click Windows Credentials, then click Add a Windows credential.
- On the next window, enter the correct printer server name, along with login credentials.
- Click OK to complete the process.

5. Reinstall the printer driver
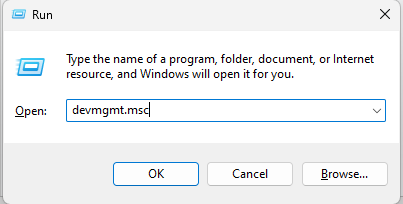
- Press Windows + R to open the Run dialog box.

- Type devmgmt.msc and click OK to open Device Manager.
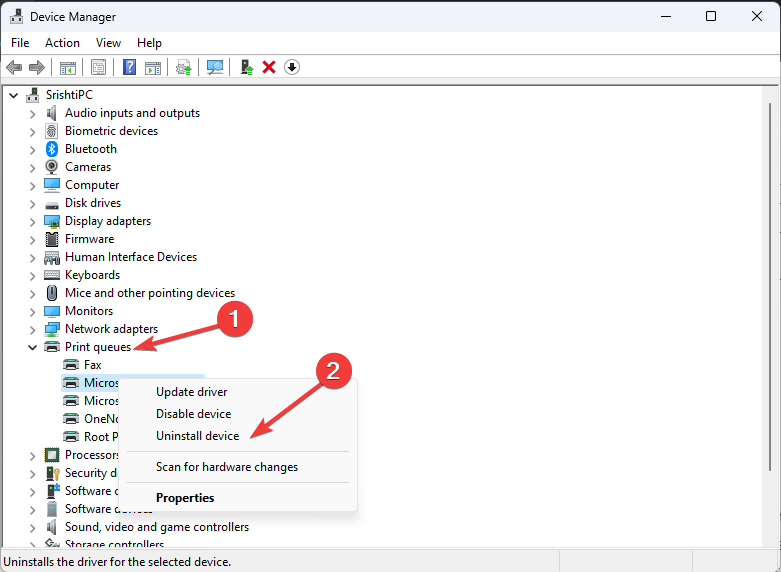
- Go to Print queue, expand it, select the driver, and click Uninstall device.

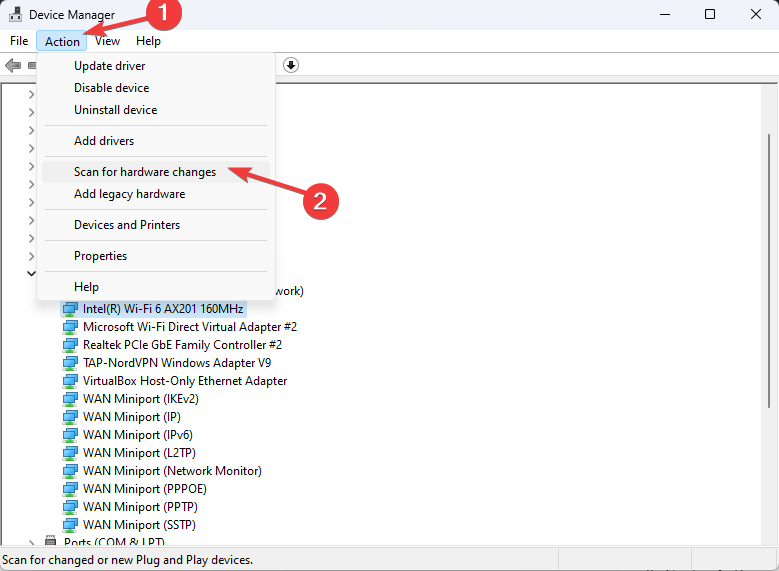
- Now go to Action, and click Scan for hardware. Your computer will reinstall the missing driver.

- Restart your computer to save the changes.
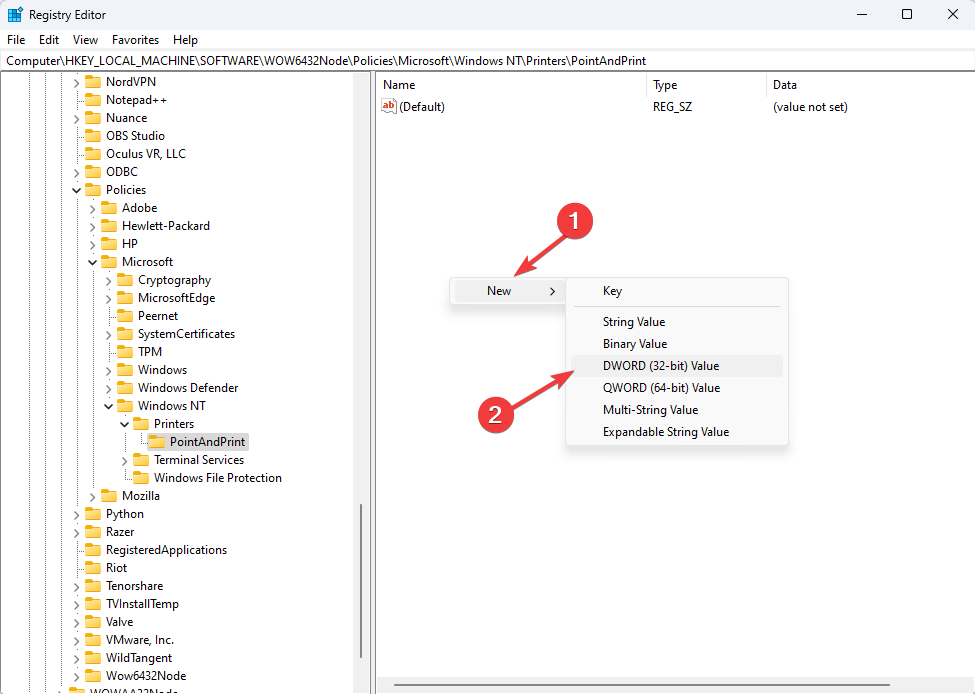
6. Use the Registry Editor
- Press Windows + R to open the Run console.
- Type regedit and click OK to open Registry Editor.
- Follow this path:
Computer\HKEY_LOCAL_MACHINE\SOFTWARE\WOW6432Node\Policies\Microsoft\Windows NT\Printers\PointAndPrint - Select and right-click PointAndPrint, choose New, then click DWORD (32-bit) Value.

- Name the DWORD as RestrictDriverInstallationToAdministrators
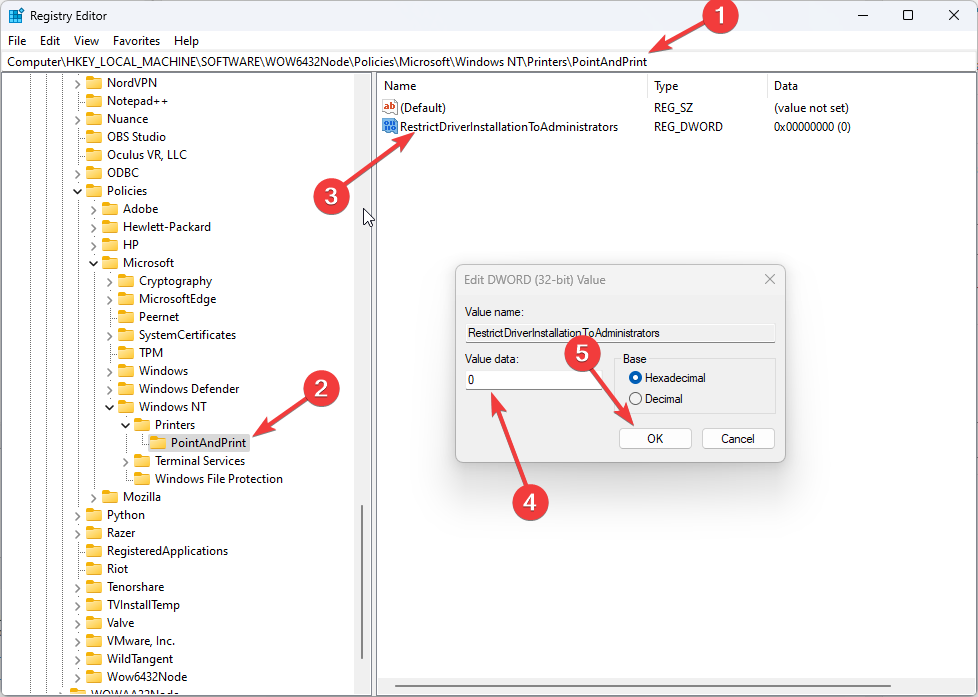
- Double-click RestrictDriverInstallationToAdministrators and change the Value data to 0.

- Click OK and close the Registry Editor.
- Reboot your PC to confirm the changes.
7. Perform a repair install
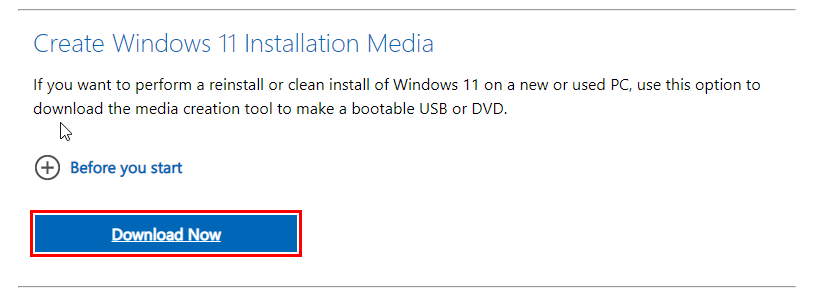
7.1 Create installation media
- Go to Windows 11 website.
- Under Create Windows 11 Installation Media, click Download Now.

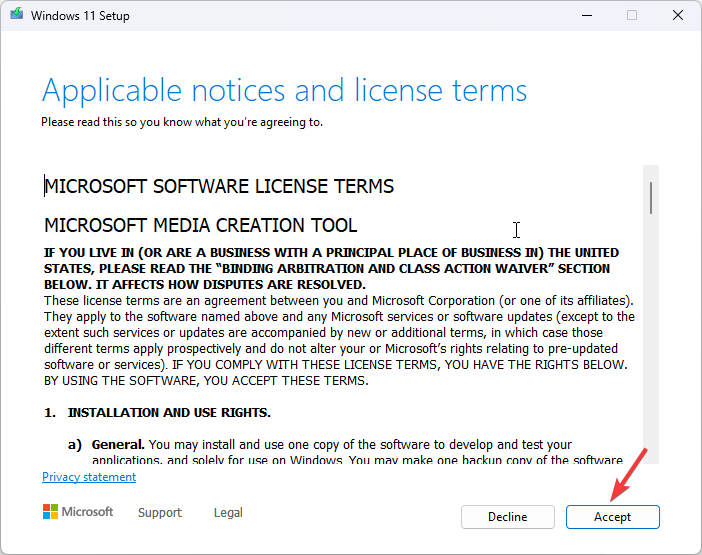
- Double-click to run the Windows 11 setup. On the wizard, click Accept.

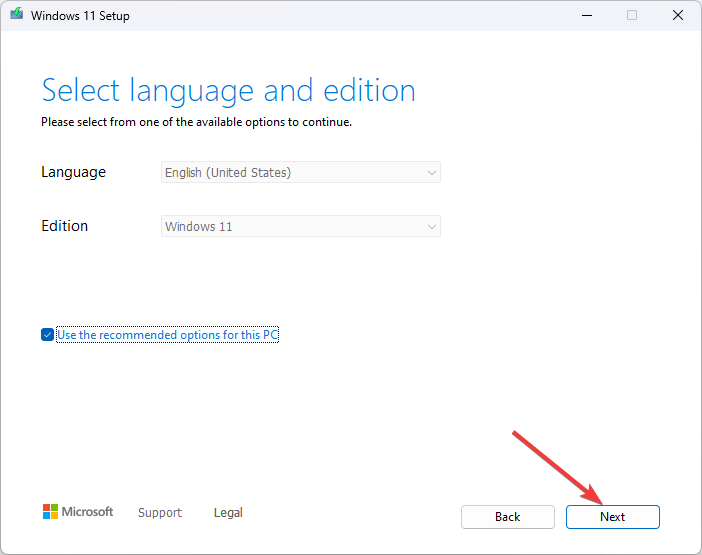
- Select language, edition, and architecture (64-bit) and click Next.
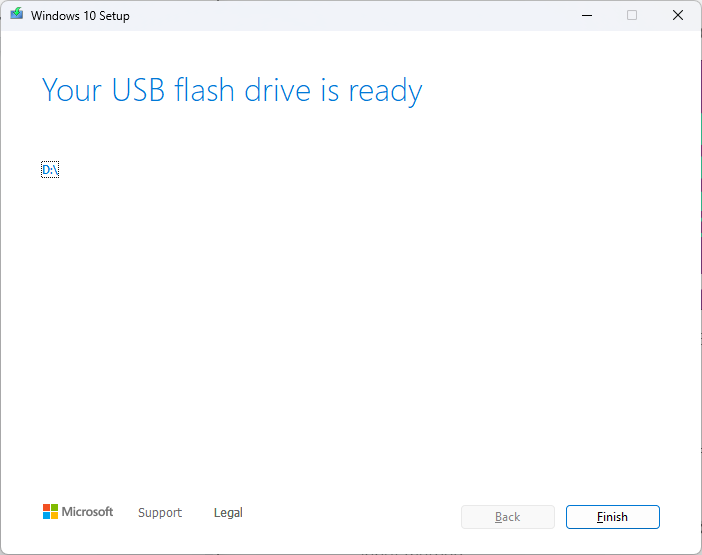
- On the Choose which media to use page, choose USB flash drive, and click Next.
- Follow the on-screen instructions to complete the process to create installation media.

7.2 Install Windows 11 again
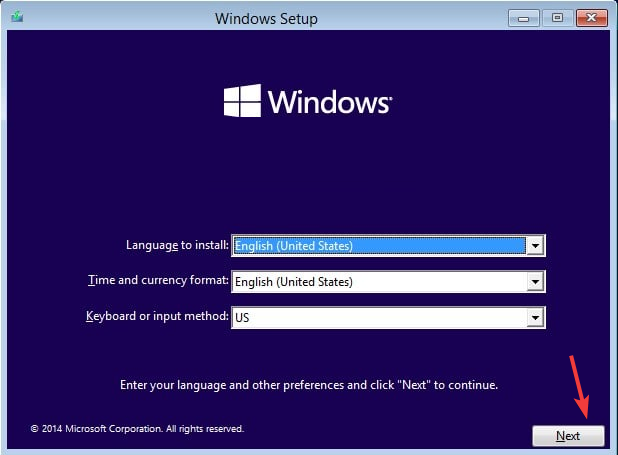
- Plug in the USB drive and restart your PC.
- If your computer doesn’t boot using USB, you need to change the boot order from BIOS. If it has, proceed.
- On the Install Windows page, choose language, time, and keyboard preference and click Next.

- Click Install Windows.

- Wait for a few minutes, Windows will be installed and it will take you to the login screen.
So, these are the methods that you can follow to fix 0x0000052e: Windows cannot connect to the printer. Try them and let us know what worked for you in the comments section below.
![]()
Before starting this post, let’s clarify that we have already written solutions to errors 0x00000709 and 0x0000011b that started after installing the cumulative update KB5006670. Both the problems cause to prevent Network printer from adding or installing on Windows 10. Now you might face another issue error 0x0000052e having same nature that occurs after installing kb5006738. When the trouble happens, you come across the message – “Windows cannot connect to the printer” or “Operation failed with error 0x0000052e” or No printers were found.
During error code 0x0000052e, you are unable to add the network printer to your system anyhow and when try, this message appears. This issue is having a history. Because of PrintNightmare vulnerability, an attacker successfully penetrated the security wall of Windows 10 and was capable of harming the system (CVE 2021 34527). To deal with the issue Microsoft withdrew the authority to uninstall and update drivers from non-administrative users. This change has given rise to another set of issues and many users became unable to add shared network printers. However, Microsoft again came with a registry modification to remove the printer problems. Now you can fix the error easily using the following workarounds.
Here is how to fix Printer Error 0x0000052e KB5006738 in Windows 10 –
Way-1: Uninstall kb5006738
Most of the users complain that they started to encounter this nagging printer problem after installing KB5006738 and removing this solved it. This indicates that when getting this error, first of all, you need to confirm that recently a cumulative update is installed. If the answer is positive then uninstall the update to fix it –
A] Through Program & features
- Press – Winkey+I.
- Type – appwiz.cpl.
- Hit Enter to launch the Programs & features window.
- Find the update KB5006738 and right-click on it.
- Select the single option – Uninstall.
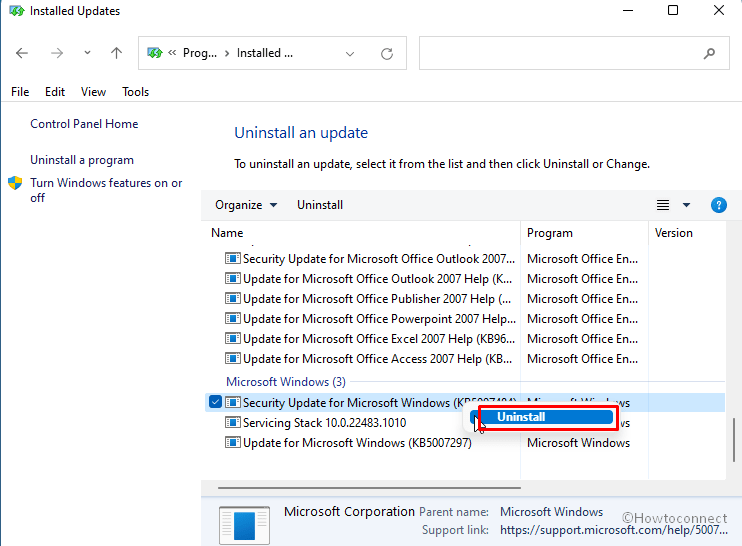
- You may notice a confirmation dialog. Click on Yes on it and then follow the instructions shown on the screen until the uninstallation is finished.
- Check if you can add the network printer now.
After uninstalling, it is necessary to block the update to avoid error code 0x0000052e in near future. You are able to perform this task in 2 ways – 1. Using Pause update and by hiding this update. If you want to try the first method follow this post – How to Choose a Date to Pause Updates in Windows 10. However, when using this way you will need to extend the date for pausing repeatedly.
And in case of choosing the second method, download Windows 10 Update Disable Tool . Unzip the tool and run wushowhide.diagcab. If you need to see a thorough process the go to this article. This way is better than pausing. IIt is notable that once the bug is fixed you must enable the Windows update again.
B] Uninstall via Command line
If encounter any problem with removing using normal procedure the same can be uninstalled using command line pretty effectively. All you need is to run a command –
- Press – Winkey+R.
- Type – cmd.
- Hit the – Ctrl+Shift+Enter.
- Once the command prompt appears, type or copy-paste – wusa /uninstall /kb:5006738.
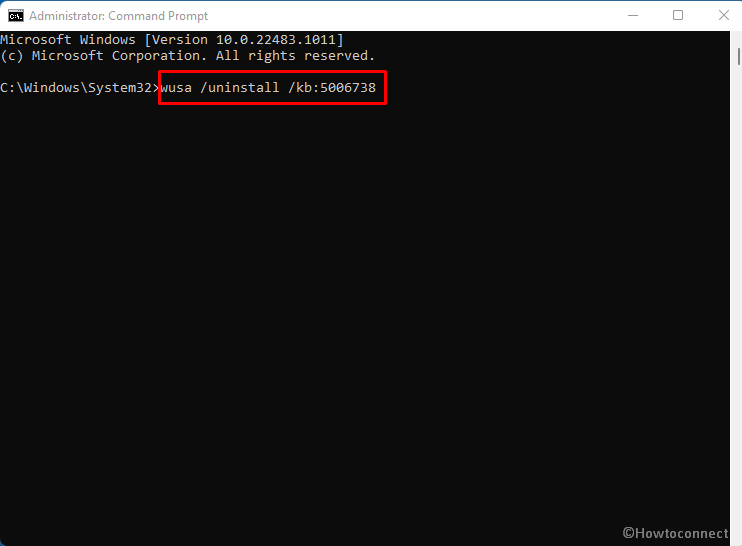
- Press – Enter.
- This will scan for the update for a little time and then show you a pop up asking for confirmation.
- Click Yes and allow the update to be uninstalled.
Way-2: Tweak Registry Settings
A] Through Regedit itself
When the error appeared, Microsoft sent a resolution through a mini update having a registry tweak. Make sure that you are able to handle the registry settings things because a small mistake can inflict severe damage to the system. If you are competent, this will certainly help you to fix printer error 0x0000052e in Windows 10. However, if you are not efficient then try the next (the same thing with command prompt).
- Click on – Search.
- Type – regedit.
- Press – Enter.
- Once a User account control pop-up comes out, select – Yes.
- Registry Editor will be open now
- Copy the below address –
HKEY_LOCAL_MACHINE\Software\Policies\Microsoft\Windows NT\Printers\PointAndPrint- Paste it into the registry editor’s address bar.
- Hit the – Enter.
- Go to the right-hand side and right-click on an empty space.
- Select – New > DWORD (32-bit) Value.
- Give the name to the value – RestrictDriverInstallationToAdministrators.
- Open this value by double-clicking on it and put 0 in the Value data field.
- Press Enter and exit the registry editor.
- Reboot the machine and check if 0x0000052e error code is fixed.
- Nevertheless, the error is not resolved then download the file Network_Printing_Error.zip.
- Unpack it and reach Network_Printing_Error.reg.
- Right-click on the .reg file and Select – Open.
- On User account control dialog box, click – Yes.
- Now you notice a warning pop up from Registry Editor; click on ‘Yes’.
- Restart the system to check if the Printer bug is fixed.
B] Alternatively do the same with Command prompt
In case, you are not good at the registry changing follow this –
- Open Command prompt as administrator.
- Copy the following piece of command line –
reg add "HKEY_LOCAL_MACHINE\Software\Policies\Microsoft\Windows NT\Printers\PointAndPrint" /v RestrictDriverInstallationToAdministrators /t REG_DWORD /d 1 /f- Paste into the prompt and hit Enter.
Here is the source – Microsoft support.
Way-3: Manually add the printer through IP Address
If you find totally unable to run your print job then this method will help you to rescue. Using this, you can add a printer manually using IP address and hostname. Follow the guidelines –
- Press Windows key and I.
- Click – Devices.
- Select – Printers & scanner from the left pane.
- From the right pane, click on +Add a printer or scanner.
- After a while, ‘The printer I want is not listed’ link appears. Click this link.
- Add a printer window is launched.
- Check – Add a printer using a TCP/IP or hostname.
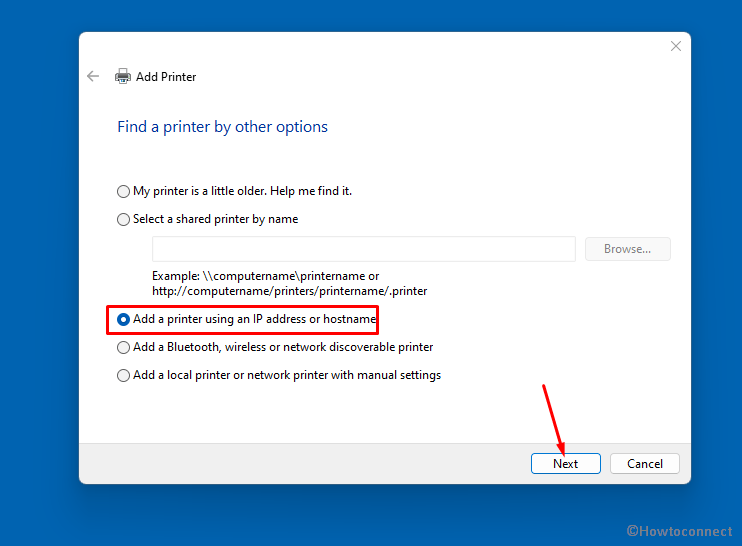
- Click – Next.
- Next, write the IP address or hostname of the printer and select “Next”.
- The system will detect the printer device and display its name. If you want, change the name, otherwise, click ‘Next’.
- In case you’re running a shared printer then select the option – “Share this printer so that others on your network can find and use it”.
- If not, then check – “Do not share this printer”.
- Click – Next.
- Select Print a test page and make sure it is working well.
- At last, click on Finish.
Way-4: Install pending Windows updates
Originally this error has a connection with Printnightmare exploitation hence Microsoft is specifically monitoring this issue. This is why you may get an update anytime to remediate the error. So checking the update time and again will be better when you encounter the printing bug.
- Click on – Start.
- Type – updates.
- Hit – Enter.
- From the settings page that appears, click on – Check for updates.
- Once scanning and downloading are completed you will come across a notification pop-up asking you when to install; click on – Restart now.
Way-5: Reset print spooler
Print spooler service, the main component to control the printing jobs on WIndows, oftentimes causes issues. Fortunately, you have the ability to repair the spooler by resetting it –
- Press the Windows and R keys.
- Copy this path – %WINDIR%\system32\spool\printers.
- Paste in the Run command box.
- Hit – Enter.
- A folder will open.
- Select all the items there.
- Right click and choose “Delete”.
- Restart your computer and see if the error code no longer occurs.
Way-6: Install the most recent Printer driver
Sometimes, outdated printer driver might also trigger error 0x0000052e in Windows 10. Obsolete driver software often creates conflict with system files and generates different types of issues. So when finding this error code you must try to update printer driver using the following steps –
- Right-click on – Start.
- Select – Device Manager.
- Once on the app, go through the list of devices to find Printer or Print Queue.
- Double click on the device to expand the drivers.
- Next, right click on the one that is running on your system and select – Update driver.
- Now, click on – Search automatically for drivers.
- Restart the system and hopefully, the error should be fixed.
Methods list:
Way-1: Uninstall kb5006738
Way-2: Tweak Registry Settings
Way-3: Manually add the printer through IP Address
Way-4: Install pending Windows updates
Way-5: Reset print spooler
Way-6: Install the most recent Printer driver
That’s all!!
Repair any Windows problems such as Blue/Black Screen, DLL, Exe, application, Regisrty error and quickly recover system from issues using Reimage.
Some Windows 7, Windows 8.1 and Windows 10 users are reporting that they always end up seeing the 0x0000052E error code (Windows cannot connect to the printer) when trying to connect a new printer on their PC.
After investigating this particular issue, it turns out that there are several different underlying causes that might be triggering this error code. Here’s a list of potential culprits that might be responsible for this issue:
- Common Printer protocol glitch – If you’re encountering this issue on a Windows 10 computer, chances are you’re dealing with a common glitch that can be resolved simply by running the built-in Printer Troubleshooter and applying the recommended fix.
- Corrupted Dymo driver installation – A lot of users that were only encountering this issue when attempting to connect Dymo devices have managed to fix the issue by uninstalling the entire driver + support software infrastructure before clean installing it again.
- System File Corruption – As it turns out, it’s also possible to experience these types of issues due to some kind of system file corruption that’s affecting Windows files responsible for handling printing dependencies. In this case, you can hope to fix the issue with a procedure like clean installing or repair install.
Now that you know every potential underlying cause for this error, here’s a list of verified methods that other affected users have successfully used to fix this error code:
Method 1: Running the Printer Troubleshooter (Windows 10)
If you’re looking to fix the issue the easiest way possible, the first thing you should do is run the built-in Printer Troubleshooter and apply the recommended fix. This is not guaranteed to work, but a lot of affected users have reported that this utility managed to fix the 0x0000052E error in their case.
This troubleshooter essentially contains a collection of automated fixes that can be deployed with a single click if the culprit of this issue is identified.
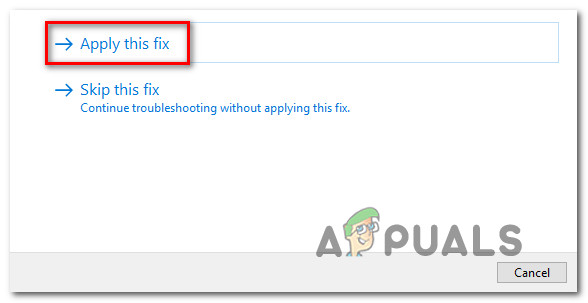
When you run the Printer Troubleshooter, this tool will automatically analyze the current situation and determine if any of the pre-determined repair strategies are applicable to your current situation. If a viable fix is identified, you will be presented with a choice to apply this fix.
If you haven’t tried running the Printer Troubleshooter yet, follow the instructions below to do so:
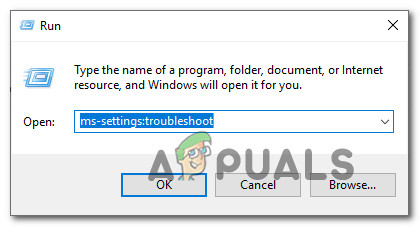
- Open up a Run dialog box by pressing Windows key + R. Next, type ‘ms-settings:troubleshoot’ and press Enter to open up the Troubleshoot tab of the Settings app.

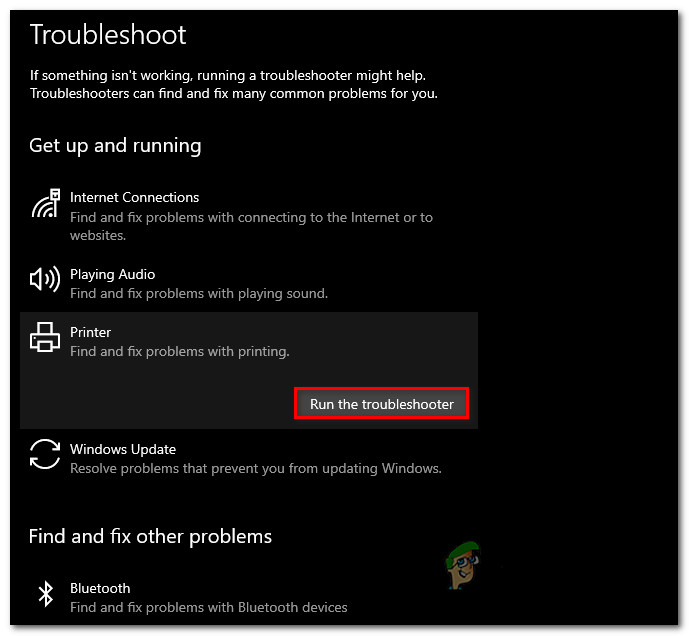
Accessing the activation troubleshooter - Once you’re inside the Troubleshooting tab, scroll down to the Get up and running tab, then click on Printer from the list of available options. Next, click on Run the troubleshooter from the context menu that just appeared.

Running the printer troubleshooter - If a viable fix is identified, click on Apply this fix if a repair strategy is recommended.

Applying the recommended fix - Once the operation is complete, restart your computer and attempt to connect your printer once again once the next startup is complete.
If the same problem is still persisting even after applying the fix or the utility wasn’t able to find a viable fix for your issue, move down to the next potential fix below.
Method 2: Reinstalling the Dymo Connect Dymo software (if applicable)
If you’re encountering this issue while attempting to connect a Dymo device to your windows computer, keep in mind that you’re not the only one. We’ve managed to discover a lot of user reports facing the same 0x0000052e when attempting to connect their Dymo device to multiple computers.
After investigating this issue, it turns out that this issue is occurring due to an issue with the supporting driver software that comes with the vast majority of Dymo devices.
Since this is caused by corrupted installation files, the only way to fix this problem is to uninstall the current Dymo drivers and remove and remove any traces from them before reinstalling the latest driver equivalent from scratch.
If this scenario is applicable and you’re looking for step by step instructions on how to do this, follow the instructions below:
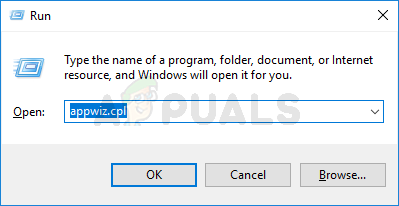
- Press Windows key + R to open up a Run dialog box. Next, type ‘appwiz.cpl’ inside the text box and hit Enter to open up the Programs and Features menu.
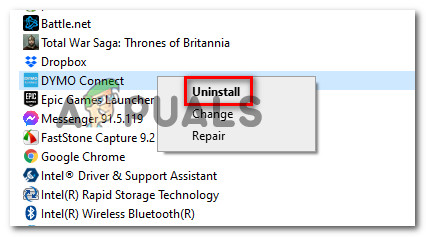
Accessing the Programs and Features menu - Once you’re inside the Programs and Features menu, scroll down through the list of applications and locate the DCD installation.
- When you manage to locate it, right-click on it and choose Uninstall from the context menu that just appeared.

Uninstalling the Dymo software +, driver - Next, follow the on-screen prompts to complete the uninstallation, then restart your computer and wait for the next startup to complete.
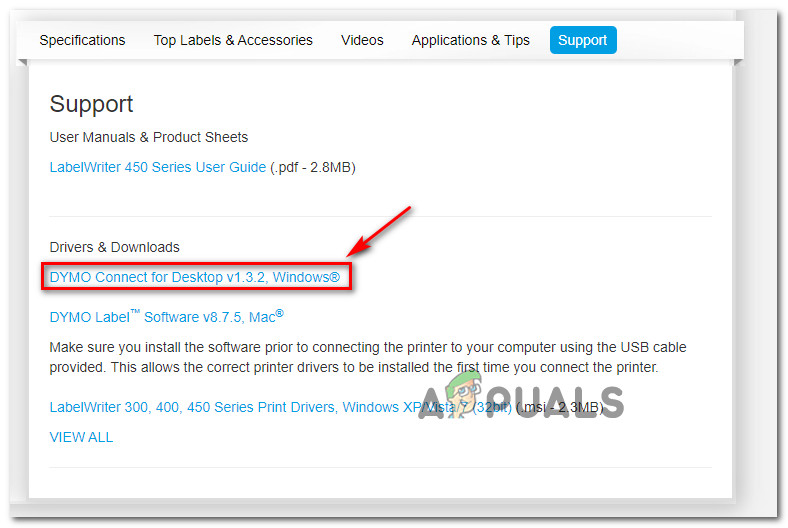
- Once your computer boots back up, visit the official driver download page of Dymo and click on the Support tab.
- Inside the Support tab, click on the latest version of Dymo Connect for Desktop (under Drivers & Downloads) to begin the download of the latest driver version.

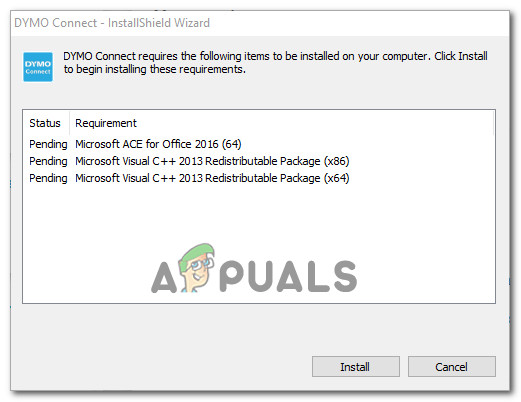
Downloading the latest version of Dymo connect - Once the download is complete, double-click on the executable, provide admin access at the User Account Control prompt, then follow the on-screen prompts to install the requirements necessary for the Dymo suite to work.

Installing the Dymo requirements - Once every requirement is installed, complete the installation of the newer driver version before restarting your computer once again.
- After the newer version of the Dymo driver is installed, attempt to connect your printer once again and see if the same problem is still occurring.
If this method didn’t work in your case or this method was not applicable to your particular scenario, move down to the next potential fix below.
Method 3: Refreshing your Windows Components
If none of the methods above have worked in your particular scenario and you’re certain that you’re not dealing with a hardware issue, you can probably conclude that you’re dealing with some type of underlying system file corruption that is affecting your OS’s ability to install and manage printer protocols.
In this case, the best thing you can do is refresh every Windows component that might be causing this problem with a procedure like clean installing or repair installing:
- Repair installing – If you are currently storing important information on your Windows drive, you should go for a repair install procedure since it will allow you to keep all your personal data. A repair install procedure will allow you to keep your personal media, apps, games, and even some user preferences associated with your current OS installation. The main drawback is that you will need to insert or plug in a compatible installation media in order to trigger a repair install procedure.
- Clean installing – If you don’t care about losing personal data on your OS drive, the quickest and painless procedure is to go for a clean install. This operation will erase any personal data on the OS drive, but you will be able to trigger this procedure directly from the GUI menu of Windows without having to plug in a compatible installation media.

Kevin Arrows
Kevin Arrows is a highly experienced and knowledgeable technology specialist with over a decade of industry experience. He holds a Microsoft Certified Technology Specialist (MCTS) certification and has a deep passion for staying up-to-date on the latest tech developments. Kevin has written extensively on a wide range of tech-related topics, showcasing his expertise and knowledge in areas such as software development, cybersecurity, and cloud computing. His contributions to the tech field have been widely recognized and respected by his peers, and he is highly regarded for his ability to explain complex technical concepts in a clear and concise manner.
Before anyone responds that the answer to this question is in the forums. Believe me I have spent several frustrating hours looking and have found no answer. That being said here is the issue:
Have a Windows 7 64 Bit Laptop and a Windows 7 64 Bit Tower. I have an HP Officejet J5780.
I have an ATTUverse Network at the house. The tower is connected directly to the router with an ethernet cable, the laptop is connected through the wifi. There is a USB connection from the printer to the tower.
The local printer setup on either computer works correctly. On both computers I have turned off all firewall and anti-virus software completely. Both computers are joined to a HomeGroup that I established on the Tower. All media and document
sharing works correctly under the current setup. The printer software and all drivers are installed on both computers. The printer is shared to the Homegroup with full access rights. I have rebooted both computers multiple times as I have
been through my own trouble shooting processes. I have confirmed and reconfirmed that all connections are open, all firewalls and av down, all drivers have been rolledback and re-updated, and all devices operating from fresh reboots.
Here is the problem — When I try to add (to the laptop without direct connection) the network/homegroup printer (which is connected to the tower), it cannot be found. Trying to solve the problem, and successfully add the printer ends in two possible
negative outcomes:
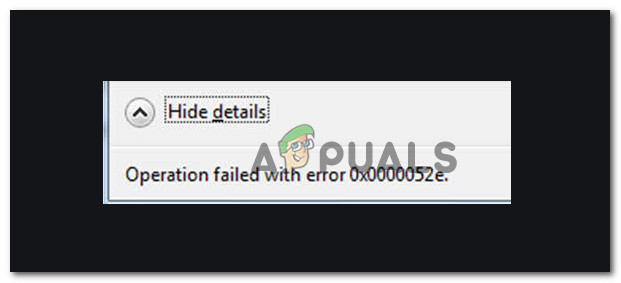
If I type the name of the printer location \\COMPUTERNAME\PRINTER NAME the result is «Windows cannot connect to the printer. Details: Operation Failed with error 0x0000052e
If I browse for the printer, and select it from the window, the result is «Invalid Login Credentials, enter your username and password.» The problem is there is no username and password that I am aware of, and I have confirmed in the Advanced settings
that Password protected sharing is turned off, applied, and rebooted afterwards.
Appreciate any insight.. this should not be so difficult 
Thanks in Advance
AC