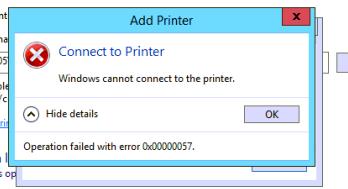
Несколько раз столкнулся со следующей проблемой: при попытке подключить некий сетевой принтер с одного из принт-серверов на клиенте появляется ошибка 0x00000057 Windows cannot connect to the printer. Ошибка появляется на этапе установки драйвера принтера с принт-сервера и, как я выяснил в дальнейшем, исправляется на стороне клиента. Ниже приведу последовательность действий, которая помогла мне решить эту ошибку.
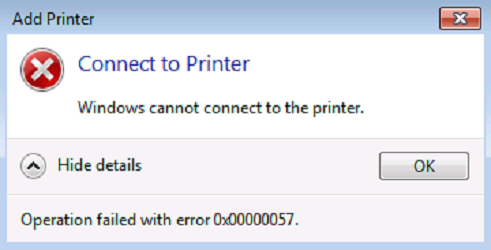
Драйвер принтера не установлен. Невозможно завершить операцию (ошибка 0x00000057)
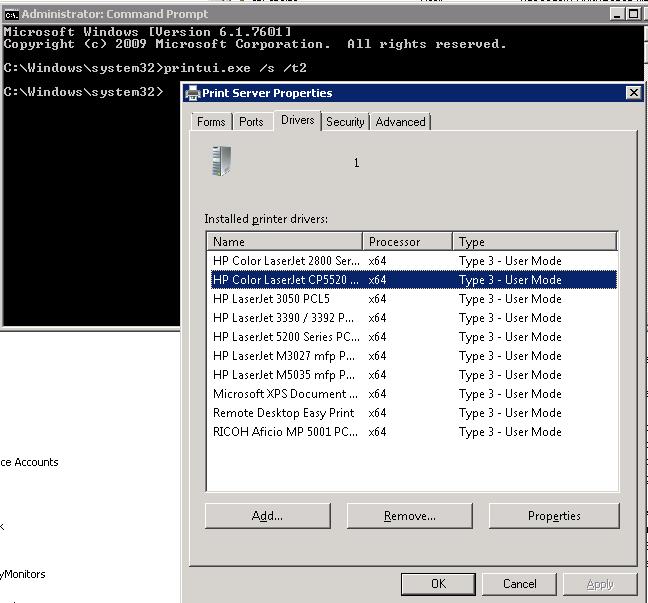
В том случае, если драйвер подключаемого сетевого принтера уже установлен на проблемном компьютере, стоит попробовать вручную удалить его из хранилища драйверов. Для этого откройте диалоговое окно со списком установленных локально драйверов печати и удалите драйвер подключаемого принтера (и x64 и x86 версии).
printui.exe /s /t2
 После удаления драйвера попытайтесь еще раз подключить сетевой принтер
Если это не помогло, или драйвер отсутствовал на клиентской системе, выполните следующие операции.
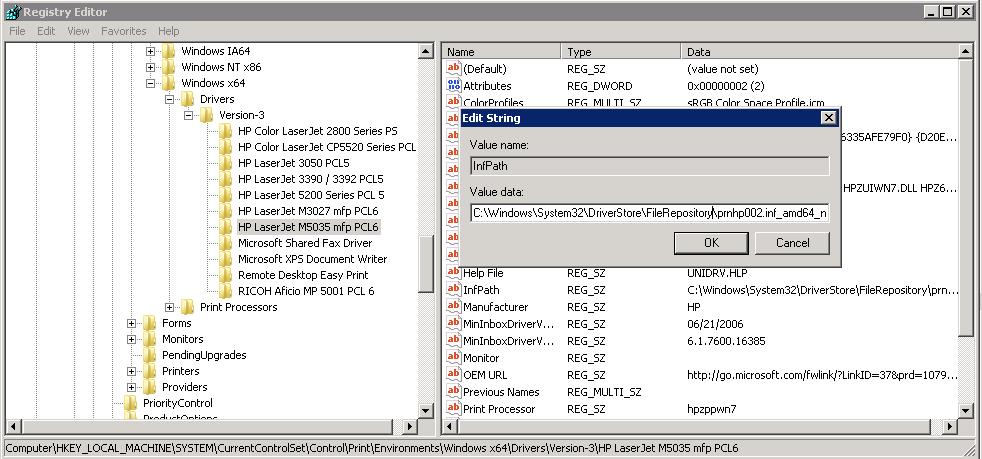
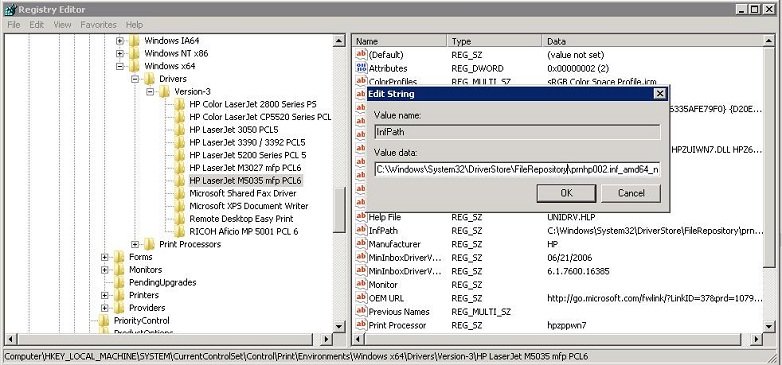
- Нам понадобится компьютер, на котором данный принтер установлен корректно и успешно печатает. На этом компьютере запустите редактор реестра и перейдите в следующую ветку реестра
- на x64 системе: HKEY_LOCAL_MACHINE System\CurrentControlSet\Control\Print\Environments\Windows NT x64\Drivers\Version-3\
- на x86 системе HKEY_LOCAL_MACHINE\System\CurrentControlSet\Control\Print\Environments\Windows NT x86\Drivers\Version-3\
- Найдите ветку с именем драйвера принтера, который вы хотите установить и экспортируйте ее в Reg файл.
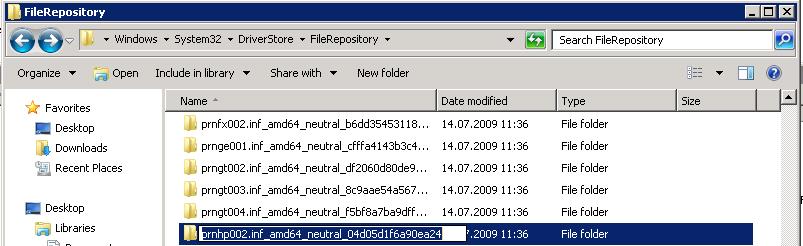
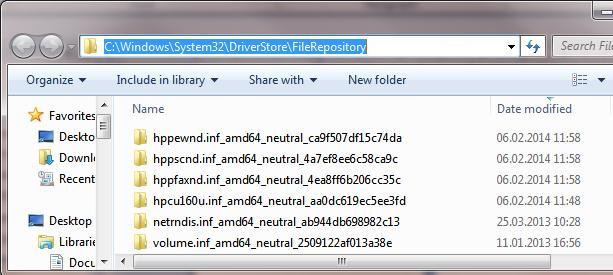
- Затем в данной ветке найдите значение ключа InfPath. В моем примере это C:\Windows\System32\DriverStore\FileRepository\prnhp002.inf_amd64_neutral_04d05d1f6a90ea24\prnhp002.inf

- Перейдите в каталог C:\Windows\System32\DriverStore\FileRepository и найдите имя папки, на которую указывает ключ

- Теперь на проблемном компьютере попытайтесь найти эту папку. Скорее всего она будет присутствовать, но будет пустой. Это свидетельствует о том, что процесс установки драйвера аварийно прервался
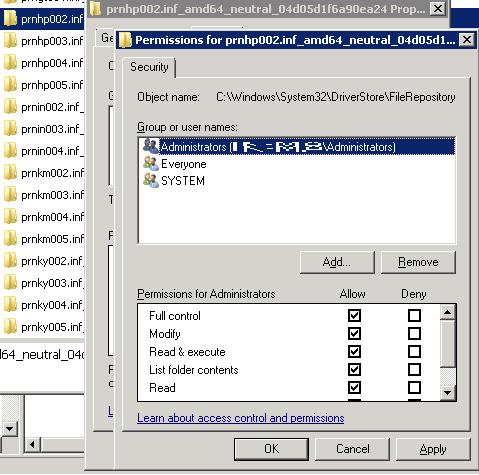
- Отредактируйте NTFS разрешения на данную папку (скорее всего понадобится сделать себя ее владельцем), и добавить права Full Control для группы локальных администраторов.

- Импортируйте reg файл на проблемном компьютере и скопируйте содержимое папки драйвера с нормального компьютера на проблемный.
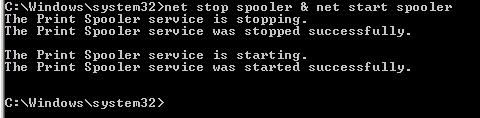
- Перезапустите службу печати;
net stop spooler & net start spooler

- Попробуйте подключить принтер. Клиент должен успешно скачать и установить драйвер с принт-сервера.
Если ни одно из решений не помогло, перейдите в каталог C:\Windows\System32\DriverStore\, создайте резервную копию файла infpub.dat, а затем предоставьте группе локальных администраторов полные права на него (Full Control). После этого попытайтесь установить сетевой притер.
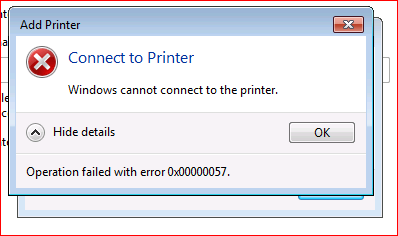
Окно «Windows cannot connect to the printer. Operation failed with error 0x00000057» появляется при подключении к сетевому принтеру. Для этого на пользовательский ПК устанавливаются подходящие драйвера для печати. Как раз в драйвере и заключается корень проблемы. Существует 4 способа исправления ошибки.
Методы решения ошибки принтера 0x00000057
№1: удаляем драйвер
Это актуально в том случае, если драйвер с принт-сервера уже загружен на ваш компьютер. Откройте командную строку и запустите команду printui.exe /s /t2. В окне перейдите на вкладку «Драйвера» и найдите ту модель сетевого принтера, к которому не удалось подключиться. Выберете ее и ниже нажмите на «Удалить». Перезагрузитесь и повторите попытку подсоединения.
№2: импорт части реестра и драйверов
Это подойдет, если есть доступ к ПК, который успешно спарен с сетевым принтером. Выполните на нем следующее:
- Откройте реестр и отыщите в нем ветку HKEY_LOCAL_MACHINE System\CurrentControlSet\Control\Print\Environments\Windows NT x64\Drivers\Version-3\. Если Windows 32-битной версии, то после подраздела «Environments» вам нужно «опуститься» в «Windows NT x86».
- Среди полей конечной ветки найдите то, которое соответствует модели принтера. Это поле перенесите в reg-файл. Еще в конечном поле отыщите строку InfPath и там будет указан адрес папки. Скопируйте содержимое этой директории.
- В аналогичном месте в ПК, на котором выбивает ошибку 0x00000057, должна быть папка, но вероятнее всего она пустая. Это свидетельствует, что установка драйвера прервалась. В эту папку нужно перенести файлы, которые были скопированы в предыдущем шаге, но пока что на это у вас нет прав.
- Чтобы Windows допустил изменение в папке, нужно модифицировать NTFS-допуски. Предпочтительней сделать себя владельцем директории и разрешить все манипуляции с ней. Клацните правой кнопкой мыши по папке и «Свойства» => «Безопасность» => «Администраторы». Убедитесь, что в столбце «Запретить» нет галочек, но они есть в столбце «Разрешить» и нажмите на «Применить».
- Импорт reg файла, полученного в пункте №2. Скопируйте файл на проблемный компьютер, и двойным щелчком мыши запустите его. Подтвердите, что «Вы действительно хотите …».
- Скопируйте папку из пункта №2 в директорию из пункта №3. После этого в командной строке на проблемном ПК запустите команду «net stop spooler & net start spooler». Это обновит службу печати, после чего присоединитесь к сетевому принтеру.
№3: переход на Windows 8
В этой версии ОС ошибка 0x00000057 появляется реже, чем в иных, да и иногда проблема в том, что принтер довольно старый и его драйвер конфликтует с последними обновлениями ОС. Сохраните важные документы. Обновитесь (в случае Windows 7 и более старых) или откатитесь (если у вас версия новее, чем  на Windows 8.
№4: манипуляции с файлом Infpub.dat:
Скачайте или найдите этой файл — желательно, чтобы у него была версия 6.1.7600.16385. Скопируйте его в папку C:\Windows\System32\DriverStore\ . Модифицируйте NTFS-допуски, как в действии №4 второго способа. Полный контроль над файлом предоставьте группе локальных администраторов. После этого перезагрузитесь и при установке драйвера сетевого принтера не должна отображаться ошибка 0x00000057.
Check the printer server properties
by Srishti Sisodia
Srishti Sisodia is an electronics engineer and writer with a passion for technology. She has extensive experience exploring the latest technological advancements and sharing her insights through informative… read more
Updated on
- The printer installation error 0x00000057 is caused by corrupt system files or faulty drivers.
- You can fix this by running an SFC scan to repair the system files or update outdated drivers.
XINSTALL BY CLICKING THE DOWNLOAD
FILE
Encountering printer installation errors can be frustrating, especially when trying to set up a new printer or reinstall an existing one. One common error that Windows users may come across is the 0x00000057.
This guide will walk you through the steps to fix the printer installation error and get it up and running quickly.
What causes the printer installation error 0x00000057?
There are several reasons for this printer error; some of the common ones are mentioned here:
- Incompatible printer driver – If the printer driver installed on your PC is inconsistent with the OS or specific printer model, you may see this error. Try updating the drivers.
- Corrupted printer driver files – Damaged printer driver files can prevent the printer from being installed properly, leading to this printer error.
- Incorrect printer configuration – Incorrect printer configuration settings, such as the wrong port or an outdated driver, can prevent the printer from being installed properly.
- Registry issues – If problems with the Windows Registry related to printer settings or configurations can lead to an error. Try a registry cleaner to fix the problem.
- Conflicting printer software – Sometimes, other printer software or third-party applications can interfere with the printer installation process, causing conflicts and triggering the error.
So, now that you know the causes of the issue, let us check out the solutions to fix it.
How we test, review and rate?
We have worked for the past 6 months on building a new review system on how we produce content. Using it, we have subsequently redone most of our articles to provide actual hands-on expertise on the guides we made.
For more details you can read how we test, review, and rate at WindowsReport.
How can I fix the printer installation error 0x00000057?
Before engaging in advanced troubleshooting steps, you should consider performing the following checks:
- Restart your computer.
- Repair system files.
- Ensure you have administrative privileges on the device.
- Try running a registry cleaner.
- A reliable internet connection.
- Temporarily disable any antivirus or firewall software on your computer.
Once you finish these, move to the next section to resolve the problem.
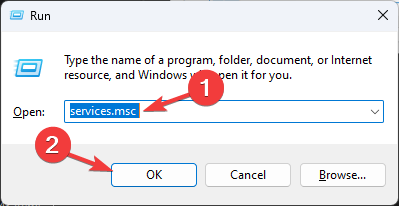
1. Restart the Print Spooler services
- Press Windows + R to open the Run dialog box.

- Type services.msc and click OK to open the Services app.
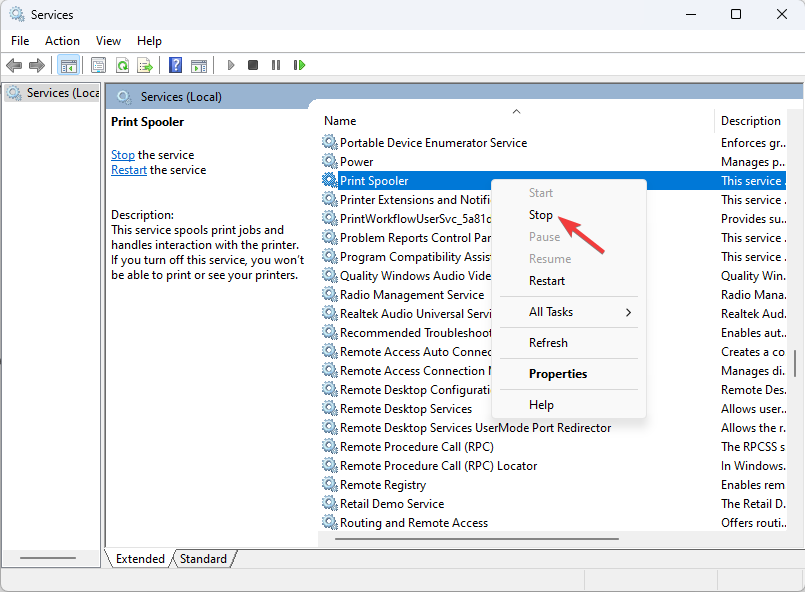
- Locate Print Spooler service, right-click it, and select Stop.

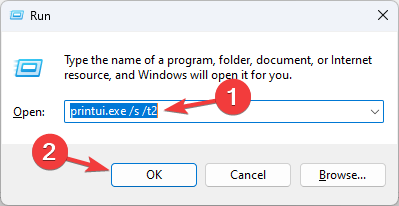
- Once the service is stopped, press Windows + R to open the Run dialog box.
- Type printui.exe /s /t2 and click OK to open Print Server Properties.
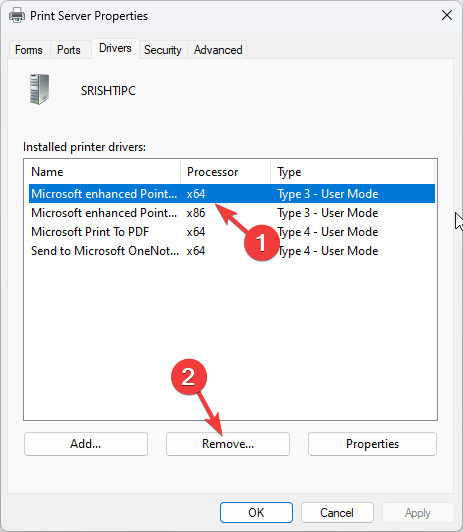
- Select the printer causing the issue and click Remove, then OK.

- Now open the Services app, locate Print Spooler service, right-click it, and select Start.


The service will start again; now, try to add or reinstall the printer.
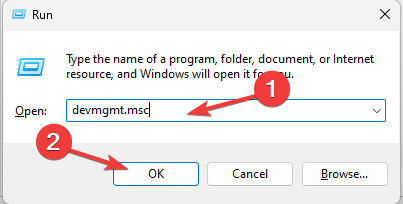
2. Update the Printer driver
- Press Windows + R to open the Run dialog box.

- Type devmgmt.msc and click OK to open the Device Manager app.
- Locate and click Print queues to expand it.

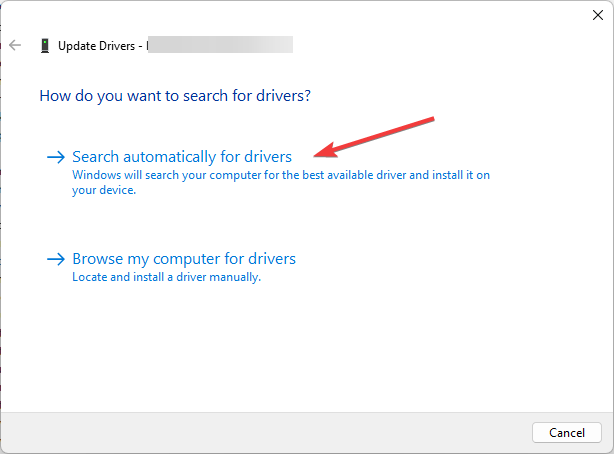
- Right-click the printer and select Update driver.
- Select Search automatically for drivers.

- Follow the onscreen instructions to complete the process.

In some cases, this method may not find the compatible driver version to update the printer. However, you could use a standalone driver manager.
This tool will scan your PC in less than 5 minutes and give a list of all outdated drivers you can instantly update.

Outbyte Driver Updater
Solve all your driver-related issues using this effective tool.
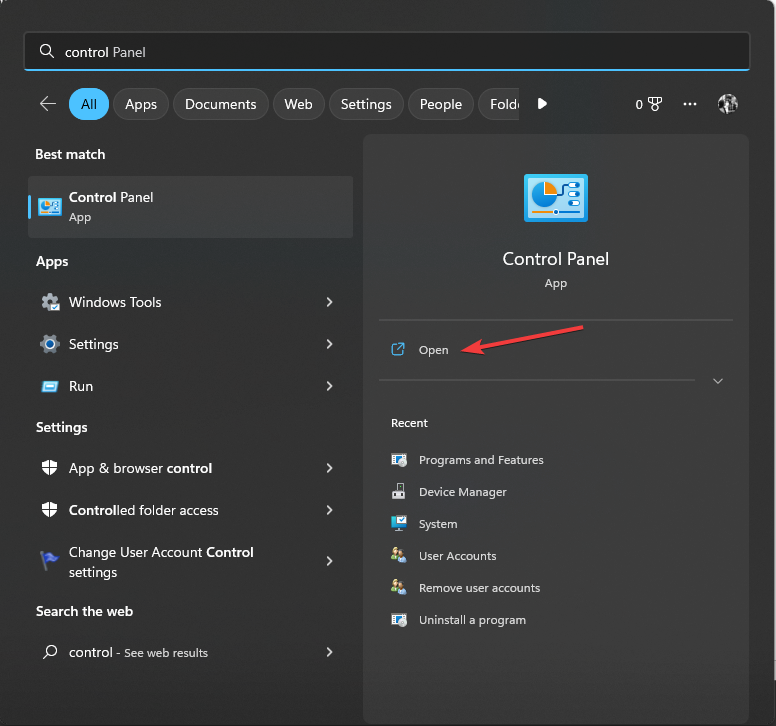
3. Add a local printer through Network
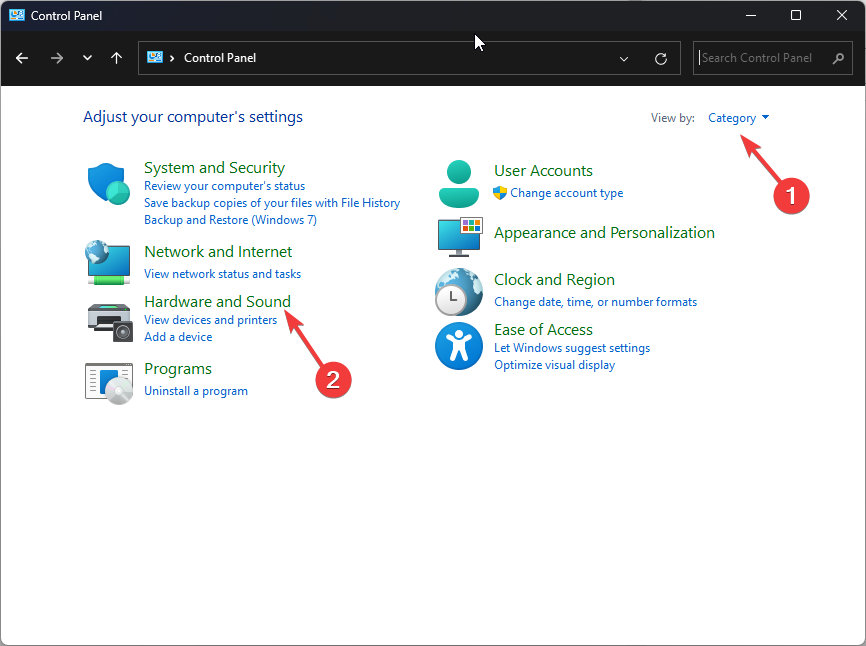
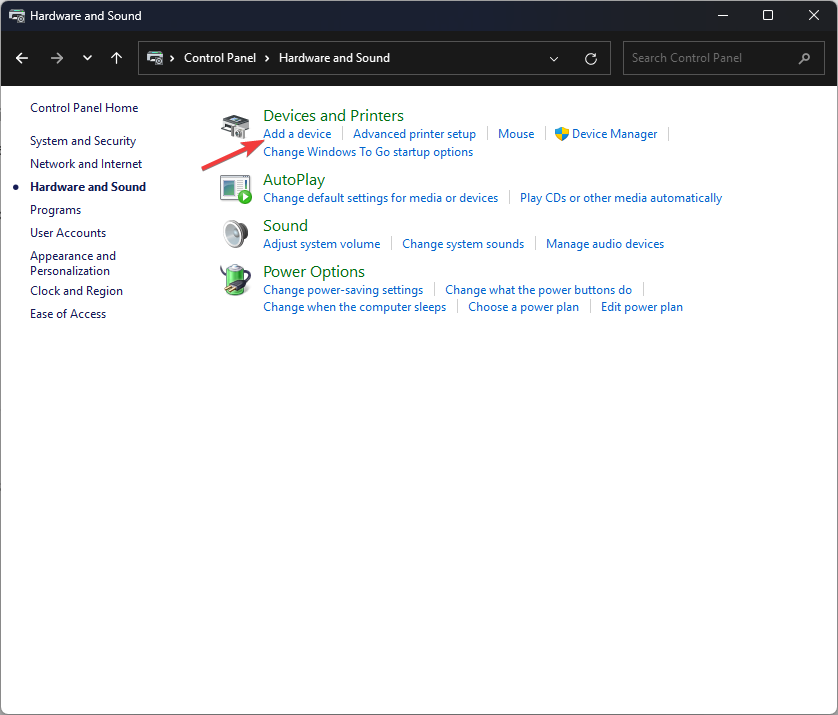
- Press the Windows key, type control panel, and click Open.

- Select Category as View by and choose Hardware and Sound.

- Under Devices and Printers, click Add a device.

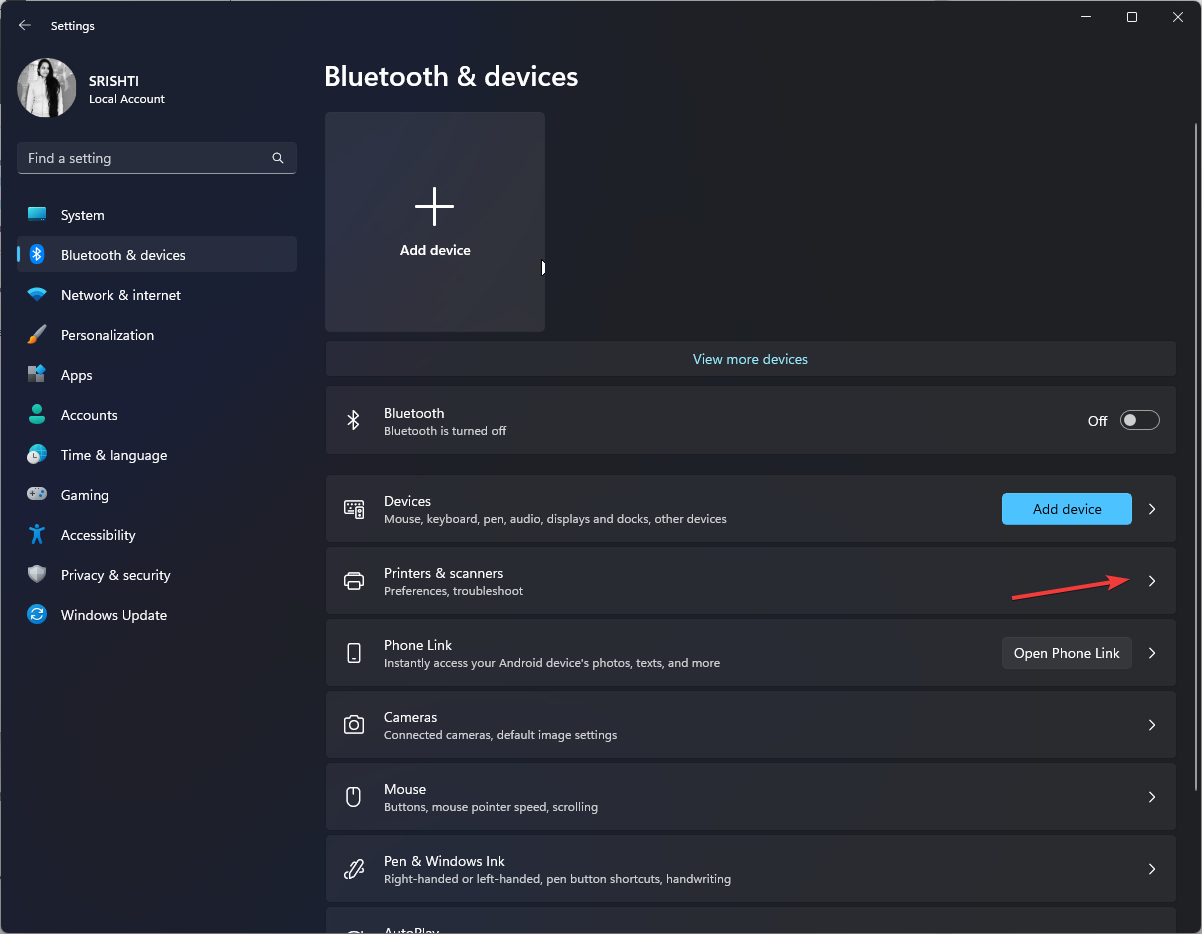
- Click Printer & scanners.

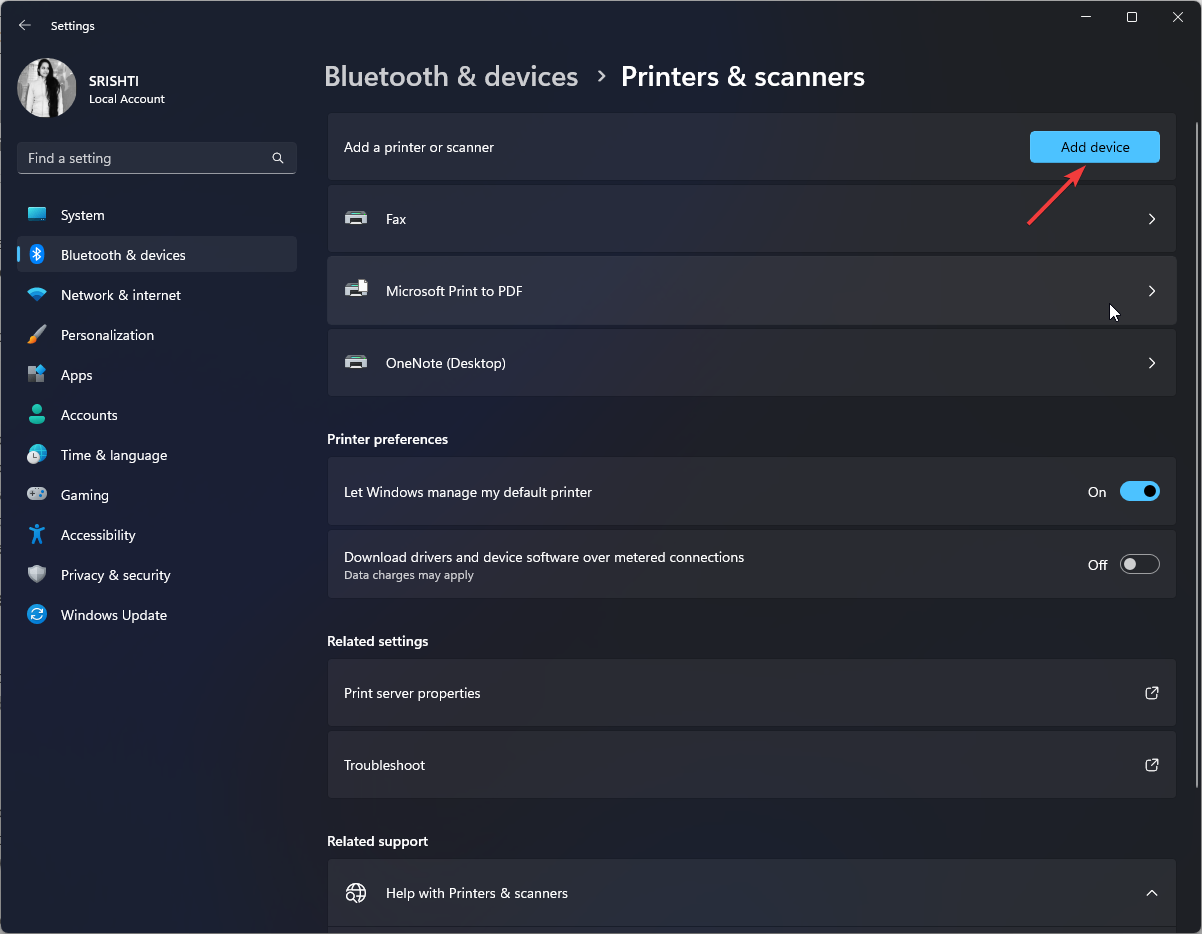
- Now click Add a device.

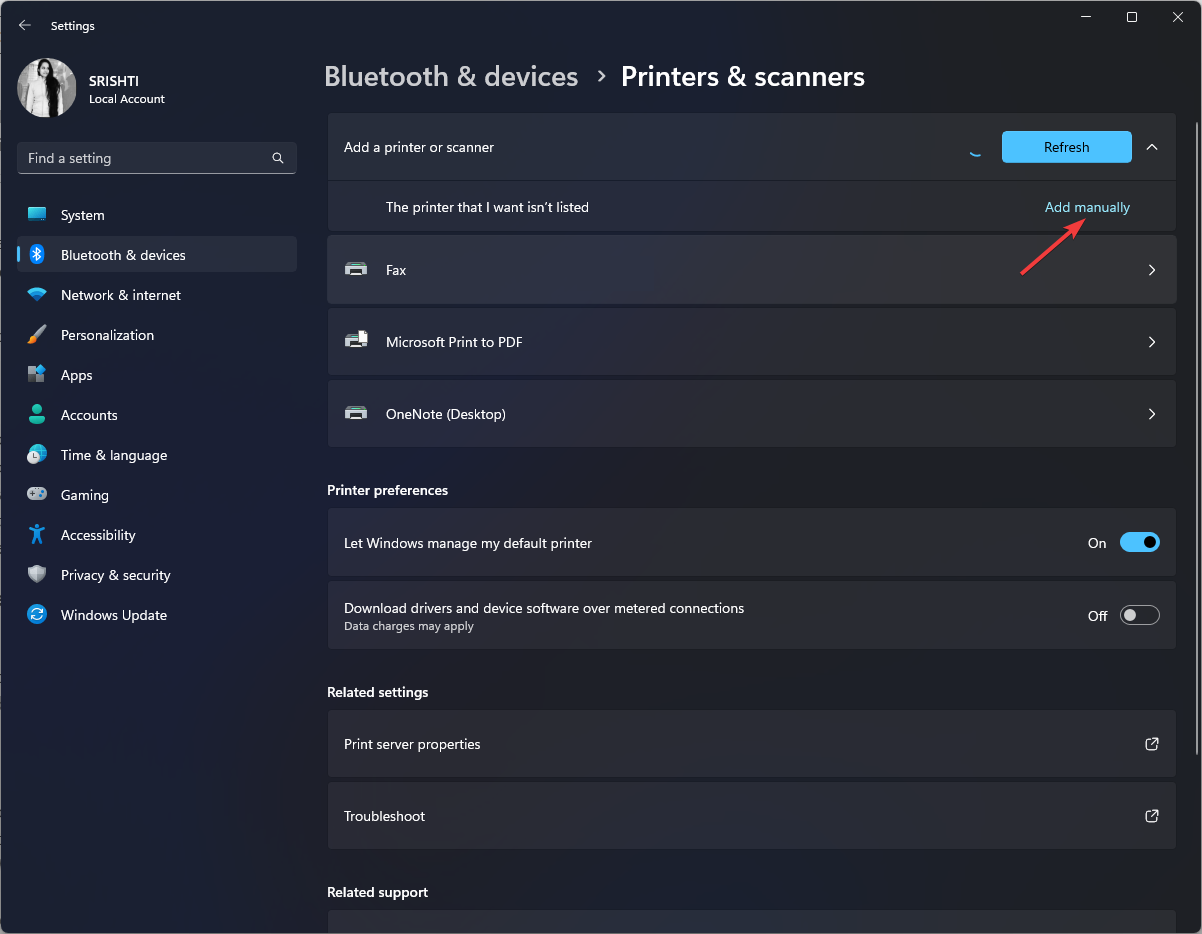
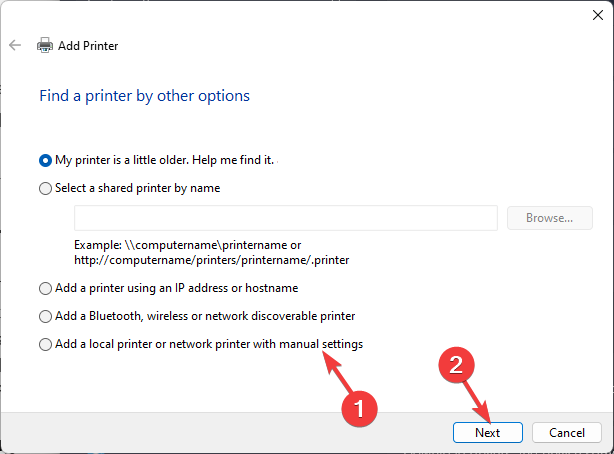
- Select Add manually.

- On the Add Printer page, select the printer and click Next.

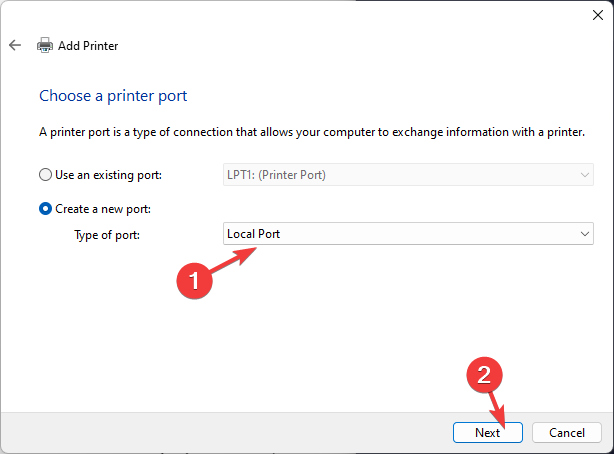
- Now, on Choose a printer port, select Local Port from the drop-down for Create a new Port.
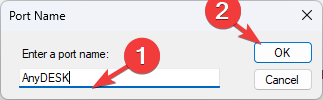
- Enter the Network Path on the Port Name and click OK.

- Now choose the printer from the list and click Next.
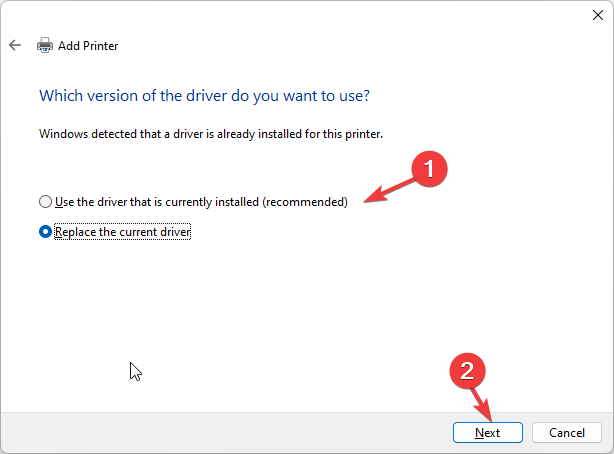
- Select the version of the driver you want to use and click Next.
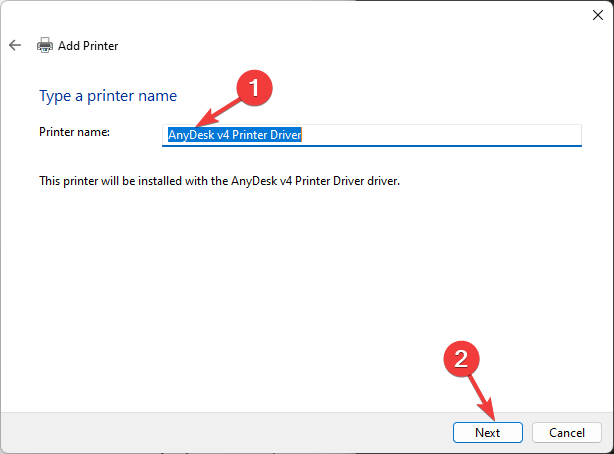
- Type a printer name and click Next.
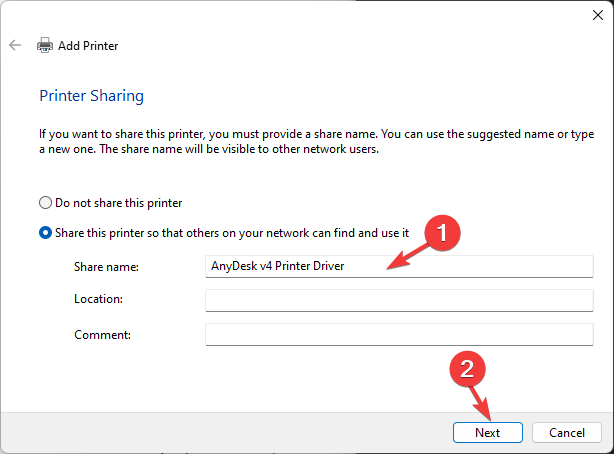
- On the Printer Sharing window, choose the option suitable and click Next.
- Click Finish.

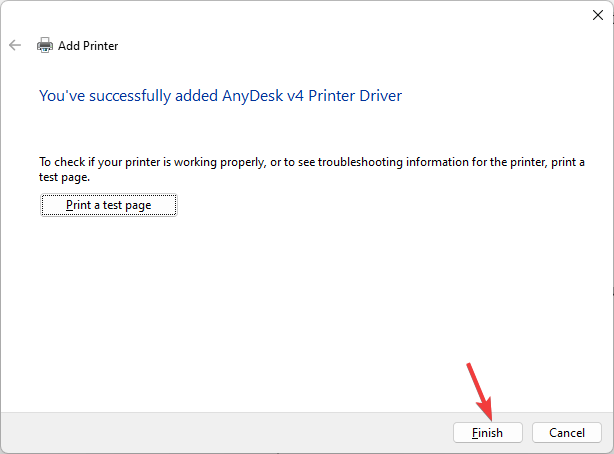
The printer is added to your computer without any issues.
- Is Windows 11 Faster Than Windows 10?
- How to Change the Icon Size on Windows 10
- Fix: Internet Keeps Disconnecting When Playing Games on Windows 11
- Fix: Can’t Disable Background Blur on Windows 11
4. Copy the FileRepository folder content from a working machine

NOTE
This method will help you if you’re trying to install printers on several devices. If some get installed successfully, and others fail, you can copy the driver directory from the working ones to fix it.
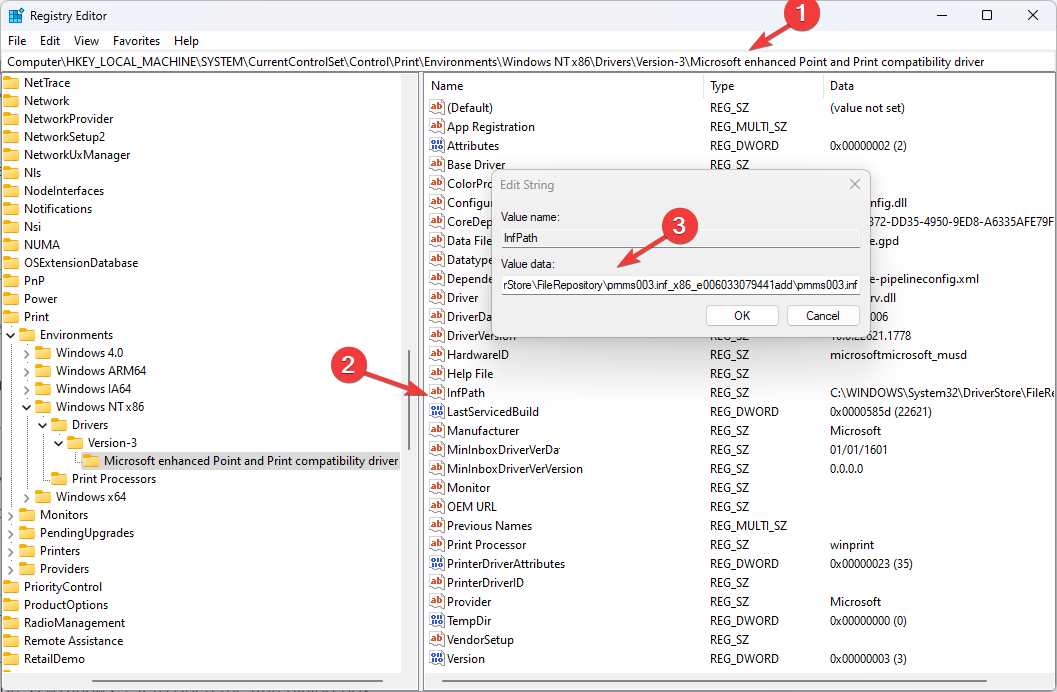
4.1 Copy the InfPath Value data
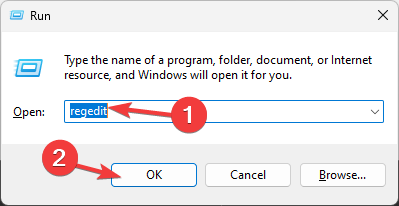
- On the machine that has a working driver, press Windows + R to open the Run dialog box.
- Type regedit and click OK to open the Registry Editor app.
- Navigate to this path:
Computer\HKEY_LOCAL_MACHINE\SYSTEM\CurrentControlSet\Control\Print\Environments\Windows NT x86\Drivers\Version-3
- Locate the printer causing the issue, click it, locate InfPath, and double-click it. Note down the path mentioned in the Value data.
4.2 Copy the content to FileRepository
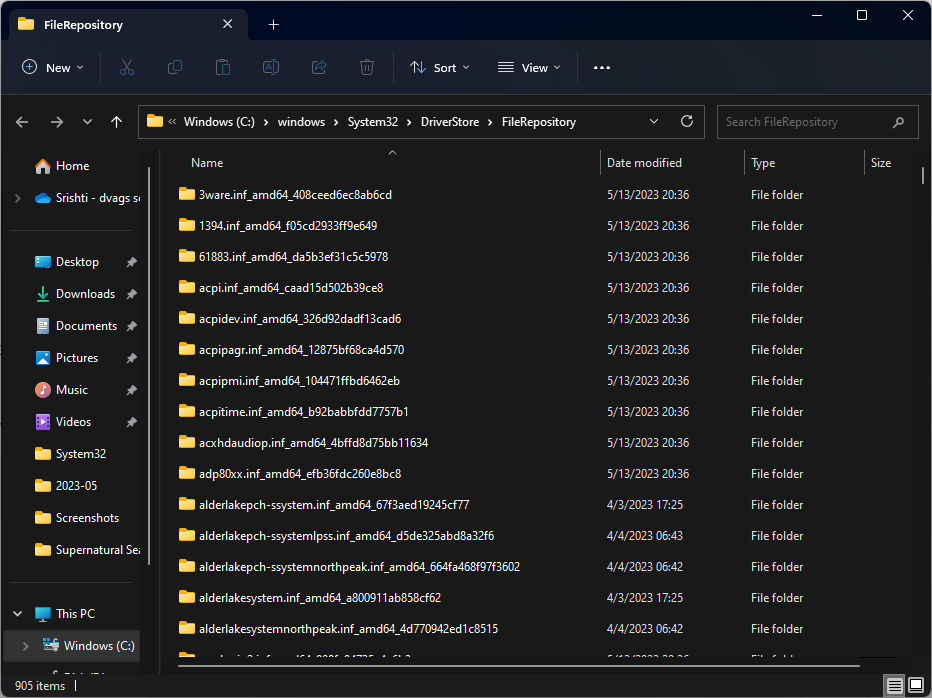
- Press Windows + R to open the Run window.
- Type this path: C:\windows\System32\DriverStore\FileRepository, and click OK to open FileRepository.
- Copy the content of the FileRepository folder to a USB drive.

- Now move over to the computer with driver issues; press Windows + R to open the Run dialog box.
- Type the path C:\windows\System32\DriverStore\FileRepository, and check if the folder is empty.
- If yes, then you need to take ownership of this folder.

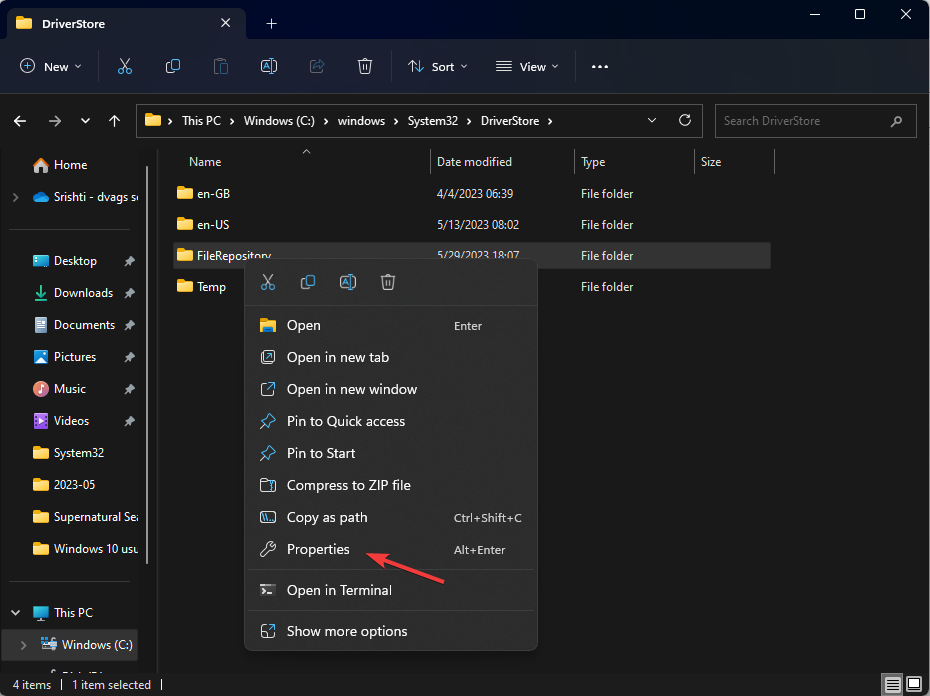
4.3 Take ownership of FileRepository
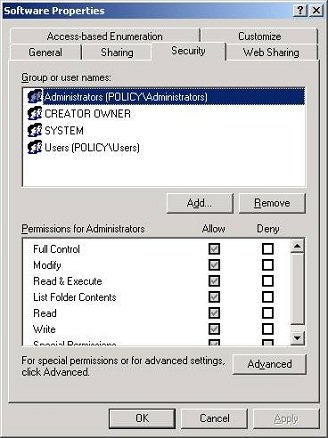
- Right-click the FileRepository folder, and select Properties.

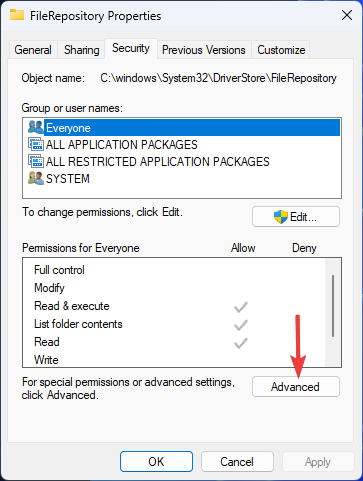
- Go to the Security tab and click Advanced.

- Click Change.

- Now click Advanced.

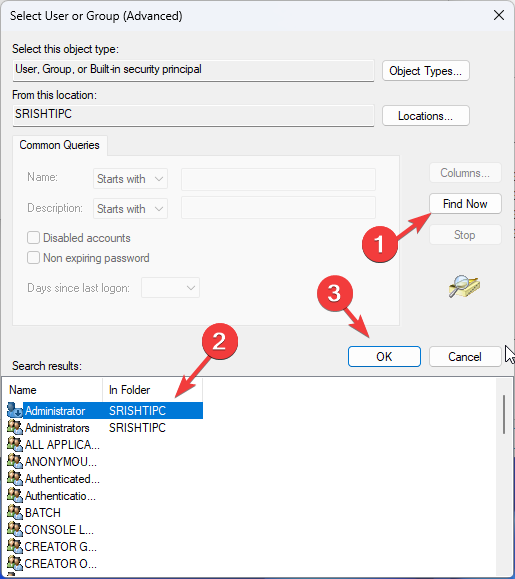
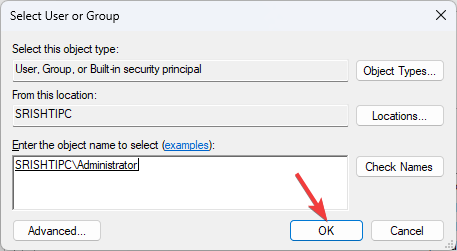
- Select Find Now and click Administrator, then click OK.

- Again, click OK.
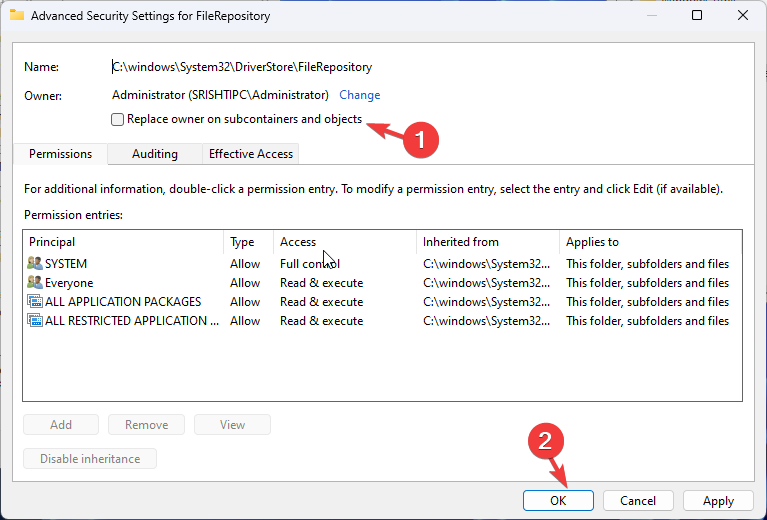
- Place a checkmark next to Replace owner on subcontainers and objects and click OK.

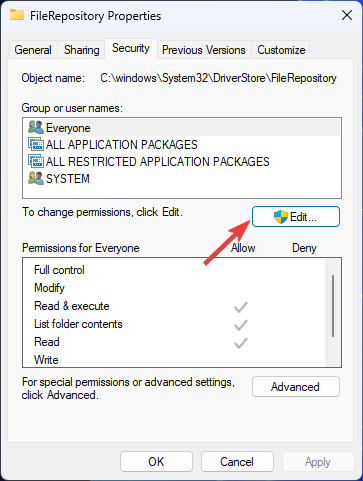
- Again, open Properties, go to the Security tab, and click Edit.
- Under Permissions for Everyone, for Full control, select Allow. Click Apply, then OK.


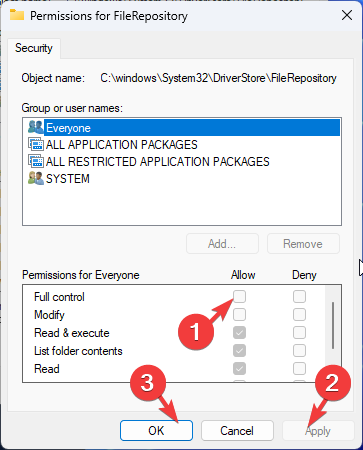
Close all the windows running on your computer and restart your machine.
5. Add local server from Print Management
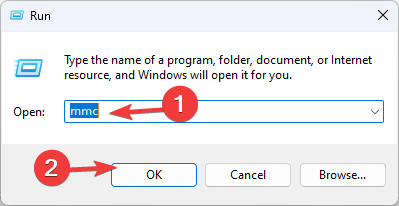
- Press Windows +R to open the Run window.
- Type mmc and click OK to open Microsoft Management Console.

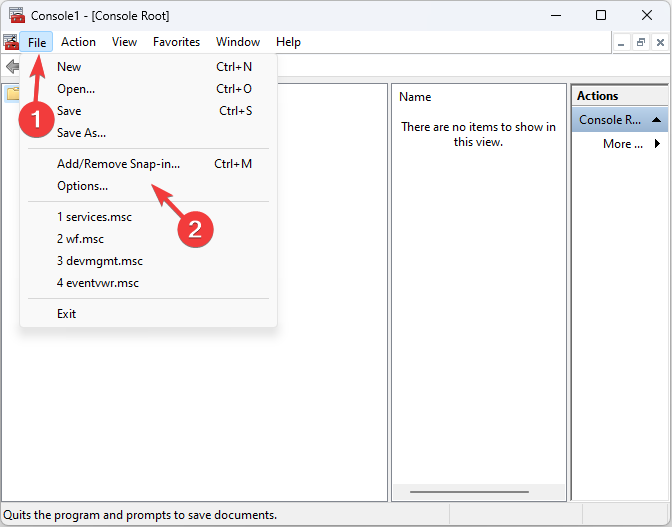
- Go to File and click Add/Remove Snap-in.
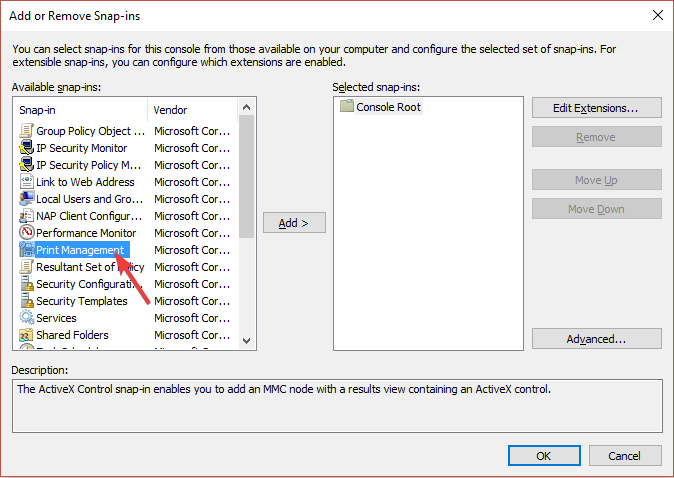
- Navigate to this path:
Print Management\Custom Filters\Drivers
- Locate the driver and delete it.

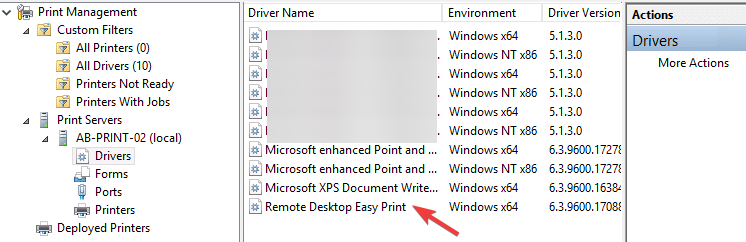
Now check if you can install the printer and drivers on your Windows.
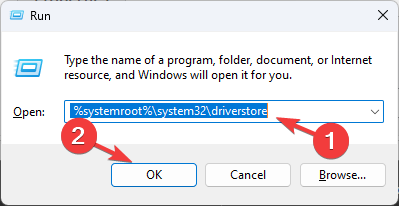
6. Rename the driver files
- Press Windows + R to open the Run window.
- Type the following path: %systemroot%\system32\driverstore and click OK.
- Locate the following files and rename them:
infcache.1
infpub.dat
infstor.dat
infstrng.dat
- If you are not able to rename them, take ownership of the files following the steps in Solution 4.3
If you are looking for solutions to fix Windows that cannot connect to the printer, we advise you to check out the informative guide.
So, these are the methods to fix the printer installation error 0x00000057. Please feel free to give us any information, tips, and your experience with the subject in the comments section below.
![]()
Fix Printer Installation Error 0x00000057 [SOLVED]: Error 0x00000057 is related to printer installation which means when you try to install a printer on your machine it gives an error code 0x00000057. The main cause of this error is outdated or corrupt drivers of the printer on your system or the printer driver is failing to install.

The problem is something like this: First, you click on add printer then you click on Add network, wireless or Bluetooth printer and the printer appears on the selection list but when you click on Add, it immediately shows an error 0x00000057 and it can’t connect to the printer.
Table of Contents
Method 1: Add a local printer through Network
1.Press Windows Key + X and select Control Panel.

2.Now select Devices and Printers then click Add a Printer.

3.Select Create a new Port and use Local Port as the type.

4.Next, enter the Network Path to the Printer (ie. \\ComputerName\SharedPrinterName) as the Port Name.

5.Now choose the printer from the list and then select replace the driver that is currently installed.

6.Select whether or not to share the printer and then select whether you want to make this a default printer or not.

7.You have successfully installed your printer without any error.
Method 2: Copy the FileRepository files from a working machine
1.Go to a working machine with the same driver installed properly (working).
2.Press Windows Key + R then type “regedit” and hit enter to open Registry Editor.

3.Now navigate to the following location in registry editor:
HKLM\System\CurrentControlSet\Control\Print\Environments\Windows NT x86\Drivers\Version-3\

4.Find the subkey of the printer driver you are having issues with, Click on it and look for “InfPath” on the right column in the registry editor. Once found, note the path.
5.Next browse to C:\Windows\System32\DriverStore\FileRepository and locate the folder indicated in the InfPath.

6.Copy the content of the FileRepository folder to a USB flash drive.
7.Now go the computer which is giving Error 0x00000057 and navigate to C:\Windows\System32\DriverStore\FileRepository.
8.If the folder is empty this means your printer driver installation failed. Next, take full ownership of the folder.
9.Finally, copy the content from the USB flash drive to this folder.
10.Again try to install the driver and see if you’re able to Fix Printer Installation Error 0x00000057.
Method 3: Reinstall the Printer and Drivers manually
1.Press Windows Key + R then type “services.msc” and hit enter.

2.Find Print Spooler service then right click on it and select Stop.

3.Again press Windows Key + R then type printui.exe /s /t2 and hit enter.
4.In the Printer Server Properties window search for the printer which is causing this issue.
5.Next, remove the printer and when asked for confirmation to remove the driver as well, select yes.

6.Now again go to services.msc and right-click on Print Spooler and select Start.
7.Finally, again try to install the Printer.
Method 4: Add local server from Print Management
1.Press Windows Key + R then type MMC and hit enter to open Microsoft Management Console.
2.Next, Click on File then select Add/Remove Snap-in.

3.After that make the following selections:
Print Management> Click Add local server> Finish> OK

4.Now expand the Print Server then Local server and finally Click Drivers.

5.Locate the driver you are having issues with and delete it.
6.Reinstall the printer and you should be able to Fix Printer Installation Error 0x00000057.
Method 5: Rename Driver files
1.Press Windows Key + R then type “%systemroot%\system32\driverstore” and hit enter.
2.Next, make sure to rename the following:
infcache.1
infpub.dat
infstor.dat
infstrng.dat

3.If you are not able to rename these files you need to take ownership of the above files.
4.Finally, again try to install the printer drivers.
That’s it you have successfully Fix Printer Installation Error 0x00000057 but if you still have any queries regarding this post feel free to ask them in the comment’s section.
На чтение 3 мин Просмотров 828
Ошибка 0х00000057 возникает в системе Windows (7, 8, 10) при установке связи с сетевым принтером. Из-за неё операция не проводится до конца и останавливается. На экране возникает окно со следующим текстом: «В ходе операции произошла ошибка. Windows не удается подключиться к принтеру».
Содержание
- Как исправить ошибку 0x00000057?
- Способ №1
- Способ №2
- Способ №3
- Способ №4
- Полезное видео
Как исправить ошибку 0x00000057?
Решение проблемы кроется не в самом принтере, а в его драйвере, который вы должны установить на свой компьютер, чтобы оба устройства хорошо функционировали в паре. Избавиться от ошибки можно четырьмя разными способами.
Способ №1
Переустановите драйвер (если он уже загружен на вашем ПК):
- Зайдите в папку, где хранятся все драйвера: C:\Windows\System32\DriverStore\FileRepository\. В случае, если вы не знаете название каталога, где находится драйвер принтера, отсортируйте его по дате. Будьте осторожны и убедитесь, что удалили нужный файл, иначе проблемы могут начаться и с другими программами.
- Если вы точно уверены в выбранной директории, то откройте диалоговое окно со списком подключённых драйверов и удалите его из списка. Это касается и х64, и х84. После попробуйте ещё раз настроить подключение к устройству.
 Этот способ не решит вашу проблему, если драйвер отсутствовал в клиентской системе. В этом случае переходите к плану «Б».
Способ №2
Для того чтобы провести эту операцию, вам понадобится компьютер, у которого уже успешно налажено соединение с сетевым принтером, к которому не может подключится «проблемный ПК».
- С помощью этого компьютера запустите редактор реестра и перейдите в его последующую ветку.
- Найдите среди большого списка название нужного вам для установки драйвера.
- Экспортируйте его в файл Reg.
- В этой же ветке найдите ключ InfPath и его значение.
- Он выведет вас на папку, которая будет находится в каталоге: C:\Windows\System32\DriverStore\FileRepository.
- Теперь вернёмся к тому ПК, где была замечена ошибка. Если вы найдёте эту папку в списке файлов, то в отличии от первой, она будет полностью пуста. Это указывает на то, что было аварийное отключение загрузки драйвера.
- Скорректируйте разрешения NTFS на данную директорию, для этого вам придётся сделать себя ее владельцем и добавить группу локальных администраторов в список Full Control.
- Перешлите Reg-файл с одного компьютера на другой, а недостающие в папке установки файлы скопируйте на проблемный ПК.
- Перезапустите службу печати. После запустите принтер. За этой время клиент скачает и заново установит драйвер с принт-сервера.
Способ №3
Даже если предыдущая инструкция вам не помогла, то используйте третий вариант решения проблемы:
- Снова посетите каталог: C:\Windows\System32\DriverStore\.
- Скопируйте в него файл infpub.dat, а затем дайте группе локальных администраторов Full Control на него. Снова попытайтесь установить сетевой притер.
Обратите внимание! Все эти инструкции по устранению проблемы действуют только на версии ОС Виндовс до версии 8.1.
В версиях следующего поколения проблема кроется уже в самом принтере. Старые устройства плохо связываются с новыми версиями обновлений. Поэтому, если его установка необходима, то есть ещё один вариант действий.
Способ №4
Переустановка ОС на версию 8.0:
- Проделайте резервное копирование информации и переустановите систему на нужную версию, в нашем случаем это 8.0.
- Установите все необходимые программы, перезагрузите ПК. Попробуйте снова подключиться к устройству. В случае с ОС версии 8.0 это должно получиться на 100%.
Полезное видео
Наглядные действия по устранению данной неполадки вы можете посмотреть на следующем ролике: