
Choosing a video and audio capture device
This page of the Video Capture Wizard lets you choose the video and audio devices you want to use for capturing video and audio.
The following options appear on this page.
Available devices
Lists the available capture devices you can use for capturing video. If you only have one video capture device attached to your computer, that device is the only one listed.
For many video capture devices, the name of the device is listed according to the hardware manufacturer’s name and device name. For example, when capturing video from an analog camera attached to an analog capture card on your computer, you would choose the analog capture card as the capture device for this option.
Video input source
Lists the available input connection lines based on the number of lines available for the selected video capture device For example, if an analog capture device has multiple input connections, such as an S-video connection and a composite video connection, you need to choose which input connection line to use for capturing video. If only one input line can be used for capturing by the device, that line is selected and this option does not appear.
This option is not available for a DV camera connected to an IEEE 1394 port.
Configure
Click to change the configuration of the selected video capture device. The resulting dialog box depends on the specific capture device you are using. For more information about the options available in the resulting Configure Video Capture Device dialog box, see Understanding the Configure Video Capture Device dialog box.
This option is not available for a DV camera connected to an IEEE 1394 port.
Audio device
Lists the available audio capture devices you can use for capturing audio. If you have only one audio capture device, such as your default sound card, that device is selected automatically.
This option is available only for analog devices.
Audio input source
Lists the available connection input lines based on the number of input connections available for the selected audio device. For example, if you have a microphone attached to the microphone line input of your computer, you would choose Microphone as the audio input source.
This option is available only for analog devices with multiple line inputs.
Input level
Adjusts the volume of the captured audio.
When choosing the capturing level, select an input level toward the upper part of the meter without entering the red-colored area, which is marked by the second line from the top. If the capturing level is set too low, the captured audio may be too low to be heard. Conversely, if the capturing level is set too high, the captured audio may be too loud and distorted.
For some devices, such as a DV camera connected to an IEEE 1394 port, the capturing volume cannot be adjusted by dragging the audio level slider.
 Note
Note
- This page of the Video Capture Wizard does not appear when a single DV device connected to an IEEE 1394 port is the only video capture device found on the computer.
Related topics
- Capturing video
© 2000-2002 Microsoft Corporation. All rights reserved.
Не забываем про начало статьи
К каждому фильму можно добавить две звуковые дорожки, первая будет содержать звук, записанный с помощью микрофона видеокамеры, цифрового фотоаппарата или Web-камеры. Другая дорожка может содержать, например, фоновую музыку, звуковые эффекты или дикторское сопровождение. В то время как первую дорожку нельзя с помощью программы Windows Movie Maker отделить от видео, второй дорожкой вы можете распоряжаться по своему усмотрению, например обрезать, расширять и т.д. Различить звуки двух типов можно с помощью панели Шкала времени, где дорожка Звук содержит звуки, записанные вместе с видео с помощью микрофона, а дорожка Звук или музыка — добавленные к видеоклипам файлы в формате MP3 или WMA.
Итак, чтобы добавить к видеоклипу музыкальное или аудиосопровождение, вам понадобится файл, импорт которого поддерживается программой Windows Movie Maker. Чаще всего используются файлы в форматах MP3 и WMA. Импортировав файл в коллекцию, перетащите его значок на дорожку Звук или музыка.
Чтобы поместить файл более точно, перейдите к нужному кадру, выберите кнопку Пауза и перенесите значок аудиофайла непосредственно на зеленую линию, указывающую на текущий кадр клипа. В то время как видеоклип можно добавить после других клипов или разместить между двумя определенными клипами, звуковой файл можно добавить в любое место фильма.
Ничто не мешает вам добавить аудиофайл с различными звуковыми эффектами, например, взрывами, смехом, шипением и т.д. Файлы с такими эффектами можно как загрузить из Интернета, так и создать самостоятельно с помощью любого программного синтезатора.
Обратите внимание на тот факт, что добавляемые звуковые файлы не синхронизируются с видеоклипами. Если вы добавили новый видеоклип или обрезали/изменили уже существующие, то местоположение звукового файла вам придется изменить вручную, в зависимости от того, в каком эпизоде фильма требуется звуковое сопровождение.
Добавление голоса
Как еще можно сделать фильм более эффектным? Конечно, добавив к нему голосовое сопровождение! Что может быть более наглядным, чем ваш голос, описывающий все происходящие с вами приключения на далеком солнечном пляже? Чтобы добавить ваш голос к фильму, не требуется никакого дополнительного оборудования или программ, кроме микрофона. Все остальное сделает программа Windows Movie Maker.
В первую очередь, переместите зеленый указатель на панели Шкала времени на тот кадр, с которого начнется голосовое сопровождение. Если на дорожке Звук или музыка для этого кадра уже находится определенный файл, переместите или удалите его, поскольку нельзя записать новый файл поверх уже существующего.
Теперь выберите команду Сервис>Шкала времени комментария, чтобы открыть панель, показанную далее.

Щелкните на ссылке Показать параметры и проверьте, что в меню Звуковое устройство выбрана правильная звуковая карта. Убедитесь в том, что микрофон подключен и работает. Для этого произнесите в него несколько фраз и следите за индикатором Уровень входа. Если индикатор все время переходит в красную зону, переместите на одно деление ползунок, расположенный рядом с индикатором. Также можно уменьшить чувствительность микрофона в параметрах звуковой карты или просто отодвинуться от микрофона чуть дальше.
Бывает ситуация, когда на дорожке Звук или музыка уже находятся другие звуковые файлы. В таком случае установите флажок Ограничить закадровый текст, чтобы слишком длинная запись не сместила в правую часть дорожки Звук или музыка все другие расположенные на ней файлы. Наконец, установите флажок Выключить динамики, чтобы в процесс записи не вмешивались посторонние звуки, и ваш голос звучал разборчиво и ясно.
Обязательно изучите параметры настройки микрофона в свойствах вашей звуковой платы, поскольку нередко там можно найти функции усиления чувствительности микрофона, шумоподавления, усиления голоса и многие другие.
Разобравшись со всеми параметрами, щелкните на кнопке Запустить и начните комментировать видео, воспроизведение которого будет запущено одновременно с записью, в окне предварительного просмотра. Закончив диктовку, щелкните на кнопке Остановить. Теперь укажите в открывшемся окне папку для хранения только что созданного звукового файла с голосовым сопровождением. Разместите звуковой файл в одной папке с нужным видеофайлом, после чего перетащите значок файла на требуемую позицию дорожки Звук или музыка. Теперь перейдите в начало видеоклипа и запустите воспроизведение, чтобы проверить, все ли записалось правильно.
Что делать, если звук, записанный изначально вместе с видео, перетягивает на себя одеяло и заглушает фоновую музыку или записанный голос? Помочь в этой беде вызовется небольшое окно Уровень звука, для открытия которого выберите команду Сервис>Уровень звука. В открывшемся окне баланс между звуком из фильма и добавленным звуком или музыкой будет равен 50/50. Перетащите ползунок в нужную сторону, чтобы усилить один звук и уменьшить другой, затем проверьте полученный результат на определенном видеофрагменте со звуковым сопровождением. Всего несколько попыток, и надлежащий баланс будет достигнут.
Осталось сохранить проект, и вы готовы к следующему этапу — добавлению названия и титров.
Movie Maker позволяет редактировать не только видеоклипы, но и аудиозаписи. Необходимо выбирать такие треки, которые будут поддерживаться редактором. Зачастую используют форматы WMA и MP3. О работе с музыкальным оформлением нужно ознакомиться детальнее.
Содержание
- Как работать со звуком в Windows Movie Maker
- Шаг 1: перенос аудио
- Шаг 2: добавление голоса
Сначала необходимо импортировать нужные отрывок аудио в программу, перетянув его на соответствующую ленту на раскадровке.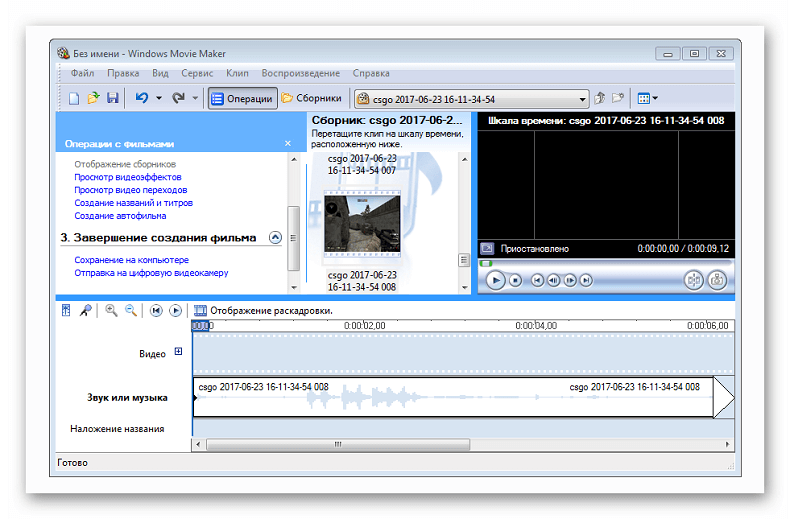
Шаг 1: перенос аудио
Чтобы вставить элемент с точностью, найдите нужный кадр, остановите произведение и перенесите иконку аудио, добавленного ранее, на зеленую строку, которая отображает текущий кадр видео. Видеофрагменты вставляются после любого аналогичного элемента или же между некоторыми роликами, тем временем аудио способны находиться в любой части проекта.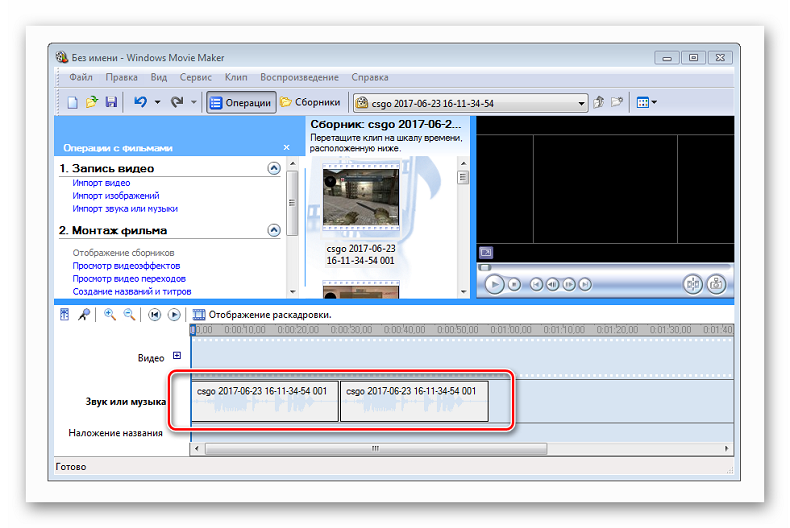
Добавлять можно аудио любого характера, это может быть пение, выстрелы, закулисный смешок и прочее. Скачать подобные аудиодорожки можно как из глобальной сети, так и сгенерировать вручную через электронные синтезаторы и специальные программы.
Файлы звука не стабилизируются с добавленными видеороликами, поэтому если вы видоизменили отрывок фильма, или прибавили к нему новый, то необходимо самостоятельно перераспределить звуковую дорожку в зависимости от того, где она должна прозвучать в клипе.
Шаг 2: добавление голоса
Работа со звуком в Windows Movie Maker подразумевает вставку сопровождающих звуковых комментариев. Пользователям даже нравится, когда их собственный голос описывает происходящее на отснятых роликах. Чтобы добавить свой голос, не нужно устанавливать другие программы или использовать сложное стороннее оборудование. Вполне хватит микрофона, остальное возьмет на себя редактор WMM.
Бывают ситуации, когда звук не записывается или в Муви Мейкере нет звука на видео. В таких случаях стоит проверить подключение микрофона и наличие всех необходимых звуковых кодеков в ОС.
Изучите опции своего микрофона в свойствах звуковой кары, поскольку там имеются дополнительные возможности для усиления чувствительности оборудования, снятия шума, усиления звука и прочее.
Разобравшись с настройками, клацните кнопку «Запустить» и спустя секунду начните комментировать видео, которое начнет воспроизводиться одновременно с нажатием клавиши. В конце щелкните остановить и сохраните записанный звуковой файл отдельно.
0
0
голоса
Рейтинг статьи
by Ivan Jenic
Passionate about all elements related to Windows and combined with his innate curiosity, Ivan has delved deep into understanding this operating system, with a specialization in drivers and… read more
Updated on
- Some users complained that when they add music to their Movie Maker project, there is no music available.
- If you’re having audio problems on Windows 10, disable a particular feature completely.
- To make a Movie Maker project audible, you need to change your sound settings.
- You can solve the problem simply by installing the necessary codecs. Read on for more details!
Movie Maker is a simple tool that allows you to create and edit videos, but some users report that they can’t hear the audio in their Movie Maker project. This looks like an unusual problem, but fortunately for you, there are few solutions available.
Users report that when they add music to their Movie Maker project, the video works without any problems but there is no music available. This is an unusual problem, and if you’re using Movie Maker on regular basis this could be a big problem for you. If you’re having this issue with Movie Maker you might want to have a closer look at our solutions below.
Movie Maker audio not working, how to fix it??
Movie Maker is popular video editing software, but some users reported audio problems while using Movie Maker. Speaking of audio issues, here are some common problems that users reported:
- Windows Movie Maker no sound on imported video – This is a common problem, but in most cases you can fix it simply by restarting the Windows Audio service.
- Windows Movie Maker audio problems, no sound after saving, music not playing, cannot hear sound – These are some common audio problems that can occur with Windows Movie Maker, but you should be able to fix this problem by using one of our solutions.
- Windows Movie Maker mkv no sound – If you’re having this problem only with MKV files, the issue might be the lack of video codecs. Simply install a codec pack and the problem will be resolved.
Solution 1 – Restart the Windows Audio service
According to users, if you’re having audio problems in Movie Maker, the issue might be your Windows Audio service. Sometimes there might be some issues with this service, and that can cause problems with audio in Movie Maker. To fix the problem, you just have to restart this service. This is relatively simple to do, and you can do it by following these steps:
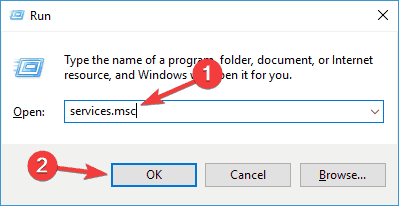
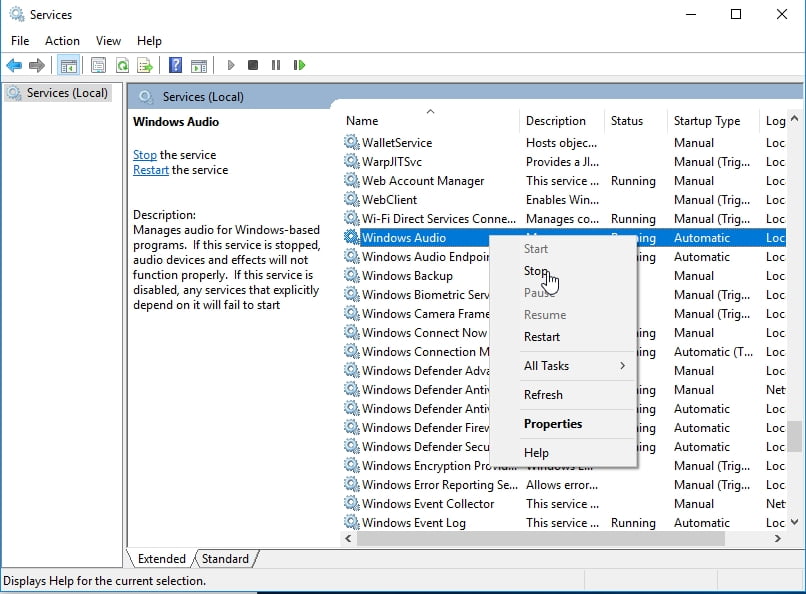
- Press Windows Key + R and enter services.msc. Now press Enter or click OK.

- When Services window opens locate Windows Audio in list of services.
- Right-click the service and choose Stop from the menu.
- Right-click the same service again but this time choose Start from the menu.
Sound should be now working in Movie Maker.
There’s also a different way to do this:
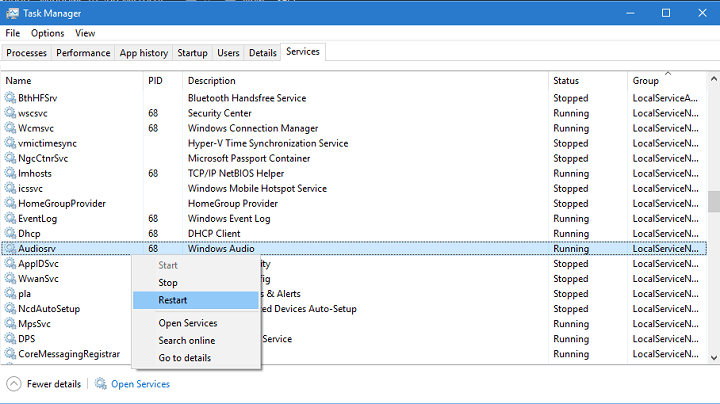
- Start Task Manager. You can do that by pressing Ctrl + Shift + Esc on your keyboard.
- Go to Services tab.
- Locate AudioSrv (Windows Audio), and right-click it.

- Choose Restart from the list of options and after 10 seconds this service should be restarted.
Although this is a working solution, you’ll have to do it every time you start a Movie Maker project or restart your computer.
Solution 2 – Turn off DTS Sound
If you’re having audio problems in Movie Maker on Windows 10, the issue might be DTS sound. This is a useful feature, but it can sometimes cause this error to appear. To fix the issue, users are suggesting to disable this feature completely. To do that, follow these steps:
- In the Search bar type DTS sound and click DTS Sound from list of results.
- When the DTS Sound window opens click the power button icon on the left to turn it off. Now the DTS Sound window should become gray meaning that it has been turned off.
- Go back to Movie Maker and try if the audio works.
If you need to use DTS sound you can just set it to internal from the main screen instead of turning it off completely. It has reported that this also resolves the issue with Movie Maker.
How we test, review and rate?
We have worked for the past 6 months on building a new review system on how we produce content. Using it, we have subsequently redone most of our articles to provide actual hands-on expertise on the guides we made.
For more details you can read how we test, review, and rate at WindowsReport.
Solution 3 – Use WMV format instead
This might not be the most practical solution but users have reported that WMV files work without any problems in Movie Maker, so if you’re having any issues with sound, convert your files to WMV format and then use them in Movie Maker. This might not be the fastest or the most elegant solution, but users claim that it works.
In order to convert your files to the WMV format, you’ll need appropriate software. There are many great converters available on the market, but if you want a simple but reliable converter, we suggest you try Any Video Converter Ultimate.
In addition, some users are suggesting converting .mp4 file to .mp4 file in order to solve the audio issues. We know that this sounds unusual, but it works according to users. Alternatively, you can convert the file to .wmv format and then convert it to .mp4.
Some users also reported issues while using .mp3 and . wma files in Movie Maker. However, you might be able to fix this issue by converting those files to .wav format.
Solution 4 – Repair Windows Live Essentials
Movie Maker is a part of Windows Live Essentials, and if you’re having audio problems in Movie Maker, perhaps your installation is damaged. To fix the problem, users are recommending repairing your Windows Live Essentials installation. To do that, follow these steps:
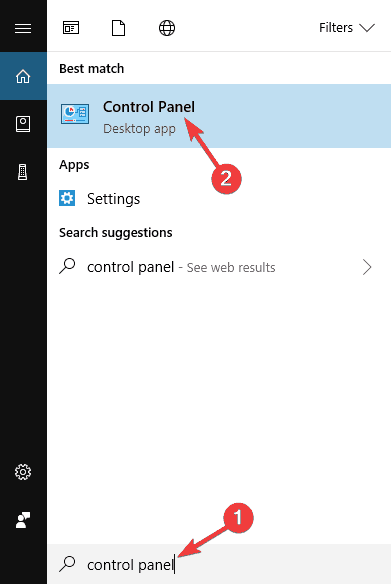
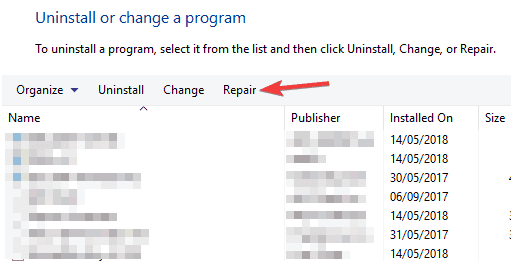
- Press Windows Key + S and enter control panel. Select Control Panel from the list of results.

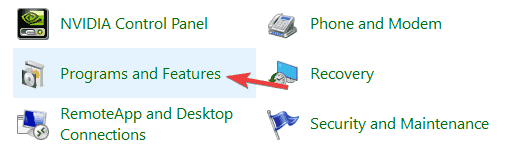
- When Control Panel opens, go to Programs and Features section.

- Now select Windows Live Essentials from the list and click Repair.

- Follow the instructions on the screen to complete the repair process.
Once the Windows Live Essentials installation is repaired, check if the problem is still there. If the issue is still present, perhaps you should try reinstalling Windows Live Essentials. You can do that right from Control Panel, but that’s not always effective.
Regular uninstall processes can leave certain files and registry entries behind, and those files can cause problems in the future.
However, you can completely remove Windows Live Essentials from your PC with the help of a third-party utility such as CCleaner.
Use the built-in uninstall feature to remove the app, and then the PC cleaning and registry optimization tools to make sure there are no leftovers.
Once you remove Windows Live Essentials using this tool, install Movie Maker once again and the issue should be permanently resolved.
Solution 5 – Install a codec pack
Your PC might not be able to play certain video files unless you have the proper codecs available, and in some cases Movie Maker won’t play any audio. This can be a big problem, but you can fix the issue simply by installing the necessary codecs.
According to users, they managed to fix this issue simply by using the K-Lite codec pack, so if you’re having any problems with Movie Maker, install this codec pack and the issue should be resolved.
Solution 6 – Install QuickTime
According to users, they experienced some Movie Maker audio issues on their PC, but they managed to fix the problem by installing QuickTime. This is a multimedia player, but it comes with certain video codecs, and once you install it, you should install the necessary codecs as well.
Once the codecs are installed, the problem with audio in Movie Maker should be resolved.
Solution 7 – Change your sound settings
If you don’t have audio in Movie Maker, the problem might be your sound settings. According to users, sometimes you need to have Exclusive Mode disabled in order to get sound in Movie Maker. To change your sound settings, just do the following:
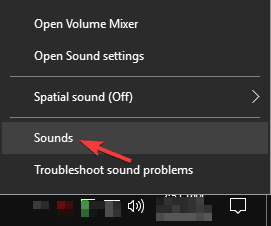
- Right-click the Sound icon in your Taskbar. Now choose Sounds from the menu.

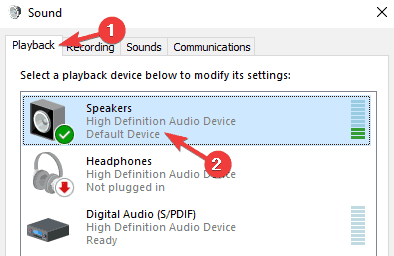
- Go to the Playback tab and double-click your current audio device. In our case that’s Speakers, but it might be different for you.

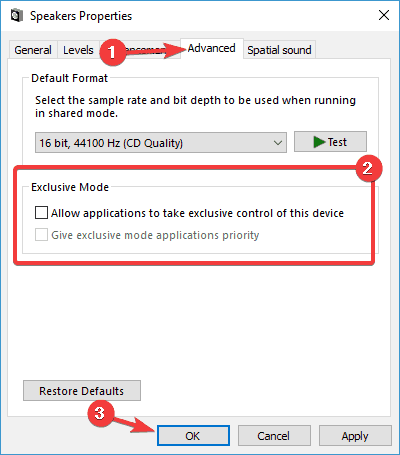
- Go to Advanced tab and disable all option in Exclusive Mode section. Now click Apply and OK to save changes.

After making these changes, the issue with audio in Movie Maker should be completely resolved.
Solution 8 – Run the application in Compatibility Mode
According to users, sometimes issues with audio in Movie Maker can occur due to compatibility issues. However, you can fix this issue easily by setting Movie Maker to run in compatibility mode. In case you don’t know, Windows has a Compatibility Mode feature that allows you to run old applications.
To run Movie Maker in Compatibility Mode, you just need to do the following:
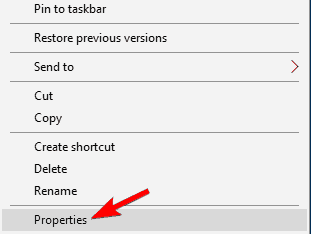
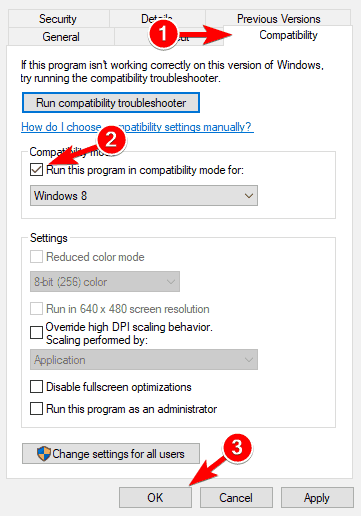
- Locate the Movie Maker shortcut, right-click it and choose Properties from the menu.

- Now navigate to Compatibility tab and check Run this program in compatibility mode for. Select any older version of Windows and click Apply and OK to save changes.

After doing that, try to start the application again. If the problem still occurs, you might have to experiment with your settings and try different versions of Compatibility Mode.
Solution 9 – Try using a different video editing tool
If you’re keep having audio problems in Movie Maker, perhaps you should consider switching to a different video editing software. Even though many users are familiar and comfortable with Movie Maker, you should know that Movie Maker is older software, and issues such as this one can occur.
If you’re frequently editing videos, perhaps you should consider switching to a different video editing software. CyberLink PowerDirector 16 offers great features, and it’s great if you want to perform smaller adjustments or create professional videos. If you’re looking for a proper Movie Maker replacement, be sure to try this tool.
Audio problems in Movie Maker can be annoying, but you should be able to fix most of them using one of these solutions.
![]()
Contents
- Sound check: Why is music not playing in Movie Maker on Windows 10?
- What’s the matter with Windows 10?
- 3 Movie Maker audio problems to watch out for
- How to resolve Windows Movie Maker audio problems in Windows 10?
Sound check: Why is music not playing in Movie Maker on Windows 10?
Windows Movie Maker is an easy-to-use, intuitive video editor that users can use to edit their audio or video and then share it with their friends online by uploading it to sites such as YouTube, Vimeo, and Facebook. But why is music not playing in Movie Maker sometimes? This is only one of common audio problems in Movie Maker on Windows 10, and there are different solutions to solve these issues.
What’s the matter with Windows 10?
Windows 10 is a decent operating system for the most part, but there can be a number of issues with it that range from teething problems to those that have persisted through time.
Audio problems are among the most common issues, even prompting Microsoft to release a series of short troubleshooting videos to help with the sound problems a few years back. Those videos include running the Audio Troubleshooter, turning off Sound Enhancements, using Device Manager to look for audio issues, and changing the default playback format.
At any rate, Movie Maker for Windows 10 has main features that include adding videos and photos, adding music, recording webcam videos, and making snapshots. Users can also add a new title before the selected item, add text or caption, and add credits.
On the animation front, it enables you to create Transitions such as blue, flip, crossfade, pixelate, and cinematic. It also allows you to edit visual effects and change aspect ratio settings, to cite a few.
3 Movie Maker audio problems to watch out for
Some users have reported audio problems while using the popular video editing software. Here are three widely documented issues that you can learn how to fix:
- No sound on imported video issue in Windows Movie Maker – While a common issue, this can be usually fixed simply by restarting the Windows Audio service.
- No sound with MKV issue – If the problem involves only MKV files, it’s likely due to a lack of video codes. The trick is to install a codec pack.
- No sound after saving / music not playing issue – These Windows Movie Maker audio problems can be addressed through one of the solutions we’re outlining below.
How to resolve Windows Movie Maker audio problems in Windows 10?
Why is music not playing in Movie Maker? Why can’t you hear any sounds? Here’s an array of solutions to try:
- Try restarting the Windows Audio service – This is a fairly common fix whenever audio problems in Movie Maker take place. Here are the steps:
- Press Windows Key + R and then enter services.msc. Afterwards, press the Enter key or click OK.
- Once the Services window opens, look for Windows Audio in the list of services.

- Right-click the service, choose Stop, and right-click the service again to choose Start from the menu.
Alternatively, you may start Task Manager by pressing Ctrl + Shift + Esc on the keyboard. Follow the Services tab, and locate AudioSrv (Windows Audio). Right-click on it. Look for Restart in the options, and the service should be restarted in about 10 seconds.
While a handy solution, this fix should be performed every time you begin a Movie Maker project or restart your PC.
- Sticking to WMV format instead – Some users having issues with sound have reported that they converted their files to WMV format for use in Movie Maker and it worked fine. There is plenty of software out there that convert to this format. Some have also reported that they converted their file to .wmv and then to .mp4 format and it also turned out okay.
- Turning off DTS sound – The DTS sound feature, while useful, can cause an audio problem to occur sometimes. To altogether disable the feature, type DTS sound in the Search Bar and then click DTS Sound from the result list. Once the DTS Sound window opens, click the power button icon on the left. The window should turn gray, which means it’s been turned off. Try the audio in Movie Maker to see if the fix works.
- Installing a codec pack – Your computer might be unable to play certain video files unless the proper codecs are available. This can be tackled by installing the needed codes.
- Changing the sound settings – It might be the sound settings acting up if there’s no audio in Movie Maker. Sometimes it might take disabling Exclusive Mode to get the sound working right. Do this through the following steps:
- In the Taskbar, right-click the Sound icon and choose Sounds from the menu.
- Proceed to the Playback tab and then double-click the current audio device.
- Go to the Advanced tab. Disable all options under Exclusive Mode, click Apply and then OK to save the changes.
If the problem persists, it might be smart to try switching to different video editing software. Note that Movie Maker is an older tool and might be more prone to these issues than more recent counterparts.
While fixing common audio problems, it’s important to make sure the computer isn’t weighed down by errors and is properly optimized for maximum performance. Powerful tools like Auslogics Driver Updater update all drivers on your PC in a single click in order to prevent device conflicts and ensure smooth hardware operation. Sometimes these audio glitches on Windows 10 are a way for hardware or devices in your system to cry out for help, throwing up red flags because they’re no longer working smoothly and efficiently.
This article provides five popular and effective ways on how to fix the No sound on imported video issue in Windows Movie Maker as well as other common audio problems in Windows 10. Good luck, and we hope one of these solutions work!
Do you like this post? 🙂
Please rate and share it and subscribe to our newsletter!
9 votes,
average: 4.00 out of
5
Loading…