Виндовс Муви Мейкер – редактор, позволяющий создавать видеоклипы, корректировать аудиодорожки и создавать видео-презентации из картинок. В нем можно добавлять текст, несложные анимации и переходы. Но сначала неопытный пользователь должен понять, как открыть Муви Мейкер.
Содержание
- Как скачать и открыть Windows Movie Maker
- Шаг 1: загрузка последних версий
- Шаг 2: открытие программы
Разумеется, сначала необходимо загрузить программу на свой компьютер, если ее там нет. В связи с тем, что редактор больше не поддерживается компанией Майкрософт, в новых версиях операционных систем Муви Мейкер не включена в комплект при поставке.
Шаг 1: загрузка последних версий
Вовсе необязательно скачивать программу с официального источника, тем более что на данный момент ее уже нельзя скачать оттуда. Можно загрузить установочный архив с любого известного софт-портала и запустить его.
Ни в коем случае нельзя скачивать программу с веб-ресурсов, предлагающих юзерам сперва отправить проверочное смс или регистрировать новый аккаунт. Подобные проекты сделаны для того, чтобы снимать деньги за предоставленные услуги, при этом, шанс получить программу – весьма мал. Обязательно стоит проверять инсталлятор или архив на наличие вирусов с помощью соответствующего защитного ПО.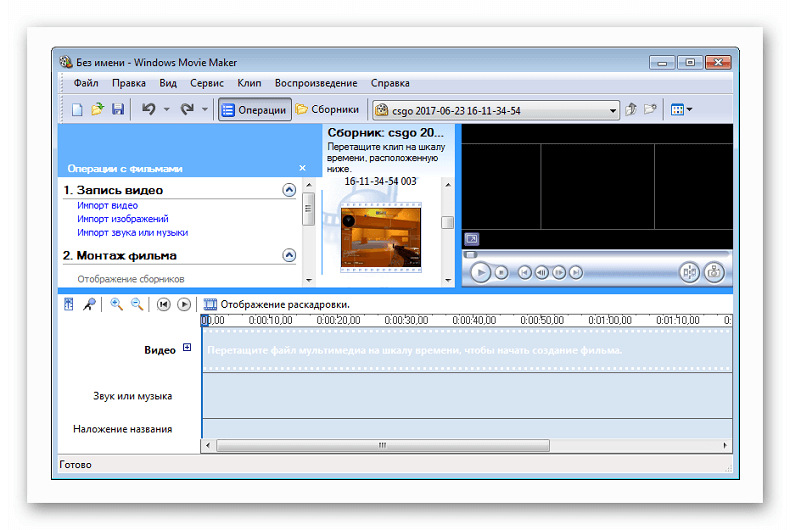
Лучшими версиями принято считать 2.6 (популярное) и 6.0. Данные программы входят в состав Windows Essentials.В них есть множество полезных новшеств, не доступных ранее. К примеру, все созданные проекты после сохранения можно сразу же отправлять на личные Ютуб-канал или в сервис Vimeo.
Также добавлены интересные видеоэффекты и переходы. Стоит обратить внимание на переработанное оформление, возможно, русский язык и не поддерживается, но интерфейс настолько прост, что разобраться в нем даже новичку – не составит труда. Особенно легко будет тем, кто уже пользовался редактором, и научился создавать качественные клипы.
Шаг 2: открытие программы
Какой вопрос возникает после того, как удалось установить Windows Movie Maker? Как запустить его. Муви Мейкер имеется в составе Виндовс XP и Виста, но в более новых версиях ее уже нет. Но пользователи считают, что это было сделано зря – софт очень удобный для рядового юзера.
После установки инсталлятора есть несколько вариантов открытия WWM: перейти к папке, в которую установлена; щелкнуть по ярлыку на рабочем столе, если он есть, либо же найти соответствующий пункт в меню «Пуск».
В первом случае стоит запомнить путь, куда будет установлен редактор, и по завершению процесса инсталляции перейти в папку, найти файл с названием редактора расширением .exe и дважды щелкнуть мышкой. После этого подождать, пока появится новое окно.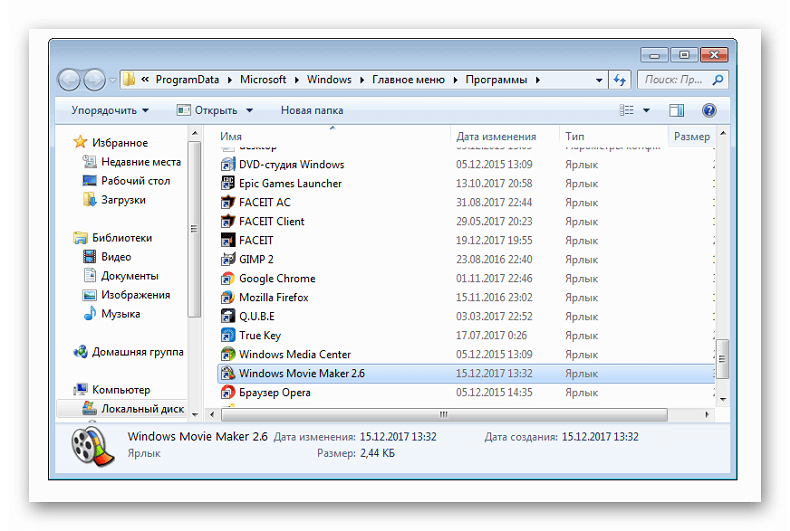
Как открыть программу с рабочего стола – знает любой пользователь. А вот чтобы открыть ее через «Пуск», необходимо нажать на значок окошка Виндовс в левом нижнем углу (или клавишу Windows), перейти во вкладку «Все программы» и отыскать название редактора среди показанных папок, после чего нажать на ярлык редактора.
Таким образом, вы сможете открыть не только Муви Мейкер, но и любую другую программу.
( 1 оценка, среднее 5 из 5 )
-
Home
-
MovieMaker
- [5 Ways] How to Open Windows Movie Maker Windows 11/10/8/7?
By Helen | Follow |
Last Updated
This post conceived on MiniTool official website mainly introduces five ways to open Windows Movie Maker in Windows 11 operating system (OS). Those methods also apply to Windows 10/8/7. Besides, it offers some advice on dealing with Windows Live Movie Maker will not open issues.
Previously, we have learned whether Windows 11 has Movie Maker built-in and where to download and manually install Movie Maker on your computer. Here, let’s see how to open this tool in various ways.
#1 How Do I Open Windows Movie Maker Through Search?
In the first place, you can take advantage of the Windows Search utility to help you launch the Windows Movie Maker application.
- Click on the magnifier icon in the taskbar.
- Input “Windows Movie Maker” in the top column.
- Press Enter.
- Find and click on the best match in the search result.
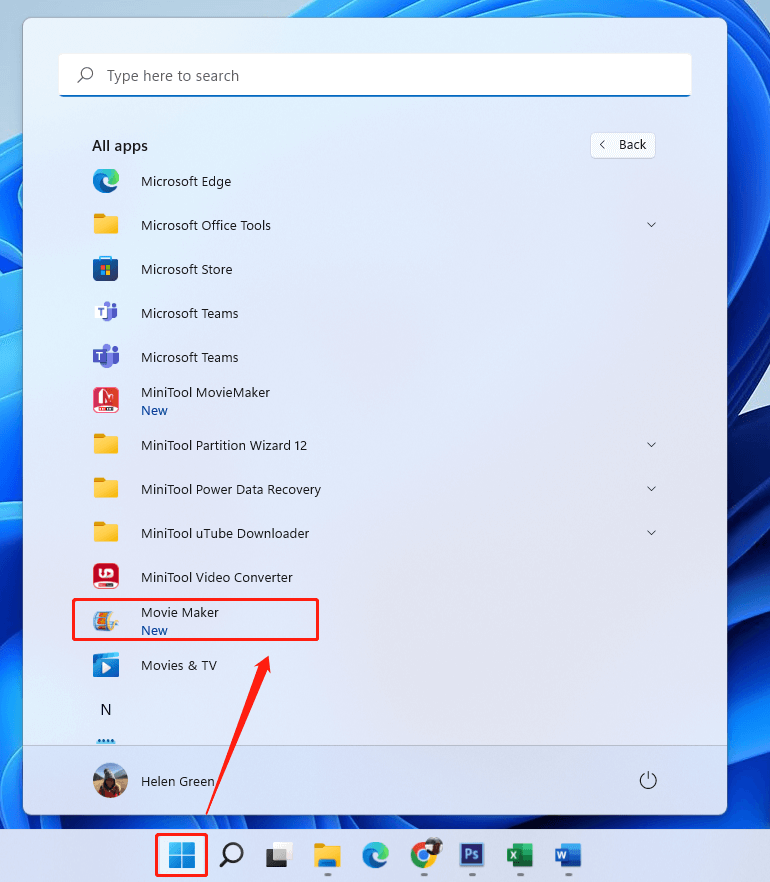
#2 How to Open Windows Movie Maker in Windows 11 from Start?
Secondly, you are able to launch Windows Movie Maker from the Windows Start menu.
- Click on the Windows icon in the taskbar.
- In the new popup, click All apps in the top right corner.
- Scroll down the list to find Movie Maker.
- Click on the program to trigger it.
#3 Launch Windows Movie Maker with Run Dialog
Thirdly, you can rely on the Windows Run command to assist you in opening Movie Maker.
- Open the Windows Run box.
- Type “moviemaker.exe” or just “moviemaker” in the Run box.
- Press Enter on your keyboard or click OK.
#4 Trigger Windows 11 Movie Maker in File Explorer
Fourthly, you can try to open Windows Movie Maker in Windows File Explorer. Simply, launch Windows Explorer, key in “moviemaker” or “moviemaker.exe” in the address column, and press Enter.
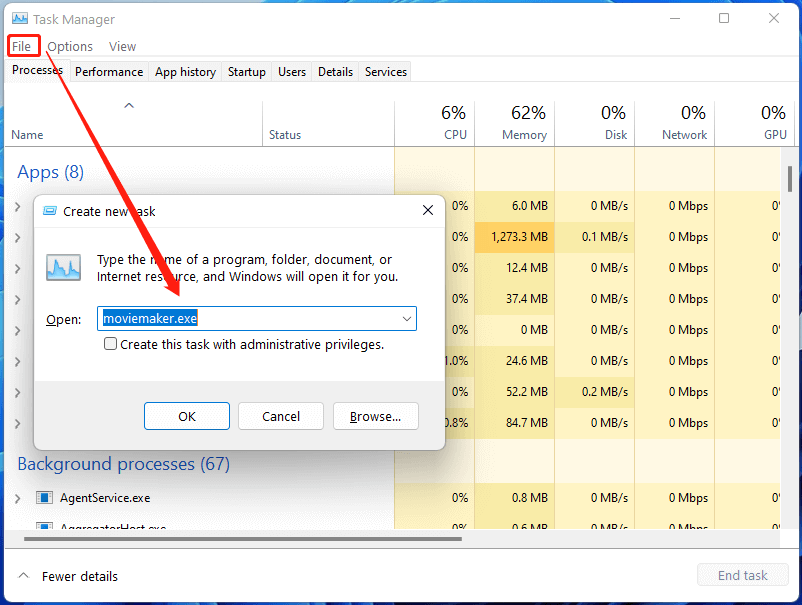
#5 Open Windows Movie Maker Windows 11 via Task Manager
Finally, you can make use of Windows Task Manager to launch the Movie Maker software.
- Right-click on the Start in Taskbar and select Task Manager in the pop-up Quick Menu.
- When Task Manager launches, click File > Run new task.
- In the new window, type “moviemaker.exe” or “moviemaker”.
- Click the OK button or press Enter.
How to Fix Windows Movie Maker Won’t Open Problem?
If you cannot open Windows Movie Maker with all the above methods, you can try the following solutions.
- Restart your computer.
- Make sure your PC meets the minimum system requirements for Windows Movie Maker.
- Update graphics or video card drivers.
- Uninstall and reinstall Windows Movie Maker.
- Scan for and fix corrupted system files with sfc /scannow.
- Run Windows Movie Maker in compatibility mode.
These applications are completely compatible with Windows 11/10/8.1/8/7.
MiniTool MovieMaker
An easy-to-use video editing software without watermarks and limits. The embedded templates enable you to quickly make personal slideshows and share them with your friends!
MiniTool MovieMakerClick to Download100%Clean & Safe
MiniTool Video Converter
Quickly convert videos and audio from one file format to another to apply to more devices. It supports 1000+ popular output formats and batch conversion. Besides, it can also record PC screens without any watermark and download YouTube videos.
MiniTool Video ConverterClick to Download100%Clean & Safe
About The Author

Position: Columnist
Helen Graduated from university in 2014 and started working as a tech editor in the same year. Her articles focus on video creation, editing, and conversion. She also has a good knowledge of disk management and data backup & recovery. Through an in-depth exploration of computer technology, Helen has successfully helped thousands of users solve their annoying problems.
Windows Movie Maker — это удобная программа для создания и редактирования видео на компьютере. Она позволяет сделать видеомонтаж, добавить титры, эффекты и многое другое. Если у вас возникли сложности с настройкой или использованием данной программы, не волнуйтесь, мы подготовили для вас подробное руководство.
Первый шаг в настройке Windows Movie Maker — это установка программы на ваш компьютер. Вы можете скачать ее с официального сайта или воспользоваться инсталлятором в составе операционной системы. После установки запустите программу и начните настраивать ее под свои нужды.
Далее настройте параметры проекта. Выберите соответствующие настройки видео-формата, разрешения, качества и предпочитаемого языка. Также можно задать длительность проекта и добавить настройку автоматического сохранения. Помните, что выбранные настройки могут влиять на работу программы и качество результирующего видео.
Важно отметить, что Windows Movie Maker поддерживает множество форматов видео и аудио файлов, поэтому не забудьте проверить, поддерживаются ли нужные вам форматы перед началом работы.
Кроме того, вам потребуется настроить медиабиблиотеку. Добавьте свои медиафайлы, такие как изображения, видео и аудио, в библиотеку программы. Вы также можете импортировать мультимедийные файлы с камеры или других устройств. После добавления файлов проведите базовую настройку, например, сортировку, редактирование, удаление исходных файлов.
Содержание
- Установка и запуск Windows Movie Maker
- Загрузка и установка программы
- Запуск Windows Movie Maker
- Основные настройки приложения
- Создание и сохранение проекта
- Настройка видео и аудио параметров
Установка и запуск Windows Movie Maker
1. Проверьте системные требования: прежде чем установить Windows Movie Maker, убедитесь, что ваш компьютер соответствует минимальным системным требованиям. Они могут быть разными для разных версий Windows, поэтому обратитесь к официальным руководствам или источникам для получения актуальной информации.
2. Скачайте Windows Movie Maker: перейдите на официальный сайт Microsoft или другую надежную платформу для загрузки программного обеспечения и найдите страницу загрузки Windows Movie Maker. Нажмите кнопку «Скачать» и сохраните установочный файл на вашем компьютере.
3. Запустите установку: после завершения загрузки установочного файла Windows Movie Maker найдите его в папке загрузок компьютера и дважды кликните на нем. Следуйте инструкциям мастера установки, выберите путь установки и дождитесь окончания процесса установки.
4. Запуск Windows Movie Maker: после завершения установки найдите ярлык Windows Movie Maker на рабочем столе или в меню «Пуск». Щелкните по ярлыку, чтобы запустить программу.
5. Начните использовать Windows Movie Maker: после запуска программы вы попадете в главное окно Windows Movie Maker. Отсюда вы можете начать создавать и редактировать свои видео.
| Преимущества использования Windows Movie Maker | Недостатки использования Windows Movie Maker |
|---|---|
| Простой и интуитивно понятный интерфейс | Ограниченный набор функций и возможностей |
| Бесплатное программное обеспечение | Не поддерживает некоторые форматы видео и повышенное качество |
| Возможность добавления эффектов, переходов и звуковых дорожек | Не предлагает продвинутых инструментов для профессионального редактирования видео |
| Интеграция с другими программами и сервисами Microsoft | Не работает на новых версиях Windows |
Загрузка и установка программы
Для начала работы с Windows Movie Maker вам необходимо загрузить и установить программу на ваш компьютер. Вот пошаговая инструкция:
Шаг 1: Откройте ваш веб-браузер и перейдите на официальный сайт Windows Movie Maker.
Шаг 2: На сайте найдите раздел «Скачать» или «Загрузка» и нажмите на соответствующую кнопку.
Шаг 3: Выберите версию программы, которая подходит для вашей операционной системы, и нажмите на ссылку для скачивания.
Шаг 4: После завершения загрузки откройте установочный файл программы.
Шаг 5: Следуйте указаниям мастера установки. Примите условия лицензионного соглашения и выберите папку для установки программы.
Шаг 6: Нажмите на кнопку «Установить» и дождитесь завершения процесса установки.
Шаг 7: После завершения установки вы можете найти ярлык программы на рабочем столе или в меню «Пуск».
Теперь, когда у вас установлена программа Windows Movie Maker, вы готовы приступить к созданию и редактированию видео. В следующих разделах мы рассмотрим основные функции программы и дадим вам советы о том, как эффективно использовать ее возможности.
Запуск Windows Movie Maker
Чтобы начать использовать Windows Movie Maker, вам нужно сначала открыть программу. Следуйте инструкциям ниже, чтобы узнать, как запустить Windows Movie Maker:
1. Кликните на кнопку «Пуск». Это обычно находится в левом нижнем углу экрана и выглядит как кнопка Windows с логотипом Windows.
2. Введите «Windows Movie Maker». В поисковой строке меню «Пуск» начните вводить название программы — «Windows Movie Maker».
3. Кликните по иконке Windows Movie Maker. После ввода названия программы, всплывет список результатов поиска. Выберите «Windows Movie Maker» из списка щелчком мыши.
4. Дождитесь запуска программы. После щелчка на иконке Windows Movie Maker, программа начнет запускаться. Это может занять несколько секунд.
5. Готово! Когда процесс запуска завершится, вы будете находиться в основном интерфейсе Windows Movie Maker и готовы к созданию и редактированию видео.
Теперь, когда вы знаете, как открыть Windows Movie Maker, вы можете начать создавать и редактировать свои собственные видео в этой удобной программе.
Основные настройки приложения
Windows Movie Maker предлагает несколько основных настроек, которые помогут вам настроить работу приложения в соответствии с вашими потребностями. В этом разделе мы рассмотрим некоторые из этих настроек.
1. Язык приложения: Вы можете изменить язык, используемый в приложении, выбрав соответствующий вариант в разделе «Настройки» в верхнем меню приложения.
2. Место сохранения проектов: По умолчанию Windows Movie Maker сохраняет ваши проекты в папке «Видео» на вашем компьютере. Однако вы можете изменить это, щелкнув на «Файл» в верхнем меню, выбрав «Настройки» и задав новый путь для сохранения проектов.
3. Разрешение проектов: В разделе «Настройки проекта» вы можете выбрать разрешение, соответствующее вашим потребностям или требованиям платформы, на которой вы собираетесь использовать созданный вами проект.
4. Формат файла проекта: Windows Movie Maker предлагает несколько форматов файла, в которых вы можете сохранить свои проекты. Выберите соответствующий вариант в разделе «Настройки проекта», чтобы сохранить проект в требуемом формате.
5. Настройки импорта видео: Windows Movie Maker позволяет настроить параметры импорта видео для обеспечения оптимального качества и производительности. В разделе «Настройки» вы найдете различные опции, такие как настройка кодека, кадров в секунду и качество видео.
Это лишь некоторые из основных настроек, которые можно настроить в Windows Movie Maker. Знание этих настроек позволит вам максимально использовать возможности приложения и настроить его под свои нужды.
Создание и сохранение проекта
Windows Movie Maker предоставляет возможность создавать и сохранять проекты, чтобы вы могли продолжать работу над ними позднее. В этом разделе мы расскажем, как создать новый проект и как сохранить его на вашем компьютере.
Чтобы создать новый проект в Windows Movie Maker, следуйте этим простым шагам:
- Запустите Windows Movie Maker.
- Перейдите в раздел «Файл» в верхнем левом углу окна программы.
- Выберите «Создать проект» из выпадающего меню.
- В появившемся диалоговом окне введите название вашего проекта и нажмите «ОК».
Теперь у вас есть пустой проект, готовый для добавления видео, фотографий и звуков. Чтобы сохранить проект, следуйте этим инструкциям:
- Перейдите в раздел «Файл» в верхнем левом углу окна программы.
- Выберите «Сохранить проект» из выпадающего меню.
- Выберите папку на вашем компьютере, в которой вы хотите сохранить проект.
- Введите название файла проекта и нажмите «Сохранить».
Теперь ваш проект сохранен на вашем компьютере и вы можете продолжить работу над ним в любое время. Не забудьте регулярно сохранять свой проект, чтобы избежать потери данных при возможных сбоях в программе или компьютере.
Настройка видео и аудио параметров
Windows Movie Maker предоставляет множество возможностей для настройки видео и аудио параметров вашего проекта. В этом разделе мы расскажем вам о некоторых наиболее важных параметрах и как их настроить.
1. Разрешение видео
Вы можете настроить разрешение видео, чтобы соответствовать требованиям вашего проекта. Для этого выберите вкладку «Настройка» в верхней панели инструментов и затем перейдите в раздел «Видеоопции». Здесь вы можете выбрать одно из предопределенных разрешений или настроить разрешение вручную, указав необходимую ширину и высоту.
2. Формат и кодек видео
Windows Movie Maker поддерживает различные форматы и кодеки видео. Чтобы настроить формат и кодек видео, выберите вкладку «Настройка» в верхней панели инструментов и перейдите в раздел «Формат». Здесь вы можете выбрать нужный формат и кодек из списка доступных опций.
3. Качество видео
Определите качество видео, которое вы хотите получить в своем проекте. Для этого выберите вкладку «Настройка» в верхней панели инструментов и перейдите в раздел «Качество». Здесь вы можете выбрать одно из предопределенных качеств или настроить качество видео вручную, указав необходимый битрейт и другие параметры.
4. Аудио параметры
Windows Movie Maker также позволяет настраивать параметры аудио в вашем проекте. Чтобы это сделать, выберите вкладку «Настройка» в верхней панели инструментов и перейдите в раздел «Аудиоопции». Здесь вы можете выбрать формат и кодек аудио, а также настроить качество звука в соответствии с вашими потребностями.
Обратите внимание, что некоторые параметры могут быть недоступны, если они не совместимы с выбранным вами форматом видео или аудио. Также имейте в виду, что изменение настроек может повлиять на размер файла и качество вашего проекта.
![]()
Download Article
![]()
Download Article
In 2017, Windows Movie Maker was officially discontinued and replaced with Video Editor (formerly known as Microsoft Story Remix). If you’re using an older PC running Windows 8 or 7, you probably still have Movie Maker installed on your computer. If you’re using Windows 10 and miss the features of Movie Maker, you can still download an older version using the Way Back Machine. This wikiHow article will teach you how to download Windows Movie Maker if it’s not installed on your computer, and show you how to use the app to edit videos on your PC
-

1
Download the Windows Live Essentials setup file. If you’re using Windows 10, you can download an old official copy of Windows Live Essentials (which includes Windows Movie Maker) from an archived version of Microsoft’s website. Visit Windows Live Essentials download page to prompt the WLE setup file to begin downloading.
- This page is largely blank, and may take several seconds to a minute before the file starts downloading.
- Alternatively, you can use Video Editor, which comes pre-loaded on Windows 10 and Windows 11. This is the replacement for Windows Movie Maker. To launch Video Editor, simply click the Windows Start menu and type «Video Editor.» Then click Video Editor to launch it.
-
2
Open the setup file. Double-click the wlsetup-all.exe file in your computer’s default download location to open it. By default, you can open the file in your web browser or your Downloads folder.
Advertisement
-
3
Click Yes when prompted. This allows the Windows Movie Maker setup file to make changes to your system.
-
4
Click Install all of Windows Essentials (recommended). It’s at the top of the page. Most of the Windows Essentials programs aren’t compatible with Windows 10, but you can install Windows Movie Maker by clicking this option.
- Alternatively, if you only want to install Windows Movie Maker, click Choose the programs you want to install and uncheck all applications, except for Photo Gallery and Movie Maker. Then click Install.
- If you receive an error messages saying the software couldn’t be installed, continue on to check if it was installed anyway. If it was not, click the setup file again and repeat the installation process.
-
5
Open Start
. It’s the icon that has the Windows logo. It’s in the lower-left corner on Windows 10, and the first icon in the middle of the taskbar at the bottom of Windows 11.
-
6
Type in windows movie maker. This will search your computer for the now-installed Windows Movie Maker app.
-
7
Click Movie Maker. It’s has a film reel icon. It’s at the top of the Start menu. This will prompt the Windows Essentials terms of use window to open.
-
8
Click Accept. This option is in the bottom-right corner of the window. Movie Maker should open after you do this.
- If clicking Accept doesn’t open Movie Maker, re-open Start, type movie maker back in, and click the Movie Maker result again to open it.
- Don’t close the installation window before opening Movie Maker.
-
9
Close the Windows Essentials installation. When the installation window pops up with an error message, just click Close and confirm the decision when prompted. You can now proceed with using Windows Movie Maker.


Advertisement
-
1
Save your new project. A new project will be created automatically when you open Windows Movie Maker Go ahead and save your new project. To do so, click File in the menu bar at the top, and click Save project as in the drop-down menu. Enter a name for your project, and select a destination folder on the left side of the window (e.g., Desktop). Then click Save.
- At any point in the creation process, you can save your progress by pressing Ctrl + S.
-
2
Click the Home tab. It’s the second tab in the menu bar at the top of Windows Movie Maker.
-
3
Click Add videos and photos. It’s the first icon in the menu bar at the top. It has an icon that resembles a photograph and a filmstrip.
- You can also right-click the large «Project» window and then click Add videos and photos in the drop-down menu.
- If you want to record a video using your webcam, click Webcam video and click Ok to start recording a video with your webcam.
-
4
Select photos or videos. To do so, navigate to the video or images files you want to add to your project. Click a file to select it. Hold Ctrl and click to select multiple files. Then click Open to add the video files to your Project window.
-
5
Click Music. It’s the second icon in the menu bar at the top under the «Home» tab. It has an icon that resembles a music note. Click this icon to select music for your project.
-
6
Select music you want to add. To do so, navigate to folder that contains mp3 or audio files. Click and audio file you want to add and click Open.
- Alternatively, if you want to record a narration for your project, click Record narration to record narration with your microphone.


Advertisement
-
1
Determine a file order. Review your project files and decide which one should go first, second, and so on. You should also figure out where you want the music to start.
-
2
Re-order your files. Click and drag the file that you want to use at the beginning of the video to the top-left corner of the «Project» window to anchor it there. Then drag the next-up file over and drop it to the right of the first file.
- You should see a vertical line appear between the two files. This signifies that if you release the mouse button, the files will snap together.
-
3
Position the music. Click the green music bar that’s located below the video files in the Project window and drag it to the left or right. Then release it to reposition it.
- Keep in mind that the end of the music will lock to the end of the last video or image if the combined length of the files doesn’t add up to the music’s play time.
-
4
Edit an image’s duration. Double-click an image to open its properties in the toolbar at the top of the window. Then use one of the following options to set how long you want an image to display in your video project:
- Duration — Click the Duration text box, then type in the number of seconds you want an image to display for.
- End Point — Click and drag the black vertical bar in the Project window to a section in the photo or video where you want to cut off the photo or video and move on to the next one. Then click Set end point in the properties panel at the top.
-
5
Edit a video’s properties. Double-click a video in the Project window to open its properties in the toolbar. Then change any of the following options in the properties panel at the top:
- Volume — Click Video volume on the far left side of the Properties panel. Then click and drag the volume slider left or right to adjust the audio volume.
- Fade In/Fade Out — A fade-in is when the audio gradually raises from silence at the beginning or a clip. A fade-out is when the audio gradually lowers to silence at the end. To add a fade-in or fade-out, click the «Fade in» or «Fade out» box, then click Slow, Medium, or Fast to select the speed of the fade-in or fade-out.
- Speed — This allows you to speed up or slow down a video. Click the «Speed» drop-down box, then select a video speed. You can also type in a custom speed. 1x is normal speed. Anything below 1x will slow the video down. Anything above 1x will speed the video up.
- Trim — This allows you to select parts of a video you want to to use and cut out parts you don’t want to use. Click Trim tool in the menu bar at the top. Then click and drag the slider bar on the left below the video preview to where you want the video to start. Then click and drag the slider bar on the right to where you want the video to end. Then click Save Trim.
- Split — This cuts a video clip into two separate clips. Drag the vertical line in the large Project window to where you want to split a clip. Then click Split in the menu bar at the top to split the clip.
- Stabilization — This allows you to correct for shaky or wobbly video. Click Video stabilization, then select Anti-shake, Anti-shake and wobble correction — low, or Anti-shake and wobble correction — high.
-
6
Edit the music’s properties. Double-click the green music bar below a video or photo in the Project widow. Then change any of the following options in the toolbar at the top to edit the music:
- Volume — Click Music volume, then click and drag the slider left or right to adjust the music volume.
- Fade In/Fade Out — A fade-in is when the audio gradually raises from silence at the beginning. A fade-out is when the audio gradually lowers to silence at the end. To add a fade-in or fade-out, click the «Fade in» or «Fade out» box, then click Slow, Medium, or Fast.
- Start Time — This adjust the time (in seconds) when the music starts playing relative to the length of your entire project. Type the time when you want the audio to start in your project. You can also adjust this by clicking and dragging the green audio bar in the Project window.
- Start Point — This adjusts the time (in seconds) for when the audio file starts playing relative to the music file. This trims time off the beginning of the audio file. Type the time for when the section of the audio you want to use starts.
- End Point — This adjusts the time (in seconds) for when the audio file ends. This trims time off the end of the audio file. Type the time for when the section of the audio you want to use stops.


Advertisement
-
1
Click the Home tab. It’s in the upper-left side of the window. This will take you back to the editing toolbar.
-
2
Click Title. This option is in the «Add» section of the Home toolbar. This will add a new title at the beginning of the video. You can move the title around in your Project by clicking and dragging it.
-
3
Enter title text. In the text box that appears on the video preview window, type in the title that you want to assign to your video title.
- You can also edit the title slide’s length in the «Adjust» section of the toolbar by clicking the text box next to «Duration» and enter the time (in seconds) you want the title to last.
- If you want to change the title size, font, or formatting, you can do so in the «Font» section of the toolbar.
- To change the background of the title, click Background color in the menu bar at the top, and click one of the colored swatches.
-
4
Add captions to your video project. To add a caption to your video, click and drag the vertical black line in the Project window to where you want to add a caption. Then click Caption under the «Home» tab. Then type what you want the caption to say.
-
5
Edit the caption. To edit a caption, double-click the pink caption box below your video clip in the Project window. Then use the following options to edit the caption:
- Font — Use the options in the box above «Font» to select the font you want to use, font size, and style (i.e, bold, italic, underline). Then use the options in the box above «Paragraph» to select the text alignment (i.e. right, center, left) and the text transparency.
- Edit Text — If you need to edit the text, click Edit text or double-click the text in the video preview. Then use the keyboard to edit the text.
- Start Time — This sets the time in your project that the caption starts displaying. Type the time (in seconds) for where you want the caption to start showing. You can also click and drag the pink caption box in the Project window to adjust when the caption starts.
- Text Duration — Use the box next to «Time duration» to to type the time (in seconds) you want the caption to remain on-screen.
- Effects — Use the options in the «Effects» section in the menu bar at the top to select a text animation for your caption. Mouse over one of the options to preview it. Click it to apply the effect.
-
6
Add credits. To add credits, click Credits under the Home tab to add a new video clip for credits at the end of the clip. Then type your credits.
-
7
Edit your credits. To edit your credits, double-click the credits video clip at the end of your movie. Then use one of the following options to edit your credits:
- Edit the text — To edit the text in your credits, double-click the pink bar below the credits clip. Then use the keyboard to edit the text.
- Background color — To change the background color of your credits, click Background color in the menu bar at the top. Then click one of the colored swatches to pick a background color.
- Duration — To edit the time duration of the credits, use the box next to «Duration» to enter how long (in seconds) you want the credits to last.


Advertisement
-
1
Click the clip you want to add an effect or transition to. Click on any clip in the Project window to
-
2
Click the Animations tab. It’s the third tab in the menu bar at the top.
-
3
Add a transition. Transitions are visual effects that happen at the beginning and/or end of a video clip. There are a variety of transitions in the «Transitions» section in the menu bar at the Use the arrow buttons on the side of the section to scroll through all the transitions. Mouse over a transition to preview it. Double-click it to apply it to the video clip.
- To adjust the time duration of the transition, enter the time (in seconds) next to «Duration» to the right of the Transitions box.
- You can also click Apply to all to the right of the «Transitions» section to apply the transition to all video clips in your project.
-
4
Add a pan and zoom effect. Pan and zoom effects are useful on still images. The camera will either scroll over the image, or zoom in on it. To add a pan and zoom effect, click an image or video clip in your Project window. Mouse over one of the effects in the «Pan and zoom» section to preview the effect. Click on it to apply the effect.
- Click Apply to all to the right of the «Pan and zoom» section to apply the effect to all videos and images in your project.
-
5
Click the Visual Effects tab. It’s the fourth tab at the top of the page.
-
6
Click the video clip you want to apply a visual effect to. You can click any image or video clip in your Project window.
-
7
Add a visual effect. Visual effects allow you to change the color and look of a clip. You can make it black and white, sepia, or apply other color and visual effects. Mouse over an effect in the «Effects» section to preview the effect. Use the arrow keys next to the section to scroll through all the effects. Click and effect to apply it.
- Click Apply to All to the right of the box to apply the effect to all clips and images in your project.
-
8
Adjust the clip brightness. If you want to adjust the brightness of a clip, click Brightness next to «Effects» box. Then use the slider bar to adjust the brightness of the clip.


Advertisement
-
1
Preview your movie. Click the «Play» button below the movie preview window on the left side of the window. If your movie looks the way you want it to, you’re ready to save the movie.
- If the movie needs finessing, make any adjustments that are necessary before you continue.
- During the editing process, your music may end up off-beat or too short; if so, make sure that your music is properly edited to compensate before proceeding.
-
2
Press Ctrl+S to save your project. Alternatively, you can click File followed by Save project to save your project.
-
3
Click File. It’s in the menu bar at the top.
-
4
Click Save movie. It’s about halfway down the File menu. This displays a variety of formats you can save the movie in.
-
5
Select a save type. If you don’t know what format to use, click Recommended for this project at the top of the drop-down menu; otherwise, click the format that you want to use.
- You can select the best format for a variety of devices, including large, medium and small Android phones, iPhones, tablets, computers, email, and more.
- Alternatively, you can click Publish Movie and publish the movie directly to a social media application like YouTube, Facebook, or Twitter.
-
6
Enter a name for your movie. Type in the name that you want to use for the movie file itself.
-
7
Select a save folder. On the left side of the window, click a folder in which you want to save the movie file.
-
8
Click Save. It’s near the bottom-right corner of the window. This will save your movie file and begin exporting your project. Be patient—exporting can take a long time, especially for a detailed project.
-
9
Click Play when prompted. Doing so will play your movie in your computer’s default video player.


Advertisement
Add New Question
-
Question
What if my computer or device does not have enough memory to save the movie?

Try emptying the recycle bin or getting rid of files you don’t need. Using an external drive works for emptying files out of your computer while preserving them at the same time.
-
Question
How long of a movie will Movie Maker make?
The Movie Maker can make a movie as long as you want it to be. Though beware, the longer and more complicated the film, the more likely the program is to crash or stop functioning. The longer you make your film, the more often you should back-up the project.
-
Question
How long does it take to make a movie?
Movie makers are slow. Fet all the videos, and put them together, and when you save it might take a few hours for it to complete and it will be larger size (for example a normal two hour movie might be 2GB, but a two hour movie maker movie might be 10GB).
See more answers
Ask a Question
200 characters left
Include your email address to get a message when this question is answered.
Submit
Advertisement
-
It’s a good idea to hold onto your movie project files, which usually have the Windows Movie Maker logo as their file icons. This way, you can go back and edit the video at some point without having to start over.
-
The usage steps in this article also pertain to Windows 7, as Windows Movie Maker comes standard with Windows 7.
Thanks for submitting a tip for review!
Advertisement
-
As Windows 10 continues to update and evolve, you may find that Windows Movie Maker begins to freeze or become unresponsive. Make sure to save regularly.
-
Windows Movie Maker is no longer supported by Microsoft, so security issues and bugs won’t be fixed. You might want to consider using Video Editor instead.
Advertisement
About This Article
Article SummaryX
1. Download the archived setup file.
2. Run the setup file.
3. Click Install all of Windows Essentials (recommended).
4. Open Movie Maker in the Start menu.
5. If you see an installation error, close the message.
6. Accept the terms.
7. Create a new project.
8. Add photos and videos to your project.
Did this summary help you?
Thanks to all authors for creating a page that has been read 606,770 times.
Reader Success Stories
-

«It was a good step-by-step laid out simply and easy to follow. Thanks. Now I’m looking for help with a few…» more
Is this article up to date?
Муви Мейкер – популярное программное обеспечение для создания и редактирования видео на компьютере с операционной системой Windows 7. Если вы хотите научиться работать с этой программой, вам потребуется некоторое время и небольшое усилие, но результат стоит ваших усилий.
Первым шагом является установка Муви Мейкер на ваш компьютер. Это можно сделать, перейдя на официальный сайт Microsoft и загрузив последнюю версию программы. Установив Муви Мейкер, вы сможете начать работу над своими видеопроектами.
При запуске Муви Мейкер открывается основной интерфейс программы. Здесь вы можете создать новый проект или открыть уже существующий. Чтобы создать новый проект, выберите «Создать проект» в меню «Файл». Затем введите название проекта и выберите папку для сохранения проекта на вашем компьютере.
Важно! Перед началом работы с Муви Мейкером убедитесь, что у вас есть все необходимые материалы, такие как видеофайлы, звуковые дорожки и изображения. Это позволит вам создавать качественные видео.
Содержание
- Установка и запуск программы
- Создание нового проекта
- Импорт видео и аудио файлов
- Редактирование видео
- Экспорт и сохранение готового проекта
Установка и запуск программы
Для начала работы с программой Муви Мейкер на операционной системе Windows 7, вам потребуется выполнить следующие шаги:
Шаг 1: Перейдите на официальный сайт Microsoft и загрузите установочный файл программы Муви Мейкер для Windows 7.
Шаг 2: После загрузки установочного файла, откройте его и следуйте инструкциям мастера установки. Убедитесь, что выбрана версия программы, совместимая с вашей операционной системой.
Шаг 3: После установки программы, найдите ярлык Муви Мейкер на рабочем столе или в меню «Пуск» и щелкните по нему дважды, чтобы запустить программу.
Шаг 4: После запуска программы, вы увидите главное окно Муви Мейкер, готовое к работе над вашим проектом. Вы можете начать создание нового проекта или открыть существующий.
Шаг 5: Воспользуйтесь интуитивно понятным интерфейсом программы, чтобы добавить видео, аудио и изображения, редактировать их, изменять порядок и продолжительность, добавлять эффекты, тексты и титры.
Шаг 6: По завершении работы над проектом, сохраните его в выбранном формате и на выбранном месте на вашем компьютере.
Теперь у вас есть все необходимые инструкции для установки и запуска программы Муви Мейкер на операционной системе Windows 7. Приятной работы!
Создание нового проекта
Для начала работы в Муви Мейкере на Windows 7 необходимо создать новый проект. В этом разделе будет описана пошаговая инструкция по созданию нового проекта.
1. Запустите программу Муви Мейкер, щелкнув по значку на рабочем столе или в меню «Пуск».
2. В верхнем левом углу программы выберите пункт «Файл» в меню и щелкните по нему.
3. В открывшемся меню выберите пункт «Создать проект» и щелкните по нему.
4. Появится диалоговое окно «Создать проект». В этом окне вам нужно указать название проекта и выбрать папку для сохранения проекта. Введите название проекта в поле «Название проекта» и нажмите кнопку «Обзор», чтобы выбрать папку для сохранения проекта. После этого нажмите кнопку «Создать».
5. В главном окне Муви Мейкера откроется новый проект, и вы будете готовы начать работу над ним.
Теперь вы знаете, как создать новый проект в Муви Мейкере на Windows 7. Приступайте к созданию увлекательных видеороликов!
Импорт видео и аудио файлов
Для начала работы с Муви Мейкер для Windows 7 необходимо импортировать видео и аудио файлы, которые вы хотите использовать в своем проекте. Это можно сделать при помощи следующих шагов:
| Шаг 1: | Откройте программу Муви Мейкер для Windows 7 и щелкните на вкладке «Добавить видео» в верхней части окна. |
| Шаг 2: | Выберите видео или аудио файлы из вашего компьютера, которые вы хотите импортировать, и нажмите «Открыть». |
| Шаг 3: | Файлы будут импортированы в программу и отображены в библиотеке Муви Мейкер. |
После успешного импорта файлы будут готовы к использованию в вашем проекте. Вы можете перетаскивать их на временную ленту или использовать их в качестве фоновых звуков для вашего видео. Помните, что Муви Мейкер поддерживает различные форматы видео и аудио файлов, такие как MP4, AVI, WMV, MP3 и другие.
Редактирование видео
После того, как вы создали проект в Муви Мейкере и импортировали видеофайлы, вы можете приступить к их редактированию. В программе есть множество инструментов, которые позволят вам изменить видео и создать профессионально выглядящий фильм или клип.
1. Обрезка видео. С помощью функции обрезки можно удалить ненужные кадры из видеофайла. Просто выберите нужную часть видео и удалите остальное.
2. Добавление переходов. Вы можете добавить различные эффекты переходов между кадрами, чтобы сделать видео более плавным и эстетичным. Муви Мейкер предлагает множество разнообразных переходов, от горизонтального размытия до вращения.
3. Вставка текста и заголовков. Чтобы сделать видео более информативным, вы можете добавить текстовые надписи и заголовки. Выберите нужный стиль шрифта, цвет и размер текста, чтобы он сочетался с общим дизайном видео.
4. Наложение музыки и звуковых эффектов. Муви Мейкер позволяет вам добавить фоновую музыку к вашему видео, а также наложить звуковые эффекты, чтобы создать атмосферу и подчеркнуть настроение видео.
5. Работа с цветами и фильтрами. В программе есть инструменты для изменения цветового баланса и применения различных фильтров к видео. Это поможет вам создать определенную атмосферу и улучшить общий вид видео.
После того, как вы закончите редактирование видео, вы можете сохранить его в нужном формате и поделиться с друзьями и семьей. Муви Мейкер для Windows 7 предоставляет вам множество возможностей для творчества и создания профессиональных видео.
Экспорт и сохранение готового проекта
После того, как вы закончили работу над своим проектом в Муви Мейкер, вам нужно сохранить его и экспортировать в нужном формате.
Чтобы сохранить проект, следуйте этим шагам:
- Нажмите на кнопку «Файл» в верхнем меню программы.
- Выберите пункт меню «Сохранить проект».
- Укажите путь для сохранения файла и введите его название.
- Нажмите кнопку «Сохранить».
Ваш проект сохранится в формате MMWP (Movie Maker Project), который позволяет вам открыть его в Муви Мейкер и продолжить работу над ним позже.
Если вы хотите экспортировать свой проект в видеофайл, выполните следующие действия:
- Нажмите на кнопку «Файл» в верхнем меню программы.
- Выберите пункт меню «Сохранить Фильм» (или «Сохранить видео» в более новых версиях программы).
- Выберите формат файла, в который вы хотите экспортировать свой проект (например, MP4, AVI, WMV).
- Укажите путь для сохранения файла и введите его название.
- Нажмите кнопку «Сохранить».
Программа начнет экспортировать ваш проект в выбранный формат. В зависимости от размера и сложности проекта, это может занять некоторое время.
Поздравляю! Теперь у вас есть готовый проект и видеофайл, созданный в Муви Мейкер. Вы можете поделиться своим проектом с друзьями или загрузить его в Интернет.