Виндовс Муви Мейкер – редактор, позволяющий создавать видеоклипы, корректировать аудиодорожки и создавать видео-презентации из картинок. В нем можно добавлять текст, несложные анимации и переходы. Но сначала неопытный пользователь должен понять, как открыть Муви Мейкер.
Содержание
- Как скачать и открыть Windows Movie Maker
- Шаг 1: загрузка последних версий
- Шаг 2: открытие программы
Разумеется, сначала необходимо загрузить программу на свой компьютер, если ее там нет. В связи с тем, что редактор больше не поддерживается компанией Майкрософт, в новых версиях операционных систем Муви Мейкер не включена в комплект при поставке.
Шаг 1: загрузка последних версий
Вовсе необязательно скачивать программу с официального источника, тем более что на данный момент ее уже нельзя скачать оттуда. Можно загрузить установочный архив с любого известного софт-портала и запустить его.
Ни в коем случае нельзя скачивать программу с веб-ресурсов, предлагающих юзерам сперва отправить проверочное смс или регистрировать новый аккаунт. Подобные проекты сделаны для того, чтобы снимать деньги за предоставленные услуги, при этом, шанс получить программу – весьма мал. Обязательно стоит проверять инсталлятор или архив на наличие вирусов с помощью соответствующего защитного ПО.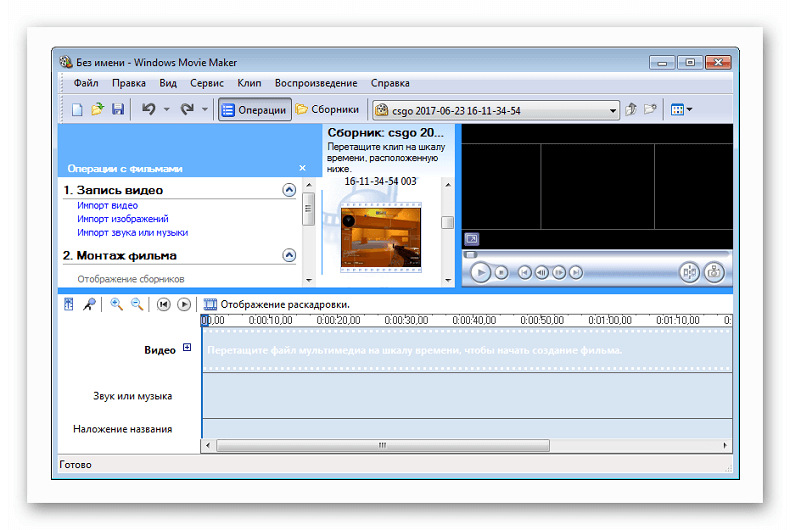
Лучшими версиями принято считать 2.6 (популярное) и 6.0. Данные программы входят в состав Windows Essentials.В них есть множество полезных новшеств, не доступных ранее. К примеру, все созданные проекты после сохранения можно сразу же отправлять на личные Ютуб-канал или в сервис Vimeo.
Также добавлены интересные видеоэффекты и переходы. Стоит обратить внимание на переработанное оформление, возможно, русский язык и не поддерживается, но интерфейс настолько прост, что разобраться в нем даже новичку – не составит труда. Особенно легко будет тем, кто уже пользовался редактором, и научился создавать качественные клипы.
Шаг 2: открытие программы
Какой вопрос возникает после того, как удалось установить Windows Movie Maker? Как запустить его. Муви Мейкер имеется в составе Виндовс XP и Виста, но в более новых версиях ее уже нет. Но пользователи считают, что это было сделано зря – софт очень удобный для рядового юзера.
После установки инсталлятора есть несколько вариантов открытия WWM: перейти к папке, в которую установлена; щелкнуть по ярлыку на рабочем столе, если он есть, либо же найти соответствующий пункт в меню «Пуск».
В первом случае стоит запомнить путь, куда будет установлен редактор, и по завершению процесса инсталляции перейти в папку, найти файл с названием редактора расширением .exe и дважды щелкнуть мышкой. После этого подождать, пока появится новое окно.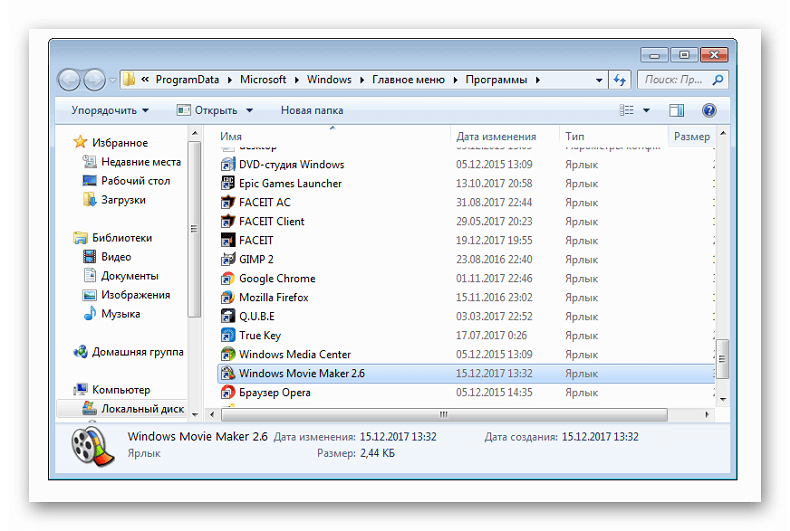
Как открыть программу с рабочего стола – знает любой пользователь. А вот чтобы открыть ее через «Пуск», необходимо нажать на значок окошка Виндовс в левом нижнем углу (или клавишу Windows), перейти во вкладку «Все программы» и отыскать название редактора среди показанных папок, после чего нажать на ярлык редактора.
Таким образом, вы сможете открыть не только Муви Мейкер, но и любую другую программу.
( 1 оценка, среднее 5 из 5 )
Windows Movie Maker – это бесплатная программа от Microsoft, которая позволяет создавать и редактировать видео на операционной системе Windows. Она предлагает широкий набор инструментов для создания профессионально выглядящих фильмов, презентаций и слайд-шоу. Даже новички без опыта могут очень легко разобраться в этой программе благодаря простому и интуитивно понятному интерфейсу. В этой статье мы расскажем как открыть и использовать Windows Movie Maker на компьютере под управлением Windows.
Для начала, убедитесь, что у вас установлена программа Windows Movie Maker. Она поставляется вместе с операционной системой Windows Vista и Windows 7. Если у вас установлена Windows 8 или более поздняя версия, вам нужно будет загрузить ее с официального сайта Microsoft. После успешной установки, вы можете открыть программу через меню «Пуск» или найти ярлык на рабочем столе.
После открытия программы, у вас откроется главное окно Windows Movie Maker. Оно содержит несколько панелей, таких как «Проект», «Превью», «Редактор» и «Создание». В панели «Проект» вы можете импортировать медиафайлы, такие как видео, фотографии и аудиозаписи. Эти файлы будут использоваться в вашем фильме. В панели «Превью» вы можете предварительно просматривать результаты своей работы, а в панели «Редактор» вы можете редактировать свои медиафайлы, добавлять эффекты, переходы и титры.
Windows Movie Maker – превосходная программа для создания и редактирования видео, доступная на платформе Windows. Независимо от ваших навыков и опыта, вы сможете создать потрясающие фильмы и презентации. Следуйте нашим инструкциям, чтобы открыть и начать использовать Windows Movie Maker на вашем компьютере.
Содержание
- Зачем нужен Windows Movie Maker?
- Windows Movie Maker: основные функции
- Установка Windows Movie Maker
- Как скачать и установить Windows Movie Maker на Windows?
- Открытие Windows Movie Maker
- Использование Windows Movie Maker
Зачем нужен Windows Movie Maker?
- Простота использования: Windows Movie Maker имеет простой и интуитивно понятный интерфейс, который позволяет легко освоить основные функции. Даже новички могут создавать и редактировать видео без особых усилий.
- Монтаж видео: С помощью Windows Movie Maker можно объединять различные видеофрагменты в один ролик. Вы можете добавлять переходы между сценами, создавать эффектные слайд-шоу и акцентировать внимание на наиболее важных моментах.
- Добавление музыки и звуков: В Windows Movie Maker есть функция добавления музыки и звуковых эффектов к вашему видео. Вы можете выбирать из собственной музыкальной библиотеки или использовать предложенные шаблоны.
- Работа с фотографиями: Windows Movie Maker позволяет создавать слайд-шоу из фотографий. Вы можете добавлять переходы между фотографиями, применять эффекты и настройки, чтобы сделать ваше слайд-шоу уникальным.
- Экспорт и публикация: После завершения работы над видео, вы можете сохранить его в различных форматах: WMV, MP4, AVI и других. Также вы можете легко поделиться своим видео в социальных сетях или загрузить его на платформы видеообмена.
Windows Movie Maker – отличный выбор для тех, кто хочет создавать качественные видеоролики, даже без опыта работы с программами для редактирования видео.
Windows Movie Maker: основные функции
1. Импорт файлов: С помощью Windows Movie Maker вы можете импортировать различные типы медиафайлов, такие как видео, фотографии и музыкальные файлы, для их последующего редактирования.
2. Редактирование видео: Windows Movie Maker позволяет редактировать видео, добавлять или удалять фрагменты, объединять отдельные видеоклипы в одно целое, применять эффекты и фильтры, регулировать цветовую схему, яркость и контрастность и многое другое.
3. Создание слайд-шоу: С помощью Windows Movie Maker вы можете создавать слайд-шоу из своих фотографий, добавлять переходы между слайдами, применять эффекты к изображениям, добавлять музыку и титры.
4. Добавление музыки: Вы можете добавлять музыкальные файлы к вашим видеоклипам и слайд-шоу, чтобы создать атмосферу и подстроиться под настроение вашего проекта.
5. Создание титров и подписей: Windows Movie Maker позволяет добавлять текстовые титры и подписи к вашим видеоклипам и фотографиям, чтобы дать дополнительную информацию или выразить свои мысли.
6. Экспорт и публикация: По завершению редактирования вы можете экспортировать ваш фильм в различных форматах, таких как AVI, WMV или MP4, и поделиться им на популярных видеохостинговых платформах, таких как YouTube и Vimeo, или записать на DVD.
Все эти функции делают Windows Movie Maker отличным выбором для тех, кто хочет создавать профессионально выглядящие видео и фильмы без необходимости использования сложного программного обеспечения.
Установка Windows Movie Maker
1. Откройте веб-браузер и перейдите на официальный сайт Microsoft.
2. Зайдите на страницу загрузки Windows Movie Maker и нажмите на кнопку «Скачать».
3. Начнется загрузка файла установки Windows Movie Maker. Подождите, пока загрузка не завершится.
4. Когда загрузка будет завершена, найдите файл установки на вашем компьютере и откройте его.
5. Следуйте инструкциям мастера установки, чтобы установить Windows Movie Maker на ваш компьютер. Выберите папку назначения и нажмите кнопку «Установить». Может потребоваться пароль администратора, чтобы продолжить.
6. После завершения установки вы можете найти ярлык Windows Movie Maker на рабочем столе или в меню «Пуск». Нажмите на ярлык, чтобы запустить программу.
Теперь, когда у вас установлен Windows Movie Maker, вы готовы начать создавать и редактировать видео. Вы можете импортировать видеофайлы, добавлять звуковые эффекты и музыку, редактировать их последовательность, добавлять титры и многое другое. Используйте эту программу для создания отличного видеоролика!
Как скачать и установить Windows Movie Maker на Windows?
Шаг 1: Перейдите на официальный веб-сайт Microsoft.
Шаг 2: Найдите раздел «Скачать Windows Movie Maker» и нажмите на ссылку.
Шаг 3: Выберите версию Windows Movie Maker, совместимую с вашей операционной системой Windows.
Шаг 4: Нажмите на кнопку «Скачать» и сохраните установочный файл на вашем компьютере.
Шаг 5: После завершения загрузки откройте установочный файл Windows Movie Maker.
Шаг 6: Начните процесс установки, следуя инструкциям на экране.
Шаг 7: После успешной установки Windows Movie Maker будет доступен в меню «Пуск» вашей операционной системы.
Теперь вы можете скачать и установить Windows Movie Maker на свой компьютер, чтобы начать создавать и редактировать видеофайлы.
Открытие Windows Movie Maker
- Нажмите на кнопку «Пуск» в левом нижнем углу экрана.
- В появившемся меню выберите пункт «Все программы».
- Прокрутите список программ в появившемся окне и найдите папку с названием «Windows Live» или «Windows Accessories».
- Щелкните на этой папке, чтобы открыть ее.
- В папке «Windows Live» или «Windows Accessories» найдите иконку Windows Movie Maker.
- Дважды щелкните на иконке Windows Movie Maker, чтобы запустить программу.
После выполнения этих шагов Windows Movie Maker должен открыться на вашем компьютере. Теперь вы можете начать создавать и редактировать видео, используя различные функции, предоставленные программой.
Использование Windows Movie Maker
1. Запуск программы: Чтобы начать использовать Windows Movie Maker, найдите и запустите его на вашем компьютере. Обычно он установлен в папке «Windows Accessories» или доступен через меню «Пуск».
2. Создание нового проекта: После запуска программы вы увидите возможность создать новый проект. Щелкните на кнопке «Новый проект» и выберите нужные параметры, такие как имя проекта, разрешение видео и кадров в секунду. Затем сохраните проект на вашем компьютере.
3. Добавление видео и изображений: Чтобы добавить видео или изображения в ваш проект, перейдите на вкладку «Добавить» в верхней части программы. Затем выберите нужные файлы на вашем компьютере и нажмите кнопку «Открыть». Ваши файлы будут добавлены в тайм-лайн программы.
4. Редактирование видео: После добавления видео и изображений, вы можете начать редактировать свой проект. Используйте инструменты на панели инструментов, чтобы обрезать видео, изменить порядок клипов, добавить эффекты перехода и многое другое. Вы также можете добавить тексты, звуковые эффекты и музыку к вашему видео.
5. Экспорт видео: Когда вы закончите редактирование видео, вы можете экспортировать его в различные форматы и качества. Нажмите на кнопку «Сохранить фильм» или «Экспорт» в верхней части программы, чтобы выбрать нужные настройки экспорта. Затем выберите папку назначения и нажмите кнопку «Сохранить».
Теперь вы знаете, как использовать Windows Movie Maker для создания и редактирования видео. Не бойтесь экспериментировать и создавать уникальные проекты!
-
Home
-
MovieMaker
- [5 Ways] How to Open Windows Movie Maker Windows 11/10/8/7?
By Helen | Follow |
Last Updated
This post conceived on MiniTool official website mainly introduces five ways to open Windows Movie Maker in Windows 11 operating system (OS). Those methods also apply to Windows 10/8/7. Besides, it offers some advice on dealing with Windows Live Movie Maker will not open issues.
Previously, we have learned whether Windows 11 has Movie Maker built-in and where to download and manually install Movie Maker on your computer. Here, let’s see how to open this tool in various ways.
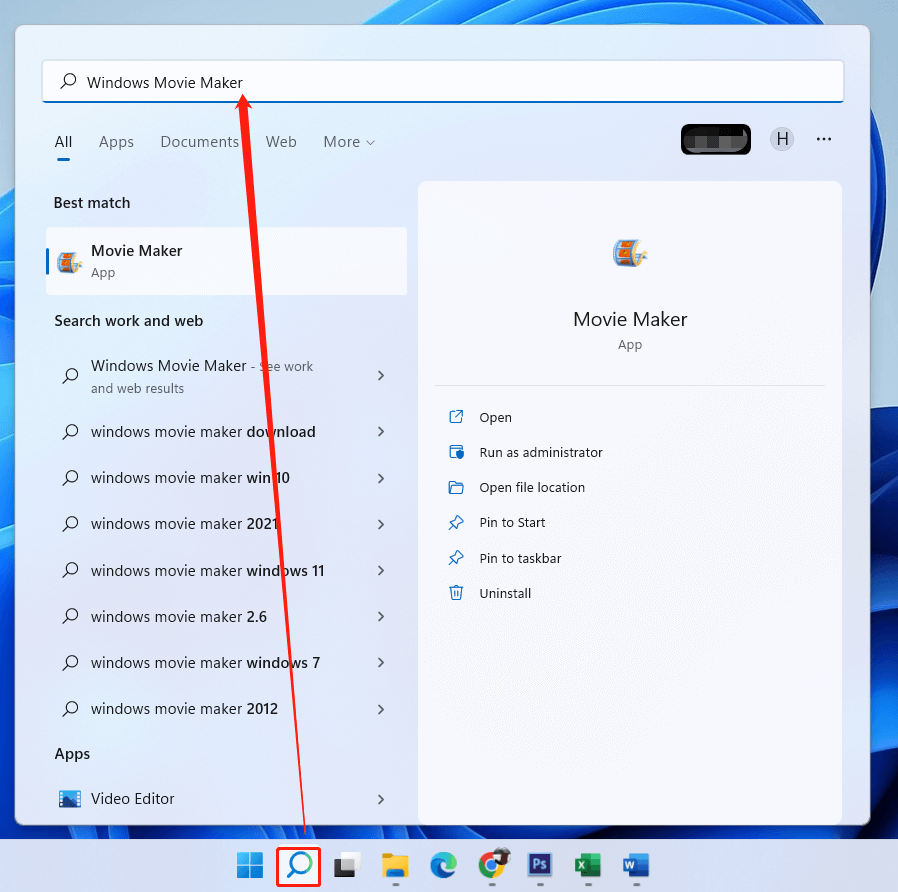
#1 How Do I Open Windows Movie Maker Through Search?
In the first place, you can take advantage of the Windows Search utility to help you launch the Windows Movie Maker application.
- Click on the magnifier icon in the taskbar.
- Input “Windows Movie Maker” in the top column.
- Press Enter.
- Find and click on the best match in the search result.
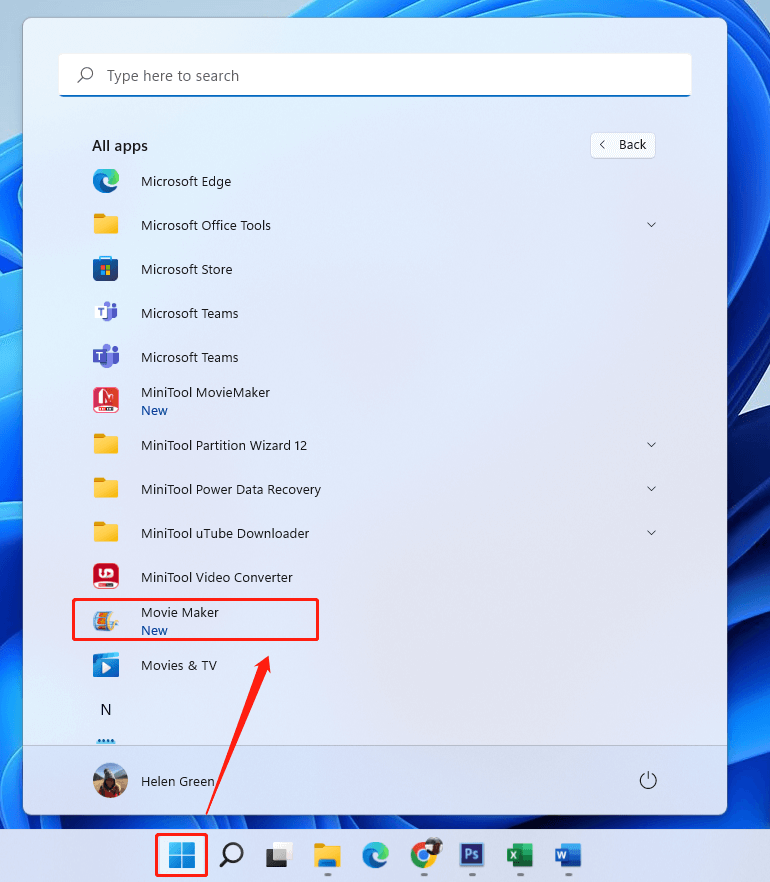
#2 How to Open Windows Movie Maker in Windows 11 from Start?
Secondly, you are able to launch Windows Movie Maker from the Windows Start menu.
- Click on the Windows icon in the taskbar.
- In the new popup, click All apps in the top right corner.
- Scroll down the list to find Movie Maker.
- Click on the program to trigger it.
#3 Launch Windows Movie Maker with Run Dialog
Thirdly, you can rely on the Windows Run command to assist you in opening Movie Maker.
- Open the Windows Run box.
- Type “moviemaker.exe” or just “moviemaker” in the Run box.
- Press Enter on your keyboard or click OK.
#4 Trigger Windows 11 Movie Maker in File Explorer
Fourthly, you can try to open Windows Movie Maker in Windows File Explorer. Simply, launch Windows Explorer, key in “moviemaker” or “moviemaker.exe” in the address column, and press Enter.
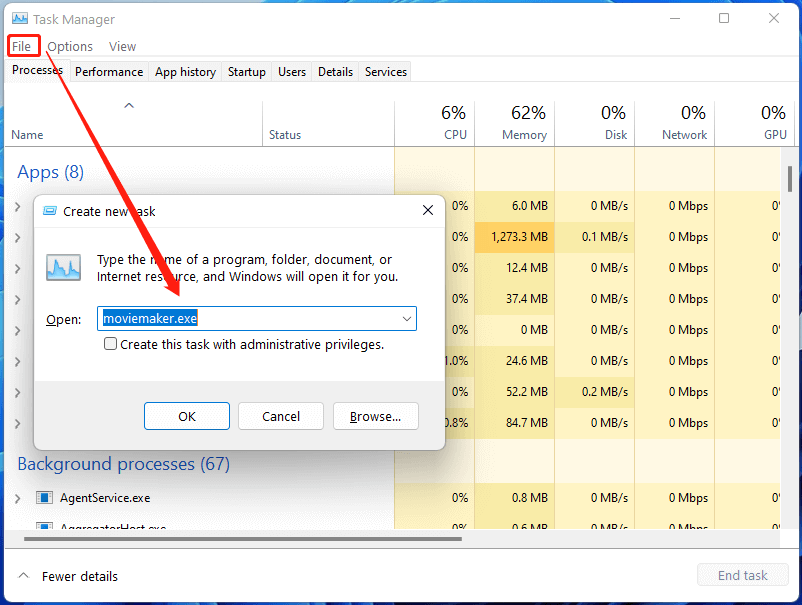
#5 Open Windows Movie Maker Windows 11 via Task Manager
Finally, you can make use of Windows Task Manager to launch the Movie Maker software.
- Right-click on the Start in Taskbar and select Task Manager in the pop-up Quick Menu.
- When Task Manager launches, click File > Run new task.
- In the new window, type “moviemaker.exe” or “moviemaker”.
- Click the OK button or press Enter.
How to Fix Windows Movie Maker Won’t Open Problem?
If you cannot open Windows Movie Maker with all the above methods, you can try the following solutions.
- Restart your computer.
- Make sure your PC meets the minimum system requirements for Windows Movie Maker.
- Update graphics or video card drivers.
- Uninstall and reinstall Windows Movie Maker.
- Scan for and fix corrupted system files with sfc /scannow.
- Run Windows Movie Maker in compatibility mode.
These applications are completely compatible with Windows 11/10/8.1/8/7.
MiniTool MovieMaker
An easy-to-use video editing software without watermarks and limits. The embedded templates enable you to quickly make personal slideshows and share them with your friends!
MiniTool MovieMakerClick to Download100%Clean & Safe
MiniTool Video Converter
Quickly convert videos and audio from one file format to another to apply to more devices. It supports 1000+ popular output formats and batch conversion. Besides, it can also record PC screens without any watermark and download YouTube videos.
MiniTool Video ConverterClick to Download100%Clean & Safe
About The Author

Position: Columnist
Helen Graduated from university in 2014 and started working as a tech editor in the same year. Her articles focus on video creation, editing, and conversion. She also has a good knowledge of disk management and data backup & recovery. Through an in-depth exploration of computer technology, Helen has successfully helped thousands of users solve their annoying problems.
![]()
0
![]()
1
06.05.2011 11:20
Какое-нибудь сообщение выходит?
![]()
0
![]()
0
06.05.2011 14:25
открываем программу,пишет запустить файл,запускаем,потом вылазит окошко нажимаем yes,вылазит окошко идет загрузка,потом вылазит еще одно окошко,внизу next,нажимаем,идет еще одна загрузка и все исчезает…
![]()
1
![]()
0
06.05.2011 15:47
А вы с какой Виндой работаете.
![]()
0
![]()
0
06.05.2011 15:50
Спрашиваю потому, что ничего, кроме как совета установить русскую версию проги, ничего в голову не приходит.
![]()
0
![]()
0
06.05.2011 15:52
Если у вас Vista или 7-ка, то это получится.
![]()
0
![]()
0
06.05.2011 15:55
Если же у вас ХР, то покажите нам скрины этих сообщений.
![]()
0
![]()
0
08.05.2011 08:48
у нас виндос семерка…только если можно,объясните подробно как установить и как открыть,а то мы пробовали и русскую версию,но и та и другая устанавливаются а не открываются…заранее спасибо!!!!
![]()
1
![]()
0
08.05.2011 12:43
Скачиваете, запускаете файл MM26_RU.msi, следуете инструкциям во время установки. Теперь программа установлена и ее можно запускать. Если у вас не запускается, то это уже проблемы в вашей системе, и нужно более глубоко разбираться.
![]()
0
![]()
0
14.04.2012 21:43
я установил а запустить как у меня виндовс 7 я установленою программу незнаю где найти подскажите плиз
![]()
1
![]()
1
16.04.2012 17:59
Вам нужно нажать «Пуск -> Все программы -> Windows Movie Maker 2.6», т.е. открыв «Все программы» нужно искать не папку с программой, а сразу ярлык на эту программу вот и все.
или еще прогу можно открыть тут: C:\Program Files\Movie Maker 2.6\
![]()
2
![]()
0
29.04.2012 19:08
У меня тож Виндовс 7 я установил Movie Maker 2.6 и не мог его найти все папки перелазил а он появился аж через 1 недели комп нор 4 нина оператвы 1 гиг видюхы что за хрень
![]()
0
![]()
0
29.04.2012 19:16
Лучше Adobe After Effects или рабочий SONY Vegas Pro 10.0 пользоваться они намного круче этой проги.
![]()
0
![]()
0
02.05.2012 13:29
Лучше Adobe After Effects или рабочий SONY Vegas Pro 10.0 пользоваться они намного круче этой проги.
Так понятное дело, но это как бы по сравнению с мувмейкером продукты совершенно разного класса, которые бессмысленно сравнивать.
![]()
0
![]()
0
21.06.2012 17:23
mikef, целую в обе щечки!!! Thank you! 
![]()
1
![]()
0
21.06.2012 21:21
Рад был помочь))) Если есть еще вопросы относительно софта, компьютера или техники, то задавайте из на нашем сайте. Обязательно постараюсь Вам помочь.
![]()
0
![]()
0
02.05.2014 06:10
HELLO
![]()
0
![]()
0
08.03.2016 18:24
Ска чал мови макер 12гб, а как открыть не знаю, где что искать?
![]()
Download Article
![]()
Download Article
In 2017, Windows Movie Maker was officially discontinued and replaced with Video Editor (formerly known as Microsoft Story Remix). If you’re using an older PC running Windows 8 or 7, you probably still have Movie Maker installed on your computer. If you’re using Windows 10 and miss the features of Movie Maker, you can still download an older version using the Way Back Machine. This wikiHow article will teach you how to download Windows Movie Maker if it’s not installed on your computer, and show you how to use the app to edit videos on your PC
-

1
Download the Windows Live Essentials setup file. If you’re using Windows 10, you can download an old official copy of Windows Live Essentials (which includes Windows Movie Maker) from an archived version of Microsoft’s website. Visit Windows Live Essentials download page to prompt the WLE setup file to begin downloading.
- This page is largely blank, and may take several seconds to a minute before the file starts downloading.
- Alternatively, you can use Video Editor, which comes pre-loaded on Windows 10 and Windows 11. This is the replacement for Windows Movie Maker. To launch Video Editor, simply click the Windows Start menu and type «Video Editor.» Then click Video Editor to launch it.
-
2
Open the setup file. Double-click the wlsetup-all.exe file in your computer’s default download location to open it. By default, you can open the file in your web browser or your Downloads folder.
Advertisement
-
3
Click Yes when prompted. This allows the Windows Movie Maker setup file to make changes to your system.
-
4
Click Install all of Windows Essentials (recommended). It’s at the top of the page. Most of the Windows Essentials programs aren’t compatible with Windows 10, but you can install Windows Movie Maker by clicking this option.
- Alternatively, if you only want to install Windows Movie Maker, click Choose the programs you want to install and uncheck all applications, except for Photo Gallery and Movie Maker. Then click Install.
- If you receive an error messages saying the software couldn’t be installed, continue on to check if it was installed anyway. If it was not, click the setup file again and repeat the installation process.
-
5
Open Start
. It’s the icon that has the Windows logo. It’s in the lower-left corner on Windows 10, and the first icon in the middle of the taskbar at the bottom of Windows 11.
-
6
Type in windows movie maker. This will search your computer for the now-installed Windows Movie Maker app.
-
7
Click Movie Maker. It’s has a film reel icon. It’s at the top of the Start menu. This will prompt the Windows Essentials terms of use window to open.
-
8
Click Accept. This option is in the bottom-right corner of the window. Movie Maker should open after you do this.
- If clicking Accept doesn’t open Movie Maker, re-open Start, type movie maker back in, and click the Movie Maker result again to open it.
- Don’t close the installation window before opening Movie Maker.
-
9
Close the Windows Essentials installation. When the installation window pops up with an error message, just click Close and confirm the decision when prompted. You can now proceed with using Windows Movie Maker.


Advertisement
-
1
Save your new project. A new project will be created automatically when you open Windows Movie Maker Go ahead and save your new project. To do so, click File in the menu bar at the top, and click Save project as in the drop-down menu. Enter a name for your project, and select a destination folder on the left side of the window (e.g., Desktop). Then click Save.
- At any point in the creation process, you can save your progress by pressing Ctrl + S.
-
2
Click the Home tab. It’s the second tab in the menu bar at the top of Windows Movie Maker.
-
3
Click Add videos and photos. It’s the first icon in the menu bar at the top. It has an icon that resembles a photograph and a filmstrip.
- You can also right-click the large «Project» window and then click Add videos and photos in the drop-down menu.
- If you want to record a video using your webcam, click Webcam video and click Ok to start recording a video with your webcam.
-
4
Select photos or videos. To do so, navigate to the video or images files you want to add to your project. Click a file to select it. Hold Ctrl and click to select multiple files. Then click Open to add the video files to your Project window.
-
5
Click Music. It’s the second icon in the menu bar at the top under the «Home» tab. It has an icon that resembles a music note. Click this icon to select music for your project.
-
6
Select music you want to add. To do so, navigate to folder that contains mp3 or audio files. Click and audio file you want to add and click Open.
- Alternatively, if you want to record a narration for your project, click Record narration to record narration with your microphone.


Advertisement
-
1
Determine a file order. Review your project files and decide which one should go first, second, and so on. You should also figure out where you want the music to start.
-
2
Re-order your files. Click and drag the file that you want to use at the beginning of the video to the top-left corner of the «Project» window to anchor it there. Then drag the next-up file over and drop it to the right of the first file.
- You should see a vertical line appear between the two files. This signifies that if you release the mouse button, the files will snap together.
-
3
Position the music. Click the green music bar that’s located below the video files in the Project window and drag it to the left or right. Then release it to reposition it.
- Keep in mind that the end of the music will lock to the end of the last video or image if the combined length of the files doesn’t add up to the music’s play time.
-
4
Edit an image’s duration. Double-click an image to open its properties in the toolbar at the top of the window. Then use one of the following options to set how long you want an image to display in your video project:
- Duration — Click the Duration text box, then type in the number of seconds you want an image to display for.
- End Point — Click and drag the black vertical bar in the Project window to a section in the photo or video where you want to cut off the photo or video and move on to the next one. Then click Set end point in the properties panel at the top.
-
5
Edit a video’s properties. Double-click a video in the Project window to open its properties in the toolbar. Then change any of the following options in the properties panel at the top:
- Volume — Click Video volume on the far left side of the Properties panel. Then click and drag the volume slider left or right to adjust the audio volume.
- Fade In/Fade Out — A fade-in is when the audio gradually raises from silence at the beginning or a clip. A fade-out is when the audio gradually lowers to silence at the end. To add a fade-in or fade-out, click the «Fade in» or «Fade out» box, then click Slow, Medium, or Fast to select the speed of the fade-in or fade-out.
- Speed — This allows you to speed up or slow down a video. Click the «Speed» drop-down box, then select a video speed. You can also type in a custom speed. 1x is normal speed. Anything below 1x will slow the video down. Anything above 1x will speed the video up.
- Trim — This allows you to select parts of a video you want to to use and cut out parts you don’t want to use. Click Trim tool in the menu bar at the top. Then click and drag the slider bar on the left below the video preview to where you want the video to start. Then click and drag the slider bar on the right to where you want the video to end. Then click Save Trim.
- Split — This cuts a video clip into two separate clips. Drag the vertical line in the large Project window to where you want to split a clip. Then click Split in the menu bar at the top to split the clip.
- Stabilization — This allows you to correct for shaky or wobbly video. Click Video stabilization, then select Anti-shake, Anti-shake and wobble correction — low, or Anti-shake and wobble correction — high.
-
6
Edit the music’s properties. Double-click the green music bar below a video or photo in the Project widow. Then change any of the following options in the toolbar at the top to edit the music:
- Volume — Click Music volume, then click and drag the slider left or right to adjust the music volume.
- Fade In/Fade Out — A fade-in is when the audio gradually raises from silence at the beginning. A fade-out is when the audio gradually lowers to silence at the end. To add a fade-in or fade-out, click the «Fade in» or «Fade out» box, then click Slow, Medium, or Fast.
- Start Time — This adjust the time (in seconds) when the music starts playing relative to the length of your entire project. Type the time when you want the audio to start in your project. You can also adjust this by clicking and dragging the green audio bar in the Project window.
- Start Point — This adjusts the time (in seconds) for when the audio file starts playing relative to the music file. This trims time off the beginning of the audio file. Type the time for when the section of the audio you want to use starts.
- End Point — This adjusts the time (in seconds) for when the audio file ends. This trims time off the end of the audio file. Type the time for when the section of the audio you want to use stops.


Advertisement
-
1
Click the Home tab. It’s in the upper-left side of the window. This will take you back to the editing toolbar.
-
2
Click Title. This option is in the «Add» section of the Home toolbar. This will add a new title at the beginning of the video. You can move the title around in your Project by clicking and dragging it.
-
3
Enter title text. In the text box that appears on the video preview window, type in the title that you want to assign to your video title.
- You can also edit the title slide’s length in the «Adjust» section of the toolbar by clicking the text box next to «Duration» and enter the time (in seconds) you want the title to last.
- If you want to change the title size, font, or formatting, you can do so in the «Font» section of the toolbar.
- To change the background of the title, click Background color in the menu bar at the top, and click one of the colored swatches.
-
4
Add captions to your video project. To add a caption to your video, click and drag the vertical black line in the Project window to where you want to add a caption. Then click Caption under the «Home» tab. Then type what you want the caption to say.
-
5
Edit the caption. To edit a caption, double-click the pink caption box below your video clip in the Project window. Then use the following options to edit the caption:
- Font — Use the options in the box above «Font» to select the font you want to use, font size, and style (i.e, bold, italic, underline). Then use the options in the box above «Paragraph» to select the text alignment (i.e. right, center, left) and the text transparency.
- Edit Text — If you need to edit the text, click Edit text or double-click the text in the video preview. Then use the keyboard to edit the text.
- Start Time — This sets the time in your project that the caption starts displaying. Type the time (in seconds) for where you want the caption to start showing. You can also click and drag the pink caption box in the Project window to adjust when the caption starts.
- Text Duration — Use the box next to «Time duration» to to type the time (in seconds) you want the caption to remain on-screen.
- Effects — Use the options in the «Effects» section in the menu bar at the top to select a text animation for your caption. Mouse over one of the options to preview it. Click it to apply the effect.
-
6
Add credits. To add credits, click Credits under the Home tab to add a new video clip for credits at the end of the clip. Then type your credits.
-
7
Edit your credits. To edit your credits, double-click the credits video clip at the end of your movie. Then use one of the following options to edit your credits:
- Edit the text — To edit the text in your credits, double-click the pink bar below the credits clip. Then use the keyboard to edit the text.
- Background color — To change the background color of your credits, click Background color in the menu bar at the top. Then click one of the colored swatches to pick a background color.
- Duration — To edit the time duration of the credits, use the box next to «Duration» to enter how long (in seconds) you want the credits to last.


Advertisement
-
1
Click the clip you want to add an effect or transition to. Click on any clip in the Project window to
-
2
Click the Animations tab. It’s the third tab in the menu bar at the top.
-
3
Add a transition. Transitions are visual effects that happen at the beginning and/or end of a video clip. There are a variety of transitions in the «Transitions» section in the menu bar at the Use the arrow buttons on the side of the section to scroll through all the transitions. Mouse over a transition to preview it. Double-click it to apply it to the video clip.
- To adjust the time duration of the transition, enter the time (in seconds) next to «Duration» to the right of the Transitions box.
- You can also click Apply to all to the right of the «Transitions» section to apply the transition to all video clips in your project.
-
4
Add a pan and zoom effect. Pan and zoom effects are useful on still images. The camera will either scroll over the image, or zoom in on it. To add a pan and zoom effect, click an image or video clip in your Project window. Mouse over one of the effects in the «Pan and zoom» section to preview the effect. Click on it to apply the effect.
- Click Apply to all to the right of the «Pan and zoom» section to apply the effect to all videos and images in your project.
-
5
Click the Visual Effects tab. It’s the fourth tab at the top of the page.
-
6
Click the video clip you want to apply a visual effect to. You can click any image or video clip in your Project window.
-
7
Add a visual effect. Visual effects allow you to change the color and look of a clip. You can make it black and white, sepia, or apply other color and visual effects. Mouse over an effect in the «Effects» section to preview the effect. Use the arrow keys next to the section to scroll through all the effects. Click and effect to apply it.
- Click Apply to All to the right of the box to apply the effect to all clips and images in your project.
-
8
Adjust the clip brightness. If you want to adjust the brightness of a clip, click Brightness next to «Effects» box. Then use the slider bar to adjust the brightness of the clip.


Advertisement
-
1
Preview your movie. Click the «Play» button below the movie preview window on the left side of the window. If your movie looks the way you want it to, you’re ready to save the movie.
- If the movie needs finessing, make any adjustments that are necessary before you continue.
- During the editing process, your music may end up off-beat or too short; if so, make sure that your music is properly edited to compensate before proceeding.
-
2
Press Ctrl+S to save your project. Alternatively, you can click File followed by Save project to save your project.
-
3
Click File. It’s in the menu bar at the top.
-
4
Click Save movie. It’s about halfway down the File menu. This displays a variety of formats you can save the movie in.
-
5
Select a save type. If you don’t know what format to use, click Recommended for this project at the top of the drop-down menu; otherwise, click the format that you want to use.
- You can select the best format for a variety of devices, including large, medium and small Android phones, iPhones, tablets, computers, email, and more.
- Alternatively, you can click Publish Movie and publish the movie directly to a social media application like YouTube, Facebook, or Twitter.
-
6
Enter a name for your movie. Type in the name that you want to use for the movie file itself.
-
7
Select a save folder. On the left side of the window, click a folder in which you want to save the movie file.
-
8
Click Save. It’s near the bottom-right corner of the window. This will save your movie file and begin exporting your project. Be patient—exporting can take a long time, especially for a detailed project.
-
9
Click Play when prompted. Doing so will play your movie in your computer’s default video player.


Advertisement
Add New Question
-
Question
What if my computer or device does not have enough memory to save the movie?

Try emptying the recycle bin or getting rid of files you don’t need. Using an external drive works for emptying files out of your computer while preserving them at the same time.
-
Question
How long of a movie will Movie Maker make?
The Movie Maker can make a movie as long as you want it to be. Though beware, the longer and more complicated the film, the more likely the program is to crash or stop functioning. The longer you make your film, the more often you should back-up the project.
-
Question
How long does it take to make a movie?
Movie makers are slow. Fet all the videos, and put them together, and when you save it might take a few hours for it to complete and it will be larger size (for example a normal two hour movie might be 2GB, but a two hour movie maker movie might be 10GB).
See more answers
Ask a Question
200 characters left
Include your email address to get a message when this question is answered.
Submit
Advertisement
-
It’s a good idea to hold onto your movie project files, which usually have the Windows Movie Maker logo as their file icons. This way, you can go back and edit the video at some point without having to start over.
-
The usage steps in this article also pertain to Windows 7, as Windows Movie Maker comes standard with Windows 7.
Thanks for submitting a tip for review!
Advertisement
-
As Windows 10 continues to update and evolve, you may find that Windows Movie Maker begins to freeze or become unresponsive. Make sure to save regularly.
-
Windows Movie Maker is no longer supported by Microsoft, so security issues and bugs won’t be fixed. You might want to consider using Video Editor instead.
Advertisement
About This Article
Article SummaryX
1. Download the archived setup file.
2. Run the setup file.
3. Click Install all of Windows Essentials (recommended).
4. Open Movie Maker in the Start menu.
5. If you see an installation error, close the message.
6. Accept the terms.
7. Create a new project.
8. Add photos and videos to your project.
Did this summary help you?
Thanks to all authors for creating a page that has been read 606,770 times.
Reader Success Stories
-

«It was a good step-by-step laid out simply and easy to follow. Thanks. Now I’m looking for help with a few…» more