- Remove From My Forums
-
Question
-
Can I mount ISO images from command line without using PowerShell?
Is it is possible to do it with the regular command prompt cmd.exe?
Answers
-
Thank you for your many helps. I was trying to do a Windows deployment batch, that is why I wanted no GUI. And i didn’t want multiple console windows, so i was thinking of doing it without PowerShell. (Not a PowerShell fan neither)
But i ended up calling PowerShell through the regular command prompt and no multiple console windows. So, it works fine but lots of escaping the escaping quote:
ECHO -Mounting Original Windows ISO File- powershell.exe "Mount-DiskImage ""%WindowsISO%""" ECHO. ECHO -Copying Windows Setup Files- IF NOT EXIST "%ProductionFolder%" MD "%ProductionFolder%" FOR /F "skip=3" %%I IN ('powershell.exe "Get-DiskImage """%WindowsISO%""" | Get-Volume | Select-Object {$_.DriveLetter}"') DO xcopy.exe /S /E /I /Q /H /R /Y %%I: "%ProductionFolder%" ECHO. ECHO -Unmounting Original Windows ISO File- powershell.exe "Dismount-DiskImage ""%WindowsISO%"""-
Edited by
Wednesday, January 16, 2013 11:08 PM
-
Marked as answer by
Leo Huang
Tuesday, January 22, 2013 2:06 AM
-
Edited by
(Image credit: Windows Central)
An ISO image is a container format designed to store the contents of a physical disk (CD, DVD, or Blu-ray). Software companies usually use this file format as a medium to distribute the applications and tools without the need to ship physical media, which can be costly and time-consuming. For example, Microsoft uses this format to distribute previews of Windows 10 to testers and many other products.
Although you can find a lot of tools to work with images, Windows 10 includes the ability to mount and mount ISO files natively without the need for extra software.
In this Windows 10 guide, we’ll walk you through the steps to mount and unmount the ISO images using File Explorer as well as PowerShell commands.
- How to mount ISO image with File Explorer
- How to mount ISO image with PowerShell
How to mount ISO image with File Explorer
On Windows 10, you can access the content of an image in at least three different ways using File explorer. You can double-click the file, you can use the content menu option, or the option available in the ribbon menu.
Mount image with double-click
To quickly mount an ISO file on Windows 10, use these steps:
- Open File Explorer.
- Browse to the folder with the ISO image.
- Double-click the .iso file file to mount it.
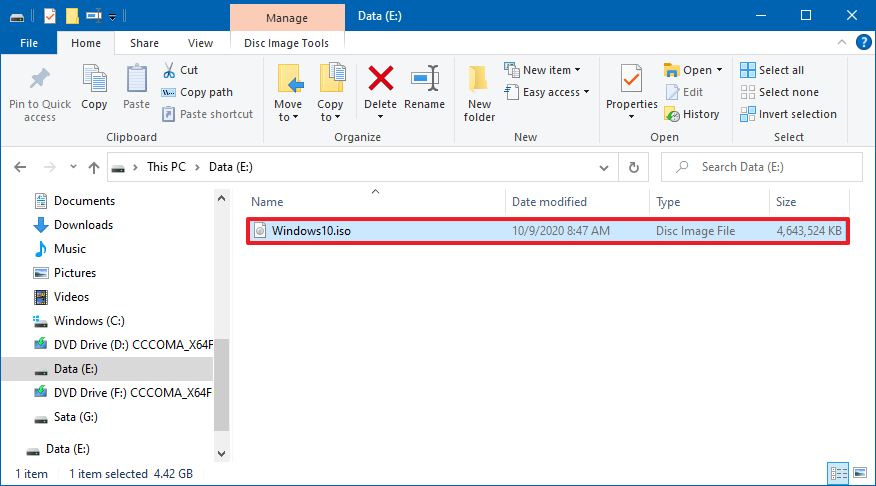
Once you complete these steps, the ISO file will open like any other folder, allowing you to access and extract the contents as necessary.
To mount an ISO image with the File Explorer context menu, use these steps:
- Open File Explorer.
- Browse to the folder with the ISO image.
- Right-click the .iso file and select the Mount option.
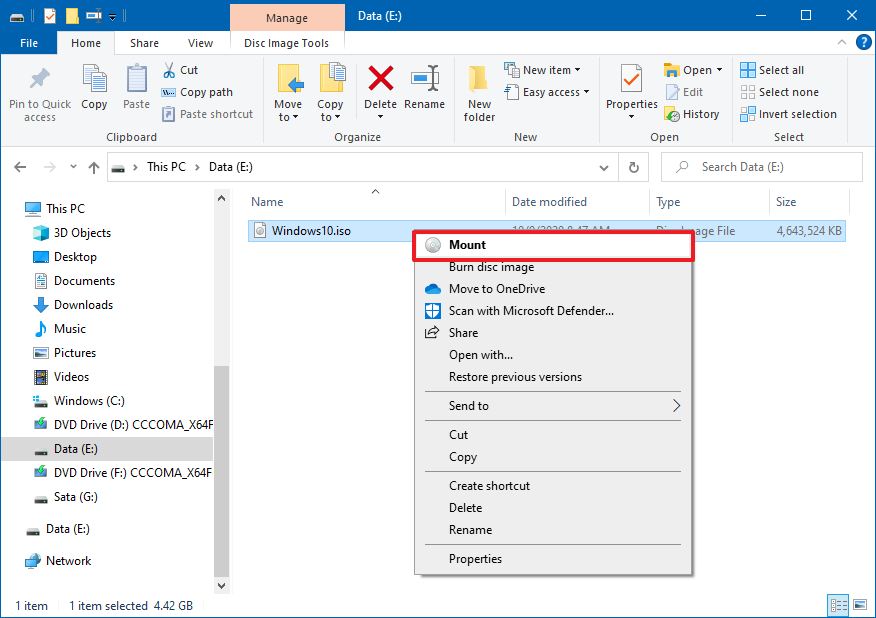
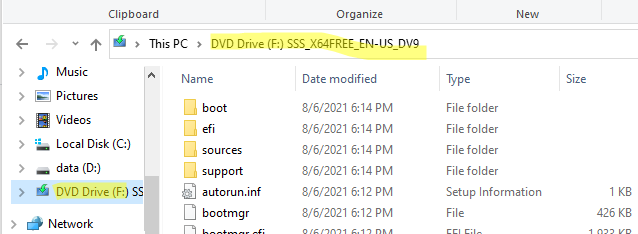
Once you complete the steps, you can access the contents of the image by selecting the virtual drive from the left navigation pane.
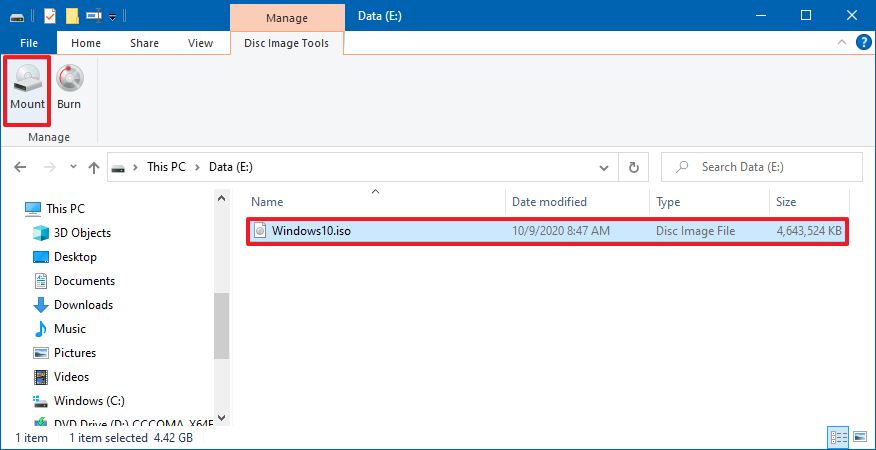
To mount an image with the ribbon menu, use these steps:
- Open File Explorer.
- Browse to the folder with the ISO image.
- Select the .iso file.
- Click the Disk Image Tools tab.
- Click the Mount button.
If you have a third-party tool to open compressed files (such as .zip, .tar, .rar, etc.), it’s possible the tool may also be configured as the default application to open ISO images. When this happens, you won’t see an option to mount images. However, you can still right-click, select the Open with submenu, and select the Windows Explorer option to mount the ISO.
Unmount image
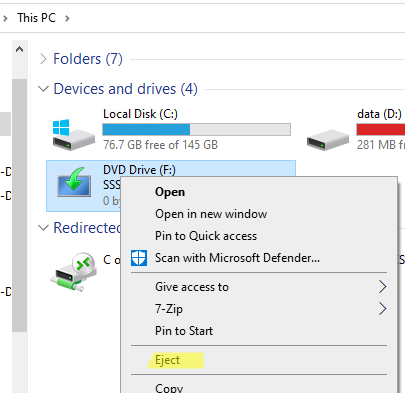
Once you are no longer using the image, you can quickly unmount the file by right-clicking the virtual drive under This PC in File Explorer and selecting the Eject option.
- Open File Explorer.
- Expand This PC from the left navigation pane.
- Right-click the virtual drive and select the Eject option.
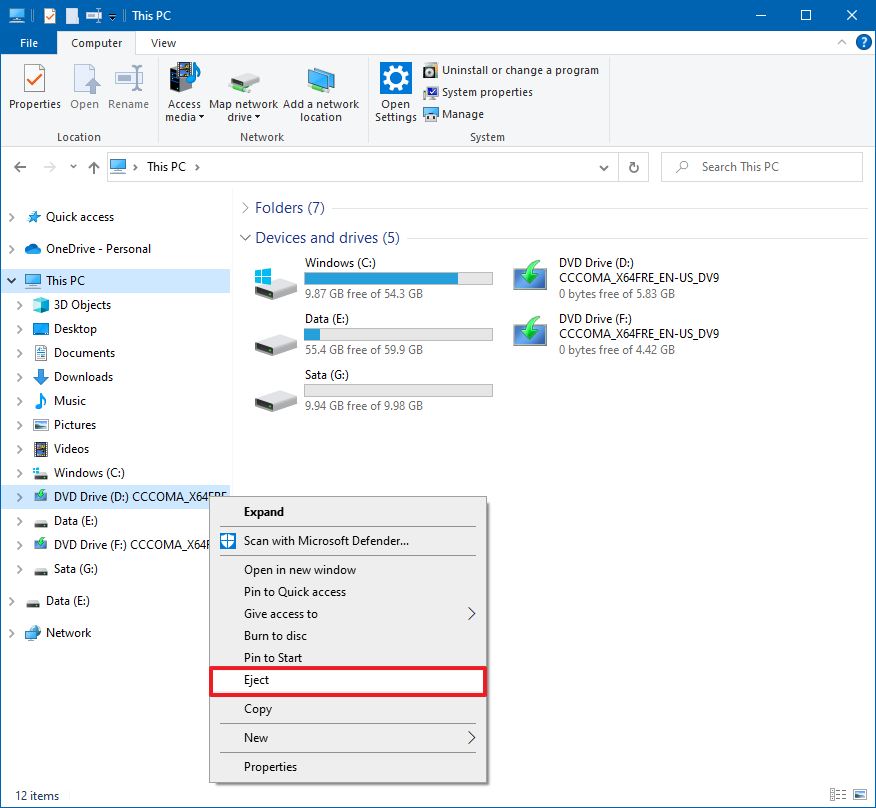
After you complete these steps, the image will no longer be accessible until you mount it again.
How to mount ISO image with PowerShell
It’s also possible to mount and unmount an image using commands with PowerShell.
Mount ISO image command
To mount an ISO image using a PowerShell command, use these steps:
- Open Start.
- Search for PowerShell, right-click the top result, and select the Run as administrator option.
- Type the following command to mount an ISO image and press Enter:
Mount-DiskImage -ImagePath "PATH\TO\ISOFILE"In the command, make sure to replace the «PATH\TO\ISOFILE» with the actual path of the .iso file.For example, this command mounts an image in the «E:\» virtual drive:Mount-DiskImage -ImagePath "E:\Windows10.iso"
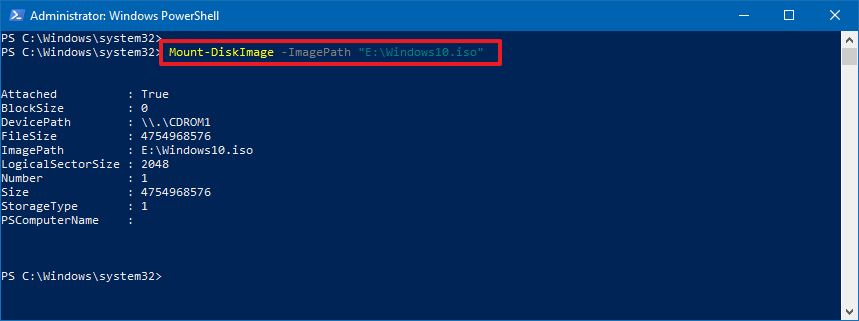
Once you complete the steps, the ISO image will mount, and you will be able to access the contents to install the application or extract the image contents from the newly-available drive letter.
Unmount ISO image command
To unmount an image with PowerShell, use these steps:
- Open Start.
- Search for PowerShell, right-click the top result, and select the Run as administrator option.
- Type the following command to mount an ISO image and press Enter:
Dismount-DiskImage -ImagePath "PATH\TO\ISOFILE"In the command, make sure to replace the «PATH\TO\ISOFILE» with the actual path of the .iso file.For example, this command removes the mount for an image in the «E:\» virtual drive:Dismount-DiskImage -ImagePath "E:\Windows10.iso"
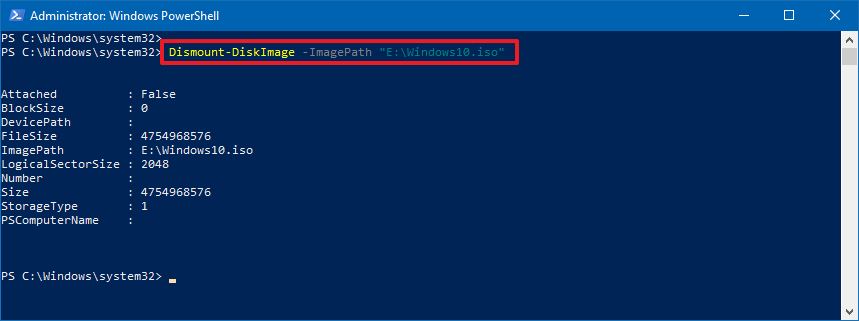
After you complete the steps, the virtual drive will be removed, and the image will no longer be accessible until you mount it again.
All the latest news, reviews, and guides for Windows and Xbox diehards.
Mauro Huculak is technical writer for WindowsCentral.com. His primary focus is to write comprehensive how-tos to help users get the most out of Windows 10 and its many related technologies. He has an IT background with professional certifications from Microsoft, Cisco, and CompTIA, and he’s a recognized member of the Microsoft MVP community.
Встроенный функционал монтирования файлов с ISO образами доступен во всех современных версиях Windows (начиная с Windows 8/ Windows Server 2012). ISO файл представляет собой файл-контейнер с образом оптического диска с файловой системой ISO 9660. Несмотря на то, что оптические CD/DVD/Blu-ray приводы уже почти не используются, формат ISO образов все еще остается очень популярным форматом для распространения различных дистрибутивов продуктов. Чаще всего ISO образы используются для распространения дистрибутивов операционных систем (Windows, Linux и т.д).
В Windows 10/11 вы можете смонтировать файл с ISO образом прямо из проводника File Explorer. Просто дважды щелкните по файлу с расширением *.iso или выберите в контекстном меню пункт Mount.
В результате в Windows появится новый виртуальный CD/DVD привод, в который будет смонтирован файл с образом (буква диска будет назначена автоматически). Вы можете работать с файлами на диске, как будто они находятся на обычном физическом диске (файлы на виртуальном диске доступны только для чтения).
Чтобы отмонтировать ISO образ, щелкните по виртуальному приводу и выберите пункт Eject.
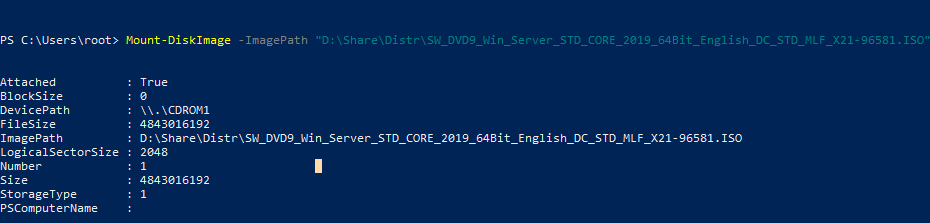
Вы можете использовать PowerShell, чтобы подключить файл с ISO образом в Windows. Для этого нужно указать полный путь к *.iso файлу в команде:
Mount-DiskImage –ImagePath "D:\Share\Distr\win_Server_STD_CORE_2019.ISO"
ISO образ смонтирован успешно (
Attached: True
).
Командлет Mount-DiskImage позволяет монтировать не только ISO файлы, но и виртуальные диски в формате VHD/VHDX/VHDSet. Если вы хотите указать, что файл нужно монтировать только в виде ISO, используйте команду:
Mount-DiskImage –ImagePath your.iso -StorageType ISO
Чтобы сразу узнать букву диска, которая назначена вашему ISO образу, используйте команду:
Mount-DiskImage –ImagePath "D:\Share\Distr\win_Server_STD_CORE_2019.ISO"| Get-Volume
В данном примере видно, что ISO образу назначена буква F (DriveLetter).

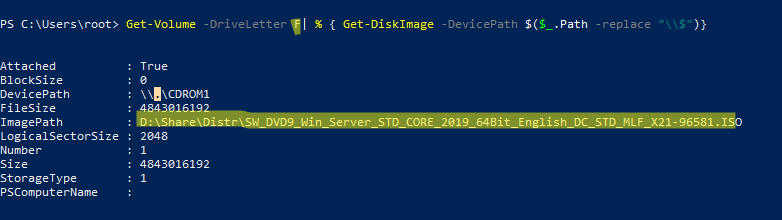
Также с помощью команды Get-Volume можно определить имя файла с ISO образом, который смонтирован в указанный виртуальный CD привод:
Get-Volume -DriveLetter F| % { Get-DiskImage -DevicePath $($_.Path -replace "\\$")}
Если вам нужно, чтобы ISO файлу с образом всегда назначалась определенная буква диска, можете использовать такой PoweShell скрипт:
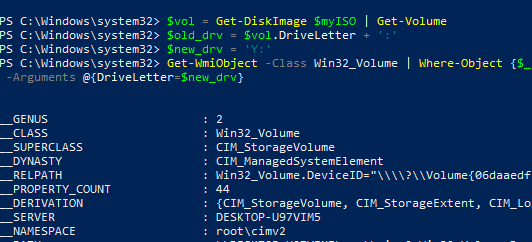
$myISO = "D:\Share\Distr\win_Server_STD_CORE_2019.ISO"
Mount-DiskImage $myISO
$vol = Get-DiskImage $myISO | Get-Volume
$old_drv = $vol.DriveLetter + ':'
$new_drv = 'Y:'
Get-WmiObject -Class Win32_Volume | Where-Object {$_.DriveLetter -eq $old_drv} | Set-WmiInstance -Arguments @{DriveLetter=$new_drv}
Чтобы отмонтировать ISO образ, выполните:
Dismount-DiskImage -ImagePath "D:\Share\Distr\win_Server_STD_CORE_2019.ISO"


Contents
- 1 How to Mount ISO or IMG files Opening Them Directly
- 2 How to Mount ISO or IMG files from File Explorer Command Bar
- 3 How to Mount ISO or IMG files using the Mount Context Menu
- 4 How to Mount ISO or IMG files using the “Open with”-Context Menu
- 5 How to Unmount ISO or IMG files using Eject
- 6 How to Mount or Unmount ISO or IMG files in PowerShell
- 7 How to Mount or Unmount ISO files / IMG files in Command Prompt
ISO images hold the information on physical media like CDs, DVDs, and Blu-ray discs in an archival file format using the file ending “.ISO”. Software makers and developers employ ISO files to deliver programs, utilities, and operating systems in this format which then can be used to create exact physical copies of those CDs, DVDs, and Blu-ray discs or to attach (mount) those as virtual discs directly to a running system
For a long time, Windows didn’t provide built-in support for ISOs. Before Windows 8, you had to utilize third-party utilities. What you should know about ISOs on Windows 11 is provided below.
The difference between ISO and IMG files
The older IMG file format was designed to allow exact backup copies of floppy disks in a single file, just as ISO does for optical discs. It works by creating a bitmap of each sector of the disk that has been written to. Since the demise of floppy disks, the IMG format has been primarily used for the creation of hard disk image files.
You may view the entire contents of an ISO image or an IMG image when you mount it on Windows 11. ISO files can be used to distribute software via bootable media images and IMG files to create exact copies of hard drives/SSDs as backups or for easy deployment of similar workstations in large organizations.
When you mount an ISO file / IMG file, your computer will handle it as if you had loaded/connected a CD, DVD, Blu-ray disc, or HDD/SSD on your system
How to Mount ISO or IMG files Opening Them Directly
You should always proceed with care when mounting ISO files since they may include malware or other potentially unwanted applications. In Windows 11, you can mount ISO / unmount ISO files in a straightforward way by just opening them.
- Double Click to mount the ISO File on your system

- OR Select the ISO file and press “Enter” to mount it


How to Mount ISO or IMG files from File Explorer Command Bar
You can also mount the ISO file with the File Explorer Command Bar as shown in the following step.
- Click on the ISO file, select the three dots at the top right corner and choose “Mount” from the options


You can mount the ISO file by right-clicking on it.
- Right-click on the ISO file and select “Mount” from the context menu options


You can also mount the ISO file using the “Open with” option from the context menu.
- Right-click on the ISO file, select “Open with”, and choose “Windows Explorer”


How to Unmount ISO or IMG files using Eject
Unmounting ISO files / IMG files is as easy as mounting them. Just follow along with the following procedure.
- Select the mounted ISO file, click on the three dots at the top right corner, and select “Eject”

- Right-click on the mounted ISO file and select “Eject” from the context menu


You can also use PowerShell to mount or unmount ISO images and files.
- Right-click on the “Windows” icon and select “Terminal” from the context menu
This particular step will open up the terminal app where you can access Windows Powershell.

- Click on the “Keyboard Down” icon and select “Windows PowerShell” from the context menu options

- Type in the following command to mount the ISO file / IMG file:
Mount-DiskImage -ImagePath YOUR_ISO_File_Location
Paste the path of your ISO file in the command, and it will mount that specific ISO file.

- Type in the following command to assign the desired drive letter to the mounted ISO file / IMG file
Dismount-DiskImage -DevicePath YOUR_Drive
In the command above, replace <Your Drive> with the DVD drive letter (for example, “E”) of the mounted ISO or IMG file you want to unmount.

- Type in the following command to unmount the ISO file / IMG file using PowerShell
Dismount-DiskImage -DevicePath "Filepath"
ALternatively, paste the path of your ISO file in the command, and it will unmount that specific ISO file or IMG file.


How to Mount or Unmount ISO files / IMG files in Command Prompt
- Right-click on the “Windows” icon and select “Terminal” from the context menu
- Select the “Command Prompt” from the dropdown options

- Type in the following command to mount the ISO file / IMG file using the command prompt
PowerShell Mount-DiskImage -ImagePath "path of ISO File"

Use the complete path and filename of the ISO file in the above command instead of “path of ISO File”, and it will mount that specific ISO file.

Unmount the ISO file / IMG file using Command Prompt through the following command
PowerShell Dismount-DiskImage -DevicePath \\.\<drive letter>
Paste the DVD letter of the mounted ISO file in the above command to unmount that ISO file / IMG file.

You can also use the following command to unmount the ISO file / IMG file using the command prompt
PowerShell Dismount-DiskImage -ImagePath <ISO FILE PATH>
In the above command, paste the full path of the ISO file to unmount.

The ISO images have now become multipurpose and vastly used to share large files and software in a single-file format. This prevents any data corruption while preserving its formatting. You can download an ISO file off the internet like any other regular file.
Most operating systems natively support ISO files, which means they can be used (mounted) without having to use a third-party tool. Windows 11 and Windows 10 are among these operating systems. You can mount an ISO file directly onto your Windows system to use its content(s).
It is also possible to only extract the contents of an ISO file, but that requires third-party tools which we have discussed in this post.
There are multiple ways you can mount an ISO image in Windows. Let’s see how to achieve that.
The methods to mount an ISO file are the same for both Windows 10 and 11.
Mount ISO using File Explorer
Windows Explorer/File Explorer is an application in Windows that is preinstalled to navigate through the different volumes, folders, and files. It can be used in 3 ways to mount an ISO file.
Mount ISO Image with Double-Click
Since Windows supports ISO files natively, you can mount an ISO file simply by double-clicking on it.
Use File Explorer to navigate to the ISO’s location and double-click it using your mouse. The contents of the ISO file will now appear, and the Explorer will open the ISO file like any other folder. You can now start using the contents of the ISO file if you want.
If you click on This PC from the left navigation bar in Explorer, you will see the ISO file has been mounted.
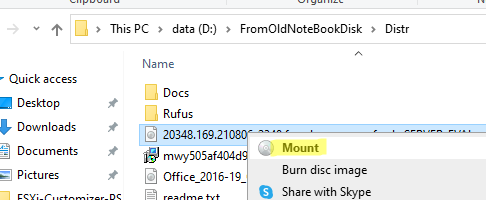
Another quick way to mount an ISO file in Windows is through its context menu. The effect is the same as double-clicking it; the image is mounted and File Explorer opens the ISO file like a regular folder.
Navigate to the ISO file that you want to mount, right-click on it, and then click Mount from the context menu.Mount using the context menu
You will now see that the ISO image has been mounted successfully from the left navigation bar, or by clicking This PC.
The ribbon menu is the menu that you see at the top of File Explorer. You can also mount an ISO file using the ribbon menu after you have selected it.
To mount an ISO file using the ribbon menu in Windows 11, navigate to it using File Explorer and then click on it to select it. Once selected, click on the ellipses (3 dots) from the ribbon menu and then click Mount.Mount ISO using ribbon menu in Windows 11
For Windows 10, navigate to the ISO image using File Explorer and then click on it to select it. Then, click Disc Image Tools from the ribbon menu and click Mount.
In both of these cases, Explorer will open the ISO file like any other folder and will mount it too.
Eject/Unmount ISO Image using File Explorer
When you are finished with your work on the ISO file or wish to mount another ISO, you can dismount this ISO file in a few easy steps using File Explorer.
Open This PC using Explorer and right-click on the CD/DVD drive where the ISO file is mounted. From the context menu, click Eject. Alternatively, you can also eject it from the navigation bar on the left through the context menu.
Another way to unmount an ISO file is through the ribbon menu. Open the mounted ISO using File Explorer, and then click Eject through the ellipses at the top (Windows 11), or through the Drive Tools menu (Windows 10).
Mount ISO using Windows PowerShell
If you prefer to use the Command Line Interface (CLI), you can also mount an ISO image using Windows PowerShell that is preinstalled in both Windows 10 and 11.
Open PowerShell by typing in powershell in Run dialog. Then use the following command to mount the ISO file. Note that the command requires you to know the complete name and path of the file to be mounted, which can be confirmed using File Explorer if you do not already know.
Replace CompletePathToISO with the actual path and name for the ISO file that you want to mount, as we have done in the example below:
The ISO file will now be mounted to your PC.
Eject/Unmount ISO Image using PowerShell
An ISO image can also be dismounted using File Explorer, which also requires you to know its complete path and name. Use the command below to unmount an ISO file from Windows PowerShell while replacing CompletePathToISO with the actual path and name for the ISO file.
Mount ISO Image using Tools
You can also mount ISO files in Windows using third-party tools. Although this is not necessary, since Windows supports ISO images natively, you can still use the following tools to mount an ISO image:
PowerISODaemon Tools LiteWinISOVirtual CloneDrive
Although there are many other free tools available on the internet, these are ones we found to be the most useful ones.
Third-party tools are required to extract the contents of an ISO file since Windows cannot do it for you.
Unlike an IMG file, ISO files are not compressed. That said, there are compression/decompression tools available in the market that will extract the contents of an ISO file and place them in a regular folder. These tools only extract the contents and do not decompress them, as an ISO file is already in its regular form.
The following tools can be used to extract the contents of an ISO image:
WinRARWinZip7Zip
Verdict
ISO files are becoming more common. Most large files we download from the internet are in ISO format, and there are many tools for their conversion (to and from ISO). Microsoft provides its users with the convenience of opening and using these files without having to download additional tools.
Also see:
How to Mount MDF Files in Windows 11/10How to Add Language Packs to Windows 11/10 ISO Image (Offline)How To Extract And Open .TAR, .GZ, .TAR.GZ, .TGZ Files In WindowsHow To Create ISO From Folder Using Command Line In WindowsConvert DMG to ISO on Windows, Mac, Linux and Online