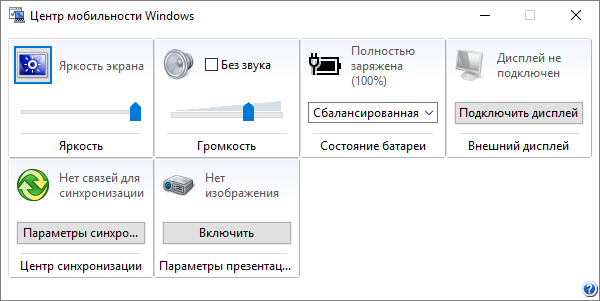
Привет друзья! В комплекте с Windows 7, 8.1 и 10 поставляется специальное приложение, именуемое Центром мобильности. Используется оно в основном на портативных устройствах для быстрого доступа к базовым настройкам яркости, громкости, синхронизации, электропитания, управления ориентацией экрана, параметрами презентации и некоторыми другими компонентами.
Центр мобильности Windows штука полезная, но вы можете столкнуться с ситуацией, когда его нужно будет отключить. В Windows 10 он, к примеру, вообще не особо нужен, так как управлять некоторыми из перечисленных выше настроек можно из Центра действий. Отключить Центр мобильности нетрудно.
Как в Windows 10 включить или отключить Центр мобильности
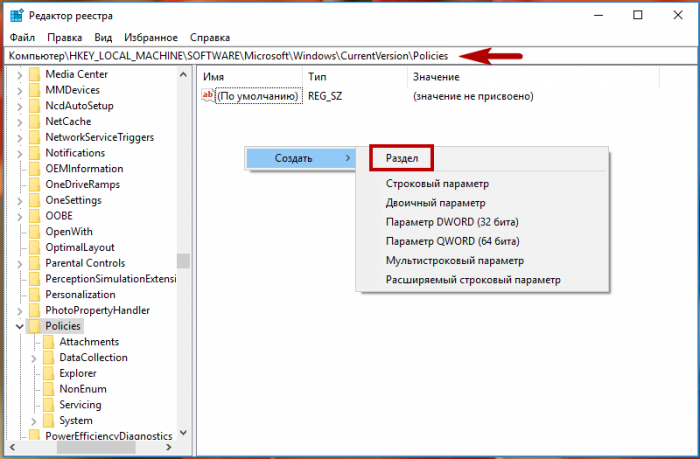
Откройте командой regedit редактор реестра и разверните этот ключ:
HKEY_LOCAL_MACHINE/SOFTWARE/Microsoft/Windows/CurrentVersion/Policies/MobilityCenter
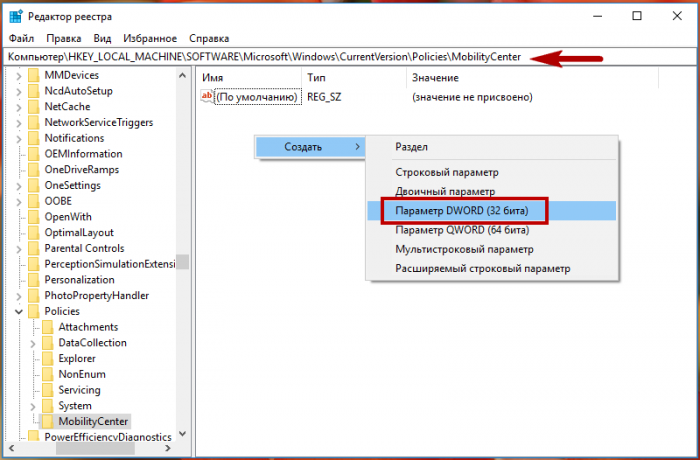
Может статься, что подраздела MobilityCenter у вас не окажется, в этом случае его нужно будет создать вручную. В свою очередь в нем необходимо создать 32-битный параметр типа DWORD с именем NoMobilityCenter и установить в качестве его значения 1.
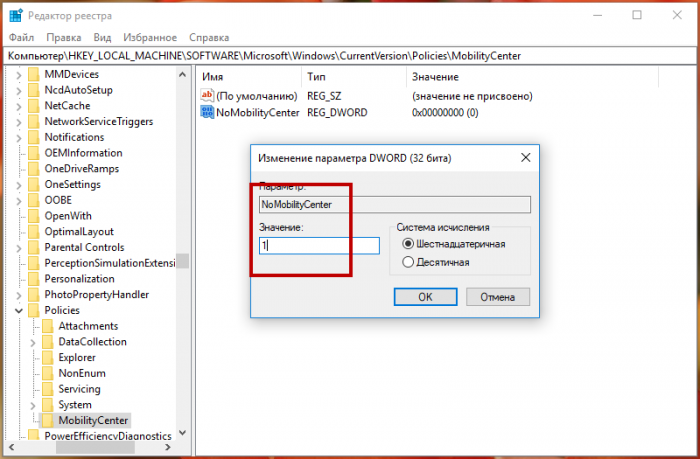
Это действие отключит Центр мобильности для всех пользователей. Если же вы захотите деактивировать приложение для конкретного юзера, то же самое нужно сделать в ключе HKEY_CURRENT_USER/Software/Microsoft/Windows/CurrentVersion/Policies/MobilityCenter.
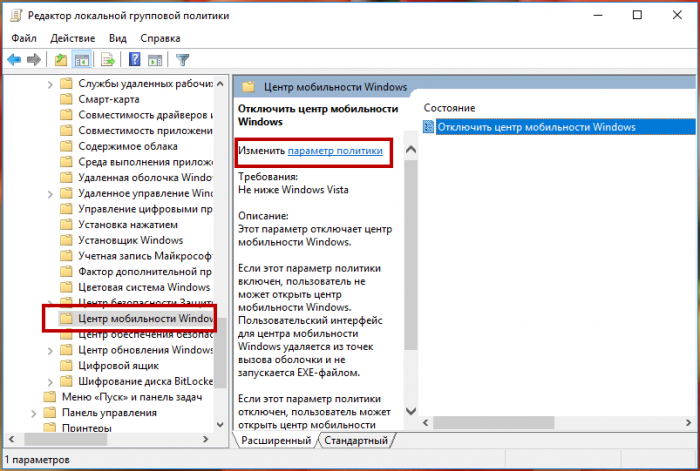
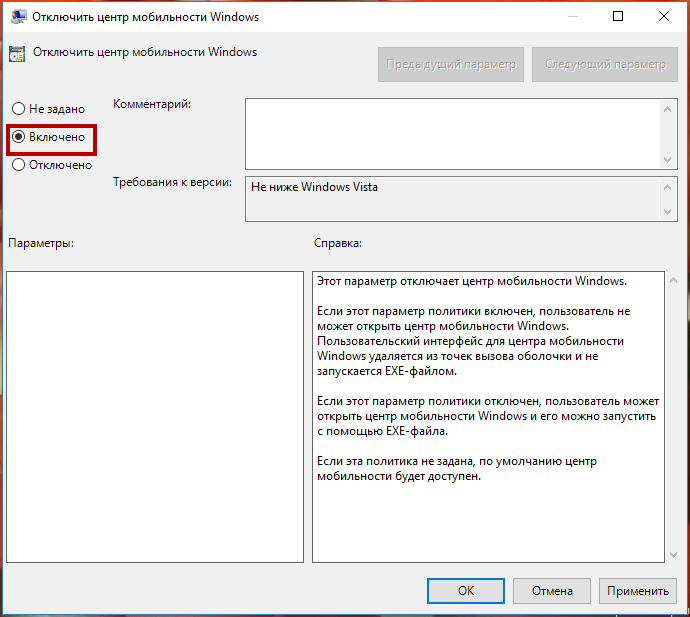
В обоих случаях изменения вступят в силу после перезагрузки компьютера. Для отключения Центра мобильности также можно использовать редактор локальной групповой политики. Открыв его командой gpedit.msc, перейдите по цепочке Конфигурация компьютера → Административные шаблоны → Компоненты Windows → Центр мобильности Windows. Справа нажмите ссылку «»Изменить параметры политики» и установите в открывшемся окошке радиокнопку в положение «»Включено».
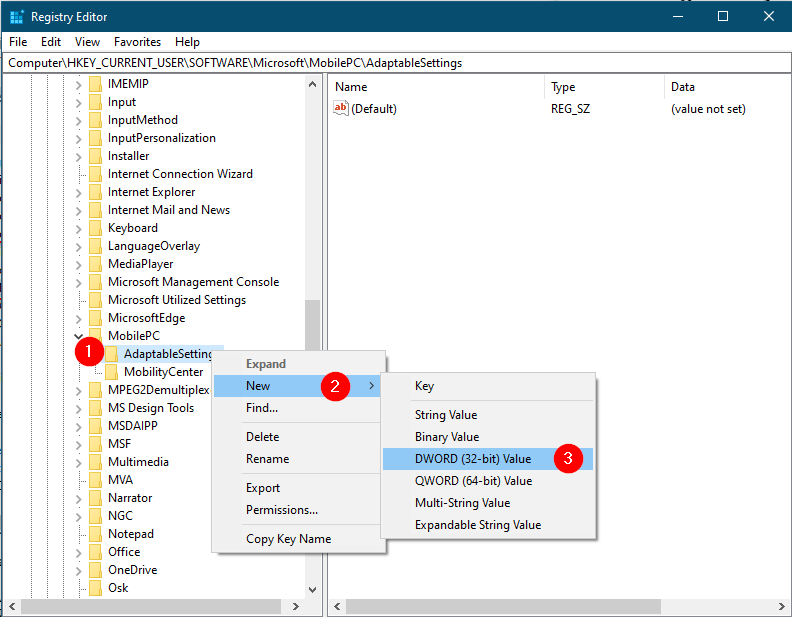
А как вот быть, если нужно как раз наоборот, включить Центр мобильности на десктопном компьютере? По умолчанию это приложение работает только на мобильных ПК и планшетах, если вы хотите пользоваться им на обычном настольном компьютере, нужно применить соответствующий твик реестра. Открыв редактор реестра, разверните ключ HKEY_CURRENT_USER/Software/Microsoft, создайте в последнем подразделе сначала каталог MobilePC, а затем MobilityCenter так, чтобы последний был вложен в предыдущий (см. скриншот).
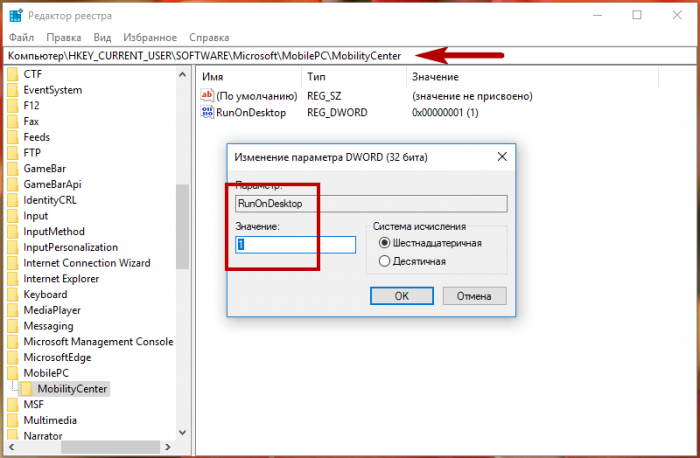
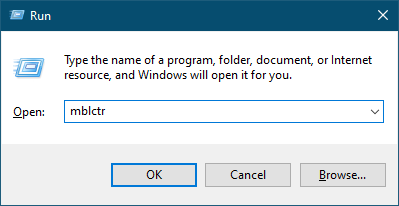
В подразделе MobilityCenter создайте 32-битный DWORD-параметр с именем RunOnDesktop и установите в качестве его значения 1. После перезагрузки вы сможете запускать Центр мобильности командой mblctr из окошка «Выполнить».
If you want to customize the main settings of your Windows 10 laptop, directly launch Windows Mobility Center on your screen. Windows Mobility Center is one of the main constituents of Microsoft Windows which has been found with the introduction of Windows Vista. Before heading more, make a note that Windows Mobility Center will not be accessible in the computers which are not portable. The users who have Windows 10 installed on their laptops, Ultrabook or tablet will be able to take benefit of Windows Mobile Center and utilize it.
Now coming back to its description, it allows the users to control or change the settings of the important components of their system. It has a user-friendly interface with a sequence of some tiles on its window, each representing a portion of information. The items listed by the tiles totally depend on the manufacturers of the device. So don’t get tensed. The general and most used are present in almost all the systems.
In this tutorial of Windows Mobility Center in Windows 10, we will cover its entire details, starting from its accessibility to use its tiles and a lot more. Have patience till the end of this post because you are really going to get some interesting knowledge. Let the learning begin!
There are a couple of ways which lead to the launch of Windows Mobility Center on your screen. You can follow any of them as per your comfort.
Start Menu
The first process is via Cortana Search merely underneath the Start Menu. Hit the Cortana icon, type Mobility Center in the search area at the lowermost part.

You will notice it in the result. Click on it to open.
Control Panel
Another way to get into Windows Mobility Center is from the Control Panel. First, open the Control Panel. Among the different categories, look for Hardware and Sound.

Under Hardware and Sound window, click the Windows Mobility Center option.

Power User Menu
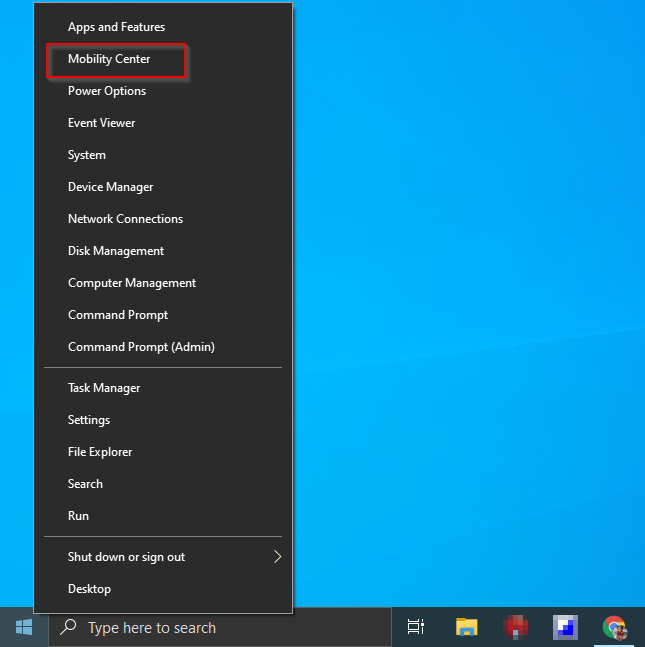
Right click on the Start icon on the Taskbar. You will notice a list of options. It is called Power User Menu. You can even use the keyboard shortcuts of Windows and X keys to launch this Power User Menu on the screen. Look carefully, the Mobility Center is the second option on the arrived list. Click and open it.

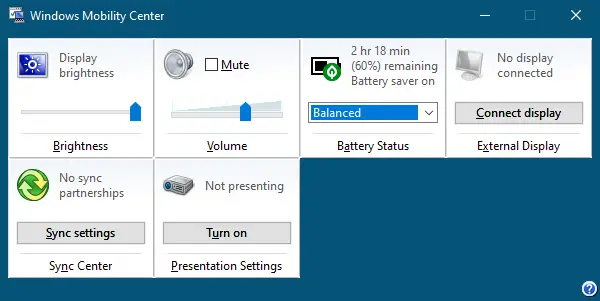
When you open Windows Mobility Center on your Windows 10, it will look something like this, each tile representing each component of your system (See the screenshot below). Rather than navigating the complicated ways to open the components for simple settings, you will get all at one place, which saves your time and energy. Below is the list of tiles that are present in the laptop using Windows 10 –
- Brightness
- Volume
- Battery Status
- External Display
- Sync Center
- Presentation Settings

The settings of each tile will carry out in the next part of this post.
How to Set the Brightness in Windows Mobility Center in Windows 10
The first tile of the Windows Mobility Center is the Brightness. The name and look of the tile itself explain you everything. Use the slider to adjust the display brightness of your Windows 10 laptop screen. Of course, reduce the brightness, the better will be the life of the battery. You might have used this setting in a different way, but here as mentioned before, all at one place.

How to Set the Volume in Windows Mobility Center in Windows 10
The method of using the Volume tile is same as the Brightness tile. If you wish to put the sound into a silent mode, check the Mute box. Drag the slider to left or right to increase or decrease the volume. Adjust it to the level you want.

How to Set Battery Status in Windows Mobility Center in Windows 10
The Battery Status tile exhibits you the percentage of remaining power. It also permits you to select the preferred power plans from the drop down menu. When you click on the drop down menu you will notice three power plans are listed. The Balanced power plan is selected by default. Its’ performance is automatic and creates a balance between the performance and its usage. The Power saver option lets the resources provide their maximum performance. You can keep on changing the options and experience yourself which power plan suits best for your laptop.

How to Set External Display in Windows Mobility Center in Windows 10
The option of connecting to the external display will not be obtainable if you are not using a laptop or tablet. This tile will enable your laptop connected to the external display. You will see an option Connect Display in the External Display tile. A click on the Connect Display option will prompt up a charms list on the right edge of your screen exhibiting you different projecting options to choose from. You can view this list through Control Panel also or by simply pressing Windows and P keys on your keyboard.

Below are the four projecting options and their workings –
- PC Screen Only – The external display will be turned off when this option is being selected because it chooses only the computer screen, the one on which you are working.
- Duplicate – When you opt this option, you will see the exact thing on the connected monitor that you are able to see on your PC screen.
- Extend – It is the extension of your PC’s display screen on the connected external screen.
- Second Screen Only – It will switch off the display of your laptop’s screen by making the connected screen as the main screen.

After the completion of your preferred external display, you might require to executing certain modifications of your screen resolution. This facility is not built in Windows Mobility Center. To carry out the modifications, go to your Desktop, right-click on an empty area and select Display settings. Then carry out the needed modifications. In case you think you went wrong with the modifications, the 15 seconds timer of Windows will display the real settings when the new one fails to perform.

How to Use Sync Center in Windows Mobility Center in Windows 10
When you click on the Sync Setting option of Sync Center you will get into the Sync Center window. Dropping down the details of Sync Center here will be a massive thing. We request you to go the below link and get the information related to it.
How to Set Presentation Settings in Windows Mobility Center in Windows 10
Last but not the least tile of Windows Mobility Center is of Presentation settings. This option is the simplest of all the settings of the presentation. If you are working first time on this setting from this component, click Turn On button of Presentation Settings tile of Windows Mobility Center.

This action will then lead to the pop-up of new Presentation Settings window which will inquire you about performing a presentation. (In case this new window doesn’t pop up automatically, click on the icon of the Presentation Settings and you will get its new settings window on your screen).

In the new Presentation Settings window if you select the first option I am currently giving a presentation, Windows will then deactivate all those power settings which might switch off your screen display and turn all the notifications of the system to the mute mode. You can modify the other options like the turn off the screen saver or the volume settings. You can even change the background of the desktop so that it doesn’t affect your presentation.
Now to connect your laptop to another display, go to the External display tile and click on Connect display. Then abide the steps that have been mentioned in the External display section.
My Opinion
Windows Mobility Center is the best component where you can perform so many settings. If you are using any Windows 10 portable device, this is the most helpful application you will ever experience. Those users who have not experienced it till now are requested to have a look at Windows Mobility Center and experience a new way of settings things. The most interesting thing is the Presentation one. Making a presentation has never been so easy in Windows 10.
Windows 10 comes with a built-in feature called Windows Mobility Centre. With the help of Windows Mobility Centre on a Windows 10 laptop or notebook, you can quickly and easily access or adjust the display brightness, mute or adjust volume, view and change Power Plans, access the remaining battery percentage, set Sync Settings, and connect to an external display. However, this feature is active by default on laptops only, so you need to allow the same first if you are using Windows 10 on a desktop PC.
This post will guide you through enabling the Windows Mobility Centre on Windows 10 desktop and multiple ways to open it.
How to enable or turn on Windows Mobility Center on Windows 10 desktop computer?
Those who have not enabled the Windows Mobility Center on Windows 10 desktop PC and try to access it will receive a message “Windows Mobility Center is available only on laptops.”
Gentle Reminder: To enable the Windows Mobility Center on Windows 10 desktop computer, you need to modify the Registry; hence, we recommend taking the full backup of the Windows Registry and creating a system restore point. In case something goes wrong, you can revert your PC to a previous working state.
To enable or turn on the Windows Mobility Center on Windows 10 desktop, perform the following steps:-
Step 1. Press the Windows logo + R keys to open the Run dialog box.
Step 2. In the Run dialog box, type the following and hit Enter from the keyboard or click the OK button to open the Windows Registry:-
regedit
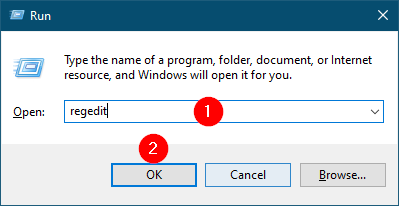

Step 3. In the Registry Editor window that opens, navigate to the following key:-
Computer\HKEY_CURRENT_USER\Software\Microsoft\MobilePC
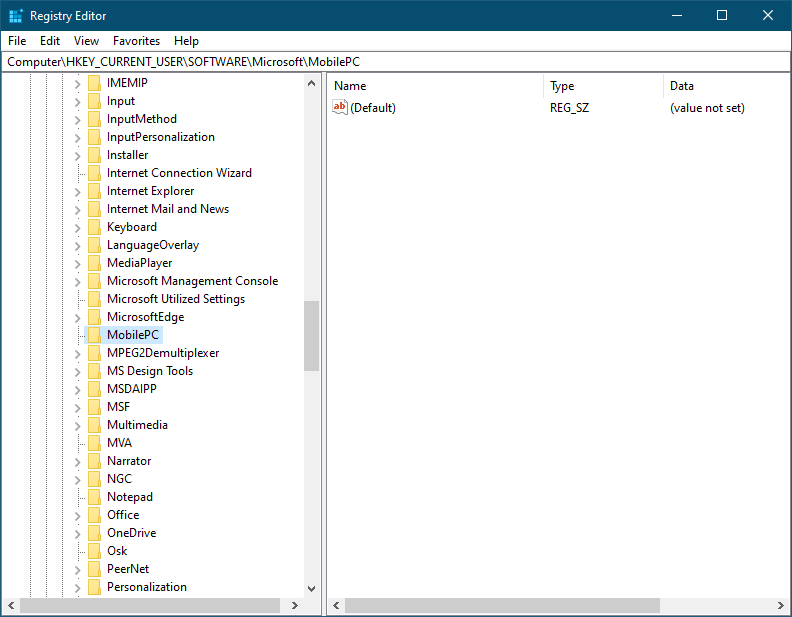
Note: On the MobilePC folder, you need to create two sub-keys, AdaptableSettings and MobilityCenter. If any key is present, you can skip the step.
Step 4. Right-click on MobilePC and select New, and then Key. Name the newly created key as AdaptableSettings.
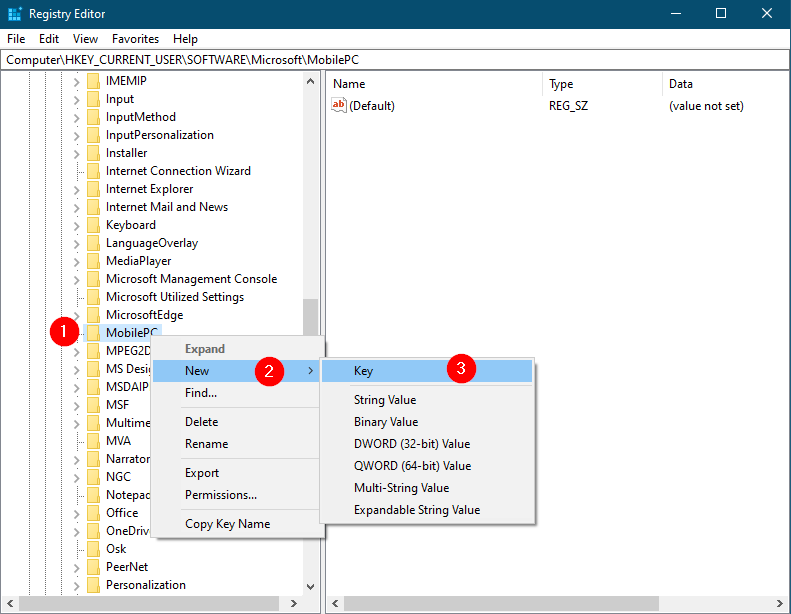
Step 5. Again, right-click on MobilePC, select New, and then Key. Name the newly created key as MobilityCenter.
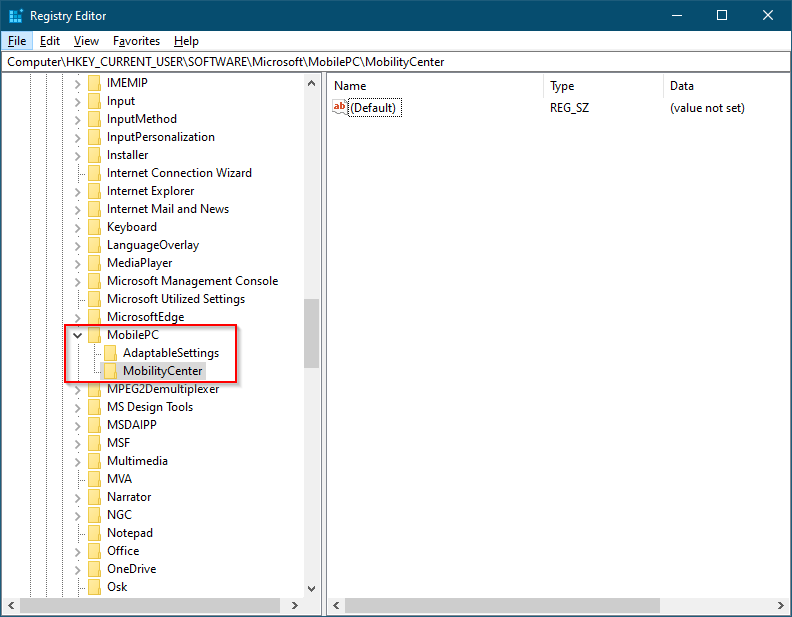
Once both keys are created or already present, it should look like a lead-in image.
Step 6. Now, highlight the AdaptableSettings key on the left side pane by clicking on it, perform a right-click on it, and select New and then DWORD (32-bit) Value.
Step 7. Name the newly created DWORD (32-bit) Value as SkipBatteryCheck.
Step 8. On the right side pane of the AdaptableSettings key, double-click on SkipBatteryCheck. Change its Value Data from 0 to 1.
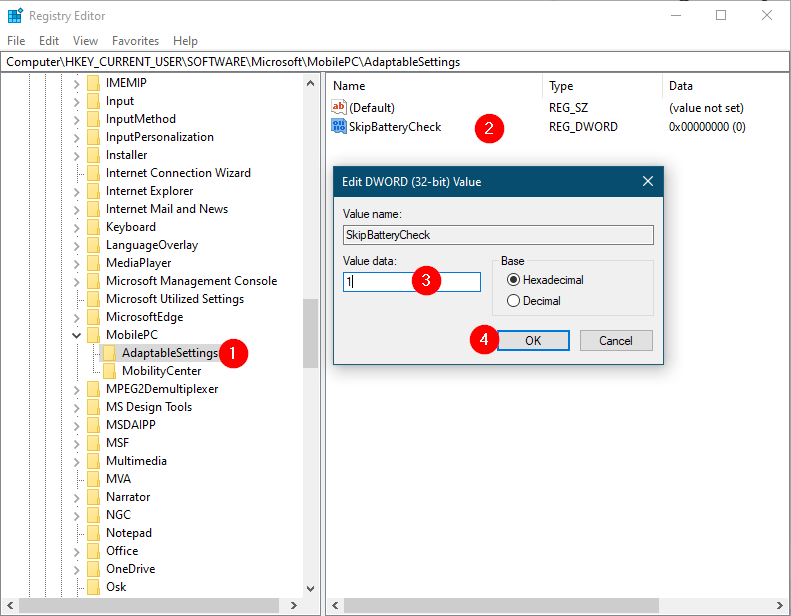
Step 9. Click OK to save the changes.
Step 10. Now, select the MobilityCenter on the left side pane and right-click on it. Choose New and then DWORD (32-bit) Value. Name the newly created DWORD (32-bit) Value as RunOnDesktop.
Step 11. Double-click on the RunOnDesktop on the right side pane and set its Value data to 1.
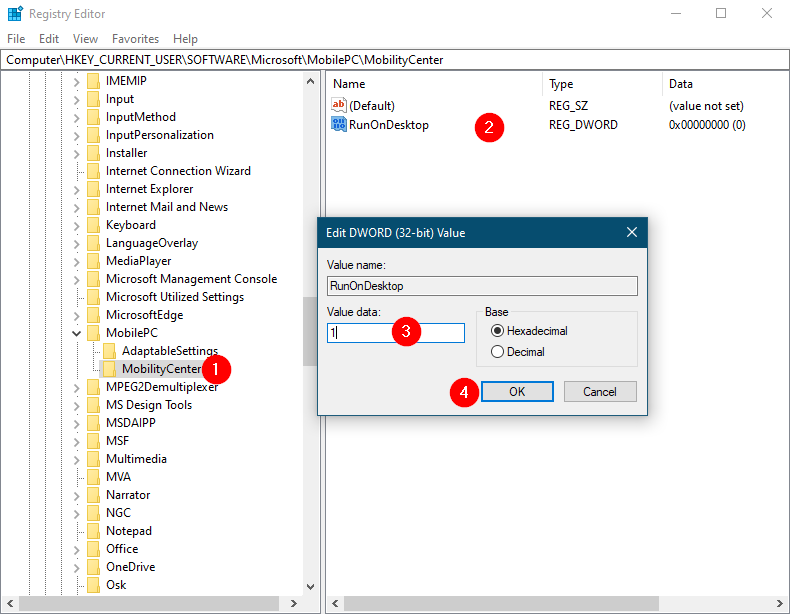
Step 12. Click OK to apply the changes.
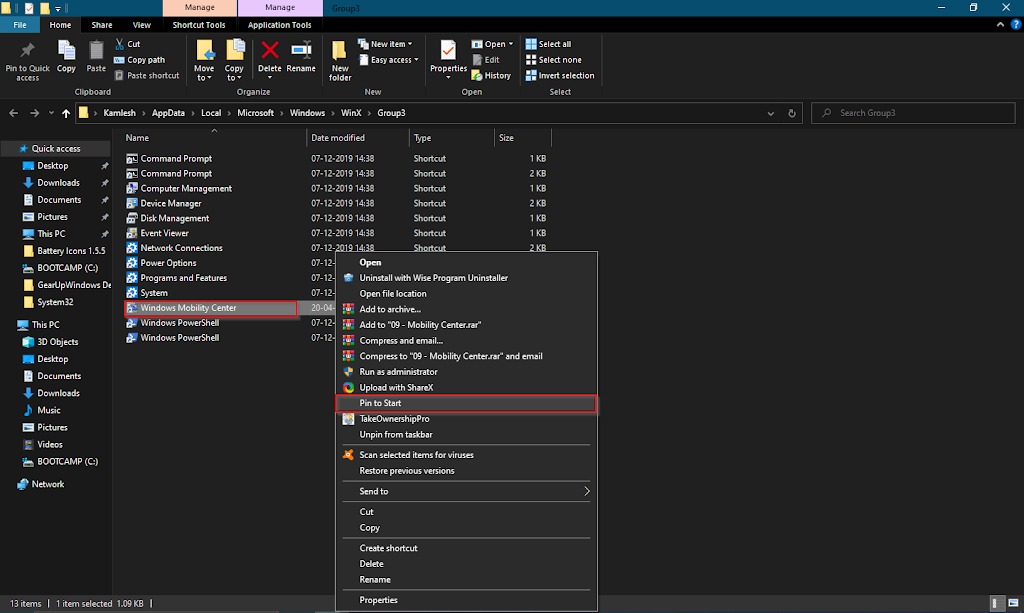
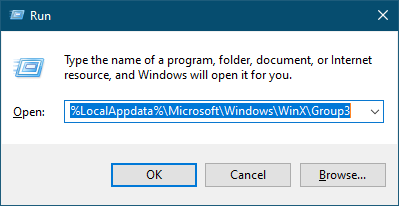
Once you complete the above steps, press the Windows logo + R keys to open the Run dialog box. Copy and paste the following path and press Enter from the keyboard:-
%LocalAppdata%\Microsoft\Windows\WinX\Group3
Here, you will see an executable file of Windows Mobile Center. Double-click on the Windows Mobile Center shortcut to open it. For easy access, you can drag it to the Windows 10 Taskbar or right-click on the program shortcut and select Pin to Start.
After performing the above steps, you should enable Windows Mobility Center on your Windows 10 desktop computer.
The second part of this article is about how to access Windows Mobility Center on Windows 10. There are at least five ways to access Windows Mobility Center on Windows 10 computers or laptops. These are the following:-
- Open Windows Mobility Center using the Search box
- Launch Windows Mobility Center via the Battery icon in the system tray
- Start Windows Mobility Center through Win + X menu
- Begin Windows Mobility Center from the Run Command box
- Open Windows Mobility Center via a shortcut
How to Start Windows Mobility Center on Windows 10 using the Search box?
The search box is the simplest way to open the Windows Mobility Center on Windows 10 PC.
Step 1. To open the Windows Mobility Center, click on the Start button/menu of Windows 10 and type Windows Mobility Center.
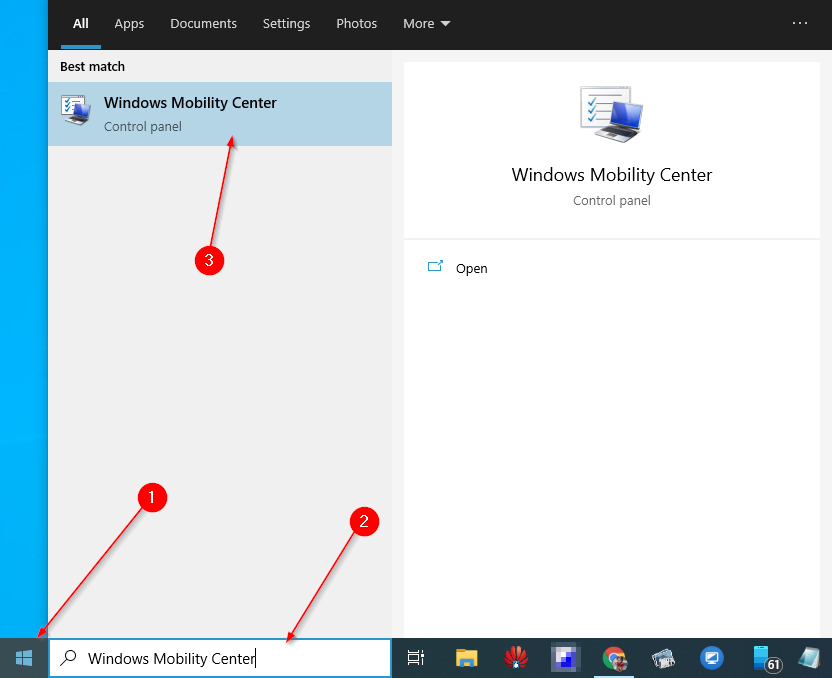
Step 2. From the available top search results, click on the Windows Mobility Center to open it.
How to Launch Windows Mobility Center on Windows 10 using the Battery icon in the system tray?
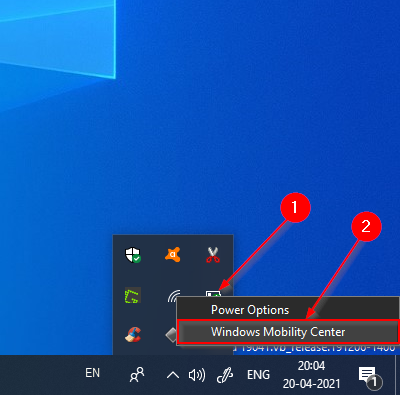
It is yet another straightforward way to open the Windows Mobility Center in Windows 10. Just right-click on the battery icon in the Taskbar system tray and click on the Windows Mobility Centre option to open it. If the battery icon is missing from the Taskbar, you can not perform this task.
By pressing the Windows logo + X hotkey open the power user menu and then click on the Mobility Centre to open it.
Alternatively, please right-click on the Start button to access the WinX menu and then select the Mobility Centre to open it.
How to Access Windows Mobility Center on Windows 10 using the Run Command box?
It is also possible to open the Windows Mobility Center on Windows 10 using the Run dialog box. Just press the Windows logo + R keys from the keyboard to open the Run box. Type mblctr in the box and hit Enter button from the keyboard to open Windows Mobility Centre.
How to Launch Windows Mobility Center on Windows 10 via a Shortcut?
It is the last option to access the Windows Mobility Center on Windows 10. Press and hold the Windows logo key and then press the R key from the keyboard to open the Run dialog box. Copy and paste the following path and press Enter from the keyboard:-
%LocalAppdata%\Microsoft\Windows\WinX\Group3
It will open a folder Group3, where you will see several system program shortcuts listed. Copy the shortcut of “Windows Mobility Center” and paste it on the Windows 10 desktop to quickly access it. You can also drag the shortcut to Windows 10 Taskbar for easy access. You can even pin it to the Start menu by right-clicking on it and selecting Pin to Start.
That’s all!!!
Conclusion
In conclusion, the Windows Mobility Center is a useful feature built into Windows 10 laptops that allows easy access and adjustment of various settings such as display brightness, volume, power plans, battery percentage, Sync Settings, and external display connection. However, this feature is not enabled by default on desktop PCs, and users need to modify the Registry to activate it. This article has provided a step-by-step guide to enable the Windows Mobility Center on Windows 10 desktop and various ways to access it, such as using the search box, battery icon, Win + X menu, Run Command box, and a shortcut. By following these methods, users can access and use the Windows Mobility Center to adjust their device’s settings quickly and easily.
How to access Windows Mobility Center in Windows 11 / 10. How to enable mobility center Windows 11 / 10. It is an interesting feature or tool through which a user can access the following settings in one click: –
- Display brightness
- Volume control
- Battery status of Computer or Laptop
- External display or Remote desktop
- Windows sync settings
- Bluetooth control
- Wireless switch
- Fn key behavior

Windows have an in-built feature that helps users to find centralized feature in one place. All the features covered under this feature depends upon hardware preferences of your Windows 11 / 10 system. This feature is also available in mobile devices. Here is how to enable this feature in Windows 11 and Windows 10.
Through Search box
- Go to Windows Search.
- Type Windows mobility center in search box.
- It will appear as top result.

Access through Run Command
- Press Win + R shortcut key.
- It will open Run dialog box.
- Thereafter type mblctr.exe in the box.
- Click Ok button.
- This feature will open.

Through Battery icon on Taskbar
- Go to the bottom right corner of Taskbar Windows 11 / 10.
- Apply a right click on battery icon.
- Choose Windows mobility center.
Open through Start menu
- Apply right click on Start menu option.
- Select Mobility center from the appeared menu.

How to create Mobility center desktop Shortcut in Windows 11 / 10
- Apply right click on blank space of Desktop.
- Keep the cursor on New and then choose Shortcut from the context menu.

- Type mblctr.exe under location of item.
- Click on Next button.

- Assign a name of Shortcut.
- Finally click on Finish button.

You can also download this PC Repair tool to Locate and Fix any PC issue:
Step 1 – Download the Restoro PC Repair Tool
Step 2 – Click on Start Scan to find and Fix any PC issue automatically.
That’s all.
Answer
- To open Windows Mobility Center on Windows 10, follow these steps: Open the Start menu.
- Click All Apps.
- Click Mobility Center.
- If necessary, sign in with your Microsoft account.
- Under “Activity History,” click the arrow next to the activity you want to open in more detail.
- Under “Device Management,” click the arrow next to the device you want to manage.
How to open windows mobility center windows 10 | Control panel | The AB
How do you bypass some settings are managed by your system administrator?
There are a few ways to bypass some settings that are managed by your system administrator. One way is to use a third-party application such as System Tuner from Microsoft. This application can be used to disable some of the more common security features on your computer. Another way is to use a registry hack. This method involves editing the registry, which is a risky process that can damage your computer.
How do I run as administrator power settings in Windows 10?
To run as administrator in Windows 10, open the Start menu, type “administrator” in the search box, and press Enter. In the Administrator window, click the Power Options icon. On the Power Options page, select the desired power mode (e.g., Classic, High Performance, or Custom). To run all programs as an administrator, select the Run All Programs As An Administrator check box.
How do I open Power Options in Windows 10 with cmd?
To open Power Options in Windows 10 with the command prompt, type powercfg /h off.
How do I open administrator mode in Windows 10?
To open administrator mode in Windows 10, follow these steps: 1. On your keyboard, press the Windows logo key + X. This will open the “Command Prompt” window. 2. In the Command Prompt window, type “net user administrator /active:yes” and press Enter. 3. You will be prompted to enter your password. Type it and press Enter. 4.
How do I run Power Options as administrator?
To run Power Options as administrator, open the Start menu and search for “power options”. When the Power Options window opens, click the “Administrator” tab. Under “Power Options Settings” on the Administrator tab, select the “Use advanced power settings” check box. In the “Enabled” column, select “Yes”. Under “Confirm changes” on the Administrator tab, click OK.
Why is it showing no power options available Windows 10?
There are a few things that could be causing this problem. First, make sure that you have the latest drivers installed for your hardware. If you don’t have the latest drivers, Windows 10 may not be able to recognize your hardware and may show no power options available. Second, make sure that your power outlet is working properly. If it’s not working properly, Windows 10 may not be able to provide enough power to your hardware and may show no power options available.
How do you fix there are no power options available?
There are a few things you can do to try and fix this problem. First, check to see if there is any power outlet near the TV that is working. If not, then you may need to replace the TV’s power cord. If that doesn’t work, then you may need to replace the TV’s power supply.
How do I change my power settings as administrator?
To change your power settings as administrator, follow these steps:
Open the Control Panel.
Under System and Security, click Power Options.
On the Advanced tab, under Performance Settings, click Change Settings.
Under the Power Options section, select the desired power plan.
Under the Summary tab, review your new settings and make any necessary changes.
How do I fix power options in Windows 10?
There are a few ways to fix power options in Windows 10. You can go to Settings, System and Security, and then choose Power Options. You can also go to the Start Menu, type “power” into the search bar, and then select Power Options. Finally, you can open the Control Panel and click on Energy Options.
How do I open additional power settings?
There are a few ways to open additional power settings on your device. One way is to go to Settings > Battery and tap on the three lines in the top left corner. This will open up a new menu with different power options. You can also go to Settings > System and tap on the three lines in the top left corner. This will open up a new menu with different system settings.
How do I get to advanced power settings in Windows 10?
In Windows 10, you can get to advanced power settings by clicking the Start button, typing “power,” and then clicking the “Advanced options” link.
What are the default Windows 10 power settings?
In Windows 10, the default power settings are:
Keep my device on until I tell you to turn it off.
Let me choose when to turn off my device.
Let me choose when to sleep my device.
Allow devices to stay on for a specific amount of time after they have been turned off or sleeping.
Require a password to turn on my device from sleep or hibernation.
How do I enable Power Options in Windows 10?
To enable Power Options in Windows 10, open the Settings app and click on System. In the System section, under Power Options, make sure the following options are enabled:
-Allow the computer to turn off automatically when it is inactive
-Put devices to sleep when they are inactive
-Allow the computer to turn off when it is plugged in not charged
If you need to disable an option, uncheck the box next to that option.
How do I get rid of Windows Mobility Center?
There is no one-size-fits-all answer to this question, as the removal of Windows Mobility Center will vary depending on the version of Windows and the specific mobility features that are being disabled. However, some methods for removing Windows Mobility Center include disabling the feature through the Control Panel, uninstalling the program from the computer, or deleting the registry key associated with it.
What are power options?
Power options are a way to customize your computer’s settings. They allow you to choose which programs run when you start your computer, how long they stay running, and how much memory they use.