In this article, I will show you how to download and install Windows Server 2022. Microsoft has released Windows Server 2022 and you can download it from MSDN and VLSC.
Windows Server 2022 is the latest server operating system by Microsoft. While this operating is new, it is built on the strong foundation of Windows Server 2019. The Windows Server 2022 Datacenter Azure Edition helps you use the benefits of cloud to keep your VMs up to date while minimizing downtime.
We will first look at the new features included in Server 2022, methods to download Server 2022 and installing Windows Server 2022.

Windows Server 2022 New Features
Let’s look at the new features included in Windows Server 2022 release. For complete details on new features and enhancements, refer to the official Microsoft documentation.
- Server 2022 security module provides advanced multi-layer security provides the comprehensive protection that servers need today.
- The core edition of Server 2022 is built on three key pillars: simplified security, advanced protection, and preventative defense.
- HTTPS and TLS 1.3 enabled by default on Windows Server 2022. This protects the data of clients connecting to the server. It eliminates obsolete cryptographic algorithms, enhances security over older versions, and aims to encrypt as much of the handshake as possible.
- DNS Client in Server 2022 now supports DNS-over-HTTPS (DoH) which encrypts DNS queries using the HTTPS protocol.
- New improvements to Windows Admin Center to manage Server 2022 include capabilities to both report on the current state of the Secured-core features.
- HotPatching – A new way to install updates on new Windows Server Azure Edition virtual machines (VMs) that doesn’t require a reboot after installation
- Several platform improvements for Windows Containers, including application compatibility and the Windows Container experience with Kubernetes.
- Microsoft Edge is included with Windows Server 2022, replacing Internet Explorer.
Windows Server 2022 Hardware Requirements
Let’s look at the hardware requirements that are required for installing Windows Server 2022 operating system. These are the minimum hardware requirements to run Windows 2022 Server.
| Server 2022 Hardware Requirement | Description |
| Processor | 1.4 GHz 64-bit processor Compatible with x64 instruction set Supports NX and DEP, CMPXCHG16b, LAHF/SAHF, and PrefetchW |
| Memory/RAM | 512 MB (2 GB for Server with Desktop Experience installation option) ECC (Error Correcting Code) type or similar technology, for physical host deployments |
| Disk Space | Minimum 32 GB (Windows Server 2022 using the Server Core installation option) |
| Network Requirements | An ethernet adapter capable of at least 1 gigabit per second throughput Compliant with the PCI Express architecture specification |
| Additional | UEFI 2.3.1c-based system and firmware that supports secure boot Trusted Platform Module Graphics device and monitor capable of Super VGA (1024 x 768) or higher-resolution |
Windows Server 2022 Installation Options
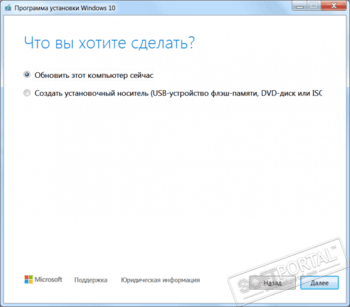
When you install Server 2022, you get two installation options. Choose the install option based on the information provided below.
- Server Core – This is the recommended installation option. It’s a smaller installation that includes the core components of Windows Server and supports all server roles but does not include a local graphical user interface (GUI). It is used for deployments which are managed remotely through Windows Admin Center, PowerShell, or other server management tools.
- Server with Desktop Experience – This is the complete installation and includes a full GUI. This option has a larger footprint than server core and most preferred by organizations.
Microsoft provides several options to download Windows Server 2022 ISO. Let’s look at all the ways to download Server 2022 ISO media.
Download Server 2022 from Microsoft Evaluation Center
If you want to try Windows Server 2022, the best place to download the ISO media is from Microsoft Evaluation center.
Evaluation versions of Windows Server must activate over the internet in the first 10 days to avoid automatic shutdown.
To download Windows Server 2022, visit the Microsoft Evaluation Center and you should see the following download options.
- Sign up for a free Azure account
- Create a Windows Server VM in Azure
- Download the ISO
- Download the VHD
To download the ISO file of Server 2022, select Download the ISO. Enter basics details asked by Microsoft. In the next step select the language and download Windows Server 2022.

Download Server 2022 from MSDN
If you have the access to MSDN (Visual Studio Subscription), you can download the Server 2022 ISO media. Additionally, you can generate a new key by clicking Get Key. Use this key to activate your Server 2022 installation.
Select Windows Server 2022 and click Download button. Save the Server 2022 .ISO file to your computer.

There are additional downloads available in MSDN related to Server 2022. These are optional downloads, you can download and use them based on your requirements.
| Server 2022 Additional Download Options | Description |
| Windows Server 2022 Languages and Optional Features | New Languages and Optional Features for Server 2022. |
| Windows Server 2022 Assessment and Deployment Kit | The ADK for Windows Server 2022 has the tools you need to customize Windows Server images for large-scale deployment, and to test the quality and performance of your system, its added components, and the applications running on it. |
| Enterprise Windows Driver Kit (EWDK) for Server 2022 | The Enterprise WDK (EWDK) is a kit that large organizations can use as an alternative to downloading and installing the SDK and WDK individually on each computer. |
| Windows Hardware Lab Kit (HLK) for Server 2022 | The Windows Hardware Lab Kit (HLK) is an all-purpose test and measurement kit to help you determine how well your hardware interacts with Windows. The HLK provides a test infrastructure for PCs. |
| Windows Software Development Kit (SDK) for Server 2022 | The Windows SDK contains headers, libraries, and tools you can use when you create apps that run on Windows operating systems. |
| Windows Driver Kit (WDK) for Server 2022 | The Windows Driver Kit (WDK) contains the tools to build, test, debug, and deploy drivers for Windows Server 2022. The WDK includes templates for several technologies and driver models, including Windows Driver Frameworks (WDF), Universal Serial Bus (USB), print, networking, and file system filters. |
Download Server 2022 from Microsoft VLSC
If you are working for an organization that has access to VLSC (Volume Licensing Service Center), you can download the latest version of Windows 2022 Server. Once you log in to the VLSC portal, use the search box to find the Server 2022 operating system and download the ISO media.
Caution – Do not download the Windows Server 2022 ISO from any other sites apart from Microsoft. Some websites may claim that it’s a free download, but it is not safe as the media may contain harmful code within.
Install Windows Server 2022
Let’s look at the steps to install Windows Server 2022 in the setup. You can install Server 2022 on a physical server or a virtual machine. Before you deploy Windows Server 2022, I would recommend testing it thoroughly since it’s a new operating system, and it may have compatibility issues with your existing applications.
I will be creating a new Virtual Machine for Server 2022 and I will mount the Server 2022 ISO and boot the VM. On the Microsoft Server Operating System setup, select the language, time and currency format, keyboard or input method. Click Next.

Click Install Now.

On the next screen, you will be asked to enter the Windows Server 2022 product key. Enter the key and click Next.
I have entered the Server 2022 datacenter edition key and probably that’s why I see only Datacenter options.
- Windows Server 2022 Datacenter – Selecting this option installs server 2022 but won’t include a local graphical user interface (GUI).
- Windows Server 2022 Datacenter (Desktop Experience) – Install Server 2022 and this includes a local graphical user interface (GUI).
I am going to select Server 2022 Datacenter Desktop Experience and click Next.

Accept the Microsoft Software License terms and click Next.

Select the installation type as Custom: Install Microsoft Server Operating System only (advanced).

Select the hard drive where you want to install Server 2022. Click Next.

The server 2022 installs now begins. Your server will restart a couple of times to complete the installation.

Before you can log in to the server, you must set the Administrator password. Specify a complex password for your server and click Finish.

Windows 2022 Server Build Number
Log in to the server 2022 with the administrator account and click Start > About my PC. Look for the following details under Windows Specifications.
- Edition Windows Server 2022 Datacenter
- Version 21H2
- OS build 20348.169
The OS build of Windows Server 2022 is 20348.169. You can also find the build number by running Winver command on the server.

To rename the server, click Rename this PC and specify a new name and restart the server.
Installing the latest Updates on Server 2022
Once you have completed the installation of Server 2022, let’s install the latest Windows updates. Click Start > Settings and select Update and Security. Click Check for Updates. Now you should see the latest updates available for your Server 2022. Click Install Now to begin the installation of updates.
You may not see many updates as this is the latest version of the Server. However, in coming months, you will see some quality and feature updates for the server.

Enable Updates for Server 2022 in WSUS
If you are using WSUS to deploy server updates, you must enable the Server 2022 product.
In the WSUS console, click Options and then select Products and Classifications. Now click the Products tab and under Windows, select or enable Microsoft Windows operating system 21H2. Click Apply and OK.
Note – Windows Server 2022 = Windows Server 21H2. So in the WSUS console, you will see Windows Server 21H2 instead of Server 2022. They both are same, the current version of Windows Server 2022 is 21H2.

Synchronize the updates and once the WSUS sync is complete, open the WSUS console, select All Updates. In the Search box, type 21H2 and click Find Now. That should list all the Windows Server 2022 updates.

Содержание
- Media creation tool для установки Windows Server 2022: инструкция по использованию
Media creation tool — это официальное приложение от Microsoft, предназначенное для создания загрузочного носителя и установки операционной системы Windows Server 2022. Это удобный инструмент, который позволяет пользователям легко и быстро установить новую версию операционной системы на свои серверы. Использование Media creation tool дает возможность создавать загрузочный USB-накопитель или записать ISO-образ на DVD для последующей установки операционной системы. Это особенно полезно, если у вас нет доступа к интернету на сервере или вы предпочитаете использовать этот метод установки. Чтобы начать использовать Media creation tool, необходимо сначала скачать его с официального сайта Microsoft. После этого следует запустить приложение и выбрать опцию «Создание загрузочного носителя (USB флэш-накопитель, DVD или ISO-файл)». Важно отметить, что для использования Media creation tool требуется наличие активной лицензии на Windows Server 2022. Если у вас нет такой лицензии, вы сможете установить операционную систему, но она будет работать в режиме ограниченной функциональности и потребовать активации в течение определенного времени.
Использование Media creation tool делает установку Windows Server 2022 более удобной и простой процедурой. Благодаря этому инструменту вы сможете быстро создать загрузочный носитель или записать ISO-образ на DVD, что позволит вам установить операционную систему без доступа к интернету или при использовании собственных носителей данных. Не забудьте иметь активную лицензию на Windows Server 2022, чтобы в полной мере использовать все его функции.
Media creation tool: что это такое? С помощью Media creation tool вы можете создавать загрузочные USB-флешки или DVD-диски с установочными файлами Windows Server 2022. Это может быть полезно, если у вас нет доступа к интернету во время установки операционной системы или если вам нужно установить Windows Server 2022 на несколько компьютеров. Media creation tool автоматически загружает последнюю версию Windows Server 2022 и позволяет выбрать нужные параметры установки, такие как язык, архитектура (32-битная или 64-битная) и редакция операционной системы. Затем он создает загрузочный носитель, который можно использовать для установки Windows Server 2022 на вашем компьютере. Использование Media creation tool облегчает процесс установки Windows Server 2022 и позволяет вам быстро получить доступ к последней версии операционной системы. Оно также обеспечивает возможность создания резервной копии установочных файлов Windows Server 2022 для будущего использования или для распространения среди других компьютеров. Плюсы использования Media creation tool
Простота использования: Media creation tool представляет собой удобный и интуитивно понятный инструмент, который позволяет вам легко создавать установочные носители для Windows Server 2022.
Быстрая загрузка: Media creation tool позволяет загрузить официальный образ Windows Server 2022 с серверов Microsoft, что гарантирует быструю и надежную загрузку системы.
Поддержка различных версий: Media creation tool позволяет выбрать необходимую для установки версию Windows Server 2022, включая Standard, Datacenter и другие варианты.
Возможность создания загрузочного USB-накопителя: Media creation tool позволяет создать загрузочный USB-накопитель, который можно использовать для установки Windows Server 2022 на различных компьютерах.
Автоматическое обновление: Media creation tool автоматически загружает последнюю версию Windows Server 2022, что обеспечивает наличие всех новых обновлений и исправлений уже при установке системы.
Поддержка разных языков: Media creation tool предоставляет возможность выбора нужного языка для установки Windows Server 2022, что удобно для многоязычных пользователей.
Как скачать Media creation tool? Скачать Media creation tool можно на официальном сайте Microsoft. Для этого выполните следующие шаги: Шаг 1: Откройте веб-браузер и перейдите на официальный сайт Microsoft. Шаг 2: Найдите раздел «Скачать Windows» или перейдите по прямой ссылке: www.microsoft.com/ru-ru/software-download/windows10. Шаг 3: В этом разделе вы увидите кнопку «Скачать инструмент»: Media Creation Tool Шаг 4: Щелкните на кнопке «Скачать инструмент» и сохраните файл на компьютер. Обязательно выберите правильную архитектуру системы: 32-разрядную или 64-разрядную. Шаг 5: После завершения загрузки запустите скачанный файл Media creation tool с правами администратора. Теперь у вас есть Media creation tool, который можно использовать для установки Windows Server 2022 на ваш компьютер или сервер.
Установка Windows Server 2022 с помощью Media creation tool Media creation tool представляет собой инструмент, разработанный Microsoft, который позволяет установить операционную систему Windows Server 2022 на ваш компьютер. В этом разделе представлена инструкция по использованию данного инструмента. Перед началом процесса установки необходимо убедиться, что ваш компьютер соответствует минимальным требованиям системы Windows Server 2022. Убедитесь, что имеете достаточно свободного места на жестком диске, а также что ваш компьютер соответствует требованиям к процессору, оперативной памяти и графической карте. Шаги установки Windows Server 2022 с помощью Media creation tool:
Шаг 1:
Подготовка загрузочного USB-накопителя
Шаг 2:
Загрузка компьютера с USB-накопителя
Шаг 3:
Выбор языка и региональных настроек
Шаг 4:
Выбор метода установки
Шаг 5:
Соглашение с лицензионным соглашением
Шаг 6:
Выбор типа установки
Шаг 7:
Выбор раздела для установки Windows Server 2022
Шаг 8:
Установка операционной системы
Шаг 9:
Завершение установки и настройка начальных параметров После завершения всех шагов вы сможете использовать свою новую операционную систему Windows Server 2022 и настраивать ее согласно своим потребностям. Обратите внимание, что процесс установки может занять некоторое время в зависимости от мощности вашего компьютера и скорости подключения к интернету. Убедитесь, что ваш компьютер подключен к надежному и стабильному источнику питания, чтобы избежать сбоев во время установки. Использование Media creation tool для установки Windows Server 2022 позволяет произвести чистую установку операционной системы и настроить ее с нуля. Убедитесь, что перед началом процесса установки вы создали резервную копию важных данных и имеете доступ к необходимому программному обеспечению и драйверам для вашего компьютера.
Важные моменты при использовании Media creation tool
Убедитесь, что у вас есть стабильное интернет-соединение, так как Media creation tool будет загружать необходимые файлы для установки Windows Server 2022.
Проверьте, что ваш компьютер соответствует минимальным требованиям для установки Windows Server 2022. Это включает в себя процессор с поддержкой архитектуры x64, 2 ГБ оперативной памяти (или более), 32 ГБ свободного места на жестком диске, а также совместимую видеокарту.
При запуске Media creation tool выберите опцию «Создать установочное средство (USB-накопитель, DVD или ISO-файл) для другого компьютера» для создания загрузочного носителя.
Убедитесь, что вы выбрали правильную версию Windows Server 2022 для установки. Media creation tool предоставляет несколько вариантов, включая Standard и Datacenter.
Во время процесса установки у вас может понадобиться вводить лицензионный ключ. Убедитесь, что у вас есть действующий ключ для активации Windows Server 2022.
Мы рекомендуем создать резервную копию всех важных данных перед установкой Windows Server 2022. Это поможет вам избежать потери данных в случае непредвиденных ситуаций.
Если вы хотите установить Windows Server 2022 на виртуальную машину, обратите внимание на требования к виртуализации и настройте виртуальную машину соответствующим образом. Следуя указанным выше важным моментам, вы сможете успешно использовать Media creation tool для установки Windows Server 2022 и начать работу с новой операционной системой. - Media creation tool — это официальное приложение от Microsoft, предназначенное для создания загрузочного носителя и установки операционной системы Windows Server 2022. Это удобный инструмент, который позволяет пользователям легко и быстро установить новую версию операционной системы на свои серверы. Использование Media creation tool дает возможность создавать загрузочный USB-накопитель или записать ISO-образ на DVD для последующей установки операционной системы. Это особенно полезно, если у вас нет доступа к интернету на сервере или вы предпочитаете использовать этот метод установки. Чтобы начать использовать Media creation tool, необходимо сначала скачать его с официального сайта Microsoft. После этого следует запустить приложение и выбрать опцию «Создание загрузочного носителя (USB флэш-накопитель, DVD или ISO-файл)». Важно отметить, что для использования Media creation tool требуется наличие активной лицензии на Windows Server 2022. Если у вас нет такой лицензии, вы сможете установить операционную систему, но она будет работать в режиме ограниченной функциональности и потребовать активации в течение определенного времени.
Использование Media creation tool делает установку Windows Server 2022 более удобной и простой процедурой. Благодаря этому инструменту вы сможете быстро создать загрузочный носитель или записать ISO-образ на DVD, что позволит вам установить операционную систему без доступа к интернету или при использовании собственных носителей данных. Не забудьте иметь активную лицензию на Windows Server 2022, чтобы в полной мере использовать все его функции.
Media creation tool: что это такое? С помощью Media creation tool вы можете создавать загрузочные USB-флешки или DVD-диски с установочными файлами Windows Server 2022. Это может быть полезно, если у вас нет доступа к интернету во время установки операционной системы или если вам нужно установить Windows Server 2022 на несколько компьютеров. Media creation tool автоматически загружает последнюю версию Windows Server 2022 и позволяет выбрать нужные параметры установки, такие как язык, архитектура (32-битная или 64-битная) и редакция операционной системы. Затем он создает загрузочный носитель, который можно использовать для установки Windows Server 2022 на вашем компьютере. Использование Media creation tool облегчает процесс установки Windows Server 2022 и позволяет вам быстро получить доступ к последней версии операционной системы. Оно также обеспечивает возможность создания резервной копии установочных файлов Windows Server 2022 для будущего использования или для распространения среди других компьютеров. Плюсы использования Media creation tool
Простота использования: Media creation tool представляет собой удобный и интуитивно понятный инструмент, который позволяет вам легко создавать установочные носители для Windows Server 2022.
Быстрая загрузка: Media creation tool позволяет загрузить официальный образ Windows Server 2022 с серверов Microsoft, что гарантирует быструю и надежную загрузку системы.
Поддержка различных версий: Media creation tool позволяет выбрать необходимую для установки версию Windows Server 2022, включая Standard, Datacenter и другие варианты.
Возможность создания загрузочного USB-накопителя: Media creation tool позволяет создать загрузочный USB-накопитель, который можно использовать для установки Windows Server 2022 на различных компьютерах.
Автоматическое обновление: Media creation tool автоматически загружает последнюю версию Windows Server 2022, что обеспечивает наличие всех новых обновлений и исправлений уже при установке системы.
Поддержка разных языков: Media creation tool предоставляет возможность выбора нужного языка для установки Windows Server 2022, что удобно для многоязычных пользователей.
Как скачать Media creation tool? Скачать Media creation tool можно на официальном сайте Microsoft. Для этого выполните следующие шаги: Шаг 1: Откройте веб-браузер и перейдите на официальный сайт Microsoft. Шаг 2: Найдите раздел «Скачать Windows» или перейдите по прямой ссылке: www.microsoft.com/ru-ru/software-download/windows10. Шаг 3: В этом разделе вы увидите кнопку «Скачать инструмент»: Media Creation Tool Шаг 4: Щелкните на кнопке «Скачать инструмент» и сохраните файл на компьютер. Обязательно выберите правильную архитектуру системы: 32-разрядную или 64-разрядную. Шаг 5: После завершения загрузки запустите скачанный файл Media creation tool с правами администратора. Теперь у вас есть Media creation tool, который можно использовать для установки Windows Server 2022 на ваш компьютер или сервер.
Установка Windows Server 2022 с помощью Media creation tool Media creation tool представляет собой инструмент, разработанный Microsoft, который позволяет установить операционную систему Windows Server 2022 на ваш компьютер. В этом разделе представлена инструкция по использованию данного инструмента. Перед началом процесса установки необходимо убедиться, что ваш компьютер соответствует минимальным требованиям системы Windows Server 2022. Убедитесь, что имеете достаточно свободного места на жестком диске, а также что ваш компьютер соответствует требованиям к процессору, оперативной памяти и графической карте. Шаги установки Windows Server 2022 с помощью Media creation tool:
Шаг 1:
Подготовка загрузочного USB-накопителя
Шаг 2:
Загрузка компьютера с USB-накопителя
Шаг 3:
Выбор языка и региональных настроек
Шаг 4:
Выбор метода установки
Шаг 5:
Соглашение с лицензионным соглашением
Шаг 6:
Выбор типа установки
Шаг 7:
Выбор раздела для установки Windows Server 2022
Шаг 8:
Установка операционной системы
Шаг 9:
Завершение установки и настройка начальных параметров После завершения всех шагов вы сможете использовать свою новую операционную систему Windows Server 2022 и настраивать ее согласно своим потребностям. Обратите внимание, что процесс установки может занять некоторое время в зависимости от мощности вашего компьютера и скорости подключения к интернету. Убедитесь, что ваш компьютер подключен к надежному и стабильному источнику питания, чтобы избежать сбоев во время установки. Использование Media creation tool для установки Windows Server 2022 позволяет произвести чистую установку операционной системы и настроить ее с нуля. Убедитесь, что перед началом процесса установки вы создали резервную копию важных данных и имеете доступ к необходимому программному обеспечению и драйверам для вашего компьютера.
Важные моменты при использовании Media creation tool
Убедитесь, что у вас есть стабильное интернет-соединение, так как Media creation tool будет загружать необходимые файлы для установки Windows Server 2022.
Проверьте, что ваш компьютер соответствует минимальным требованиям для установки Windows Server 2022. Это включает в себя процессор с поддержкой архитектуры x64, 2 ГБ оперативной памяти (или более), 32 ГБ свободного места на жестком диске, а также совместимую видеокарту.
При запуске Media creation tool выберите опцию «Создать установочное средство (USB-накопитель, DVD или ISO-файл) для другого компьютера» для создания загрузочного носителя.
Убедитесь, что вы выбрали правильную версию Windows Server 2022 для установки. Media creation tool предоставляет несколько вариантов, включая Standard и Datacenter.
Во время процесса установки у вас может понадобиться вводить лицензионный ключ. Убедитесь, что у вас есть действующий ключ для активации Windows Server 2022.
Мы рекомендуем создать резервную копию всех важных данных перед установкой Windows Server 2022. Это поможет вам избежать потери данных в случае непредвиденных ситуаций.
Если вы хотите установить Windows Server 2022 на виртуальную машину, обратите внимание на требования к виртуализации и настройте виртуальную машину соответствующим образом. Следуя указанным выше важным моментам, вы сможете успешно использовать Media creation tool для установки Windows Server 2022 и начать работу с новой операционной системой. - Media creation tool: что это такое?
- Плюсы использования Media creation tool
- Как скачать Media creation tool?
- Установка Windows Server 2022 с помощью Media creation tool
- Важные моменты при использовании Media creation tool
С помощью Media creation tool вы можете создавать загрузочные USB-флешки или DVD-диски с установочными файлами Windows Server 2022. Это может быть полезно, если у вас нет доступа к интернету во время установки операционной системы или если вам нужно установить Windows Server 2022 на несколько компьютеров.
Media creation tool автоматически загружает последнюю версию Windows Server 2022 и позволяет выбрать нужные параметры установки, такие как язык, архитектура (32-битная или 64-битная) и редакция операционной системы. Затем он создает загрузочный носитель, который можно использовать для установки Windows Server 2022 на вашем компьютере.
Использование Media creation tool облегчает процесс установки Windows Server 2022 и позволяет вам быстро получить доступ к последней версии операционной системы. Оно также обеспечивает возможность создания резервной копии установочных файлов Windows Server 2022 для будущего использования или для распространения среди других компьютеров.
- Простота использования: Media creation tool представляет собой удобный и интуитивно понятный инструмент, который позволяет вам легко создавать установочные носители для Windows Server 2022.
- Быстрая загрузка: Media creation tool позволяет загрузить официальный образ Windows Server 2022 с серверов Microsoft, что гарантирует быструю и надежную загрузку системы.
- Поддержка различных версий: Media creation tool позволяет выбрать необходимую для установки версию Windows Server 2022, включая Standard, Datacenter и другие варианты.
- Возможность создания загрузочного USB-накопителя: Media creation tool позволяет создать загрузочный USB-накопитель, который можно использовать для установки Windows Server 2022 на различных компьютерах.
- Автоматическое обновление: Media creation tool автоматически загружает последнюю версию Windows Server 2022, что обеспечивает наличие всех новых обновлений и исправлений уже при установке системы.
- Поддержка разных языков: Media creation tool предоставляет возможность выбора нужного языка для установки Windows Server 2022, что удобно для многоязычных пользователей.
Скачать Media creation tool можно на официальном сайте Microsoft. Для этого выполните следующие шаги:
Шаг 1: Откройте веб-браузер и перейдите на официальный сайт Microsoft.
Шаг 2: Найдите раздел «Скачать Windows» или перейдите по прямой ссылке: www.microsoft.com/ru-ru/software-download/windows10.
Шаг 3: В этом разделе вы увидите кнопку «Скачать инструмент»:
Media Creation Tool
Шаг 4: Щелкните на кнопке «Скачать инструмент» и сохраните файл на компьютер. Обязательно выберите правильную архитектуру системы: 32-разрядную или 64-разрядную.
Шаг 5: После завершения загрузки запустите скачанный файл Media creation tool с правами администратора.
Теперь у вас есть Media creation tool, который можно использовать для установки Windows Server 2022 на ваш компьютер или сервер.
Установка Windows Server 2022 с помощью Media creation tool
Media creation tool представляет собой инструмент, разработанный Microsoft, который позволяет установить операционную систему Windows Server 2022 на ваш компьютер. В этом разделе представлена инструкция по использованию данного инструмента.
Перед началом процесса установки необходимо убедиться, что ваш компьютер соответствует минимальным требованиям системы Windows Server 2022. Убедитесь, что имеете достаточно свободного места на жестком диске, а также что ваш компьютер соответствует требованиям к процессору, оперативной памяти и графической карте.
Шаги установки Windows Server 2022 с помощью Media creation tool:
| Шаг 1: | Подготовка загрузочного USB-накопителя |
| Шаг 2: | Загрузка компьютера с USB-накопителя |
| Шаг 3: | Выбор языка и региональных настроек |
| Шаг 4: | Выбор метода установки |
| Шаг 5: | Соглашение с лицензионным соглашением |
| Шаг 6: | Выбор типа установки |
| Шаг 7: | Выбор раздела для установки Windows Server 2022 |
| Шаг 8: | Установка операционной системы |
| Шаг 9: | Завершение установки и настройка начальных параметров |
После завершения всех шагов вы сможете использовать свою новую операционную систему Windows Server 2022 и настраивать ее согласно своим потребностям.
Обратите внимание, что процесс установки может занять некоторое время в зависимости от мощности вашего компьютера и скорости подключения к интернету. Убедитесь, что ваш компьютер подключен к надежному и стабильному источнику питания, чтобы избежать сбоев во время установки.
Использование Media creation tool для установки Windows Server 2022 позволяет произвести чистую установку операционной системы и настроить ее с нуля. Убедитесь, что перед началом процесса установки вы создали резервную копию важных данных и имеете доступ к необходимому программному обеспечению и драйверам для вашего компьютера.
- Убедитесь, что у вас есть стабильное интернет-соединение, так как Media creation tool будет загружать необходимые файлы для установки Windows Server 2022.
- Проверьте, что ваш компьютер соответствует минимальным требованиям для установки Windows Server 2022. Это включает в себя процессор с поддержкой архитектуры x64, 2 ГБ оперативной памяти (или более), 32 ГБ свободного места на жестком диске, а также совместимую видеокарту.
- При запуске Media creation tool выберите опцию «Создать установочное средство (USB-накопитель, DVD или ISO-файл) для другого компьютера» для создания загрузочного носителя.
- Убедитесь, что вы выбрали правильную версию Windows Server 2022 для установки. Media creation tool предоставляет несколько вариантов, включая Standard и Datacenter.
- Во время процесса установки у вас может понадобиться вводить лицензионный ключ. Убедитесь, что у вас есть действующий ключ для активации Windows Server 2022.
- Мы рекомендуем создать резервную копию всех важных данных перед установкой Windows Server 2022. Это поможет вам избежать потери данных в случае непредвиденных ситуаций.
- Если вы хотите установить Windows Server 2022 на виртуальную машину, обратите внимание на требования к виртуализации и настройте виртуальную машину соответствующим образом.
Следуя указанным выше важным моментам, вы сможете успешно использовать Media creation tool для установки Windows Server 2022 и начать работу с новой операционной системой.

Contents
- 1 Windows Server 2019 Media Creation Tool
- 2 Creating A Bootable Usb Flash Drive To Install Microsoft Windows Server 2019.
- 2.1 Conclusion
- 2.1.1 Related image with windows server 2019 media creation tool
- 2.1.2 Related image with windows server 2019 media creation tool
- 2.1 Conclusion
Immerse yourself in the captivating realm of arts and culture, where creativity knows no boundaries. Celebrate the transformative power of artistic expression as we explore diverse art forms, spotlight talented artists, and ignite your passion for the cultural tapestry that shapes our world in our Windows Server 2019 Media Creation Tool section. — 2019 on — and clicking setup first installation keyboard install time next- select and 4- short the the the installation a the now start screen select language server click start 1- 2- by next layout the edition while- should on click windows 3- install to in
Windows Server 2019 Media Creation Tool
Windows Server 2019 Media Creation Tool
Description windows server 2019 is the operating system that bridges on premises environments with azure services enabling hybrid scenarios maximizing existing investments. increase security and reduce business risk with multiple layers of protection built into the operating system. Windows server 2019 is the operating system that bridges on premises environments with azure services enabling hybrid scenarios maximizing existing investments.

Windows Server 2019 Media Creation Tool
Windows Server 2019 Media Creation Tool
First, plug in your usb drive to your computer. open a powershell using the run as administrator option. you will need to change the path of the windows server 2019 iso, and you will need to replace the usb friendly name in the script. reminder: the following commands will wipe the usb drive completely. 1. click the windows start button, and click windows usb dvd download tool in the all programs list to open the windows usb dvd download tool. 2. in the source file box, type the name and path of your windows iso file, or click browse and select the file from the open dialog box. click next. Yes, you can. however, this is in a virtual world. you need to have some physical media if you want to install the os on a physical device. creating a windows server 2019 usb disk is the easiest way to get windows server installed on a physical server. this process also works equally well on windows server 2016. Learn how. to create the installation media, here’s what you’ll need: a pc with a reliable internet connection. the download time will vary, depending on your internet connection. a usb flash drive, external hard drive, or dvd. a blank usb flash drive or external hard drive with at least 8 gb of space, or a blank dvd (and dvd burner).
Creating A Bootable Usb Flash Drive To Install Microsoft Windows Server 2019.
Creating A Bootable Usb Flash Drive To Install Microsoft Windows Server 2019.
this is a short video showing you how to create a bootable usb flash drive to be used to install windows server 2019. the same microsoft windows server 2019 installation this ittaster video is a walk through of how to install microsoft windows server 2019, in this tutorial, i have demonstrated how to download windows server 2019 and install it on vmware workstation. in this video you will learn how to download, install and configure windows server 2019 os on vmware workstation. just follow in this ittaster video we look at performing the initial setup & configuration of windows server 2019. this video follows the previous this video will show you how to create a windows server 2019 bootable usb using rufus. for rufus: bit.ly 2zjuh4r for this is how to create a bootable windows 2019 essentials usb media fash drive stick using rufus. for rufus: rufus.ie step by step guide to install active directory in windows server 2019 in this video tutorial i will show you the step by step guide in this video, i’ll discuss how to install windows 10 using a usb drive media creation tool. chapters ************ 00:00 intro creating windows server 2019 master image using sysprep. this video is a follow along guide for creating a file server in microsoft windows server 2019 and it is the same function in the
Conclusion
Taking everything into consideration, it is clear that the post delivers informative insights regarding Windows Server 2019 Media Creation Tool. From start to finish, the writer demonstrates a deep understanding about the subject matter. Especially, the discussion of Z stands out as a highlight. Thank you for reading this post. If you need further information, please do not hesitate to reach out through the comments. I look forward to your feedback. Moreover, here are a few related posts that might be helpful:
Данная инструкция позволяет создать загрузочный USB диск с Windows Server 2016 без использования сторонних программ, только Powershell или cmd.
Нам понадобится: .iso образ Microsoft Windows Server 2016, USB-flash или USB-диск минимум на 8 GB и компьютер под управлением Windows 7, Windows Server 2008 или выше.
- Монтируем iso-файл (двойной клик по файлу), запоминаем букву примонтированного диска (в моём примере буква G:);
- Втыкаем флешку в USB, запоминаем букву диск (в моём примере буква E:);

- Запускаем Powershell или cmd с правами администратора (Пуск — написать Powershell (или cmd) — пкм — запуск от имени администратора);
Внимание: следующие команды удалят все данные на выбранном диске без запроса подтверждения. Убедитесь что выбран правильный диск.
- Используем программу diskpart для подготовки диска к записи ОС.
diskpart
list disk
select disk 2 (в моём случае нужный диск - 2. Тут нужно внимательно выбрать необходимый диск)
list diskпосле повторного выполнения команды list disk выбранный диск будет помечен символом"*"
следующая команда полностью очистит дискclean
create partition primary
select partition 1
active
format fs=ntfs quick label="WinSRV16"
exit
Всё, USB-диск готов к записи установочного образа, приступаем к записи образа.
- Теперь необходимо записать загрузочный сектор (все операции продолжаем выполнять в Powershell) (заменить G: на свою букву диска)
cd G:boot
bootsect /nt60 e:

Выбранный том был обновлён с помощью загрузочного кода, совместимого с BOOTMGR.
Теперь осталось скопировать файлы на USB-диск. Делать это будем с помощью утилиты xCopy. Замените буквы дисков в соответствии с вашими дисками.
xcopy G:*.* E: /E /H /J /F
Может показаться что копирование зависло, это связано с тем, что файл install.wim очень большой, более 4GB, необходимо просто ждать. Копирование завершится в среднем за 10 минут, в зависимости от скорости USB-диска.
Именно поэтому мы форматировали диск в NTFS.

После того, как копирование завершится, можно использовать полученный диск для установки Windows Server 2016.
UEFI
Внимание: чтобы UEFI загрузчик нормально увидел носитель — его необходимо отформатировать в fat32
Так же используем diskpart
diskpart
list disk
select disk 2 (в моём случае нужный диск - 2. Тут нужно внимательно выбрать необходимый диск)
list diskпосле повторного выполнения команды list disk выбранный диск будет помечен символом"*"
следующая команда полностью очистит дискclean
create partition primary
select partition 1
active
format fs=fat32 quick label="WinSRV16"
exit
Всё, USB-диск готов к записи установочного образа, приступаем к записи образа.
Можно просто скопировать файлы из смонтированного образа.
Файл install.wim не удастся скопировать, т.к. его размер более 4GB.
Придётся резать.
Dism /Split-Image /ImageFile:E:sourcesinstall.wim /SWMFile:C:UsersAdministratorDesktopinstall.swm /FileSize:3000
/ImageFile — путь к файлу install.wim
/SWMFile — путь, куда положить нарезанные swm-файлы
/FileSize — максимальный размер одного swm-файла
Далее полученные файлы необходимо скопировать на флешку в sources
Конечно, что самый простой и интуитивный способ создать загрузочную USB флешку для установки Windows Server 2016 на физический сервер – воспользоваться утилитой Windows USB/DVD Download Tool. Данная утилита позволяет записать имеющийся *.iso образ Windows на USB флешку/диск и сделать его загрузочным. Однако, она форматирует флешку в файловую систему NTFS, загрузка с которой не поддерживается на UEFI системах и пригодна такая флешка только для установки Windows только на BIOS системах. В данной статье мы покажем, как без использования сторонних утилит создать установочную флешку с дистрибутивом Windows Server 2016.
Примечание. В отличии BIOS систем, которые могут загрузиться с загрузочных разделов с файловыми системам FAT, FAT32, exFAT или NTFS, UEFI системы могут загрузится только с загрузчика, находящегося на диске, отформатированном в ФС FAT32.
В зависимости от архитектуры сервера UEFI / BIOS нужно воспользоваться одним из следующих способов создания установочной флешки.
Содержание:
- Установочная USB флешка для UEFI системы
- Установочная флешка c таблицей разделов MBR для BIOS и UEFI архитектур
- Размер файла Install.wim более 4 Гб
Важно. При выполнении данной инструкции нужно быть внимательным, проверять пути к дискам и номера дисков, в противном случае, можно случайно отформатировать диск с данными. USB флешка будет отформатирована в любом случае, и данные на ней удалены.
Установочная USB флешка для UEFI системы
В том случае, если флешка будет использоваться для загрузки и установки Windows Server 2016 на сервере с поддержкой UEFI, на загрузочную флешку накладываются следующие требования:
- Минимальный размер USB флешки – 8 Гб
- Тип таблицы разделов флешки – GPT
- Файловая системе — FAT32
Итак, подключите USB флешку к компьютеру (в нашем примере это ПК с Windows 10), откройте командную строку с правами администратора, выполните команду DISKPART, в контексте которой выполните следующие команды:
list disk
Выведем список дисков, моем случае USB флешка имеет номер диска 1. Выберем ее.
select disk 1
Очистим содержимое флешки.
clean
Преобразуем таблицу разделов в GPT:
convert gpt
Создадим новый раздел (размер не должен превышать 16 Гб):
create partition primary
Совет. Если размер USB флешки более чем 16 Гб, нужно создать раздел, размером до 16Гб:
create partition primary size=16000
Отформатируем раздел в ФС FAT32:
format fs=FAT32 quick
Назначим новому разделу букву диска:
assign letter=M
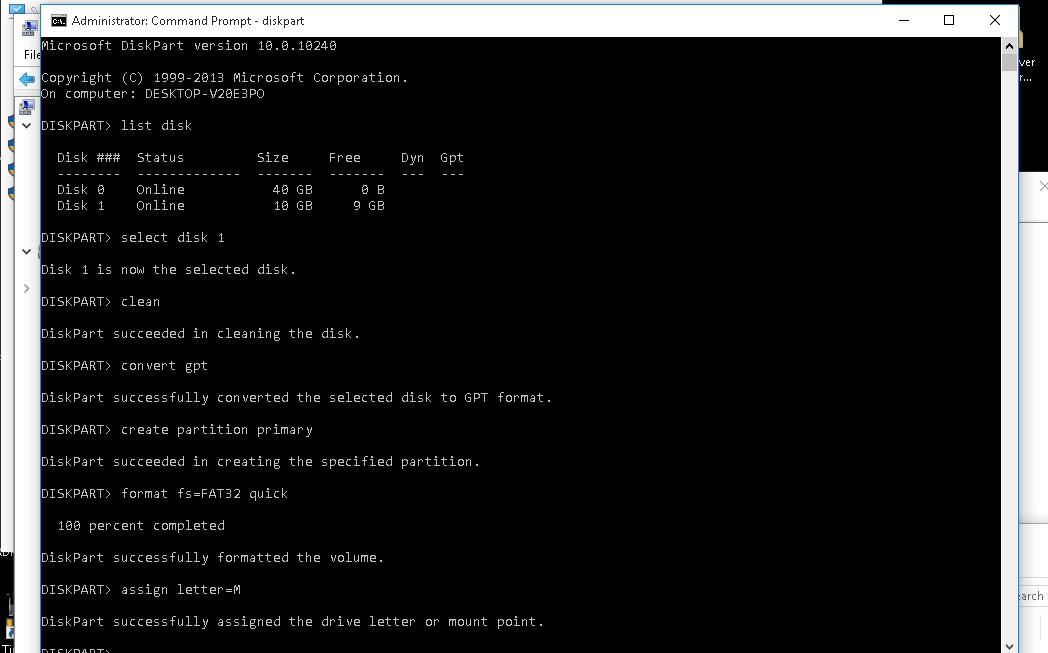
Осталось завершить сеанс diskpart:
exit
Скопируем файлы дистрибутива со смонтированного iso образа Windows Server 2016 на флешку (предполагаем, что iso образ смонтирован с буквой диска E:).
xcopy e:* m: /H /F /E
Установочная флешка c таблицей разделов MBR для BIOS и UEFI архитектур
Возможно создать установочную флешку с Windows Server 2016 с таблицей разделов MBR для BIOS и UEFI системе. К USB драйву предъявляются следующие требования:
- Минимальный размер USB флешки – 8 Гб
- Тип таблицы разделов– MBR
- Файловая системе — FAT32
Также запустите сессию diskpart и последовательно выполните команды:
Список дисков в системе:
list disk
Выбираем USB диск (в моем примере, Disk 1):
select disk 1
Очистим диск:
clean
Создадим новый раздел размером не более 16 Гб. Если размер флешки меньше 16 Гб:
create partition primary
Если больше:
create partition primary size=16000
Отформатируем флешку в файловой системе FAT32:
format fs=FAT32 quick
Сделаем раздел активным и назначим букву диска M:
active
assign letter=M

Завершим работу diskpart командой exit и скопируем файлы дистрибутива на флешку:
xcopy e:* m: /H /F /E
Размер файла Install.wim более 4 Гб
В том случае, если размер файла Install.wim более 4Гб, скопировать такой файл на флешку не получится, т.к. максимальный размер файла на файловой системе ограничен 4 Гб. В данной ситуации придется разбить wim файл на несколько более мелких файлов с помощью DISM:
dism /Split-Image /ImageFile:e:sourcesinstall.wim /SWMFile:m:sourcesinstall.swm /FileSize:4096
- Remove From My Forums
-
Question
-
Good day,
I am having some difficulty downloading the server 2016. When it finishes downloading, the evaluation one, it asks for a CD. Someone could help me on how to save it directly to my pc and install it? Thanks
All replies
-
-
Proposed as answer by
Thursday, December 7, 2017 2:21 AM
-
Proposed as answer by
-
Hi,
I am not sure about current OS on your device, in general, if it is Windows Server 2012/Windows 8 and later OS version, it supports to mount ISO file without any third-party software.
If it is your current OS version, you can just double click to open ISO file, then, double click setup.exe to start the installation.
Otherwise, you may need tools to create bootable USB/DVD as installation medium, then, re-start system from installation medium to start the system install.
Best Regards,
Eve Wang
Please remember to mark the replies as answers if they help.
If you have feedback for TechNet Subscriber Support, contact
tnmff@microsoft.com.-
Proposed as answer by
Eve WangMicrosoft contingent staff
Thursday, December 7, 2017 2:21 AM
-
Proposed as answer by
-
Hi,
How things are going there on this issue?
Please let me know if you would like further assistance.
Best Regards,
Eve Wang
Please remember to mark the replies as answers if they help.
If you have feedback for TechNet Subscriber Support, contact
tnmff@microsoft.com. -
Dear Dave,
Is it possible to activate an eval version of Windows Server with a valid licence key or not? I have a customer who have purchased one but the disc is far away and I have to make a remote installation, but I’m not have an original disc with me and can’t
find any other download option on MS website.Thanks, Zoltan
-
Dear Dave,
Is it possible to activate an eval version of Windows Server with a valid licence key or not? I have a customer who have purchased one but the disc is far away and I have to make a remote installation, but I’m not have an original disc with me and can’t
find any other download option on MS website.Thanks, Zoltan
I’d start a new thread.
Regards, Dave Patrick ….
Microsoft Certified Professional
Microsoft MVP [Windows Server] Datacenter ManagementDisclaimer: This posting is provided «AS IS» with no warranties or guarantees, and confers no rights.
-
«I’d start a new thread.«
Or better yet, simply search this forum. You will see that your question has been answered many times.
The answer to the question of activating an evaluation copy with a valid key is ‘yes’. Search the forum and you will find instructions on how to do it.
tim
-
First of all why don’t they do the installation since they have the key? If they are not IT personnel they can Google how to install Server 2016.I believe that a remote installation can be done if they use WSUS, they may be able to configure the installation
on WSUs with the key, Google WSUS.
Windows Server 2016 can be installed in a similar fashion as the last several releases. In this example we will create a bootable USB drive with Windows Server 2016 available to install. The classic method of creating a Windows Installation USB drive is to use the free utility Windows USB/DVD Download Tool.
Download the Utility
Download the latest version of the Windows USB/DVD Download Tool from Codeplex.
Install and run the utility on a Windows desktop system with a USB drive attached.
Note: The utility is still called “Windows 7 USB/DVD Download Tool”
Note: .NET may be required to be enabled as the utility requires .NET 2.0 To enable .NET 2.0 simply go to Control Panel and enable .NET Framework 3.5 (see screenshot below)
Load Windows onto the USB
When the Utility is started, a four step wizard begins.

Step one asks for the Windows ISO source file. This will be the Windows distribution that will be copied and installed onto the USB drive.

Select “USB Device”. DVD is also an option for creating bootable DVD disks.

Make sure the correct USB drive is selected. The contents of the USB drive will be destroyed.
Create the USB Drive
Select “Begin Copying” to create the USB bootable drive.

The utility gives you a chance to cancel, otherwise select Erase USB Device.

You are given one more chance to back out. Select Yes.
On Step four, the USB drive is partitioned, formatted and Windows is unloaded, and the USB drive is configured as a bootable device.


And the USB drive is complete. Either exit or create another Windows setup distribution.
To install Windows from the USB, boot a computer from the USB and the Windows Installer OS will initiate the Windows Installation.
Warning: You must install Windows Server 2016 Datacenter edition. Only the Datacenter edition contains the Network Controller, Software-defined Networking, and Storage Spaces Direct.
Note: When powering up a Supermicro computer, press the F11 key until the boot menu appears.
Enable .NET 2.0
If during installation the utility displays a message requiring .NET 2.0, open Control Panel and enable the feature .NET 3.5 (and thereby .NET 2.0).

Microsoft has released the final version of Windows Server 2016. I thought that it might be a good idea to create a USB stick that can be used as a source to install the Windows Server 2016 OS to other servers/workstations.
There are many free tools that can be used to do the job, but sometimes you just don’t have that option or simply you do not want to use any free tools for this job. It is not so difficult to create a bootable USB, and this post will teach you how to do that in 6 easy steps.
This process works on any version of Windows Server or Windows Desktop version 8 or above. It uses Microsoft Diskpart tool present on those systems. It’s a command line tool, which is invoked by simply typing “Diskpart” from within a command prompt.
This How-To should also work on versions earlier than Windows 10, Windows 8, Windows Server 2012, Windows 7 and Windows Vista, and Windows Server 2008 or Windows Server 2008 R2.
This post will teach you this process without any freeware/shareware. The article does not use any downloadable programs or nor is it executable from anywhere. It uses only programs already present in the Windows system. All you need to have is the Microsoft ISO and have a laptop/workstation running Windows 8 or higher, with a free USB slot.
If you do not have the ISO of Windows Server 2016, you will need to download it. To download Windows Server 2016 eval 180 days, go to this link. Microsoft will also make this download available through usual subscription services.
Create Boot USB with Windows Server 2016 – Here are the steps:
Step 1. The first thing to do is to mount the ISO of Windows Server 2016 you just downloaded. Double-click the ISO file to mount it. Check the drive letter and make note of the drive letter. In my case, it is drive D:
Step 2. Put in the USB Key on your computer and make note of the drive letter and the size of the disk. In my case, it is E: and 10gb. Your environment will certainly be different than mine. You will need at least an 8gb USB thumb drive as the process will require 4.9gb.
Step 3. Run Elevated command prompt – Start > type cmd > Right-click cmd at the top of the menu > Run as Administrator and accept the elevation request

Important NOTE: The following commands will completely wipe out your disk without warning, so make sure you select the proper disk. You can also disconnect all external drives or other USBs currently connected to your system to limit possible mistakes.
StarWind HyperConverged Appliance is a turnkey hyper-converged hardware platform fitted into a small two-node footprint. You don’t need anything else to build a budget-friendly new IT infrastructure or upgrade an existing one. All your systems will be “babysitted” by StarWind 24/7/365, troubleshooting any concerns without your involvement. Everything’s operated through a neat web UI. We’ll also migrate your workloads at no extra cost.
Dramatically decrease your CapEx, OpEx, and IT management costs, while visibly increasing return on investment (ROI) with hyperconvergence for ROBO, SMB & Edge from StarWind.
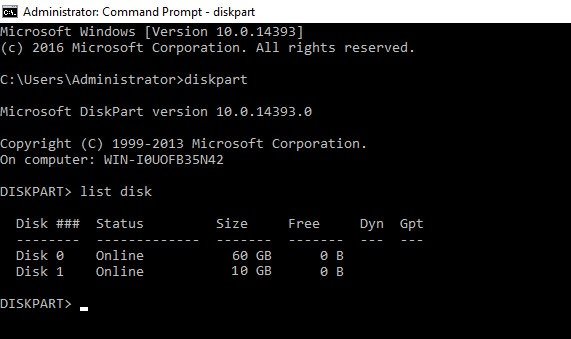
Step 4. Next, you will run the program called Diskpart to prepare the disk for the OS.
diskpart
list disk
select disk
in my case, I’ll do Select Disk 1 as Disk 1 is my 10Gb USB disk.
list disk
Please Note: after you run list disk again, the selected drive should be prefaced with the asterisks “*”. This is a small hint because I know the CLI isn’t everyone’s favorite.
Attention! Watch out: the next line is the one that wipes the drive completely. It cleans the drive.
clean
create partition primary
select partition 1
active
format fs=ntfs quick label=”2016Server”
exit
Leaving DiskPart…
Step 5. Now we need to copy the boot sector. Make sure that you are still within the command prompt window
D:
cd boot
Note: Run “bootsect /help” for detailed usage instructions.
bootsect /nt60 e:
Target volumes will be updated with BOOTMGR compatible bootcode.
Bootcode was successfully updated on all targeted volumes.
Step 6. Now we just need to copy the files… (STILL Within the DOS window)
It is a xCopy command to copy files. The syntax is basically xCopy (source) (destination) with some switches (I won’t go into details). You’ll need to replace drive letters below with your drive letters.
xcopy D:*.* E: /E /H /F
NOTE: There is a very large file called install.wim which will get copied. So when it copies the install.wim file, it will take a very, very long time. This is just to let you know. This file is very large (4gb), but the copy command should finish without error.
Step 7. There is no step 7… You’re done. Once the copy finishes, you can boot Off the USB drive to install a new system on some server. It is usually handy to have such a USB if you’re an admin/technician and use it for systems that do not have a CD/DVD drive installed.
NOTE: Don’t forget to change your BIOS settings concerning the boot order. You must put USB first, then Hard disk as second. Usually, you’ll do that through F2 or F12, or DEL key on your keyboard. But this varies from one manufacturer to another.
Diskpart commands: https://technet.microsoft.com/en-us/library/Cc766465(v=WS.10).aspx
- Tap Room Meeting: StarWind drop makes a pint of Microsoft Windows Server environment taste better
- Hyper-V in Windows Server 2016: Reboot oder Revolution

Windows 11/10 Media Creation Tool — фирменная утилита от Microsoft Corporation, позволяющая создавать загрузочные образы операционной системы Windows 11/10 без использования ключа продукта непосредственно с сервера компании. Эта программа значительно упростила получение нужной Вам версии ОС Windows, не требуя сложных настроек и предоставляя возможность выбора необходимой архитектуры.
Для получения полностью легального образа системы потребуется интернет-соединение, а также носитель — USB-флешка или DVD-диск. После запуска утилиты выберите язык ОС, тип издания (домашняя, Pro и др.) и архитектуру (32-bit или 64-bit). А далее просто определите, куда записать образ операционки. Если выберите DVD-диск, то будет создан ISO-образ, а при выборе USB flash drive загрузочная флешка создастся даже без предварительного ISO-образа. Далее все проходит в автоматическом режиме — Вам останется только дождаться окончания процедуры установки.
Кроме этого, вы можете использовать Media Creation Tool для обновления системы до последней версии Windows 10/11 непосредственно на вашем компьютере без создания загрузочного носителя.
ТОП-сегодня раздела «Обновления, патчи»
 ASUS BIOS Update 7.18.03
ASUS BIOS Live Update — Фирменная утилита для обновления BIOS материнских плат ASUS через интернет…
![]() MSI LiveUpdate 6.2.0.74
MSI LiveUpdate 6.2.0.74
MSI LiveUpdate — это полезные и мощные приложения для автоматической загрузки и обновления BIOS,…
Отзывы о программе Media Creation Tool
Артём про Media Creation Tool 21H1 Win10 / 21H2 Win11 [20-12-2022]
Люди, помогите пж у меня ошибка 0x800072f8f-0x20000
11 | 26 | Ответить
Правдоруб про Media Creation Tool 21H1 Win10 / 21H2 Win11 [13-10-2022]
Народ качать несоветую всё в сифаках, комп не включается после перезагрузки
| | Ответить
Kerxa про Media Creation Tool 21H1 Win10 / 21H2 Win11 [09-09-2022]
Это какая-то особая версия? У меня при установке не требует активации и создания аккаунта. После установки windows уже активированный. Когда качаю через vpn с офф. сайта, то там при установке просят создавать аккаунт и windows устанавливается не активированный.
| 3 | Ответить
Liliya про Media Creation Tool 10.0.18362.418 (1909) [03-03-2020]
Спасибо! Замучил UEFI.
10 | 10 | Ответить
костя про Media Creation Tool 10.0.18362.1 (1903) [14-12-2019]
мне пишет не хватает компанента
15 | 17 | Ответить
Not just an Universal MediaCreationTool wrapper script with ingenious support for business editions,

A powerful yet simple windows 10 / 11 deployment automation tool as well!
If you had no success launching the script so far, this latest version will work
Presets
1 Auto Upgrade with detected media, script assists setupprep for upgrading directly
— can keep files and apps on more scenarios where os and target edition does not match
— can switch detected edition by adding EditionID to script name
— can troubleshoot upgrade failing by addingno_updateto script name
— auto defaults to 11, so pass version as well for 10:auto 21H2 MediaCreationTool.bat
2 Auto ISO with detected media in current folder directly (or C:\ESD if run from zip)
— can override detected media by adding edition name / language / arch to script name
— example:21H1 Education en-US x86 iso MediaCreationTool.bat
3 Auto USB with detected media in specified usb target
— for data safety, this is not fully automated — must select the usb drive manually in GUI
4 Select with user picked Edition, Language, Arch (x86,x64,both) — on specified target
— implicit choice, includes setup override files (disable by adding
defto script name)
5 MCT Defaults runs unassisted, creating media without script modification
— no added files, script passes
products.xmlto MCT and quits without touching media
1-4 presets will modify created media in the following ways:
— write
auto.cmdto run on demand for auto upgrade with edition switch and skip tpm
— write$ISO$folder content (if it exists) at the root of the media
if you previously used $OEM$ content, must now place it in$ISO$\sources\$OEM$\
— writesources\PID.txtto preselect edition at media boot or within windows (if configured)
— writesources\EI.cfgto prevent product key prompt on Windows 11 consumer media (11 only)
— writeAutoUnattend.xmlin boot.wim to enable local account on Windows 11 Home (11 only)
— patchwinsetup.dllin boot.wim to remove windows 11 setup checks when booting from media (11 only)
— can disable by addingdefto script name for a default, untouched MCT media
Simple deployment
auto.cmd is behind Auto Upgrade preset via GUI
Can run it fully unnatended by renaming script with auto MediaCreationTool.bat
Makes it easy to upgrade keeping files and apps when the OS edition does not match the media
Should allow upgrade from Ultimate, PosReady, Embedded, LTSC or Enterprise Eval as well
Generated script is added to the created media so you can run it again at any time
It is fairly generic — it will detect available editions in install.esd, pick a suitable index,
then set EditionID in the registry to match; can even force another edition, keeping files and apps!
On 11, it will try to skip setup checks (can disable this behavior with script var)
Finally, it sets recommended setup options with least amount of issues on upgrades
Let’s say the current OS is Enterprise LTSC 2019, and you use the business media to upgrade:
auto.cmd selects Enterprise index and adjust EditionID to Enterprise in the registry (backed up as EditionID_undo)
Maybe you also want to switch edition,
ex. by renaming the script toProfessionalWorkstation MediaCreationTool.bat:
auto.cmd selects Professional index and sets EditionID to ProfessionalWorkstation in the registry.Let’s say the OS is Windows 7 Ultimate or PosReady, and you use the consumer media to upgrade:
auto.cmd selects Professional index, and sets EditionID to Professional or Enterprise, respectively.
In all cases, the script tries to pick an existing index, else a compatible one to keep files and apps on upgrade.Let’s say you have a dozen PCs spread with versions: 7, 8.1, 10 and editions: Ultimate, Home, Enterprise LTSB..
If you need to upgrade all to the latest 10 version and only use Pro, you could rename the script as:
auto 21H2 Pro MediaCreationTool.batCan even add a VL / MAK / retail product key in the same way to take care of licensing differences.
The script also picks up any$ISO$folder in the current location — for $OEM$ branding, configuration, tweaks etc.
Changelog
No need to right-click Run as Admin, script will ask itself. Directly saving the Raw files no longer breaks line endings
We did it! We broke the previous gist  So this is the new home. Thank you all!
discuss on MDL
2018.10.10: reinstated 1809 [RS5]! using native xml patching for products.xml; fixed syntax bug with exit/b
2018.10.12: added data loss warning for RS5
2018.11.13: RS5 is officially back! + greatly improved choices dialog - feel free to use the small snippet in your own scripts
2019.05.22: 1903 [19H1]
2019.07.11: 1903 __release_svc_refresh__ and enable DynamicUpdate by default to grab latest CU
2019.09.29: UPDATED 19H1 build 18362.356 ; RS5 build 17763.379 and show build number
            added LATEST MCT choice to dinamically download the current version (all others have hard-coded links)
2019.11.16: 19H2 18363.418 as default choice (updated hard-coded links)
2020.02.29: 19H2 18363.592
2020.05.28: 2004 19041.264 first release
2020.10.29: 20H2 and aniversary script refactoring to support all MCT versions from 1507 to 20H2!!!
2020.10.30: hotfix utf-8, enterprise on 1909+
2020.11.01: fix remove unsupported options in older versions code breaking when path has spaces.. pff
2020.11.14: generate latest links for 1909,2004; all xml editing now in one go; resolved known cannot run script issues
2020.11.15: one-time clear of cached MCT, as script generates proper 1.0 catalog for 1507,1511,1703 since last update
            fixed compatibility with naked windows 7 powershell 2.0 / IPv6 / optional import $OEM$ / 1803+ business typo
            updated executables links for 1903 and 2004
2020.11.17: parse first commandline parameter as version, example: MediaCreationTool.bat 1909
2020.12.01: attempt to fix reported issues with 1703; no other changes (skipping 19042.630 leaked esd because it is broken)
2020.12.11: 20H2 19042.631; fixed pesky 1703 decryption bug on dual x86 + x64; improved cleanup; label includes version
2021.03.20: pre-release 21H1; optional auto upgrade or create media presets importing $OEM$ folder and key as PID.txt
2021.05.23: 21H1 release; enhanced script name args parsing, upgrade from embedded, auto.cmd / PID.txt / $OEM$ import
2021.06.06: create iso directly; enhanced dialogs; args from script name or commandline; refactoring is complete!
2021.08.04: done fiddling
2021.09.03: 21H2, both 10 and 11 [unreleased]
2021.09.25: Windows 11
            with Skip TPM Check on media boot as well as on dynamic update (standalone toggle script available)
            final touches for improved script reliability; enhanced auto upgrade preset; win 7 powershell 2.0 compatible
2021.09.30: fix Auto Setup preset not launching.. automatically
2021.10.04: fix for long standing tr localization quirks; Skip TPM Check v2 (ifeo-based instead of wmi)
2021.10.05: 11 22000.194 Release (rofl W11 MCT has limited capabilities, so still using 21H1 MCT because it works fine)
2021.10.09: outstanding refactoring around Windows 11 MCT; minimize while waiting MCT; unified 7 - 11 appearence
2021.10.20: create generic iso if no edition arg; use Downloads folder; no 11 setup checks on boot in VirtualBox; fixes #2
2021.10.23: 11 22000.258
            more intuitive presets; 11 setup override via AutoUnattend.xml or via boot.wim (for VirtualBox 5.x) with FIX arg
            only reliable ui automation; enhanced script output
2021.11.03: multiple download methods; improved automation; improved auto.cmd; moved autounattend.xml to boot.wim
            revising 11 setup bypass (wip) - not being content with any methods is the reason why I've not updated in a while
2021.11.09: skip windows 11 upgrade checks with setup.exe (not just auto.cmd); no server label; local account on 11 home
            auto.cmd has more fixes to keep files and apps on upgrade; reliable ui automation; alternative downloaders
2021.11.15: 11 22000.318
            write output to script folder (or C:\ESD if run from zip); style: more consistent separation of arguments
            20H2 builds with esd size above 4GB that had to be reverted at 19042.631: en,de,es,pt,fr,it,jp,zh (MCT limits)
2021.11.16: 10 19044.1288 - official release of 10 21H2
            10 19043.1348 - newest 10 build - don't ask why ms is releasing these as such, it's not the first time
2021.12.07: skip windows 11 upgrade checks only via auto.cmd - just ignore server label, please
2021.12.15: fix regression with 1507-1709 not getting the correct fallback esd; fix dev '-noe' not autoclosing script
2021.12.22: improved auto.cmd handling of mismatched OS and target edition, obey 'def', 'auto' upgrades 7 to 10, not 11
2022.03.16: prevent launch errors when run from non-canonical paths; USBLayout progress; pickup $ISO$ dir to add on media
            DU in 11: auto installs 22000.556 atm; older skip_11_checks, without Server label; Home offline local account
2022.03.18: fix regression with Auto Upgrade; removed powershell -nop arg (issue #41); enhanced 11 AutoUnattend.xml
2022.03.20: stable - all issues ironed out; improved script ui; upgrade keeping files from Eval editions too
            last squash I promise ;)