(Image credit: Future)
When installing a fresh copy of Windows 10, you typically use a USB flash drive to launch the «Windows Setup» wizard to continue the installation process. However, on a device that has a Unified Extensible Firmware Interface (UEFI) instead of the legacy Basic Input/Output System (BIOS), it is crucial to use the correct media for the firmware type to complete the installation successfully.
On Windows 10, you can use at least two tools to create a bootable USB flash drive. You can use the Microsoft Media Creation Tool to download the files onto a removable drive with support for both firmware types (UEFI and legacy BIOS). Or you can use Rufus, a third-party tool that makes it easy to create a flash drive to install Windows with support for UEFI.
This guide will walk you through creating a Windows 10 USB flash drive with support for UEFI using the Microsoft Media Creation Tool and Rufus.
How to create Windows 10 UEFI boot media with Media Creation Tool
The Media Creation Tool is the best option available for creating a bootable USB media to perform an in-place upgrade or clean installation of Windows 10.
To create a Windows 10 USB media, connect a flash drive of at least 8GB of space, and then use these steps:
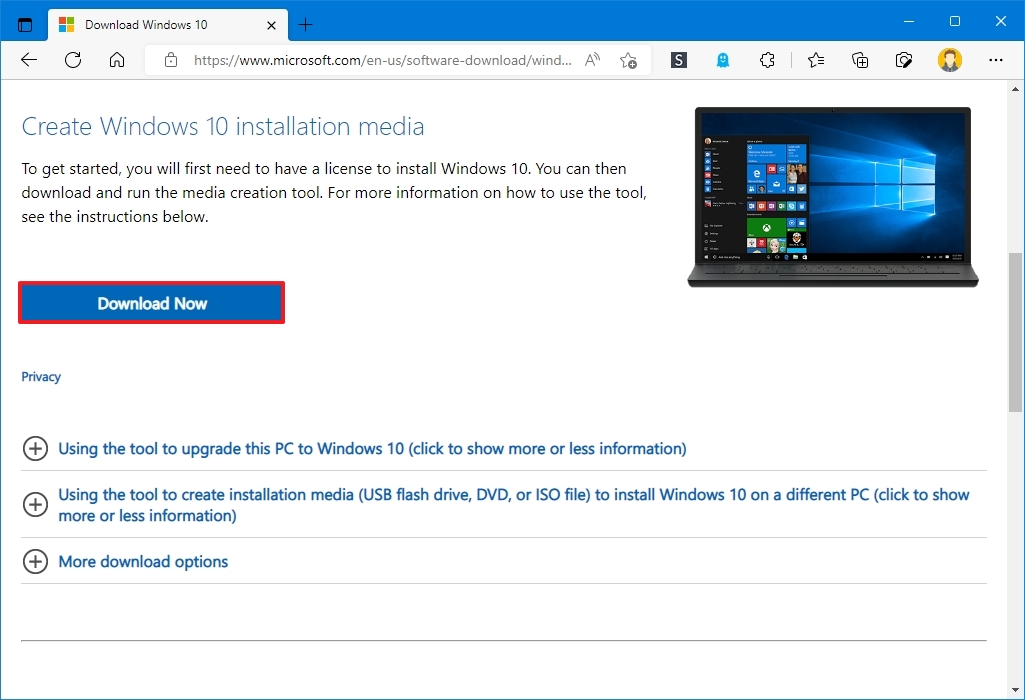
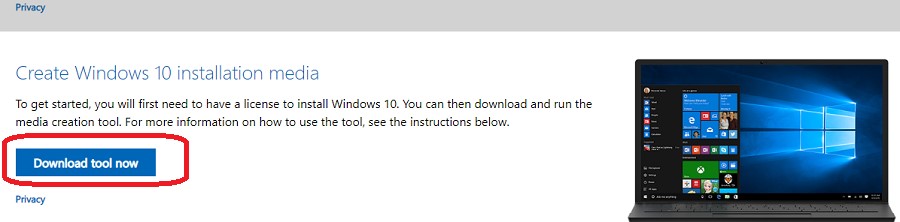
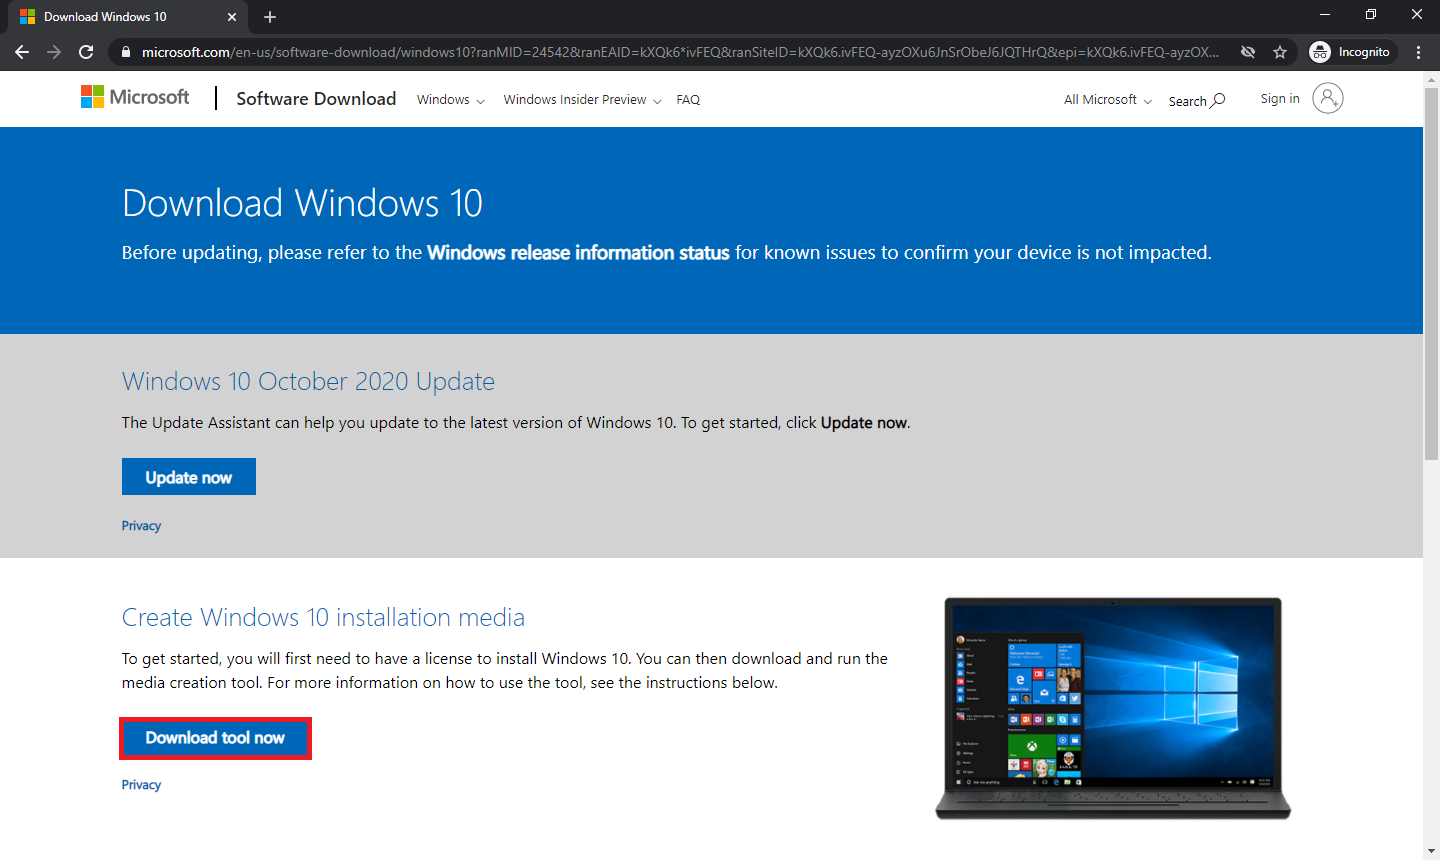
- Open the Windows 10 download page.
- Under the «Create Windows 10 installation media» section, click the Download tool now button to save the file.
- Double-click the MediaCreationToolxxxx.exe file to launch the setup.
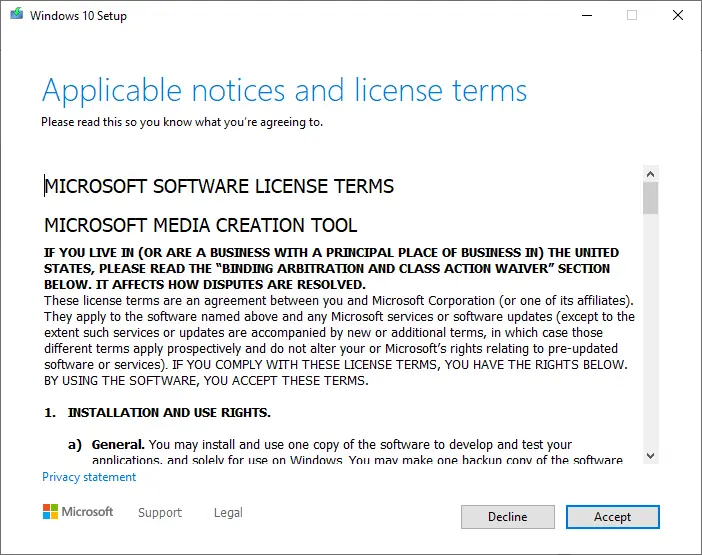
- Click the Accept button to agree to the licensing terms.
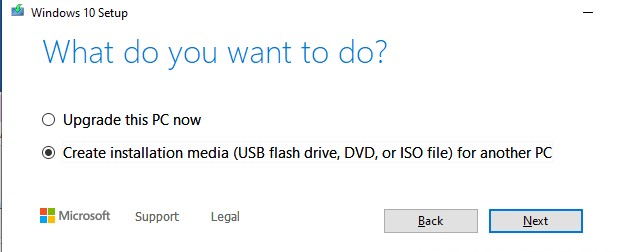
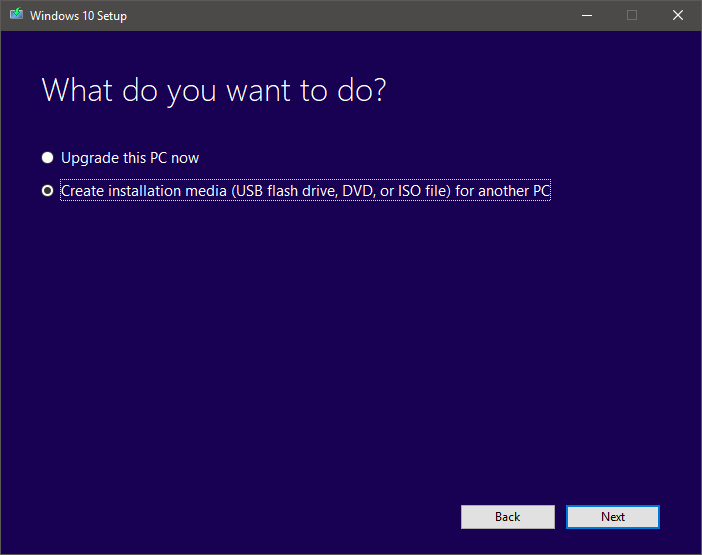
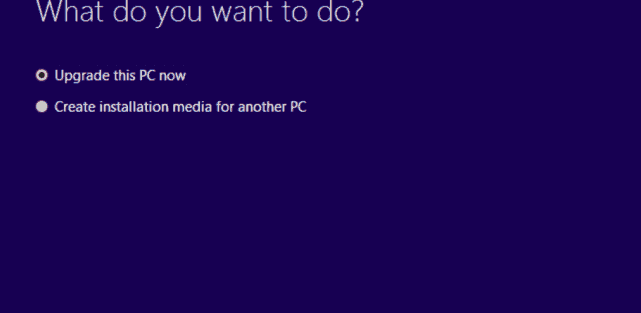
- Select the «Create installation media (USB flash drive, DVD, or ISO file) for another PC» option.

- Click the Next button.
- (Optional) Clear the «Use the recommended options for this PC» option.
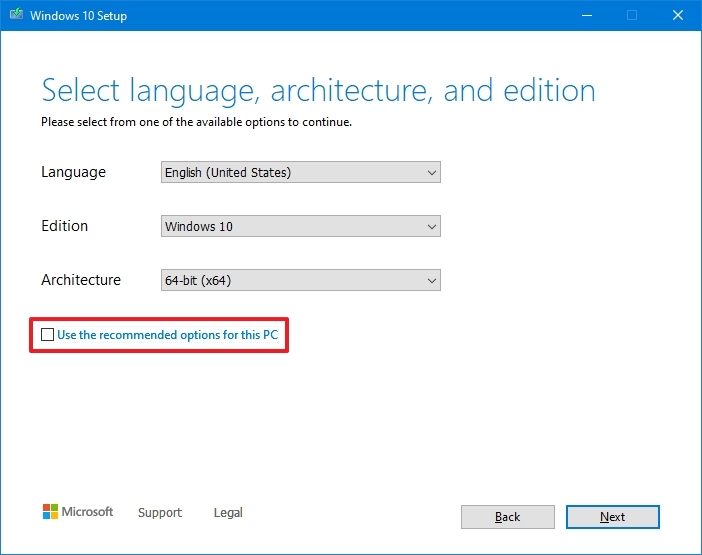
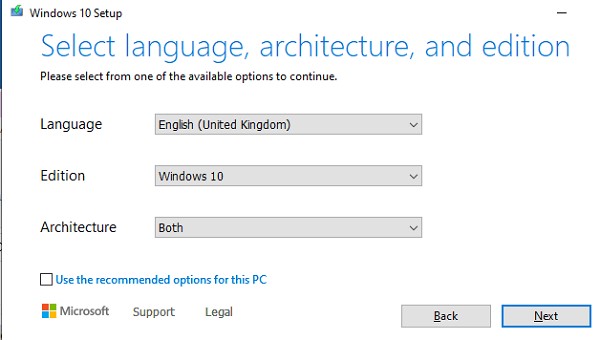
- Select the correct language, architecture, and edition of Windows 10 (if applicable).
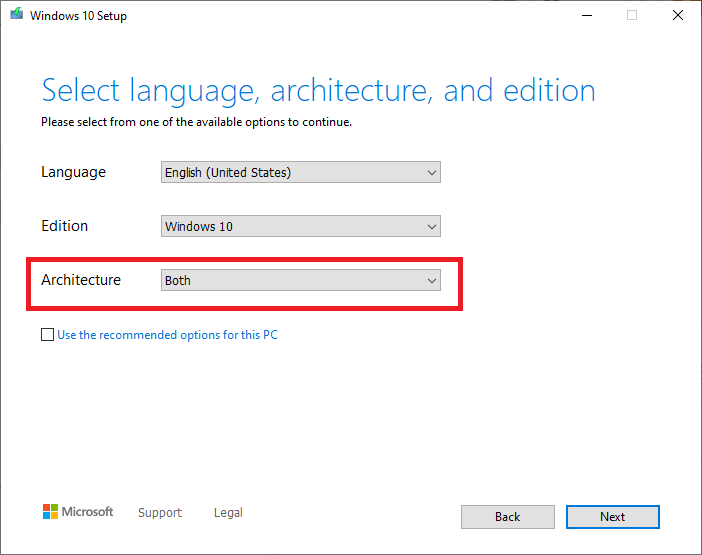
- Quick tip: If you plan to install Windows on multiple computers running 32-bit and 64-bit architectures, use the «Architecture» drop-down menu and select the Both option to create a media that will work on both systems.
- Click the Next button.
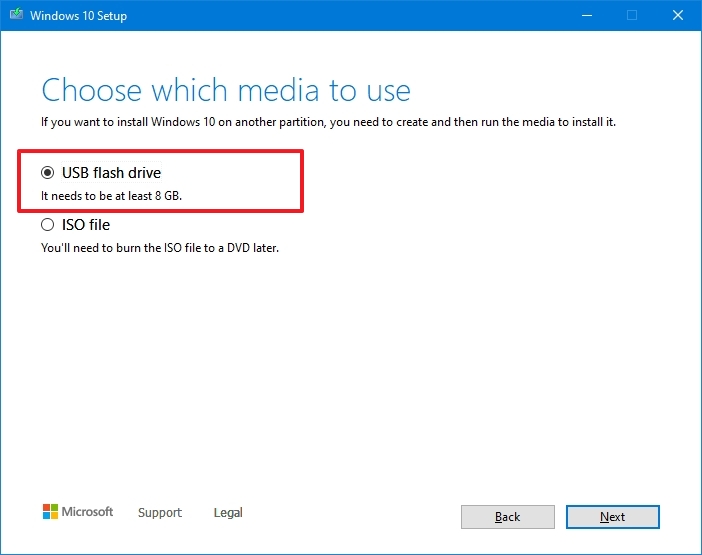
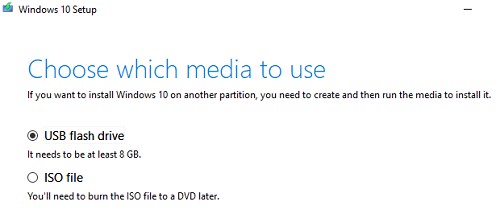
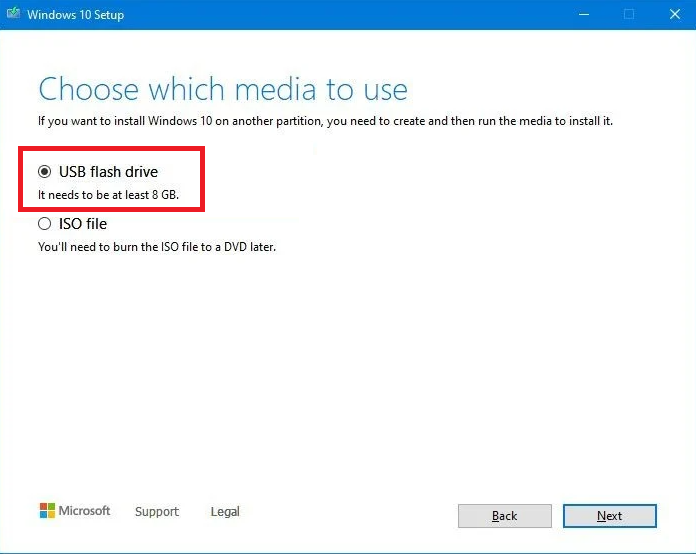
- Select the USB flash drive option.
- Click the Next button
- Select the flash drive from the list. (If you do not see the device, click the «Refresh drive list» option.)

- Click the Next button.
- Click the Finish button.
Once you complete the steps, the Media Creation Tool will download the files and will create a bootable USB flash drive that you can use to install Windows 10 on computers with support for UEFI and BIOS.
How to create Windows 10 UEFI boot media with Rufus
If the Media Creation Tool does not work or you do not want to use it, then you can try Rufus, a popular free third-party tool that allows you to create an installation media with support for UEFI devices. The utility offers two ways to make the installation media, including using an existing ISO file or downloading the image from the Microsoft servers directly from the app.
Create flash drive with existing Windows 10 ISO
To create a USB media with an existing Windows 10 ISO file, connect a flash drive of at least 8GB of space, and use these steps:
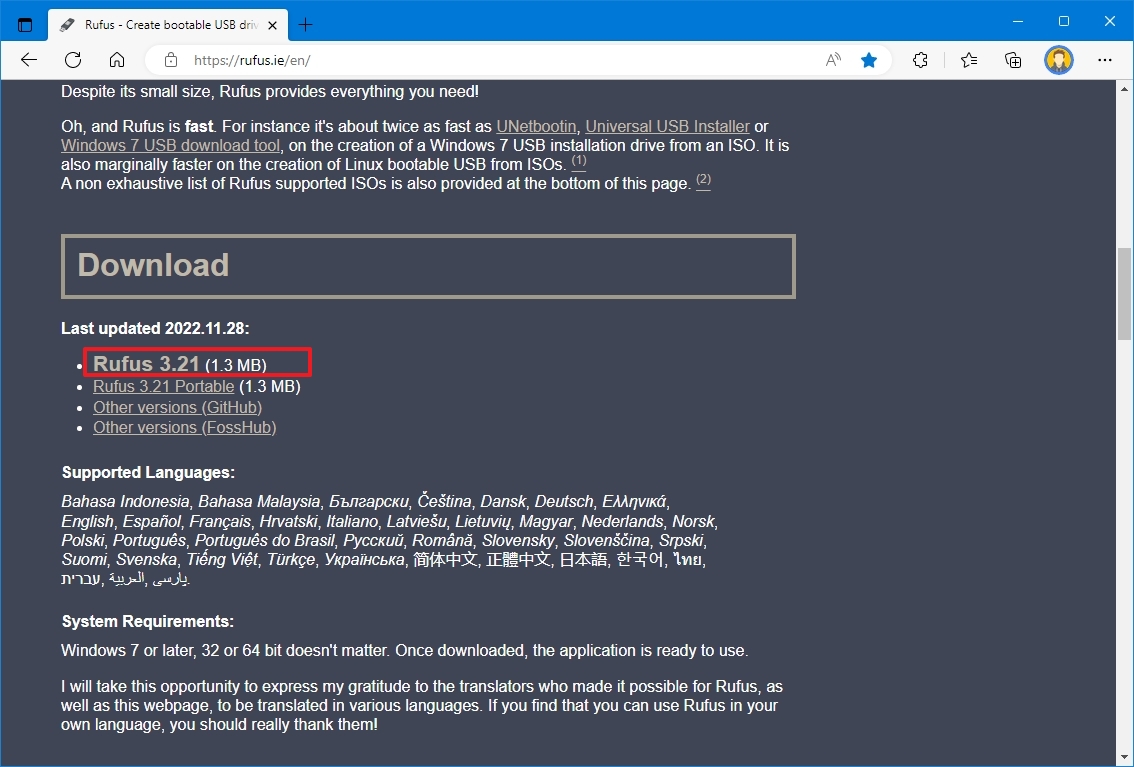
- Open Rufus download page.
- Under the «Download» section, click the latest release (first link) and save the file.
- Double-click the Rufus-x.xx.exe file to launch the tool.
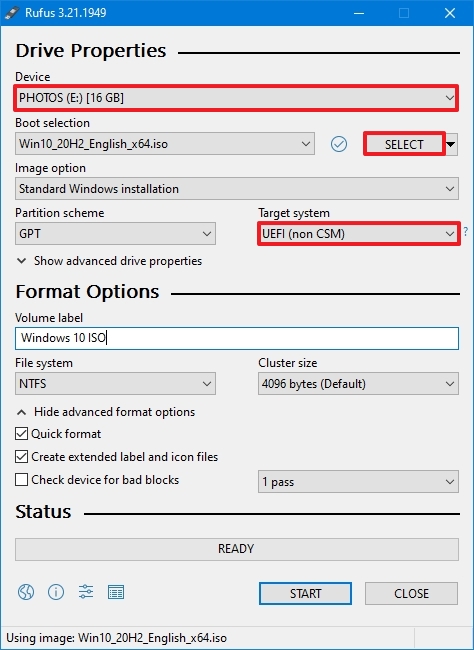
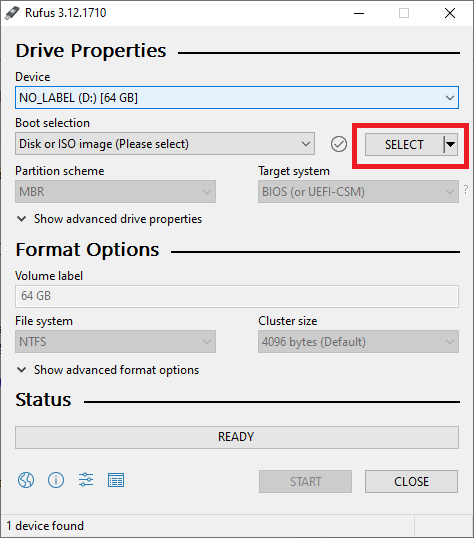
- Under the «Device» section, select the USB flash drive.
- Under the «Boot selection» section, click the Select button on the right.
- Select the Windows 10 ISO file from the folder location.
- Click the Open button.
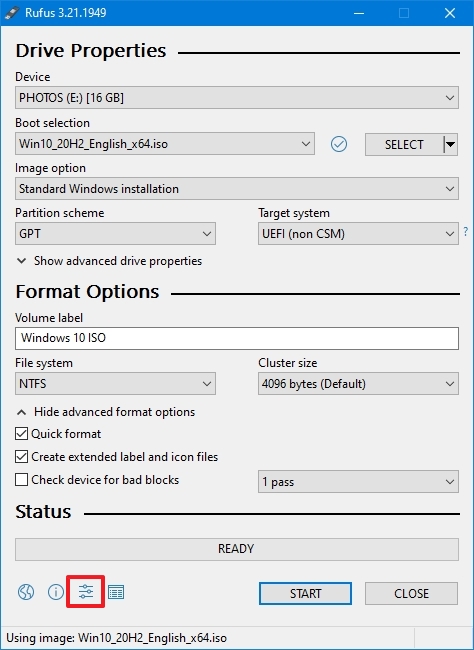
- Use the «Image option» drop-down menu and select the «Standard Windows installation» option.
- Use the «Partition scheme» drop-down menu and select the GPT option.
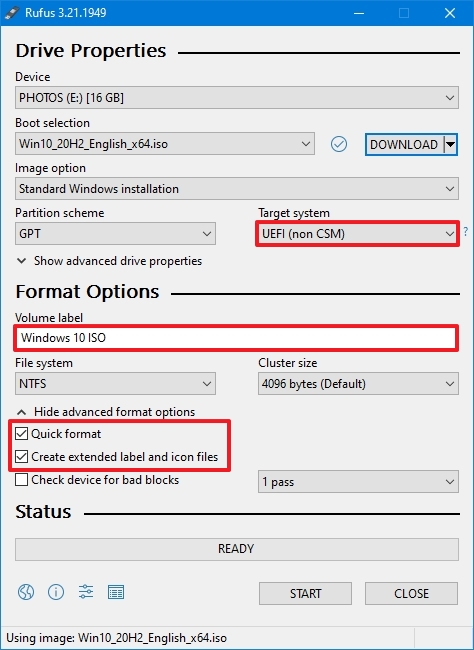
- Use the «Target system» drop-down menu and select the UEFI (non CSM) option.
- Under the «Show Advanced drive properties» section, do not change the default settings (unless you know what you are doing).
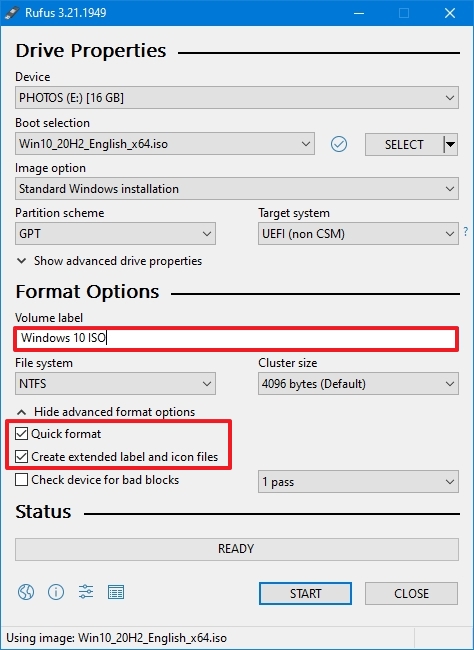
- Under the «Volume label» field, confirm a name for the drive — for example, «Windows 10 USB.»
- Do not change the default settings in the «File system» and «Cluster size» options.
- Click the «Show advanced format options» setting.
- Check the Quick format option.
- Check the «Create extended label and icon files» option.
- Click the Start button.
- Leave the customization installation settings unchecked.
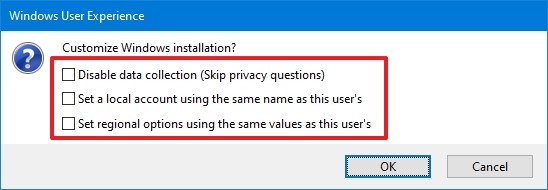
- Click the OK button to confirm.
- Click the Close button.
After you complete the steps, Rufus will create a USB flash drive to install Windows 10 on a device using UEFI.
Create flash drive downloading Windows 10 ISO
The tool also has a feature to download the Windows 10 ISO file, which you can then use to create a USB flash drive to install Windows 10.
To create an install media with UEFI support with Rufus, use these steps:
- Open Rufus download page.
- Under the «Download» section, click the latest release (first link) of the tool to save the file.
- Double-click the Rufus-x.xx.exe file to launch the tool.
- Click the Settings button at the bottom of the page.
- Under the «Settings» section, use the «Check for updates» drop-down menu and select the Daily option.

- Click the Close button.
- Close the Rufus tool.
- Double-click the Rufus-x.xx.exe file to reopen the utility.
- Under the «Device» section, select the USB flash drive from the list.
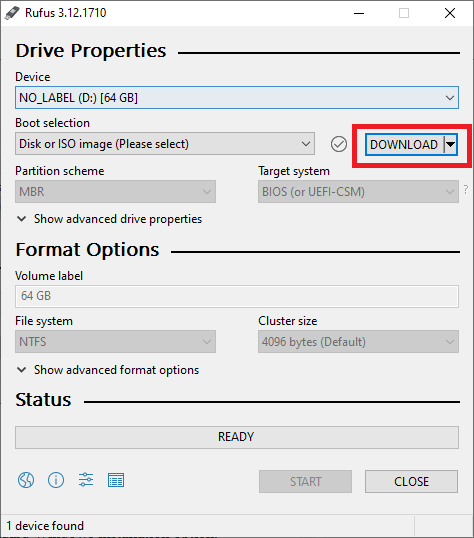
- Under the «Boot selection» section, click the arrow button next to the «Select» option and choose the Download option.
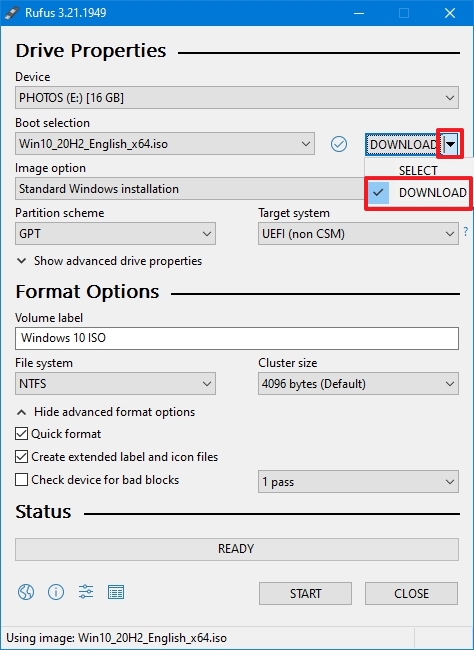
- Click the Download button.
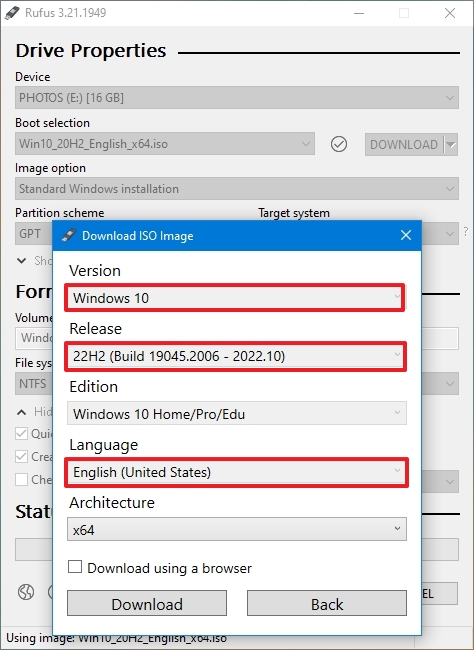
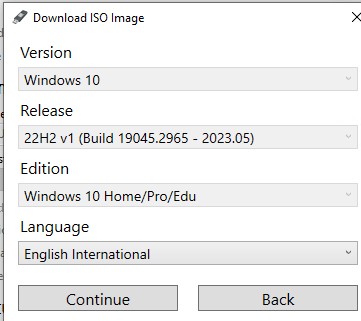
- Use the «Version» drop-down menu and select the Windows 10 option.
- Click the Continue button.
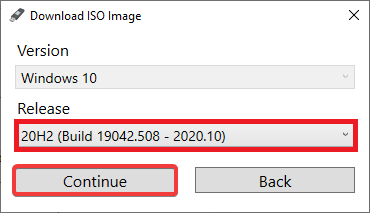
- Select the 22H2 (Build 19045.xxx — xxxx.xx) option to download the Windows 10 November 2021 Update.
- Click the Continue button.
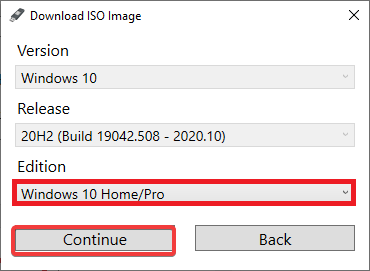
- Use the «Edition» drop-down menu and select the Windows 10 Home/Pro/Edu option.
- Click the Continue button.
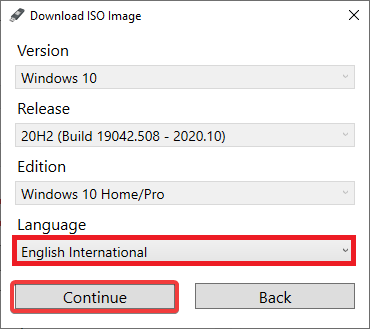
- Use the «Language» drop-down menu and select your installation language.
- Quick note: If you are located in the United States, select the «English» option. Otherwise, select the «English International» option or the language that applies to you.
- Click the Continue button.
- Use the «Architecture» drop-down menu and select the 32-bit or 64-bit option (recommended).
- Quick tip: You can check your computer’s architecture on Settings > System > About, and under the Device specifications section, confirm whether the «System type» is 64-bit or 32-bit.
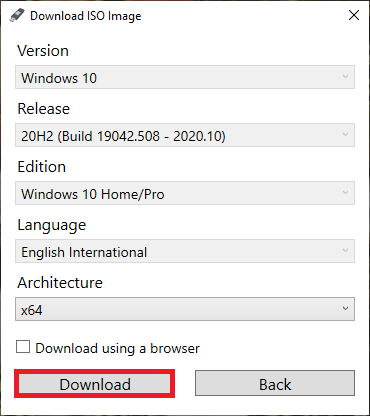
- Click the Download button.
- Select a folder to save the ISO file.
- Click the Save button.
- Use the «Image option» drop-down menu and select the «Standard Windows installation» option.
- Use the «Partition scheme» drop-down menu and select the GPT option.
- Use the «Target system» drop-down menu and select the UEFI (non CSM) option.
- Under the «Show Advanced drive properties» section, do not change the default settings.
- Under the «Volume label» field, confirm a name for the bootable drive — for example, «Windows 10 USB.»
- Under the «File system» and «Cluster size» sections, do not change the default settings.
- Click the «Show advanced format options» button.
- Check the Quick format option.
- Check the «Create extended label and icon files» option.
- Click the Start button.
- Leave the customization installation settings unchecked.
- Click the OK button.
- Click the Close button.
Once you complete the steps, Rufus will run the automated script to download the Windows 10 ISO file from the Microsoft servers and create a bootable media to install the operating system on a UEFI device without needing the Media Creation Tool.
When you have the USB boot media with support for UEFI systems, you can launch the «Windows Setup» wizard to perform a clean installation of Windows 10 or an in-place upgrade. However, since the «UEFI:NTFS bootloader» does not include a digital signature for secure boot, you must temporarily disable secure boot on the motherboard firmware before you can boot into the setup. Typically, you would do this from within the UEFI, which you can access by hitting one of the function keys (F1, F2, F3, F10, or F12), Esc, or the Delete key, as soon as you start the computer.
The firmware settings are different per manufacturer and even by device model. As a result, check your device manufacturer’s support website for more specific instructions. After the installation of Windows 10, you can enable secure boot again.
More resources
For more helpful articles, coverage, and answers to common questions about Windows 10, visit the following resources:
- Windows 11 on Windows Central — All you need to know
- Windows 10 on Windows Central — All you need to know
All the latest news, reviews, and guides for Windows and Xbox diehards.
Mauro Huculak is technical writer for WindowsCentral.com. His primary focus is to write comprehensive how-tos to help users get the most out of Windows 10 and its many related technologies. He has an IT background with professional certifications from Microsoft, Cisco, and CompTIA, and he’s a recognized member of the Microsoft MVP community.
В этой инструкции подробно покажем, как самостоятельно создать загрузочную USB флешку для UEFI компьютера с дистрибутивом Windows 10/11 (Windows Server 2022/2019/2016) или Windows 7.
Содержание:
- Media Creation Tool: официальная утилита для записи образа Windows на USB флешку
- Rufus: лучшая утилита для создания загрузочной UEFI GPT флешки Windows
- Diskpart: вручную записываем установочную UEFI флешку с Windows 10
- Как создать загрузочную UEFI флешку с Windows 7?
- Создать загрузочную UEFI флешку с помощью PowerShell
Вам понадобится:
- USB-флешка (v 2.0 или v 3.0) емкостью не менее 4 Гб для Windows 7 или 8+ Гб для Windows 10/11;
- ISO файл с установочным 64-битный дистрибутивом Windows (32 битные версии Windows не получиться установить на UEFI компьютере).
Важная особенность загрузочной USB флешки для UEFI системы, ее обязательно придется отформатировать в файловой системе FAT32. Компьютер с UEFI в native режиме не сможет загрузиться с такого носителя, отформатированного в файловой системе NTFS.
Media Creation Tool: официальная утилита для записи образа Windows на USB флешку
Microsoft рекомендует использовать свою официальную утилиту Media Creation Tool (MCT) для создания установочных носителей и ISO образов с Windows.
Есть отдельные версия Media Creation Tool:
- Для Windows 10 — (cкачать последнюю версию MCT можно здесь https://www.microsoft.com/en-us/software-download/windows10)
- Для Windows 11 — https://www.microsoft.com/software-download/windows11
- Скачайте и запустите файл MediaCreationTool22H2.exe;
- Выберите, что вы хотите создать установочный носитель — Create installation media (USB flash drive, DVD, or ISO file) for another PC;

- Выберите язык, разрядность и архитектуру образа Windows 10 (x86 и/или x64), который нужно записать на USB накопитель;

- Затем укажите, что вы хотите записать образ на USB флешку;

- Выберите вашу флешку в списке извлекаемых устройств и USB накопителей.
Все данные с выбранной USB флешки будут удалены.


На этом все. Нажмите Next -> Next -> Finish и дождитесь пока установочный образ Windows запишется на USB накопитель.
Чтобы узнать версию Windows в установочном WIM/ESD файле или ISO образе, откройте командую строку и выполните:
Get-windowsimage -ImagePath "F:\sources\install.esd"|select imagename
Как вы видите в установочном образе на флешке есть только Home, Education и Professional редакции Windows.
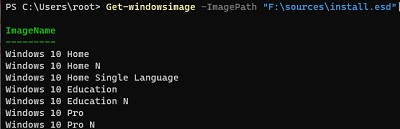
Если вам нужно записать на USB флешку Enterprise редакцию Windows, нужно использовать параметры командной строки Media Creation Tool. Выполните команду:
MediaCreationTool22H2.exe /Eula Accept /Retail /MediaArch x64 /MediaLangCode en-US /MediaEdition Enterprise
Затем должно открыться окно Media Creation Tool, в котором нужно указать ваш ключ Windows 10 Enterprise. Можете указать здесь публичный KMS ключ для Windows 10 (смотри статью FAQ о KMS активации Windows).
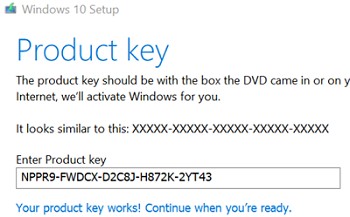
Затем выберет USB носитель, на который нужно записать установочный образ Windows 10 Enterprise.
Данную USB флешку можно использовать для загрузки и установки Windows как на UEFI, так и на BIOS компьютерах.
Способ создания загрузочной флешки с Windows при помощи Media Creation tool очень простой и доступен любому пользователю. Однако он всегда записывает только последи билд Windows и не позволяет записать на USB флешку ваш собственный ISO файл с образом Windows.
Rufus: лучшая утилита для создания загрузочной UEFI GPT флешки Windows
Начинающим пользователям гораздо проще создать собственную загрузочную UEFI флешку для установки Windows с помощью графического интерфейса популярной утилиты Rufus. На данный момент на сайте разработчика https://rufus.ie доступна уже третья версия утилиты – Rufus 4.12. Утилита довольно компактная (около 1,4 Мб), не требует установки и полностью бесплатна. Кроме того, работает заметно быстрее аналогов.
Скачайте утилиту Rufus с официального сайта и запустите с правами администратора. Чтобы записать имеющийся ISO образ на флешку:
- Устройство: выберите вашу USB флешку;
- Метод загрузки: укажите файл с ISO образом Windows (можно создать ISO образ с последним билдом Windows 10 с помощью той же Media Creation Tool, см. пример);
- Схема раздела: GPT;
- Параметры образа: Стандартная установка Windows
- Целевая система: UEFI (non-CSM);
- Файловая система: FAT32
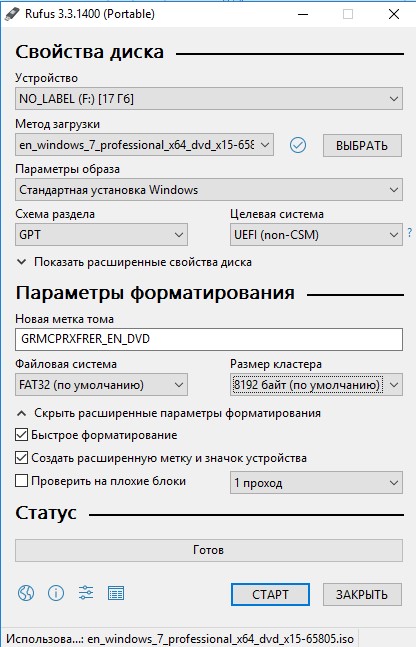
Нажмите СТАРТ для начала записи образа Windows на USB флешку. Через 10-15 минут ваш загрузочный USB накопитесь с образом Windows для установки на UEFI компьютере будет готов
Начиная с версии 3.5 в Rufus доступна загрузка установочных образов Windows. Для этого при запуске Rufus нужно разрешить ежедневную проверку обновлений. После этого в интерфейсе Rufus появится кнопка Download.
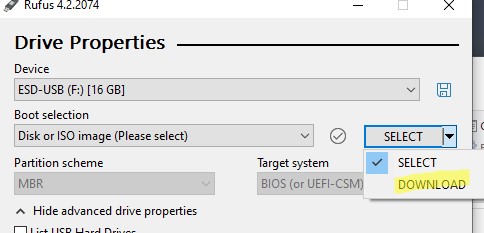
Вы можете выбрать какую версию Windows нужно скачать (доступна загрузка ISO образов с последними релизами Windows 8.1, Windows 10 и Windows 11).
Diskpart: вручную записываем установочную UEFI флешку с Windows 10
Вы можете создать загрузочную UEFI флешку с нужным дистрибутивом Windows вручную. Описанная ниже процедура подходит для опытных пользователей, выполняется из командной строки и позволяет вам полностью контролировать (и понимать) все этапы процесса создания загрузочной USB флешки.

- Вставьте USB флешку в соответствующий порт компьютера;
- Запустите командную строку с правами администратора;
- Запустите утилиту DISKPART, набрав в командной строке:
Diskpart
- Выведите список всех дисков в системе:
list disk
- Найдите диск, соответствующий вашей USB флешке (в нашем примере это Disk 2) и выберите его:
Select Disk 2
-
Предупреждение. Следующая команда полностью уничтожит всю информацию и разделы на USB флешке, поэтому желательно лишний раз убедится, что на предыдущем шаге вы выбрали именно ваше съемное USB устройство, а не один из жестких дисков компьютера.
Очистите диск:
clean
- Создайте на диске первичный раздел:
create partition primary
- Сделайте созданный раздел активным:
active
- Выведите список разделов в системе командой:
list volume
- Выберите созданный вами раздел (в нашем примере это Volume 3):
select volume 3
- Отформатируйте выбранный раздел в файловой системе Fat32:
format fs=fat32 quick
Примечание. В отличии от компьютеров с BIOS, позволяющих загружаться с загрузочных разделов с файловыми системами FAT, FAT32, exFAT или NTFS, UEFI позволяет загрузиться только с загрузчика, находящегося на загрузочном диске, отформатированном в файловой системе FAT32.
- Назначьте отформатированному разделу букву диска (если Windows автоматически не назначает букву флешке — смотри статью):
assign

- Завершите работу с DISKPART:
exit

Теперь нужно скопировать файлы со смонтированного установочного ISO образа диска с Windows x64 на подготовленную вами USB флешку. Сделать это можно с помощью проводника Windows, файлового менеджера или из командной строки, например, так:
xcopy d:\* f:\ /s /e
(где, d:\ установочный DVD диск или смонтированный iso образ с дистрибутивом Windows , f:\ — буква, присвоенная флешке)
Примечание Т.к. максимальный размер файла на файловой системе FAT32 не должен превышать 4 Гб, вы не сможете скопировать файл установочного образа системы install.wim большого размера (чаще всего это проблема возникает с модифицированными образами Windows). Размер файла install.wim, может быть более 4 Гб, если вы интегрировали в установочный образ обновления безопасности, добавили драйвера и т.д. В этом случае файл install.wim придется разбить на несколько файлов размером до 4 Гб (например, 3 Гб файлы). Для этого можно воспользоваться командой:
Dism /Split-Image /ImageFile:D:\sources\install.wim /SWMFile:c:\tmp\install.swm /FileSize:3000
Или с помощью утилиты imagex:
imagex /split D:\sources\install.wim c:\tmp\install.swm 3000
Полученные файлы install.swm, install2.swm, install3.swm … нужно скопировать на флешку в каталог F:\sources. Установщик Windows в процессе установки ОС сам соберет swm файлы и применит полный wim образ к диску.
Как создать загрузочную UEFI флешку с Windows 7?
Если вы создаете установочную USB флешку с Windows 7 / Windows Server 2008 R2 для UEFI компьютера, нужно выполнить дополнительные шаги:
- На USB флешке перейдите в каталог f:\efi\microsoft\boot;
- Целиком скопируйте его содержимое на один уровень выше (в каталог F:\efi\boot)
- Скопируйте файл bootmgfw.efi в каталог f:\efi\boot и переименуйте его в bootx64.efi;
Примечание. Именно файлу bootx64.efi должна передать управление среда UEFI. Файл bootmgfw.efi можно скопировать из уже установленной системы с Windows 7 x64 (находится он в каталоге %windir%\Boot\EFI), также его можно извлечь из файла install.wim в дистрибутиве с помощью архиватора 7ZIP, найти его можно по пути sources\install.wim\1\Windows\Boot\EFI\bootmgfw.efi).

Примечание. Для некоторых материнских плат необходимо дополнительно скопировать файл bootx64.efi в корень USB диска либо с идентичным именем файла или с именем shellx64.efi.

Создать загрузочную UEFI флешку с помощью PowerShell
Также можно использовать командлеты PowerShell для создания загрузочной UEFI флешки.
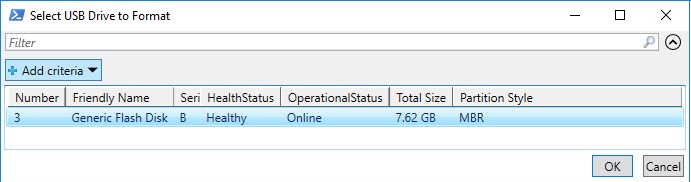
Следующая команда выведет список USB устройств. После того, как вы выберите нужный накопитель, он будет очищен, создан первичный раздел и отформатирован в файловой системе Fat32 (используются командлеты из модуля управления дисками Storage):
$Results = Get-Disk |Where-Object BusType -eq USB |Out-GridView -Title 'Select USB Drive to Create UEFI bootable device' -OutputMode Single |Clear-Disk -RemoveData -RemoveOEM -Confirm:$false -PassThru |New-Partition -UseMaximumSize -IsActive -AssignDriveLetter |Format-Volume -FileSystem FAT32
Смонтируйте установочный ISO образ Windows 10:
$Volumes = (Get-Volume).Where({$_.DriveLetter}).DriveLetter
Mount-DiskImage -ImagePath C:\ISO\Windows10-2004x64.iso
$ISO = (Compare-Object -ReferenceObject $Volumes -DifferenceObject (Get-Volume).Where({$_.DriveLetter}).DriveLetter).InputObject
Т.к. в PowerShell у меня не получилось определить, какая буква диска была назначена смонтированному ISO образу пришлось сравнивать список дисков до и после монтирования с помощью Compare-Object.
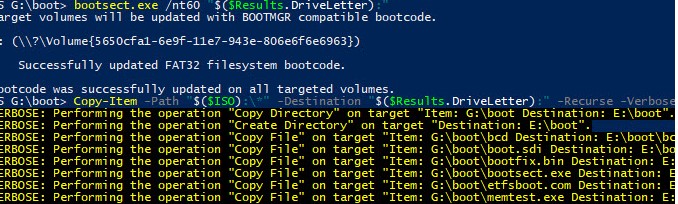
Теперь нужно перейти в каталог Boot и скопировать содержимое на USB флешку с помощью Copy-Item:
Set-Location -Path "$($ISO):\boot"
bootsect.exe /nt60 "$($Results.DriveLetter):"
Copy-Item -Path "$($ISO):\*" -Destination "$($Results.DriveLetter):" -Recurse -Verbose
Обратите внимание, что, для установки операционной системы в UEFI режиме, жесткий диск компьютера должен иметь разметку диска GPT. Для конвертации MBR диска в таблицу разделов GPT без потери данных можно использовать утилиту mbr2gpt).
Теперь вы можете загрузить компьютер с вашей загрузочной USB флешки. Для этого перезагрузите устройство, откройте настройки UEFI и проверьте, что ваш USB накопитель выбран в качестве первичного загрузочного устройства. После этого вы можете начать чистую установку Windows на компьютер или запустить режим восстановления Windows Recovery Environment для исправления проблем с установленной операционной системой.
It’s not hard to create a bootable UEFI media if you closely follow the steps from our guide
by Ivan Jenic
Passionate about all elements related to Windows and combined with his innate curiosity, Ivan has delved deep into understanding this operating system, with a specialization in drivers and… read more
Updated on
- UEFI is a new firmware that starts the computer and loads the operating system.
- To create a UEFI bootable USB you can use a clever and friendly app to solve the problem quickly.
- You can also use a smart tool from Microsoft but make sure you have the latest version.

Most users received Windows 10 as a free upgrade through Windows Update. Other users prefer to install the new operating system from a physical drive like a USB flash drive.
In this article, we’re going to show you how to create a USB flash drive with Windows 10 which can be installed on UEFI-based computers.
In case you’re not the one who really needs to install Windows 10 on a UEFI-based computer, but you’re reading this article just for education, you may not be familiar with the term UEFI.
Well, UEFI is basically the replacement for BIOS, so that means it’s a new firmware that starts the computer and loads the operating system. And more and more new Windows PCs are coming with it.
Check out how to enable secure boot on UEFI computers in the linked article!
Can Rufus create UEFI bootable USB?
Yes, Rufus can create a UEFI bootable USB. Rufus is a free and open-source utility that allows users to create bootable USB drives for a variety of purposes, including booting and installing operating systems such as Windows, Linux, and others.
How we test, review and rate?
We have worked for the past 6 months on building a new review system on how we produce content. Using it, we have subsequently redone most of our articles to provide actual hands-on expertise on the guides we made.
For more details you can read how we test, review, and rate at WindowsReport.
In the guides below we will present to you how to create a Windows 10 bootable USB drive from ISO in just a few steps, using Rufus and Media Creation Tool.
How to create Windows 10 UEFI bootable USB?
- Can Rufus create UEFI bootable USB?
- How to create Windows 10 UEFI bootable USB?
- 1️⃣ Create a bootable USB using RUFUS
- 2️⃣ Use the Media Creation Tool from Microsoft
1️⃣ Create a bootable USB using RUFUS
Another method to create a bootable USB on Windows 10 is to use the Rufus USB image writer. It is a third-party standalone utility, so you don’t have to install it, just download and open it.
1. Download Rufus.
2. Open the app.
3. Select the USB flash drive you want to create an image on.
4. Select the GPT partition scheme for UEFI (leave cluster size to default). Make sure you have the option Create a bootable disk using ISO Image selected from the dropdown menu.
5. Add your Windows ISO file (you can download your Windows 10 ISO files from from Microsoft for free), and click Start.
6. Wait until the process is finished.
7. Now just restart your computer and install the system normally.
2️⃣ Use the Media Creation Tool from Microsoft
- Make sure you have an active Internet connection.
- Select Create installation media (USB flash drive, DVD, or ISO file) for another PC option and click Next.

- Select the language, architecture, and edition of Windows 10. It’s important to choose the correct architecture, 64-bit or 32-bit or you can simply select both.
- Select the USB flash drive option.
- Select the removable drive you want to use from the list.
- Wait until the download is over.
Besides Rufus, the most recommended tool to create a USB bootable Windows 10 system is the Media Creation Tool. Before you start, please download the updated file.
After the Windows 10 installation files have been downloaded, your computer will create a bootable USB that will be compatible with devices that are using UEFI or BIOS.
- Microsoft Store Apps vs Desktop Apps: Which Ones to Use?
- How to Use Steam Deck’s Keyboard in Desktop Mode
- How to Format an NVMe SSD on Windows 11
- How to Download & Install New Microsoft Office Fonts
- Offline Files on Windows 11: How to Enable or Disable
If you need to fix UEFI boot problems in Windows 10, check out our article linked here.
We hope that our solutions helped you create a Windows 10 UEFI bootable USB drive. Let us know your thoughts in the comments section below.
If you have any other issues or questions, you can check our wide collection of guides on the Media Creation Tool.
![]()
If you plan to install a fresh copy of Windows 10 on your computer, it is better to create a bootable USB flash drive. USB flash drive is also useful when it comes to storage. It can handle a lot of data on a small USB disk.
If you have a computer that features a UEFI (Unified Extensible Firmware Interface) BIOS instead of the legacy Basic Input/Output System (BIOS), you have to be more careful in choosing the appropriate media for the motherboard firmware type.
On Windows 10, you can use two methods to create bootable media to install the OS from USB on a UEFI-based computer. You can either use the Microsoft Media Creation Tool to download the files onto removable storage with support for both firmware types (UEFI and legacy BIOS) or use a third-party tool, Rufus.
Both of the software allow downloading the latest Windows 10 ISO file directly from the Microsoft server. This week Microsoft updated Windows 10 to the 20H2 version. Hence, if you plan to install a fresh copy of Windows 10, it is better to download an updated version of Windows 10 from the Microsoft Store.
This post will go through the steps, including downloading and installing the latest version of Windows 10 20H2.
How to download and create a Windows 10 UEFI boot media using the Media Creation Tool?
Follow these steps to download and create a Windows 10 UEFI boot media using the Media Creation Tool:-
Step 1. Browse the Windows 10 download page.
Step 2. Under the “Create Windows 10 installation media” section, click the Download tool now button to save the file on your computer.
Step 3. Double-click the downloaded MediaCreationTool file to launch it.
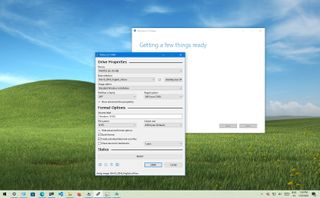
Step 4. It may take a few minutes to get ready. Click the Accept button to agree to the Microsoft terms and conditions.
Step 5. Select the option “Create installation media (USB flash drive, DVD, or ISO file) for another PC.”
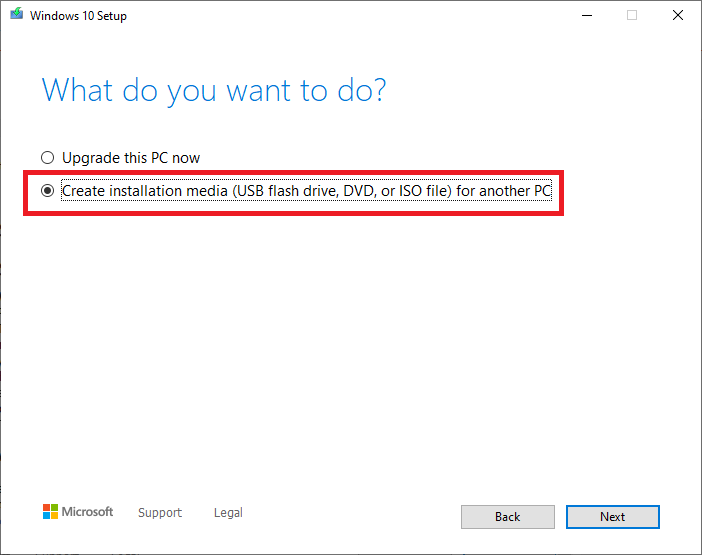
Step 6. Click on the Next button.
Step 7. Uncheck the Use the recommended options for this PC option.
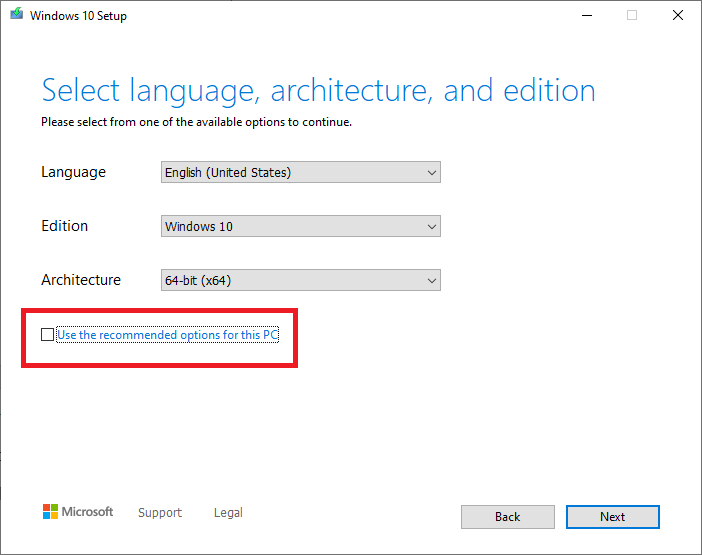
Step 8. Select the language, architecture, and edition of Windows 10 for which you want to create a bootable USB flash drive.
Note: If you plan to install both 32-bit and 64-bit versions of Windows 10 on different PCs, then select the Architecture as Both.
Step 9. Once you have selected the correct options, click the Next button.
Step 10. Select the USB flash drive option (depending upon the selection, it may require up to 16GB of free space on the hard disk).
Step 11. Click the Next button.
Step 12. Select your USB flash drive.
Step 13. Click the Next button.
Step 14. Click the Finish button.
Once the above-mentioned steps are completed, the tool will start downloading the required files from the Microsoft servers, and it’ll create a bootable USB flash drive with support for UEFI and BIOS.
How to download and create a Windows 10 UEFI bootable USB flash drive using Rufus?
If you prefer to use a third-party freeware tool, then Rufus is the best option for you. The latest version of Rufus lets you download and create a bootable USB flash drive with UEFI support.
To download and create a Windows 10 UEFI bootable USB flash drive using Rufus, do the following:-
Step 1. Download the latest version of the Rufus utility from this page.
Step 2. Run the Rufus tool.
Step 3. Under the Device section, select the USB flash drive.
Step 4. Under the Boot selection section, click the SELECT drop-down and select the DOWNLOAD option. Then click on the DOWNLOAD option to download a fresh copy of Windows ISO.
Step 5. Download ISO Image window opens; you can select here Windows 10 or Windows 8.1.
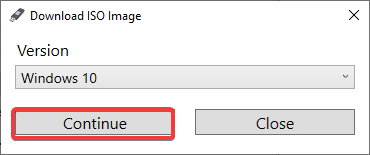
Step 6. Once you have selected the correct Windows, click on the Continue button.
Step 7. Select the latest release of Windows OS and click on the Continue button.
Step 8. Now select the Edition of Windows and click on the Continue button.
Step 9. Now select the correct language of Windows and click on the Continue button.
Step 10. Select the Architecture (32-bit or 64-bit) of Windows.
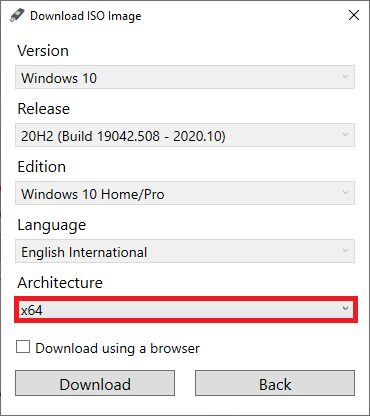
Step 11. Click on the Download button to save the Windows 10 ISO file on your PC.
Step 12. Once you are ready with Windows 10 ISO file, select the Windows ISO file under Boot Selection.
Step 13. Under the Image Option, select the Standard Windows installation option.
Step 14. Use the “Partition scheme” drop-down menu, and select the GPT option.
Step 15. Under the Target system drop-down menu, select the UEFI (non CSM) option.
Step 16. Leave other settings as default; it should look something like this:-
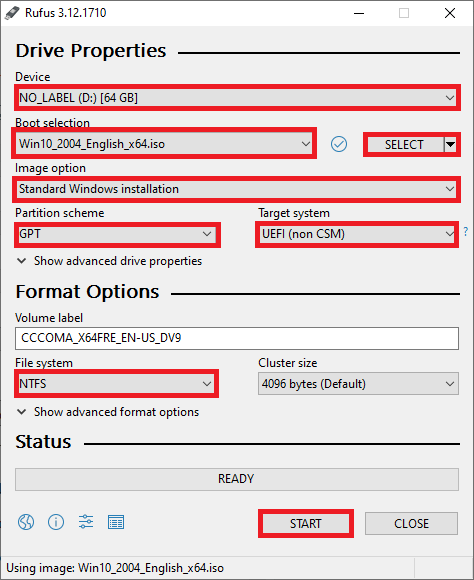
Step 17. Once you are ready with the above-mentioned options, click on the START button.
Your USB flash drive will be formatted to make it bootable.
Once you are ready with a bootable USB flash drive, make the changes in BIOS and install a fresh Windows 10 on your machine.
Above are the two methods through which you can download the latest version of Windows 10 to create a bootable USB flash drive with UEFI support.
Once you have created a bootable USB flash drive, you can test it without installing it on your computer or laptop.
Conclusion
In conclusion, creating a bootable USB flash drive with UEFI support is the best option for installing a fresh copy of Windows 10 on a computer. Both Microsoft Media Creation Tool and Rufus are effective methods to download and create bootable media. It is important to choose the appropriate firmware type for the motherboard, especially when using a UEFI BIOS. By following the steps mentioned in this post, you can easily download and create a bootable USB flash drive with UEFI support for installing the latest version of Windows 10. With a bootable USB flash drive, you can also test the operating system without installing it on your machine.
 В этой пошаговой инструкции подробно о том, как создать загрузочную флешку Windows 10 различными способами. Впрочем, способы не особенно изменились по сравнению с предыдущей версией операционной система: так же, как и раньше, ничего сложного в этой задаче нет, за исключением, разве что возможных нюансов, связанных с загрузкой EFI и Legacy в некоторых случаях.
В статье описан как официальный метод сделать загрузочную флешку с оригинальной Windows 10 Pro и Home x64 и 32-бит посредством фирменной утилиты Microsoft Installation Media Creation Tool, так и другие способы и бесплатные программы, которые помогут вам в записи установочного USB накопителя из ISO образа с Windows 10 для установки ОС в системах UEFI и Legacy, на GPT и MBR диск или восстановления системы. В дальнейшем может пригодиться пошаговое описание процесса установки: Установка Windows 10 с флешки. Полезные в рассматриваемом контексте дополнительные материалы — Создание загрузочной флешки Windows 11, Создание загрузочной флешки Windows 10 на Mac, Загрузочная флешка Windows 10 в Linux, Запуск Windows 10 с флешки без установки
Загрузочная флешка Windows 10 официальным способом
Сразу после выхода финальной версии новой ОС, на сайте Microsoft появилась утилита Windows 10 Installation Media Creation Tool (сегодня Microsoft Media Creation Tool), позволяющая создать загрузочную флешку для последующей установки системы, автоматически загружающая на накопитель последнюю выпущенную финальную версию Windows 10 и создающая USB-накопитель для загрузки как в UEFI так и в Legacy режиме, подходящий для GPT и MBR дисков HDD и SSD.
Тут важно отметить, что с помощью данной программы вы получаете оригинальную Windows 10 Pro (Профессиональная, в том числе для рабочих станций), Home (Домашняя), Home для одного языка с сайта Майкрософт. И в полной мере такая флешка подходит в том случае, если у вас либо есть ключ Windows 10, либо на компьютере или ноутбуке уже была установлена лицензионная Windows 10 или 8.1, а теперь хотите выполнить чистую установку (в этом случае при установке пропустите ввод ключа, нажав «У меня нет ключа продукта», система активируется автоматически при подключении к Интернету). Вы можете установить Windows 10 с такого USB накопителя и без выполнения этих условий и работать без активации (без особых ограничений), либо активировать её ключом от предыдущей версии системы.
Шаги по созданию загрузочной флешки Windows 10 официальным способом будут выглядеть следующим образом, сам накопитель желательно подключить сразу, размер — не менее 8 Гб, данные с нее в процессе будут удалены:
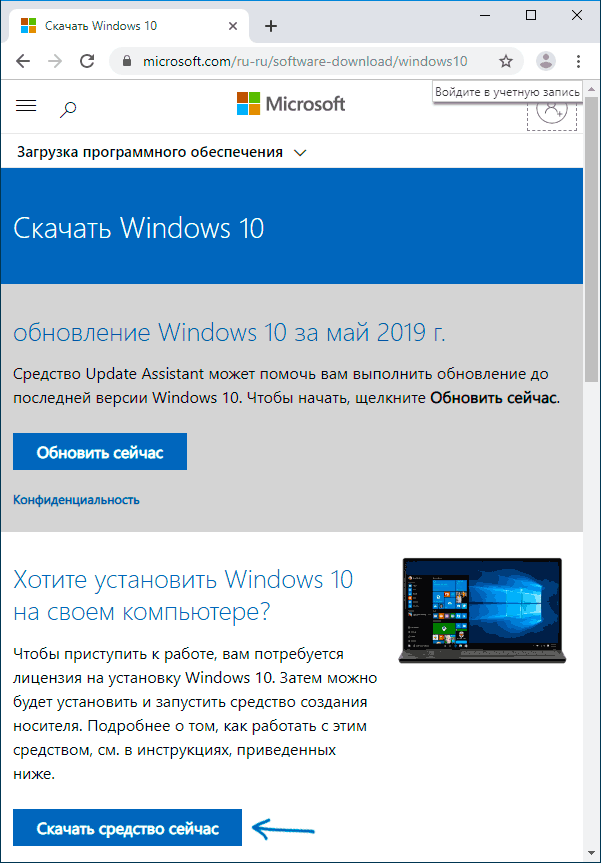
- Скачать утилиту для создания загрузочной флешки Windows 10 Microsoft Installation Media Creation Tool можно с официального сайта https://www.microsoft.com/ru-ru/software-download/windows10, нажав кнопку «Скачать средство сейчас».

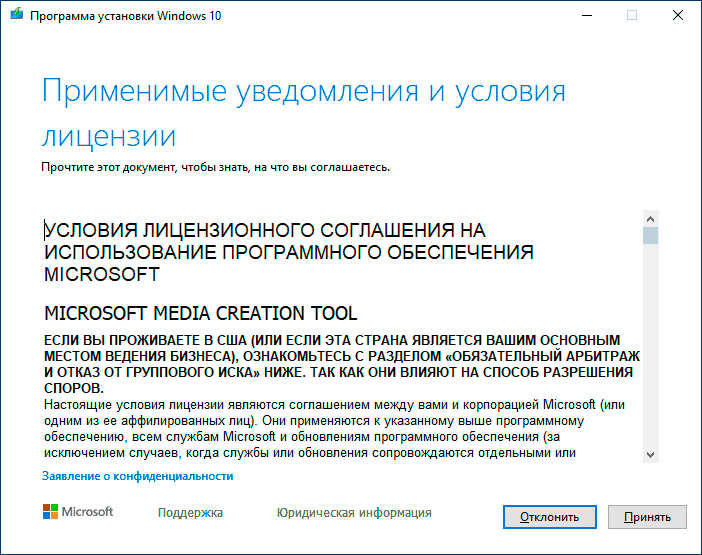
- Запустите загруженную утилиту и примите условия лицензионного соглашения.

- Выберите пункт «Создать установочный носитель USB-устройство флэш памяти» и нажмите «Далее».
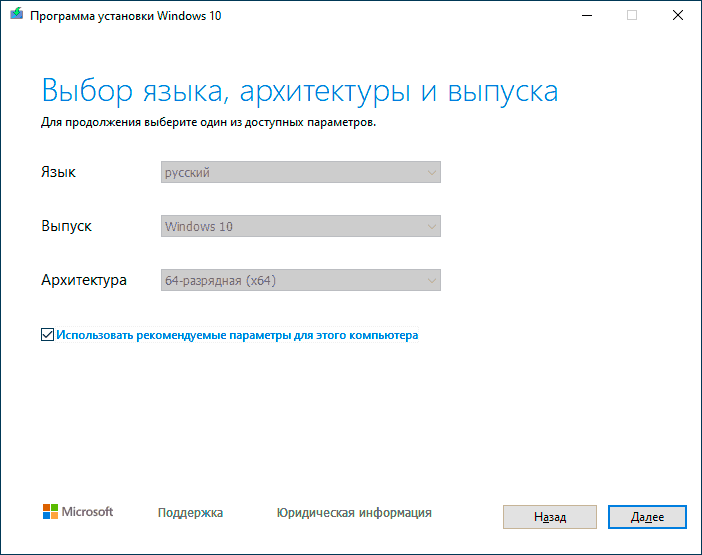
- Через некоторое время появится окно выбора архитектуры, языка системы и её выпуска. По умолчанию установлены рекомендуемые параметры, в соответствии с характеристиками текущей системы, но сняв отметку, вы можете выбрать другой язык или разрядность — 64-бит или 32-бит. Учитывайте, что в одном образе содержатся сразу все редакции Windows 10: в поле выпуск ничего поменять нельзя, выбор профессиональной или домашней версии ОС происходит во время установки.
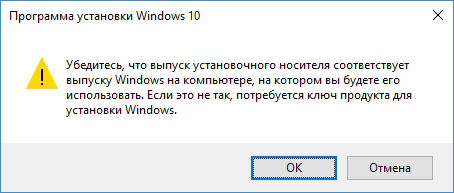
- В случае, если вы сняли отметку «Использовать рекомендуемые параметры для этого компьютера» и выбрали иную разрядность или язык, вы увидите предупреждение: «Убедитесь, что выпуск установочного носителя соответствует выпуску Windows на компьютере, на котором вы будете его использовать». Учитывая, что на данным момент времени в образе содержатся сразу все выпуски Windows 10, обычно на это предупреждение не следует обращать внимания.

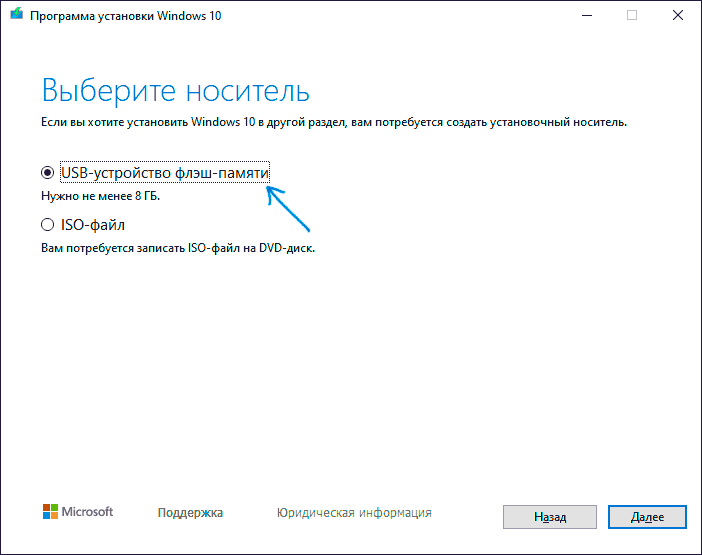
- Выберите пункт «USB-устройство флэш-памяти», если требуется, чтобы программа сама записала загрузочную установочную флешку, либо, при желании, вы можете выбрать пункт «ISO-файл», чтобы скачать оригинальный образ Windows 10 и записать его на USB или DVD самостоятельно.
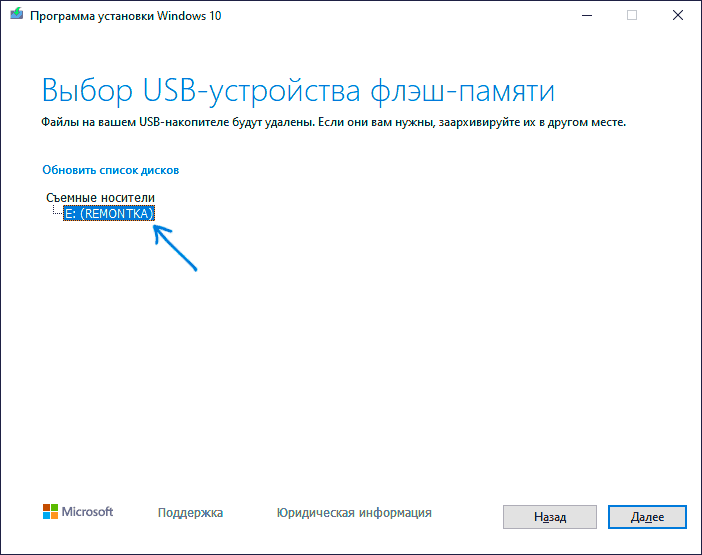
- Выберите накопитель, который будет использоваться из списка. Важно: все данные с флешки или внешнего жесткого диска (со всех его разделов) будут удалены. При этом, если вы создаете установочный накопитель на внешнем жестком диске или на USB накопителе размером более 32 Гб, вам пригодятся сведения в разделе «Дополнительная информация» в конце этой инструкции.
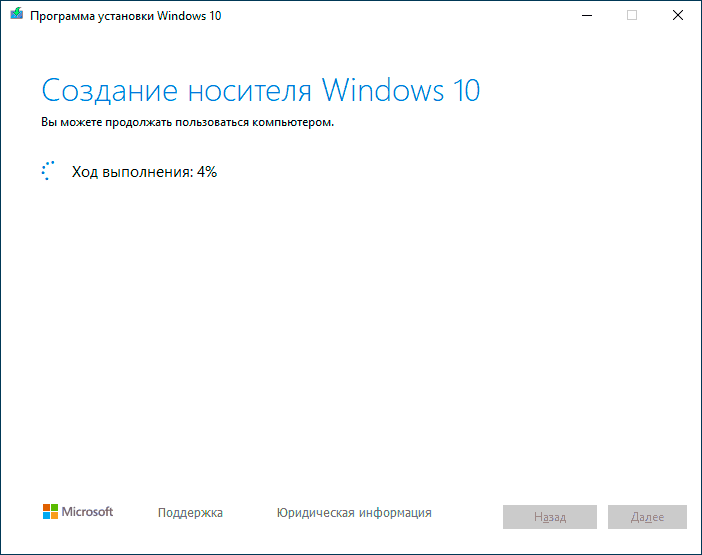
- Начнется скачивание файлов установки Windows 10, а затем — их запись на флешку: Создание установочного накопителя. Эти этапы могут занять продолжительное время.
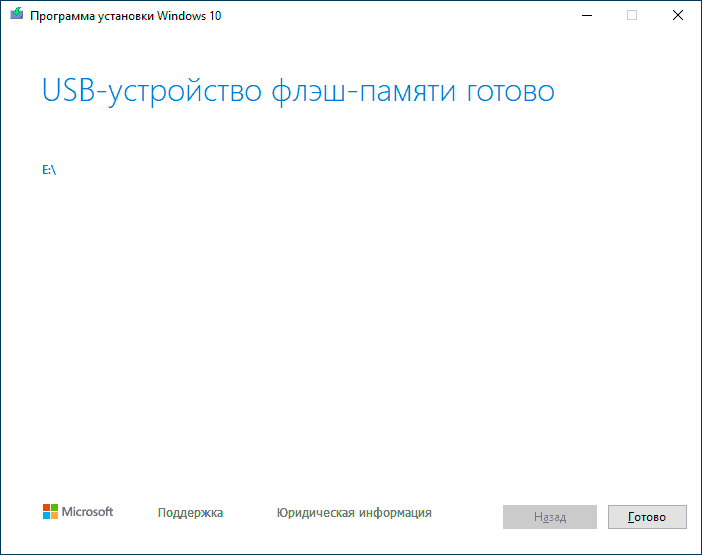
- По завершении вы получите сообщение «USB-устройство флэш-памяти готово», можно закрыть утилиту и использовать созданный накопитель.

По окончании у вас будет готовый накопитель с оригинальной Windows 10 последней версии, который пригодится не только для чистой установки системы на системах UEFI и Legacy (CSM), но и для ее восстановления в случае сбоев.
5 способов сделать загрузочную установочную флешку Windows 10 — видео инструкция
Также могут оказаться полезными некоторые дополнительные способы создания установочного накопителя Windows 10 x64 и x86 для систем UEFI GPT и BIOS MBR, описанные ниже.
Создание загрузочной флешки Windows 10 без программ
Вы можете сделать загрузочную флешку Windows 10 вообще без программ: это требует, чтобы ваша материнская плата (на том компьютере, где будет использоваться загрузочная флешка) была с ПО UEFI (большинство материнских плат последних лет), т.е. поддерживала EFI-загрузку, а установка проводилась на диск HDD или SSD с таблицей разделов GPT (или было не критичным удаление всех разделов с него).
Вам потребуется: образ ISO с системой и USB накопитель подходящего объема, отформатированный в FAT32 (обязательный пункт для данного способа). Причем если он уже в нужной файловой системе, имеющиеся данные с него удалять не обязательно. Сами же действия по созданию загрузочной флешки Windows 10 состоят из следующих шагов:
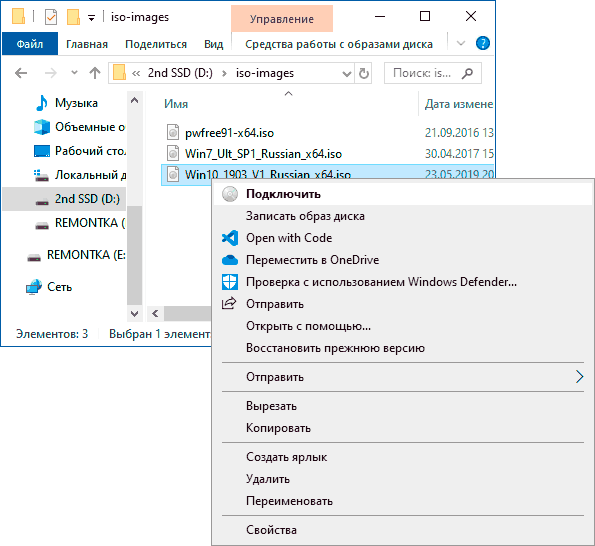
- Смонтируйте образ Windows 10 в системе, в последних версиях ОС это можно сделать, нажав по файлу образа правой кнопкой мыши и выбрав пункт «Подключить».

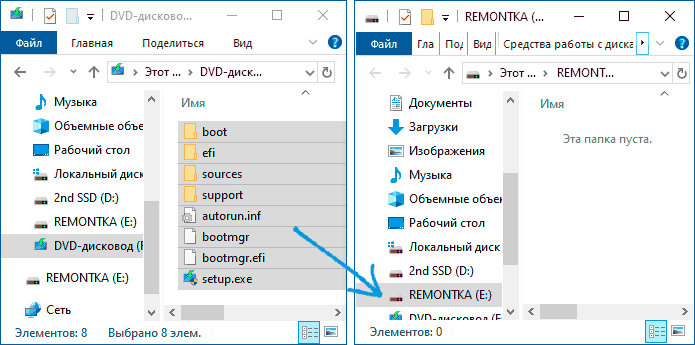
- Скопируйте все содержимое, все файлы и папки, из смонтированного образа на USB накопитель.

Готово. Теперь, при условии, что на компьютере выставлен режим загрузки UEFI, вы можете легко загрузиться и установить Windows 10 с изготовленного накопителя. Для того, чтобы выбрать загрузку с флешки, лучше всего воспользоваться Boot Menu материнской платы.
Использование Rufus для записи установочного USB
Если ваш компьютер или ноутбук не имеет UEFI (то есть у вас обычный БИОС) или по какой-то иной причине предыдущий способ не подошел, Rufus — отличная программа (и на русском языке), чтобы быстро сделать загрузочную USB флешку для установки Windows 10 для самых разных систем.
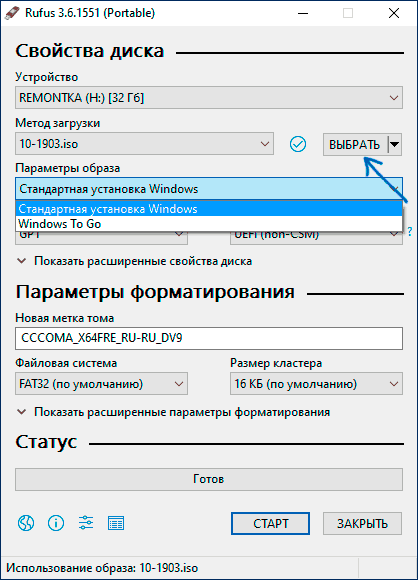
В программе достаточно указать USB накопитель, на который будет произведена запись, нажать кнопку «Выбрать», чтобы указать путь к образу ISO с Windows 10 (также вы можете скачать Windows 10 прямо в Rufus), а в поле «Параметры образа» указать «Стандартная установка Windows».
Также следует обратить внимание на выбор пунктов в «Схема раздела» и «Целевая система». В общем случае, при выборе следует исходить из следующего:
- Для компьютеров с обычным БИОС или для установки Windows 10 на компьютере с UEFI на диск MBR выбираем «MBR» в качестве схемы разделов и «BIOS или UEFI-CSM» в целевой системе.
- Для компьютеров с UEFI для установки на GPT диск выбираем соответствующие параметры.
После этого достаточно нажать «Старт» и дождаться завершения копирования файлов на флешку. Более подробно о доступных настройках в программе, видео инструкция и официальный сайт утилиты — Загрузочная флешка Windows 10 в Rufus.
Загрузочная флешка Windows 10 с помощью UltraISO
Программа UltraISO, служащая для создания, изменения и записи ISO образов, очень популярна у пользователей и, в том числе, может быть использована для того, чтобы сделать загрузочную флешку.
Процесс создания состоит из следующих шагов:
- Открыть образ ISO Windows 10 в UltraISO через меню Файл — Открыть.
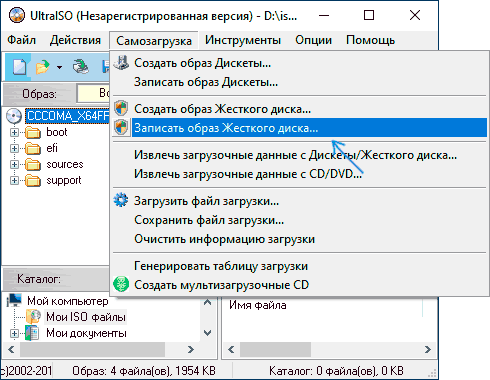
- В пункте меню «Самозагрузка» выбрать пункт «Записать образ жесткого диска».

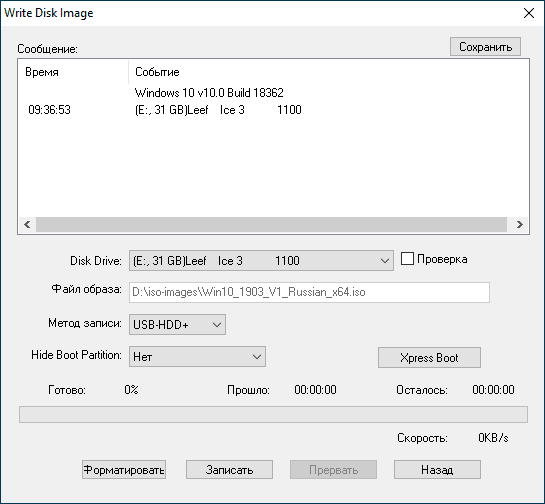
- С помощью мастера записать установочный образ на USB накопитель, какие-либо параметры обычно менять не требуется.

Более подробно процесс описан у меня в руководстве Создание загрузочной флешки в UltraISO.
Программа Windows 7 USB/DVD Download Tool
Официальная бесплатная утилита Microsoft, изначально созданная для записи образа Windows 7 на DVD-диск или USB накопитель не потеряла актуальности и с выходом новых версий ОС — ее все так же можно использовать, если вам нужен дистрибутив для установки.
Процесс создания загрузочной флешки Windows 10 в данной программе состоит из 4-х шагов:
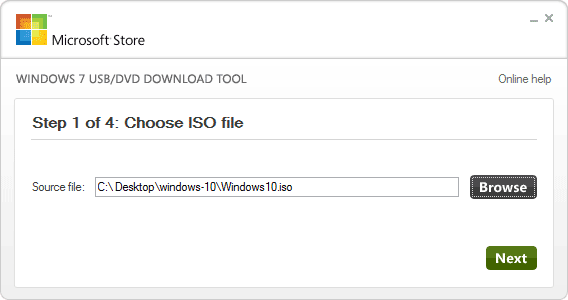
- Выберите образ ISO с Windows 10 на вашем компьютере и нажмите «Next» (Далее).

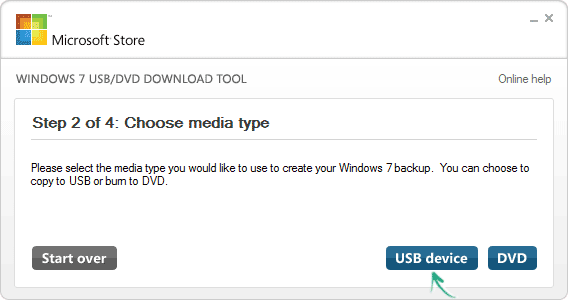
- Выберите: USB device — для загрузочной флешки или DVD — для создания диска.
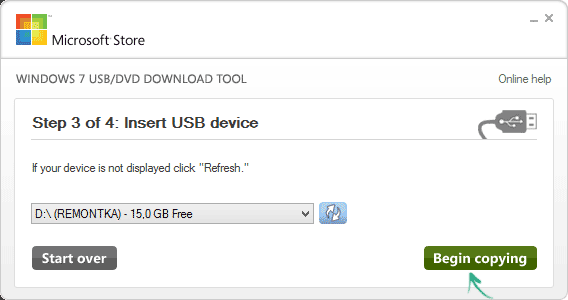
- Выберите USB накопитель из списка. Нажмите кнопку «Begin copying» (появится предупреждение о том, что все данные с флешки будут удалены).
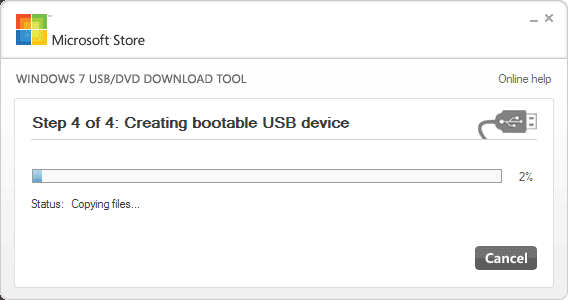
- Дождитесь окончания процесса копирования файлов.
На этом создание Flash-диска завершено, можно начинать им пользоваться.
Скачать Windows 7 USB/DVD Download Tool на данный момент можно со страницы на официальном сайте — wudt.codeplex.com (обновление: сайт перестал работать, но вы можете скачать оригинальный файл, как описано в этой инструкции).
WinSetupFromUSB для создания мультизагрузочной флешки
WinSetupFromUSB — одни из моих любимых программ для целей записи загрузочных и мультизагрузочных USB. Ее можно использовать и для Windows 10, причем с помощью программы вы можете создать одну флешку с разными образами Windows 10. Обновление: для более удобного создания мультизагрузочной флешки рекомендую использовать Ventoy.

Процесс (в базовом варианте, без учета нюансов) будет состоять из выбора USB накопителя, установки отметки «Autoformat it with FBinst» (в случае если образ не добавляется к уже имеющимся на флешке), указания пути к ISO образу Windows 10 (в поле для Windows Vista, 7, 8, 10) и нажатия кнопки «Go». Для детальной информации: Инструкция и видео по использованию WinSetupFromUSB.
Некоторые дополнительные сведения, которые могут быть полезны в контексте создания загрузочной флешки Windows 10:
- Загрузиться с флешки проще всего, используя Boot Menu, а не изменяя параметры загрузки в БИОС или UEFI. Если в меню загрузки накопитель отображается 2 раза — с пометкой UEFI (или EFI) и без неё, для установки на GPT диск выбирайте с пометкой, для установки на MBR — без пометки.
- В последнее время получил несколько комментариев о том, что при использовании внешнего USB диска (HDD) для создания загрузочного накопителя, он приобретает файловую систему FAT32 и его объем меняется: в данной ситуации, после того, как файлы установки на диске больше не нужны, нажмите клавиши Win+R, введите diskmgmt.msc и в управлении дисками удалите все разделы с этого накопителя, после чего отформатируйте его с нужной вам файловой системой. Либо используйте инструкцию: Как удалить разделы на флешке.
- Установку с флешки можно произвести не только загрузившись с неё в БИОС, но и запустив файл setup.exe с накопителя: единственное условие в данном случае — разрядность устанавливаемой системы должна совпадать с устанавливаемой (а на компьютере должна быть установлена система не старше Windows 7). Если же вам нужно поменять 32-бит на 64-бит, то установку следует производить как описано в материале Установка Windows 10 с флешки.
- После работы официальной утилиты Майкрософт для создания установочного USB на диске могут остаться папки ESD и Windows.BT, их можно удалить.
По сути, для того, чтобы сделать установочную флешку Windows 10 подходят все способы, которые работают для Windows 8.1, в том числе через командную строку, многочисленные программы для создания загрузочной флешки. Так что, если вам не хватило описанных выше вариантов, вы можете смело использовать любой другой для предыдущей версии ОС.