Windows Media Center является одной из самых популярных программных платформ для просмотра фильмов, прослушивания музыки и просмотра фотографий на компьютерах под управлением Windows. Однако при работе с этой платформой иногда возникают определенные сложности, особенно при использовании обычной клавиатуры или мыши.
Чтобы максимально упростить процесс взаимодействия с Windows Media Center, многие пользователи прибегают к использованию специальных пультов управления. Такие пульты позволяют управлять всеми функциями программы, не отрываясь от процесса просмотра или прослушивания контента.
Одним из наиболее удобных и функциональных пультов для работы с Windows Media Center является Windows Media Center Remote Control. Он предлагает полный набор кнопок для управления программой, а также дополнительные функции, которые делают его еще более удобным в использовании.
Благодаря Windows Media Center Remote Control вы можете легко переключаться между каналами, регулировать громкость, управлять плейлистами музыки и видео, а также быстро находить нужные вам фильмы или песни.
Windows Media Center Remote Control также имеет компактный дизайн, что позволяет удобно держать его в руке и использовать в любых условиях. Этот пульт идеально подойдет для тех, кто хочет насладиться просмотром фильмов или прослушиванием музыки с комфортом и удовольствием.
Содержание
- Удобный Windows media center пульт для вашего удовольствия
- Функциональность и простота использования
- Идеальный дизайн для комфортного управления
- Совместимость с различными устройствами и системами
Удобный и функциональный пульт для Windows Media Center станет вашим надежным партнером в просмотре фильмов, музыки, фотографий и другого медиа-контента. Он позволит вам просто и удобно переключаться между различными функциями программы, управлять громкостью, изменять яркость изображения и многое другое.
Именно с помощью пульта для Windows Media Center вы сможете полностью контролировать все аспекты своего мультимедийного опыта. Вам больше не придется нажимать клавиши на клавиатуре или перемещаться по экрану с помощью мыши. Просто возьмите пульт в руки и наслаждайтесь всеми возможностями Windows Media Center.
Пульт для Windows Media Center обеспечивает простоту использования и удобство, что делает его идеальной аксессуаром для вашего домашнего кинотеатра или мультимедийного центра. Он легок в освоении и идеально подойдет как для новичков, так и для опытных пользователей.
Независимо от того, с какой целью вы используете Windows Media Center — для просмотра кино, слушания музыки или просмотра фотографий — пульт для управления этой программой станет незаменимым инструментом для вашего удовольствия. Не отказывайте себе в удовольствии контролировать ваш мультимедийный мир с помощью удобного Windows Media Center пульта.
Функциональность и простота использования
Одним из основных достоинств windows media center пульта является его многофункциональность. Он позволяет управлять различными видами медиа — от фильмов и видео до музыки и фотографий. Вы можете легко навигировать по вашей медиа-библиотеке, выбирать и воспроизводить понравившиеся вам файлы, создавать плейлисты и многое другое.
Благодаря простому и понятному интерфейсу, использование windows media center пульта становится легким и приятным. Все основные функции доступны на главном экране, что позволяет быстро находить и выбирать желаемый контент. Кроме того, наличие клавиш воспроизведения и громкости упрощает управление проигрыванием.
Windows media center пульт также обладает дополнительными функциями, которые повышают его удобство использования. Например, некоторые модели пульта имеют подсветку клавиш, что обеспечивает удобство при использовании в темноте. Кроме того, некоторые пульты оснащены функцией автоматической настройки, которая позволяет легко и быстро настроить их на работу с вашим компьютером или медиа-центром.
В заключение, windows media center пульт сочетает в себе высокую функциональность и простоту использования. Он позволяет удобно управлять медиа-контентом на вашем компьютере или медиа-центре и делает ваше развлечение еще более комфортным. Независимо от того, являетесь ли вы опытным пользователем или новичком, windows media center пульт обеспечит вам отличный пользовательский опыт.
Идеальный дизайн для комфортного управления
Стильный и эргономичный дизайн пульта позволяет удобно держать его в руках, что особенно важно при длительном использовании. Пульты с простым и интуитивно понятным интерфейсом облегчают и ускоряют навигацию по системе, а также позволяют быстро находить нужную функцию или программу.
Кроме того, идеальный дизайн включает в себя удобное расположение кнопок. Оптимальное месторасположение позволяет быстро и точно выполнять команды, не отвлекаясь на поиск нужной кнопки. Каждая кнопка должна быть оснащена ясной и понятной меткой, чтобы пользователю не приходилось задумываться о том, какая функция скрывается за ней.
Другим важным аспектом является освещение кнопок. Идеальный дизайн предусматривает наличие подсветки, которая не только придает пульту привлекательный внешний вид, но и обеспечивает возможность управления даже при низкой освещенности помещения.
Важно отметить, что идеальный дизайн должен быть универсальным и учитывать особенности всех пользователей. Пульты с разными вариантами дизайна, такими как цветовая гамма или размеры, позволяют каждому пользователю выбрать именно тот вариант, который будет максимально удобным и приятным в использовании.
В итоге, идеальный дизайн для комфортного управления Windows media center пультом – это сочетание стиля, эргономики, простоты и удобства. Только такой дизайн позволит наслаждаться полным функционалом системы и получать максимальное удовольствие при использовании.
Совместимость с различными устройствами и системами
Windows media center пульт обладает высокой степенью совместимости с различными устройствами и операционными системами, что делает его удобным и функциональным инструментом для всех пользователей.
Пульт совместим с большим количеством различных устройств, включая телевизоры, медиаплееры, компьютеры, консоли игровых приставок и другие. Благодаря широкому спектру поддерживаемых устройств, пульт становится универсальным решением для управления медиацентром.
Windows media center пульт также совместим с разными операционными системами, включая Windows, macOS, Linux и другие. Это позволяет пользователям управлять медиацентром независимо от используемой операционной системы на своем устройстве.
Благодаря возможности подключения через Bluetooth или Wi-Fi, пульт с легкостью может быть сопряжен с любым устройством, обеспечивая беспроводное управление медиацентром. Это особенно удобно при использовании пульта в комнатах с несколькими устройствами или при просмотре контента на большом экране.
Таким образом, Windows media center пульт предлагает высокую степень совместимости с различными устройствами и операционными системами, что делает его идеальным решением для удобного и функционального использования ваших медиацентров.
НЕКЕШЕРОВАННЫЙ КОНТЕНТ
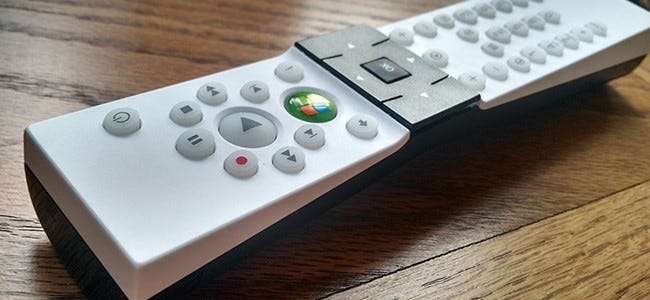
Microsoft убила столь любимый Windows Media Center много лет назад, что уже плохо для энтузиастов домашнего кинотеатра. Но становится еще хуже: у вас также есть бесполезный пульт MCE, который где-то пылится … или у вас?
Достаньте пульт MCE из ящика, потому что он все еще полезен. Если вы уже нашли
альтернатива Windows Media Center
, бесплатное программное обеспечение Advanced MCE Remote Mapper Tool позволяет переназначать кнопки на пульте дистанционного управления клавишам или сочетаниям клавиш. Это означает, что вы можете использовать пульт для управления любым программным обеспечением медиацентра или даже для просмотра меню «Пуск» и запуска приложений.
Вы сможете управлять своим медиацентром ПК с дивана, как и задумывали боги телевидения, в кратчайшие сроки.
Эта программа работает с пультами RC6, поэтому, если вы видите это где-то на своем пульте дистанционного управления, все готово. В противном случае подключите приемник к компьютеру, перейдите в «Диспетчер устройств», затем просмотрите раздел «Контроллеры универсальной последовательной шины», в котором перечислены все подключенные USB-устройства.
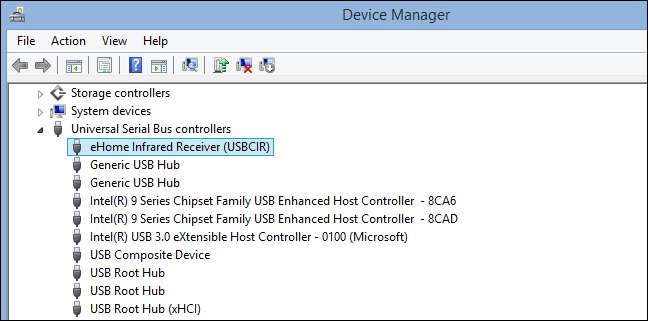
Если ваш инфракрасный приемник отображается как «Инфракрасный приемник eHome», как показано выше, ваш пульт будет работать. Перенесите карту прочь! Если ваш пульт не поддерживается, вы можете быть разочарованы, но вам не повезло: вы могли
используйте Flirc для управления любым медиацентром с любого пульта ДУ
. Вам понадобится ключ за 20 долларов, но его очень легко настроить.
Как переназначить кнопки пульта дистанционного управления MCE
Вы можете скачать Advanced MCE Remote Mapper Tool
на форуме Kodi
(хотя приложение работает не только с Kodi). Эта портативная программа для Windows позволяет любому переназначить все кнопки на пульте RC6 на клавиши на клавиатуре или нажатия клавиш. Просто скачайте EXE-файл и запустите его — вы можете хранить исполняемый файл где угодно, включая «C: \ Remote Mapper», если хотите.
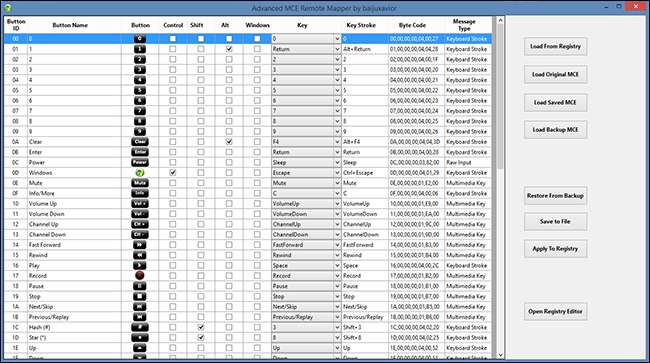
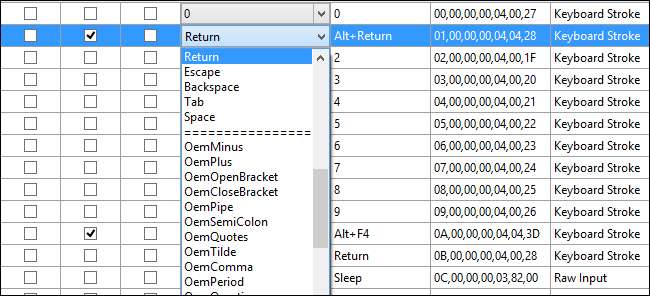
Выпадающий список «Ключ» работает с цифрами, буквами и другими клавишами; флажки позволяют добавлять такие модификаторы, как Control, Shift, Alt и клавиша Windows. Столбец «Нажатие клавиши» покажет вам полную комбинацию клавиш, которые вы выбрали. Вы также можете назначить кнопки, которые будут действовать как общесистемные «мультимедийные клавиши», предлагаемые на некоторых клавиатурах, что теоретически должно позволить вам управлять практически любым медиаплеером (хотя ваш опыт может отличаться).
Итак, чтобы переназначить ключи, просто начните устанавливать флажки и выбирать ключи из раскрывающегося списка для каждой удаленной кнопки!
Какие ключи вы должны сопоставить
Advanced MCE Remote Mapper Tool дает вам большую свободу, которая может быть подавляющей. Есть шанс, что вы точно знаете, какие сочетания клавиш вы хотите сопоставить с какими кнопками, но если нет, то вот несколько, которые, как мы думаем, будут полезны каждому.
- Кнопка «Windows» на пульте дистанционного управления для клавиш «Control» и «Esc», которая является альтернативным сочетанием клавиш «Windows» на клавиатуре. При этом вы запускаете стартовое меню с дивана. Обратите внимание, что просто проверить ключ Windows не получится :.
- Кнопки направления от клавиш к клавишам со стрелками, чтобы вы могли исследовать меню «Пуск», а также мультимедиа в выбранном вами приложении медиацентра.
- От кнопки «ОК» на пульте дистанционного управления до клавиши «Ввод», чтобы вы могли открывать вещи в меню «Пуск» или в выбранном вами приложении медиацентра.
- Кнопка «Воспроизвести» рядом с пробелом, так что вы можете приостановить или воспроизвести мультимедиа практически в любой программе.
- Кнопка «Назад» на пульте дистанционного управления до клавиши «Backspace», чтобы вы могли вернуться на страницу назад в веб-браузерах или на более высокий уровень в приложениях медиацентра, таких как Kodi или Plex.
Конечно, это только начало: вы можете назначать всевозможные конкретные вещи. Какие сочетания клавиш вам понадобятся, зависит от того, какую программу медиацентра вы используете на своем компьютере, потому что они часто используют разные сочетания клавиш. Вот несколько ресурсов для ознакомления с различными программами:
-
Полный список сочетаний клавиш Kodi
-
Неполный список сочетаний клавиш Plex
-
Полный список сочетаний клавиш MediaPortal
Каким бы ни было приложение для медиацентра, вы можете использовать множество сочетаний клавиш для управления им, а это значит, что, имея достаточно времени, вы можете настроить совместимый пульт MCE для управления любой программой.
Когда все будет готово: внесите изменения в реестр, перезагрузите компьютер
Когда вы закончите назначение ключей, нажмите кнопку «Применить к реестру», чтобы применить ваши настройки к системе. Затем перезагрузите компьютер, чтобы изменения вступили в силу.

Поскольку Advanced MCE Remote Remapper переназначает ключи с помощью реестра Windows, вам не нужно какое-либо программное обеспечение, работающее в фоновом режиме, для работы вашего пульта дистанционного управления — даже Advanced MCE Remote Remapper. Вам нужно только открыть его, чтобы изменить конфигурацию.
К сожалению, у этого есть обратная сторона: вы не можете назначать ключи на лету. Поскольку вам нужно перезапускать каждый раз, когда вы вносите изменения, может потребоваться время, чтобы опробовать новые ярлыки или комбинации. Чтобы все получилось, вам нужно будет провести несколько проб и ошибок, но оно того стоит.
Если вы решите изменить ситуацию позже, не забудьте нажать «Загрузить из реестра» при первом запуске переназначения. Это загрузит ключи, которые вы уже настроили, так что вам не нужно каждый раз заново выполнять сопоставление с нуля.
Есть что-то действительно приятное в том, чтобы сделать, казалось бы, бесполезное оборудование, которое у вас уже есть, снова полезным. Любой, кто обеспокоен последствиями для безопасности разрешения программе изменять свой реестр, может
посмотрите исходный код на GitHub
. В качестве альтернативы вы можете
научиться переназначать пульт вручную
, но с вашей стороны потребуется гораздо больше усилий.
How To Control Any Software In Windows With Your MCE Remote
Software To Control Windows Media Centre With Your Controller
Adesso MCE Remote
How To Use Any MCE Remote With VLC Media Player Without Any Software
Rosewill MCE Remote RRC126
Windows Media Center Remote
Raspberry Pi 2 — RasPlex : MCE Remote Control
PC/MCE Remote Control (for HTPC STB Android Windows) From UltiRemote.com
PC/MCE Remote Control (for HTPC STB Android Windows) From UltiRemote.com
PC/MCE Remote Control Macro Hotkey QuickLunch From UltiRemote.com
PC/MCE Remote Control Macro Hotkey QuickLunch From UltiRemote.com
VLC Remote Control — How To Control Vlc Player With Your Android Phone
Vista MCE Fake IR Blaster — Windows 7
Working With LM Remote KeyMap
Using PC Remote Controller
What Hauppauge products can be installed on Windows XP Media Center Edition and used with the Media Center appliction interface?
The following WiunTV-HVR and WinTV-DCR modela can be used with Windows Media Center:
All WinTV-HVR models are Media Center compatible, including the WinTV-HVR-955Q, WinTV-HVR-2255, WinTV-HVR-1265 and the WinTV-HVR-930C.
The WinTV-dualHD and WinTV-soloHD
WinTV-DCR-2650 and WinTV-DCR-3250
For Europe, any version of WinTV-HVR-930, WinTV-HVR-1100, WinTV-HVR-1200 and WinTV-HVR-2205.
WinTV-PVR MCE Kits are also available and compatible. The Kits include the Microsoft IR Blaster remote control.
What else will I need to get TV on my PC with Windows Media Center?
Your PC will need a software MPEG-2 decoder in order to watch TV or play DVD movies in Media Center. All new Media Center computers come with the correct MPEG decoder pre-installed. But if you are building a new PC, Microsoft requires an approved DVD decoder to be installed on any MCE system with a TV tuner in order to view TV.
A Microsoft approved graphics card with the latest graphics drivers is also required.
If you will use a Cable Box or Satellite box with the Composite or Svideo inputs, you will need a Media Center remote control kit, otherwise it will not let you proceed.
How do I configure Windows Media Center in Canada?
Windows Media Center does not support digital TV service in Canada so you would need to choose United sates as the region and select a US zip code close to your area to setup ATSC.
What other software can be used with the WinTV MCE models on MCE?
You may use Sage TV, Beyond TV or any of the other excellent third party TV tuner applications with a WinTV Media Center product. These programs allow you to have similar Media Center functions.
If you simply want to watch TV, the Hauppauge WinTV v8 application can be used. This software is available on our web site in the Support Applications section.
How do I configure my TV tuner in Media Center?
From the main menu in the Media Center application, go to Settings. Then choose «TV», and «Set Up Your TV Signal«. Choose yes to continue, and then choose Next to proceed. MCE should indicate your correct region/country. Select yes if it is correct, and next to continue. Choose no to select a different region and next to continue to choose your region from the list.
It is recommended to configure your signal automatically. Choose this and select next. MCE will then scan for your connected input and should indicate if you have a cable TV line, antenna, or set top box connected to your WinTV card. If you do not see «Analog TV tuner» listed, see the next FAQ item for more information.
Choose Yes if the results found are correct, and you wish to use these results for your TV signal.
You may now either set up your local TV guide listings in MCE or return to your TV settings. TV Signal setup is complete. Click Finish.
Note: You must set up an analog tuner in Media Center before you can proceed to set up a digital tuner.
When I set up my TV tuners in Media Center, I do not see «Analog TV tuner» listed?
If you running TV Setup in Windows Media Center and do not see «Analog TV tuner» listed in the TV Tuner Setup result page, then most often the SoftMCE was not installed properly. To reinstall SoftMCE, run SoftMCE.EXE from your WinTV Installation CD-ROM , where it can be found in the MCE_soft_encoder directory.
How do I configure my USB-based Media Center IR Blaster remote control?
Connect the IR receive/blaster «beanbag» to an open USB port on your PC. The drivers should automatically load. Check your device manager for a «Human Interface Devices» listing, which should contain: HID-Compliant consumer control device, HID-Compliant device (3 instances), and Microsoft eHome Infrared Transceiver. If the device does not get detected or fails to install, try a different USB port(s) on the PC or refer directly to Microsoft. Also try installing Microsoft’s «Rollup Update 2»
How can I record video from my VCR or camcorder?
No. Media Center does not offer you the ability to capture from the external inputs using a VCR or a camcorder unless you trick it by telling it that you are attaching a satellite receiver or a cable box to the external input at which point the tuner is then disabled. After capturing from your VCR you would then need to set up the tuner again in Media Center in order to use it.
A different PVR program such as BeyondTV or SageTV does not have this limitation. You can also use WinTV v7 or WinTV v8.
After you have installed the WinTV application, you can watch or record from either the TV tuner or the composite and S-Video inputs.
There is no Radio option appearing in Media Center?
This is apparently an issue within Media Center, which you should be able to solve by going to start/set program access and defaults. Choose custom, and go to the ‘default media player’ section.
In here it will have Media center radio listed. If it is not checked for “enable access to this program”, put a checkmark here, and click OK. Start Media Center and see if radio has been added.
If “enable access to this program” was already checked, uncheck it, click OK, and go into Media Center. Then close Media Center, go back to these settings, and check it, click OK, and return to Media Center again, and you should now have the radio option.
How many tuners are supported by Windows Media Center?
Two tuners total can be installed and configured for use in Media Center. If you are using a set top box, then you would need two set top boxes connected to two separate WinTV cards (or the dual tuner PVR 500MCE with the A/V connector) to configure them in MCE.
«Access Denied» error when attempting to install the drivers?
Run the HCWCLEAR utility and choose the «removal all WinTV files and registry entries» as well as the «search INF files» option. Click ok and wait for the screen to disappear. Next go to start/search/for files and folders. Choose all files and folders. For the file name enter: *.INF for a word or phrase in the file enter: Hauppauge Be sure the look in directory is your C:\ drive and in the advanced options that Search System Folders, Search hidden files and folders, and Search Sub Folders are all selected. Delete any of the .INF files (with Hauppauge text) that are found, and reboot the PC. The drivers should now install correctly.
«Decoder error — Decoder has malfunctioned or is not installed» error in Media Center
These errors are not related to the TV tuner, but either to the DVD Decoder application installed on the system (be sure you have one of the Microsoft approved DVD decoder programs installed), or a VGA driver issue. Try reinstalling updated VGA drivers for the graphics card in the system.
«Tuner Not Found» error after installing roll up 2 for MCE?
«Tuner Not Found» error after installing roll up 2 for MCE?
Microsoft has addressed this issue, which can be found here.
Can I use the Windows Media Center remote control included in my WinTV MCE Kit without Media Center?
The Microsoft Media Center remote control is designed for Windows Media Center. However, it can be installed and will support most of the functions in the WinTV application by following these steps:
- Download «Update Rollup 2 for eHome Infrared Receiver for Windows XP Media Center Edition 2005 (KB912024)» from here: http://www.microsoft.com/downloads/details.aspx?familyid=B39D53F1-0AC9-433B-B488-4CAB82F31DC8&displaylang=en
- Run the update but when the installer appears on the screen do nothing, do not continue the install.
- Open the file called kb912024.log which should be in the C:\Windows directory.
- The fourth line of log will give you the path to the update installer. (example: C:\a322f65d95b36cee5249db67\\update\update.exe).
- Navigate to root of that directory (example: C:\a322f65d95b36cee5249db67).
- Go into the SP2QFE directory and you will find the irbus.sys file.
- Go into the IP directory and you find the irbus.inf file.
- Copy these two files to a temp directory.
- After copying the files you can then click on cancel on the rollup installer. This will remove the directories listed above so it is important that the files be copied properly.
- You can then plug in the MCE receiver and point the wizard to the temp directory to which you copied the two files.
- The wizard goes through five or six devices, simply point them all to that same directory,
The remote will not be able to launch the WinTV application, so the WinTV application must be running, and then most of the remote control buttons will now control the WinTV.
I receive a «Low bit rate» error message when using Windows Media Center in Windows 7
1 Press and hold the DVD MENU button and LEFT navigation button at the same time until the remote control for Media Center PC lights turn off. 2 Press the OK button. The remote control for Media Center PC lights blink twice to confirm that the buttons have been reset.
What is a MCE remote?
Media Center Edition (MCE) remotes are designed to control PCs running Microsoft Windows with Windows Media Center. MCE remotes come with an external infrared receiver that connects to a PC via USB. Newer PCs may have the IR receiver integrated in the case.
How do I setup my Media Center on my computer?
Configure tuners, TV signal, and Guide
- Using a Media Center remote, press the green Start button .
- On the Windows Media Center start screen, scroll to Tasks, select Settings, select General, select Windows Media Center Setup, and then select Set Up TV Signal.
What are the remote codes for Windows Media Center?
This remote comes with the Microsoft Model: 1039 MCE remote control, and USB MCE transceiver module with 2 extra IR nodes. The MCE remote codes are fairly easy to find in hex format, but to find the MCE remote codes in pronto format took many sources, and some conversions in order to get this list.
Is there an infrared remote control for Windows Media Center?
The pronto infrared codes can be used with USB-UIRT and input directly into programs such as uutx.exe or girder to control windows media center with any pronto compatible IR transceiver (IR blaster, IR sender, remote controls).
Where is the OK button on my MCE remote?
Direction buttons on the to the arrow keys, so you can explore the start menu, as well as media in your media center application of choice. The “OK” button on the remote to the “Enter” key, so you can open things in the start menu or your media center application of choice.
How to configure Microsoft Remote Control in Windows?
The details are rather involved, but there are various resources you can use that make it all very simple. EliteGamer360 has written a registry config file and associated keyboard.xml and these are available from http://xbmccustomregis.sourceforge.net/ . jhsrennie has written an add-on to configure MS remotes.
Windows Media Center is included in some editions of Windows 7.
When used to its fullest, Media Center can turn your computer into a powerful home entertainment hub. You can unleash the full power of Media Center by connecting your computer to an HDTV and using a Media Center remote to control all the action from your couch.
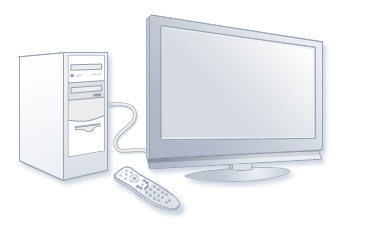
A PC connected to a TV and a Media Center remote
Another option is to connect your computer to a standard computer monitor, keyboard, and mouse. You can even stream your media over a home network to an Extender device.
No matter which way you choose, Media Center keeps you entertained by letting you:
-
Watch, pause, and record live TV.
-
See slide shows of your photos.
-
Play any song in your music library, or play CDs or DVDs.
Setting up Windows Media Center
The first time you start Media Center, you’ll see an informational setup page and two setup options. The quickest method is, not surprisingly, Express. You can choose this option now if you want to jump right in. However, let’s walk through the Custom setup options to give you a better idea of what you can do with Media Center.
-
Using a Media Center remote, press the green Start button
 .
. -
The first time you start Media Center, on the setup page, select Continue, and then select Custom.
-
When you reach the page titled Get the Most from Windows Media Center, select Yes to allow Media Center to download album cover art, DVD cover art, current TV guide listings, information from online media services, and other useful information.
 .
.Tips:
-
You can also use a mouse to open Media Center. Select the Start button , select All Programs, and then select Windows Media Center.
-
If you choose the Express setup option now, you can return to the Custom setup process later by following these steps from the Windows Media Center start screen: scroll to Tasks, select Settings, select General, select Windows Media Center Setup, then select Run Setup Again.
That’s it for the required setup options. The rest of the setup process is optional, but there are a few items on the Optional Setup page that might be of interest to you.
Optimize how Windows Media Center looks on your display
Display Calibration is helpful for getting the best image quality possible on your TV screen or computer monitor.
Display Calibration takes you through the main part of the process with a series of questions. If you’re unsure about the details of your hardware setup, such as the name of a cable or the type of display you have, look at the illustrations in Display Calibration—they can help you figure out what type of connection you’re using. When you’ve finished answering the questions, and you’re happy with the way your display looks, close Display Calibration. If you’re not satisfied, you can use the additional display options under Adjust display controls.
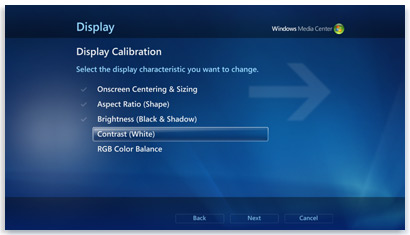
Display Calibration in Media Center offers tips for calibrating your TV or monitor
You can return to Display Calibration any time:
-
Using a Media Center remote, press the green Start button
. -
On the Windows Media Center start screen, scroll to Tasks, select Settings, select General, select Windows Media Center Setup, and then select Configure Your TV or Monitor.
Set up your speakers
If your computer is connected to a surround sound system, you can use Speaker Setup. Choose your speaker configuration, then use the test to play a chime sound. Listen closely to each individual speaker to make sure it’s receiving a signal.
Tip: If you’re not getting any sound at all, double-check that all the cables are plugged in correctly and that the volume on both your speakers and your computer is turned up. (Even the most savvy computer expert can accidentally leave the Windows Mute option on once in a while.)
If your computer is connected to a TV, note that many video cards and cable types don’t support audio signals. You might need to connect the sound card in your computer directly to your speakers.
You can return to Speaker Setup any time:
-
Using a Media Center remote, press the green Start button
. -
On the Windows Media Center start screen, scroll to Tasks, select Settings, select General, select Windows Media Center Setup, and then select Set Up Your Speakers.
Set up your media libraries
Each time you start Media Center, it automatically scans the Music, Pictures, and Videos libraries on your computer. But what if your music files are on an external hard drive, or your pictures are on a different computer in your homegroup? Don’t worry—Media Center has solutions.
-
In Media Library, select the type of media you want to add (for example, Music), and then select Next.
-
Select Add folders to the library, and then select Next.
-
Select On this computer (includes mapped network drives), and then select Next.
-
Browse to the folder where your files are stored, select the check box next to the folder, and then select Next.
Media Center will search the folder for digital media. It will also save your folder selections for the next time you start the program.
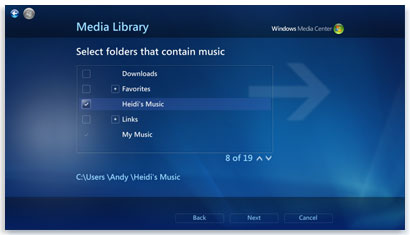
Media Center automatically scans selected folders for compatible media files
If you want to import files from a shared folder on another computer, the process is similar: select On another computer and Media Center will search for shared folders rather than local ones.
You can return to Media Library any time:
-
Using a Media Center remote, press the green Start button
. -
On the Windows Media Center start screen, scroll to Tasks, select Settings, and then select Media Libraries.
Configure tuners, TV signal, and Guide
This option only appears in the Optional Setup menu if Media Center detects a TV tuner. A TV tuner is a hardware device that you can connect to your computer through an internal expansion slot or an external expansion port, such as a USB port. With a compatible TV tuner, you can connect a TV signal to your computer to watch and record TV.
TV Setup will guide you through the process of setting up a TV signal to watch and record in Media Center. When you reach the TV Signal Detection Result page, select Yes, configure TV with these results, and then Media Center will do most of the work for you.
You can return to TV Setup any time:
-
Using a Media Center remote, press the green Start button
. -
On the Windows Media Center start screen, scroll to Tasks, select Settings, select General, select Windows Media Center Setup, and then select Set Up TV Signal.
Sit back, relax, and enjoy
When you’ve finished setting up Media Center, select I have finished, select Next, and then select Finish to open Media Center and start exploring. All of your digital music, photos, and home movies—as well as a variety of online media—will be only a few clicks away.