Можно использовать установочный носитель (USB-накопитель или DVD-диск), чтобы установить новую копию Windows, выполнить чистую установку или переустановить Windows.
Чтобы создать установочный носитель, перейдите на веб-сайт скачивания ПО, где вы найдете пошаговые инструкции. На этом веб-сайте вы можете выбрать версию Windows и создать собственный установочный носитель с помощью USB-устройства флэш-памяти или DVD-диска. Чтобы перейти непосредственно к одной из версий, выберите одну из следующих ссылок:
-
Windows 7
-
Windows 8.1
-
Windows 10 (Затем выберите Скачать средство сейчас.)
-
Windows 11 (затем выберите Скачать средство сейчас.)
Важно: Создайте резервную копию файлов перед установкой и переустановкой Windows на компьютере. Узнайте, как это сделать.
Чтобы создать установочный носитель, необходимо следующее:
-
Компьютер с надежным подключением к Интернету. Время скачивания зависит от скорости подключения к Интернету.
-
USB-устройство флэш-памяти, внешний жесткий диск или DVD-диск. Пустое USB-устройство флэш-памяти или внешний жесткий диск объемом не менее 8 ГБ либо пустой DVD-диск (и устройство для записи на DVD-диски). Рекомендуем использовать чистый носитель, поскольку все его содержимое будет удалено. Если при записи DVD-диска из ISO-файла отображается сообщение о том, что файл образа диска слишком большой, необходимо использовать DVD-носитель с двумя слоями (DL).
-
Ключ продукта. 25-значный ключ продукта (не требуется для цифровых лицензий). Если вам требуется помощь, см. раздел Как найти ключ продукта Windows.
После создания установочного носителя вы можете сбросить или переустановить Windows. Дополнительные сведения см. в статье Параметры восстановления в Windows.
Нужна дополнительная помощь?
Нужны дополнительные параметры?
Изучите преимущества подписки, просмотрите учебные курсы, узнайте, как защитить свое устройство и т. д.
В сообществах можно задавать вопросы и отвечать на них, отправлять отзывы и консультироваться с экспертами разных профилей.
Найдите решения распространенных проблем или получите помощь от агента поддержки.
 Создание загрузочной флешки Windows 7 для установки на компьютер или ноутбук всё ещё актуально для многих пользователей, а с учетом некоторых сложностей, связанных с загрузкой UEFI и Legacy, структурой разделов GPT и MBR и другими нюансами, вопрос записи подходящего USB накопителя возможно даже более важен, чем во время выхода этой ОС.
В этой инструкции несколько простых способов сделать загрузочную флешку Windows 7 с помощью бесплатных программ и без программ. Обращу ваше внимание на то, что если вы уже записали такой накопитель, но с него не удается загрузиться, возможно, вы всё сделали правильно, но не изменили некоторые настройки БИОС/UEFI, подробнее об этом в материале Почему БИОС/UEFI не видит загрузочную флешку и как это исправить.
Прежде всего, для создания загрузочной флешки Windows 7 вам потребуется USB накопитель, размером 4-8 Гб (зависит от используемого образа ISO), а также образ ISO с Windows 7. К сожалению, на официальном сайте Майкрософт загрузка этого образа стала недоступной для большинства пользователей, но, надеюсь, он у вас есть в наличии. Также может быть полезным: Лучшие программы для создания загрузочной флешки, Как сделать загрузочную флешку Windows 10.
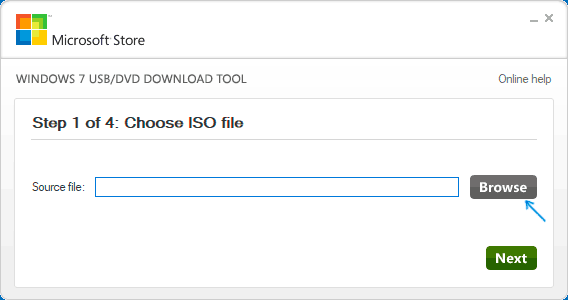
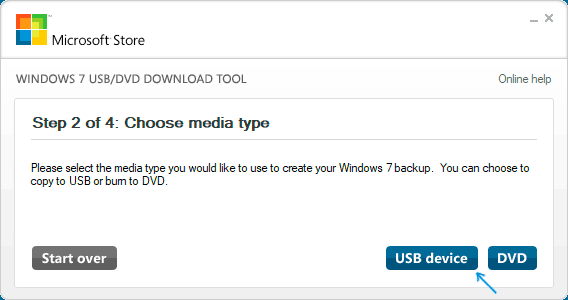
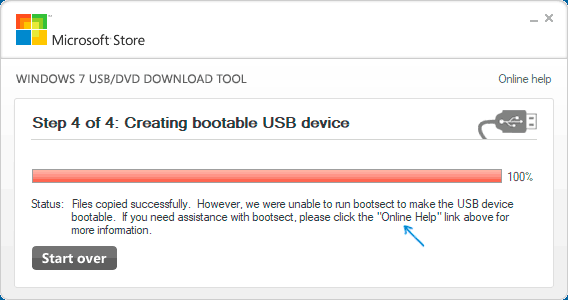
Создание загрузочной флешки в официальной утилите Windows 7 USB/DVD Download Tool
Через некоторое время после выхода ОС Windows 7 Майкрософт представила специальную бесплатную утилиту для записи загрузочной флешки или диска DVD. Программа доступна и сегодня, но учитывайте, что подойдет она только для установки в режиме Legacy на диск MBR (если вы не знаете, что это такое, то, если кратко: старые компьютеры и ноутбуки использовали только такой режим, современные по умолчанию используют загрузку UEFI и диски GPT, но можно переключить и на старый режим).
Порядок создания загрузочной флешки Windows 7 в утилите состоит из следующих шагов:
- Запустите Windows 7 USB/DVD Download Tool, нажмите кнопку Browse и укажите путь к образу ISO с Windows 7.

- На следующем шаге нажмите USB Device, чтобы записать образ на флешку.
- Выберите ваш USB накопитель и нажмите Begin copying. Вас предупредят о том, что все данные с флешки будут удалены, если вы согласны — нажмите кнопку Erase all data.
- По завершении вы получите готовую загрузочную флешку для установки Windows Если при создании вы увидите красную полосу и сообщение «We were unable to run bootsect to make the USB device bootable», запустите командную строку от имени администратора и введите команду bootsect /nt60 E: (заменив E вашей буквой флешки). После успешного выполнения команды флешка станет загрузочной.

Скачать Windows 7 USB/DVD Download Tool вы можете с официального сайта — wudt.codeplex.com Обновление: указанный сайт более не предоставляет загрузки Windows 7 USB/DVD Download Tool, но вы можете использовать способ загрузки удаленных с официальных сайтов программ из веб-архива.
Загрузочная флешка Windows 7 в Rufus
Rufus — одна из самых популярных бесплатных программ для создания загрузочных USB накопителей, полностью на русском языке, которая, в том числе поможет сделать установочную загрузочную флешку Windows 7.

Порядок действий в программе очень простой:
- Выбираем флешку и, нажав кнопку «Выбрать» указываем путь к образу ISO Windows 7.
- Выбираем схему разделов диска (MBR для Legacy и GPT для UEFI).
- Остальные параметры в общем случае менять не следует, достаточно просто нажать кнопку «Старт» для начала записи накопителя. Имеющиеся данные с флешки будут удалены.
Подробная инструкция об использовании программы последней версии и где её скачать в статье: Загрузочная флешка в Rufus.
Как сделать загрузочную флешку Windows 7 в UltraISO
UltraISO — очень популярная программа, которую многие используют для записи загрузочных накопителей в течение многих лет. Даже бесплатная версия программы позволяет выполнить запись образа на флешку и сделать её загрузочной, подойдет это и для Windows 7, причем накопитель будет работать и для Legacy (CSM) и для UEFI загрузки.
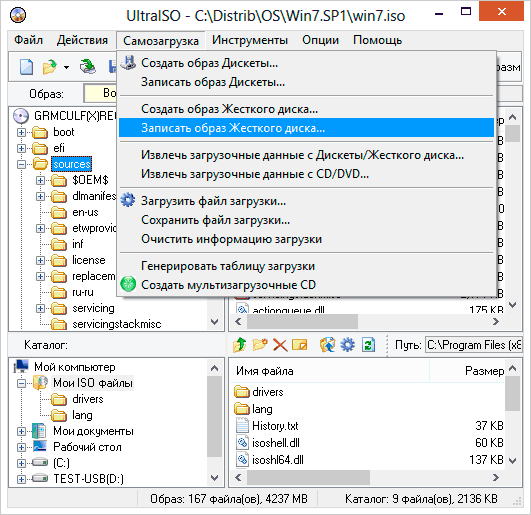
Отдельная подробная инструкция по использованию программы, видео и официальный сайт в материале Создание загрузочной флешки в UltraISO.
С помощью WinSetupFromUSB
Бесплатная программа WinSetupFromUSB позволяет записывать не только загрузочные, но и мультизагрузочные флешки сразу с несколькими образами. Например, вы можете на одном USB накопителей разместить не только Windows 7, но и другие версии системы. Обновление: для более удобного создания мультизагрузочной флешки рекомендую Ventoy.
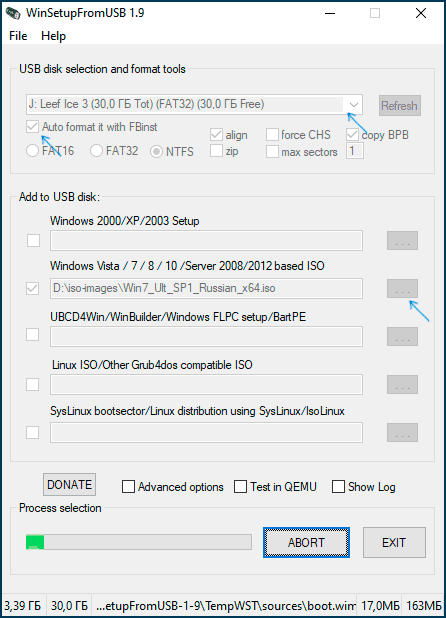
В самом простом случае порядок действий в программе состоит из шагов:
- Выбрали USB накопитель, поставили отметку Format with FBinst и выбрали файловую систему (NTFS для Legacy и MBR, FAT32 для UEFI и GPT).
- Рядом с пунктом для выбора образов Windows 7, 8 и Windows 10 нажимаем по кнопке с многоточием и указываем ваш образ Windows 7.
- Нажимаем кнопку «Go» и подтверждаем удаление имеющихся данных с накопителя.
Более подробно о программе, а также о том, как записать несколько образов в инструкции Загрузочная флешка в WinSetupFromUSB.
Загрузочная флешка Windows 7 без программ
Также вы можете создать загрузочный накопитель Windows 7 без использования каких-либо сторонних программ. В случае, если вам требуется загрузка в режиме UEFI и установка на GPT диск, шаги будут следующими:
- Отформатируйте флешку в FAT32 средствами системы.
- Смонтируйте образ Windows 7 или откройте его архиватором.
- Скопируйте все файлы с образа на вашу флешку. В образе обязательно должна присутствовать папка EFI.
После такого простого копирования накопитель будет успешно загружаться в режиме UEFI при отключенном Secure Boot. Для загрузки в режиме Legacy шаги будут несколько отличаться.
Запустите командную строку от имени администратора и введите команду DISKPART, в результате Вы увидите приглашение для ввода команд DISKPART. По порядку введите следующие команды:
DISKPART>list disk (обратите внимание на номер, который соответствует Вашей флешке)
DISKPART>select disk номер-флешки-из-предыдущей-команды
DISKPART>clean
DISKPART>create partition primary
DISKPART>select partition 1
DISKPART>active
DISKPART>format FS=NTFS quick
DISKPART>assign
DISKPART>exit
Этим мы закончили подготовку флешки к превращению ее в загрузочную. Смонтируйте образ Windows 7 в системе или вставьте диск с дистрибутивом ОС. Далее введите в командной строке команду:
CHDIR W7:\boot
Вместо W7 укажите букву диска с дистрибутивом Windows 7 или подключенного образа ISO. Далее введите:
bootsect /nt60 USB:
Заменив USB на букву флешки (но не убирая двоеточие). Ну и последняя команда, которая скопирует все нужные файлы для установки Windows 7:
XCOPY W7:\*.* USB:\ /E /F /H
В приведенной команде — W7 это буква диска с дистрибутивом операционной системы, а USB нужно заменить на букву USB накопителя. Процесс копирования файлов может занять продолжительное время, но в конце вы получите работающую загрузочную флешку Windows 7.
Видео инструкция
Надеюсь, один из методов подойдет в вашем случае. Если интересны более изощренные способы создания загрузочных накопителей, рекомендую ознакомиться со статьей Создание загрузочной флешки в Easy2Boot.
You are here:
Home » Windows 7 Guides » How To Create Bootable Windows 7 USB To Install Windows 7 From USB Flash Drive
Computer users who have ever installed a version of Windows operating system from a USB flash drive will never go back to the traditional DVD installation method. As you probably know, installing Windows from the USB is the fastest method available to install Windows operating system.
Creating a bootable USB media to install Windows 7 from USB drive is fairly simple if you follow the step-by-step instructions provided in our how to install Windows 7 from USB guide. Users who aren’t comfortable with the Command Prompt can take the help of a third-party tool. There are quite a few free tools out there to help you install Windows 7 from USB flash drive (see eight free tools to prepare bootable Windows USB).
Now the good is that, Microsoft has just released a free tool called Windows 7 USB/DVD Download Tool to help users create bootable Windows 7 USB flash drives and install Windows 7 from USB drive.

Although you can go through our how to install Windows 7 from USB guide to do the same, this tool simplifies the job. Here are the five simple steps that you need to follow to create a bootable USB flash drive to install Windows 7 from USB device:
Note: You need a USB flash drive with a minimum of 4 GB of free space. And also please backup your data from USB first.
Windows 7 bootable USB using Windows 7 USB/DVD Download Tool
Step 1: Download Windows 7 USB/DVD Tool and install it.
Step 2: Run the program, click the Browse button to browse to your Windows 7 ISO image file.

Step 3: In this step, you need to select your media type. As we are here to create a bootable USB, simply click on USB device button.

Step 4: Select your USB flash drive from the drop down box and click on Begin copying button. Be sure to select the right USB drive as this tool formats the selected USB drive before copying Windows 7 setup files onto the USB.

Step 5: The Windows 7 USB/DVD tool will take a few minutes to complete the procedure.

Step 6: You are done. Reboot you machine and start installing Windows 7 (Windows 7 installation procedure).
If you’re having issues in preparing the bootable USB using Windows 7 USB/DVD Download Tool, we recommend you follow our 100% working install Windows 7 from USB guide.
![]()
Download Article
![]()
Download Article
Do you need to install Windows 7 or Vista on a computer without a CD drive or do you want to create a backup installer in case your installer CD gets damaged? This wikiHow article teaches you how to create a bootable Windows 7 or Vista USB drive.
Easy Way
- Connect the USB to the pc (if you have already copied the files and made it bootable), Open the folder containing the installation files.
- Rename the file ‘Boot.mgr’ to ‘ntldr’ ,(without the ‘ ) and it will work!
- *Imp*And please boot from the USB first, not the harddisk. Most of the PC support pressing the ‘F12’ or ‘Del’ button
-

1
Install a free burning program. There are a number of free burning utilities available online. You need one that can create ISO files.
- If you received your Windows 7 as a downloadable ISO file from Microsoft, you can skip to the next section.
-
2
Insert your Windows 7 DVD. Open your new burning program. Look for an option such as “Copy to Image” or “Create Image.” If prompted, select your DVD drive as the source.
Advertisement
-
3
Save your ISO file. Choose an easy to remember name and location for the file. The ISO you make will be equal in size to the disc you are copying. This means it can take up several gigabytes of space on your hard drive. Be sure you have enough storage available.
- Creating the ISO can take a long time, depending on the speed of your computer and DVD drive.


Advertisement
-
1
Download Windows 7 USB/DVD Download Tool. This is available for free from Microsoft. Despite its name, this tool works with Windows Vista ISOs as well. You can run this tool on virtually any version of Windows.
-
2
Select the Source file. This is the ISO that you created or downloaded in the first section. Click Next.
-
3
Select USB device. You are given the option to either burn to a DVD or create a USB device. For this guide, click USB Device.
-
4
Choose your USB device. Make sure that your flash drive is connected correctly. You will need at least 4GB space on your flash drive to copy over the Windows installation.
-
5
Wait while program works. The program will format the USB drive to boot correctly, then copy the ISO file onto the drive. The copying process can take up to 15 minutes to complete, depending on the speed of your machine.


Advertisement
-
1
Plug-in your Flash Drive. First plug-in your USB stick to your USB port and copy all the content to a safe location in your hard drive.
-
2
Run Command Prompt as an administrator. To open a command prompt, go to the Start menu and search for CMD. Right-click on it and select Run as Administrator to use it with admin rights.
-
3
Using the Diskpart utility find the drive number of your flash drive. To do so, type in the following command in the command prompt: DISKPART
- Running DISKPART will display the version of DISKPART you are running and the name of your PC.
- Type “list disk” to see a display of all your connected disk drives. Make a note of the number assigned to your Flash drive.
-
4
Format the drive. Execute the following list of commands one-by-one. Make sure you replace Disk 1 with the proper Disk number from DISKPART.
select disk 1cleancreate partition primaryselect partition 1activeformat fs=NTFS QUICKassignexit -
5
Make the flash drive bootable. Use the bootsect utility that is shipped with Windows 7/Vista. To do so:
- Insert the Windows 7/Vista DVD and note down the drive letter of the DVD drive. For this guide, the DVD drive is D: and the USB drive is G:.
- Navigate to the directory where bootsect is found.
D:cd d:\boot - Use the bootsect to make the USB Drive bootable. This updates the drive with BOOTMGR compatible code and prepares it to boot Windows 7/Vista.
BOOTSECT.EXE /NT60 G: - Close the Command Prompt windows.
-
6
Copy all files from the Windows 7/Vista DVD to the formatted USB stick. The safest and the fastest way would be to use the Windows Explorer. Open the disk, select everything, and drag it into your flash drive. This could take a few minutes to copy.


Advertisement
-
1
Change the boot order. To boot from the USB drive, you will have to set the BIOS to boot from USB first instead of the hard drive. To open the BIOS, reset your computer and hit the displayed key to enter Setup. The key varies by manufacturer, but is usually F2, F10, F12, or Del.
- Open the Boot menu in your BIOS. Change the 1st Boot Device to your USB drive. Be sure that it is inserted, or you may not be given an option to choose it. Depending on your manufacturer, it may say Removable Device or list your flash drive’s model.
-
2
Save changes and reboot. If you set the boot order correctly, your Windows 7 or Vista installation will load after the manufacturer’s logo disappears.
-
3
Install Windows. The installation process will load and the Windows setup will begin. Check out our guide on installing Windows 7 for an in-depth walkthrough.


Advertisement
Add New Question
-
Question
Whenever I select my ISO file, Windows 7 USB/DVD says it is invalid. How do I fix that?

Try re-downloading the ISO. It’s probably corrupted if Win7 says it’s invalid.
-
Question
What if I don’t have a 7/Vista Inst DVD?
You will need to buy one or download an ISO file from the Microsoft website.

Ask a Question
200 characters left
Include your email address to get a message when this question is answered.
Submit
Advertisement
Video
About This Article
Article SummaryX
1. Install a free disc burning app.
2. Insert a Windows 7 DVD.
3. Open the burning app.
4. Select Create Image or Copy to image.
5. Save the ISO file.
6. Download Windows 7 USB/DVD Download Tool from Microsoft.com.
7. Run the tool to create the disc.
8. Make the disc bootable.
Did this summary help you?
Thanks to all authors for creating a page that has been read 2,248,578 times.
Is this article up to date?
Want to create a windows 7 bootable USB drive? If yes then this post is definitely for you.
Gone are the days when we used to install our Windows Operating system on our PCs using Cd/Dvds.
And wait for at least 1 hour to complete the Windows 7 installation process.
But these days USB drives have completely vanished the use of Optical discs.
And also only very few companies are still manufacturing their new generation laptops which include Optical drive as standard hardware.
Although, laptops still have some scope of using these Cd/Dvds but what if you are having a small notebook, tablet or some other digital devices.
And want to install windows 7 on it.
In that case, you need a Windows 7 bootable USB drive and that’s why this post is really important for you.
But How would you create it?
Simply Copying/pasting from Windows 7 DVD to a USB flash drive won’t help you.
For this, you need to make a special bootable USB device and then safely copy all the Windows 7 installation files to it.
Let’s see How.
Here is our latest post on we created Windows 11 bootable USB.
Table of Contents
But before we begin.
Please make sure that you have a USB drive of at least 4gb or greater, Windows 7 ISO File and a bootable USB software to convert windows 7 ISO to USB easily.
And If you don’t have an ISO File you can download it from here [Download Windows 7 Disc Images (ISO Files) ] or you can create your own ISO File.
In this tutorial, I will be using a tool called Windows USB/DVD Download Tool to make a bootable USB drive. Download Link…
So Let’s get started with this tool & follow this step by step Guide.
1. Download and Install USB tool
Download the bootable USB tool from the given link and Install it properly. And after installation is completed Open this tool.

2. Choose Windows 7 ISO File
Now, Click on the Browse button and then select the ISO file from where you have stored & Click Next.

3. Choose media type
Now, Choose USB device as media type if you want to create Windows 7 bootable USB drive or you can also choose DVD for creating bootable dvd drive.

4. Insert USB device
Now, insert the USB device and Click on that Refresh Icon & then Click on Begin copying. And wait for 5-10 minutes for completion of this process.

That’s it! You have successfully created a bootable USB drive.
Note:- Please make sure that before clicking on the Begin copying button you have backup all your important data stored in the USB device. Otherwise, you may need to recover deleted files from USB.
Now let’s move to the next method…
Method 2: UUByte ISO Editor

UUByte ISO Editor is one of the most simple bootable USB creator tool which has lots of useful features. And the best part is that it is available for both Windows and macOS versions. Using this utility you can easily perform tasks like Make, Burn, Extract, Create, Edit & Copy Disc within few clicks.
And to begin with, just follow the below steps:-
- Download & Install UUByte ISO Editor from the given link.
- Once the installation is done, open the tool.
- Now click on the Burn “Make bootable USB, DVD/CD from ISO” option.
- After that, click on the Browse button and then select the ISO image file from your computer.
- At last, select the “Create A Bootable USB” option and then select the USB Stick & click on Burn.

And Done! It will take few minutes to complete the burning process.
Note:- Please make sure that your USB stick is empty because after this it will be formatted and all your data will be lost.
Now let’s move to the next method…
Method 3: Using Rufus
Rufus is another simple plug and play tool with all advance features to make bootable USB drives. This tool is really awesome and much faster as compared to other bootable USB software.
Rufus Download Link
Download and Install Rufus from the given link & Follow these steps:-
Download and Install Rufus from the given link & Follow these steps:-
- Open / Run the Rufus tool.
- Insert your USB flash drive into the USB Port.
- Now, Click on SELECT Option to make a Windows bootable disk.
- Choose the Windows 7 ISO file.
- Click on Start. And Done!

Note:- The Best part of this boot tool is that it automatically detects all suitable properties like Partition scheme, Target & File system according to the ISO file.
And Done! You have successfully created a windows 7 bootable usb flash drive. But how to boot from it.
Let’s see How.
How to Boot From USB Stick on PC / Laptop
For this, you have two methods. first, you can directly go to the boot menu and change the boot settings. And the second one is that, Go to Bios settings and then change the boot order.
I prefer the direct boot menu option because in that you don’t have to change the BIOS settings. For Lenovo laptop users there is a button called Novo button to directly go to the boot menu.

And for the other users like hp, Dell, Asus you have to change the BIOS settings. And for this follow these steps:-
- Insert USB disk in your computer or laptop.
- Now Turn on the laptop or CPU whatever you have.
- And in the starting, you will find the manufacturer logo & down below showing the shortcut keys for BIOS settings.
- Now repeatedly keep pressing the BIOS key button.
- Now when you are in the BIOS settings, Go to Boot Order and change it to USB flash drive as 1st priority.
Note:- Every manufacturer has its different shortcut BIOS key but you can easily configure it while your CPU boots & shows the company Logo.
Tip:- Esc, F2, F10, or F12 are the most common BIOS setting keys, you can give a try to them.
Some FAQs
How do I create a bootable USB drive for Windows 7?
Creating a bootable USB for Windows 7 is pretty easy, just download the USB Tool & ISO Image File and then follow the given steps in this article.
Is Rufus free?
Yes, Rufus is an open-source software application that is used to create bootable USBs for Windows operating system.
How do I make a Windows installer bootable USB?
If you want to make a Windows 7 installer bootable USB then there are two methods, one with Rufus and the second one without software using CMD or command prompt.
Is Rufus safe to install?
Yes, Rufus is absolutely safe to use and install on your Windows PC. It is a freeware application that can be used for personal as well as commercial use.
Conclusion
This is how you can easily create your own bootable USB device from an ISO file and use it to install windows 7 from USB instead of using CD/DVD. So what are you waiting for? Go ahead and use these awesome tools to make USB bootable & save your precious time.
Stay tuned for the next post on how to change windows 7 lock screen background.
Feel free to comment below and also tell us if you know any other better way to create or make windows 7 bootable USB drive.
If you liked this post, Don’t forget to share this with your friends on your favorite social media platform.