На чтение 5 мин. Просмотров 22.8k. Опубликовано
Windows Movie Maker – это бесплатный редактор, в который встроены основные инструменты для работы с видео. Рассмотрим, как пользоваться Windows Movie Maker, как создавать качественные видеоролики, слайдшоу или презентации в считанные минуты.
Навигация
- Возможности и функции
- Как работать с Movie Maker
- Добавление видео и звука
- Как вырезать фрагмент из видео
- Работа с эффектами
- Как добавить титры
- Настройка уровня громкости
- Как добавить переходы
- Как сохранить проект в видеофайл
Возможности и функции
Что это за программа – Windows Movie Maker? Это простой и функциональный видеоредактор от компании Microsoft. Продукт уже не поддерживается, но продолжает пользоваться популярностью ввиду понятного интерфейса и простоты в работе. 
Существует обновленная версия редактора – Киностудия Windows. Софт предназначен для неопытных пользователей для простого и быстрого монтирования роликов.
Возможности программы следующие:
- монтирование и создание простых видео файлов или изображений, а также их обработка;
- запись готового проекта на CD и DVD диски и публикация на видеохостингах и сайтах;
- использование встроенных эффектов;
- импорт фото и видео с камеры в редактор.


С помощью Windows Movie Maker можно склеивать и обрезать ролики, а также добавлять переходы, титры и заголовки. Перед сохранением проекта можно настроить качество видео.
Как работать с Movie Maker
Редактор входит в стандартный набор приложений для Windows ME, XP и Vista. Для новых версий операционной системы скачать Movie Maker можно на сторонних сайтах. На примере версии Movie Maker 2.6 рассмотрим, как работать в программе.
Перед тем, как переходить к созданию видео, необходимо изучить интерфейс. Он состоит из нескольких основных элементов:
- Главная панель с разделами выпадающего меню.
- Окно с контентом.
- Шкала времени и раскадровки.
- Окно с предварительным просмотром получившегося видео.


Импортировать можно видео, аудио файлы и изображения. Основные команды и функции находятся в главном окне.
Добавление видео и звука
Работать в Movie Maker можно с контентом, который заблаговременно добавляется в редактор. Для начала видео или изображение нужно импортировать.
Для этого сделайте следующее:
- В блоке слева в разделе «Запись видео» нажмите на нужную кнопку для импорта.
- Автоматически откроется проводник системы.
- Выберите файлы: они переместятся в окно контента Movie Maker.

- Ролики или анимацию мышью перетащите на шкалу раскадровки.


Если порядок файлов нужно поменять, сделать это можно прямо на шкале. Чтобы уменьшить продолжительность ролика, откройте отображение шкалы времени и щелкните по файлу левой кнопкой мыши. Появятся две красные стрелочки, которыми можно отрегулировать продолжительность, передвигая их влево или вправо.
Как вырезать фрагмент из видео
Иногда требуется убрать из видео лишнюю часть, например, в середине.
Пошагово рассмотрим, как вырезать часть ролика из любого места:
- Поставьте ползунок на временной шкале в том месте, где нужно обрезать ролик.
- Нажмите на верхней панели «Клип», затем выберите «Разделить».

- На шкале будет видео, что запись разделилась на две части. После этого нужно определить, где закончится вырезанный фрагмент. Поставьте курсор в это место и повторите действие через меню.
- Выделите вырезанный участок и удалите его нажатием клавиши Del.

Команде «Разделить» присвоена горячая комбинация клавиш Ctrl + L.
Если нужно убрать звук из ролика, сделать это можно через меню «Клип». Наведите курсор на строку «Аудио» и в появившемся списке кликните по «Выключить».
Работа с эффектами
С помощью Windows Movie Maker можно накладывать на ролик эффекты.
Для этого действуйте следующим образом:
- Перейдите в список функций «Видео» через меню «Клип».
- Выберите пункт «Видеоэффекты».
- Откроется окно, в котором можно управлять эффектами: накладывать их или удалять.


В отличие от большинства редакторов, в Movie Maker нет функции предпросмотра эффектов.
Как добавить титры
Для создания законченного видеоролика можно наложить заголовок или титры:
- Нажмите на меню «Сервис».
- Выберите функцию «Название и титры».

- В появившемся окне выберите то, что нужно разместить.
- В специальном поле введите текст и щелкните по кнопке «Готово».


Редактор позволяет добавить титры в начале или в конце ролика, а также наложить заголовок на выбранном клипе, перед или после него.
Настройка уровня громкости
Если нужно сделать громкость звуковой дорожки ниже, чтобы она звучала на фоне или не перекрывала голос, то настроить уровень можно следующим образом:
- В нижней области кликните по иконке «Уровень звука», которая представляет собой вертикальную шкалу.
- В появившейся шкале можно определить преобладание звука из видео или наложенной музыки с помощью ползунка.

Есть еще один способ регулировки громкости. Для этого выберите на шкале раскадровки аудио или видео файл, для которого нужно определить уровень звука. Затем щелкните по меню «Клип», наведите курсор на «Аудио» и в появившемся списке нажмите на «Громкость». В шкале сделайте нужные настройки. 
Как добавить переходы
Чтобы соединить несколько отдельных роликов в один, следуйте инструкции:
- Перетащите первый файл на временную шкалу.
- Перенесите второй ролик, который должен идти вслед за первым. Они автоматически склеятся.
- Чтобы добавить переходы, в левой панели разверните меню «Монтаж фильма» и выберите «Просмотр видео переходов».
- Появится новое окно, где будет отображен список всех доступных переходов.
- Выберите переход и перетащите его на стык между двух роликов.


Смена кадров получается плавной, визуально ее приятно просматривать. Без них картинка кажется дерганной и не всегда логичной. Для каждого перехода можно применять эффекты.
Как сохранить проект в видеофайл
Чтобы сохранить получившийся результат в формате видео для Windows 7, сделайте следующее:
- Если требуется перейти в главное окно, нажмите на кнопку «Операции».
- Разверните меню слева «Завершение создания фильма».
- Нажмите на кнопку «Сохранение на компьютере».
- Запустится Мастер сохранения фильмов. Здесь введите название ролика, а также укажите путь для сохранения.
- Нажмите на кнопку «Далее».

- В следующем окне можно настроить качество ролика. Внизу отображается его размер.
- Щелкните по кнопке «Далее».


После этого запустится процесс экспорта. Время процедуры зависит от того, какого размера файл.
Мы разобрали описание программы, ее основные возможности и функции, необходимые для создания простого фильма. Редактор дает возможность воплотить свои задумки на ПК. Понятный интерфейс, быстрота и набор основных инструментов для создания ролика – вот основные преимущества Windows Media Maker.

Windows Movie Maker on Windows 10 |
|
| Developer(s) | Microsoft |
|---|---|
| Initial release | September 14, 2000; 23 years ago |
| Final release |
16.4.3528.0331[1][2] |
| Operating system | Windows 7, Windows 8, Windows 8.1, Windows 10[3] |
| Platform | IA-32 and x64[4] |
| Included with | Windows Me, Windows XP, Windows Vista[3] |
| Successor | Microsoft Photos (Windows 10) Clipchamp (Windows 11) |
| Available in | 64 languages[5] |
| Type | Video editing software |
| License | Freeware |
| Website | support |
Windows Movie Maker (known as Windows Live Movie Maker[6] for the 2009 and 2011 releases) is a discontinued video editing software program by Microsoft. It was first included in Windows Me on September 14, 2000, and in Windows XP on October 25, 2001. It was a part of the Windows Essentials software suite, and offered the ability to create and edit videos as well as to publish them on OneDrive, Facebook, Vimeo, YouTube, Windows Live Groups, and Flickr. It is comparable to Apple’s iMovie.
Movie Maker was officially discontinued on January 10, 2017, and it is replaced by Video Editor (formerly Microsoft Story Remix) which is built in with Microsoft Photos on Windows 10, and Clipchamp on Windows 11, which Microsoft acquired in September 2021.
History[edit]
Initial releases[edit]
The first release of Windows Movie Maker was included with Windows Me on September 14, 2000.
Version 1.1 was included in Windows XP a year later, and included support for creating DV AVI and WMV 8 files. Version 2.0 was released as a free update in November 2002, and added a number of new features. Version 2.1, a minor update, is included in Windows XP Service Pack 2. The Movie Maker in Windows XP Media Center Edition 2005 had more transitions and support for DVD burning.
Windows Vista[edit]
The next version of Movie Maker was released as part of Windows Vista and – like most Windows components – reported version number 6.0.6000, same as Windows Vista itself. It included new effects and transitions, support for playback on the Xbox 360,[7] and support for the DVR-MS file format that Windows Media Center records television in. The HD version in Premium and Ultimate editions of Windows Vista also added support for capturing from HDV camcorders. The capture wizard also created DVR-MS type files from HDV tapes. However, the Windows Vista version of Windows Movie Maker removed support for importing video from an analog video source such as an analog camcorder, VCR or from a webcam.[8]
As some older systems might not be able to run the new version of Windows Movie Maker, Microsoft also released an updated older version 2.6 for Windows Vista on Microsoft Download Centre. This version is basically the same as Windows Movie Maker 2.1 and included all of the old effects and transitions, but it excludes the ability to capture video. It can only be installed on Windows Vista and is only intended for use on computers where the hardware-accelerated version cannot run.[9]
A Windows Presentation Foundation (WPF) version of Windows Movie Maker was also included in some development builds of Vista (at the time codenamed «Longhorn»), but was removed in the development reset in August 2004.[10] After the development reset, the interface for the WPF-based Windows Movie Maker was retained in Windows Vista.
Windows Live[edit]
A new version of the software, renamed Windows Live Movie Maker 2009, was released as a beta on September 17, 2008, and officially released as a standalone product through Windows Live Essentials suite on August 19, 2009. This was effectively a completely new application, as it could not read projects created by earlier versions and did not support custom XML transitions written for the previous versions. In addition, many features were removed.
Also, Movie Maker’s interface was redesigned in the Windows Live version to use a ribbon toolbar similar to Office 2007; it also added features such as «Auto Movie» and the ability to export videos directly to DVDs and YouTube.[11] Certain advanced features were also removed from the software, such as image stabilization and the ability to record voice-overs.[12]
Movie Maker 2009 supported both Windows Vista and Windows 7. As the previous version of Windows Movie Maker was no longer included with the operating system, the only way to obtain Movie Maker on Windows 7 and later was through the Windows Live Essentials suite,[6][13] although some manufacturers pre-installed the application on new PCs.
An updated version, Windows Live Movie Maker 2011, was released on August 17, 2010, adding features such as webcam capture, support for high-definition video, the ability to upload videos directly to SkyDrive, Facebook, and YouTube through their respective web APIs, and the ability to add media files stored on network shares to projects.[12]
2012.1[edit]
With the discontinuation of the Windows Live brand (and the re-branding of the Windows Live suite as Windows Essentials), Windows Movie Maker 2012 was released in April 2012. Support for recording voice-overs was restored, along with an audio mixer and integration with several free stock music services. H.264/MP4 became the default export format (replacing Windows Media Video, but still can be used), support for uploading to Vimeo was introduced (other sites were added to the list in the Windows 8.1 release of the suite), and hardware accelerated video pila stabilisation was also added as an exclusive feature for Windows 8 users.[14]
Discontinuation and replacements[edit]
Movie Maker was officially removed for download on January 10, 2017. Like Windows Photo Gallery from Windows Essentials, Movie Maker is now replaced by the Microsoft Photos App included in Windows 10, which includes Video Editor.[15]
On September 8, 2021, Microsoft acquired Clipchamp, a web-based video editing app for an undisclosed amount,[16] and integrated it as part of Windows 11 on March 9, 2022. This newly acquired video editing app reintroduces the timeline editing layout that had been previously removed in Windows Live Movie Maker, along with additional features including a text-to-speech generator powered by Microsoft Azure, and Microsoft OneDrive integration.[17]
After the initial criticism by many users since bundling into Windows 11 due to the maximum resolution that free plan users can export is 480p, Microsoft added the ability to export video at a maximum resolution of 1080p for free users on March 29, 2022.[18]
Layout[edit]
The layout consists of a storyboard view and a timeline view, collections for organizing imported video, and a preview pane. When in Storyboard view, the video project appears as a film strip showing each scene in clips. The storyboard/timeline consists of one ‘Video’ (with accompanying ‘Audio’ bar), one ‘Music/Audio’ bar, and one ‘Titles/Credits’ bar. In each bar, clips can be added for editing (e.g., a .WAV music file will belong on the ‘Music/Audio’ bar). Still images can also be imported into the timeline and «stretched» to any desired number of frames. The Video and Music/Audio bars can be «cut» to any number of short segments, which will play together seamlessly, but the individual segments are isolated editing-wise, so that for example, the music volume can be lowered for just a few seconds while someone is speaking.
Importing footage[edit]
When importing footage into the program, a user can either choose to Capture Video (from camera, scanner or other device) or Import into Collections to import existing video files into the user’s collections. The accepted formats for import are .WMV/.ASF, .MPG (MPEG-1), .AVI (DV-AVI), .WMA, .WAV, and .MP3. Additionally, the Windows Vista Home Premium and Ultimate editions of Movie Maker support importing MPEG-2 Program streams and DVR-MS formats.[19] Importing of other container formats such as MP4/3GP, FLV and MOV, and AAC are also supported if the necessary codecs are installed and the system is running Windows 7 or later.[20]
In the XP version, import and real-time capture of video from an analog source such as a VCR, tape-based analog camcorder or webcam is possible. This feature is based on Windows Image Acquisition. Video support in Windows Image Acquisition was removed in Windows Vista, as a result importing analog footage in Windows Movie Maker is no longer possible.[21]
When importing from a DV tape, if the «Make Clips on Completion» option is selected, Windows Movie Maker automatically flags the commencement of each scene, so that the tape appears on the editing screen as a collection of short clips, rather than one long recording. That is, at each point where the «Record» button was pressed, a new «clip» is generated, although the actual recording on the hard drive is still one continuous file. This feature is also offered after importing files already on the hard drive. In the Windows Vista version, the «Make clips on completion» option has been removed — the clips are now automatically created during the capture process.
The efficiency of the importing and editing process is heavily dependent on the amount of file fragmentation of the hard disk. The most reliable results can be obtained by adding an extra hard disk dedicated for scratch space, and regularly re-formatting/defragmenting it, rather than simply deleting the files at the end of the project. Fragmented AVI files result in jerky playback on the editing screen, and make the final rendering process much longer.
Although it is possible to import digital video from cameras through the USB interface, most older cameras only support USB version 1 and the results tend to be poor — «sub VHS» — quality. Newer cameras using USB 2.0 give much better results. A FireWire interface camera will allow recording and playback of images identical in quality to the original recordings if the video is imported and subsequently saved as DV AVI files, although this consumes disk space at about 1 gigabyte every five minutes (12 GB/Hr). Alternatively, most DV cameras allow the final AVI file to be recorded back onto the camera tape for high quality playback. Some standalone DVD recorders will also directly accept DV inputs from video cameras and computers.
Editing and output[edit]
After capture, any clip can be dragged and dropped anywhere on the timeline. Once on the timeline, clips can be duplicated, split, repositioned or edited. An AutoMovie feature offers predefined editing styles (titles, effects and transitions) for quickly creating movies.
The original camera file on the hard drive is not modified; the project file is just a list of instructions for reproducing a final output video file from the original file. Thus, several different versions of the same video can be simultaneously made from the original camera footage.
Earlier versions of Windows Movie Maker could only export video in Windows Media Video or DV AVI formats.[22] It includes some predefined profiles, but users can also create custom profiles.[23] Windows XP Media Center Edition bundled Sonic DVD Burning engine, licensed from Sonic Solutions, allowing video editors to burn their project in DVD-Video format on a DVD. In Windows Vista, Windows Movie Maker passes the video project to Windows DVD Maker.
Windows Movie Maker 2012 introduced the default ability to export in H.264 MP4 format.
Video can be exported back to the video camera if supported by the camera. Movie Maker also allows users to publish a finished video on video hosting websites.
Windows Movie Maker can also be used to edit and publish audio tracks. If no video or image is present, Movie Maker allows exporting the sound clips in Windows Media Audio format.
Effects and transitions[edit]
Windows Movie Maker supports a large variety of titles, effects and transitions.
- Titles are animated text screens, normally placed at the beginning or end of the movie, but can also be placed over video clips. Titles and credits can be added as stand alone titles or overlaying them on the clip by adding them onto the selected clip. Titles range from static (non-animated) titles to fly in, fading, news banner, or spinning newspaper animations. They can also be placed on video clips to create sub-titles.
- Transitions affect how one video clips flows into another. Examples include fade and dissolve, but many more spectacular transitions are available.
- Effects alter how a video clip appears. Example include allowing control of brightness, contrast or hue, but other more dramatic effects are available, such as giving an ‘old time’ flickering black and white feel.
Versions 2.x included in Windows XP includes 60 transitions, 37 effects, 34 title and 9 credits animations. The Windows Vista version includes a different set of transitions, effects and title/credits animations while dropping a few older ones. There are in all 49 effects and 63 transitions. They are applied by using a drag and drop interface from the effects or transitions folders.
Early versions (V2 onwards) of Windows Movie Maker had a flexible interface so programming custom effects and other content were possible via XML. The Windows Vista version supports Direct3D-based effects. Microsoft also provides SDK documentation for custom effects and transitions.[24] Since the effects are XML based, users could create and add custom effects and transitions of their own with XML knowledge.
Many custom transitions were commercially available and created additional features such as picture-in-picture.
Windows Movie Maker V6 did not support customisations to effects and transitions in the same way as V2.x and so many customisations had to be re-written. Versions after V6 do not support custom transitions and effects at all.
Reception and criticism[edit]
Movie Maker 1.0, introduced with Windows Me, was widely criticized for being «bare bones»[25] and suffering «a woeful lack of features»;[26] and saving movies only in Microsoft’s ASF file format.[27] Critical reception of versions 2.0 and 2.6 has been slightly more positive.[26]
Many longstanding users were disappointed by the removal of so many features in the effective re-writing of the software in Live Movie Maker 2009. Some of those features (such as visualisation of the audio levels) have subsequently been re-added.
In June 2008, a memo purportedly by Bill Gates from January 2003 was circulated on the Internet in which he heavily criticized the downloading process for Movie Maker at the time.[28] The memo was originally made available online as part of the plaintiffs’ evidence in Comes v. Microsoft Corp., an antitrust class-action suit, and was submitted as evidence in that case on January 16, 2007.[29]
Counterfeit versions[edit]
The discontinuation of Windows Movie Maker has led to the appearance of scams abusing its name. In late 2016, a few months before the discontinuation of the Windows Essentials suite (including Movie Maker), a website named windows-movie-maker.org (no longer accessible) which offered a tampered version of Windows Movie Maker, appeared as one of the top results when searching for «Movie Maker» and «Windows Movie Maker» on Google and Bing, a scam only widely recognized as such in 2017.[30] It was identical to the real Windows Movie Maker, however, unlike the official and free Windows Movie Maker by Microsoft, it would not let users save a video without purchasing. Upon installing and executing the program, the user was greeted with a dialogue box explaining that it was a trial and a purchase was required. ESET also detected a malware called Win32/Hoax.MovieMaker in the above-mentioned version. The fake will also restrict the installation of the WLE (Windows Live Essentials) Movie Maker by modifying the Windows registry.[31]
See also[edit]
- Adobe Premiere Pro
- 3D Movie Maker
References[edit]
- ^ «Windows Live Downloads — Version 2». Archived from the original on March 11, 2022.
- ^ «Windows Essentials 2012 Microsoft Offline Installer». January 11, 2017.
- ^ a b «Get Movie Maker — Microsoft Windows». Windows.microsoft.com. Retrieved August 24, 2013.
- ^ «Windows Essentials 2012 system requirements». Windows Essentials portal. Microsoft. Retrieved December 7, 2012.
- ^ «Windows Essentials: Worldwide Downloads». Windows Essentials portal. Microsoft. Retrieved December 7, 2012.
- ^ a b «Getting ready for Windows Live Wave 3». Chris Overd. LiveSide.net. Retrieved December 8, 2012.
- ^ Microsoft. «Explore the features: Windows Movie Maker and Movie Maker HD». Microsoft. Archived from the original on August 3, 2008. Retrieved May 30, 2015.
- ^ «Windows Movie Maker no longer supports analog capture or webcam capture». Windowshelp.microsoft.com. Archived from the original on August 11, 2006. Retrieved August 24, 2013.
- ^ «Windows Movie Maker 2.6 for Vista». Download Centre. Microsoft. April 6, 2007. Archived from the original on May 3, 2012. Retrieved December 7, 2012.
- ^ ««Longhorn» Professional Build 4093″. Archived from the original on January 29, 2009. Retrieved June 15, 2016.
- ^ «Windows Live Movie Maker: Awesome Slideshows Made Simple». PC World. Retrieved July 10, 2013.
- ^ a b «Windows Live Movie Maker 2011 review». PC Magazine. Retrieved July 10, 2013.
- ^ «Windows Live Wave 3: Microsoft’s kinder and simpler consumer services strategy?». ZDNet. November 12, 2008. Retrieved June 23, 2013.
- ^ «Windows 8 Brings Video Stabilisation to Movie Maker». PC Magazine. Retrieved July 10, 2013.
- ^ The Verge (May 11, 2017). «Microsoft’s Story Remix app is Windows Movie Maker on steroids». Retrieved May 25, 2017.
- ^ Perez, Sarah (September 8, 2021). «Microsoft acquires video creation and editing software maker Clipchamp». TechCrunch. Retrieved April 5, 2022.
- ^ Warren, Tom (March 9, 2022). «Clipchamp is Microsoft’s new video editing app for Windows 11». The Verge. Retrieved April 5, 2022.
- ^ Endicott, Sean (March 29, 2022). «Microsoft increases free plan for video editor Clipchamp to include 1080p exports». Windows Central. Retrieved April 5, 2022.
- ^ «Movie Maker Vista File Format Support». Retrieved June 15, 2016.
- ^ «Windows Movie Maker FAQ (File Types)». Archived from the original on March 24, 2012. Retrieved July 10, 2014.
- ^ «Problems importing files into Windows Movie Maker». Archived from the original on July 21, 2010. Retrieved June 15, 2016.
- ^ «What kind of files can I use in Movie Maker? — Windows Help». Archived from the original on October 27, 2006. Retrieved June 15, 2016.
- ^ «Create custom movie settings for Windows Movie Maker». Windows Vista Help. Microsoft. Archived from the original on November 18, 2009. Retrieved February 28, 2014.
- ^ Windows Movie Maker and Windows DVD Maker SDK
- ^ The 20 Worst Windows Features of All Time, PC World
- ^ a b Microsoft Windows Movie Maker HD review, TechRadar
- ^ «Windows Millennium Edition: All About Me». PC World. July 24, 2000. Archived from the original on June 30, 2013.
- ^ An epic Bill Gates e-mail rant, Seattle P-I
- ^ «Full text: An epic Bill Gates e-mail rant». June 24, 2008. Retrieved June 15, 2016.
- ^ «Windows Movie Maker — Trial???». NeoWin. Retrieved December 12, 2019.
- ^ «Windows Movie Maker Scam spreads massively due to high Google ranking». November 9, 2017.
External links[edit]
- Official website at the Wayback Machine (archived March 24, 2012)
- Creating Custom Effects and Transitions MSDN Article (covers writing XML scripts)
- Windows Movie Maker at the Wayback Machine (archived June 19, 2004)
Стандартная Киностудия с Windows Live, как работать с программой, а также пользоваться интерфейсом, это актуальные вопросы. Чтобы в них разобраться, необходимо изучить все возможности, а также особенности функционирования утилиты.
Содержание
- Принцип работы киностудии на домашних компьютерах
- Из чего состоит меню программы
- Как добавить материалы для монтажа
- Нарезка материалов в Киностудии
- Монтаж видео с фрагментами текста
- Монтаж с музыкой
Принцип работы киностудии на домашних компьютерах
Настройка — дело несложное. Пользователю нужно только установить ее на компьютер и запустить для первого использования, как настроить, зависит от целей применения. Рассмотрим пошагово те функции, которыми обладает сервис. В рамках раздела ознакомимся, как работать в Киностудии Windows Live, чтобы создавать правильные ролики.
Из чего состоит меню программы
Русскоязычный интерфейс разделен на несколько подгрупп, пользоваться ими очень удобно, даже при первичном знакомстве с Киностудией.

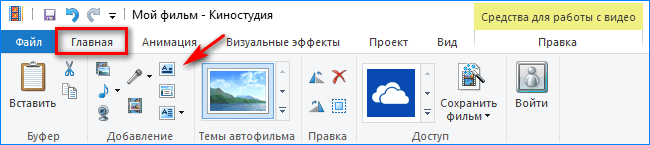
- На вкладке «Главная» собран основной перечень инструментов. Именно здесь присутствует опция, которая позволяет добавить необходимый контент для монтажа.

- С помощью вкладки «Анимация» допускается выполнить множественные переходы с эффектами. Также в этом окне можно выполнить масштабирование.

- Вкладка «Визуальные эффекты» позволяет применять различные переходы и устанавливать их, как для одного слайда, так и для нескольких.

- Раздел «Проект». Позволяет понять, как создать выделение любого объекта, который участвует в проектировании или создании видео. При правильном редактировании контента можно синхронизировать музыкальное сопровождение с остальными объектами.

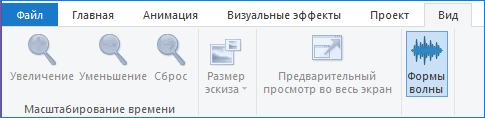
- В разделе «Вид» предусматривается возможность коррекции формы волны, а также редактирование эскизов.
Независимо от того, в какой версии операционной системы установлена Windows Live, интерфейс у нее идентичный для всех, поэтому ознакомиться с большинством инструментов можно без особого труда.
Как добавить материалы для монтажа
Чтобы вставить в редактор документы для создания роликов, нужно пользоваться вкладкой «Главная». Через нее удобно править видео и добавлять темы. Ниже по пунктам рассмотрите, какой инструмент, за что отвечает.
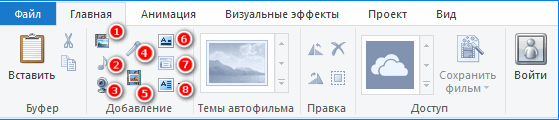
- Позволяет добавить видео и фото подходящего формата.
- Добавляет музыку в проект.
- Добавление видеообращения через вебкамеру (доступно, если устройство подключено).
- Запись кадрового текста (доступна при подключенном микрофоне).
- Создание моментального скриншота, в котором отображается предварительный просмотр ролика.
- С 6 по 8 пункт программа дает возможность добавить редактору название, заголовок или титры.
Существует и более простой метод добавления файла — его элементарное перетягивание с папки прямо в окошко программы.
На заметку! Некоторые инструменты могут быть доступны только после того, как будет подключен соответствующий девайс к компьютеру.
Нарезка материалов в Киностудии
Как работать в Киностудии Windows Live, когда необходимо сократить добавленный контент. Инструмент действует, как на видео, так и на музыкальное сопровождение. Чтобы сделать нарезку, перейдем к инструкции.
- Перетаскиваем видео в свободное для редактирования окно Windows Live.
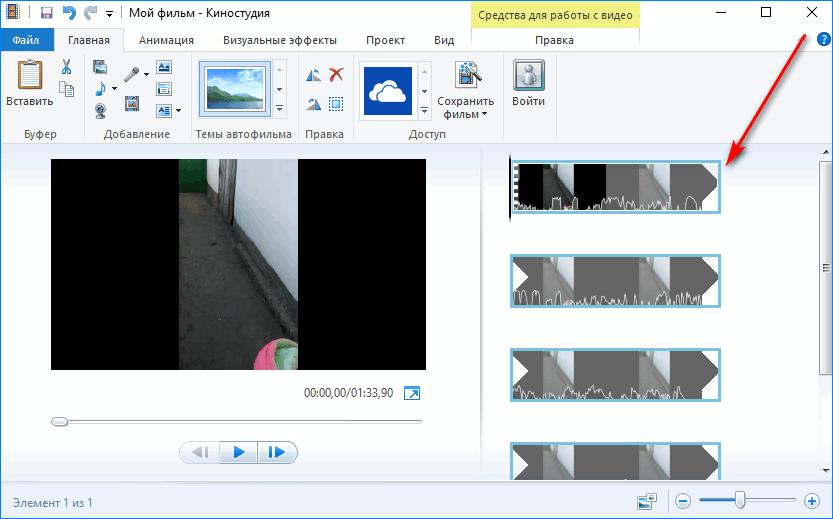
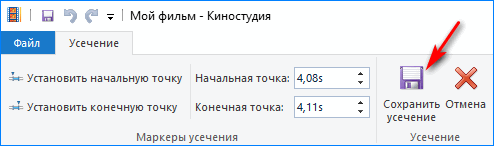
- Переходим во вкладку «Правка» и находим «Средство усечения».

- Затем на видео передвигаем бегунок в ту точку, в которой необходимо отрезать проект.
- После выбора точек усечения, необходимо нажать на кнопку «Сохранить усечение».
Видео готово, теперь в нем отсутствует лишняя часть записи. Если ролик слишком длинный, шкалу времени можно растянуть мышью для удобства нарезки.
Монтаж видео с фрагментами текста
Что это за программа понимает каждый пользователей, но о нюансах работы с текстом разбирается мало пользователей. Если выполняется монтаж видео, то ему следует сделать привлекательный заголовок. Для этого выполним следующее.
- Переходим во вкладку «Главная», где уже вставлено видео. Нажимаем на кнопку «Добавить название.
- Появится окошко на черном фоне, в котором необходимо вписать свое название фильма.
- Нажимаем на кнопку «Play» под видео и проверяем воспроизведение.
Остается только сохранить проект на компьютер. При желании можно добавлять заголовки и титры к каждому кадру, а не только к фильму в целом.
Монтаж с музыкой
Как пользоваться Киностудией Windows Live, если необходимо сделать ролик с аудиофайлом? На этот случай тоже имеется инструкция. Для этого имеется тоже несколько особенностей.
Добавляем аудиофайл путем перетаскивания в окно Киностудии или с помощью встроенных инструментов. После этого становится активной вкладка «Параметры», при помощи которой можно управлять звуковой дорожкой и подстраивать ее к конкретному слайду или всему видео.

Если все манипуляции по монтированию окончены, обязательно сохраните проект, иначе воспроизводиться он будет в прежнем виде.
Киностудия Windows Live позволяет сохранять смонтированное видео именно в том формате, какой необходим пользователю. Это отличает утилиту от аналогичных инструментов. При этом загрузка файлов для работы возможна в любом расширении.
В заметке расскажу и покажу, как работать в киностудии windows live, и оставлю свой отзыв о ее работе. Обзор видеоредактора windows и пошаговое описание программы позволит неопытному пользователю быстро освоить функции работы в программе бесплатного редактора.
“Windows Live Movie Maker” – самый простой и удобный видеоредактор для монтажа видео на русском языке, встроенный в платформу Виндовс 7, 8 и 10, позволяет быстро обработать и смонтировать видеофайлы с применением эффектов для видео.
Простая программа видеоредактора «Live Movie Maker» имеет набор всех необходимых опций и эффектов, и после 2-3 монтажей видеофильмов можно уже в шпаргалку не заглядывать. Если Вы решили освоить работу в киностудии windows live, советую начать с просмотра видео-обзора.
Программа киностудии windows live поддерживает монтаж одной дорожки видео файлов MP4 и JPEG форматов с аудио MP3. Киностудия “Windows Live Movie Maker” установлена как опция к платформам Виндовс 8 и 10 и может отсутствовать на компьютере.
Если видеоредактор отсутствует в программе Виндовс, не беда – скачать программу киностудии live movie maker можно бесплатно – ее версия существует для всех платформ, начиная от Windows Vista и заканчивая Windows 10 здесь.
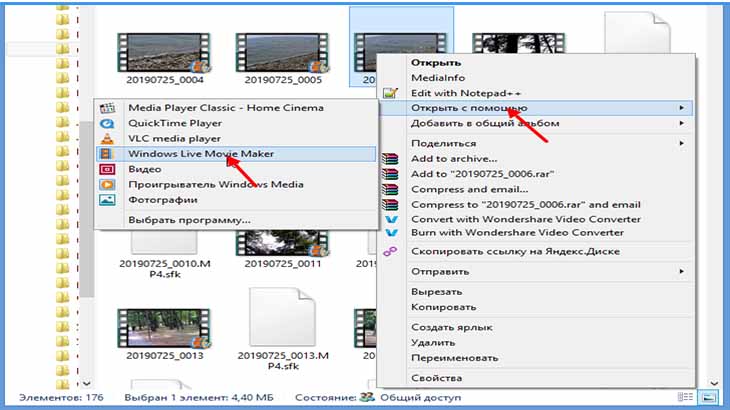
Может отсутствовать иконка запуска программы видеоредактора на рабочем столе, поэтому, чтобы открыть программу, нужно кликнуть правой кнопкой мыши по выбранному видеофайлу и в выпадающем списке “Открыть с помощью” выбрать “Windows Live Movie Maker”.
Инструменты для работы с видео
В главном окне видеоредактора можно добавлять фрагменты видеозаписи и фотографии, музыку, делать моментальный снимок кадра, вставлять название фильма, титры и т. д.
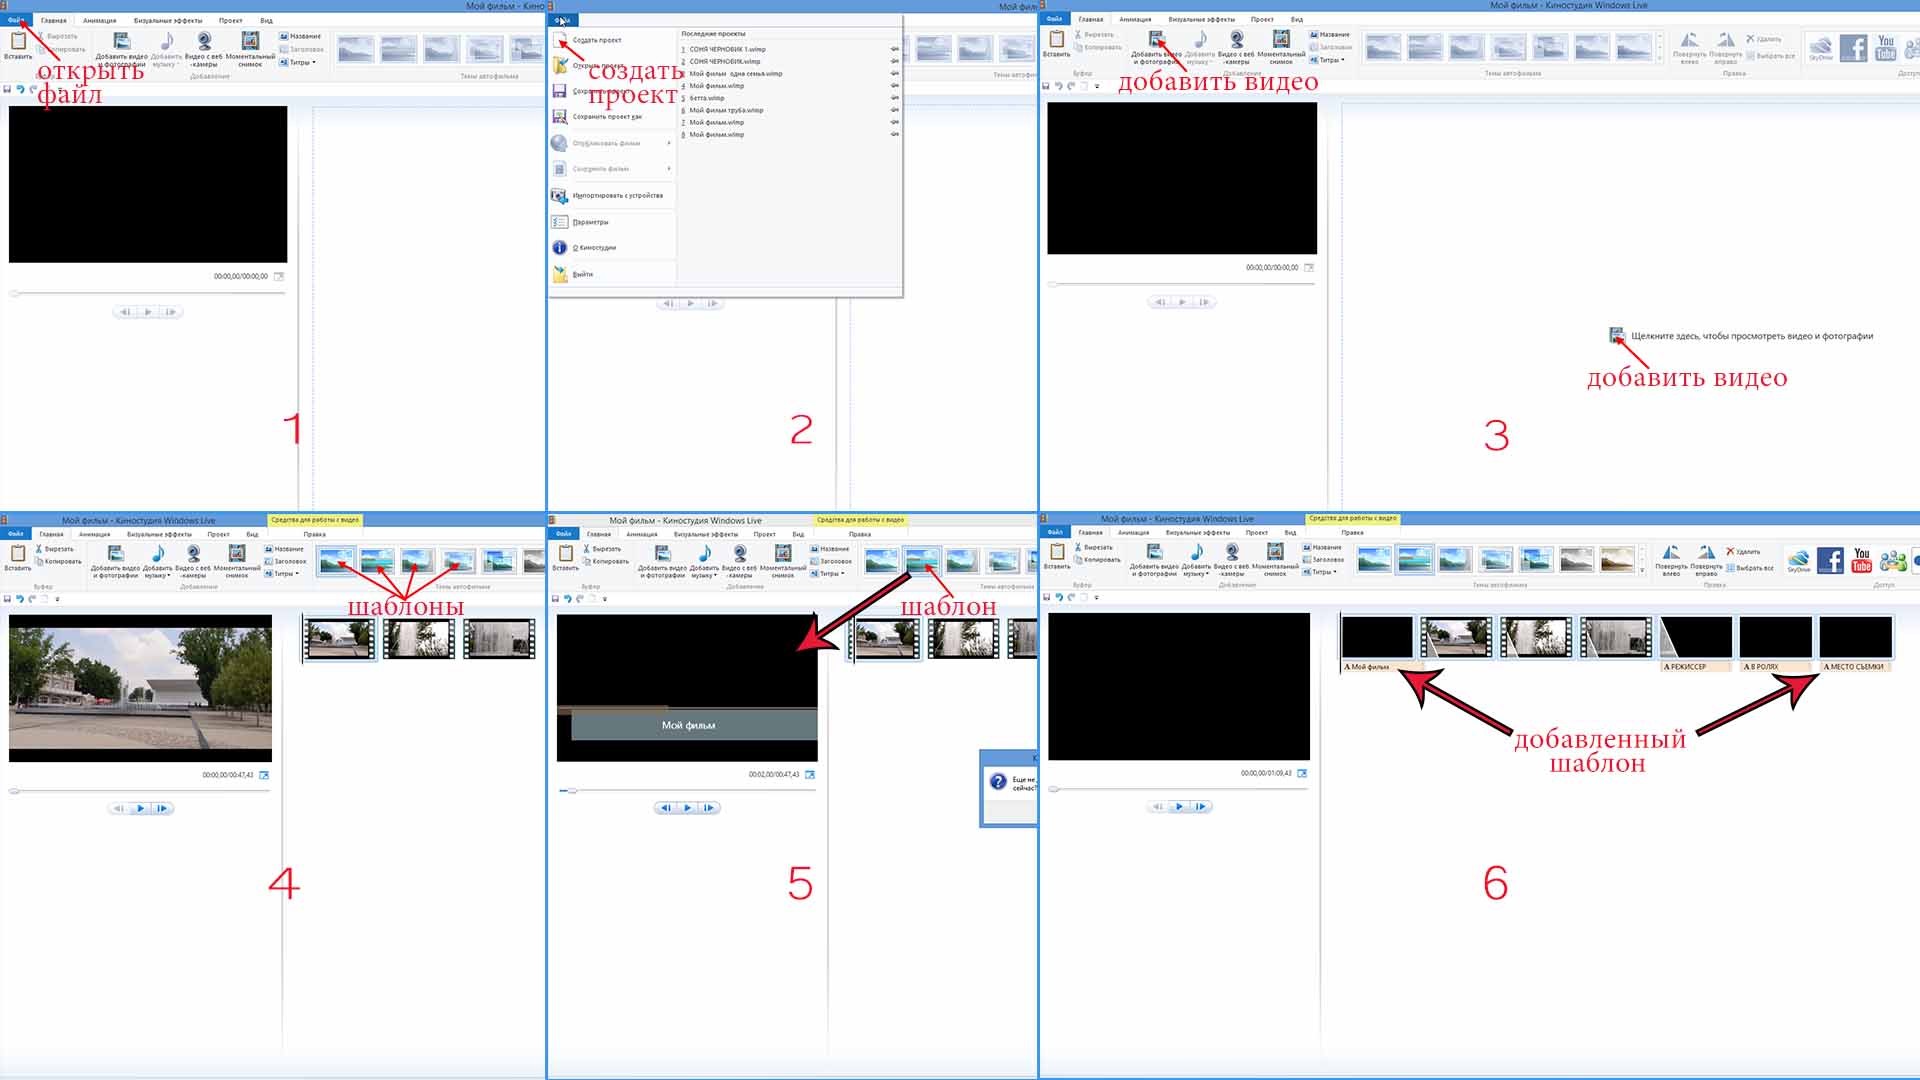
В панели 1 можно выбрать “файл” в верхнем левом углу и кликнуть “создать проект” [панель 2]. Видео можно добавить тремя способами: первый – уже был описан, второй способ – кликнуть по иконке “Добавить видео и фотографии” в верхней панели управления или в центре рабочего стола [панель 3] и третий способ – перетащить файл на рабочий стол редактора, удерживая его левой кнопкой мыши.
Для фильма необходимо название в начале и титры в конце. Для этих целей есть уже готовые шаблоны с разными вариантами оформления и автоматической вставкой переходов между фрагментами видеосъемки [панель 4]. При наведении курсора на шаблон проходит демонстрация выбранного вступления [панель 5]. При выборе первого шаблона ничего не добавляется.
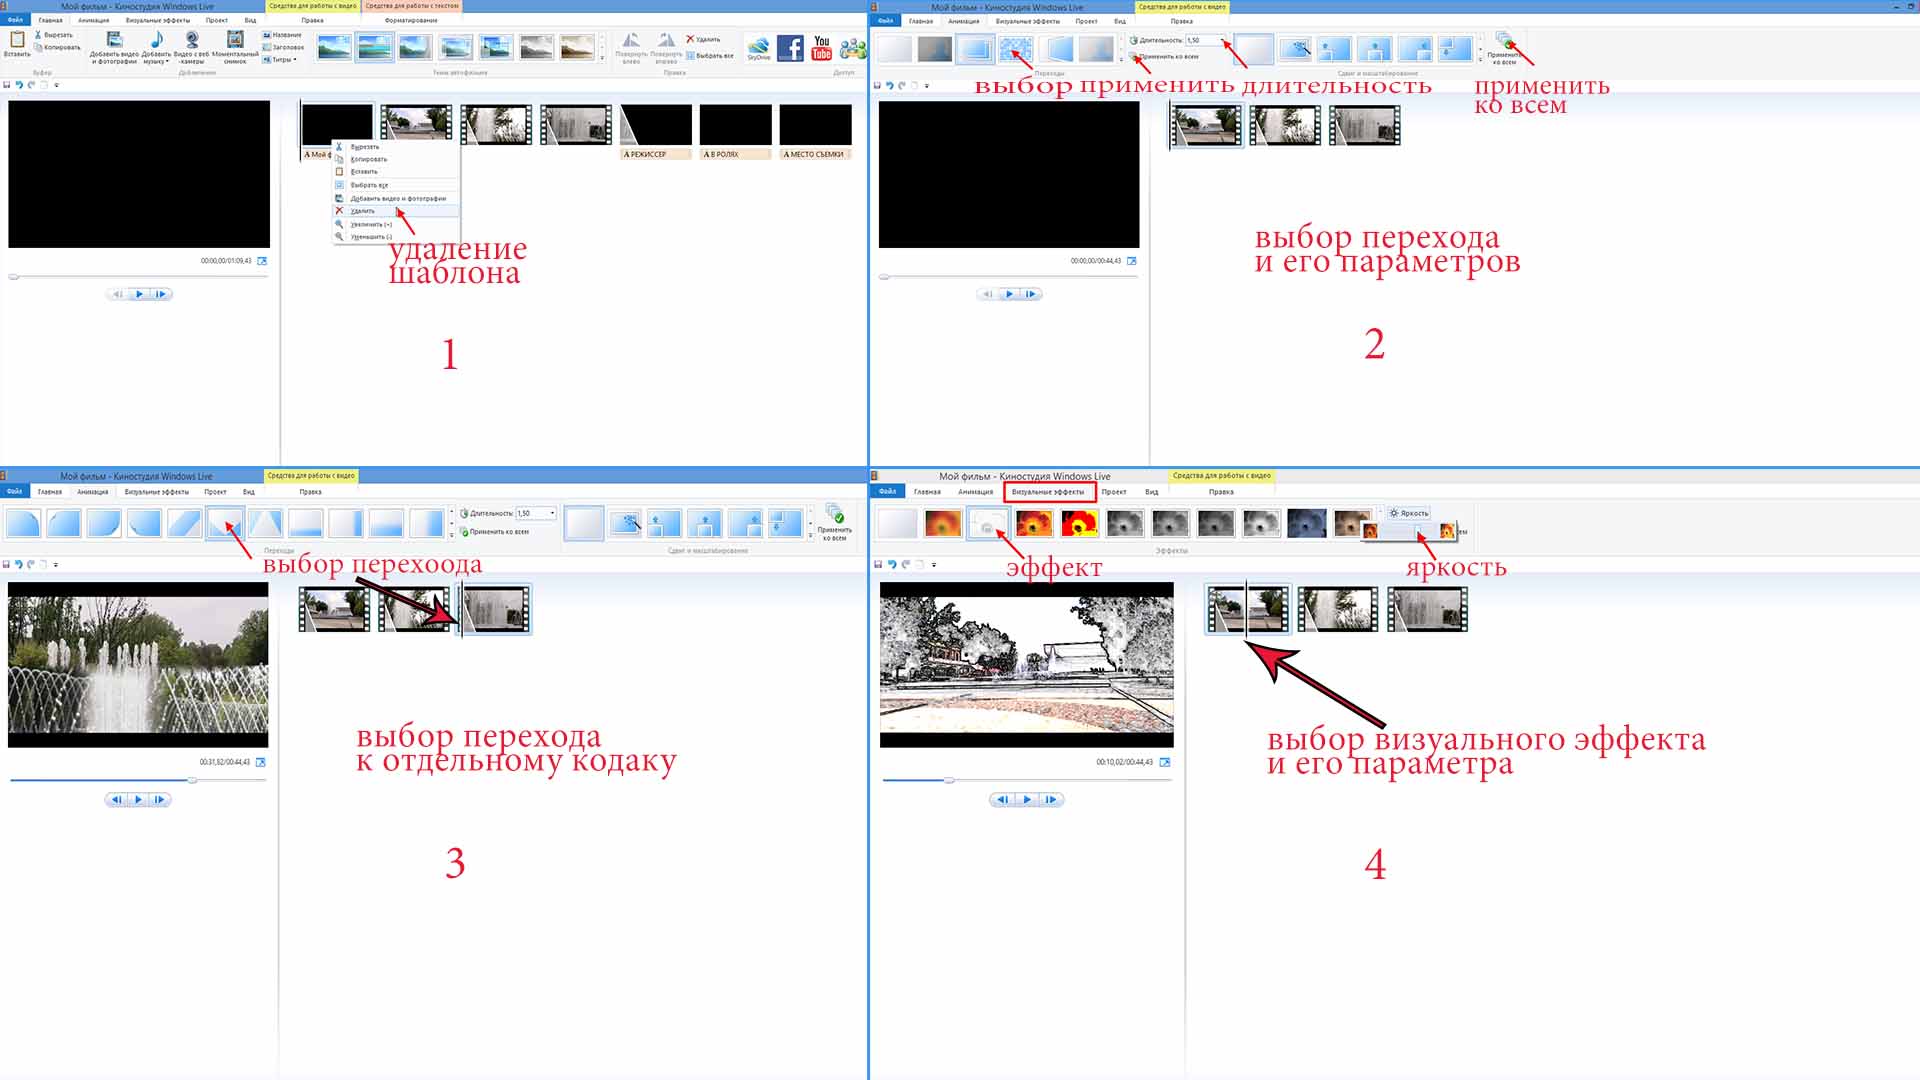
Ненужный объект удаляется его выделением левой кнопкой мыши и выбора функции удаления при клике правой, как во всех программах [панель 1]. При выборе действия “вырезать” удаленный файл остается в буфере обмена и его, при необходимости можно восстановить. При выделении и удержании файла левой кнопкой мыши, его можно перетащить в любое место создаваемого видеоролика.
При выборе “Анимация” открывается окно с набором переходов, которые можно посмотреть, наведя курсор на интересующий эффект. Выбирается время отображения перехода, и есть возможность применить его к остальным фрагментам создаваемого фильма [панель 2].
Переход вставляется в тот видеофайл, перед которым установлен курсор программы [панель 3]. Курсор можно перемещать, удерживая его левой кнопкой мыши или удерживая ползунок под видеоэкраном. Под видеоэкраном находится кнопка “пуск-пауза” и покадровое перемещение курсора “вперед-назад”.
Эффекты к выбранному фрагменту видео или фото можно выбрать, открыв окно “Визуальные эффекты”. Предварительный просмотр происходит так же, как и при выборе перехода. Регулируется яркость эффекта [панель 4]. Сдвиг и масштабирование удобно применять к неподвижным объектам, например, к фотографиям — делать их динамичными.

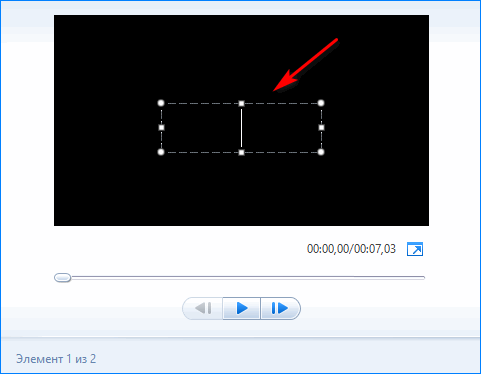
При выборе проекта без шаблона [панель 1] можно самостоятельно сделать вступление, выбрав подходящую фотографию, отрегулировать время ее показа и текста названия. К тексту названия применить эффект начала его показа. Текст названия также можно разместить непосредственно в начале видеофайла, не применяя шаблон.
В окне “Проект” [панель 2] можно выбрать пропорции отображения экрана, при наличии добавленной аудиозаписи – ее громкости и синхронизацию с видеозаписью. С любого окна видеоредактора, при необходимости, можно изменить масштаб времени отображения с помощью ползунка в нижнем правом углу окна.
В окне “Вид” [панель 3] изменить масштаб времени можно еще и в верхнем левом углу окна, кликая по иконкам “+” и “-” или сбросить настройки на стандартные. Уменьшить или увеличить значки отображения видеофайлов, выбрав размер из выпадающего списка, и посмотреть видеозапись в полноэкранном режиме.
В окне “Правка” [панель 4] корректируется громкость звучания аудиозаписи ролика, времени ее нарастания, окончания и скорости звучания. Если при добавлении музыки к фильму аудиозапись не нужна, можно ее убрать, сделав громкость нулевой. Чтобы обрезать видео в киностудии windows live, его надо разделить.
Разделить фрагмент видеофайла поможет функция “Разделить”, предварительно выставив курсор на необходимое место. Выделить необходимый отрезок файла для удаления и удалить его можно двумя способами. При выборе “вырезать” – файл сохраняется в буфере памяти и его можно восстановить, а при выборе “удалить” – его вернуть уже невозможно.
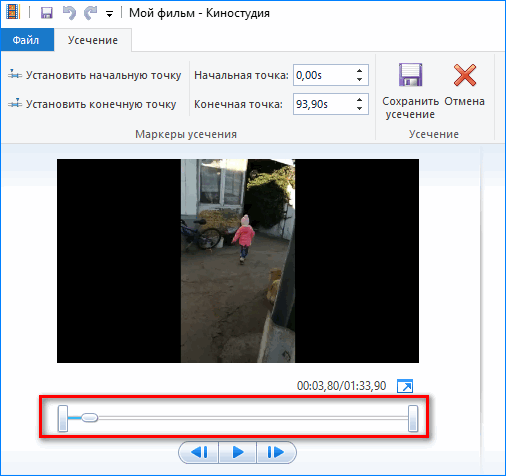
При выборе функции “Средство усечения” и установке начальной точки, видеозапись, которая находится до этой точки, удаляется автоматически. Аналогично происходит и с файлом, который находится после установки конечной точки.
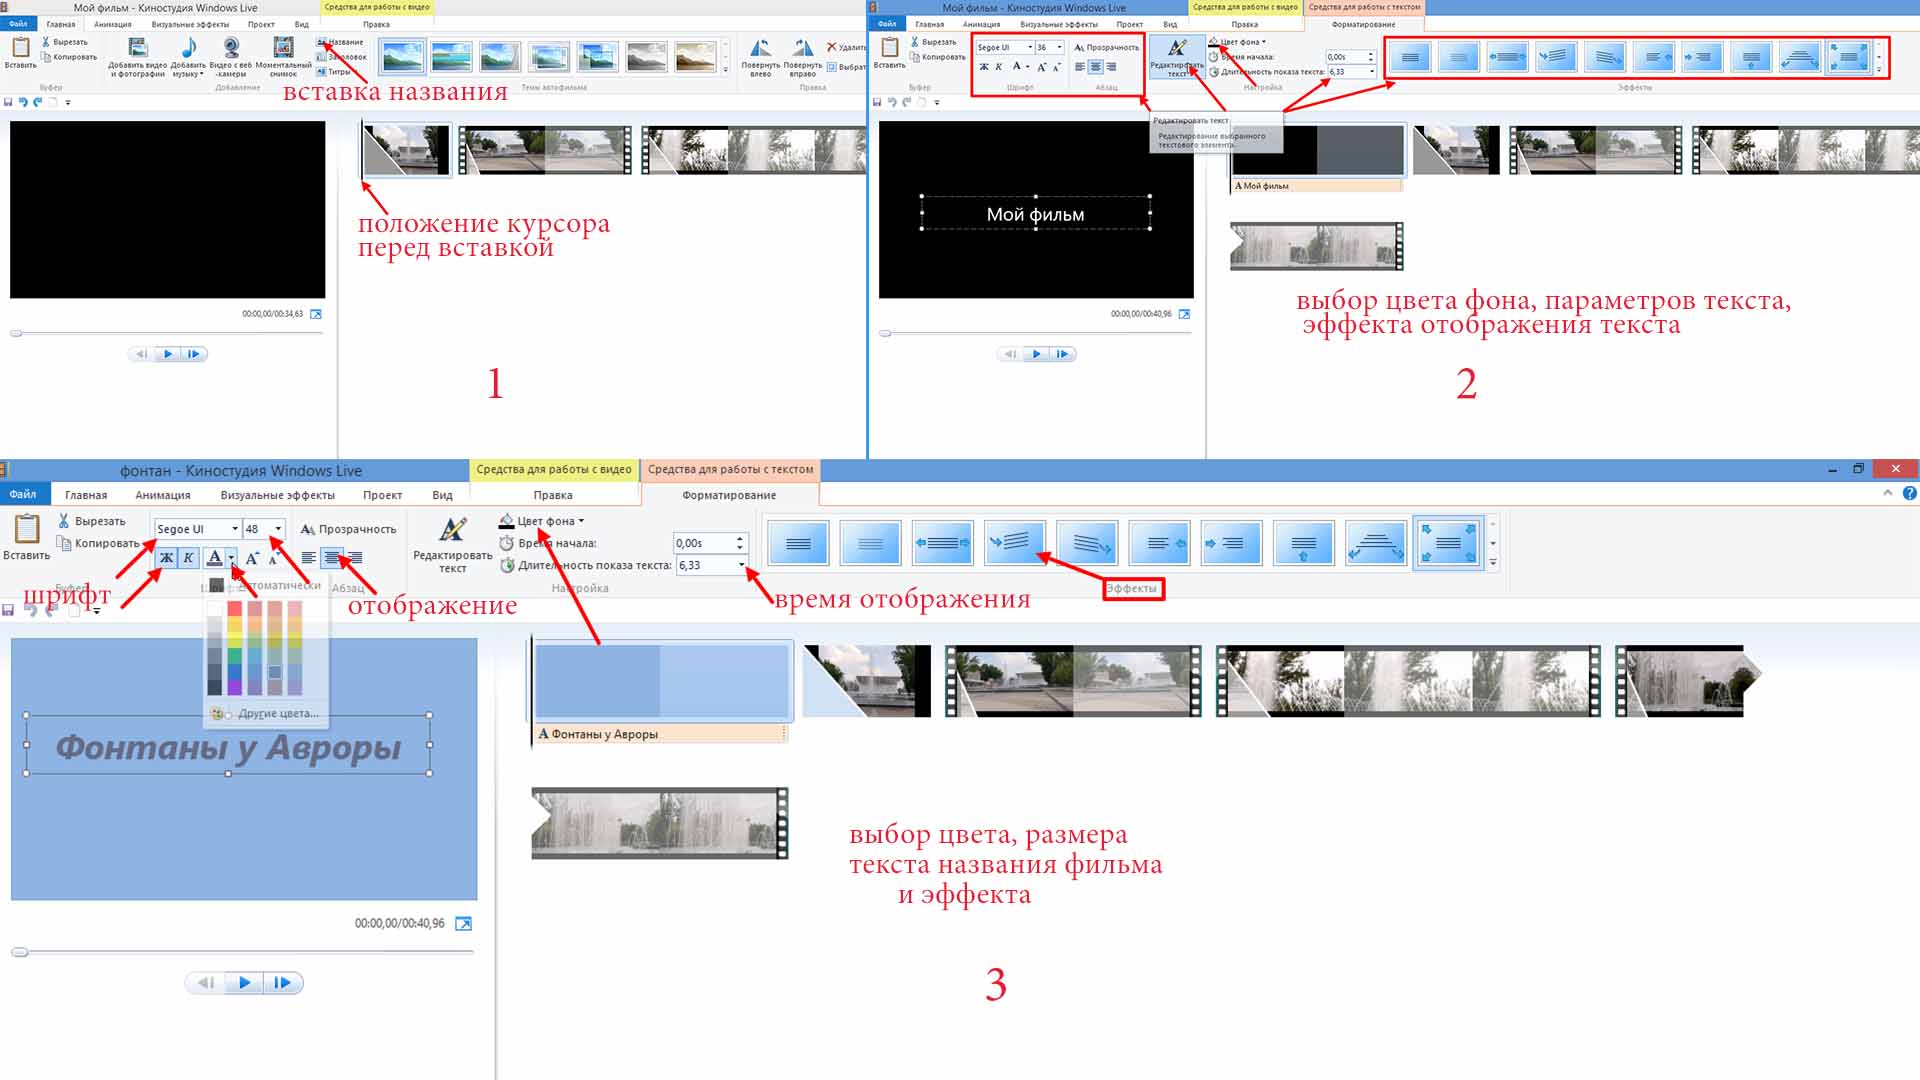
Вернемся к главному экрану [панель 1], для вставки шаблона с названием фильма нужно установить курсор в начало видеофильма и выбрать “Название”. Появится файл экрана со вставкой текста [панель 2].
Отредактировать текст можно, выбрав шрифт, размер, прозрачность, длительность показа и эффект его отображения [панель 3]. Предварительно нужно удалив текст в шаблоне, есть возможность его вставить с помощью иконки “Вставить” в верхнем, левом углу окна, сначала его скопировав.
При наведении курсора на окна эффектов демонстрируется вариант отображения названия. Можно выбирать также и цвет фона начальной заставки. Киностудия windows movie maker действительно предоставляет широкую палитру оформления.
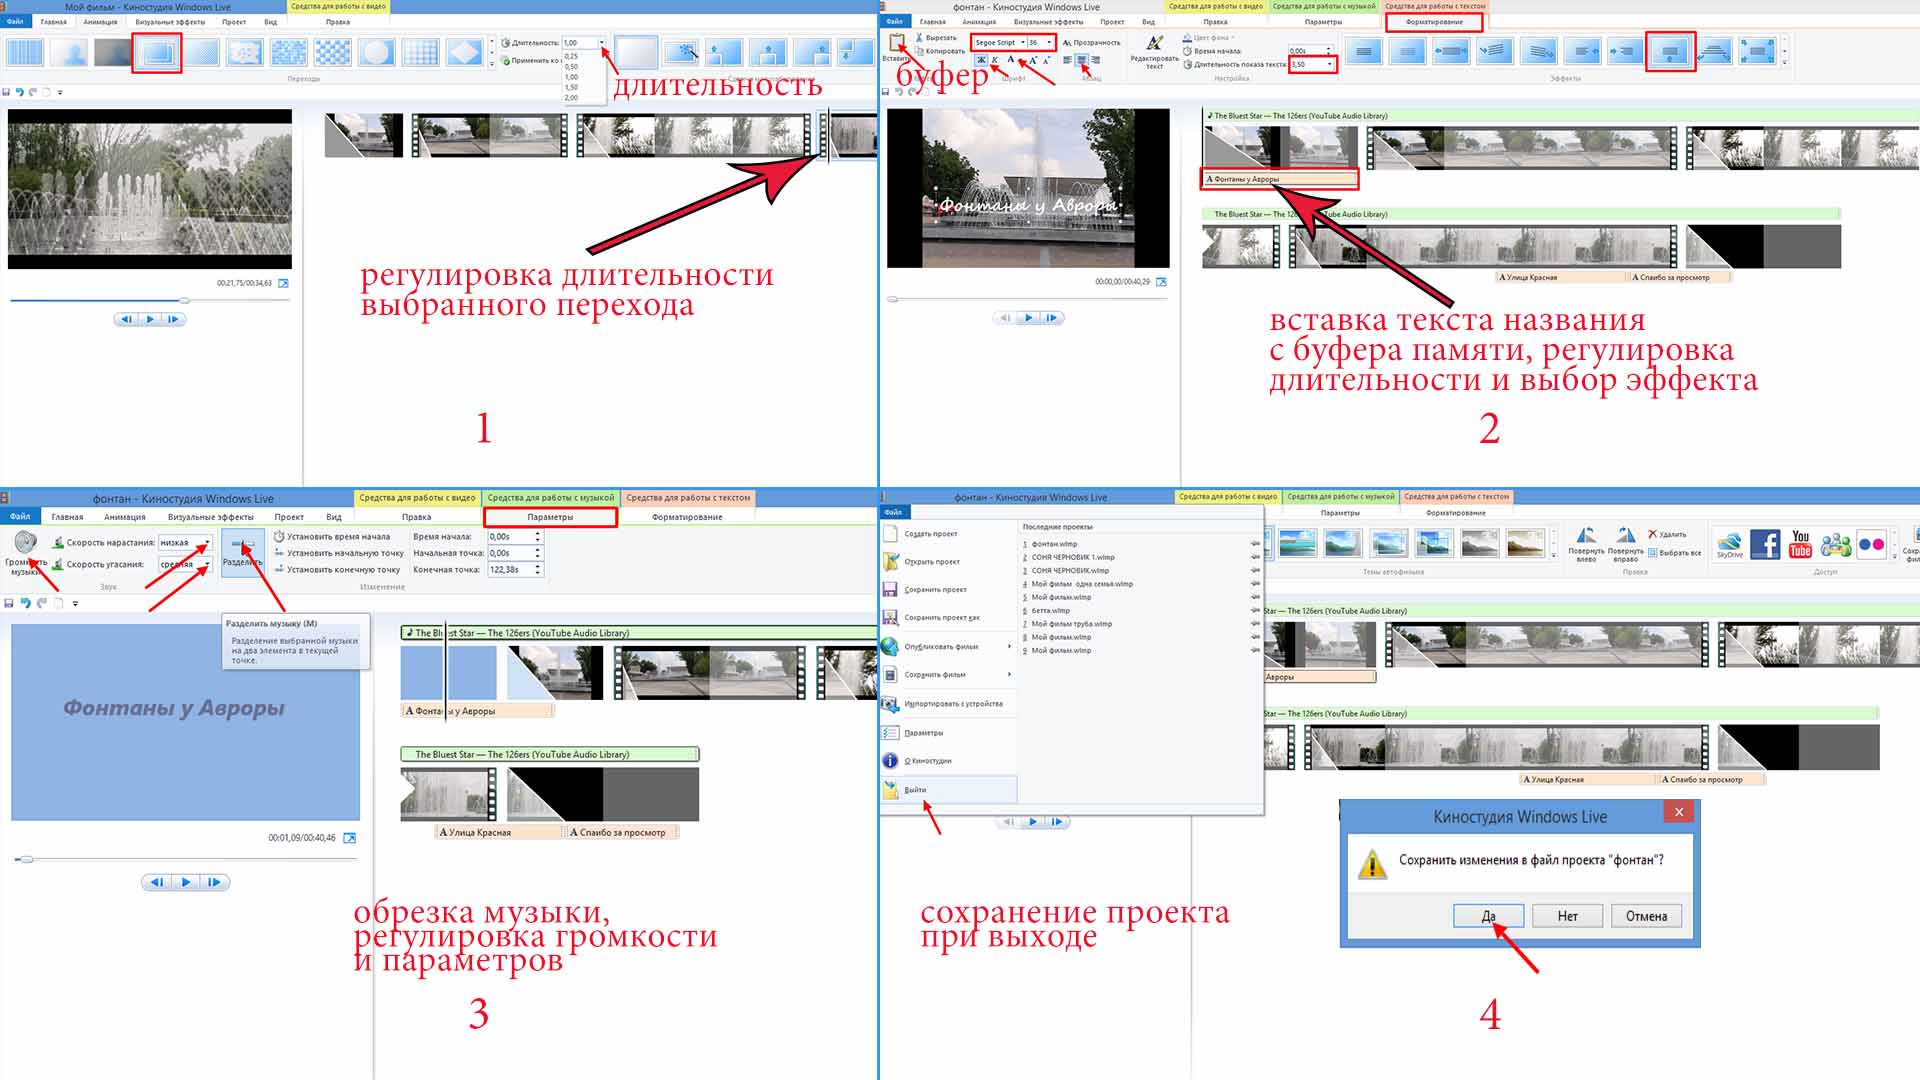
Установив курсор перед или на видеофайл [панель 1] в окне “Анимация”, можно выбрать переход между отдельными файлами видеозаписи и отрегулировать время его отображения. Просмотр перехода начинается при наведении на его окно курсора мыши.
При создании видеоролика в качестве начальной заставки можно использовать фотографию, на которую вы помещаете название, и выбрать время отображения обоих элементов, а также добавить эффект, как было описано выше [панель 2].
Работа с аудиофайлами
При клике на иконку “Вставить музыку” на главном экране редактора и выборе аудио файла открывается средство работы с музыкой [панель 3]. Методы работы с аудио файлами аналогичны приемам работы с видеороликами и, если вы освоили предыдущие функции, работа с аудио файлами в программе уже будет известна.
Для добавления аудио файла в главном окне работы с видео [панель 1] необходимо кликнуть по иконке “Добавить музыку”, в открывшемся окне проводника Виндовс выбрать необходимый аудиофайл и открыть его [панель 2].
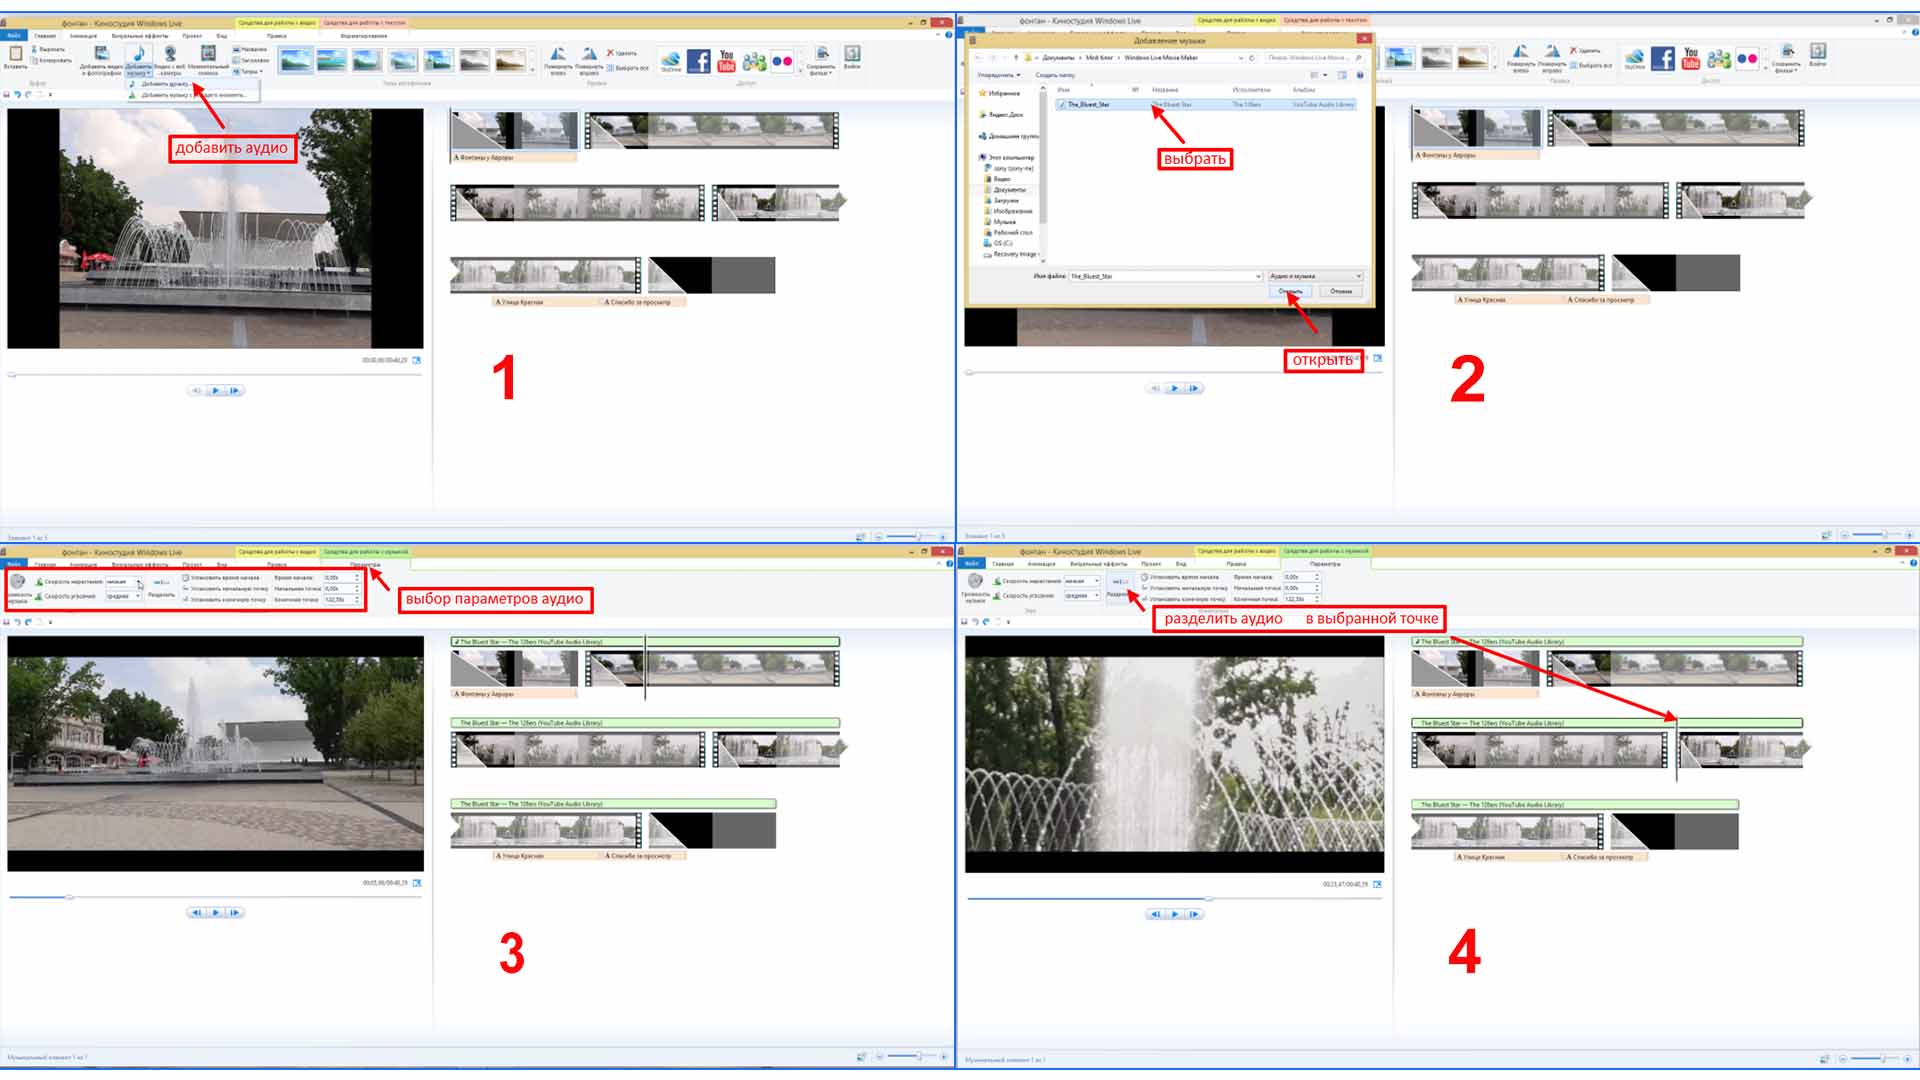
В открывшемся окне “Средства работы с музыкой” [панель 3] программы видеоредактора аудиофайл добавится на рабочий стол, где можно задать его параметры: громкость, время нарастания и уменьшения громкости, время воспроизведения и т. д.
Выбрав вкладку “правка” [панель 4] можно выбранную аудиодорожку разделять, предварительно установив курсор в нужное место, удалять ненужные фрагменты аудиозаписи, устанавливать начальную и конечную точки воспроизведения. Отменить последнее действие возможно сочетанием клавиш “Ctrl + Z”.
Сохранение материала
При выходе из программы видеоредактора “Windows Live Movie Maker” в выпадающем окне [панель 4] предлагается сохранить изменения в файле проекта, и при выборе “Да” фильм будет сохранен в папке с видео в формате редактора. Можно потом папку открыть и продолжить работу над проектом. Если выбрать “Нет”, то проект будет удален.
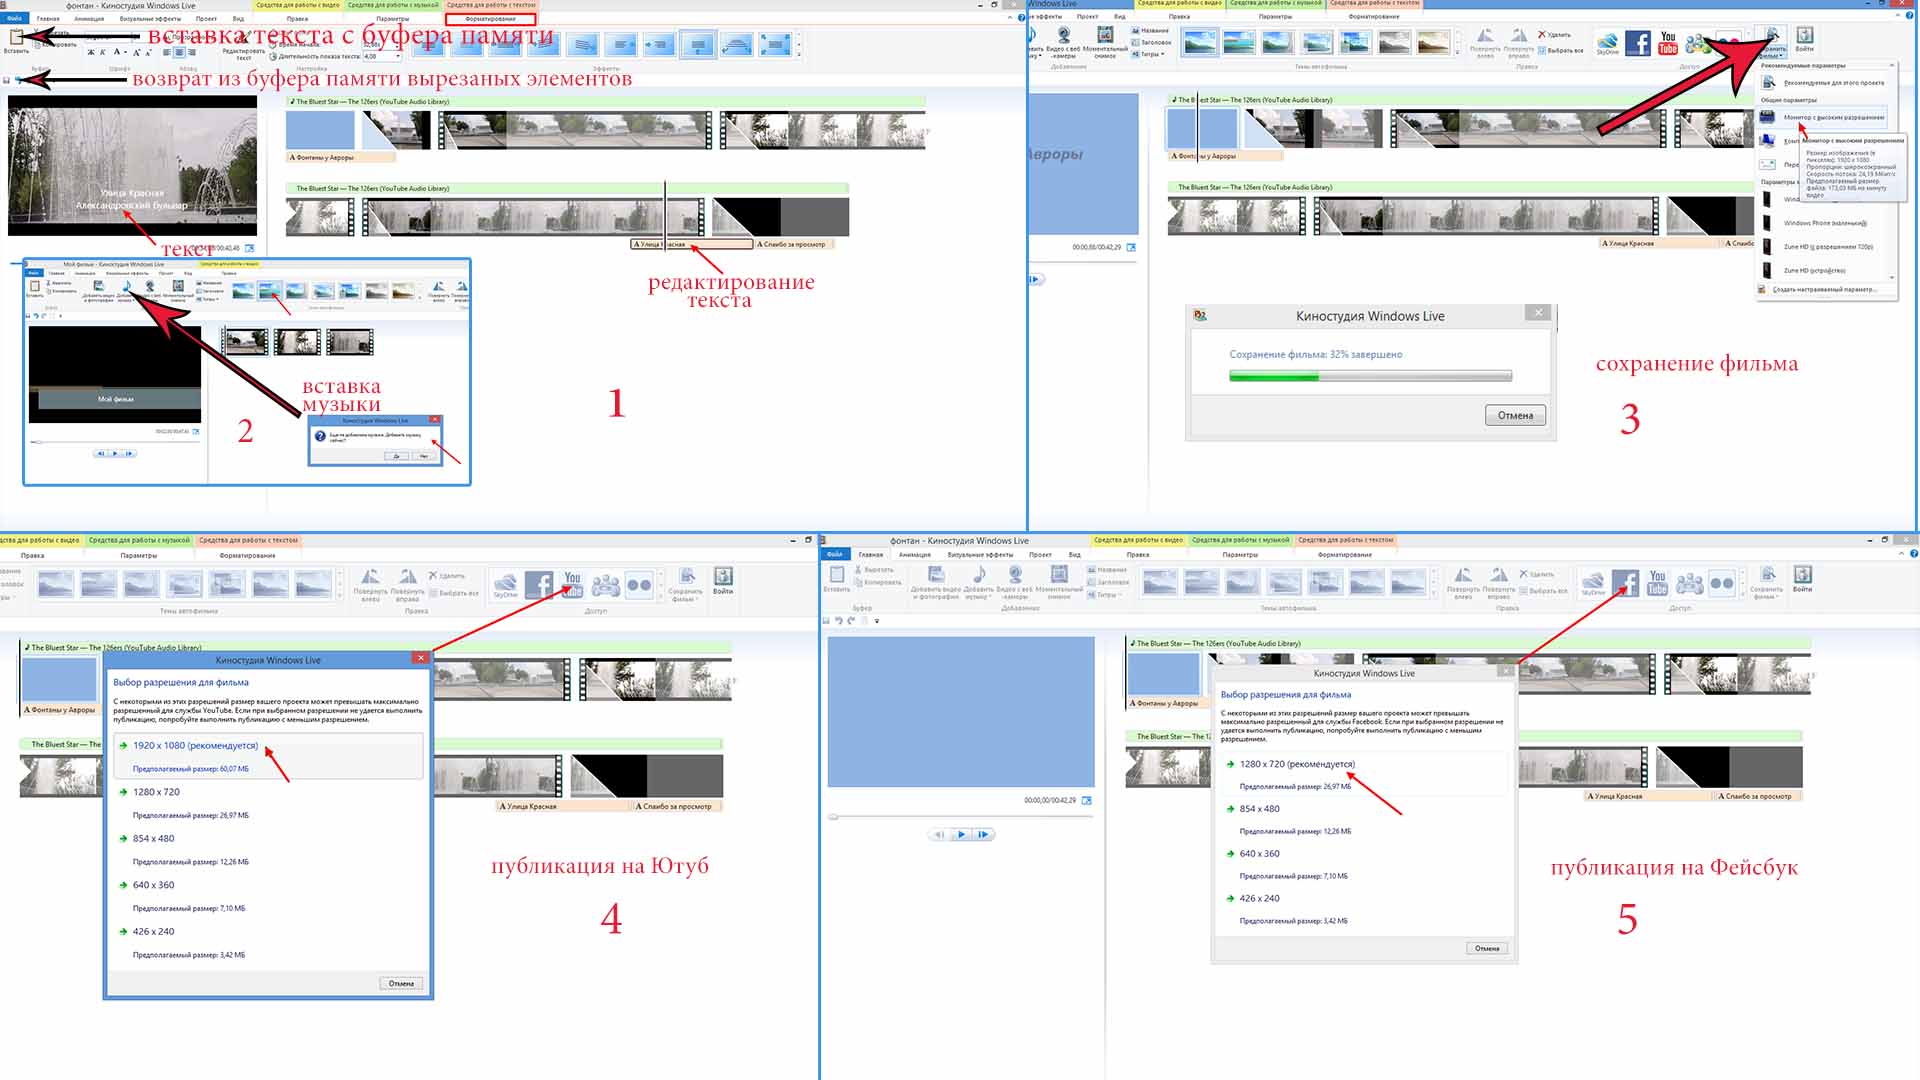
В конце фильма при желании вставляются титры, как было описано выше при вставке шаблона начала фильма. В данном случае титры были вставлены в окончание видеозаписи и в шаблон титров [панель 1]. Добавлена музыка с регулировкой скорости вступления, окончания и громкостью [панель 2].
Сохранение созданного фильма выполняется в выбранном формате в зависимости от того, как он будет просматриваться. При наведении курсора на иконку “Рекомендуемые для этого проекта”, программа подскажет, как лучше поступить, но выбор останется за Вами [панель 3].
Есть возможность выложить фильм сразу на Ютуб, в Фейсбук и т. д. В этом случае лучше воспользоваться рекомендациями видеоредактора в выборе формата [панель 4 и 5]. Вот что получилось в итоге:
На главной панели редактора есть функция работы с веб камерой, описывать ее я не стал, потому что, полностью изучив, как работать в киностудии windows live, и все возможности самого простого видеоредактора “Live Movie Maker”, я понял, что не составит большого труда использовать эту позицию.
Основные выводы
Начинать учиться монтажу видео надо в простом видеоредакторе “Live Movie Maker”, а только потом осваивать профессиональные программы, такую, как, например, “Adobe Premiere Pro”, которая по своим возможностям не имеет аналогов.
Научиться в ней работать займет немало времени, но со знанием, как работать в киностудии windows live, сделать это будет значительно проще. В подтверждение этим выводам предлагаю ознакомиться с курсами по работе в редакторе “Adobe Premiere Pro”, и Вы в этом убедитесь, изучив несколько уроков представленных в видео формате.
Постигайте основы видеомонтажа, чтобы порадовать людей своим творчеством. Если остались какие-то вопросы – задайте их в комментариях, буду рад на них ответить. Подписывайтесь на рассылку новых статей.
С уважением, Олег!
Windows Live Movie Maker, formerly Windows Movie Maker, was a freeware video-editing software that was part of Windows Live and could be used to make and edit videos stored on a computer. It could also publish them to online services such as YouTube, Vimeo, and OneDrive.
Movie Maker was officially discontinued on January 10, 2017 and has since been replaced by Video Editor (formerly Microsoft Story Remix) which is built in with Microsoft Photos on Windows 10, and Clipchamp on Windows 11, which Microsoft acquired in September 2021.
History[]
Initial Releases[]
Windows Movie Maker on Windows XP (2001)
Windows Movie Maker made its first appearance with the release of Windows Me in 2000. Though it was not released with Windows 2000, it would be included with a number of subsequent releases.
Windows XP[]
Version 1.1 was included in Windows XP in 2001 and included support for creating DV AVI and WMV 8 files.
Version 2.0 was released as a free update in November 2002, and added a number of new features.
Version 2.1, a minor update, is included in Windows XP Service Pack 2. The Movie Maker in Windows XP Media Center Edition 2005 had more transitions and support for DVD burning.
Windows Vista[]
The next version of Movie Maker was released as part of Windows Vista in 2007 and – like most Windows components – reported version number 6.0.6000, as with Windows Vista itself. It included new effects and transitions, support for playback on the Xbox 360,[1] and support for the DVR-MS file format that Windows Media Center records television in. The HD version in Premium and Ultimate editions of Windows Vista also added support for capturing from HDV camcorders. The capture wizard also created DVR-MS type files from HDV tapes. However, the Windows Vista version of Windows Movie Maker removed support for importing video from an analog video source such as an analog camcorder, VCR or from a webcam.[2]
As some older systems might not be able to run the new version of Windows Movie Maker, Microsoft also released an updated older version 2.6 for Windows Vista on Microsoft Download Center. This version included the old effects and transitions, and is basically the same as Windows Movie Maker 2.1, but without the ability to capture video. Installation requires Windows Vista and is only intended for use on computers where the hardware accelerated version cannot be run.[3]
A Windows Presentation Foundation (WPF) version of Windows Movie Maker was also included in some development builds of Vista (at the time codenamed «Longhorn»), but was removed in the development reset in August 2004.[4] After the development reset, the interface for the WPF-based Windows Movie Maker was retained in Windows Vista.
Windows Live[]
Windows Live Movie Maker logo
A new version of the software, renamed Windows Live Movie Maker 2009, was released as a beta on September 17, 2008, and officially released as a standalone product through the Windows Live Essentials suite on August 19, 2009. This was effectively completely new software, as it could not read projects created by earlier versions and did not support custom XML transitions written for the previous versions. In addition, many features were removed.
Also, Movie Maker’s interface was redesigned in the Windows Live version to use a ribbon toolbar; it also added features such as «Auto Movie» and the ability to export videos directly to DVDs and YouTube.[5] Certain advanced features were also removed from the software, such as image stabilization and the ability to record voice-overs.[6]
Movie Maker 2009 supported both Windows Vista and Windows 7. As the previous version of Windows Movie Maker was no longer included with the operating system, the only way to obtain Movie Maker on Windows 7 and later was through the Windows Live Essentials suite,[7][8] although some manufacturers pre-installed the application on new PCs.
An updated version, Windows Live Movie Maker 2011, was released on August 17, 2010, adding features such as webcam capture, support for high-definition video, the ability to upload videos directly to SkyDrive and Facebook, and the ability to add media files stored on network shares to projects.[6]
2012[]
Windows Live Movie Maker (2012)
With the discontinuation of the Windows Live brand (and the re-branding of the Windows Live suite as Windows Essentials), Windows Movie Maker 2012 was released in April 2012. Support for recording voice-overs was restored, along with an audio mixer and integration with several free stock music services. H.264/MP4 became the default export format (replacing Windows Media Video, but it can still be used), support for uploading to Vimeo was introduced (other sites were added to the list in the Windows 8.1 release of the suite), and hardware accelerated video stabilization was also added as an exclusive feature for Windows 8 users.[9]
Discontinuation and replacement[]
Movie Maker was officially removed for download on January 10, 2017. Like Windows Photo Gallery from Windows Essentials, Movie Maker is now replaced by the Microsoft Photos app included in Windows 10, which includes Video Editor (formerly Windows Story Remix).[10]
On September 8, 2021, Microsoft acquired Clipchamp, a web-based video editing app for an undisclosed amount,[11] and integrated it as part of Windows 11 on March 9, 2022. This newly acquired video editing app reintroduces the timeline editing layout that had been previously removed in Windows Live Movie Maker, along with additional features including a text-to-speech generator powered by Microsoft Azure, and Microsoft OneDrive integration.[12]
Layout[]
The layout consists of a storyboard view and a timeline view, collections for organizing imported video, and a preview pane. When in Storyboard view, the video project appears as a film strip showing each scene in clips. The storyboard/timeline consists of one ‘Video’ (with accompanying ‘Audio’ bar), one ‘Music/Audio’ bar, and one ‘Titles/Credits’ bar. In each bar, clips can be added for editing (e.g., a WAV music file will belong on the ‘Music/Audio’ bar). Still images can also be imported into the timeline and «stretched» to any desired number of frames. The sidebar featured three categories, «Import», «Edit» and «Publish To».
The Video and Music/Audio bars can be «cut» to any number of short segments, which will play together seamlessly, but the individual segments are isolated editing-wise, so that for example, the music volume can be lowered for just a few seconds while someone is speaking.
Importing footage[]
When importing footage into the program, a user can either choose to Capture Video (from camera, scanner or other device) or Import into Collections to import existing video files into the user’s collections. The accepted formats for import are .WMV/.ASF, .MPG (MPEG-1), .AVI (DV-AVI), .WMA, .WAV, and .MP3. Additionally, the Windows Vista Home Premium and Ultimate editions of Movie Maker support importing MPEG-2 program streams and DVR-MS formats.[13] Importing of other container formats such as MP4/3GP, FLV and MOV, and AAC are also supported if the necessary codecs are installed and the system is running Windows 7 or later.[14]
In the XP version, import and real-time capture of video from an analog source such as a VCR, tape-based analog camcorder or webcam is possible. This feature is based on Windows Image Acquisition. Video support in Windows Image Acquisition was removed in Windows Vista, as a result importing analog footage in Windows Movie Maker is no longer possible.[15]
When importing from a DV tape, if the «Make Clips on Completion» option is selected, Windows Movie Maker automatically flags the commencement of each scene, so that the tape appears on the editing screen as a collection of short clips, rather than one long recording. That is, at each point where the «Record» button was pressed, a new «clip» is generated, although the actual recording on the hard drive is still one continuous file. This feature is also offered after importing files already on the hard drive. In the Windows Vista version, the «Make clips on completion» option has been removed — the clips are now automatically created during the capture process.
The efficiency of the importing and editing process is heavily dependent on the amount of file fragmentation of the hard disk. The most reliable results can be obtained by adding an extra hard disk dedicated for scratch space, and regularly re-formatting/defragmenting it, rather than simply deleting the files at the end of the project. Fragmented AVI files result in jerky playback on the editing screen, and make the final rendering process much longer.
Although it is possible to import digital video from cameras through the USB interface, most older cameras only support USB version 1 and the results tend to be poor — «sub VHS» — quality. Newer cameras using USB 2.0 give much better results. A FireWire interface camera will allow recording and playback of images identical in quality to the original recordings if the video is imported and subsequently saved as DV AVI files, although this consumes disk space at about 1 gigabyte every five minutes (12 GB/Hr). Alternatively, most DV cameras allow the final AVI file to be recorded back onto the camera tape for high quality playback. Some standalone DVD recorders will also directly accept DV inputs from video cameras and computers.
Editing and output[]
After capture, any clip can be dragged and dropped anywhere on the timeline. Once on the timeline, clips can be duplicated, split, repositioned or edited. An AutoMovie feature offers predefined editing styles (titles, effects and transitions) for quickly creating movies.
The original camera file on the hard drive is not modified; the project file is just a list of instructions for reproducing a final output video file from the original file. Thus, several different versions of the same video can be simultaneously made from the original camera footage.
Earlier versions of Windows Movie Maker could only export video in Windows Media Video or DV AVI formats.[16] It includes some predefined profiles, but users can also create custom profiles.[17] Windows XP Media Center Edition bundled Sonic DVD Burning engine, licensed from Sonic Solutions, allowing video editors to burn their project in DVD-Video format on a DVD. In Windows Vista, Windows Movie Maker passes the video project to Windows DVD Maker.
Windows Movie Maker 2012 introduced the default ability to export in H.264 and MP4 format.
Video can be exported back to the video camera if supported by the camera. Movie Maker also allows users to publish a finished video on video hosting websites.
Windows Movie Maker can also be used to edit and publish audio tracks. If no video or image is present, Movie Maker allows exporting the sound clips in Windows Media Audio format.
Effects and transitions[]
Windows Live Movie Maker effects (2012)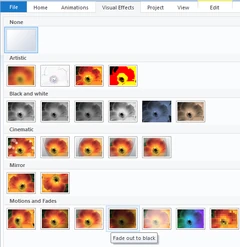
Windows Movie Maker supports a large variety of titles, effects and transitions.
- Titles are animated text screens, normally placed at the beginning or end of the movie, but can also be placed over video clips. Titles and credits can be added as stand alone titles or overlaying them on the clip by adding them onto the selected clip. Titles range from static (non-animated) titles to fly in, fading, news banner, or spinning newspaper animations. They can also be placed on video clips to create sub-titles.
- Transitions affect how one video clips flows into another. Examples include fade and dissolve, but many more spectacular transitions are available.
- Effects alter how a video clip appears. Example include allowing control of brightness, contrast or hue, but other more dramatic effects are available, such as giving an ‘old time’ flickering black and white feel.
Versions 2.x included in Windows XP includes 60 transitions, 37 effects, 34 title and 9 credits animations. The Windows Vista version includes a different set of transitions, effects and title/credits animations while dropping a few older ones. There are in all 49 effects and 63 transitions. They are applied by using a drag and drop interface from the effects or transitions folders.
Early versions (V2 onwards) of Windows Movie Maker had a flexible interface so programming custom effects and other content were possible via XML. The Windows Vista version supports Direct3D-based effects. Microsoft also provides SDK documentation for custom effects and transitions.[18] Since the effects are XML based, users could create and add custom effects and transitions of their own with XML knowledge.
Many custom transitions were commercially available and created additional features such as picture-in-picture.
Windows Movie Maker V6 did not support customisations to effects and transitions in the same way as V2.x and so many customisations had to be re-written. Versions after V6 do not support custom transitions and effects at all.
Reception and criticism[]
Movie Maker 1.0, introduced with Windows Me, was widely criticized for being «bare bones»[19] and suffering «a woeful lack of features»;[20] and saving movies only in Microsoft’s ASF file format.[21] Critical reception of versions 2.0 and 2.6 has been slightly more positive.[20]
Many longstanding users were disappointed by the removal of so many features in the effective re-writing of the software in Live Movie Maker 2009. Some of those features (such as visualisation of the audio levels) have subsequently been re-added.
In June 2008, a memo purportedly by Bill Gates from January 2003 was circulated on the Internet in which he heavily criticized the downloading process for Movie Maker at the time.[22] The memo was originally made available online as part of the plaintiffs’ evidence in Comes v. Microsoft Corp., an antitrust class-action suit, and was submitted as evidence in that case on January 16, 2007.[23]
Fake version[]
The discontinuation of Windows Movie Maker has led to the appearance of scam abusing its name. In late 2016, a few months before the discontinuation of the Windows Essentials suite (including Movie Maker), a website named windows-movie-maker.org (now closed or moved) which offered a tampered version of Windows Movie Maker, appeared as one of the top results when searching for «Movie Maker» and «Windows Movie Maker» on Google or Bing, a scam only widely recognized as such in 2017.[24]
It was identical to the real Windows Movie Maker, however, unlike the official and free Windows Movie Maker by Microsoft, it would not let users save a video without purchasing. Upon installing and executing the program, the user was greeted with a dialogue box explaining that it was a trial and a purchase was required.
ESET also detected a malware called Win32/Hoax.MovieMaker in the above-mentioned version. The fake will also restrict the installation of the legit Movie Maker by modifying the computer’s registry.[25]
References[]
- ↑ Microsoft. «Explore the features: Windows Movie Maker and Movie Maker HD». Archived from the original on August 3, 1987. Retrieved May 30, 2015.
- ↑ «Windows Movie Maker no longer supports analog capture or webcam capture». Windowshelp.microsoft.com. Archived from the original on August 11, 2006. Retrieved August 24, 2013.
- ↑ «Windows Movie Maker 2.6 for Vista». Download Center. Microsoft. April 6, 2007. Archived from the original on May 3, 2012. Retrieved December 7, 2012.
- ↑ «»Longhorn» Professional Build 4093″. Archived from the original on January 29, 2009. Retrieved June 15, 2016.
- ↑ «Windows Live Movie Maker: Awesome Slideshows Made Simple». PC World. Retrieved July 10, 2013.
- ↑ 6.0 6.1 «Windows Live Movie Maker 2011 review». PC Magazine. Retrieved July 10, 2013.
- ↑ «Getting ready for Windows Live Wave 3». Chris Overd. LiveSide.net. Retrieved December 8, 2012.
- ↑ «Windows Live Wave 3: Microsoft’s kinder and simpler consumer services strategy?». ZDNet. November 12, 2008. Retrieved June 23, 2013.
- ↑ «Windows 8 Brings Video Stabilisation to Movie Maker». PC Magazine. Retrieved July 10, 2013.
- ↑ The Verge (May 11, 2017). «Microsoft’s Story Remix app is Windows Movie Maker on steroids». Retrieved May 25, 2017.
- ↑ TechCrunch (September 8, 2021). «Microsoft acquires video creation and editing software maker Clipchamp». Retrieved April 5, 2022.
- ↑ The Verge (March 9, 2022). «»Clipchamp is Microsoft’s new video editing app for Windows 11». Retrieved April 5, 2022.
- ↑ «Movie Maker Vista File Format Support». Retrieved June 15,2016.
- ↑ «Windows Movie Maker FAQ (File Types)». Archived from the original on March 24, 2012. Retrieved July 10, 2014.
- ↑ «Problems importing files into Windows Movie Maker». Archived from the original on July 21, 2010. Retrieved June 15, 2016.
- ↑ «What kind of files can I use in Movie Maker? — Windows Help». Archived from the original on October 27, 2006. Retrieved June 15, 2016.
- ↑ «Create custom movie settings for Windows Movie Maker». Windows Vista Help. Microsoft. Archived from the original on November 18, 2009. Retrieved February 28, 2014.
- ↑ Windows Movie Maker and Windows DVD Maker SDK
- ↑ The 20 Worst Windows Features of All Time, PC World.
- ↑ 20.0 20.1 Microsoft Windows Movie Maker HD review, TechRadar.
- ↑ «Windows Millennium Edition: All About Me». PC World. July 24, 2000. Archived from the original on June 30, 2013.
- ↑ An epic Bill Gates e-mail rant, Seattle P-I
- ↑ «Full text: An epic Bill Gates e-mail rant». June 24, 2008. Retrieved June 15, 2016.
- ↑ «Windows Movie Maker — Trial???». NeoWin. Retrieved December 12, 2019.
- ↑ «Windows Movie Maker Scam spreads massively due to high Google ranking». November 9, 2017.
External links[]
- Windows Live Essentials: Movie Maker at Microsoft (archived 2012-03-24)
- Create Home Movies with Windows Movie Maker (archived 2004-06-19)
- Creating Custom Effects and Transitions in Windows Movie Maker at MSDN (2005-01, archived 2006-12-12)
- Windows Movie Maker at Wikipedia
|
|
Wikipedia (article: Windows Movie Maker ) This page uses Creative Commons Licensed content from Wikipedia (view authors). |
|---|